| 更改 ESP32 | 您所在的位置:网站首页 › ae更改分辨率 › 更改 ESP32 |
更改 ESP32
|
释放双眼,带上耳机,听听看~!
本教程展示了如何使用 Arduino IDE更改ESP32-CAM OV2640相机设置,例如对比度、亮度、分辨率、质量、饱和度等。 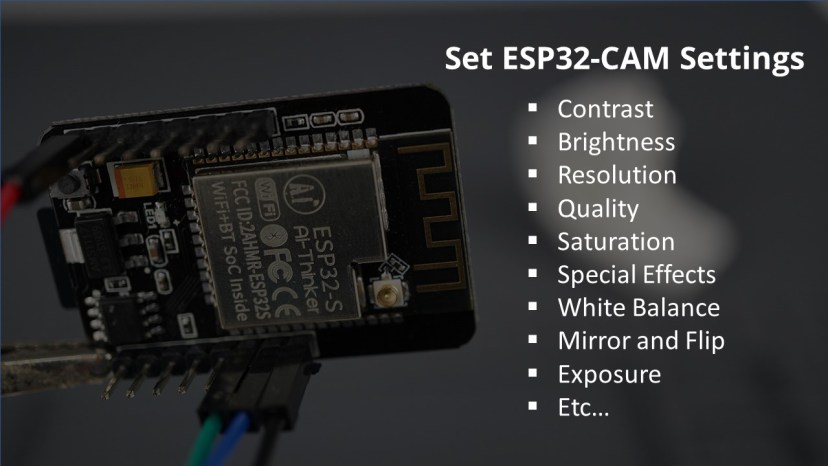
本教程中的说明适用于任何带有 OV2640 相机的 ESP32 相机开发板。 目录 安装 ESP32 环境我们将使用 Arduino IDE 对 ESP32 板进行编程。因此,您需要安装 Arduino IDE 以及 ESP32 插件:  一、ESP32开发环境搭建(arduino)
 Code_Mouse
18年8月27日
喜欢:2
浏览:11.4k
OV2640 相机设置 Code_Mouse
18年8月27日
喜欢:2
浏览:11.4k
OV2640 相机设置
在ESP32 Camera Web Server 项目中,Web 服务器提供了许多更改图像设置的选项。看看下面的截图——你可以移动滑块来更改图像设置。 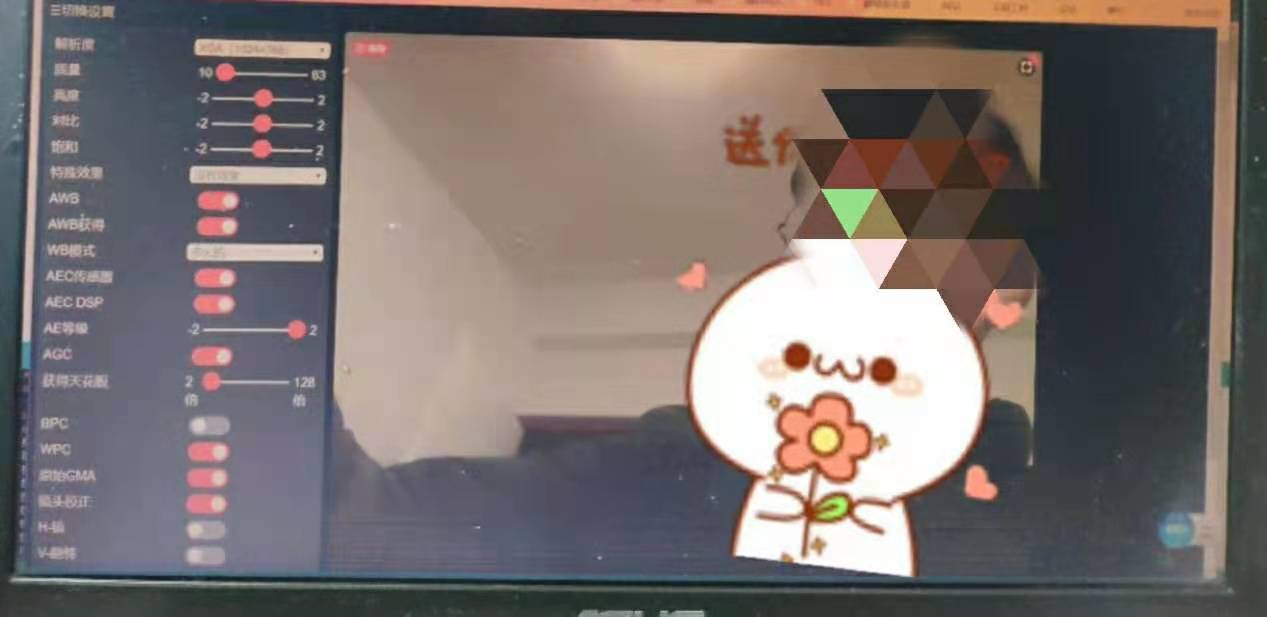
在本教程中,我们将向您展示如何在您的代码上实现这些更改,而不管您正在构建什么项目:拍摄照片或流式传输视频。 我们建议您首先遵循Camera Web Server 项目并使用图像设置来查看每个设置的作用:  ESP32-CAM视频流和Arduino IDE的人脸识别
 Luca
21年5月23日
喜欢:0
浏览:7.1k Luca
21年5月23日
喜欢:0
浏览:7.1k
根据您的相机所在的位置,您可能需要更改一些设置以获得更好的照片。使用该 Web 服务器可以让您了解需要更改的内容以及需要设置的值才能获得更好的图片。一旦您知道相机的最佳设置,您可能希望将它们应用到您的其它项目中。 更改 ESP32-CAM 相机设置要更改图像设置,请在初始化相机后,使用以下几行代码: sensor_t * s = esp_camera_sensor_get() s->set_brightness(s, 0); // -2 to 2 s->set_contrast(s, 0); // -2 to 2 s->set_saturation(s, 0); // -2 to 2 s->set_special_effect(s, 0); // 0 to 6 (0 - No Effect, 1 - Negative, 2 - Grayscale, 3 - Red Tint, 4 - Green Tint, 5 - Blue Tint, 6 - Sepia) s->set_whitebal(s, 1); // 0 = disable , 1 = enable s->set_awb_gain(s, 1); // 0 = disable , 1 = enable s->set_wb_mode(s, 0); // 0 to 4 - if awb_gain enabled (0 - Auto, 1 - Sunny, 2 - Cloudy, 3 - Office, 4 - Home) s->set_exposure_ctrl(s, 1); // 0 = disable , 1 = enable s->set_aec2(s, 0); // 0 = disable , 1 = enable s->set_ae_level(s, 0); // -2 to 2 s->set_aec_value(s, 300); // 0 to 1200 s->set_gain_ctrl(s, 1); // 0 = disable , 1 = enable s->set_agc_gain(s, 0); // 0 to 30 s->set_gainceiling(s, (gainceiling_t)0); // 0 to 6 s->set_bpc(s, 0); // 0 = disable , 1 = enable s->set_wpc(s, 1); // 0 = disable , 1 = enable s->set_raw_gma(s, 1); // 0 = disable , 1 = enable s->set_lenc(s, 1); // 0 = disable , 1 = enable s->set_hmirror(s, 0); // 0 = disable , 1 = enable s->set_vflip(s, 0); // 0 = disable , 1 = enable s->set_dcw(s, 1); // 0 = disable , 1 = enable s->set_colorbar(s, 0); // 0 = disable , 1 = enable下表显示了每个函数和接受的值: 如您所见,更改相机设置非常简单。您只需要在初始化相机后使用这些代码行。之后,您可以使用通用的功能和代码来控制相机。为了更好地理解如何使用它们,您可以按照下一个示例进行操作。 表中的函数以与Camera Web Server 示例中相同的顺序出现,以便更容易确定应该使用哪些函数和值来在您的场景中获得更好的图像。 更改 ESP32-CAM 相机设置示例为了向您展示如何在代码中应用图像设置,我们构建了一个简单的示例。以下代码每 10 秒拍摄一张照片并将其保存在 microSD 卡中。代码中有一个部分允许您更改相机设置。 #include "esp_camera.h" #include "FS.h" // SD Card ESP32 #include "SD_MMC.h" // SD Card ESP32 #include "soc/soc.h" // Disable brownout problems #include "soc/rtc_cntl_reg.h" // Disable brownout problems #include "driver/rtc_io.h" // Pin definition for CAMERA_MODEL_AI_THINKER // Change pin definition if you're using another ESP32 with camera module #define PWDN_GPIO_NUM 32 #define RESET_GPIO_NUM -1 #define XCLK_GPIO_NUM 0 #define SIOD_GPIO_NUM 26 #define SIOC_GPIO_NUM 27 #define Y9_GPIO_NUM 35 #define Y8_GPIO_NUM 34 #define Y7_GPIO_NUM 39 #define Y6_GPIO_NUM 36 #define Y5_GPIO_NUM 21 #define Y4_GPIO_NUM 19 #define Y3_GPIO_NUM 18 #define Y2_GPIO_NUM 5 #define VSYNC_GPIO_NUM 25 #define HREF_GPIO_NUM 23 #define PCLK_GPIO_NUM 22 // Keep track of number of pictures unsigned int pictureNumber = 0; //Stores the camera configuration parameters camera_config_t config; void setup() { WRITE_PERI_REG(RTC_CNTL_BROWN_OUT_REG, 0); //disable brownout detector Serial.begin(115200); //Initialize the camera Serial.print("Initializing the camera module..."); configInitCamera(); Serial.println("Ok!"); //Initialize MicroSD Serial.print("Initializing the MicroSD card module... "); initMicroSDCard(); } void loop() { //Path where new picture will be saved in SD Card String path = "/picture" + String(pictureNumber) +".jpg"; Serial.printf("Picture file name: %sn", path.c_str()); //Take and Save Photo takeSavePhoto(path); pictureNumber++; delay(10000); } void configInitCamera(){ config.ledc_channel = LEDC_CHANNEL_0; config.ledc_timer = LEDC_TIMER_0; config.pin_d0 = Y2_GPIO_NUM; config.pin_d1 = Y3_GPIO_NUM; config.pin_d2 = Y4_GPIO_NUM; config.pin_d3 = Y5_GPIO_NUM; config.pin_d4 = Y6_GPIO_NUM; config.pin_d5 = Y7_GPIO_NUM; config.pin_d6 = Y8_GPIO_NUM; config.pin_d7 = Y9_GPIO_NUM; config.pin_xclk = XCLK_GPIO_NUM; config.pin_pclk = PCLK_GPIO_NUM; config.pin_vsync = VSYNC_GPIO_NUM; config.pin_href = HREF_GPIO_NUM; config.pin_sscb_sda = SIOD_GPIO_NUM; config.pin_sscb_scl = SIOC_GPIO_NUM; config.pin_pwdn = PWDN_GPIO_NUM; config.pin_reset = RESET_GPIO_NUM; config.xclk_freq_hz = 20000000; config.pixel_format = PIXFORMAT_JPEG; //YUV422,GRAYSCALE,RGB565,JPEG // Select lower framesize if the camera doesn't support PSRAM if(psramFound()){ config.frame_size = FRAMESIZE_UXGA; // FRAMESIZE_ + QVGA|CIF|VGA|SVGA|XGA|SXGA|UXGA config.jpeg_quality = 10; //10-63 lower number means higher quality config.fb_count = 2; } else { config.frame_size = FRAMESIZE_SVGA; config.jpeg_quality = 12; config.fb_count = 1; } // Initialize the Camera esp_err_t err = esp_camera_init(&config); if (err != ESP_OK) { Serial.printf("Camera init failed with error 0x%x", err); return; } sensor_t * s = esp_camera_sensor_get(); s->set_brightness(s, 0); // -2 to 2 s->set_contrast(s, 0); // -2 to 2 s->set_saturation(s, 0); // -2 to 2 s->set_special_effect(s, 0); // 0 to 6 (0 - No Effect, 1 - Negative, 2 - Grayscale, 3 - Red Tint, 4 - Green Tint, 5 - Blue Tint, 6 - Sepia) s->set_whitebal(s, 1); // 0 = disable , 1 = enable s->set_awb_gain(s, 1); // 0 = disable , 1 = enable s->set_wb_mode(s, 0); // 0 to 4 - if awb_gain enabled (0 - Auto, 1 - Sunny, 2 - Cloudy, 3 - Office, 4 - Home) s->set_exposure_ctrl(s, 1); // 0 = disable , 1 = enable s->set_aec2(s, 0); // 0 = disable , 1 = enable s->set_ae_level(s, 0); // -2 to 2 s->set_aec_value(s, 300); // 0 to 1200 s->set_gain_ctrl(s, 1); // 0 = disable , 1 = enable s->set_agc_gain(s, 0); // 0 to 30 s->set_gainceiling(s, (gainceiling_t)0); // 0 to 6 s->set_bpc(s, 0); // 0 = disable , 1 = enable s->set_wpc(s, 1); // 0 = disable , 1 = enable s->set_raw_gma(s, 1); // 0 = disable , 1 = enable s->set_lenc(s, 1); // 0 = disable , 1 = enable s->set_hmirror(s, 0); // 0 = disable , 1 = enable s->set_vflip(s, 0); // 0 = disable , 1 = enable s->set_dcw(s, 1); // 0 = disable , 1 = enable s->set_colorbar(s, 0); // 0 = disable , 1 = enable } void initMicroSDCard(){ // Start Micro SD card Serial.println("Starting SD Card"); if(!SD_MMC.begin()){ Serial.println("SD Card Mount Failed"); return; } uint8_t cardType = SD_MMC.cardType(); if(cardType == CARD_NONE){ Serial.println("No SD Card attached"); return; } } void takeSavePhoto(String path){ // Take Picture with Camera camera_fb_t * fb = esp_camera_fb_get(); if(!fb) { Serial.println("Camera capture failed"); return; } // Save picture to microSD card fs::FS &fs = SD_MMC; File file = fs.open(path.c_str(), FILE_WRITE); if(!file){ Serial.println("Failed to open file in writing mode"); } else { file.write(fb->buf, fb->len); // payload (image), payload length Serial.printf("Saved file to path: %sn", path.c_str()); } file.close(); //return the frame buffer back to the driver for reuse esp_camera_fb_return(fb); }
为了让事情更简单,我们创建了一个名为 configInitCamera() 包含初始化相机的所有命令。 分配 OV2640 GPIO首先,它从分配 GPIO 开始。 相机频率: config.xclk_freq_hz = 20000000; OV2640 图像格式、质量和帧大小图片格式: config.pixel_format = PIXFORMAT_JPEG; //YUV422,GRAYSCALE,RGB565,JPEG图像格式可以是以下选项之一: 然后,设置帧大小、jpeg 质量和帧缓冲区计数。我们会根据您使用的是带 PSRAM 还是不带 PSRAM 的相机来选择不同的设置: 帧大小可以设置为以下选项之一: FRAMESIZE_UXGA (1600 x 1200) FRAMESIZE_QVGA (320 x 240) FRAMESIZE_CIF (352 x 288) FRAMESIZE_VGA (640 x 480) FRAMESIZE_SVGA (800 x 600) FRAMESIZE_XGA (1024 x 768) FRAMESIZE_SXGA (1280 x 1024)图像质量(jpeg_quality) 可以是 0 到 63 之间的数字。数字越小意味着质量越高。然而,非常低的图像质量数字,特别是在更高的分辨率下,可能会导致 ESP32-CAM 崩溃或可能无法正常拍摄照片。 因此,如果您注意到使用 ESP32-CAM 拍摄的图像被切成两半,或者颜色奇怪,这可能表明您需要降低质量(选择更高的数字)。 初始化OV2640相机以下几行初始化相机: // Initialize the Camera esp_err_t err = esp_camera_init(&config); if (err != ESP_OK) { Serial.printf("Camera init failed with error 0x%x", err); return; }在此之后,您可以添加我们之前向您展示的代码行来更改图像设置。 OV2640 设置:亮度、对比度、饱和度、白平衡、曝光等以下几行设置的值为默认值,您可以更改它们以更改图像设置。 sensor_t * s = esp_camera_sensor_get(); s->set_brightness(s, 0); // -2 to 2 s->set_contrast(s, 0); // -2 to 2 s->set_saturation(s, 0); // -2 to 2 s->set_special_effect(s, 0); // 0 to 6 (0 - No Effect, 1 - Negative, 2 - Grayscale, 3 - Red Tint, 4 - Green Tint, 5 - Blue Tint, 6 - Sepia) s->set_whitebal(s, 1); // 0 = disable , 1 = enable s->set_awb_gain(s, 1); // 0 = disable , 1 = enable s->set_wb_mode(s, 0); // 0 to 4 - if awb_gain enabled (0 - Auto, 1 - Sunny, 2 - Cloudy, 3 - Office, 4 - Home) s->set_exposure_ctrl(s, 1); // 0 = disable , 1 = enable s->set_aec2(s, 0); // 0 = disable , 1 = enable s->set_ae_level(s, 0); // -2 to 2 s->set_aec_value(s, 300); // 0 to 1200 s->set_gain_ctrl(s, 1); // 0 = disable , 1 = enable s->set_agc_gain(s, 0); // 0 to 30 s->set_gainceiling(s, (gainceiling_t)0); // 0 to 6 s->set_bpc(s, 0); // 0 = disable , 1 = enable s->set_wpc(s, 1); // 0 = disable , 1 = enable s->set_raw_gma(s, 1); // 0 = disable , 1 = enable s->set_lenc(s, 1); // 0 = disable , 1 = enable s->set_hmirror(s, 0); // 0 = disable , 1 = enable s->set_vflip(s, 0); // 0 = disable , 1 = enable s->set_dcw(s, 1); // 0 = disable , 1 = enable s->set_colorbar(s, 0); // 0 = disable , 1 = enable 示范更改代码中的相机设置以调整图像。然后,将代码上传到您的 ESP32-CAM。 按下 ESP32-CAM RST 按钮,它将开始拍照。然后,拿起 microSD 卡查看照片。 您可以在下面看到几张使用不同设置拍摄的图像。 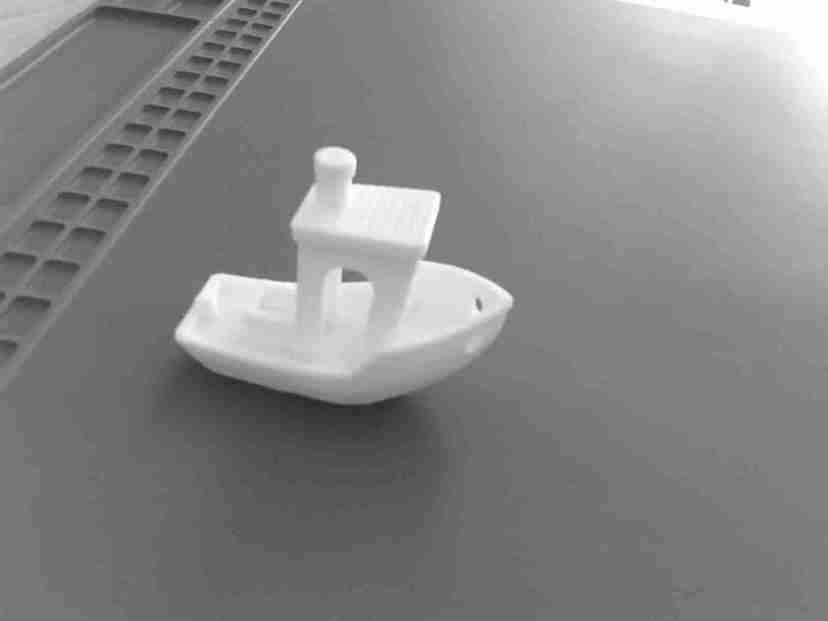 启用灰度效果的 ESP32-CAM 照片 启用灰度效果的 ESP32-CAM 照片
 亮度设置为 2 的 ESP32-CAM 照片 亮度设置为 2 的 ESP32-CAM 照片
 ESP32-CAM,对比度设置为 2,饱和度设置为 -2 ESP32-CAM,对比度设置为 2,饱和度设置为 -2
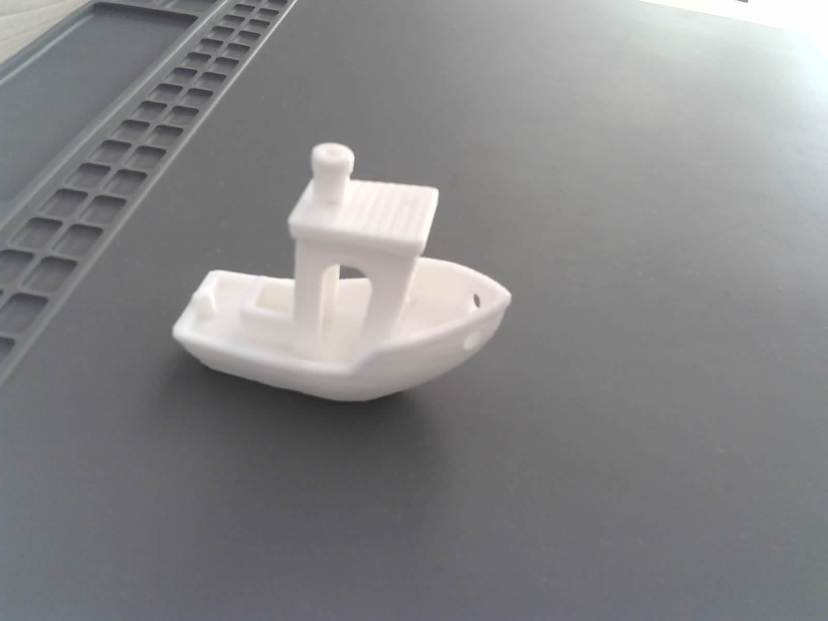
 默认设置下的 ESP32-CAM 照片 默认设置下的 ESP32-CAM 照片
在我看来,在这些条件下,获得更好画面的最佳设置是:对比度设置为 2,饱和度设置为 -2。 总结在本教程中,您学习了如何更改相机设置以调整使用 OV2640 相机获得的图像。 这很有用,因为根据您放置相机的位置,您可能需要更改设置以获得更好的图像。
文章来源:来自原作者Rui Santos英文翻译 |
【本文地址】