| 基于YOLO | 您所在的位置:网站首页 › Leapmotion和realsense › 基于YOLO |
基于YOLO
|
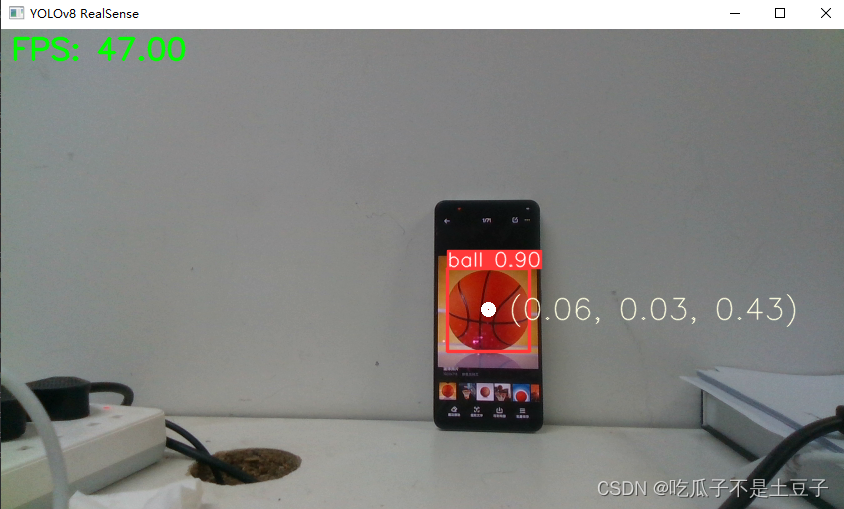
本人也是边学边用,不保证代码的可移植性,如有欠缺希望各位看官斧正,共同进步。 1 前言realsense d415本身可以输出点云数据以及图像数据,基于此结合yolo系列强大的图像识别功能,尝试用YOLO算法实时检测并分割点云数据。本项目研究的目标是篮球,因此针对篮球数据实现进行了训练。关于YOLO系列的训练方法,已经有很多文章讲解了,这里就不做赘述。 2 realsense实时检测程序对于笔者来说YOLOv8相对于前几代版本,其封装集成度更高。使用和训练也更为方便。下面废话不多说,我们直接上代码演示。 2.1 导入库和模型首先是必要的库导入,这里cv2是用于视频流显示的;pyrealsense2是realsense相机封装的一个库。其余的库不需要额外下载。 模型加载路径就是要使用的模型所在位置。 import cv2 import pyrealsense2 as rs import time import numpy as np import math from ultralytics import YOLO # 加载 YOLOv8 模型 model = YOLO("runs/detect/train/weights/best.pt") 2.2 realsense相机配置这里需要注意的是,图片流与深度信息需要对齐。 # 配置 RealSense pipeline = rs.pipeline() config = rs.config() config.enable_stream(rs.stream.depth, 848, 480, rs.format.z16, 30) config.enable_stream(rs.stream.color, 848, 480, rs.format.bgr8, 30) # 启动相机流 pipeline.start(config) align_to = rs.stream.color # 与color流对齐 align = rs.align(align_to)参考realsense官网的教程,定义如下两个函数。一个是数据对齐,另一个是点云数据读取。 def get_aligned_images(): frames = pipeline.wait_for_frames() # 等待获取图像帧 aligned_frames = align.process(frames) # 获取对齐帧 aligned_depth_frame = aligned_frames.get_depth_frame() # 获取对齐帧中的depth帧 color_frame = aligned_frames.get_color_frame() # 获取对齐帧中的color帧 # 相机参数的获取 intr = color_frame.profile.as_video_stream_profile().intrinsics # 获取相机内参 depth_intrin = aligned_depth_frame.profile.as_video_stream_profile( ).intrinsics # 获取深度参数(像素坐标系转相机坐标系会用到) '''camera_parameters = {'fx': intr.fx, 'fy': intr.fy, 'ppx': intr.ppx, 'ppy': intr.ppy, 'height': intr.height, 'width': intr.width, 'depth_scale': profile.get_device().first_depth_sensor().get_depth_scale() }''' # 保存内参到本地 # with open('./intrinsics.json', 'w') as fp: # json.dump(camera_parameters, fp) ####################################################### depth_image = np.asanyarray(aligned_depth_frame.get_data()) # 深度图(默认16位) depth_image_8bit = cv2.convertScaleAbs(depth_image, alpha=0.03) # 深度图(8位) depth_image_3d = np.dstack( (depth_image_8bit, depth_image_8bit, depth_image_8bit)) # 3通道深度图 color_image = np.asanyarray(color_frame.get_data()) # RGB图 # 返回相机内参、深度参数、彩色图、深度图、齐帧中的depth帧 return intr, depth_intrin, color_image, depth_image, aligned_depth_frame def get_3d_camera_coordinate(depth_pixel, aligned_depth_frame, depth_intrin): x = depth_pixel[0] y = depth_pixel[1] dis = aligned_depth_frame.get_distance(x, y) # 获取该像素点对应的深度 # print ('depth: ',dis) # 深度单位是m camera_coordinate = rs.rs2_deproject_pixel_to_point(depth_intrin, depth_pixel, dis) # print ('camera_coordinate: ',camera_coordinate) return dis, camera_coordinate 2.3主程序首先是对于image图像的提取,并用yolov8进行检测。这里model.predict是YOLOv8封装的图像预测程序,内部包含的内容有很多,感兴趣的可以进入官网查看https://docs.ultralytics.com/modes/predict/ intr, depth_intrin, color_image, depth_image, aligned_depth_frame = get_aligned_images() if not depth_image.any() or not color_image.any(): continue # 获取当前时间 time1 = time.time() # 将图像转为numpy数组 depth_colormap = cv2.applyColorMap(cv2.convertScaleAbs( depth_image, alpha=0.03), cv2.COLORMAP_JET) images = np.hstack((color_image, depth_colormap)) # 使用 YOLOv8 进行目标检测 results = model.predict(color_image, conf=0.5)随后就是对result中的包含的结果进行提取,这里我们主要提取的是xyxy(具体形式在在官网中有相应介绍)。然后根据边界信息,像素点对应的三维坐标。这里需要注意的是像素点全部为整数,因此在查询坐标时,数据的类型不能搞错。 annotated_frame = results[0].plot() detected_boxes = results[0].boxes.xyxy # 获取边界框坐标 for i, box in enumerate(detected_boxes): x1, y1, x2, y2 = map(int, box) # 获取边界框坐标 # 计算步长 xrange = max(1, math.ceil(abs((x1 - x2) / 30))) yrange = max(1, math.ceil(abs((y1 - y2) / 30))) # xrange = 1 # yrange = 1 point_cloud_data = [] # 获取范围内点的三维坐标 for x_position in range(x1, x2, xrange): for y_position in range(y1, y2, yrange): depth_pixel = [x_position, y_position] dis, camera_coordinate = get_3d_camera_coordinate(depth_pixel, aligned_depth_frame, depth_intrin) # 获取对应像素点的三维坐标 point_cloud_data.append(f"{camera_coordinate} ") # 一次性写入所有数据 with open("point_cloud_data.txt", "a") as file: file.write(f"\nTime: {time.time()}\n") file.write(" ".join(point_cloud_data))同时,为直观的展示位置信息,在程序中加入了中心点坐标显示。以及fps显示 # 显示中心点坐标 ux = int((x1 + x2) / 2) uy = int((y1 + y2) / 2) dis, camera_coordinate = get_3d_camera_coordinate([ux, uy], aligned_depth_frame, depth_intrin) # 获取对应像素点的三维坐标 formatted_camera_coordinate = f"({camera_coordinate[0]:.2f}, {camera_coordinate[1]:.2f}, {camera_coordinate[2]:.2f})" cv2.circle(annotated_frame, (ux, uy), 4, (255, 255, 255), 5) # 标出中心点 cv2.putText(annotated_frame, formatted_camera_coordinate, (ux + 20, uy + 10), 0, 1, [225, 255, 255], thickness=1, lineType=cv2.LINE_AA) # 标出坐标 # 计算 FPS frame_count += 1 time2 = time.time() fps = int(1 / (time2 - time1)) # 显示 FPS cv2.putText(annotated_frame, f'FPS: {fps:.2f}', (10, 30), cv2.FONT_HERSHEY_SIMPLEX, 1, (0, 255, 0), 2, cv2.LINE_AA) # 显示结果 cv2.imshow('YOLOv8 RealSense', annotated_frame) 3 完整程序 import cv2 import pyrealsense2 as rs import time import numpy as np import math from ultralytics import YOLO # 加载 YOLOv8 模型 model = YOLO("runs/detect/train/weights/best.pt") # # 获取摄像头内容,参数 0 表示使用默认的摄像头 # cap = cv2.VideoCapture(1) # 配置 RealSense pipeline = rs.pipeline() config = rs.config() config.enable_stream(rs.stream.depth, 848, 480, rs.format.z16, 30) config.enable_stream(rs.stream.color, 848, 480, rs.format.bgr8, 30) # 启动相机流 pipeline.start(config) align_to = rs.stream.color # 与color流对齐 align = rs.align(align_to) def get_aligned_images(): frames = pipeline.wait_for_frames() # 等待获取图像帧 aligned_frames = align.process(frames) # 获取对齐帧 aligned_depth_frame = aligned_frames.get_depth_frame() # 获取对齐帧中的depth帧 color_frame = aligned_frames.get_color_frame() # 获取对齐帧中的color帧 # 相机参数的获取 intr = color_frame.profile.as_video_stream_profile().intrinsics # 获取相机内参 depth_intrin = aligned_depth_frame.profile.as_video_stream_profile( ).intrinsics # 获取深度参数(像素坐标系转相机坐标系会用到) '''camera_parameters = {'fx': intr.fx, 'fy': intr.fy, 'ppx': intr.ppx, 'ppy': intr.ppy, 'height': intr.height, 'width': intr.width, 'depth_scale': profile.get_device().first_depth_sensor().get_depth_scale() }''' # 保存内参到本地 # with open('./intrinsics.json', 'w') as fp: # json.dump(camera_parameters, fp) ####################################################### depth_image = np.asanyarray(aligned_depth_frame.get_data()) # 深度图(默认16位) depth_image_8bit = cv2.convertScaleAbs(depth_image, alpha=0.03) # 深度图(8位) depth_image_3d = np.dstack( (depth_image_8bit, depth_image_8bit, depth_image_8bit)) # 3通道深度图 color_image = np.asanyarray(color_frame.get_data()) # RGB图 # 返回相机内参、深度参数、彩色图、深度图、齐帧中的depth帧 return intr, depth_intrin, color_image, depth_image, aligned_depth_frame def get_3d_camera_coordinate(depth_pixel, aligned_depth_frame, depth_intrin): x = depth_pixel[0] y = depth_pixel[1] dis = aligned_depth_frame.get_distance(x, y) # 获取该像素点对应的深度 # print ('depth: ',dis) # 深度单位是m camera_coordinate = rs.rs2_deproject_pixel_to_point(depth_intrin, depth_pixel, dis) # print ('camera_coordinate: ',camera_coordinate) return dis, camera_coordinate # 初始化 FPS 计算 fps = 0 frame_count = 0 start_time = time.time() try: while True: # 等待获取一对连续的帧:深度和颜色 intr, depth_intrin, color_image, depth_image, aligned_depth_frame = get_aligned_images() if not depth_image.any() or not color_image.any(): continue # 获取当前时间 time1 = time.time() # 将图像转为numpy数组 depth_colormap = cv2.applyColorMap(cv2.convertScaleAbs( depth_image, alpha=0.03), cv2.COLORMAP_JET) images = np.hstack((color_image, depth_colormap)) # 使用 YOLOv8 进行目标检测 results = model.predict(color_image, conf=0.5) annotated_frame = results[0].plot() detected_boxes = results[0].boxes.xyxy # 获取边界框坐标 # print('方框坐标', detected_boxes) for i, box in enumerate(detected_boxes): x1, y1, x2, y2 = map(int, box) # 获取边界框坐标 # 计算步长 xrange = max(1, math.ceil(abs((x1 - x2) / 30))) yrange = max(1, math.ceil(abs((y1 - y2) / 30))) # xrange = 1 # yrange = 1 point_cloud_data = [] # 获取范围内点的三维坐标 for x_position in range(x1, x2, xrange): for y_position in range(y1, y2, yrange): depth_pixel = [x_position, y_position] dis, camera_coordinate = get_3d_camera_coordinate(depth_pixel, aligned_depth_frame, depth_intrin) # 获取对应像素点的三维坐标 point_cloud_data.append(f"{camera_coordinate} ") # 一次性写入所有数据 with open("point_cloud_data.txt", "a") as file: file.write(f"\nTime: {time.time()}\n") file.write(" ".join(point_cloud_data)) # 显示中心点坐标 ux = int((x1 + x2) / 2) uy = int((y1 + y2) / 2) dis, camera_coordinate = get_3d_camera_coordinate([ux, uy], aligned_depth_frame, depth_intrin) # 获取对应像素点的三维坐标 formatted_camera_coordinate = f"({camera_coordinate[0]:.2f}, {camera_coordinate[1]:.2f}, {camera_coordinate[2]:.2f})" cv2.circle(annotated_frame, (ux, uy), 4, (255, 255, 255), 5) # 标出中心点 cv2.putText(annotated_frame, formatted_camera_coordinate, (ux + 20, uy + 10), 0, 1, [225, 255, 255], thickness=1, lineType=cv2.LINE_AA) # 标出坐标 # 计算 FPS frame_count += 1 time2 = time.time() fps = int(1 / (time2 - time1)) # 显示 FPS cv2.putText(annotated_frame, f'FPS: {fps:.2f}', (10, 30), cv2.FONT_HERSHEY_SIMPLEX, 1, (0, 255, 0), 2, cv2.LINE_AA) # 显示结果 cv2.imshow('YOLOv8 RealSense', annotated_frame) if cv2.waitKey(1) & 0xFF == ord('q'): break finally: # 停止流 pipeline.stop() 4 实验结果由于笔者实验室内没有篮球,这里就用手机照片暂时充当一下。
|
【本文地址】