How to Scrape HTML Table in JavaScript + Ready |
您所在的位置:网站首页 › 鲁山一高副校长名单照片 › How to Scrape HTML Table in JavaScript + Ready |
How to Scrape HTML Table in JavaScript + Ready
|
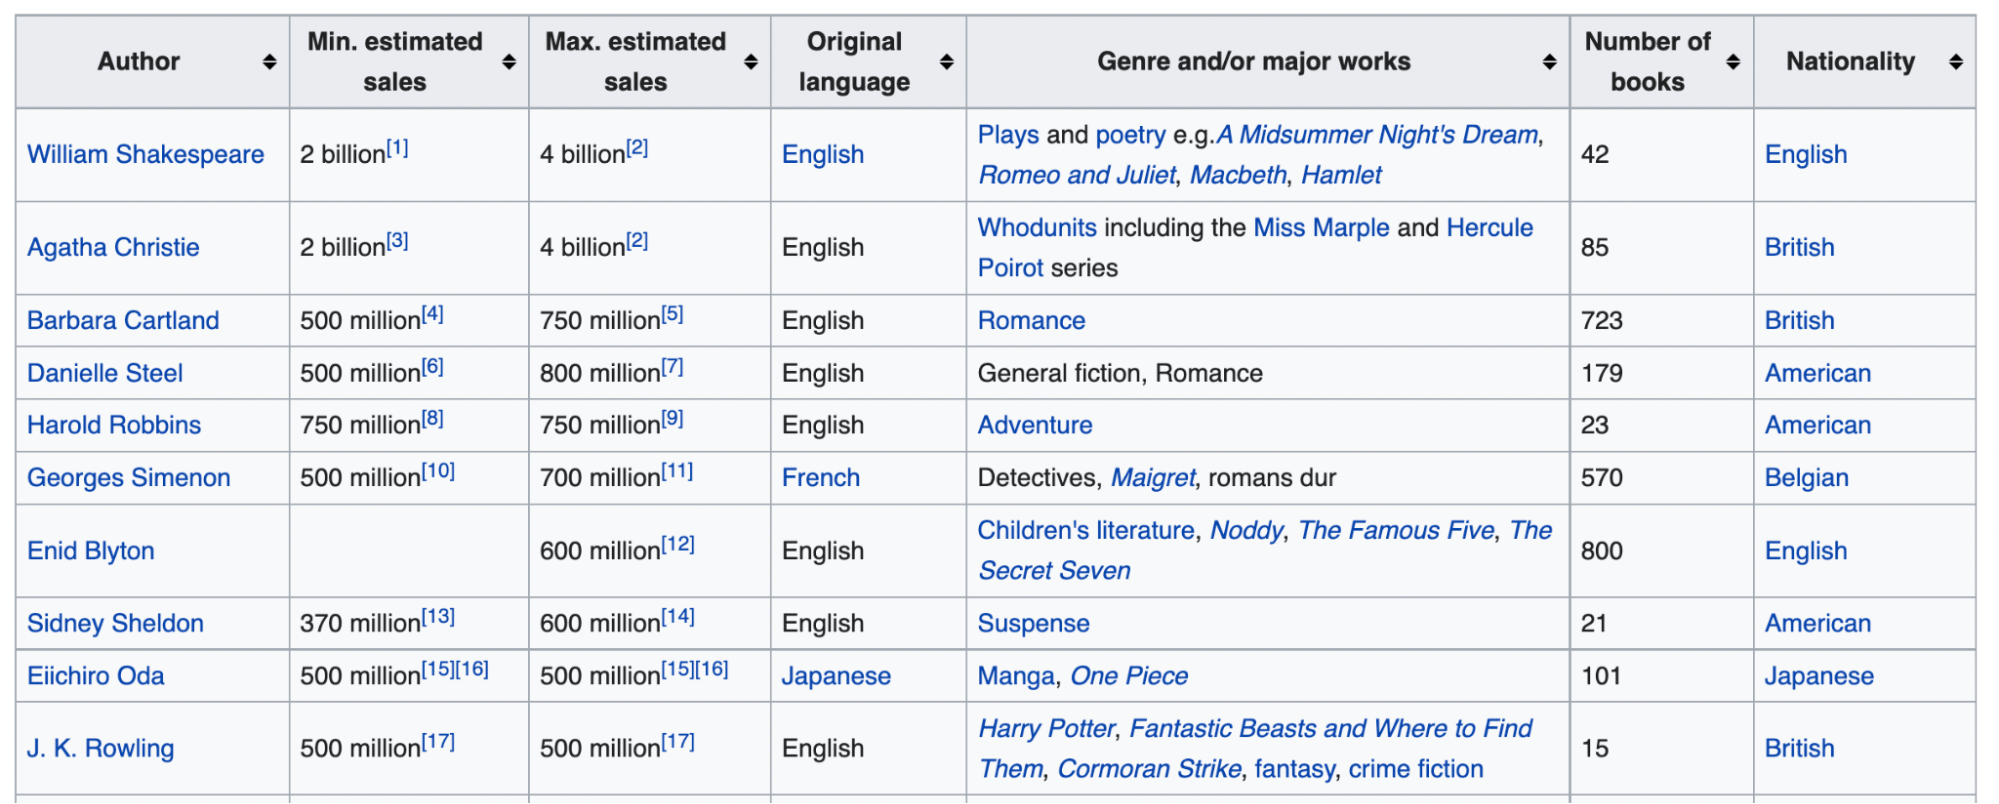
HTML tables are the best data sources on the web. They are easy to understand and can hold an immense amount of data in a simple-to-read and understand format. Being able to scrape HTML tables is a crucial skill to develop for any developer interested in data science or in data analysis in general. In this tutorial, we’re going to go deeper into HTML tables and build a simple, yet powerful, script to extract tabular data and export it to a CSV file. What is an HTML Web Table?An HTML table is a set of rows and columns that are used to display information in a grid format directly on a web page. They are commonly used to display tabular data, such as spreadsheets or databases, and are a great source of data for our projects. From sports data and weather data to books and authors’ data, most big datasets on the web are accessible through HTML tables because of how great they are to display information in a structured and easy-to-navigate format.
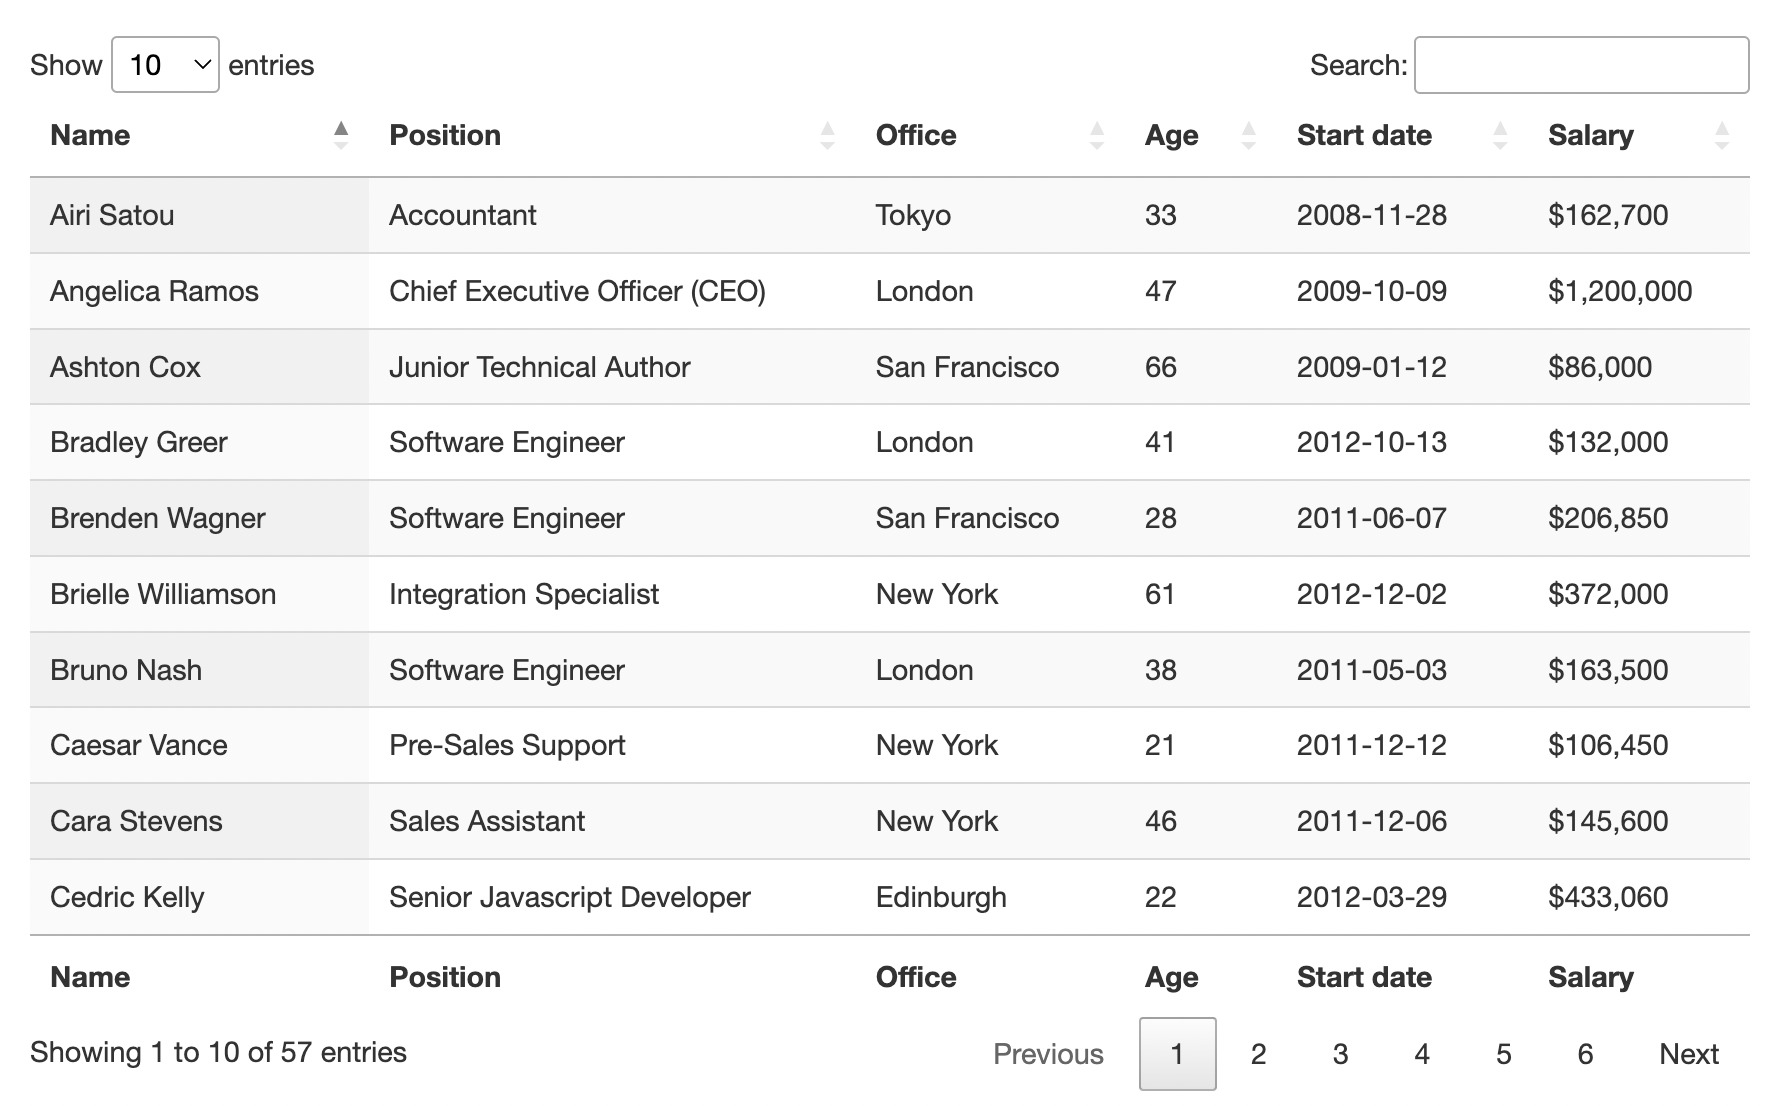
The great news for us is that, unlike dynamically generated content, the HTML table’s data lives directly inside of the table element in the HTML file, meaning that we can scrape all the information we need exactly as we would with other elements of the web – as long as we understand their structure. Understanding HTML Table’s StructureThough you can only see the columns and rows in the front end, these tables are actually created using a few different HTML tags: : It marks the start of an HTML table : Indicates a row in the table : Defines a cell in the tableThe content goes inside the tag and is used to create a row. In other words: Table > Row > Cell || table > tr > td hierarchy is followed to create an HTML table. A special cell can be created using the tag which means table header. Basically, the first cells of the first row can be created using the tag to indicate the row is the heading of the table. Here is an example to create a simple two-row and two-column based HTML table: Pet 1 Pet 2 Dog CatThere’s one major difference when scraping HTML tables though. Unlike other elements on a web page, CSS selectors target the overall cells and rows – or even the entire table – because all of these elements are actually components of the element. Instead of targeting a CSS selector for each data point, we want to scrape, we’ll need to create a list with all the rows of the table and loop through them to grab the data from their cells. If we understand this logic, creating our script is actually pretty straightforward. Scraping HTML Tables to CSV with Node.JSIf this is your first time using Node.JS for web scraping, it might be useful to go through some of our previous tutorials: Web Scraping with JavaScript and Node.js How to Build a LinkedIn Scraper For Free How to Build a Football Data Scraper Step-by-StepHowever, we’ll keep this tutorial as beginner-friendly as possible so you can use it even as a starting point. Note: For Node.JS installation instructions, please refer to the first article on the list. For today’s project, we’ll build a web scraper using Axios and Cheerio to scrape the employee data displayed on https://datatables.net/examples/styling/display.html.
We’ll be extracting the name, position, office, age, start date, and salary for each employee, and then send the data to a CSV using the ObjectsToCsv package. 1. Getting Our Files ReadyTo kickstart our project, let’s create a new directory named html-table-scraper, open the new folder on VScode (or your code editor of preference) and open a new terminal. In the terminal, we’ll run npm init -y to start a new Node.JS project. You’ll now have a new JSON file in your folder. Next, we’ll install our dependencies using the following commands: Axios: npm install axios Cheerio: npm install cheerio ObjectsToCsv: npm install objects-to-csvOur for a one command installation: npm i axios cheerio objects-to-csv. Now we can create a new file named tablescraper.js and import our dependencies at the top. const axios = require("axios"); const cheerio = require("cheerio"); const ObjectsToCsv = require("objects-to-csv");Also, your project should be looking like this:
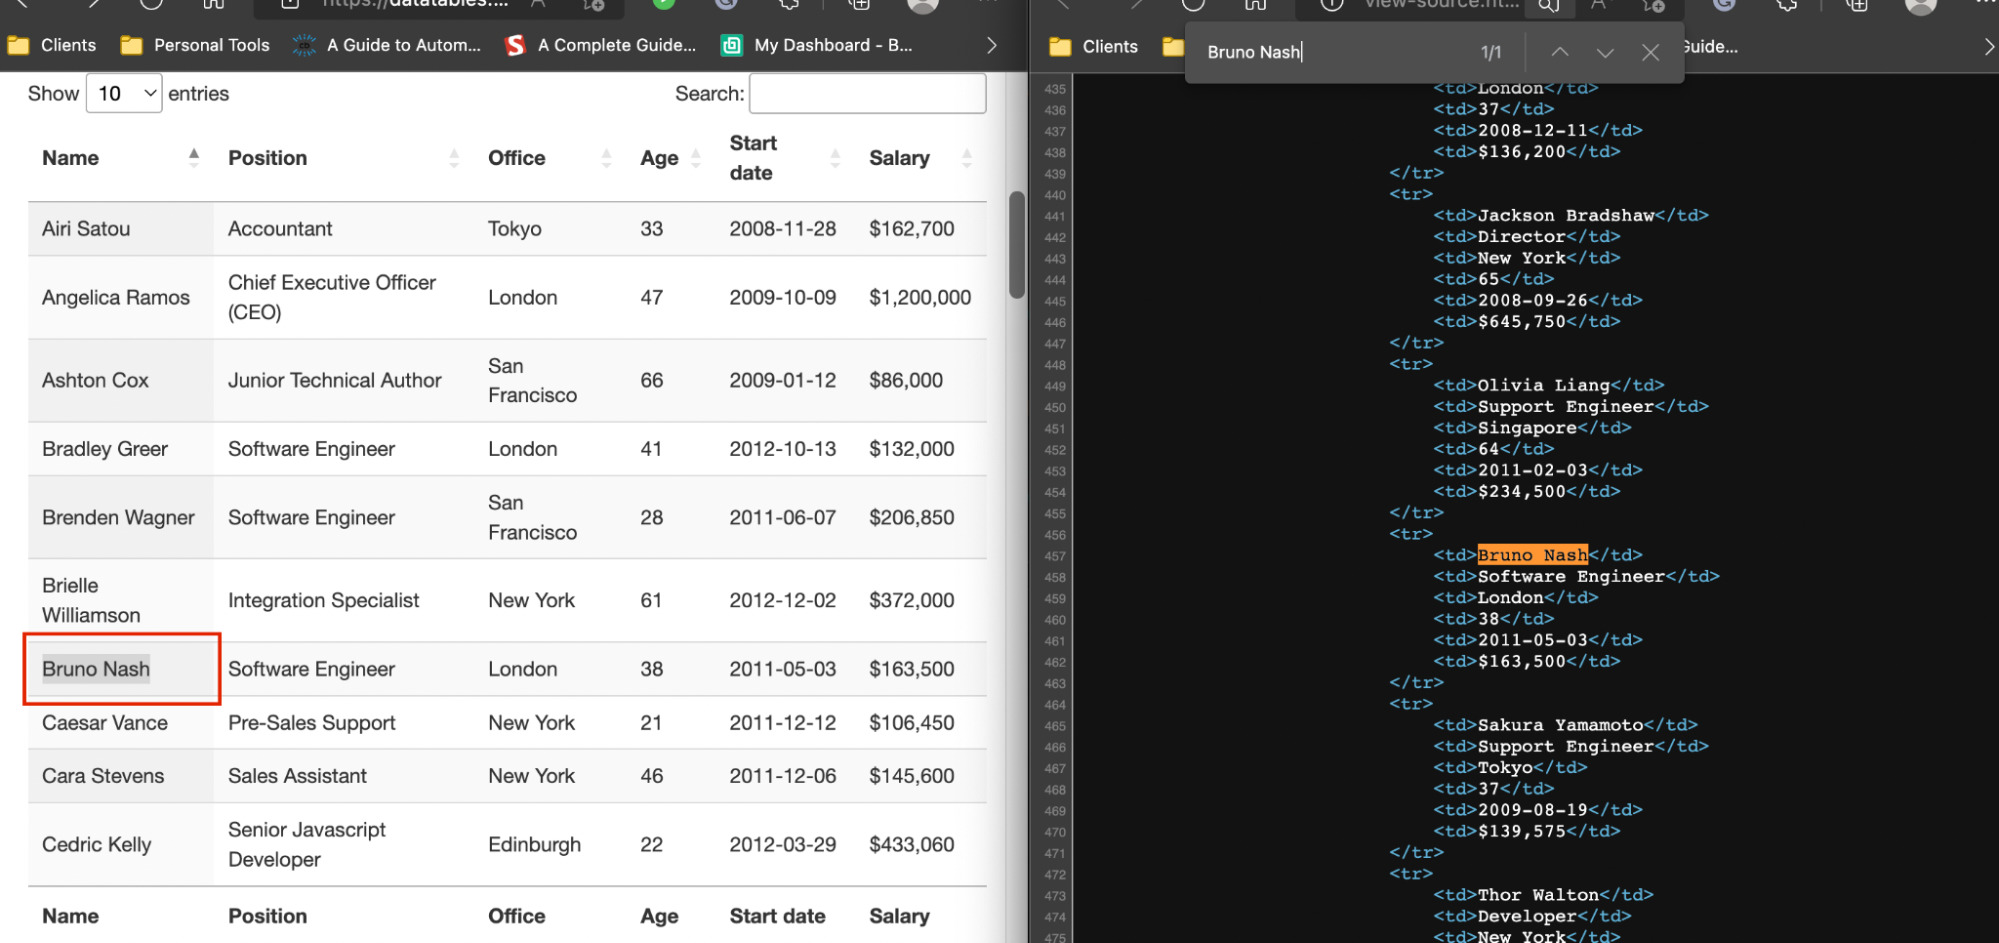
Before writing the code, we need to understand how is the website structured. Yes, all tables use the basic structure, but that doesn’t mean that all are created equally. The first thing we need to determine is whether or not this is, in fact, an HTML table. It’s very common for sites to use JavaScript to inject data into their tables, especially if there are any real-time data involved. For those cases, we would have to use a totally different approach like using a headless browser. To test if the data is inside the HTML file, all we need to do is copy some data points – let’s say the name – and look for it in the source code of the page.
We did the same for other names and data points just to make sure, and yes, all the data is right there at our disposal. Another interesting surprise is that all the rows of the table are inside the raw HTML, even though there seems to be some kind of pagination on the front end.
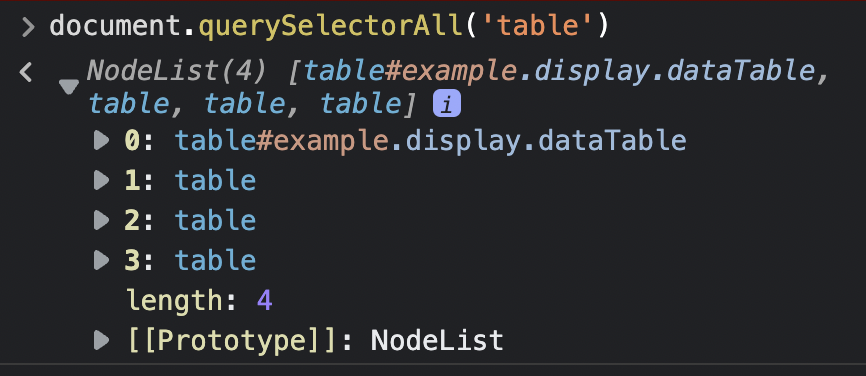
Plus, we also now know that there are a total of 57 rows to scrape. This is important because we can know whether or not we’re actually grabbing all the data available. The second thing we want to test directly on the browser is our selectors. Instead of sending a bunch of unnecessary requests, we can use the browser’s console to grab elements using the document.querySelectorAll() method. If we go to the console and type document.querySelectorAll('table'), it return four different tables.
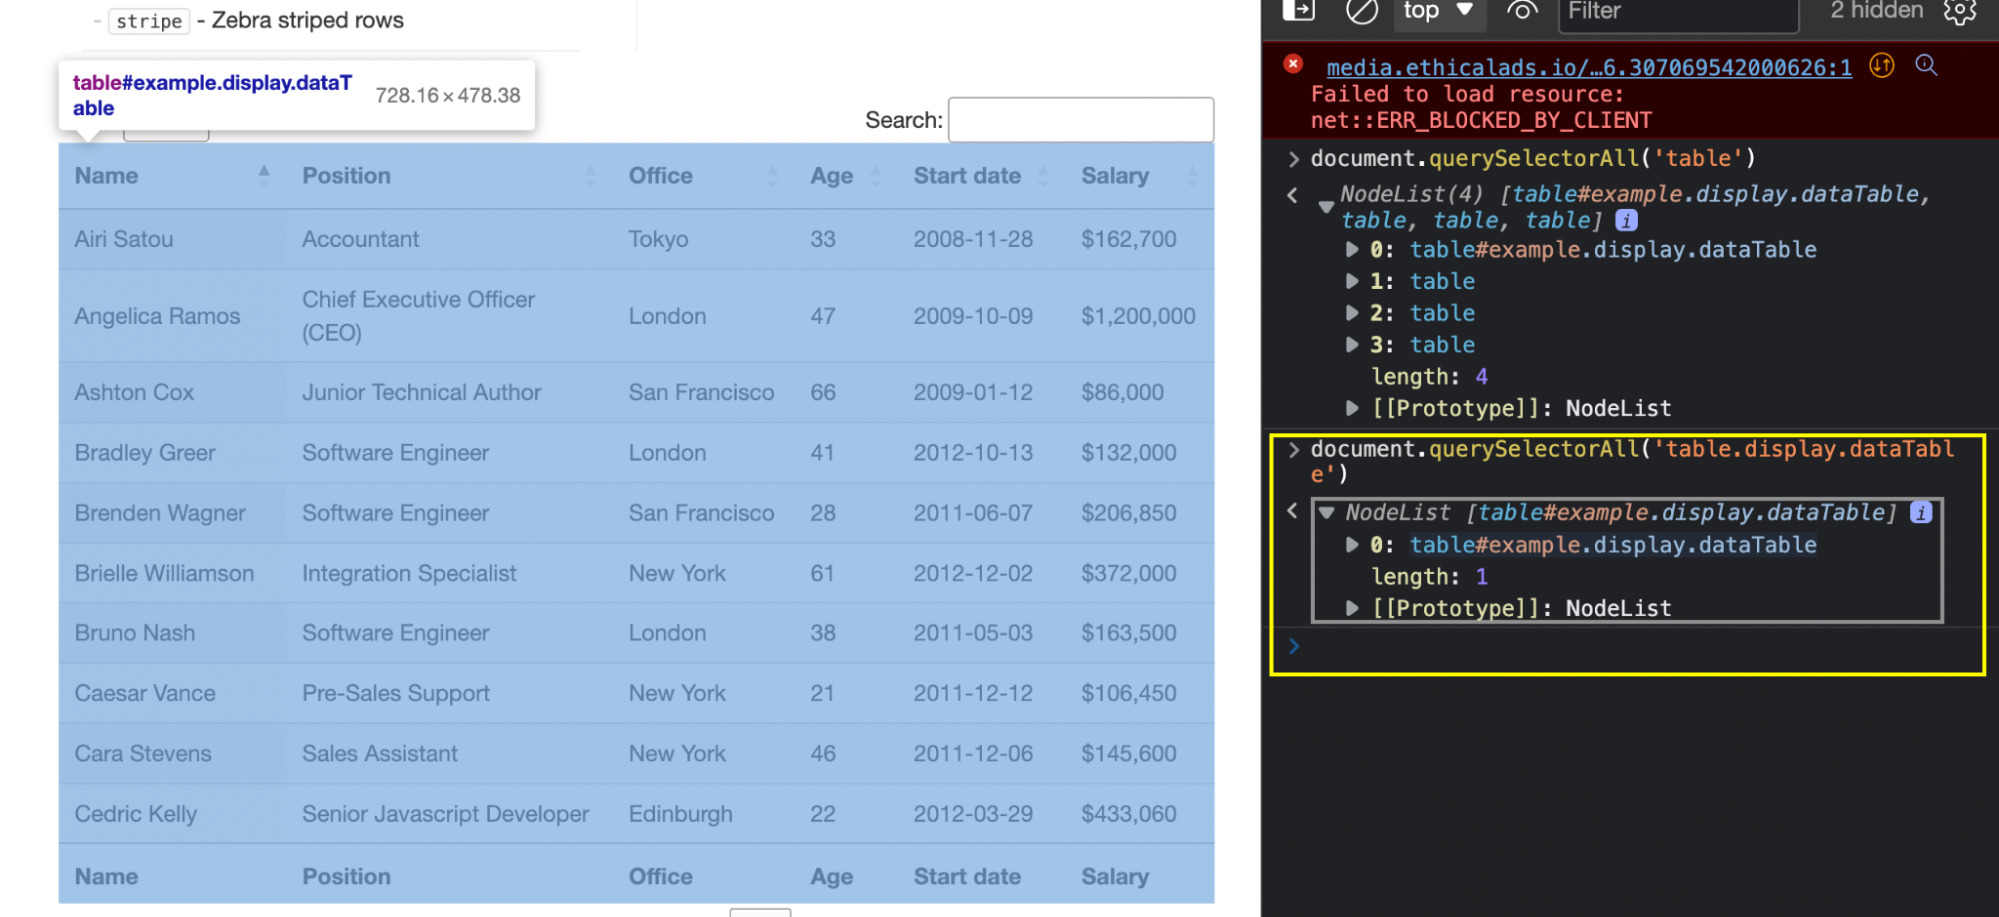
Mousing over the tables, we quickly realized that the first table (number 0) is the right one. So let’s do it again but specifying the class – which in the list is represented by the dots (.).
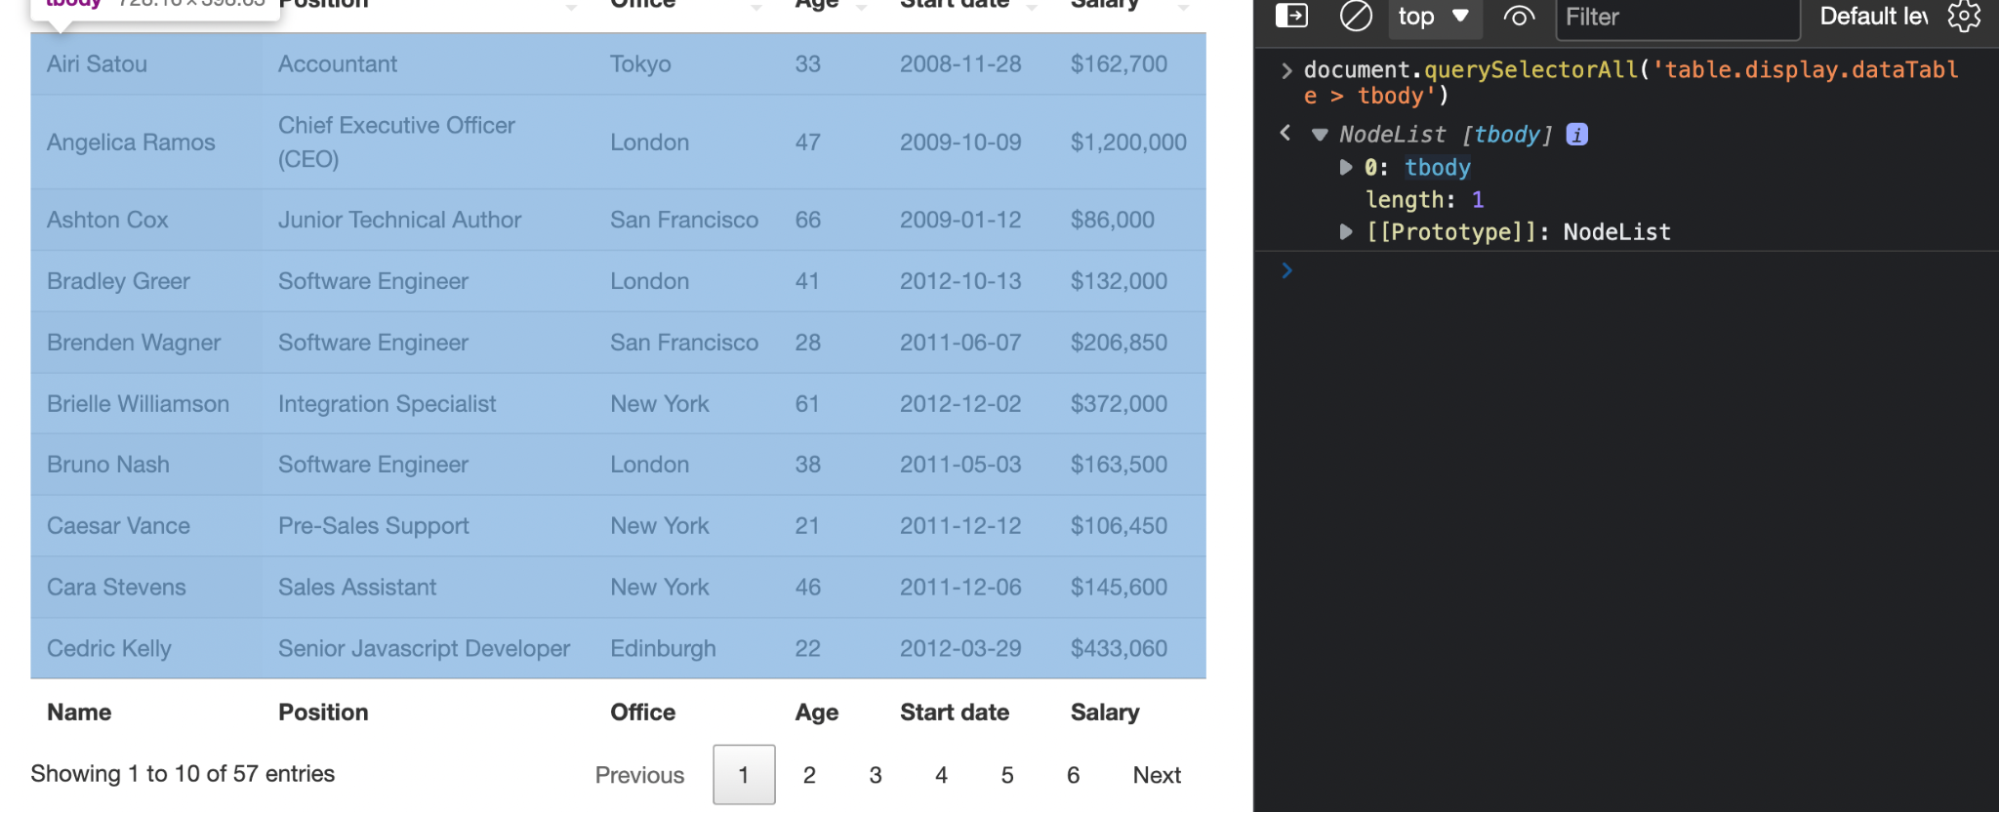
Great, we’re one step closer to our data! By taking a closer look, the data of the table is wrapped around a tag, so let’s add it to our selector to make sure that we’re only grabbing the rows containing the data we want.
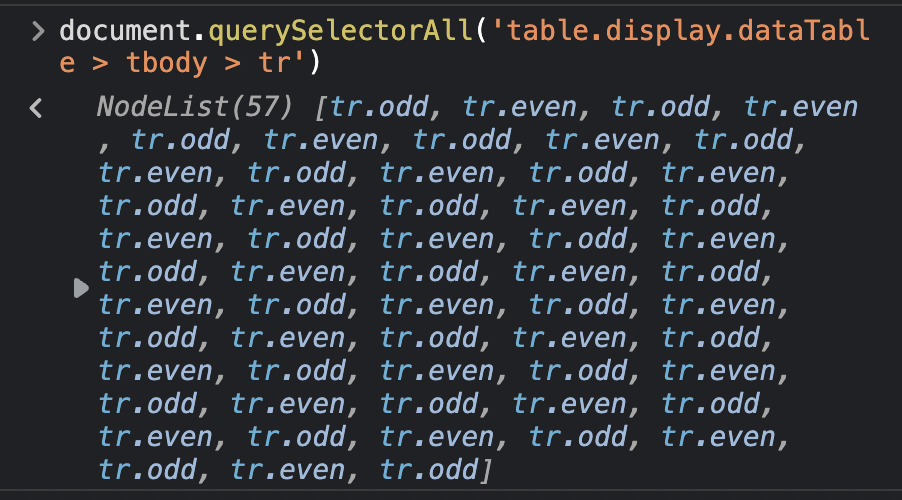
Lastly, we’ll want to grab all the rows and verify that our selector is grabbing the entire 57 rows.
Note: Because we’re using the console to select elements on the rendered HTML, we needed to set the total amount of displayed items to 100. Otherwise, our selector on the console will only show10 node items. With all this information, we can now start writing our code! 3. Sending Our HTTP Request and Parsing the Raw HTMLAxios makes it super easy to send HTTP requests inside an Async Function. All we need to do is create an async function and pass the URL to Axios in a constant named response. We’ll also log the status code of the response (which should be 200 for a successful request). (async function html_scraper() { const response = await axios('https://datatables.net/examples/styling/display.html'); console.log(response.status) })();
Note: You can name these variables as you’d like, but keep them as descriptive as possible. Next, we’ll store the data from the response (raw HTML) into a new constant named html, so we can then pass it to Cheerio for parsing using cheerio.load(). const html = await response.data; const $ = cheerio.load(html); 4. Iterating Through the HTML Table RowsUsing the selector we’ve tested before, let’s select all the rows inside the HTML table. const allRows = $('table.display > tbody > tr'); console.log(allRows.length)For testing purposes, let’s console.log() the length of allRows to verify that, indeed, we’ve picked all our target rows.
57 is exactly what we were aiming for! Of course, to go through the list of rows, we’ll be using the .each() method, but there’s one more thing we need to figure out: the order of the cells. Unlike common HTML elements, cells don’t have a unique class assigned to them. So trying to scrape each data point with a CSS class could be a mess. Instead, we’re going to target the s position within its row. In other words, we’ll tell our script to go to each row, select all cells inside the row, and then store each data point in a variable based on its position within the row. Note: In Node.JS, all lists start at 0. So the first position would be [0], and the second cell would be [1]. But how do we know which position is which? We go back to our browser’s console and test it out:
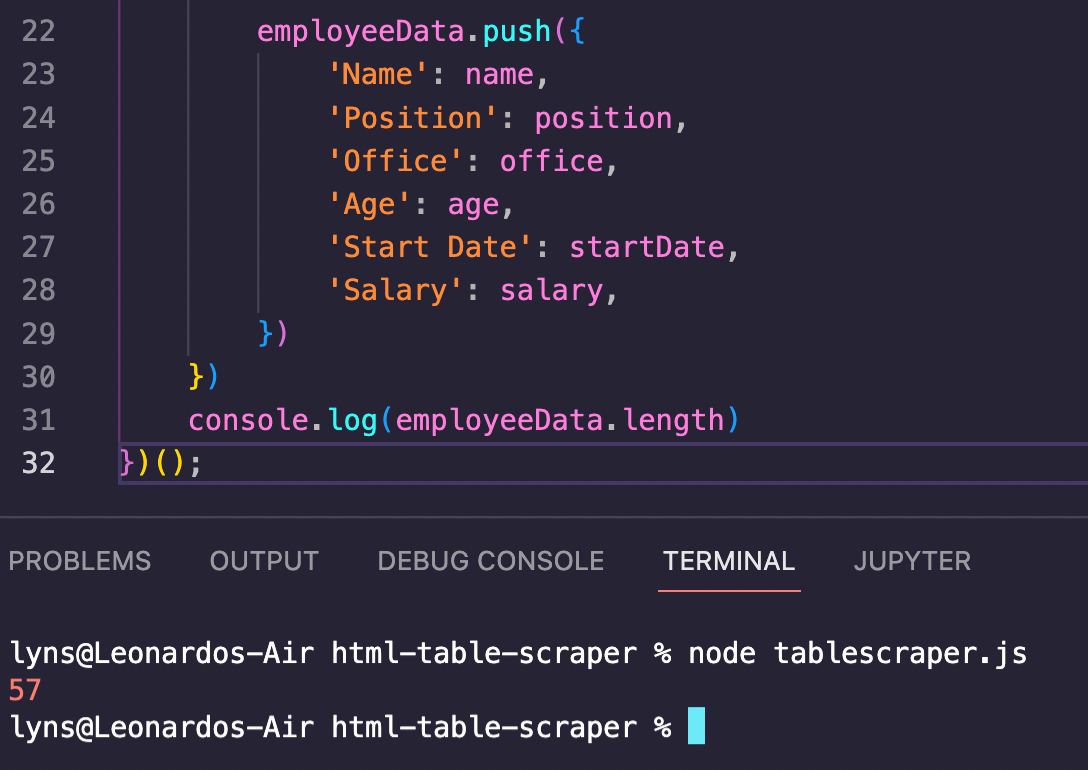
Now that we know where each element is in relation to the rest, here’s the finished parser: allRows.each((index, element) => { const tds = $(element).find('td'); const name = $(tds[0]).text(); const position = $(tds[1]).text(); const office = $(tds[2]).text(); const age = $(tds[3]).text(); const startDate = $(tds[4]).text(); const salary = $(tds[5]).text(); 5. Pushing the Scraped Data Into an Empty ArrayIf we console.log() the scraped data we’ll see that we’re scraping the text out of each cell, but with very disorganized results – which in turn makes it harder to create our CSV file. So before we export our data, let’s give it some order by pushing the data to an empty array to create a simple node list. First, create an empty array outside of the main function – if you create the empty array inside the function, it will be overwritten with every iteration, which is not something we want. employeeData = [];Then, as part of our parser, let’s use the .push() method to store our data in the empty list we’ve created. employeeData.push({ 'Name': name, 'Position': position, 'Office': office, 'Age': age, 'Start Date': startDate, 'Salary': salary, })Like always, let’s console.log() the employeeData’s length to make sure that we now have 57 items in it.
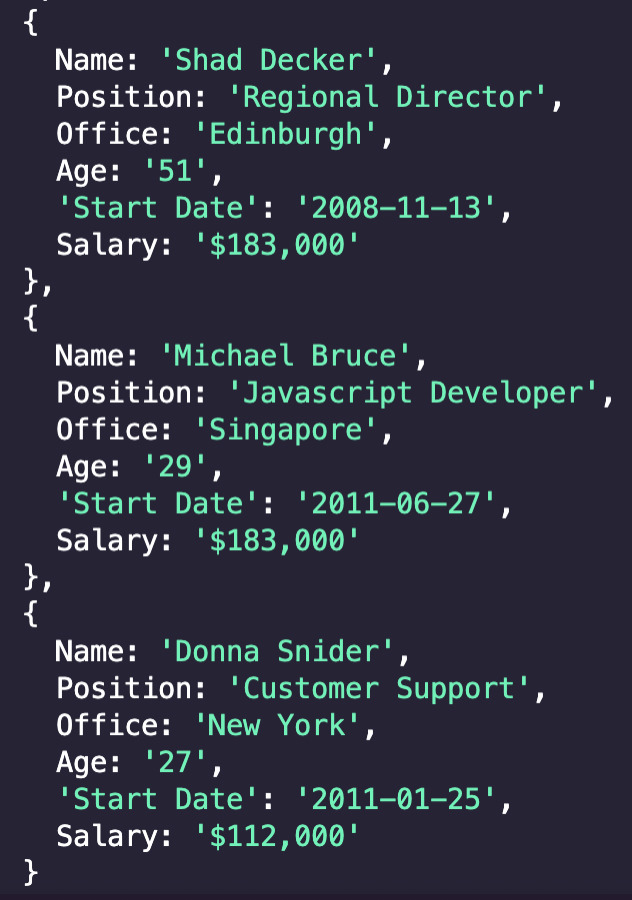
For visual context, we can also log the array to see what’s stored inside.
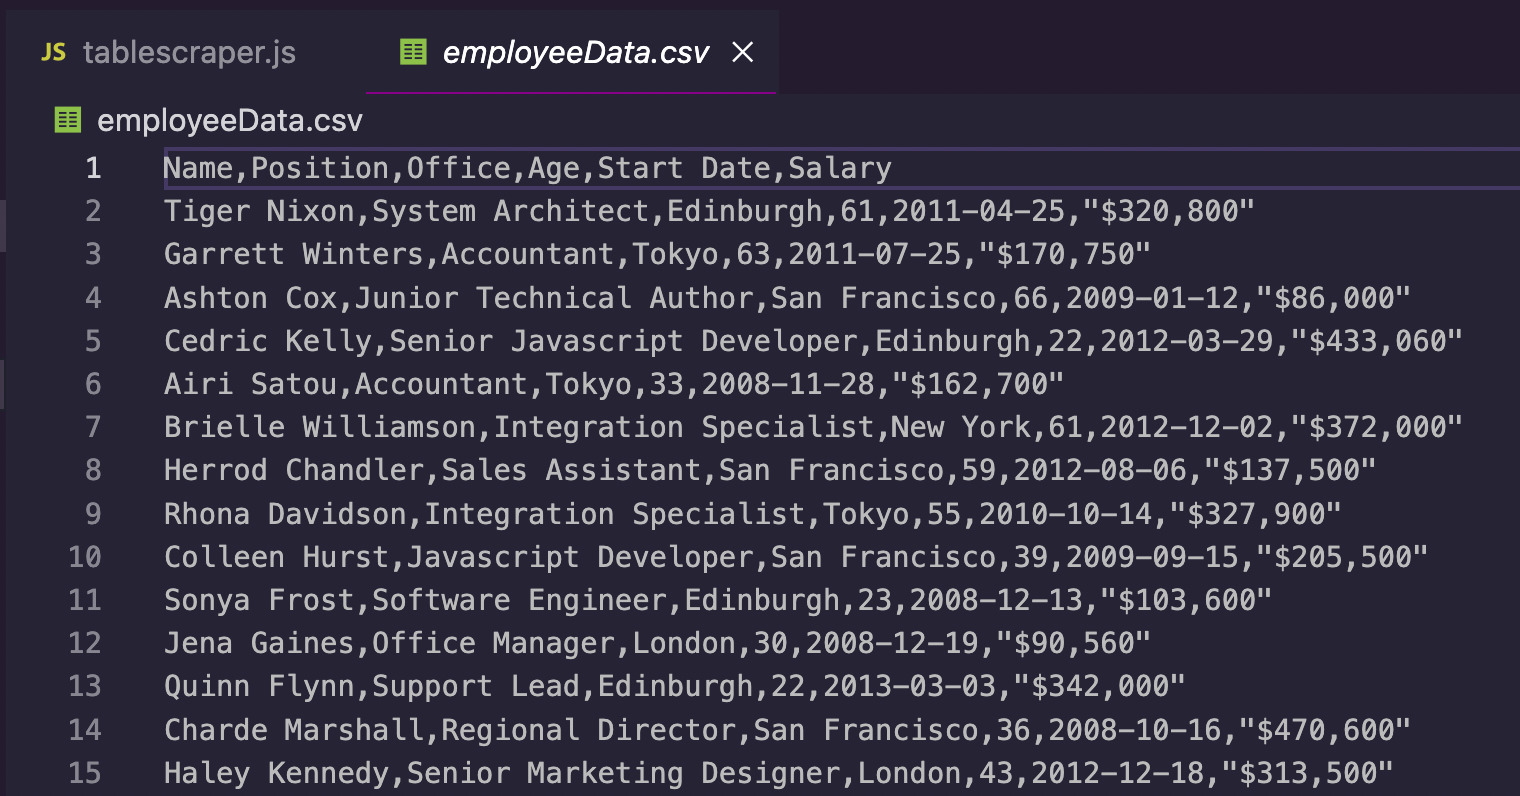
As we can see, all the data is now stored inside node items which contain every piece of data in a structured format. 6. Sending Scraped Data to a CSV FileWith our data organized, we can pass our list to ObjectsToCsv and it’ll create the file for us with no extra work: const csv = new ObjectsToCsv(employeeData); await csv.toDisk('./employeeData.csv')All we need to do is create a new csv object and pass the list to ObjectsToCsv, and then tell it to save it in our machine providing the path. 7. HTML Table Scraper [Full Code]Congratulations, you’ve officially created your first HTML table scraper! Compare your code to the finished codebase of this tutorial to ensure you haven’t missed anything: const axios = require("axios"); const cheerio = require("cheerio"); const ObjectsToCsv = require("objects-to-csv"); employeeData = []; (async function html_scraper() { const response = await axios('https://datatables.net/examples/styling/display.html') const html = await response.data; const $ = cheerio.load(html); //Selecting all rows inside our target table const allRows = $('table.display > tbody > tr'); console.log('Going through rows') //Looping through the rows allRows.each((index, element) => { //Selecting all cells within the row const tds = $(element).find('td'); //Extracting the text out of each cell const name = $(tds[0]).text(); const position = $(tds[1]).text(); const office = $(tds[2]).text(); const age = $(tds[3]).text(); const startDate = $(tds[4]).text(); const salary = $(tds[5]).text(); //Pushing scraped data to our empty array employeeData.push({ 'Name': name, 'Position': position, 'Office': office, 'Age': age, 'Start Date': startDate, 'Salary': salary, }) }) //Exporting scraped data to a CSV file console.log('Saving data to CSV'); const csv = new ObjectsToCsv(employeeData); await csv.toDisk('./employeeData.csv') console.log('Saved to CSV') })();After running our script, a new CSV file gets created inside our project’s folder:
Now, you can use this data to run further analysis like making salary comparisons based on job title or starting date, or look for trends in bigger job datasets. Of course, this script can be adapted to handle almost any HTML table you’ll find, so keep your mind open to new possibilities and Avoid Getting Blocked: Integrating ScraperAPI in a Single Line of CodeBefore yougo away, there’s one more thing we need to do to make our scraper more resilient and that’s handling anti-scraping techniques and systems. A lot of websites don’t like to be scraped because, sadly, a lot of scrapers are badly optimized and tend to hurt their sites. For that reason, you need to follow some web scraping best practices to ensure that you’re handling your projects correctly, without putting too much pressure on your target website, nor putting your script and IP in risk of getting ban or blacklisted – making it impossible to access the needed data from your machine again. To handle IP rotation, JavaScript rendering, find and implement HTTP headers, CAPTCHAs and more, all we need to do is send our initial request through ScraperAPI’s server. This API will use years of statistical analysis and machine learning to determine which is the best combination of headers and proxy, handle any unsuccessful requests and time our request so it doesn’t overload our target server. Adding it to our script is as simple as adding this string to the URL passed to Axios: const response = await axios('http://api.scraperapi.com?api_key={Your_API_Key}&url=https://datatables.net/examples/styling/display.html')Remember to substitute {Your_API_Key} with your own API key – which you can generate by creating a free ScraperAPI account. Your initial request will take a little longer while ScraperAPI handles any complexities for you and will only consume API credits for successful requests. Now it’s your turn. Web scraping is all about practice. Every website is a different puzzle so there’s no one way to do things. Instead, focus on using the foundations to take on more complex challenges. If you want to keep practicing, a few websites we recommend are: https://quotes.toscrape.com/ https://books.toscrape.com/ https://datatables.net/examples/indexUntil next time, happy scraping! |


【本文地址】
今日新闻 |
点击排行 |
|
推荐新闻 |
图片新闻 |
|
专题文章 |