QPushButton自定义样式 调整字体对齐方式 同时显示图片和文字 调整图片文字位置 |
您所在的位置:网站首页 › 自定义目录怎么修改对齐方式 › QPushButton自定义样式 调整字体对齐方式 同时显示图片和文字 调整图片文字位置 |
QPushButton自定义样式 调整字体对齐方式 同时显示图片和文字 调整图片文字位置
|
QPushButton自定义样式介绍:
基本样式:
setStyleSheet("QPushButton{"
"border: 1px solid black;"//边框宽度和颜色
"border-radius: 5px;"//边框圆角
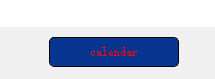
"background-color:#083590; "//背景颜色
"color:red; "//字体颜色
"}"
);
上面是基本的显示效果; 字体相关的样式: setStyleSheet("QPushButton{" "color:red; "//字体颜色 "font-size:14px; " "text-align : top; "//字体的对齐方式 left right top bottom center 默认居中对齐 "}" );
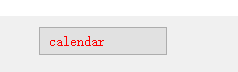
举个例子,假如想让字体左对齐,边距是10的话,具体设置和显示效果如下: setStyleSheet("QPushButton{" "color:red; "//字体颜色 "font-size:14px; " "text-align : left; "//字体的对齐方式 "padding-left: 10px;" //参考上面UI构造图 "}" );
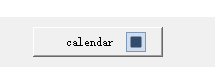
上面样式应用于自定义文字、对齐等; 背景图相关设置: setStyleSheet("QPushButton{" //"border-image:url(:src.png);"//这也可以设置背景图片,不过图片是拉伸填充的 "background-image: url(:src.png);"//自定义背景图片 "background-repeat: repeat-no-repeat;"//图片重复方式,参考CSS "background-position: right;"//qss 支持top left 等,不支持数字; "background-origin:content;" "padding-right: 15px;" "}" ); 上面设置的背景图片,都是左右对齐,怎么设置图片边距呢,就是自定义设置图片的位置,方法如下: back-ground-origin:content; padding-right:15px; 这两句是设置图片位置的关键;也就是图片位置放在content里面,调整padding的位置,就是调整图片的边距;
显示效果如上图,背景图片右对齐,边距15px; 怎么调整图片上下结构呢? tbn->setStyleSheet("QPushButton{" "border: 1px solid #00d2ff; " "min-height: 40px; " "color:red; " "font-size:14px; " "text-align : bottom; " "background-image: url(:/Resources/qss/image/checkbox_parcial.png);" "background-repeat: repeat-no-repeat;" "background-position: top;" "background-origin:content;" "padding: 10px;" "}" );
样式表及显示效果如上图;
以上;转载请注明出处; |


【本文地址】
公司简介
联系我们
今日新闻 |
点击排行 |
|
推荐新闻 |
图片新闻 |
|
专题文章 |