查看网关 |
您所在的位置:网站首页 › 网关在哪查看 › 查看网关 |
查看网关
|
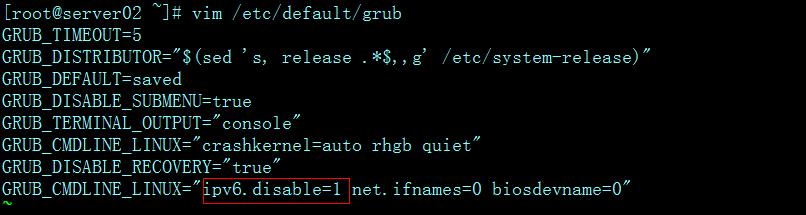
Centos/Linux下如何查看网关地址/Gateway地址? Linux下查看网关的命令还是很多的,不过如果IP是DHCP获取,那么有些命令是不适用的,当然也有通用的查询网关命令. 1.ifconfig -a 和 cat /etc/resolv.conf (主要查看ip/netmask和dns) 2.netstat -rn 3.cat /etc/sysconfig/network 4.cat /etc/sysconfig/network-scripts/ifcfg-eth0 5.traceroute 第一行就是自己的网关 6.ip route show 7.route -n 以上几个是比较常用的查询网关的命令。下面是范例: [root@localhost]# netstat -rn Kernel IP routing table Destination Gateway Genmask Flags MSS Window irtt Iface 184.82.152.96 0.0.0.0 255.255.255.248 U 0 0 0 eth0 169.254.0.0 0.0.0.0 255.255.0.0 U 0 0 0 eth0 0.0.0.0 184.82.152.97 0.0.0.0 UG 0 0 0 eth0 [root@localhost]# cat /etc/sysconfig/network-scripts/ifcfg-eth0 # Intel Corporation 82567V-2 Gigabit Network Connection DEVICE=eth0 BOOTPROTO=none HWADDR=00:1c:c0:f8:a1:ac ONBOOT=yes NETMASK=255.255.255.248 IPADDR=184.82.152.98 GATEWAY=184.82.152.97 TYPE=Ethernet [root@localhost]# ip route show 184.82.152.96/29 dev eth0 proto kernel scope link src 184.82.152.98 169.254.0.0/16 dev eth0 scope link default via 184.82.152.97 dev eth0 [root@localhost]# route -n Kernel IP routing table Destination Gateway Genmask Flags Metric Ref Use Iface 184.82.152.96 0.0.0.0 255.255.255.248 U 0 0 0 eth0 169.254.0.0 0.0.0.0 255.255.0.0 U 0 0 0 eth0 0.0.0.0 184.82.152.97 0.0.0.0 UG 0 0 0 eth0 [root@localhost]# ifconfig -a eth0 Link encap:Ethernet HWaddr 00:1C:C0:F8:A1:AC inet addr:184.82.152.98 Bcast:184.82.152.103 Mask:255.255.255.248 8、开启/关闭IPv6功能: [root@ ~]# ifconfig eth0: flags=4163 mtu 1500 inet 192.168.112.141 netmask 255.255.255.0 broadcast 192.168.112.255 inet6 fe80::bf36:72fd:ae66:3183 prefixlen 64 scopeid 0x20 ether 00:0c:29:0b:28:95 txqueuelen 1000 (Ethernet) RX packets 18149 bytes 1189590 (1.1 MiB) RX errors 0 dropped 0 overruns 0 frame 0 TX packets 2382 bytes 219015 (213.8 KiB) TX errors 0 dropped 0 overruns 0 carrier 0 collisions 0 lo: flags=73 mtu 65536 inet 127.0.0.1 netmask 255.0.0.0 inet6 ::1 prefixlen 128 scopeid 0x10 loop txqueuelen 1 (Local Loopback) RX packets 68 bytes 5908 (5.7 KiB) RX errors 0 dropped 0 overruns 0 frame 0 TX packets 68 bytes 5908 (5.7 KiB) TX errors 0 dropped 0 overruns 0 carrier 0 collisions 0 [root@ ~]# [root@ ~]#echo 1 >/proc/sys/net/ipv6/conf/all/disable_ipv6 #"1"表示关闭,"0"表示开启 [root@ ~]# ifconfig eth0: flags=4163 mtu 1500 inet 192.168.112.141 netmask 255.255.255.0 broadcast 192.168.112.255 ether 00:0c:29:0b:28:95 txqueuelen 1000 (Ethernet) RX packets 18316 bytes 1203647 (1.1 MiB) RX errors 0 dropped 0 overruns 0 frame 0 TX packets 2474 bytes 229999 (224.6 KiB) TX errors 0 dropped 0 overruns 0 carrier 0 collisions 0 lo: flags=73 mtu 65536 inet 127.0.0.1 netmask 255.0.0.0 loop txqueuelen 1 (Local Loopback) RX packets 68 bytes 5908 (5.7 KiB) RX errors 0 dropped 0 overruns 0 frame 0 TX packets 68 bytes 5908 (5.7 KiB) TX errors 0 dropped 0 overruns 0 carrier 0 collisions 0 [root@ ~]# echo 1 >/proc/sys/net/ipv6/conf/all/disable_ipv6 #"1"表示关闭,"0"表示开启 该方法是临时生效,一旦机器重启就失效,如果要使系统永久生效,则需要修改grub文件, 具体操作如下:
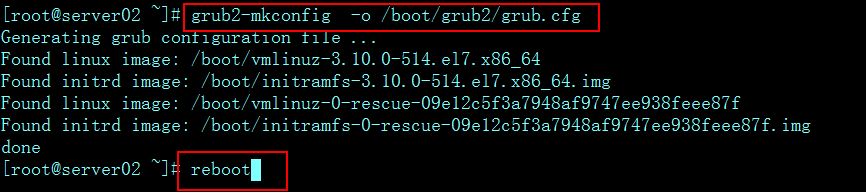
然后执行命令"grub2-mkconfig -o /boot/grub2/grub.cfg",重启系统,再验证ipv6模块是否启用
[root@server02 ~]# lsmod|grep ipv6 [root@server02 ~]# [root@server02 ~]# ifconfig eth0: flags=4163 mtu 1500 inet 192.168.112.141 netmask 255.255.255.0 broadcast 192.168.112.255 ether 00:0c:29:0b:28:95 txqueuelen 1000 (Ethernet) RX packets 409 bytes 40194 (39.2 KiB) RX errors 0 dropped 0 overruns 0 frame 0 TX packets 299 bytes 41149 (40.1 KiB) TX errors 0 dropped 0 overruns 0 carrier 0 collisions 0 lo: flags=73 mtu 65536 inet 127.0.0.1 netmask 255.0.0.0 loop txqueuelen 1 (Local Loopback) RX packets 4 bytes 340 (340.0 B) RX errors 0 dropped 0 overruns 0 frame 0 TX packets 4 bytes 340 (340.0 B) TX errors 0 dropped 0 overruns 0 carrier 0 collisions 0 [root@server02 ~]# 通过以上操作即达到永久禁止ipv6模块使用。 |
【本文地址】
今日新闻 |
点击排行 |
|
推荐新闻 |
图片新闻 |
|
专题文章 |