第三十讲:神州路由器路由重分发配置 |
您所在的位置:网站首页 › 神州数码ac配置要求 › 第三十讲:神州路由器路由重分发配置 |
第三十讲:神州路由器路由重分发配置
|
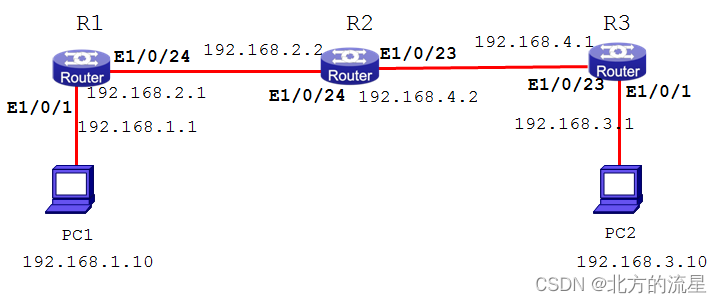
RIP和OSPF协议是目前应用最广泛的路由协议,两种协议交接的场合也很多见,两种协议的重分布是比较常见的配置。主校区原来所采用的网络协议为OSPF,而分校区采用的路由协议是RIP,采用RIP和OSPF重分发技术可以解决此问题。 实验拓扑图如下所示
任务要求:配置基础环境,如拓扑图。配置R1和R2之间使用RIP协议学习路由信息,R2和R3之间使用OSPF协议。在R2中配置RIP到OSPF的重分布,再配置ospf到RIP的重分发。查看路由表。 操作步骤: 步骤1:按照拓扑配置基础网络环境。 步骤2:配置R1路由环境。 R1#config R1_config#router rip 1 R1_config_rip#ver 2 R1_config_rip#exit R1_config#int e1/0/1 R1 _config_e1/0/1# ip rip 1 enable R1 _config_e1/0/1#exit R1_config#int e1/0/24 R1 _config_e1/0/24# ip rip 1 enable R1 _config_e1/0/24#exit 步骤3:配置R2路由环境。 R2_config#router rip R2_config_rip#version 2 R2_config_rip#exit R2_config#int e1/0/24 R2 _config_e1/0/24# ip rip 1 enable R2 _config_e1/0/24#exit R2_config#router ospf 1 R2_config_ospf_1#network 192.168.4.0 255.255.255.0 area 0 R2_config_ospf_1#exit 步骤3:配置R3路由环境。 R3#config R3_config#router ospf 1 R3_config_ospf_1#network 192.168.4.0 255.255.255.0 area 0 R3_config_ospf_1#network 192.168.3.0 255.255.255.0 area 0 R3_config_ospf_1#exit R3_config# 步骤4:查看R1路由表。 R1_config#sh ip route VRF ID: 0 C 192.168.1.0/24 is directly connected, FastEthernet0/3 C 192.168.2.0/24 is directly connected, FastEthernet0/0 R1_config# 步骤5:查看R2路由表。 R2_config#sh ip route VRF ID: 0 R 192.168.1.0/24 [120,1] via 192.168.2.1(on FastEthernet0/0) C 192.168.2.0/24 is directly connected, FastEthernet0/0 O 192.168.3.0/24 [110,2] via 192.168.4.1(on FastEthernet0/1) C 192.168.4.0/24 is directly connected, FastEthernet0/1 R2_config# 步骤6:查看R3路由表。 R3_config#sh ip route VRF ID: 0 C 192.168.3.0/24 is directly connected, FastEthernet0/3 C 192.168.4.0/24 is directly connected, FastEthernet0/0 !从上面的路由表,我们发现,只有R2的路由表是完整的,R1和R3都因为R2没有将对方的信息进行传递而得不到远端网络的消息,所以问题的关键还是在R2。 步骤7:在R2中启用动态路由的重发布过程,首先我们仅将RIP协议再发布进ospf协议。 R2_config#router ospf 1 R2_config_ospf_1#redistribute rip 步骤8:此时查看R3的路由表。 R3#sh ip route VRF ID: 0 O E2 192.168.1.0/24 [150,100] via 192.168.4.2(on FastEthernet0/0) C 192.168.3.0/24 is directly connected, FastEthernet0/3 C 192.168.4.0/24 is directly connected, FastEthernet0/0 !从上面的R3路由表,我们看到,他学习到了一条OSPF自治系统外部路由(因为是从RIP协议注入的)其默认的初始度量值是100。但同时我们也观察到,这个路由表依然是不完整的,对于R2的直连网络192.168.2.0,还是没有学习到。 步骤9:在R2中将直连路由在OSPF进程中再发布一下。 R2_config#router ospf 1 R2_config_ospf_1#redistribute connect 步骤10:再次查看R3的路由表。 R3#sh ip route VRF ID: 0 O E2 192.168.1.0/24 [150,100] via 192.168.4.2(on FastEthernet0/0) O E2 192.168.2.0/24 [150,100] via 192.168.4.2(on FastEthernet0/0) C 192.168.3.0/24 is directly connected, FastEthernet0/3 C 192.168.4.0/24 is directly connected, FastEthernet0/0 !R3已经完整了,再来看看R1有没有变化?答案是依然没有变化,它的路由表完整性是依赖R2通过RIP协议传递的,而RIP 协议传递的消息并没有包含其他远端网络。 步骤11:在R2中作RIP进程中的再发布。 R2_config#router rip R2_config_rip#redistribute ospf 1 R2_config_rip#redistribute connect R2_config_rip#exit 步骤12:再查看R1的路由表。 R1_config#sh ip route VRF ID: 0 C 192.168.1.0/24 is directly connected, FastEthernet0/3 C 192.168.2.0/24 is directly connected, FastEthernet0/0 R 192.168.3.0/24 [120,1] via 192.168.2.2(on FastEthernet0/0) R 192.168.4.0/24 [120,1] via 192.168.2.2(on FastEthernet0/0) 此时,从终端测试连通性,可以连通,实验完成。 |
【本文地址】
今日新闻 |
点击排行 |
|
推荐新闻 |
图片新闻 |
|
专题文章 |