How To Set Up Highly Available Web Servers with Keepalived and Reserved IPs on Ubuntu 14.04 |
您所在的位置:网站首页 › 汉堡热量大还是螺蛳粉热量大 › How To Set Up Highly Available Web Servers with Keepalived and Reserved IPs on Ubuntu 14.04 |
How To Set Up Highly Available Web Servers with Keepalived and Reserved IPs on Ubuntu 14.04
| TutorialHow To Set Up Highly Available Web Servers with Keepalived and Reserved IPs on Ubuntu 14.04Published on October 20, 2015UbuntuNginxHigh Availability By Justin Ellingwood  Introduction Introduction
High availability is a function of system design that allows an application to automatically restart or reroute work to another capable system in the event of a failure. In terms of servers, there are a few different technologies needed to set up a highly available system. There must be a component that can redirect the work and there must be a mechanism to monitor for failure and transition the system if an interruption is detected. The keepalived daemon can be used to monitor services or systems and to automatically failover to a standby if problems occur. In this guide, we will demonstrate how to use keepalived to set up a highly available web service. We will configure a Reserved IP address that can be moved between two capable web servers. If the primary server goes down, the Reserved IP will be moved to the second server automatically, allowing service to resume. PrerequisitesIn order to complete this guide, you will need to create two Ubuntu 14.04 servers on your DigitalOcean account. Both servers must be located within the same datacenter and should have private networking enabled. On each of these servers, you will need a non-root user configured with sudo access. You can follow our Ubuntu 14.04 initial server setup guide to learn how to set up these users. When you are ready to get started, log into both of your servers with your non-root user. Install and Configure NginxWhile keepalived is often used to monitor and failover load balancers, in order to reduce our operational complexity, we will be using Nginx as a simple web server in this guide. Start off by updating the local package index on each of your servers. We can then install Nginx: sudo apt-get update sudo apt-get install nginxIn most cases, for a highly available setup, you would want both servers to serve exactly the same content. However, for the sake of clarity, in this guide we will use Nginx to indicate which of the two servers is serving our requests at any given time. To do this, we will change the default index.html page on each of our hosts. Open the file now: sudo nano /usr/share/nginx/html/index.htmlOn your first server, replace the contents of the file with this: Primary server's /usr/share/nginx/html/index.html PrimaryOn your second server, replace the contents of the file with this: Secondary server's /usr/share/nginx/html/index.html SecondarySave and close the files when you are finished. Build and Install KeepalivedNext, we will install the keepalived daemon on our servers. There is a version of keepalived in Ubuntu’s default repositories, but it is outdated and suffers from a few bugs that prevent our configuration from working. Instead, we will install the latest version of keepalived from source. Before we begin, we should grab the dependencies we will need to build the software. The build-essential meta-package will provide the compilation tools we need, while the libssl-dev package contains the SSL libraries that keepalived needs to build against: sudo apt-get install build-essential libssl-devOnce the dependencies are in place, we can download the tarball for keepalived. Visit this page to find the latest version of the software. Right-click on the latest version and copy the link address. Back on your servers, move to your home directory and use wget to grab the link you copied: cd ~ wget http://www.keepalived.org/software/keepalived-1.2.19.tar.gzUse the tar command to expand the archive and then move into the resulting directory: tar xzvf keepalived* cd keepalived*Build and install the daemon by typing: ./configure make sudo make installThe daemon should now be installed on the system. Create a Keepalived Upstart ScriptThe keepalived installation moved all of the binaries and supporting files into place on our system. However, one piece that was not included was an Upstart script for our Ubuntu 14.04 systems. We can create a very simple Upstart script that can handle our keepalived service. Open a file called keepalived.conf within the /etc/init directory to get started: sudo nano /etc/init/keepalived.confInside, we can start with a simple description of the functionality keepalived provides. We’ll use the description from the included man page. Next we will specify the runlevels in which the service should be started and stopped. We want this service to be active in all normal conditions (runlevels 2-5) and stopped for all other runlevels (when reboot, poweroff, or single-user mode is initiated, for instance): /etc/init/keepalived.conf description "load-balancing and high-availability service" start on runlevel [2345] stop on runlevel [!2345]Because this service is integral to ensuring our web service remains available, we want to restart this service in the event of a failure. We can then specify the actual exec line that will start the service. We need to add the --dont-fork option so that Upstart can track the pid correctly: /etc/init/keepalived.conf description "load-balancing and high-availability service" start on runlevel [2345] stop on runlevel [!2345] respawn exec /usr/local/sbin/keepalived --dont-forkSave and close the files when you are finished. Create the Keepalived Configuration FileWith our Upstart file in place, we can now move on to configuring keepalived. The service looks for its configuration files in the /etc/keepalived directory. Create that directory now on both of your servers: sudo mkdir -p /etc/keepalived Collecting the Private IP addresses of your ServersBefore we create the configuration file, we need to find the private IP addresses of both of our servers. On DigitalOcean servers, you can get our private IP address through the metadata service by typing: curl http://169.254.169.254/metadata/v1/interfaces/private/0/ipv4/address && echo Output10.132.7.107This can also be found with the iproute2 tools by typing: ip -4 addr show dev eth1The value you are looking for will be found here: Output3: eth1: mtu 1500 qdisc pfifo_fast state UP group default qlen 1000 inet 10.132.7.107/16 brd 10.132.255.255 scope global eth1 valid_lft forever preferred_lft foreverCopy this value from both of your systems. We will need to reference these addresses inside of our configuration files below. Creating the Primary Server’s ConfigurationNext, on your primary server, create the main keepalived configuration file. The daemon looks for a file called keepalived.conf inside of the /etc/keepalived directory: sudo nano /etc/keepalived/keepalived.confInside, we will start by defining a health check for our Nginx service by opening up a vrrp_script block. This will allow keepalived to monitor our web server for failures so that it can signal that the process is down and begin recover measures. Our check will be very simple. Every two seconds, we will check that a process called nginx is still claiming a pid: Primary server's /etc/keepalived/keepalived.conf vrrp_script chk_nginx { script "pidof nginx" interval 2 }Next, we will open a block called vrrp_instance. This is the main configuration section that defines the way that keepalived will implement high availability. We will start off by telling keepalived to communicate with its peers over eth1, our private interface. Since we are configuring our primary server, we will set the state configuration to “MASTER”. This is the initial value that keepalived will use until the daemon can contact its peer and hold an election. During the election, the priority option is used to decide which member is elected. The decision is simply based on which server has the highest number for this setting. We will use “200” for our primary server: Primary server's /etc/keepalived/keepalived.conf vrrp_script chk_nginx { script "pidof nginx" interval 2 } vrrp_instance VI_1 { interface eth1 state MASTER priority 200 }Next, we will assign an ID for this cluster group that will be shared by both nodes. We will use “33” for this example. We need to set unicast_src_ip to our primary server’s private IP address that we retrieved earlier. We will set unicast_peer to our secondary server’s private IP address: Primary server's /etc/keepalived/keepalived.conf vrrp_script chk_nginx { script "pidof nginx" interval 2 } vrrp_instance VI_1 { interface eth1 state MASTER priority 200 virtual_router_id 33 unicast_src_ip primary_private_IP unicast_peer { secondary_private_IP } }Next, we can set up some simple authentication for our keepalived daemons to communicate with one another. This is just a basic measure to ensure that the servers in question are legitimate. Create an authentication sub-block. Inside, specify password authentication by setting the auth_type. For the auth_pass parameter, set a shared secret that will be used by both nodes. Unfortunately, only the first eight characters are significant: Primary server's /etc/keepalived/keepalived.conf vrrp_script chk_nginx { script "pidof nginx" interval 2 } vrrp_instance VI_1 { interface eth1 state MASTER priority 200 virtual_router_id 33 unicast_src_ip primary_private_IP unicast_peer { secondary_private_IP } authentication { auth_type PASS auth_pass password } }Next, we will tell keepalived to use the routine we created at the top of the file, labeled chk_nginx, to determine the health of the local system. Finally, we will set a notify_master script, which is executed whenever this node becomes the “master” of the pair. This script will be responsible for triggering the Reserved IP address reassignment. We will create this script momentarily: Primary server's /etc/keepalived/keepalived.conf vrrp_script chk_nginx { script "pidof nginx" interval 2 } vrrp_instance VI_1 { interface eth1 state MASTER priority 200 virtual_router_id 33 unicast_src_ip primary_private_IP unicast_peer { secondary_private_IP } authentication { auth_type PASS auth_pass password } track_script { chk_nginx } notify_master /etc/keepalived/master.sh }Once you’ve set up the information above, save and close the file. Creating the Secondary Server’s ConfigurationNext, we will create the companion script on our secondary server. Open a file at /etc/keepalived/keepalived.conf on your secondary server: sudo nano /etc/keepalived/keepalived.confInside, the script that we will use will be largely equivalent to the primary server’s script. The items that we need to change are: state: This should be changed to “BACKUP” on the secondary server so that the node initializes to the backup state before elections occur. priority: This should be set to a lower value than the primary server. We will use the value “100” in this guide. unicast_src_ip: This should be the private IP address of the secondary server. unicast_peer: This should contain the private IP address of the primary server.When you change those values, the script for the secondary server should look like this: Secondary server's /etc/keepalived/keepalived.conf vrrp_script chk_nginx { script "pidof nginx" interval 2 } vrrp_instance VI_1 { interface eth1 state BACKUP priority 100 virtual_router_id 33 unicast_src_ip secondary_private_IP unicast_peer { primary_private_IP } authentication { auth_type PASS auth_pass password } track_script { chk_nginx } notify_master /etc/keepalived/master.sh }Once you’ve entered the script and changed the appropriate values, save and close the file. Create the Reserved IP Transition ScriptsNext, we will need to create a pair of scripts that we can use to reassign the Reserved IP address to the current Droplet whenever the local keepalived instance becomes the master server. Download the Reserved IP Assignment ScriptFirst, we will download a generic Python script (written by a DigitalOcean community manager) that can be used to reassign a Reserved IP address to a Droplet using the DigitalOcean API. We should download this file to the /usr/local/bin directory: cd /usr/local/bin sudo curl -LO http://do.co/assign-ipThis script allows you to re-assign an existing Reserved IP by running: python /usr/local/bin/assign-ip reserved_ip droplet_IDThis will only work if you have an environmental variable called DO_TOKEN set to a valid DigitalOcean API token for your account. Create a DigitalOcean API TokenIn order to use the script above, we will need to create a DigitalOcean API token in our account. In the control panel, click on the “API” link at the top. On the right-hand side of the API page, click “Generate new token”:
On the next page, select a name for your token and click on the “Generate Token” button:
On the API page, your new token will be displayed:
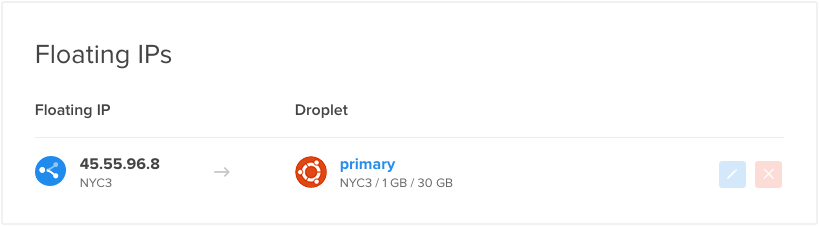
Copy the token now. For security purposes, there is no way to display this token again later. If you lose this token, you will have to destroy it and create another one. Configure a Reserved IP for your InfrastructureNext, we will create and assign a Reserved IP address to use for our servers. In the DigitalOcean control panel, click on the “Networking” tab and select the “Reserved IPs” navigation item. Select the Droplet from the list that you assigned as your “primary” server:
A new Reserved IP address will be created in your account and assigned to the Droplet specified:
If you visit the Reserved IP in your web browser, you should see the “primary” server index.html page:
Copy the Reserved IP address down. You will need this value in the script below. Create the Wrapper ScriptNow, we have the items we need to create the wrapper script that will call our /usr/local/bin/assign-ip script with the correct credentials. Create the file now on both servers by typing: sudo nano /etc/keepalived/master.shInside, start by assigning and exporting a variable called DO_TOKEN that holds the API token you just created. Below that, we can assign a variable called IP that holds your Reserved IP address: /etc/keepalived/master.sh export DO_TOKEN='digitalocean_api_token' IP='reserved_ip_addr'Next, we will use curl to ask the metadata service for the Droplet ID of the server we’re currently on. This will be assigned to a variable called ID. We will also ask whether this Droplet currently has the Reserved IP address assigned to it. We will store the results of that request in a variable called HAS_RESERVED_IP: /etc/keepalived/master.sh export DO_TOKEN='digitalocean_api_token' IP='reserved_ip_addr' ID=$(curl -s http://169.254.169.254/metadata/v1/id) HAS_RESERVED_IP=$(curl -s http://169.254.169.254/metadata/v1/reserved_ip/ipv4/active)Now, we can use the variables above to call the assign-ip script. We will only call the script if the Reserved IP is not already associated with our Droplet. This will help minimize API calls and will help prevent conflicting requests to the API in cases where the master status switches between your servers rapidly. To handle cases where the Reserved IP already has an event in progress, we will retry the assign-ip script a few times. Below, we attempt to run the script 10 times, with a 3 second interval between each call. The loop will end immediately if the Reserved IP move is successful: /etc/keepalived/master.sh export DO_TOKEN='digitalocean_api_token' IP='reserved_ip_addr' ID=$(curl -s http://169.254.169.254/metadata/v1/id) HAS_RESERVED_IP=$(curl -s http://169.254.169.254/metadata/v1/reserved_ip/ipv4/active) if [ $HAS_RESERVED_IP = "false" ]; then n=0 while [ $n -lt 10 ] do python /usr/local/bin/assign-ip $IP $ID && break n=$((n+1)) sleep 3 done fiSave and close the file when you are finished. Now, we just need to make the script executable so that keepalived can call it: sudo chmod +x /etc/keepalived/master.sh Start Up the Keepalived Service and Test FailoverThe keepalived daemon and all of its companion scripts should now be completely configured. We can start the service on both of our machines by typing: sudo start keepalivedThe service should start up on each server and contact its peer, authenticating with the shared secret we configured. Each daemon will monitor the local Nginx process, and will listen to signals from the remote keepalived process. When both servers are healthy, if you visit your Reserved IP in your web browser, you should be taken to the primary server’s Nginx page:
Now, we are ready to test the failover capabilities of our configuration. Failover should occur when either of the following conditions occur: When the Nginx health check on the primary server indicates that Nginx is no longer running. In this case, the primary server’s keepalived daemon will enter the “fault” state. It will notify the secondary server that it should transition to the master state and claim the Reserved IP. When the secondary server loses its keepalived connection to the primary server. If the secondary server cannot reach the primary server for any reason, it will transition to the “master” state and attempt to claim the Reserved IP.If the primary server later recovers, it will transition back to the master state and reclaim the Reserved IP because it will initiate a new election (it will still have the highest priority number). Testing Nginx FailureWe can test the first condition by stopping the Nginx service on the primary server: sudo service nginx stopIf you refresh your web browser, you might initially get a response indicating that the page is not available:
However, after just a few seconds, if you refresh the page a few times, you will see that the secondary server has claimed the Reserved IP address:
We can recover from the failure by restarting the Nginx daemon on the primary server: sudo service nginx startAfter a few seconds, if you refresh the page, you will find that the primary server has reclaimed ownership of the Reserved IP again:
The other scenario we should test is whether the secondary correctly transitions to the master state if it cannot connect to the primary server. We can reboot the master server to test this: sudo rebootAgain, we should at first see a service interruption at the Reserved IP address:
A few seconds later, the secondary server will pick up the requests:
A moment later, when the primary server finishes rebooting, it will reclaim the IP address:
This verifies our second failure scenario. ConclusionIn this guide, we configured a highly available web server environment using keepalived, the DigitalOcean API, and a Reserved IP address. The actual infrastructure was rather simple, but the concepts can be applied to any type of infrastructure where service availability and uptime is important. Thanks for learning with the DigitalOcean Community. Check out our offerings for compute, storage, networking, and managed databases. Learn more about us About the authorsauthor Still looking for an answer?Ask a questionSearch for more helpWas this helpful? 10 CommentsThis textbox defaults to using Markdown to format your answer. You can type !ref in this text area to quickly search our full set of tutorials, documentation & marketplace offerings and insert the link! Sign In or Sign Up to CommentChris3 • April 7, 2016Thanks for the clear tutorial. Are there any guides on setting up duplication across two DO servers so they serve the same content in the event of failover? oleersoy • March 31, 2016Hi - Great article. When setting this up does digital ocean guarantee that the two virtual servers used are on separate physical servers? aparhan • October 3, 2023This looks very promising. However, I would like to see a similar kind of configuration all set up within the VPC using an internal IP-address to connect other droplets. Could this be something happening in the future? nhlakamzobe • January 25, 2022I cannot get sudo start keepalived to work, I have also tried systemctl start keepalived with no luck. Please help. litemama1 • August 24, 2018Is it possible to have 1 master and multiple slaves? or nginx-ha package only supports 1 master and 1 slave? lickedcat • May 10, 2018I’d like to make on recommendation for the vrrp_script block in the /etc/keepalived.conf file. In the tutorial above the author used vrrp_script chk_nginx { script “pidof nginx” interval 2 } When I used pidof nginx, I got an error posted by keepalived to syslog that I should use the full path to pidof, therefore I changed it to vrrp_script chk_nginx { script “/usr/bin/pidof nginx” interval 2 } That got rid of the warning message, but while in syslog I noticed both droplets transitioned into to FAULT state because for some reason when executing pidof nginx, the syslog messages showed that another command was run killall5 nginx. Not sure why that was happening so I decided to find an alternative checking script and I found this one that seems to work file now. vrrp_script chk_nginx { script “netstat -atunp | grep nginx | grep tcp | grep -v tcp6” interval 2 } In short my recommendation is to substitute “pidof nginx” with “netstat -atunp | grep nginx | grep tcp | grep -v tcp6” Andreas Christensen • July 8, 2017Great tutorial, just one major “but”… I am using the new DO firewalls feature, and this does not allow me to allow VRRP - is there any way to get around this issue? Thanks in advance. raegli • March 29, 2017Thanks for the great tutorial, work perfect, just wondering why must the droplets be located within the same datacenter (as you describe in Prerequisites). as example that work for NYC1 and NYC3, but not on just LON1 because on maintenance.or? enydrueda • November 3, 2016If one of my nginx’s droplets die (restart, kernel panic, etc), the health check will still work? pequet • October 30, 2016If your Ubuntu is 16.04 you will most likely have problems at the Upstart command “start keepalived” (Upstart being replaced with systemd) Salvation is here: https://www.digitalocean.com/community/questions/keepalived-for-ubuntu-16  This work is licensed under a Creative Commons Attribution-NonCommercial- ShareAlike 4.0 International License. This work is licensed under a Creative Commons Attribution-NonCommercial- ShareAlike 4.0 International License.
|


【本文地址】
今日新闻 |
点击排行 |
|
推荐新闻 |
图片新闻 |
|
专题文章 |