matplotlib绘图:散点图、折线图、柱状图、水平条形图、饼图和直方图 |
您所在的位置:网站首页 › 条形图包括什么内容和内容 › matplotlib绘图:散点图、折线图、柱状图、水平条形图、饼图和直方图 |
matplotlib绘图:散点图、折线图、柱状图、水平条形图、饼图和直方图
|
目录
数据可视化Matplotlib安装和导入库安装Matplotlib库导入Matplotlib库中的`pyplot`子库
一、Matplotlib基础知识1. Figure对象1.1 定义1.2 划分子图1.3 设置中文字体1.4 添加标题1.5 调整子图
二、散点图引入scatter()函数
二、折线图plot()函数
三、柱状图1. 普通柱形图2. 并列柱形图3. 堆叠条形图4. 柱线混合图
四、水平条形图五、饼图五、直方图
)
数据可视化
数据分析阶段:理解和洞察数据之间的关系算法调试阶段:发现问题,优化算法项目总结阶段:展示项目成果
Matplotlib
Matplotlib 是Python中类似 MATLAB 的绘图工具,可以快速方便地生成高质量的图标 import matplotlib.pyplot as plt matplotlib.pyplot是一个有命令风格的函数集合,它看起来和MATLAB很相似。每一个pyplot函数都使一副图像做出些许改变,例如创建一幅图,在图中创建一个绘图区域,在绘图区域中添加一条线等等。在matplotlib.pyplot中,各种状态通过函数调用保存起来,以便于可以随时跟踪像当前图像和绘图区域这样的东西。绘图函数是直接作用于当前axes(matplotlib中的专有名词,图形中组成部分,不是数学中的坐标系。) 一、Matplotlib基础知识Matplotlib中的基本图表包括的元素 x轴和y轴 axis 水平和垂直的轴线 x轴和y轴刻度 tick 刻度标示坐标轴的分隔,包括最小刻度和最大刻度 x轴和y轴刻度标签 tick label 表示特定坐标轴的值 绘图区域(坐标系) axes 坐标系标题 title 轴标签 xlabel ylabel 1. Figure对象 1.1 定义在任何绘图之前,我们需要一个Figure对象,可以理解成我们需要一张画板才能开始绘图。 import matplotlib.pyplot as plt fig = plt.figure(num, figsize, dpi, facecolor, edgecolor, frameon) 参数说明num图形编号或名称,取值为数字/字符串figsize绘图对象的宽和高,单位是英寸dpi绘图对象的分辨率,缺省值为80facecolor背景颜色edgecolor边框颜色frameon表示是否显示边框FigureClassOptionally use a custom Figure instance.clear如果是True,并且图形已经存在,则清楚该图形例子: plt.figure(figsize=(3, 2), facecolor="green") plt.plot() plt.show()
在matlib中,两条坐标轴连接的区域叫做轴域。
每个subplot函数只创建一个子图,前两个参数只是说明将画布划分为2*2的区域,可以创建四个子图,但是并没有同时创建四个子图。要创建四个子图就需要执行四条语句,分别创建每个子图。 当subplot函数中的行数,列数和子图序号都小于10时,可以省略各个参数间的逗号,用一个三位数来代替,如下。 plt.subplot(221) plt.subplot(222) plt.subplot(223) plt.subplot(224)
title()函数的主要参数: 参数说明取值loc标题位置left / rightrotation标题文字旋转角度color标题颜色黑色fontsize标题的字体大小12fontweight字体粗细normal / light / medium / semibold / bold / heavy / blackfontstyle设置字体类型xx-small / x-small / small / medium / large / x-large / xx-largehorizontalalignment标题水平对齐方式center / left / rightverticalalignment标题的垂直对齐方式top / center / bottom / baselinefontdict设置参数字典例子,比如绘制下图: 小技巧: 代码分段运行 代码分段 使用 #%% 将代码分段(应该自2018版pycharm就可以这样了) 注意:仅在科学模式Scientific Mode下有效分段运行 法一:Ctrl + Enter 逐端运行 法二:点击代码段左边的绿色三角形 如果得到下列结果,则需要对画布进行调整 如果得到下列结果,则需要对画布进行调整  这里主标题挡住了子标题,上下两个子图的间距也过小了
1.5 调整子图 这里主标题挡住了子标题,上下两个子图的间距也过小了
1.5 调整子图
tight_layout()函数 检查坐标轴标签、刻度标签和子图标题,自动调整子图,使之填充整个绘图区域,并消除子图之间的重叠。 在上述代码中增加 import matplotlib.pyplot as plt #%% # 设置默认字体为中文 plt.rcParams["font.family"] = "SimHei" # 创建一个绘图对象,并将它的前景色绘制为浅灰色 fig = plt.figure(facecolor="lightgrey") # 创建了四个子图 plt.subplot(2, 2, 1) # 创建默认子标题 plt.title("子标题1") plt.subplot(2, 2, 2) # 子标题 左对齐,字体颜色是蓝色 plt.title("子标题2", loc="left", color="b") plt.subplot(2, 2, 3) # 将参数放在字典中,所有关键字都是字符串 myfontdict = {"fontsize": 12, "color": "g", "rotation": 30} plt.title("子标题3", fontdict=myfontdict) plt.subplot(2, 2, 4) # 标题字体为白色,背景色为黑色 plt.title("子标题4", color="w", backgroundcolor="black") plt.suptitle("全局标题", fontsize=20, color="red", backgroundcolor="yellow") plt.tight_layout() plt.show()
这是子图区域的左下角坐标和右上角坐标,坐标必须为标准化图形坐标, 默认是(0,0,1,1) 散点图(Scatter):是数据点在直角坐标系中的分布图 原始数据分布的规律 射击手向靶子多次射击后留下的记录。射击的成绩呈正太分布数据变化的趋势 射击手向靶子多次射击后留下的记录。射击的成绩呈正太分布数据变化的趋势  房屋大小和房价呈线性关系数据分组 房屋大小和房价呈线性关系数据分组  横坐标是花瓣长度,纵坐标是花瓣宽度
scatter()函数
scatter(x, y, scale, color, marker, label) 横坐标是花瓣长度,纵坐标是花瓣宽度
scatter()函数
scatter(x, y, scale, color, marker, label)
参数说明如下 参数说明默认值x标题位置的x坐标不可忽略y标题位置的y坐标不可忽略scale数据点的大小36color数据点的颜色marker数据点的样式‘o’(远点)label图例文字这是其他数据点样式 取值中文描述取值中文描述取值中文描述-实线1朝下的三角v朝下的三角–虚线2朝上的三角^朝上的三角-.点线3朝左的三角朝右的三角.点s正方形D钻石形,像素p五角形d小版钻石形o圆形*星型|垂直线形++号标记h1号六角形_水平线形xx号标记H2号六角形例子: 来绘制这个图
这里我们看到由于设置了中文字体,负号不能正常显示,因此我们需要设置坐标轴 plt.rcParams["axes.unicode_minus"] = False绘图时,pyplot会根据数据的分布区间,自动加上坐标轴。如果要改变x轴,y轴的坐标范围,设置坐标轴的刻度样式或者给坐标轴加上标签,那么可以使用这几个函数 函数说明xlabel(x, y, fontsize, color)设置x轴标签ylabel(x, y, fontsize, color)设置y轴标签xlim(xmin, xmax)设置x轴坐标的范围ylim(ymin, ymax)设置y轴坐标的范围tick_params(labelsize)设置刻度文字的字号 # 设置默认字体为中文 plt.rcParams["font.family"] = "SimHei" # 标准正态分布 n = 1024 x = np.random.normal(0, 1, n) y = np.random.normal(0, 1, n) # 绘制散点图 plt.scatter(x, y, color="blue", marker="*") # 设置标题 plt.title("标准正态分布", fontsize=20) # 解决负号显示不出来的问题 plt.rcParams["axes.unicode_minus"] = False # 设置文本 plt.text(2.5, 2.5, "均值:0\n标准差:1") # 设置坐标轴范围 plt.xlim(-4, 4) plt.ylim(-4, 4) # 设置轴标签文本 plt.xlabel('横坐标x', fontsize=14) plt.ylabel('纵坐标y', fontsize=14) plt.show()
loc参数的取值 取值图例位置取值图例位置0best6center left1upper right7center right2upper left8lower center3lower left9upper center4lower right10center5right # 设置默认字体为中文 plt.rcParams["font.family"] = "SimHei" # 标准正态分布 n = 1024 x1 = np.random.normal(0, 1, n) y1 = np.random.normal(0, 1, n) # 均匀分布 x2 = np.random.uniform(-4, 4, (1, n)) y2 = np.random.uniform(-4, 4, (1, n)) # 绘制散点图 plt.scatter(x1, y1, color="blue", marker="*", label="正态分布") plt.scatter(x2, y2, color="yellow", marker="o", label="均匀分布") # 默认位置, 使用默认字体 plt.legend() # 设置标题 plt.title("标准正态分布", fontsize=20) # 解决负号显示不出来的问题 plt.rcParams["axes.unicode_minus"] = False # 设置文本 plt.text(2.5, 2.5, "均值:0\n标准差:1") # 设置坐标轴范围 plt.xlim(-4, 4) plt.ylim(-4, 4) # 设置轴标签文本 plt.xlabel('横坐标x', fontsize=14) plt.ylabel('纵坐标y', fontsize=14) plt.show()
折线图:散点图的基础上,将相邻的点用线段想连接 描述变量变化的趋势 plot()函数
plot(x, y, cplor, marker,label, linewidth, markersize)
plot()函数
plot(x, y, cplor, marker,label, linewidth, markersize)
参数说明如下: 参数说明默认值x标题位置的x坐标0,1,2,…y标题位置的y坐标不可忽略color数据点的颜色marker数据点的样式‘o’(圆点)label图例文字linewidth折线的宽度markersize数据点的大小例子: 绘制这样一个折线图,这是一个房间24小时的温度和湿度的监测记录
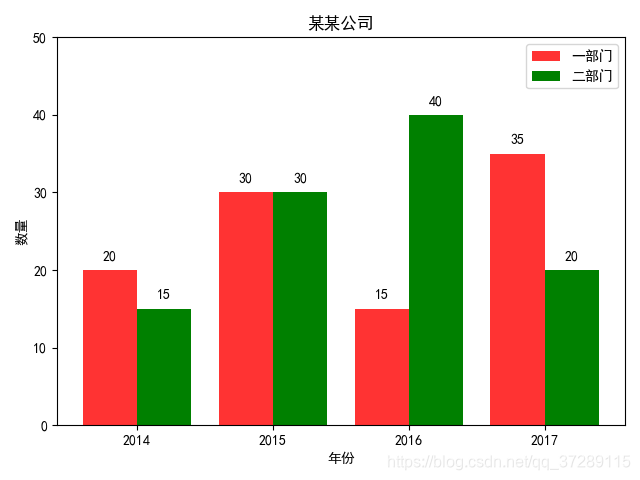
由一系列高度不等的柱形条纹表示数据分布的情况。 参数说明如下: 参数说明xx轴的位置序列,一般采用arange函数产生一个序列heighty轴的数值序列,也就是柱形图的高度,一般就是我们需要展示的数据alpha透明度width为柱形图的宽度,默认0.8color或facecolor柱形图填充的颜色edgecolor图形边缘颜色label图例文字linewidth or linewidths or lw边缘or线的宽度例子:
语法 barh(y, width, height, left, align='center')参数说明如下: 参数说明yy轴的位置序列,一般采用arange函数产生一个序列width柱形图的宽,默认0.8heightx轴的数值序列,也就是柱形图的高度,一般就是我们需要展示的数据alpha透明度align柱形图在x坐标的哪侧,可选值 ‘center’ ‘edge’left额外增量color或facecolor柱形图填充的颜色edgecolor图形边缘颜色label图例文字linewidth or linewidths or lw边缘or线的宽度 plt.rcParams['font.sans-serif'] = ['SimHei'] plt.rcParams['axes.unicode_minus'] = False price = [39.5, 39.9, 45.4, 38.9, 33.34] plt.barh(range(5), price, height=0.7, color='steelblue', alpha=0.8) # 从下往上画 plt.yticks(range(5), ['亚马逊', '当当网', '中国图书网', '京东', '天猫']) plt.xlim(30,47) plt.xlabel("价格") plt.title("不同平台图书价格") for x, y in enumerate(price): plt.text(y + 0.2, x - 0.1, '%s' % y) plt.show()
语法 barh(y, width, height, left, align='center')参数说明如下: 参数说明x(每一块)的比例,如果sum(x) > 1会使用sum(x)归一化explode设置各部分间隔值, 每一块离开中心距离labels每一块饼图外侧显示的图例colors每一块的颜色autopct控制饼图内百分比设置,可以使用format字符串或者format function '%1.1f’指小数点前后位数(没有用空格补齐)pctdistance类似于labeldistance,指定autopct的位置,默认值为0.6shadow在饼图下面画一个阴影。默认值:Falselabeldistancelabel标记的绘制位置,相对于半径的比例,默认值为1.1, 如 |

 可选参数
可选参数 语法:
语法: 例子:
例子:
 其他常用中文字体的名称
 suptitle()函数的主要参数:
 可以看到,子图之间的间距已经被自动调整了。标题和坐标轴之间不再重叠。但是,全局标题和子图区域还是有重叠。这是因为tight_layout()函数使子图区域充满了整个画布。我们现在希望能在画布上面留出一点位置来放置全局标题。这时候,只需要修改tight_layout()函数中的rect参数就可以了。

 我们还需要添加适当的文字描述
 增加均匀分布的点
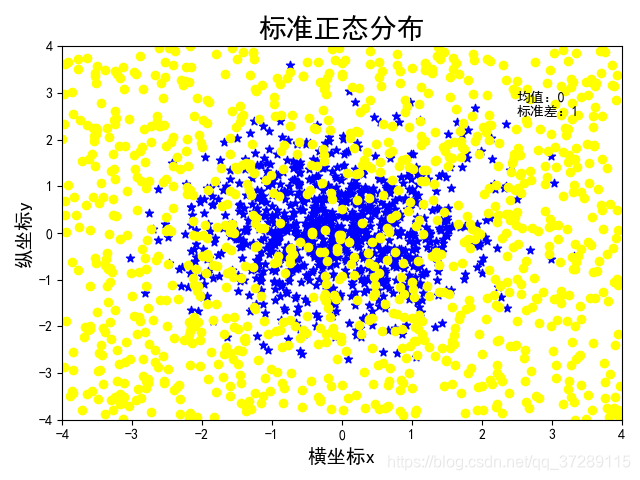 增加图例
增加图例


 语法
语法


【本文地址】
今日新闻 |
点击排行 |
|
推荐新闻 |
图片新闻 |
|
专题文章 |