如何在word中制作流程图 |
您所在的位置:网站首页 › 怎样用word制作工作流程图表 › 如何在word中制作流程图 |
如何在word中制作流程图

如何在word中制作流程图 
Microsoft Word provides built-in tools for creating and arranging different types of flowcharts. You can create your own flowchart by using different shapes and SmartArt. Here’s how to do it. Microsoft Word提供了用于创建和安排不同类型的流程图的内置工具。 您可以使用不同的形状和SmartArt创建自己的流程图。 这是操作方法。 用Word制作流程图 (Making a Flowchart in Word)When working with shapes in any Office application, it’s always useful to use gridlines to make sure everything is sized and placed correctly. To make the gridlines appears, head over to the “View” tab and tick the “Gridlines” checkbox. 在任何Office应用程序中使用形状时,使用网格线以确保所有内容的大小和正确放置总是很有用的。 要显示网格线,请转到“查看”选项卡,然后选中“网格线”复选框。 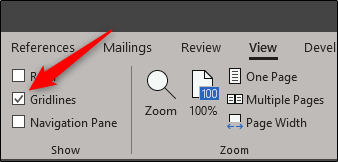
Your gridlines will now appear on your Word document. 您的网格线现在将出现在您的Word文档中。 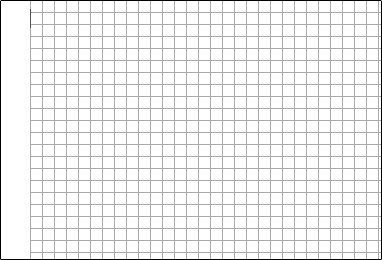
Next, switch to the “Insert” tab and then click the “Shapes” button (we’ll go through SmartArt later). 接下来,切换到“插入”选项卡,然后单击“形状”按钮(稍后我们将介绍SmartArt)。 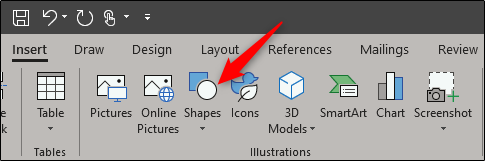
A drop-down menu displays a large library of shapes you can choose from. We’ll be focusing on two things here—the connectors in the “Lines” group near the top and the shapes in the “Flowchart” group near the bottom. 下拉菜单显示了一个很大的形状库,您可以从中选择。 在这里,我们将集中讨论两件事:顶部附近的“线”组中的连接器和底部附近的“流程图”组中的形状。 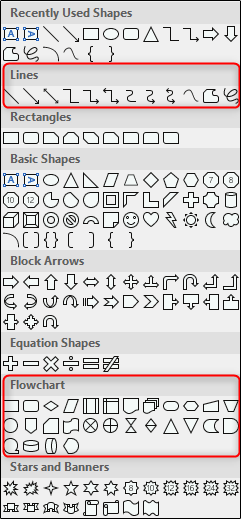
Before we continue, it’s important to understand the intended purpose of the shapes. You may want to consider reading this comprehensive list that details the meaning of flowchart shapes, but here’s a quick overview of the basics. 在继续之前,重要的是要了解形状的预期目的。 您可能需要考虑阅读这份详尽的清单,其中详细列出了流程图形状的含义 ,但这是基础知识的简要概述。 Rectangle: Used for process steps. 矩形:用于处理步骤。 Diamond: Used to show decision points. 菱形:用于显示决策点。 Oval: Used as the terminator shape, indicating the start and end points of a process. 椭圆形:用作终止符形状,指示过程的起点和终点。 Hovering over any of the shapes in the drop-down menu displays a text bubble showing the shape’s purpose. 将鼠标悬停在下拉菜单中的任何形状上都会显示一个文本气泡,显示该形状的用途。 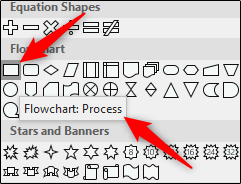
Let’s go ahead and insert our first shape. Back at the shapes menu, select the shape you’d like to use in the flow chart. Since this is our first shape being used in the flowchart, we’ll use the oval shape. 让我们继续并插入我们的第一个形状。 返回形状菜单,选择要在流程图中使用的形状。 由于这是流程图中使用的第一个形状,因此我们将使用椭圆形。 
Once you select the shape, you’ll notice your cursor turns into a crosshair. To draw the shape, click and drag. 选择形状后,您会注意到光标变成了十字准线。 要绘制形状,请单击并拖动。 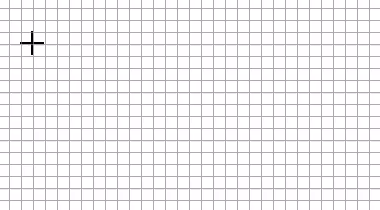
After drawing the shape, you’ll notice a new “Format” tab appears with commands that let you format your shape, change the outline and fill color, and more. 绘制形状后,您会注意到一个新的“格式”选项卡出现,其中的命令可用于设置格式,更改轮廓和填充颜色等。 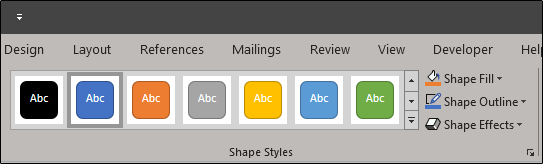
To insert text inside the shape, select the shape and then start typing. 要将文本插入形状中,请选择形状,然后开始输入。 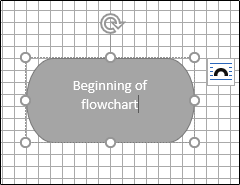
Let’s insert another shape and then connect the two shapes. We’ll add a rectangle to indicate another part of the process. Repeat the above steps to insert the shape. 让我们插入另一个形状,然后将两个形状连接起来。 我们将添加一个矩形以指示过程的另一部分。 重复上述步骤以插入形状。 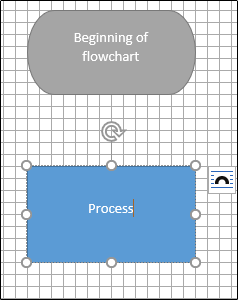
To connect the two shapes, head back to the shape menu and select the connector you want to use. We’ll use a simple line arrow for this example. 要连接两个形状,请返回形状菜单,然后选择要使用的连接器。 在此示例中,我们将使用简单的箭头。 
Once you select the arrow, click the center handle on the first shape and then, while still holding down your mouse button, drag to the center handle on the next shape. 选择箭头后,单击第一个形状的中心手柄,然后在按住鼠标键的同时拖动到下一个形状的中心手柄。 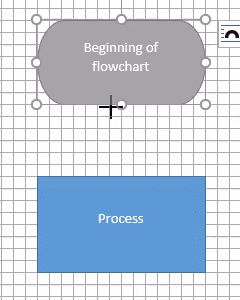
As with shapes, you can also format the arrow with different line widths, colors, and so on. 与形状一样,您也可以使用不同的线宽,颜色等来设置箭头的格式。 
If you plan to use the same line format throughout the entire flowchart, right-click the inserted line after you’ve formatted it and select “Set as Default Line.” You can do this with shapes, too. 如果您打算在整个流程图中使用相同的行格式,请在格式化后在插入的行上单击鼠标右键,然后选择“设置为默认行”。 您也可以使用形状。 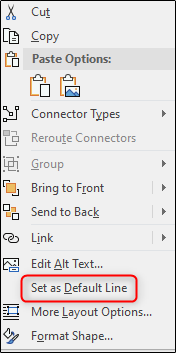 使用SmartArt创建流程图 (Creating a Flowchart with SmartArt)
In addition to using shapes to create your flowchart, you also have some pretty handy options with SmartArt. Head over to the “Insert” tab and then click the “SmartArt” button. 除了使用形状创建流程图之外,SmartArt还提供了一些非常方便的选项。 转到“插入”标签,然后单击“ SmartArt”按钮。 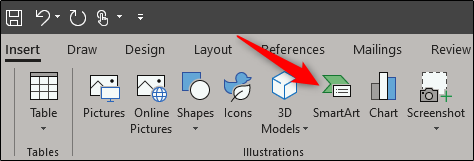
In the Choose a SmartArt Graphic window, select the “Process” category on the left, chose a type of process (we’re using the “Picture Accent Process” option here), and then click “OK.” 在“选择SmartArt图形”窗口中,选择左侧的“处理”类别,选择一种处理类型(我们在这里使用“图片口音处理”选项),然后单击“确定”。 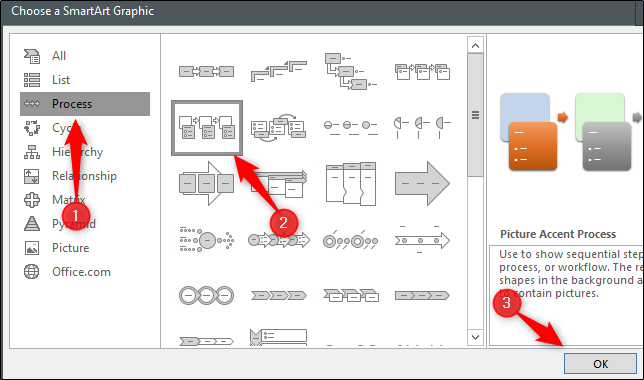
This SmartArt graphic is designed explicitly to detail a process. It groups shapes for adding photos (1) and text (2). 此SmartArt图形专门设计用于详细说明过程。 它对添加照片(1)和文本(2)的形状进行分组。 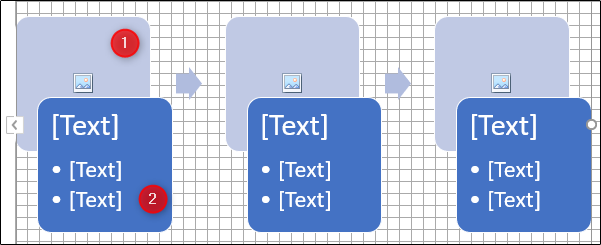
Enter the relevant information. If you don’t need a particular object, you can get rid of it by selecting it and pressing the delete key. On the other hand, if you can copy the objects if you need to add additional information. 输入相关信息。 如果不需要特定的对象,可以通过选择它并按Delete键来摆脱它。 另一方面,如果可以复制对象,则需要添加其他信息。 翻译自: https://www.howtogeek.com/424397/how-to-create-a-flowchart-in-word/ 如何在word中制作流程图 |
【本文地址】
今日新闻 |
点击排行 |
|
推荐新闻 |
图片新闻 |
|
专题文章 |