科研作图 |
您所在的位置:网站首页 › 怎么有效控制成本 › 科研作图 |
科研作图
|
局部图像放大镜效果的python实现
前言代码应用
前言
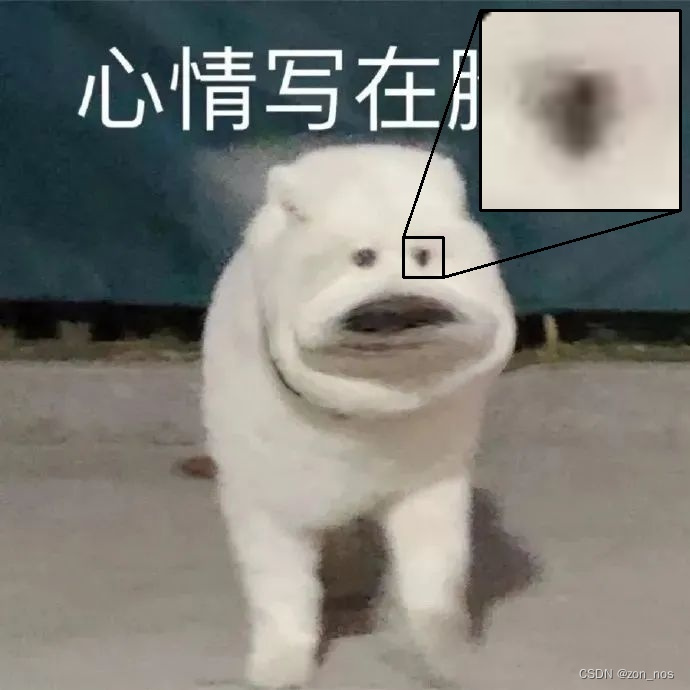
当图中想传达的区域太小,而在不裁剪的情况下又想要放大图中的某一部分区域,实现放大镜的效果。 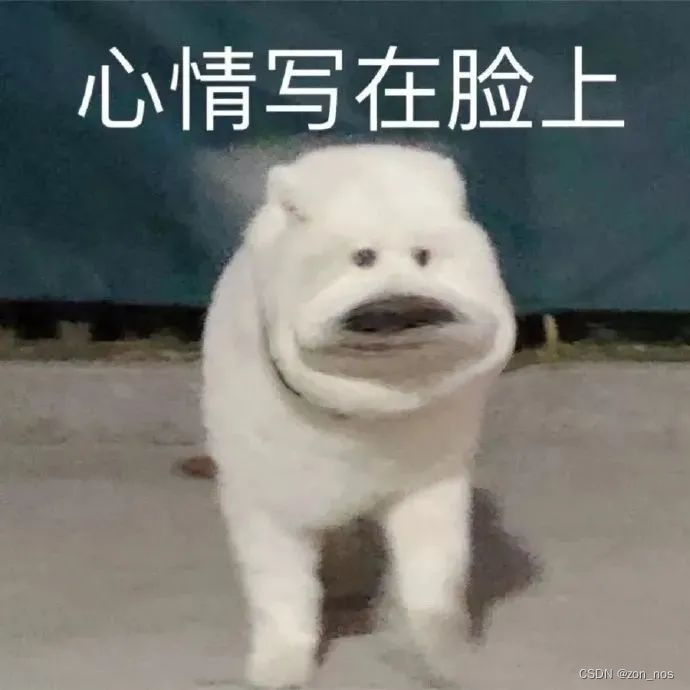 比如我想放大这只大冤种狗狗的眼睛,并将放大的结果放置在图中的角落里。达到如下图所示的结果。该如何实现呢?
 代码
代码
为了能方便友友们直接上手使用,我编写了可交互式的局部放大功能的代码。大家只需要输入自己图像的路径就可以体验啦。 import cv2 import os import numpy as np img_path= r'' # 请输入自己需要放大图像的路径 img_name = os.path.basename(img_path) img = cv2.imread(img_path) def on_EVENT_LBUTTONDOWN(event, x, y, flags, param): global img if event == cv2.EVENT_LBUTTONDOWN: # 按下鼠标左键则放大所点的区域 xy = "%d,%d" % (x, y) print (xy) length = 20 # 局部区域的边长的一半 big_length = 200 # 放大后图像的边长 part_left = x - length part_right = x + length part_top = y - length part_bottom = y + length height, width, _ = np.shape(img) if (x = height / 2): loc_bottom = height - 10 loc_top = loc_bottom - big_length loc_right = width - 10 loc_left = loc_right - big_length cv2.line(img,(part_right,part_top),(loc_right,loc_top),(0,0,0),2) cv2.line(img,(part_left,part_bottom),(loc_left,loc_bottom),(0,0,0),2) part = img[part_top:part_bottom,part_left:part_right] mask = cv2.resize(part, (big_length, big_length), fx=0, fy=0, interpolation=cv2.INTER_LINEAR) img[loc_top:loc_bottom,loc_left:loc_right]=mask cv2.rectangle(img,(part_left,part_top),(part_right,part_bottom),(0,0,0),2) cv2.rectangle(img,(loc_left,loc_top),(loc_right,loc_bottom),(0,0,0),2) cv2.imshow("image", img) if event == cv2.EVENT_RBUTTONDOWN: # 按下鼠标右键恢复原图 img = cv2.imread(img_path) cv2.imshow("image", img) cv2.namedWindow("image") cv2.setMouseCallback("image", on_EVENT_LBUTTONDOWN) cv2.imshow("image", img) cv2.waitKey(0) cv2.imwrite("image1.jpg", img)以下是简介的版本,大家只需要修改某些参数就能实现上述功能啦。 import cv2 import os import numpy as np img_path= r'' # 请输入自己需要放大图像的路径 img = cv2.imread(img_path) # 输入局部点的中心点的坐标以及截取的边长的一半 x = 364 y = 261 length = 20 part_left = x - length part_right = x + length part_top = y - length part_bottom = y + length # 输入放大后图像左上点位于原图中的位置和边长 loc_left = 10 loc_top = 10 big_length = 200 loc_right = loc_left + big_length loc_bottom = loc_top + big_length # 截取图像中的局部区域并放大 part = img[part_top:part_bottom,part_left:part_right] mask = cv2.resize(part, (big_length, big_length), fx=0, fy=0, interpolation=cv2.INTER_LINEAR) # 将放大后的图像放置位于指定区域 img[loc_top:loc_bottom,loc_left:loc_right]=mask # 画一些图形引导人的视线(可选择) cv2.rectangle(img,(part_left,part_top),(part_right,part_bottom),(0,0,0),2) cv2.rectangle(img,(loc_left,loc_top),(loc_right,loc_bottom),(0,0,0),2) cv2.line(img,(part_right,part_top),(loc_right,loc_top),(0,0,0),2) cv2.line(img,(part_left,part_bottom),(loc_left,loc_bottom),(0,0,0),2) # 展示结果并保存 cv2.namedWindow("image2") cv2.imshow("image2", img) cv2.imwrite("image3.jpg", img) cv2.waitKey(0)下面具体介绍一下这个代码的核心部分,方便大家后续进行魔改。 1.获取局部区域并插值放大 part = img[part_top:part_bottom,part_left:part_right] mask = cv2.resize(part, (big_length, big_length), fx=0, fy=0, interpolation=cv2.INTER_LINEAR)2.将放大的图像放在原图中的某个位置 img[loc_top:loc_bottom,loc_left:loc_right]=mask3.可以添加边框和线指引人的视线 cv2.rectangle(img,(part_left,part_top),(part_right,part_bottom),(0,0,0),2) cv2.rectangle(img,(loc_left,loc_top),(loc_right,loc_bottom),(0,0,0),2) cv2.line(img,(part_right,part_top),(loc_right,loc_top),(0,0,0),2) cv2.line(img,(part_left,part_bottom),(loc_left,loc_bottom),(0,0,0),2) 应用如果大家也是一名研究生,可以利用这些代码制作以下类型的图片。 Green Fluorescent Protein and Phase Contrast Image Fusion Via Detail Preserving Cross Network Image fusion in the loop of high-level vision tasks: A semantic-aware real-time infrared and visible image fusion network |


【本文地址】
公司简介
联系我们
今日新闻 |
点击排行 |
|
推荐新闻 |
图片新闻 |
|
专题文章 |