Android 从零开发一个简易的相机App |
您所在的位置:网站首页 › 安卓app开发中的界面是怎么实现的 › Android 从零开发一个简易的相机App |
Android 从零开发一个简易的相机App
|
本文介绍了实现一个简易Android相机App过程中,遇到的一些问题,对Camera API的选型、通知相册更新、跳转相册、左右滑动界面切换拍照/录像,相机切换时候的高斯模糊虚化效果、相机切换的3D效果做了说明。 1. 技术选型Android调用相机可以使用Camera1、Camera2和CameraX 1.1 Camera1Camera1的API相对复杂,且Google在Android 5.0的时候,就已经停止维护了。 但由于种种原因,有时候不得不使用Camera1的API。 如果必须要使用,建议参照 Camera1Java 这个Github库,写的还挺详细的。 同时,还有Camera1的官方文档 : Camera1 API 1.2 Camera2Android5.0以上支持Camera2的API,如果使用Camera2,可以看我的博客 : 十分钟实现 Android Camera2 相机预览 十分钟实现 Android Camera2 相机拍照 十分钟实现 Android Camera2 视频录制 还有官方的文档 : Android Developers | Camera2 overview 也可以直接使用Github上的一个封装库 CameraView,使用起来比较简单, 它支持使用Camera1或Camera2作为引擎,进行图片的拍摄和视频的捕捉。 @Override protected void onCreate(Bundle savedInstanceState) { super.onCreate(savedInstanceState); CameraView camera = findViewById(R.id.camera); camera.setLifecycleOwner(this); }具体详见 官方文档 CameraView官方文档 Android5.0以上支持Camera2,但 Android 5.0 及更高版本的设备可能并不支持所有相机 API2 功能。 不是所有Android设备都支持完整的Camera2功能, 现在都2022了, Camera2出来都有8年左右了, Android车机上还有在使用低版本HAL的, 就会导致Camera2一些高级功能都没法使用。详见 Android Camera2 综述 1.3 Camera XCameraX 是 Jetpack 的新增库。基于Camera2开发,向上提供更简洁的API接口,向下处理了各种厂商机型的兼容性问题,有助于在众多设备上打造一致的开发者体验。 Camera X 用起来也很简单 val preview = Preview.Builder().build() val viewFinder: PreviewView = findViewById(R.id.previewView) // The use case is bound to an Android Lifecycle with the following code val camera = cameraProvider.bindToLifecycle(lifecycleOwner, cameraSelector, preview) // PreviewView creates a surface provider and is the recommended provider preview.setSurfaceProvider(viewFinder.getSurfaceProvider())具体详见我的另一篇博客 Android 使用CameraX实现预览/拍照/录制视频/图片分析/对焦/切换摄像头等操作 这里,我选用了CameraX来进行相机的开发。 1.4 扩展知识 : Android Camera HALHAL(Hardware Abstraction Layer),即Android 的Camera硬件抽象层。 HAL 位于相机驱动程序和更高级别的 Android 框架之间,它定义了必须实现的接口,以便应用可以正确地操作相机硬件。 HAL 可定义一个标准接口以供硬件供应商实现,可让Android忽略较低级别的驱动程序实现。HAL实现通常会内置在共享库模块(.so)中。 Android Developers | HAL介绍 接下来来介绍下开发简易相机App的时候,遇到的问题 2. 通知相册更新当我们拍摄了一张图片之后,如果不通知系统更新相册,那么在相册中是找不到这张图片的。 所以当我们拍摄了图片后,必须要通知系统,让相册更新这张图片。 首先,新建一个FileUtils类,将需要保存的图片存储在该路径下 object FileUtils { val FILENAME = "yyyy-MM-dd-HH-mm-ss-SSS" val PHOTO_EXTENSION = ".jpg" /** Helper function used to create a timestamped file */ fun createFile(baseFolder: File, format: String, extension: String) = File( baseFolder, SimpleDateFormat(format, Locale.US) .format(System.currentTimeMillis()) + extension ) /** Use external media if it is available, our app's file directory otherwise */ fun getOutputDirectory(context: Context): File { val appContext = context.applicationContext val mediaDir = context.externalMediaDirs.firstOrNull()?.let { File(it, appContext.resources.getString(R.string.app_name)).apply { mkdirs() } } return if (mediaDir != null && mediaDir.exists()) mediaDir else appContext.filesDir } fun getMoviesDirectory(context: Context): File { var externalDirectory = Environment.getExternalStorageDirectory() return File(externalDirectory, "Movies") } }然后保存图片后 //这里是异步线程 File outputDirectory = FileUtils.INSTANCE.getOutputDirectory(context); File myCaptureFile = FileUtils.INSTANCE.createFile(outputDirectory, FileUtils.INSTANCE.getFILENAME(), FileUtils.INSTANCE.getPHOTO_EXTENSION()); //写入文件 BufferedOutputStream bos = new BufferedOutputStream(new FileOutputStream(myCaptureFile)); bm.compress(Bitmap.CompressFormat.JPEG, 100, bos); bos.flush(); bos.close();最后,通知系统更新相册 //把图片保存后声明这个广播事件通知系统相册有新图片到来 Intent intent = new Intent(Intent.ACTION_MEDIA_SCANNER_SCAN_FILE); Uri uri = Uri.fromFile(myCaptureFile); Log.d(TAG, "Photo capture succeeded:" + myCaptureFile.getPath()); intent.setData(uri); context.sendBroadcast(intent);需要注意的是,这里没有启用分区存储,如果要适配分区存储的话,请看这几篇文章 Android 10 分区存储完全解析 Android Developer : 访问共享存储空间中的媒体文件 支持 Android 12,全版本保存图片到相册方案 3. 跳到相册相机里还有一个跳转到全部相册的功能 首先,是去网上找到了一个跳转到相册的方法 3.1 使用Intent.ACTION_PICK val intent = Intent(Intent.ACTION_PICK, MediaStore.Images.Media.EXTERNAL_CONTENT_URI) if (isVideo){ intent.type = "video/*" }else{ intent.type = "image/*" } startActivity(intent)详见 android如何调系统用相册并处理返回 但是这其实是一个选择图片的Intent,并不是跳转到真的相册。 后来想到,可以通过隐式Intent跳转到系统相册的App,这里以华为的相册为例 3.2 反编译获得隐式intent 3.2.1 查找包名并导出首先,我们需要先查找到华为相册的包名,导出华为相册app // 第一步 : 查看包名 adb shell am monitor //第二步 : 查看该包名的存放路径 adb shell pm path com.huawei.photos //第三步 : 导出到电脑上 adb pull 路径地址具体详见 用adb导出某个app 3.2.2 使用dex2jar进行反编译我们先解压apk,获取到dex文件,然后使用dex2jar进行反编译 需要注意的是,需要把dex版本修改为036,高版本已不支持反编译了。 d2j-dex2jar classes.dex反编译成功后,我们使用jd-gui进行打开 同时,通过apktool我们可以反编译得到AndroidManifest.xml 查看Manifest可以得知,相册app的入口是GalleryMain
最终的itnent为 if (RomUtils.isHuawei()) { val intent = Intent() intent.setClassName("com.huawei.photos", "com.huawei.gallery.app.GalleryMain") intent.putExtra("tab", 1) startActivity(intent) } 4. 左右滑动界面切换拍照/录像一般相机左右滑动之后可以切换拍照/录像功能,我们对根view进行touchEvent监听即可 private var mPosX = 0F private var mPosY = 0F private var mCurPosX = 0F private var mCurPosY = 0F binding.rootView.setOnTouchListener { v, event -> when (event.action) { MotionEvent.ACTION_DOWN -> { mPosX = event.x mPosY = event.y } MotionEvent.ACTION_MOVE -> { mCurPosX = event.x mCurPosY = event.y } MotionEvent.ACTION_UP -> if (mCurPosX - mPosX > 0 && Math.abs(mCurPosX - mPosX) > 120 ) { //往左滑 } else if (mCurPosX - mPosX 120 ) { //往右滑 } } true } 5. 相机切换时候虚化,实现高斯模糊效果我这里使用到了AndroidUtilCode里的工具类ImageUtils,使用ImageUtils.fastBlur来进行高斯模糊效果的处理 val originBitmap = binding.previewView.bitmap val blurBitmap = ImageUtils.fastBlur(originBitmap, 0.25F, 25F) binding.imgBlur.setImageBitmap(blurBitmap)这里需要注意的有两点 用户点击切换后,需要同步先处理好高斯模糊的效果,再进行摄像头的切换,这个处理时间大概在200ms,对于用户几乎是无感知的CameraX 默认使用的implementationMode为performance,我是改为compatible取到的图像角度才是正常的,关于implementationMode可以看 CameraX 实现预览文档效果如下 市面上主流的相机,切换前后摄像头的时候,会有3D翻转的效果。 网上找到了这篇文章 手把手教你实现Android开发中的3D卡片翻转效果!,自己按照文中步骤实现了一下 Rotate3dAnimation.kt /** * An animation that rotates the view on the Y axis between two specified angles. * This animation also adds a translation on the Z axis (depth) to improve the effect. */ public class Rotate3dAnimation extends Animation { private final float mFromDegrees; private final float mToDegrees; private final float mCenterX; private final float mCenterY; private final float mDepthZ; private final boolean mReverse; private Camera mCamera; /** * Creates a new 3D rotation on the Y axis. The rotation is defined by its * start angle and its end angle. Both angles are in degrees. The rotation * is performed around a center point on the 2D space, definied by a pair * of X and Y coordinates, called centerX and centerY. When the animation * starts, a translation on the Z axis (depth) is performed. The length * of the translation can be specified, as well as whether the translation * should be reversed in time. * * @param fromDegrees the start angle of the 3D rotation //起始角度 * @param toDegrees the end angle of the 3D rotation //结束角度 * @param centerX the X center of the 3D rotation //x中轴线 * @param centerY the Y center of the 3D rotation //y中轴线 * @param reverse true if the translation should be reversed, false otherwise//是否反转 */ public Rotate3dAnimation(float fromDegrees, float toDegrees, float centerX, float centerY, float depthZ, boolean reverse) { mFromDegrees = fromDegrees; mToDegrees = toDegrees; mCenterX = centerX; mCenterY = centerY; mDepthZ = depthZ;//Z轴移动的距离,这个来影响视觉效果,可以解决flip animation那个给人看似放大的效果 mReverse = reverse; } @Override public void initialize(int width, int height, int parentWidth, int parentHeight) { super.initialize(width, height, parentWidth, parentHeight); mCamera = new Camera(); } @Override protected void applyTransformation(float interpolatedTime, Transformation t) { final float fromDegrees = mFromDegrees; float degrees = fromDegrees + ((mToDegrees - fromDegrees) * interpolatedTime); final float centerX = mCenterX; final float centerY = mCenterY; final Camera camera = mCamera; final Matrix matrix = t.getMatrix(); Log.i("interpolatedTime", interpolatedTime+""); camera.save(); if (mReverse) { camera.translate(0.0f, 0.0f, mDepthZ * interpolatedTime); } else { camera.translate(0.0f, 0.0f, mDepthZ * (1.0f - interpolatedTime)); } camera.rotateX(degrees); camera.getMatrix(matrix); camera.restore(); matrix.preTranslate(-centerX, -centerY); matrix.postTranslate(centerX, centerY); } }Rotate3dManager.kt class Rotate3dManager(val photo1: View) { private var centerX = 0 private var centerY = 0 private val depthZ = 400 private val duration = 300 private var closeAnimation: Rotate3dAnimation? = null /** * 卡牌文本介绍关闭效果:旋转角度与打开时逆行即可 */ private fun initCloseAnim() { closeAnimation = Rotate3dAnimation( 360F, 270F, centerX.toFloat(), centerY.toFloat(), depthZ.toFloat(), true ) closeAnimation!!.setDuration(duration.toLong()) closeAnimation!!.setFillAfter(true) closeAnimation!!.setInterpolator(AccelerateInterpolator()) closeAnimation!!.setAnimationListener(object : Animation.AnimationListener { override fun onAnimationStart(animation: Animation) { } override fun onAnimationRepeat(animation: Animation) {} override fun onAnimationEnd(animation: Animation) { val rotateAnimation = Rotate3dAnimation( 90F, 0F, centerX.toFloat(), centerY.toFloat(), depthZ.toFloat(), false ) rotateAnimation.duration = duration.toLong() rotateAnimation.fillAfter = true rotateAnimation.interpolator = DecelerateInterpolator() photo1!!.startAnimation(rotateAnimation) } }) } fun operate() { if (photo1.width operate() } return } //以旋转对象的中心点为旋转中心点,这里主要不要再onCreate方法中获取,因为视图初始绘制时,获取的宽高为0 centerX = photo1.width / 2 centerY = photo1.height / 2 if (closeAnimation == null) { initCloseAnim() } //用作判断当前点击事件发生时动画是否正在执行 if (closeAnimation!!.hasStarted() && !closeAnimation!!.hasEnded()) { return } photo1!!.startAnimation(closeAnimation) } }然后,对想要翻转的View进行使用即可 val rotate3dManager = Rotate3dManager(targetView) rotate3dManager.operate()效果如下 github地址 : DialogFlipTest 转载:https://blog.csdn.net/EthanCo/article/details/126260794 |
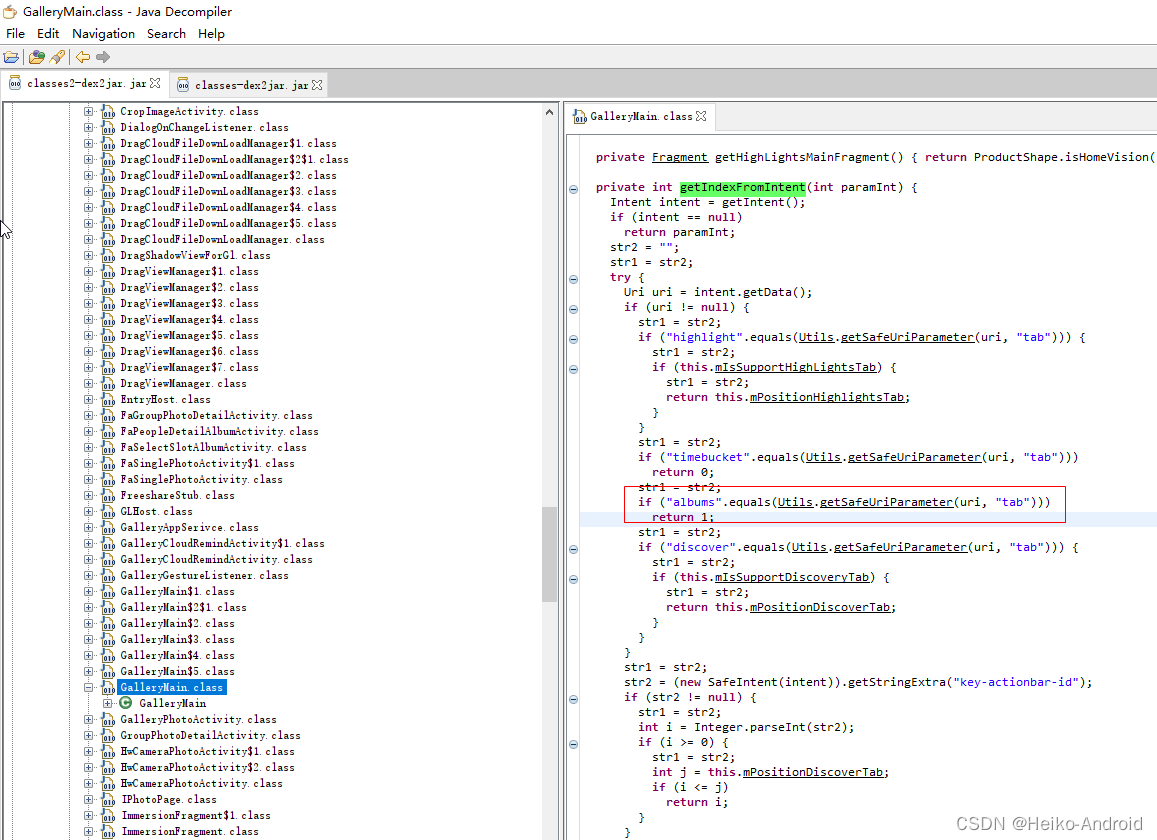 可以看到,当tab为1的时候,会切换到albums这个tab,这个就是我们想要的。

【本文地址】
今日新闻 |
点击排行 |
|
推荐新闻 |
图片新闻 |
|
专题文章 |