Vue + ElementUI 后台管理系统实现顶部一级菜单栏,左侧二级菜单栏 |
您所在的位置:网站首页 › 一级菜单对应多个二级菜单怎么设置出来 › Vue + ElementUI 后台管理系统实现顶部一级菜单栏,左侧二级菜单栏 |
Vue + ElementUI 后台管理系统实现顶部一级菜单栏,左侧二级菜单栏
|
一、目的
后台管理系统页面的整体结构如图:
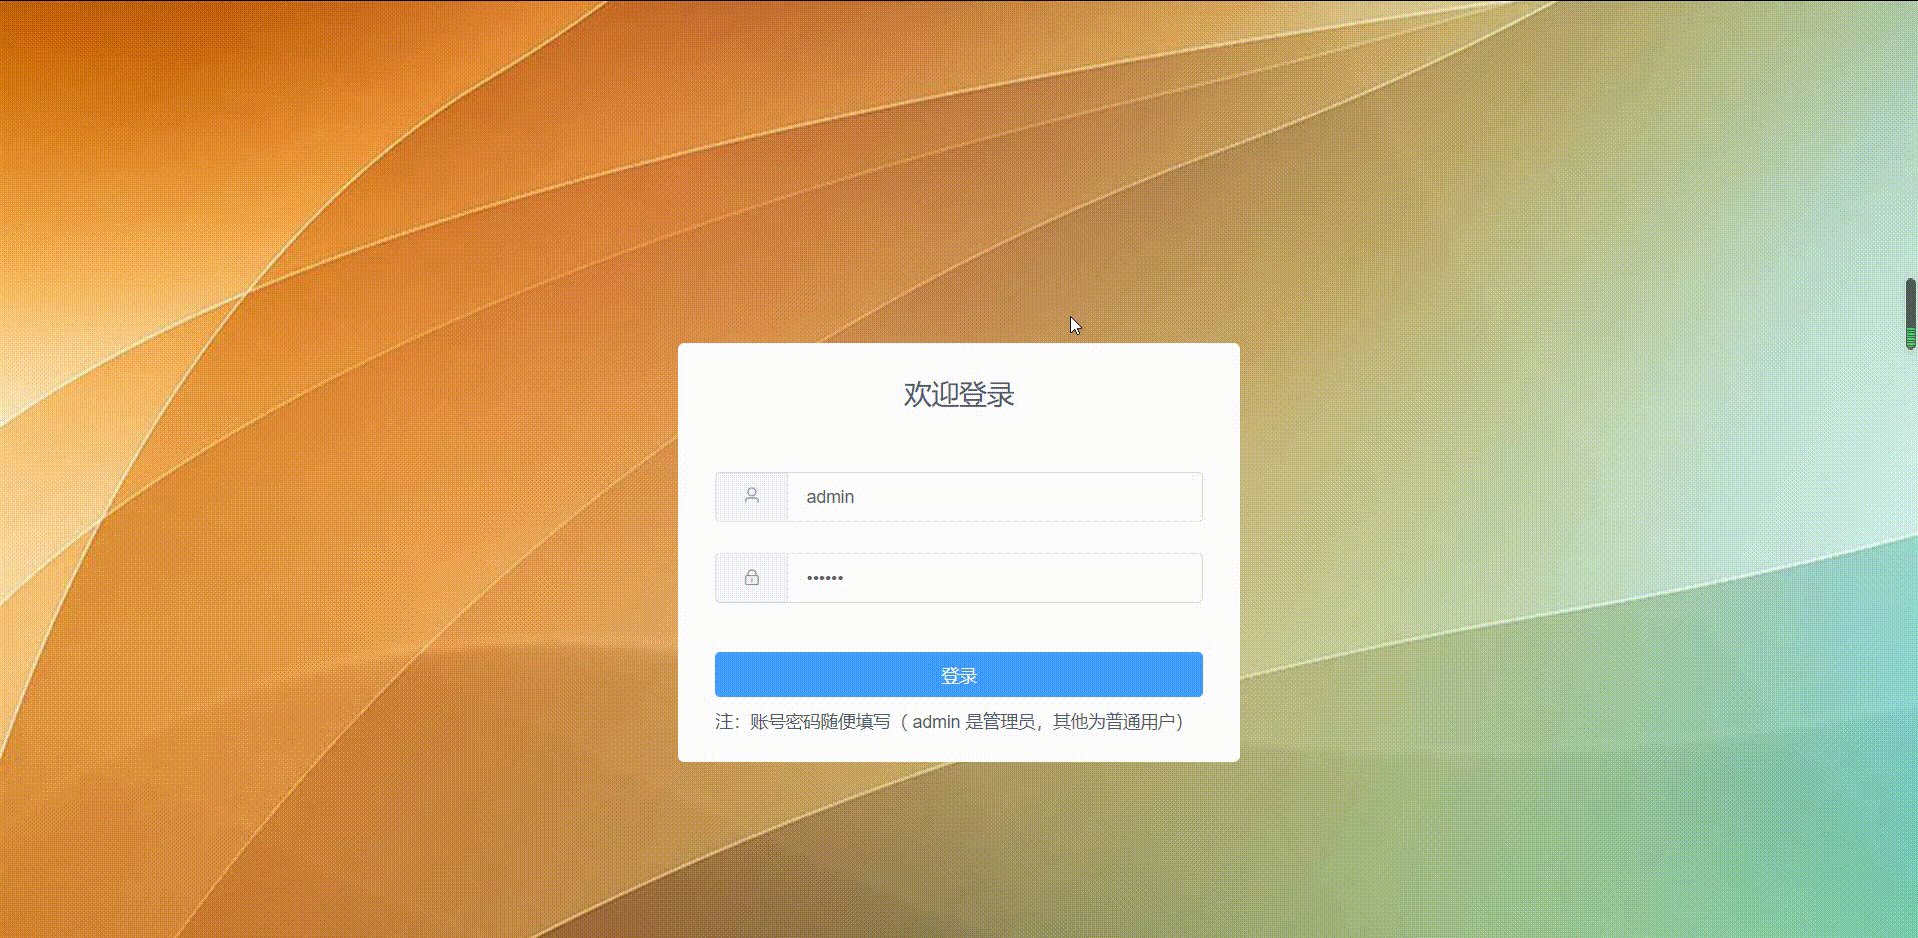
实现顶部一级菜单和左侧二级菜单进行响应,选哪个一级菜单时,左侧菜单栏有相对应下的二级菜单,产生联动效果。然后选不同的二级菜单,主体内容区域展示对应内容。 二、效果图
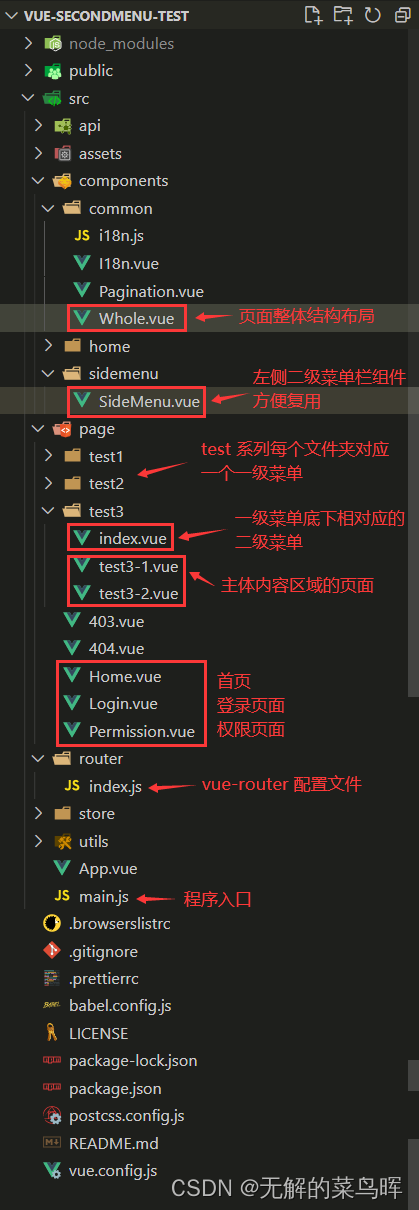
后台管理系统模板源码的 github 地址:https://github.com/hxhpg/vue-secondMenu-test 三、具体操作实现1、用 vue-cli 创建的 Vue 项目后,自己再手动搭建项目的基本目录结构,如图:
2、创建一个公共组件 Whole.vue 来实现整体页面结构的布局,通过 div 来进行区域定位和大小设定。 使用 el-menu 组件的 mode 属性为 "horizontal" 来使导航菜单变更为水平模式。 @select="handleSelect" 来切换不同的一级菜单展示不同的二级菜单栏和主体内容区域,用 router-view 通过路由来进行组件页面跳转,代码如下: 后台管理系统 {{ item.title }} {{ username }}
修改密码
退出登录
import bus from "@/utils/bus";
export default {
data(){
return{
itemList: [ // 水平一级菜单栏的菜单
{ path: '/Home', title: '首页' },
{ path: '/test1', title: '一级菜单1' },
{ path: '/test2', title: '一级菜单2' },
{ path: '/test3', title: '一级菜单3' },
{ path: '/permission', title: '管理员权限' },
// { path: '/i18n', title: '国际化组件' }
],
}
},
computed: {
username(){
return localStorage.getItem('ms_username') || '';
},
toIndex(){ // 根据路径绑定到对应的一级菜单,防止页面刷新重新跳回第一个
return '/' + this.$route.path.split('/')[1];
},
},
created() {
},
methods: {
handleSelect(path){ // 切换菜单栏
this.$router.push({
path: path
});
},
handleCommand(command){ // 用户名下拉菜单选择事件
if(command == 'loginout'){
localStorage.removeItem('ms_username');
this.$router.push({
path: '/Login'
});
}
}
}
}
.wrapper {
width: 100%;
height: 100%;
background: #f0f0f0;
}
.header {
position: relative;
box-sizing: border-box;
width: 100%;
height: 70px;
font-size: 22px;
}
.header .logo {
float: left;
margin-left: 60px;
margin-top: 17.5px;
height: 29px;
width: 160px;
vertical-align: middle;
}
/* --------------- 用户头像区域的样式 ---------------- */
.header-right {
float: right;
padding-right: 50px;
}
.header-user-con {
display: flex;
align-items: center;
justify-content: center;
height: 70px;
}
.user-avator {
margin-left: 20px;
}
.user-avator img {
display: block;
width: 40px;
height: 40px;
border-radius: 50%;
}
.user-name {
margin-left: 10px;
}
.el-dropdown-link {
cursor: pointer;
}
.el-dropdown-menu__item {
text-align: center;
}
/* --------------- 水平一级菜单栏的样式--------------------- */
.el-menu.el-menu--horizontal {
border-bottom: none !important;
float: left;
margin-left: 50px;
background: transparent;
}
.el-menu--horizontal > .el-menu-item.is-active {
/* border-bottom: 2px solid #3989fa;
color: #3989fa; */
font-weight: bold;
}
.el-menu--horizontal > .el-menu-item {
font-size: 16px;
margin: 0 15px;
}
{{ username }}
修改密码
退出登录
import bus from "@/utils/bus";
export default {
data(){
return{
itemList: [ // 水平一级菜单栏的菜单
{ path: '/Home', title: '首页' },
{ path: '/test1', title: '一级菜单1' },
{ path: '/test2', title: '一级菜单2' },
{ path: '/test3', title: '一级菜单3' },
{ path: '/permission', title: '管理员权限' },
// { path: '/i18n', title: '国际化组件' }
],
}
},
computed: {
username(){
return localStorage.getItem('ms_username') || '';
},
toIndex(){ // 根据路径绑定到对应的一级菜单,防止页面刷新重新跳回第一个
return '/' + this.$route.path.split('/')[1];
},
},
created() {
},
methods: {
handleSelect(path){ // 切换菜单栏
this.$router.push({
path: path
});
},
handleCommand(command){ // 用户名下拉菜单选择事件
if(command == 'loginout'){
localStorage.removeItem('ms_username');
this.$router.push({
path: '/Login'
});
}
}
}
}
.wrapper {
width: 100%;
height: 100%;
background: #f0f0f0;
}
.header {
position: relative;
box-sizing: border-box;
width: 100%;
height: 70px;
font-size: 22px;
}
.header .logo {
float: left;
margin-left: 60px;
margin-top: 17.5px;
height: 29px;
width: 160px;
vertical-align: middle;
}
/* --------------- 用户头像区域的样式 ---------------- */
.header-right {
float: right;
padding-right: 50px;
}
.header-user-con {
display: flex;
align-items: center;
justify-content: center;
height: 70px;
}
.user-avator {
margin-left: 20px;
}
.user-avator img {
display: block;
width: 40px;
height: 40px;
border-radius: 50%;
}
.user-name {
margin-left: 10px;
}
.el-dropdown-link {
cursor: pointer;
}
.el-dropdown-menu__item {
text-align: center;
}
/* --------------- 水平一级菜单栏的样式--------------------- */
.el-menu.el-menu--horizontal {
border-bottom: none !important;
float: left;
margin-left: 50px;
background: transparent;
}
.el-menu--horizontal > .el-menu-item.is-active {
/* border-bottom: 2px solid #3989fa;
color: #3989fa; */
font-weight: bold;
}
.el-menu--horizontal > .el-menu-item {
font-size: 16px;
margin: 0 15px;
}
3、这样就把页面顶部的一级菜单栏展现出来了。接下来要封装一个左侧二级菜单栏的组件 SideMenu.vue ,设定 props 是让调用该组件时把传递的值获取到。代码如下: {{ item.title }} export default { props: { itemList: { type: Array, default: () => [] } }, data(){ return { } }, computed: { toIndex(){ // 根据路径绑定到对应的二级菜单,防止页面刷新重新跳回第一个 return this.$route.path.split('/')[2]; } }, methods:{ }, } /* 左侧菜单栏定位和位置大小设定 */ .sidebar { display: block; position: absolute; left: 0; top: 70px; bottom: 0; overflow-y: scroll; } .sidebar::-webkit-scrollbar { width: 0; } .sidebar-el-menu { width: 250px; } .sidebar > ul { height: 100%; } /* 左侧二级菜单项的样式 */ .el-menu-item{ font-size: 14px !important; padding-left: 35px !important; } /* 左侧二级菜单选中时的样式 */ .el-menu-item.is-active { color: white !important; background: #3989fa !important; } .el-menu-item, .el-submenu__title { height: 50px !important; line-height: 50px !important; }4、然后在各个一级菜单下( 项目目录的 page 文件夹下的各个文件夹里的 index.vue )调用左侧二级菜单栏组件。 每个 index.vue 会对应每个一级菜单,这个通过改变路径(@select="handleSelect")和对路由进行配置来实现跳转,通过组件之间的传值通信把二级菜单项传给左侧二级菜单栏的组件。 再次用 router-view 通过路由来进行组件页面跳转(这样就形成两层嵌套,进行两次 router-view 路由跳转),index.vue 代码如下: import SideMenu from '@/components/sidemenu/SideMenu'; export default { components: { SideMenu }, data(){ return{ itemList: [ { path: 'test1-1', title: '二级菜单1-1' }, { path: 'test1-2', title: '二级菜单1-2' }, { path: 'test1-3', title: '二级菜单1-3' }, { path: 'test1-4', title: '二级菜单1-4' }, { path: 'test1-5', title: '二级菜单1-5' } ] } } }5、一二级菜单联动效果所需的组件和页面基本弄好了,最后得将这些都拼接起来走通,要对 vue-router 进行配置( router 文件夹下 index.js 文件),代码如下: import Vue from 'vue'; import VueRouter from 'vue-router'; Vue.use(VueRouter); const originalPush = VueRouter.prototype.push; VueRouter.prototype.push = function push(location) { return originalPush.call(this, location).catch(err => err); } export default new VueRouter({ routes: [ { path: '/', // 程序启动默认路由 component: () => import('@/components/common/Whole.vue'), meta: { title: '整体页面布局' }, redirect: '/Home', // 重定向到首页 children: [ { path: '/Home', component: () => import('@/page/Home.vue'), meta: { title: '首页' } }, { path: '/test1', component: () => import('@/page/test1/index.vue'), meta: { title: '一级菜单1' }, redirect: '/test1/test1-1', // 该配置是若点击选择一级菜单时,默认选中并跳转到该一级菜单下的第一个二级菜单 children:[ { path: 'test1-1', component: () => import('@/page/test1/test1-1.vue'), meta: { title: '二级菜单1-1' }, }, { path: 'test1-2', component: () => import('@/page/test1/test1-2.vue'), meta: { title: '二级菜单1-2' }, }, { path: 'test1-3', component: () => import('@/page/test1/test1-3.vue'), meta: { title: '二级菜单1-3' }, }, { path: 'test1-4', component: () => import('@/page/test1/test1-4.vue'), meta: { title: '二级菜单1-4' }, }, { path: 'test1-5', component: () => import('@/page/test1/test1-5.vue'), meta: { title: '二级菜单1-5' }, } ] }, { path: '/test2', component: () => import('@/page/test2/index.vue'), meta: { title: '一级菜单2' }, redirect: '/test2/test2-1', // 该配置是若点击选择父目录时,默认选中该父目录下的子路径页面 children:[ { path: 'test2-1', component: () => import('@/page/test2/test2-1.vue'), meta: { title: '二级菜单2-1' }, }, { path: 'test2-2', component: () => import('@/page/test2/test2-2.vue'), meta: { title: '二级菜单2-2' }, }, { path: 'test2-3', component: () => import('@/page/test2/test2-3.vue'), meta: { title: '二级菜单2-3' }, }, ] }, { path: '/test3', component: () => import('@/page/test3/index.vue'), meta: { title: '一级菜单3' }, redirect: '/test3/test3-1', children:[ { path: 'test3-1', component: () => import('@/page/test3/test3-1.vue'), meta: { title: '二级菜单3-1' } }, { path: 'test3-2', component: () => import('@/page/test3/test3-2.vue'), meta: { title: '二级菜单3-2' } }, ] }, { path: '/i18n', // 国际化组件 component: () => import('@/components/common/I18n.vue'), meta: { title: '国际化' } }, { path: '/permission', // 权限页面 component: () => import('@/page/Permission.vue'), meta: { title: '权限测试', permission: true } }, { path: '/404', component: () => import('@/page/404.vue'), meta: { title: '404' } }, { path: '/403', component: () => import('@/page/403.vue'), meta: { title: '403' } }, ] }, { path: '/Login', // 登录页面 component: () => import('@/page/Login.vue'), meta: { title: '登录' } }, { path: '*', redirect: '/404' } ] });6、顶部一级菜单栏,左侧二级菜单栏的功能效果完成了,接下来就可以去开发具体的主体内容区域的页面了。例如 test1-2.vue 的代码如下: 主体页面 1 - 2 export default { data(){ return{ } } } .test-div i{ font-size: 25px; }其中主体内容区域的定位和位置大小设定的 css 如下( 这些样式是公共,可复用的,单独写一个样式文件来全局引入使用 ): /* 页面主体部分 */ .content-box { position: absolute; left: 250px; /* 控制左侧二级菜单栏的宽度 */ right: 0; top: 70px; bottom: 0; padding: 10px 20px; -webkit-transition: left .3s ease-in-out; transition: left .3s ease-in-out; background: #f0f0f0; } .content { width: auto; height: 100%; padding: 10px; overflow-y: scroll; box-sizing: border-box; } .content-collapse { left: 65px; } .container { padding: 20px; /* 控制主体部分与主体边框的距离 */ background: #fff; border: 1px solid #ddd; border-radius: 5px; } /* 表格栏样式 */ .table-container { margin-top: 20px; } /* 分页栏样式 */ .pagination-area { width: 100%; text-align: right; margin: 20px 0 10px 0; } /* 测试主体页面的 div 样式 */ .test-div{ margin: 15px; }整个后台管理系统模板的核心内容开发大致是这样的,更多具体细节可以下载完整的源码来看。 项目实现了登录功能,一二级菜单联动选择展示不同的主体内容部分,封装了 axios 请求库,还简单配置了管理员和普通用户的权限区分。 这是我本人在工作学习中遇到的问题,并对解决问题的方案进行了一次记录,跟小伙伴们分享出来哈 ~ 供参考学习,有什么建议也欢迎评论留言,转载请注明出处哈,感谢支持! 后续扩展文章: Vue + ElementUI 后台管理系统实现主题风格切换_无解的菜鸟晖的博客-CSDN博客 Vue + ElementUI 后台管理系统实现顶部一级菜单栏,左侧多级菜单栏(二级、三级等)_无解的菜鸟晖的博客-CSDN博客 |

【本文地址】
今日新闻 |
点击排行 |
|
推荐新闻 |
图片新闻 |
|
专题文章 |