STM32F4探索者LED灯闪烁 |
您所在的位置:网站首页 › led资源库 › STM32F4探索者LED灯闪烁 |
STM32F4探索者LED灯闪烁
|
原理
2个读取输入电平函数: uint8_t GPIO_ReadInputDataBit(GPIO_TypeDef* GPIOx, uint16_t GPIO_Pin);//读取某个GPIO的输入电平 uint16_t GPIO_ReadInputData(GPIO_TypeDef* GPIOx);//读取某组GPIO的输入电平2个读取输出电平函数: uint8_t GPIO_ReadOutputDataBit(GPIO_TypeDef* GPIOx, uint16_t GPIO_Pin);//读取某个GPIO的输出电平 uint16_t GPIO_ReadOutputData(GPIO_TypeDef* GPIOx);//读取某组GPIO的输出电平4个设置输出电平函数: void GPIO_SetBits(GPIO_TypeDef* GPIOx, uint16_t GPIO_Pin);//设置某个IO口输出为高电平 void GPIO_ResetBits(GPIO_TypeDef* GPIOx, uint16_t GPIO_Pin);//设置某个IO口输出为低电平 void GPIO_WriteBit(GPIO_TypeDef* GPIOx, uint16_t GPIO_Pin, BitAction BitVal); void GPIO_Write(GPIO_TypeDef* GPIOx, uint16_t PortVal);初始化GPIO void LED_Init() { GPIO_InitTypeDef GPIO_InitStructure;//定义结构体 RCC_AHB1PeriphClockCmd(RCC_AHB1Periph_GPIOF, ENABLE);//设置时钟使能 GPIO_InitStructure.GPIO_Pin = GPIO_Pin_9 | GPIO_Pin_10;//设置为9和10口 GPIO_InitStructure.GPIO_Mode = GPIO_Mode_OUT;//设置为输出模式 GPIO_InitStructure.GPIO_OType = GPIO_OType_PP;//设置为推挽 GPIO_InitStructure.GPIO_Speed = GPIO_Speed_100MHz;//设置速度 GPIO_InitStructure.GPIO_PuPd = GPIO_PuPd_UP;//上拉 GPIO_Init(GPIOF, &GPIO_InitStructure);//初始化GPIOF这里用了结构体 GPIO_SetBits(GPIOF,GPIO_Pin_9 | GPIO_Pin_10);//设置GPIOF9和10为高电平 }注: 1.推挽输出: 可以输出强高低电平,连接数字器件 开漏输出: 只可以输出强低电平,高电平得靠外部电阻拉高。输出端相当于三极管的集电极. 要得到高电平状态需要上拉电阻才行. 适合于做电流型的驱动,其吸收电流的能力相对强(一般20ma以内) 2.时钟使能函数我们可以在stm32f4xx_rcc.c中使用搜索功能(Ctrl+F)可以找到 3.函数的参数我们可以使用go to definition of来快速查找 例 led.h #ifndef __LED__H #define __LED__H void LED_Init(); #endifled.c #include"LED.H" #include"sys.h" void LED_Init() { GPIO_InitTypeDef GPIO_InitStructure; RCC_AHB1PeriphClockCmd(RCC_AHB1Periph_GPIOF, ENABLE); GPIO_InitStructure.GPIO_Pin = GPIO_Pin_9 | GPIO_Pin_10; GPIO_InitStructure.GPIO_Mode = GPIO_Mode_OUT; GPIO_InitStructure.GPIO_OType = GPIO_OType_PP; GPIO_InitStructure.GPIO_Speed = GPIO_Speed_100MHz; GPIO_InitStructure.GPIO_PuPd = GPIO_PuPd_UP; GPIO_Init(GPIOF, &GPIO_InitStructure); GPIO_SetBits(GPIOF,GPIO_Pin_9 | GPIO_Pin_10); }main.c #include "sys.h" #include "delay.h" #include "usart.h" #include "led.h" int main(void) { delay_init(168); LED_Init(); while(1) { GPIO_ResetBits(GPIOF,GPIO_Pin_9); GPIO_SetBits(GPIOF,GPIO_Pin_10); delay_ms(500); GPIO_SetBits(GPIOF,GPIO_Pin_9); GPIO_ResetBits(GPIOF,GPIO_Pin_10); delay_ms(500); } } |
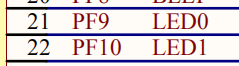
 我们可以看到两个LED是和电阻串联然后接在VCC上的,共阳极,另一端的引脚分别接在PF9和PF10。所以我们只需要控制PF9和PF10的高低电平就可以控制LED的亮和灭。低电平为亮,高电平为灭。 我们要先了解几个函数: 1个初始化函数: void GPIO_Init(GPIO_TypeDef* GPIOx, GPIO_InitTypeDef* GPIO_InitStruct)//初始化一个或者多个IO口(同一组)的工作模式,输出类型,速度以及上下拉方式。也就是一组IO口的4个配置寄存器。;
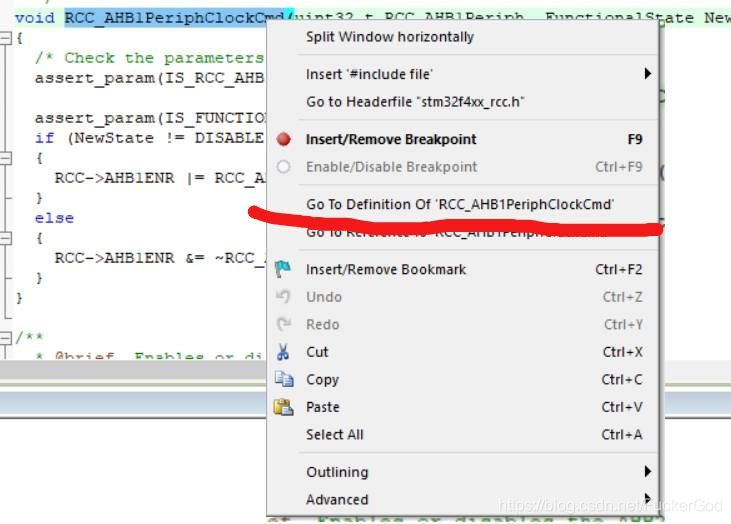 我们点击一下go to definition of
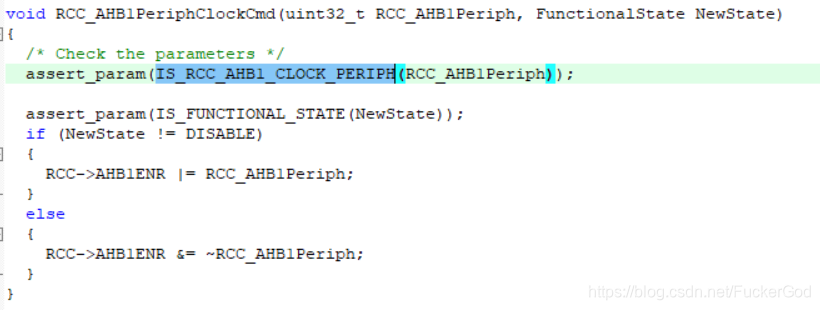 is开头的就是对参数的一个判断语句 所以我们对对蓝标再使用一次go to definition of
 光标会在最下面,上面就是我们可以填入的参数了。
【本文地址】
公司简介
联系我们
今日新闻 |
点击排行 |
|
推荐新闻 |
图片新闻 |
|
专题文章 |