ceph |
您所在的位置:网站首页 › iscsi挂载存储配置详解 › ceph |
ceph
|
作者:吴业亮 博客:wuyeliang.blog.csdn.net 一.架构及方案 Ceph Block框架
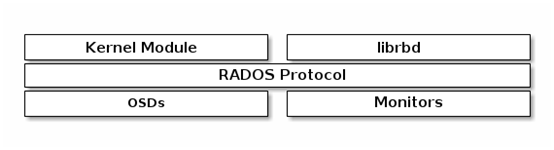
iSCSI gateway的实现主要有TGT && LIO两种方式。 TGT TGT:Linux target framework,为创建、维护SCSI target 驱动(包括iSCSI、FC、SRP等)提供支持。 工作在用户空间;在Linux 2.6.38 版本后(含),内核集成了 Linux-IO Target。在ceph集成原生iscsi之前,通常使用基于用户空间的"scsi-target-utils"套件实现tgt。 基于centos7.x系列,安装"scsi-target-utils"套件后,iscsi并不支持ceph rbd后端存储(通过"tgtadm --lld iscsi --mode system --op show"查看),主要原因是redhat针对套件屏蔽了支持ceph rbd后端存储的代码。 解决方案: 通过"rbd map xxx"将ceph rbd挂载到本地后,再通过iscsi tgt的"direct-store"模式发布ceph块存储。 方案缺点: "rbd map xxx"挂载ceph rbd是通过"ceph rbd kernel module"的形式,tgt在用户空间实现,导致发布的ceph rbd在内核态与用户态之间频繁切换,影响性能。 LIO LIO:Linux-IO Target,用软件实现各种SCIS Target。 工作在内核空间;支持较多传输协议,如Fibre Channel(Qlogic,linux3.5)、FCoE(linux3.0)、iSCSI(linux 3.1)、iSER (Mellanox InfiniBand,linux3.10), SRP (Mellanox InfiniBand,linux3.3), USB等;对 iSCSI RFC 规范的支持非常好,包括完整的错误恢复都有支持;从内核 3.17 开始引入用户态后端支持,即 TCMU(Target Core Module in Userspace)在Linux 2.6.38 版本后(含),内核集成了 Linux-IO Target。本文主要介绍基于LIO的ceph原生iscsi 实现方式,LIO利用用户空间直通(即TCMU)与ceph的librbd库进行交互(tcmu-runner处理LIO TCM后端存储的用户空间端的守护进程,在内核之上多了一个用户态的驱动层,这样只需要根据tcmu的标准来对接接口即可,而不用去直接与内核进行交互),并将rbd image暴露给iSCSI客户端。 二、前提条件 1、版本 Ceph Luminous 版本的集群或者更新的版本RHEL/CentOS 7.5或者Linux kernel v4.16或者更新版本的内核其他控制软件 targetcli-2.1.fb47 or newer package python-rtslib-2.1.fb68 or newer package tcmu-runner-1.4.0 or newer package ceph-iscsi-3.2 or newer package2、针对ceph-mon或osd节点,并没有特殊的iscsi-gateway参数选项,但降低若干默认的检测osd宕机时间,可以有效降低initiator的连接超时。可在ceph-mon节点修改ceph.conf文件后分发到所有节点,如: 方法一: # 新增参数 [osd] osd client watch timeout = 15 osd heartbeat grace = 20 osd heartbeat interval = 5重启服务 systemctl restart ceph.target方法二: 命令修改方法 # ceph tell osd.* config set osd_client_watch_timeout 15 # ceph tell osd.* config set osd_heartbeat_grace 20 # ceph tell osd.* config set osd_heartbeat_interval 5验证方法: [root@node2 ~]# ceph daemon osd.0 config get osd_client_watch_timeout { "osd_client_watch_timeout": "15" } [root@node2 ~]# ceph daemon osd.0 config get osd_heartbeat_grace { "osd_heartbeat_grace": "20" } [root@node2 ~]# ceph daemon osd.0 config get osd_heartbeat_interval { "osd_heartbeat_interval": "5" }三、自动化部署 环境 1、通过ceph-ansible安装 # yum install ceph-ansible其他ceph-ansible具体安装参见 https://wuyeliang.blog.csdn.net/article/details/1053449682、修改/etc/ansible/hosts,新增需要安装iscsi-gateway的节点主机名 [iscsigws] node1 node2 node33、安装 # cd /usr/share/ceph-ansible # ansible-playbook site.yml --limit iscsigws4、查看状态 # ceph -s cluster: id: 8789218f-5fca-4727-9c74-aff3c2cebeab health: HEALTH_OK services: mon: 3 daemons, quorum node1,node2,node3 (age 14m) mgr: node2(active, since 14m), standbys: node1, node3 mds: cephfs:1 {0=node2=up:active} 2 up:standby osd: 48 osds: 48 up (since 14m), 48 in (since 65m) rgw: 3 daemons active (node1.rgw0, node2.rgw0, node3.rgw0) tcmu-runner: 2 daemons active (node1:wyl/disk, node2:wyl/disk) data: pools: 8 pools, 2200 pgs objects: 43.01k objects, 107 GiB usage: 65 GiB used, 9.3 TiB / 9.4 TiB avail pgs: 2200 active+clean io: client: 3.0 KiB/s rd, 2 op/s rd, 0 op/s wr # gwcli ls Warning: Could not load preferences file /root/.gwcli/prefs.bin. o- / .................................................................................................... [...] o- cluster .................................................................................... [Clusters: 1] | o- ceph ....................................................................................... [HEALTH_OK] | o- pools ..................................................................................... [Pools: 8] | | o- .rgw.root ......................................... [(x3), Commit: 0.00Y/3089638M (0%), Used: 1536K] | | o- cephfs_data ....................................... [(x3), Commit: 0.00Y/3089638M (0%), Used: 0.00Y] | | o- cephfs_metadata ................................... [(x3), Commit: 0.00Y/3089638M (0%), Used: 1536K] | | o- default.rgw.control ............................... [(x3), Commit: 0.00Y/3089638M (0%), Used: 0.00Y] | | o- default.rgw.log ................................... [(x3), Commit: 0.00Y/3089638M (0%), Used: 0.00Y] | | o- default.rgw.meta ................................... [(x3), Commit: 0.00Y/3089638M (0%), Used: 384K] | | o- rbd ................................................ [(x3), Commit: 0.00Y/3089638M (0%), Used: 192K] | | o- wyl ........................................... [(x3), Commit: 0.00Y/3089638M (0%), Used: 17388864K] | o- topology .......................................................................... [OSDs: 48,MONs: 3] o- disks .................................................................................. [0.00Y, Disks: 0] o- iscsi-targets .......................................................... [DiscoveryAuth: None, Targets: 05、后面具体的服务为rbd-target-api,可以通过systemctl来管理 # systemctl rbd-target-api6、登录web创建iscsi设备 四、手动部署环境 1、安装软件 配置源 [root@node1 yum.repos.d]# cat ceph-iscsi.repo [ceph-iscsi] name=ceph-iscsi noarch packages baseurl=http://download.ceph.com/ceph-iscsi/3/rpm/el7/noarch enabled=1 gpgcheck=1 gpgkey=https://download.ceph.com/keys/release.asc type=rpm-md [ceph-iscsi-source] name=ceph-iscsi source packages baseurl=http://download.ceph.com/ceph-iscsi/3/rpm/el7/SRPMS enabled=0 gpgcheck=1 gpgkey=https://download.ceph.com/keys/release.asc type=rpm-md [root@node1 yum.repos.d]# cat python-rtslib-dev.repo [python-rtslib] name=python-rtslib packages for $basearch baseurl=https://2.chacra.ceph.com/r/python-rtslib/master/67eb1605c697b6307d8083b2962f5170db13d306/centos/7/flavors/default/$basearch enabled=1 gpgcheck=0 type=rpm-md [python-rtslib-noarch] name=python-rtslib noarch packages baseurl=https://2.chacra.ceph.com/r/python-rtslib/master/67eb1605c697b6307d8083b2962f5170db13d306/centos/7/flavors/default/noarch enabled=1 gpgcheck=0 type=rpm-md [python-rtslib-source] name=python-rtslib source packages baseurl=https://2.chacra.ceph.com/r/python-rtslib/master/67eb1605c697b6307d8083b2962f5170db13d306/centos/7/flavors/default/SRPMS enabled=1 gpgcheck=0 type=rpm-md [root@node1 yum.repos.d]# cat tcmu-runner-dev.repo [tcmu-runner] name=tcmu-runner packages for $basearch baseurl=https://1.chacra.ceph.com/r/tcmu-runner/master/9c84f7a4348ac326ac269fbdda507953dba6ec2c/centos/7/flavors/default/$basearch enabled=1 gpgcheck=0 type=rpm-md [tcmu-runner-noarch] name=tcmu-runner noarch packages baseurl=https://1.chacra.ceph.com/r/tcmu-runner/master/9c84f7a4348ac326ac269fbdda507953dba6ec2c/centos/7/flavors/default/noarch enabled=1 gpgcheck=0 type=rpm-md [tcmu-runner-source] name=tcmu-runner source packages baseurl=https://1.chacra.ceph.com/r/tcmu-runner/master/9c84f7a4348ac326ac269fbdda507953dba6ec2c/centos/7/flavors/default/SRPMS enabled=1 gpgcheck=0 type=rpm-mdceph相关的ISCSI软件包可以从redhat通过的源代码进行编译或者下载centos已经编译好的。 # yum install ceph-iscsi tcmu-runner targetcli python-rtslib -y # ceph osd pool create rbd 150 150 # ceph osd pool application enable rbd rbd --yes-i-really-mean-it2 创建配置文件 创建/etc/ceph/iscsi-gateway.cfg ,此文件主要设置iscsi服务的网关。 [config] # Name of the Ceph storage cluster. A suitable Ceph configuration file allowing # access to the Ceph storage cluster from the gateway node is required, if not # colocated on an OSD node. cluster_name = ceph # Place a copy of the ceph cluster's admin keyring in the gateway's /etc/ceph # drectory and reference the filename here gateway_keyring = ceph.client.admin.keyring # API settings. # The API supports a number of options that allow you to tailor it to your # local environment. If you want to run the API under https, you will need to # create cert/key files that are compatible for each iSCSI gateway node, that is # not locked to a specific node. SSL cert and key files *must* be called # 'iscsi-gateway.crt' and 'iscsi-gateway.key' and placed in the '/etc/ceph/' directory # on *each* gateway node. With the SSL files in place, you can use 'api_secure = true' # to switch to https mode. # To support the API, the bear minimum settings are: api_secure = false # Additional API configuration options are as follows, defaults shown. # api_user = admin # api_password = admin # api_port = 5001 trusted_ip_list = 192.168.70.81,192.168.70.82,192.168.70.833、 同步文件到其他节点 # scp /etc/ceph/iscsi-gateway.cfg node2:/etc/ceph # scp /etc/ceph/iscsi-gateway.cfg node3:/etc/ceph4、 启动API服务 # systemctl daemon-reload # systemctl enable rbd-target-api # systemctl start rbd-target-api # systemctl status rbd-target-api ● rbd-target-api.service - Ceph iscsi target configuration API Loaded: loaded (/usr/lib/systemd/system/rbd-target-api.service; enabled; vendor preset: disabled) Active: active (running) since Thu 2018-05-31 11:35:04 CST; 4s ago Main PID: 25372 (rbd-target-api) CGroup: /system.slice/rbd-target-api.service └─25372 /usr/bin/python /usr/bin/rbd-target-api May 31 11:35:04 node1 systemd[1]: Started Ceph iscsi target configuration API. May 31 11:35:04 node1 systemd[1]: Starting Ceph iscsi target configuration API... May 31 11:35:05 node1 rbd-target-api[25372]: Started the configuration object watcher May 31 11:35:05 node1 rbd-target-api[25372]: Checking for config object changes every 1s May 31 11:35:05 node1 rbd-target-api[25372]: * Running on http://0.0.0.0:5000/5、配置ISCSI服务 5.1 创建target # gwcli /> cd iscsi-targets /iscsi-target> create iqn.2003-01.com.redhat.iscsi-gw:iscsi-igw /iscsi-targets> cd iqn.2003-01.com.redhat.iscsi-gw:iscsi-igw/ /iscsi-target...-gw:iscsi-igw> cd gateways5.2 创建ISCSI网关 /iscsi-target...-igw/gateways> create node1 192.168.70.81 OS version/package checks have been bypassed Adding gateway, sync'ing 0 disk(s) and 0 client(s) ok /iscsi-target...-igw/gateways> create node2 192.168.70.82 OS version/package checks have been bypassed Adding gateway, sync'ing 0 disk(s) and 0 client(s) ok /iscsi-target...-igw/gateways> create node3 192.168.70.83 OS version/package checks have been bypassed Adding gateway, sync'ing 0 disk(s) and 0 client(s) ok /iscsi-target...-igw/gateways> ls o- gateways .................................................................................................. [Up: 3/3, Portals: 3] o- node1 .................................................................................................. [192.168.70.81 (UP)] o- node2 .................................................................................................. [192.168.70.82 (UP)] o- node3 .................................................................................................. [192.168.70.83 (UP)]如果操作系统非Centos或redhat,则需要加skipchecks=true参数。 /iscsi-target...-igw/gateways> create node1 192.168.70.81 skipchecks=true遇到问题“The first gateway defined must be the local machine”,必须先创建本地节点 /iscsi-target...-igw/gateways> create node1 10.130.70.91 The first gateway defined must be the local machine /iscsi-target...-igw/gateways> create node2 10.130.70.91 Adding gateway, sync'ing 0 disk(s) and 0 client(s) ok遇到问题Failed : Gateway creation failed, gateway(s) unavailable:node2(UNKNOWN state),需要三个节点都升级内核,升级内核参见:https://wuyeliang.blog.csdn.net/article/details/67644077 /iscsi-target...-igw/gateways> create node1 10.130.70.90 skipchecks=true OS version/package checks have been bypassed Adding gateway, sync'ing 0 disk(s) and 0 client(s) Failed : Gateway creation failed, gateway(s) unavailable:node2(UNKNOWN state)遇到问题Is the API server running and in the right mode (http/https)? 注意关闭防火墙 systemctl stop firewalld5.3 创建RBD image > /iscsi-target...-igw/gateways> cd /disks > /disks> create pool=rbd image=disk_1 size=90G5.4 创建客户端名称 Linux平台可以查看/etc/iscsi/initiatorname.iscsi文件获取InitiatorName。如果修改了默认的名称,必须重启iscsid服务,否则在登录iscsi服务端的时候会报错。 > /disks> cd /iscsi-target/iqn.2003-01.com.redhat.iscsi-gw:iscsi-igw/hosts > /iscsi-target...eph-igw/hosts> create iqn.1994-05.com.redhat:rh7-client5.5 设置客户端认证 > /iscsi-target...at:rh7-client> auth username=myiscsiusername password=myiscsipassword5.6 客户端映射磁盘 /iscsi-target...at:rh7-client> disk add rbd/disk_1五、windows的多路径连接 下面分享下Windows下多路径功能配置 如果没有添加MultipathI/O功能,在iSCSI发起程序属性——》设备——》中看到“MPIO”显示会是灰色。 安装MPIO 配置MPIO支持ISCSI
连接ISCSI配置MPIO支持 然后选择连接的存储-选择属性配置另一条路径 此时再查看属性
六.iSCSI initiator 安装initiator与multipath工具 iscsi-initiator-utils是通用initiator套件;device-mapper-multipath是多路径工具 # yum install iscsi-initiator-utils device-mapper-multipath -y 设置multipath服务,启用multipath服务,生成”/etc/multipath.conf”文件 # mpathconf --enable --with_multipathd y在”/etc/multipath.conf”文件新增配置,针对LIO后端存储设置多路径ha devices { device { vendor "LIO-ORG" hardware_handler "1 alua" path_grouping_policy "failover" path_selector "queue-length 0" failback 60 path_checker tur prio alua prio_args exclusive_pref_bit fast_io_fail_tmo 25 no_path_retry queue } }重新加载multinpath服务 # systemctl reload multipathd iscsi discovery 1)设置chap认证 # 开启initiator的chap认证,并设置username/password,与iscsi-target设置保持一致; # CHAP Settings部分,涉及57/61/62行 # vim /etc/iscsi/iscsid.conf node.session.auth.authmethod = CHAP node.session.auth.username = iscsiname node.session.auth.password = iscsipassword2)设置initiatoe-name # 设置initiator-name,保持与iscsi-target设置的initiator-name一致 # vim /etc/iscsi/initiatorname.iscsi InitiatorName=iqn.2020-04.192.168.70.50:iscsi-initiator3)发现iscsi-target # 发现iscsi存储:iscsiadm -m discovery -t st -p ISCSI_IP,ISCSI_IP默认采用3260端口; # 查看iscsi发现记录:iscsiadm -m node # 删除iscsi发现记录:iscsiadm -m node -o delete -T LUN_NAME -p ISCSI_IP # iscsiadm -m discovery -t st -p 192.168.70.574)登陆iscsi-target # 登录iscsi存储:iscsiadm -m node -T LUN_NAME -p ISCSI_IP -l # 登出iscsi存储:iscsiadm -m node -T LUN_NAME -p ISCSI_IP -u # 显示会话情况:iscsiadm -m session # iscsiadm -m node -T iqn.2018-09.192.168.70.5x:iscsi-gw -l # 1个后端存储,通过3条路径连接 # multipath -ll # 通过多路径连接后端存储,生成多个盘符; # 通过multipath服务汇聚,生成盘符/dev/mapper/mpathx,mount时间直接使用; # 或:lsscsi # fdisk -l mount验证 # mkfs.xfs /dev/mapper/mpatha # 挂载分区 # mount /dev/mapper/mpatha /mnt # 查看挂载情况 # df -Th 修改/etc/fstab设置开机启动挂载 /dev/mapper/mpatha1 /mnt xfs noatime,_netdev 0 0 参数说明: # filesystem parameters列设置挂载时间; # noatime:禁止更新文件与目录的inode访问时间,以获得更快的访问速度; # _netdev:标识文件系统位于网络上,防止网络启动前挂载 # rbd参考: https://docs.ceph.com/docs/master/rbd/iscsi-target-cli/ https://www.lagou.com/lgeduarticle/43742.html https://blog.51cto.com/candon123/2125049 https://blog.51cto.com/ityunwei2017/1916244 https://www.cnblogs.com/netonline/p/10432653.html |
 2. Ceph iSCSI基本框架

 7、服务卸载


【本文地址】
今日新闻 |
点击排行 |
|
推荐新闻 |
图片新闻 |
|
专题文章 |