pytorch 导出 onnx 模型 & 用onnxruntime 推理图片 |
您所在的位置:网站首页 › 3325hd010ab0输出规格 › pytorch 导出 onnx 模型 & 用onnxruntime 推理图片 |
pytorch 导出 onnx 模型 & 用onnxruntime 推理图片
pytorch 导出 onnx 模型 & 用onnxruntime 推理图片
 zxxRobot
分类:学习笔记
发布时间 2022.03.14阅读数 12341 评论数 0
zxxRobot
分类:学习笔记
发布时间 2022.03.14阅读数 12341 评论数 0
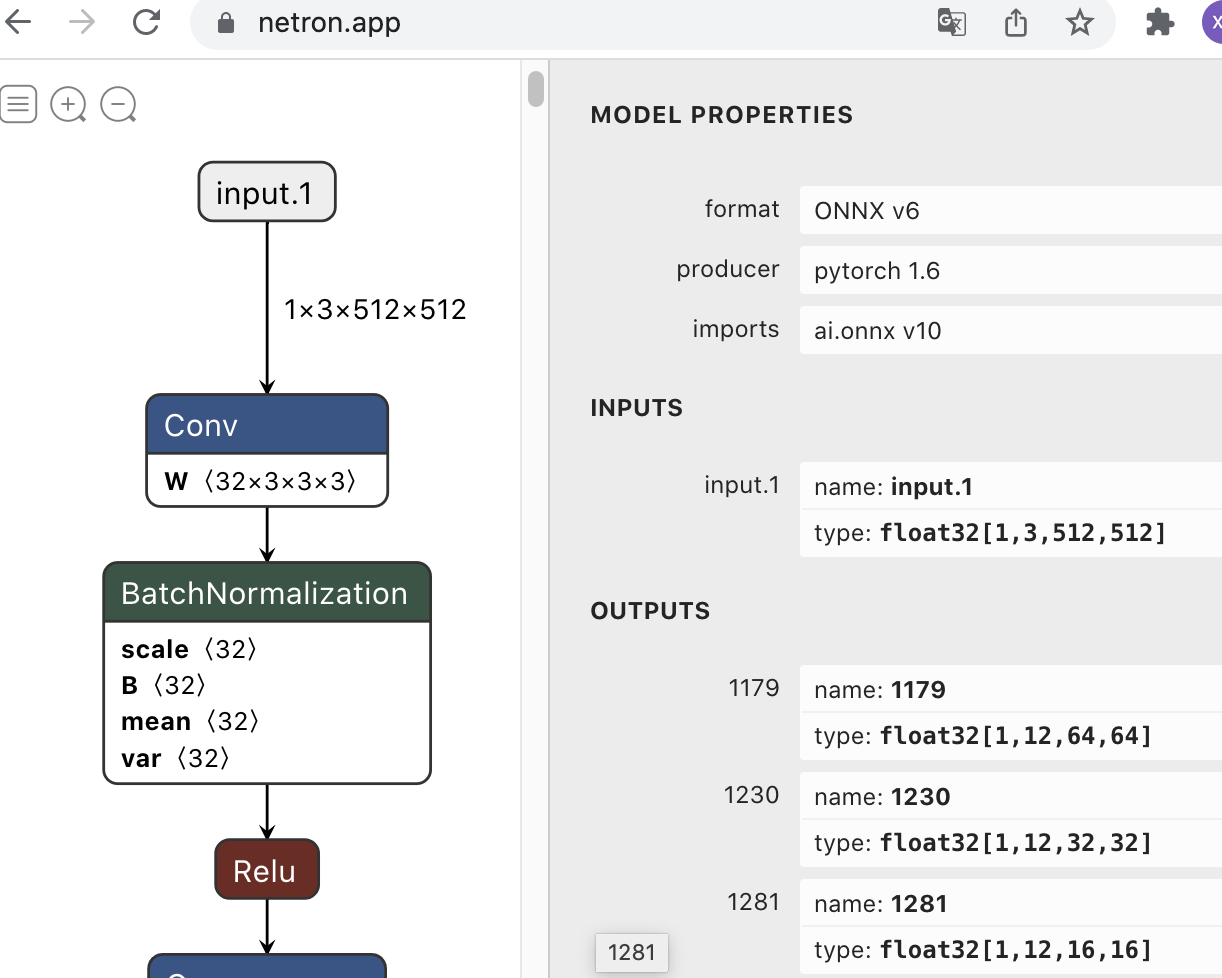
参考:https://pytorch.org/tutorials/advanced/super_resolution_with_onnxruntime.htmlhttps://github.com/BBuf/onnx_learn ONNX是微软和Facebook提出用来表示深度学习模型的开放格式。所谓开放就是ONNX定义了一组和环境,平台均无关的标准格式,来增强各种AI模型的可交互性。不同的机器学习框架(tensorflow、pytorch、mxnet 等)训练的模型可以方便的导出为 .onnx 格式,然后通过 ONNX Runtime 在 GPU、FPGA、TPU 等设备上运行。为了方便的将 onnx 模型部署到不同设备上,微软为各种环境构建了 docker file 和 容器。 下面介绍如何将 pytorch 模型导出 onnx 格式,以及如何用在 python 环境中用 onnx 模型推理。 1. pytorch 导出 onnx 模型pytorch 中内置了 onnx 导出器,可以轻松的将 .pth 格式导出为 .onnx 格式。 代码如下 import torch.onnx device = torch.device("cuda" if torch.cuda.is_available() else "cpu") model = torch.load("test.pth") # pytorch模型加载 model.eval() # 将模型设置为推理模式。这是必需的,因为 dropout 或 batchnorm 等运算符在推理和训练模式下的行为有所不同 # 创建一个随机的输入 tensor batch_size = 1 #批处理大小 input_shape = (3, 512, 512) #输入数据,改成自己的输入shape dummy_input = torch.randn(batch_size, *input_shape, requires_grad=True) dummy_input = dummy_input.to(device) export_onnx_file = "test.onnx" # 导出的ONNX文件名 # 导出模型 torch.onnx.export(model, # model being run dummy_input, # model input (or a tuple for multiple inputs) export_onnx_file, # where to save the model export_params=True, # store the trained parameter weights inside the model file opset_version=11, # onnx opset的库版本 do_constant_folding=True, # whether to execute constant folding for optimization input_names = ['input'], # # 模型输入结点的名字,有几个输入就定义几个,如['input1','input2'] output_names = ['output'], #模型输出节点的名字,同样可以有多个输出 # dynamic_axes={'input' : {0 : 'batch_size'}, 'output' : {0 : 'batch_size'}}) # variable length axes ) print(" ") print('Model has been converted to ONNX')动态导出 上述方法没有设置动态轴参数dynamic_axes,那么导出的模型输入输出尺寸是固定的,即对于输入尺寸[1, 3, 512, 512],在以后使用onnx进行推理时输入尺寸也必须是[1, 3, 512, 512]。如果设置了dynamic_axes={'input' : {0 : 'batch_size'}, 'output' : {0 : 'batch_size'}}) 则表示输入和输出的第 0 轴,即 batch_size ,为动态值,以后推理时输入输出的 batch_size 可以是任意值。 检查 onnx 模型检查模型的版本、图的结构、节点及其输入和输出来验证ONNX图的有效性。 import onnx onnx_model = onnx.load("model.onnx") onnx.checker.check_model(onnx_model) print(onnx.helper.printable_graph(onnx_model.graph)) # 打印计算图也可以通过 Netron.app 可视化 onnx 模型的结构。打开网页,将模型拖入界面即可。
有时候导出的 onnx 模型会过于复杂,可以通过 onnx-simplifier 精简 onnx 模型的结构。onnx-simplifer的核心思路简单讲就是利用onnxruntime推断一遍ONNX的计算图,然后使用常量输出替代冗余的运算OP。安装 install onnx-simplifier pip3 install -U pip && pip3 install onnx-simplifier即可使用 onnxsim 命令,简化模型结构: onnxsim input_onnx_model output_onnx_model也可以使用 python 脚本: import onnx from onnxsim import simplify model = onnx.load(path + model_name + '.onnx') # load your predefined ONNX model model_simp, check = simplify(model) # convert model assert check, "Simplified ONNX model could not be validated" # use model_simp as a standard ONNX model object我们在导出ONNX模型的一般流程就是,去掉后处理(如果预处理中有部署设备不支持的算子,也要把预处理放在基于nn.Module搭建模型的代码之外),尽量不引入自定义OP,然后导出ONNX模型,并过一遍onnx-simplifier,这样就可以获得一个精简的易于部署的ONNX模型。 2. 用 onnx 模型推理图片onnxruntime 有 cup 版本和 gpu 版本。 gpu 版本要注意与 cuda 版本匹配,否则会报错,版本匹配可以到此处查看。 # 1. CUP 版 pip install onnxruntime # 2. GPU 版,cup 版和 gpu 版不可重复安装,如果想使用 gpu 版需卸载 cpu 版 pip install onnxruntime-gpu # 或 pip install onnxruntime-gpu==版本号使用onnxruntime推理 import onnxruntime as ort import cv2 import numpy as np # 读取图片 img_path = 'test.jpg' input_shape = (512, 512) img = cv2.imread(img_path) print(img.shape) img = cv2.resize(img, input_shape) print(img.shape) img = cv2.cvtColor(img,cv2.COLOR_BGR2RGB) img = img.astype(np.float32)/255. # 注意输入的图像的type一定要是 numpy 而不是 tensor。此处为np.float32,因为torch模型是float32,要保持一致。 img = img.transpose(2,0,1).reshape(1, 3, *input_shape) # HWC->BCHW # 加载 onnx onnx_path= 'test.onnx' sess = ort.InferenceSession(onnx_path,providers=['CUDAExecutionProvider']) # 'CPUExecutionProvider' input_name = sess.get_inputs()[0].name output_name = [output.name for output in sess.get_outputs()] # 推理 outputs = sess.run(output_name, {input_name:img}) # outputs = [torch.Tensor(x) for x in outputs] # 转换为 tensor得到 outputs 后,按照模型输出,decode 即可。 更多性能调优方法:https://github.com/microsoft/onnxruntime-openenclave/blob/openenclave-public/docs/ONNX_Runtime_Perf_Tuning.mdIO 绑定:https://github.com/microsoft/onnxruntime/blob/master/docs/python/inference/api_summary.rst#iobinding 目标检测深度学习onnx模型部署原创文章作者:zxxRobot。如若转载,请注明出处:古月居 https://www.guyuehome.com/37123 打赏 0 点赞 1 收藏 0 分享 微信 微博 QQ 图片 上一篇:飞桨 PP-PicoDet 配置与训练 下一篇:主动学习论文阅读——Not All Labels Are Equal: Rationalizing The Labeling Costs for Training Object Detection |
【本文地址】
今日新闻 |
点击排行 |
|
推荐新闻 |
图片新闻 |
|
专题文章 |