| 鸿蒙源码构建工具Gn 与 Ninja 的介绍及使用入门 | 您所在的位置:网站首页 › 鸿蒙系统的用法 › 鸿蒙源码构建工具Gn 与 Ninja 的介绍及使用入门 |
鸿蒙源码构建工具Gn 与 Ninja 的介绍及使用入门
|
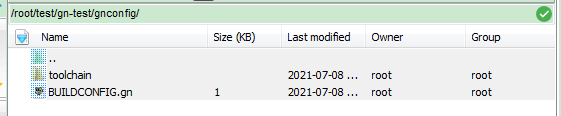
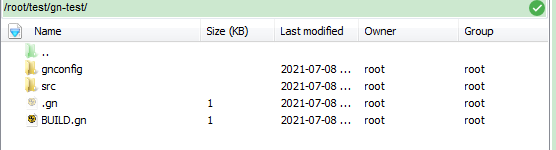
之前搞嵌入式一直只听说和使用过makefile和make编译命令。 最近鸿蒙HarmonyOS系统的火爆,对其源码的编译构建产生了兴趣,了解到鸿蒙系统的编译构建是基于 Gn 和 Ninja 完成的。 那么什么是Gn 与 Ninja?比makefile强到哪了? 了解尝试了一番,被这速度惊到了! 为什么要使用它,总结两点就是:1.比写makefile省事,2.比make编译速度速度快不止一点点。 简单来说Gn有点儿类似于cmake或automake之类的辅助生成makefile脚本的东东,相当于构建脚本的命令。Ninja相当于构建指令,功能类似于make命令。解释的可能不太准确但是这样可能容易理解些。 专业的介绍: 什么是Ninja? Ninja 是借由 Google Chrome 项目而诞生的一个构建工具,它的诞生目标是为了速度。换句话说,在 Google Chrome 项目的开发过程中,开发者们认为同类型的其它构建工具不给力,所以才会考虑重新开发更高效的工具。 官方介绍:https://ninja-build.org/ 类似同类型的构建界的老大哥老古董make ,make 即 GNU Make,一个用于决定如何使用命令完成最终目标构建的程序。 make 有3 个特性: make 只是一个通用程序,它不知道如何具体的完成目标的构建工作。 make 需要 makefile 中的描述来决定目标构建的具体方案。 make 需要借助其它工具(如:gcc)才能执行方案,最终完成工作。 Ninja 可以看作是一个更好更快的 make 。 什么是GN? GN是一个生成Ninja构建文件的元构建系统,以便你可以用Ninja构建你的项目。 gn、ninja的安装,使用环境Ubuntu18.04,参见:https://blog.csdn.net/qiuguolu1108/article/details/103842556 嫌编译安装麻烦的,可以直接拷贝使用二进制文件gin和ninja到系统的/usr/bin文件夹中使用。 gin和ninja的二进制可执行文件,上述链接中有说明。 简单的使用入门: 以helloworld为例,建一个gn-test文件夹: 几个文件必不可少,这个需要手工去提前按照格式创建好。否则直接执行gn gen ./out会报错的。 前提是必须存在几个文件和文件夹。 必要的几个文件: .gn文件 根目录下的BUIlD.gn文件 gnconfig文件夹中的BUILDCONFIG.gn文件 可以输入指令: gn help dotfile查看默认的.gin文件模板。 我的这个例子的.gin文件如下: buildconfig="//gnconfig/BUILDCONFIG.gn"然后在项目的根目录下创建gnconfig文件夹和内部的BUILDCONFIG.gn文件。 我的BUILDCONFIG.gn文件内容如下: set_default_toolchain("//gnconfig/toolchain:gcc") cflags_cc = [ "-std=c++11" ]可以看到,这里面有指定了一些东西,那么还得在gnconfig文件夹下再放一些东西。 在gnconfig文件夹下创建toolchain文件夹,里面再放个BUILD.gn文件,内容挺复杂,先原样拷贝即可: # Copyright 2014 The Chromium Authors. All rights reserved. # Use of this source code is governed by a BSD-style license that can be # found in the LICENSE file. toolchain("gcc") { tool("cc") { depfile = "{{output}}.d" command = "gcc -MMD -MF $depfile {{defines}} {{include_dirs}} {{cflags}} {{cflags_c}} -c {{source}} -o {{output}}" depsformat = "gcc" description = "CC {{output}}" outputs = [ "{{source_out_dir}}/{{target_output_name}}.{{source_name_part}}.o", ] } tool("cxx") { depfile = "{{output}}.d" command = "g++ -MMD -MF $depfile {{defines}} {{include_dirs}} {{cflags}} {{cflags_cc}} -c {{source}} -o {{output}}" depsformat = "gcc" description = "CXX {{output}}" outputs = [ "{{source_out_dir}}/{{target_output_name}}.{{source_name_part}}.o", ] } tool("alink") { rspfile = "{{output}}.rsp" command = "rm -f {{output}} && ar rcs {{output}} @$rspfile" description = "AR {{target_output_name}}{{output_extension}}" rspfile_content = "{{inputs}}" outputs = [ "{{target_out_dir}}/{{target_output_name}}{{output_extension}}", ] default_output_extension = ".a" output_prefix = "lib" } tool("solink") { soname = "{{target_output_name}}{{output_extension}}" # e.g. "libfoo.so". sofile = "{{output_dir}}/$soname" rspfile = soname + ".rsp" command = "g++ -shared {{ldflags}} -o $sofile -Wl,-soname=$soname @$rspfile" rspfile_content = "-Wl,--whole-archive {{inputs}} {{solibs}} -Wl,--no-whole-archive {{libs}}" description = "SOLINK $soname" # Use this for {{output_extension}} expansions unless a target manually # overrides it (in which case {{output_extension}} will be what the target # specifies). default_output_extension = ".so" # Use this for {{output_dir}} expansions unless a target manually overrides # it (in which case {{output_dir}} will be what the target specifies). default_output_dir = "{{root_out_dir}}" outputs = [ sofile, ] link_output = sofile depend_output = sofile output_prefix = "lib" } tool("link") { outfile = "{{target_output_name}}{{output_extension}}" rspfile = "$outfile.rsp" command = "g++ {{ldflags}} -o $outfile @$rspfile {{solibs}} {{libs}}" description = "LINK $outfile" default_output_dir = "{{root_out_dir}}" rspfile_content = "{{inputs}}" outputs = [ outfile, ] } tool("stamp") { command = "touch {{output}}" description = "STAMP {{output}}" } tool("copy") { command = "cp -af {{source}} {{output}}" description = "COPY {{source}} {{output}}" } }
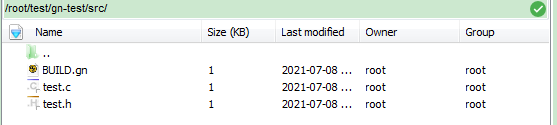
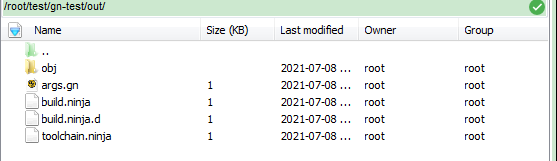
主要是.gn文件和gnconfig中的buildconfig这两项创建好后,基本保持不动,剩下的就是跟编译具体项目相关了。 如我的这个入门hellowold例子,跟目录下创建BUILD.gn文件,内容如下: group("default"){ deps = [ "//src:hello", ] }在src目录里,创建BUILD.gn文件,内容如下: executable("hello") { sources = [ "test.c", ] }至此,总算是构建脚本整完了,感觉挺繁琐的。但是如果熟悉了,大概就是这套路吧。最后当你看到它惊人的构建速度时,就会觉得这一切都是值得的。 接下来就是敲命令啦: 项目根目录下执行 gn gen ./out
打开查看产生了如下内容:
最后生成可执行文件吧:
速度快的不到1秒就构建结束了。 查看下执行结果:
|


【本文地址】