| 在 Windows 11 中连接到隐藏 Wi | 您所在的位置:网站首页 › 隐藏网络怎么连接电视 › 在 Windows 11 中连接到隐藏 Wi |
在 Windows 11 中连接到隐藏 Wi
|
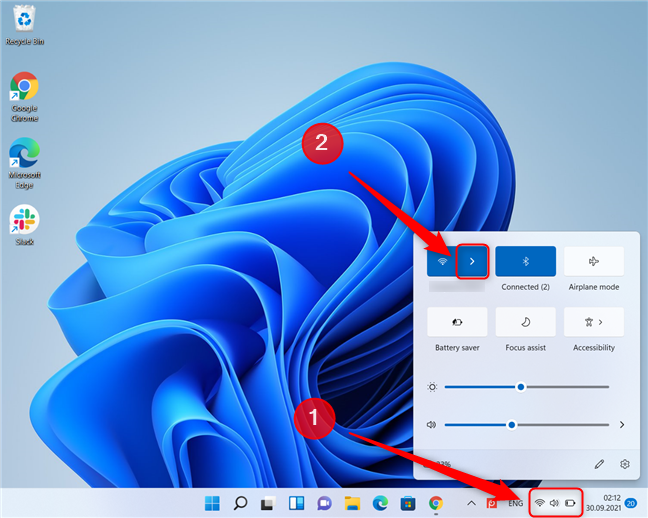
在Windows 11(Windows 11)中连接到隐藏的 Wi-Fi(Wi-Fi)网络并非易事。在本教程中,我们将解释何时使用隐藏网络有用,访问隐藏Wi-Fi需要哪些信息,以及如何连接到笔记本电脑、平板电脑和其他装有Windows 11的设备上的隐藏网络。让我们从回答一个简单的问题开始:什么是隐藏的Wi-Fi网络? 什么是隐藏的 Wi-Fi 网络?隐藏网络什么时候有用?通常,Wi-Fi 网络向范围内的所有设备广播其名称(也称为服务集标识符(Service Set Identifier)或SSID),使用户可以轻松选择他们想要连接的网络。当网络配置为隐藏时,它不会广播其名称。相反,客户端设备必须通过广播它尝试连接的网络的正确名称来“建立联系”。 与流行的看法相反,隐藏的 Wi-Fi 网络并不安全。它们具有相同的加密协议,因此唯一使它们与众不同的是它们不广播自己的名字。隐藏 Wi-Fi 网络的主要原因是防止不受欢迎的用户和临时攻击者试图连接到它。但是,坚定的攻击者仍然可以找到隐藏的网络(find a hidden network)。 要连接到隐藏的 Wi-Fi 网络,您需要了解以下详细信息: 网络的确切名称 安全类型(WEP、WPA2 等) 隐藏网络使用的密码(也称为安全密钥)然后,您有几种连接方式,我们将在下一节中进行解释。 1. 如何使用快速设置连接到隐藏的 Wi-Fi 网络(Quick Settings)将 Windows 11 设备连接到隐藏的 Wi-Fi 网络的最直接方法是访问快速设置(Quick Settings)。首先,确保您的 Wi-Fi 适配器已打开,(your Wi-Fi adapter is turned on)并且您在要连接的隐藏网络范围内。然后按键盘上的Win + A打开快速设置(Quick Settings)。或者,单击或点击屏幕右下角的任何Wi-Fi 、音量或电池图标。(Wi-Fi)在快速设置(Quick Settings )窗口中,按 Wi-Fi 符号旁边的箭头(“管理 Wi-Fi 连接(Manage Wi-Fi connections)”)。
从快速设置(Quick Settings)中打开网络列表 Windows 11 显示设备范围内的所有Wi-Fi网络的列表。(Wi-Fi)查找名为Hidden network的条目。它应该是列表中的最后一个条目。如果隐藏网络条目不存在,请跳转到本文的下一部分。(If the Hidden network entry is not present, jump to the next section of this article.)如果该条目存在,单击它以选择它,然后单击Connect。如果您打算定期使用此 Wi-Fi 网络并且不想每次都手动连接,请勾选“自动连接”复选框。(Connect automatically)
在列表中选择隐藏网络(Select Hidden Network),然后单击或点击连接(Connect) 输入网络名称并按Next。
输入(Enter)隐藏网络的名称,然后点击下一步 现在,输入隐藏Wi-Fi(Wi-Fi)网络的密码(安全密钥),然后按Next。
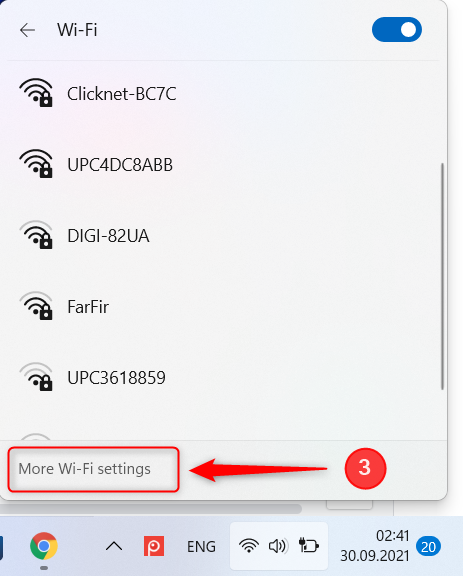
输入(Enter)隐藏网络的密码,然后单击或点击下一步 您的 Windows 11 笔记本电脑或平板电脑将连接到隐藏网络。 2. 使用设置(Settings)应用程序连接到隐藏的 Wi-Fi 网络有时第一种方法可能会失败,因为您要连接的 Wi-Fi 网络在 Wi-Fi 网络列表中未显示(Wi-Fi)为隐藏(Wi-Fi)网络。(Hidden network )如果是这种情况,您需要在打开网络列表后单击/点击更多 Wi-Fi 设置(More Wi-Fi settings)(请参阅本教程上一部分的步骤 1 和 2)。
从Windows 11(Windows 11)中的网络列表访问“设置”应用(Settings) 这将打开设置(Settings)应用程序的网络和互联网(Network & internet)部分。要到达同一个地方,您也可以打开(open Settings)设置(Settings),然后转到“Network & internet -> Wi-Fi.”单击或点击“管理已知网络(Manage known networks)”。
单击(Click)管理(Manage)已知网络以查看网络列表 按屏幕右侧的添加网络按钮。(Add network )然后您需要输入网络名称并选择隐藏网络的安全类型。
在“设置”中添加新的 Wi-Fi 网络 如果网络有加密,您现在必须输入密码。勾选“即使此网络没有广播也连接(Connect even if this network is not broadcasting)”旁边的复选框。如果您打算定期使用此 Wi-Fi 网络并且不想每次都手动连接,请勾选“自动连接”复选框。(Connect automatically)接下来,单击保存(Save)。
输入(Enter)密码并配置新网络 重要提示:(IMPORTANT: )选中“即使此网络未广播也连接(Connect even if this network is not broadcasting)”复选框可能会使您的隐私受到威胁,因为您的设备会主动搜索隐藏网络,即使它不在范围内。然后可以由熟练的专业人员截取该广播。这也意味着您的设备将使用更多的能量,因此如果它使用电池运行,请考虑到这一点。 隐藏的网络现在将显示在快速设置(Quick settings)Wi-Fi 网络列表中。如果您没有连接到网络并且您选中了自动连接(Connect automatically)复选框,您的设备将连接到隐藏网络。
使用快速设置(Quick Settings)连接到隐藏网络 如果您没有选择自动连接,您现在必须手动连接到隐藏的Wi-Fi网络。继续并关闭“设置”(Settings )应用,然后返回“快速设置”( Quick Settings )(Win+A)。单击Wi-Fi(Wi-Fi)图标旁边的箭头。在列表中,选择新创建的条目,然后单击或点击Connect。 3. 使用控制面板(Control Panel)和“设置(Set)连接或网络”向导连接到隐藏网络第三种方法自Windows XP时代以来就已经存在,并且基本保持不变。要使用“设置连接或网络(Set Up a Connection or Network)”向导连接到隐藏的 Wi-Fi 网络,首先打开控制面板(open the Control Panel)。一种方法是打开开始菜单(Start Menu),键入“控制面板(control panel)”并按Enter (或在结果列表中选择控制面板)。(Control Panel)接下来,单击或点击网络和 Internet(Network and Internet)下方的“查看网络状态和任务(View network status and tasks)” 。
使用控制面板(Use Control Panel)连接到Windows 11中的隐藏网络(Windows 11) 现在,单击或点击窗口下部的“设置新连接或网络”。(Set up a new connection or network)
在Windows 11(Windows 11)中启动“设置(Set)连接或网络”向导 这将启动“设置连接或网络(Set Up a Connection or Network)”向导。选择“手动连接到无线网络(Manually connect to a wireless network)”并单击或点击下一步(Next)。
单击(Click)手动(Manually)连接到无线网络 在适当的字段中输入您的(Enter)WiFi网络的安全信息,如下所示: (Enter)在网络名称(Network name)字段中输入网络名称。 在安全类型(Security type)字段中,选择隐藏无线网络使用的安全类型。 在安全密钥(Security key)字段中,输入隐藏WiFi网络的密码。 如果您不想让其他人看到您输入的密码,请选中“隐藏字符(Hide characters)”复选框。 如果您希望您的设备在范围内时自动连接到此网络,请选中“自动开始此连接(tart this connection automatically)”框。 选中“即使网络未广播也连接”框。(Connect even if the network is not broadcasting.)这会使 Windows 11 定期搜索隐藏网络,即使您的设备不在其覆盖范围内。完成所有内容后,单击Next。
输入(Enter)隐藏网络的详细信息 如果您当前未连接到另一个网络并且您选中了“自动启动此连接(tart this connection automatically)”框,您的设备将自动连接到隐藏网络。单击关闭(Close),然后关闭控制面板(Control Panel)窗口。
关闭“设置(Set)连接或网络”向导 如果您没有选择自动连接,您现在必须手动连接到隐藏的Wi-Fi网络,方法是转到Quick Settings (Win+A)Wi-Fi图标旁边的箭头并选择您刚刚的网络创建的。最后,单击或点击Connect,您就完成了。 您是在家中还是在办公室访问隐藏网络?希望您现在知道如何连接到隐藏的网络,并对它们有更多的了解。在离开之前,我们很想知道您是否在家中、办公室或旅行时使用隐藏网络。此外,如果您知道本文未探讨的在Windows 11中连接到隐藏Wi-Fi网络的方法,请告诉我们,我们将对其进行更新。 3 ways to connect to hidden Wi-Fi networks in Windows 11 -Connecting to hidden Wi-Fi networks in Windows 11 is not an easy task. In this tutorial, we explain when it іs useful to use a hidden network, what information is required in order to access a hidden Wi-Fi, and how to connect to hidden networks on laptops, tablеts, аnd other devices with Windows 11. Let’s start bу answering a simple question: what’s a hidden Wi-Fi network? What’s a hidden Wi-Fi network? When is a hidden network useful?Usually, Wi-Fi networks broadcast their name (also known as Service Set Identifier, or SSID) to all devices within range, making it easy for the users to select the network they want to connect to. When a network is configured as hidden, it does not broadcast its name. Instead, the client device must “make contact”, by broadcasting the correct name of the network it’s trying to connect to. Contrary to popular belief, hidden Wi-Fi networks are not more secure. They have the same encryption protocols, so the only thing that makes them special is the fact that they don’t broadcast their name. The main reason to hide a Wi-Fi network is to prevent unwanted users and casual attackers from trying to connect to it. A determined attacker can still find a hidden network though. To connect to a hidden Wi-Fi network, you need to know the following details: The exact name of the network The security type (WEP, WPA2, etc.) The password (also known as the security key) used by the hidden networkYou then have several ways of connecting, which we explain in the next sections. 1. How to connect to a hidden Wi-Fi network using Quick SettingsThe most straightforward method of connecting your Windows 11 device to a hidden Wi-Fi network is by accessing Quick Settings. First, make sure your Wi-Fi adapter is turned on and you are in range of the hidden network you want to connect to. Then press Win + A on your keyboard to open Quick Settings. Alternatively, click or tap on any of the Wi-Fi, volume, or battery icons in the lower right corner of the screen. In the Quick Settings window, press the arrow next to the Wi-Fi symbol (“Manage Wi-Fi connections”).
Open the network list from Quick Settings Windows 11 displays a list of all the Wi-Fi networks that are in range of your device. Look for an entry named Hidden network. It should be the last entry in the list. If the Hidden network entry is not present, jump to the next section of this article. If the entry is present, click on it to select it, then click on Connect. Also tick the “Connect automatically” checkbox if you plan to use this Wi-Fi network regularly and don’t want to connect manually each time.
Select Hidden Network in the list and click or tap on Connect Type the network name and press Next.
Enter the name of the hidden network and hit Next Now, enter the password (the security key) of the hidden Wi-Fi network and press Next.
Enter the password of the hidden network and click or tap on Next Your Windows 11 laptop or tablet will connect to the hidden network. 2. Connecting to a hidden Wi-Fi network using the Settings appSometimes the first method may fail because the Wi-Fi network you want to connect to doesn’t appear as Hidden network in the Wi-Fi network list. If this is the case, you need to click/tap on More Wi-Fi settings after opening the network list (see steps 1 and 2 from the previous section of this tutorial).
Access the Settings app from the network list in Windows 11 This opens the Network & internet section of the Settings app. To get to the same place, you can also open Settings, and go to “Network & internet -> Wi-Fi.” Click or tap on “Manage known networks.”
Click on Manage known networks to see the networks list Press on the Add network button, on the right side of the screen. You then need to enter the network name and choose the security type of the hidden network.
Add a new Wi-Fi network in Settings If the network has encryption, you now have to input the password. Tick the checkbox next to “Connect even if this network is not broadcasting.” Also tick the “Connect automatically” checkbox if you plan to use this Wi-Fi network regularly and don’t want to connect manually each time. Next, click on Save.
Enter the password and configure the new network IMPORTANT: Checking the “Connect even if this network is not broadcasting” checkbox may put your privacy at risk, since your device will actively search for the hidden network even if it’s not in range. This broadcast can then be intercepted by skilled professionals. It also means that your device will use slightly more energy, so if it runs on batteries, take this into consideration. The hidden network will now show up in the Quick settings Wi-Fi network list. If you are not connected to a network and you checked the Connect automatically checkbox, your device will connect to the hidden network.
Connect to the hidden network using Quick Settings If you didn’t choose to connect automatically, you now have to connect to the hidden Wi-Fi network manually. Go ahead and close the Settings app, then go back to Quick Settings (Win+A). Click the arrow next to the Wi-Fi icon. In the list, select the newly created entry, then click or tap on Connect. 3. Connecting to a hidden network using the Control Panel and the "Set Up a Connection or Network" wizardThis third method has been around since the days of Windows XP, and has remained largely unchanged. To connect to a hidden Wi-Fi network using the "Set Up a Connection or Network" wizard, first open the Control Panel. One way to do it is by opening the Start Menu, typing “control panel” and pressing Enter (or selecting Control Panel in the results list). Next, click or tap on “View network status and tasks,” below Network and Internet.
Use Control Panel to connect to a hidden network in Windows 11 Now, click or tap on "Set up a new connection or network" in the lower part of the window.
Start the "Set Up a Connection or Network" wizard in Windows 11 This starts the "Set Up a Connection or Network" wizard. Choose "Manually connect to a wireless network" and click or tap Next.
Click on Manually connect to a wireless network Enter the security information for your WiFi network in the appropriate fields, as follows: Enter the name of the network in the Network name field. In the Security type field, choose the type of security used by the hidden wireless network. In the Security key field, enter the password of the hidden WiFi network. If you do not want others to see the password you type, check the "Hide characters" checkbox. If you want your device to connect to this network automatically when in range, check the box that says "Start this connection automatically." Check the box that says "Connect even if the network is not broadcasting." This makes Windows 11 search for the hidden network periodically, even if your device is not in its coverage area.When done completing everything, click Next.
Enter the details of the hidden network If you are not currently connected to another network and you checked the box that says "Start this connection automatically," your device will automatically connect to the hidden network. Click Close and then close the Control Panel window.
Close the "Set Up a Connection or Network" wizard If you didn’t choose to connect automatically, you now have to connect to the hidden Wi-Fi network manually by going to Quick Settings (Win+A), clicking the arrow next to the Wi-Fi icon and selecting the network you just created. Finally, click or tap on Connect, and you’re done. Do you access hidden networks at home or at the office?Hopefully, you now know how to connect to hidden networks and have gained more insight on them. Before leaving, we’d love to know if you use hidden networks at home, at the office, or when traveling. Also, if you know of a method to connect to hidden Wi-Fi networks in Windows 11 that we haven’t explored in this article, let us know and we will update it. |


【本文地址】