| 安卓应用接入谷歌内购支付完整教程(源码) | 您所在的位置:网站首页 › 谷歌付款信息免税设置 › 安卓应用接入谷歌内购支付完整教程(源码) |
安卓应用接入谷歌内购支付完整教程(源码)
|
GooglePay 谷歌支付内购接入小结
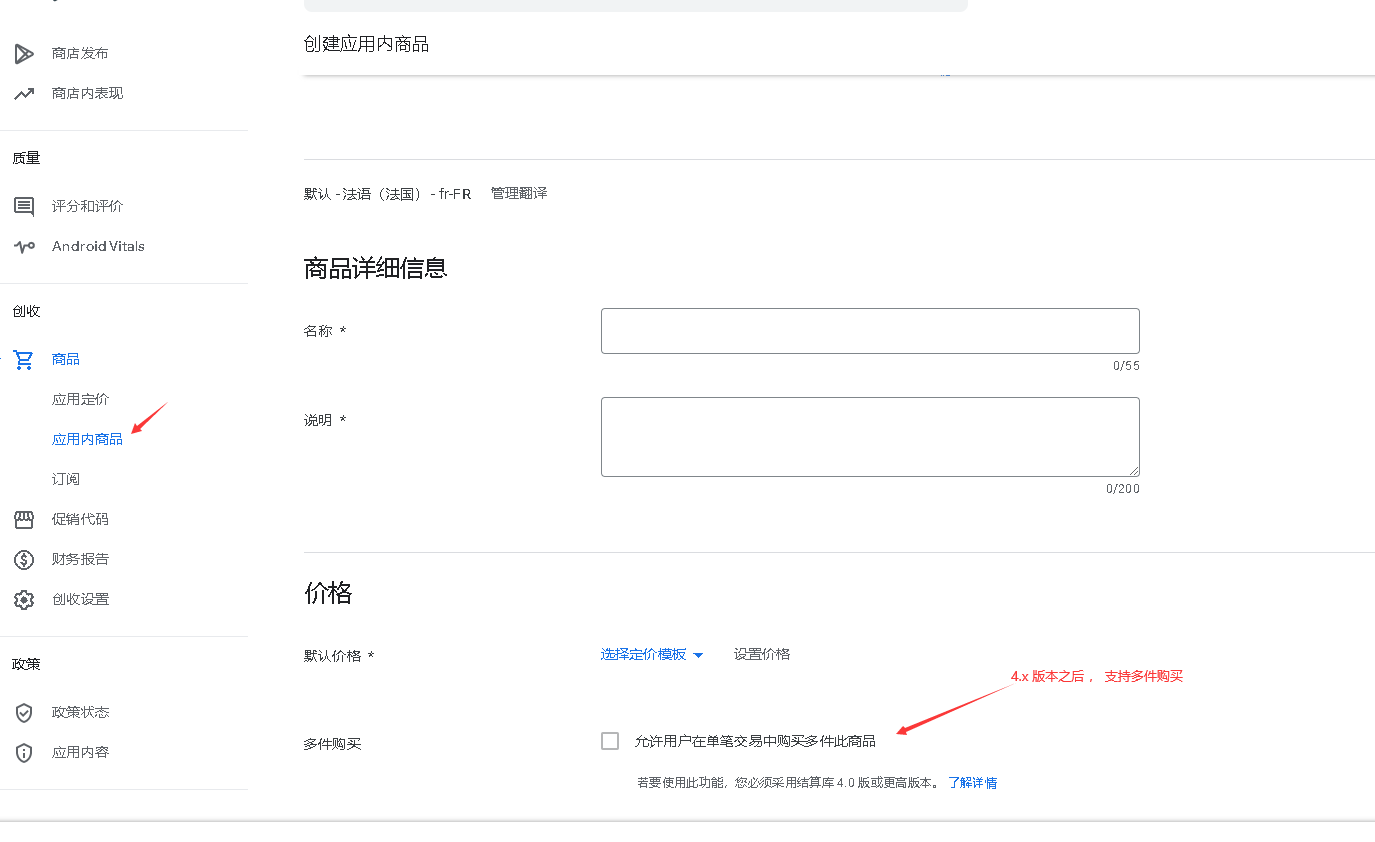
丿独狼灬望曰 GooglePay 谷歌支付内购接入小结 - 简书 (jianshu.com) 近段时间在做安卓的海外项目,项目中需要使用Google Play支付,小编把Google支付的相关代码整理下 文档地址: 1.准备文档:https://developer.android.com/google/play/billing/getting-ready 2.集成文档:https://developer.android.com/google/play/billing/integrate 一、前期准备设置 Google Play 开发者帐号 如需在 Google Play 上发布您的应用和游戏,请使用 Google Play 管理中心。您还可以使用 Google Play 管理中心管理与结算相关的商品和设置。 如需访问 Google Play 管理中心,您需要设置 Google Play 开发者帐号。 如需在 Google Play 上销售付费应用和应用内购商品,您还必须在 Google 付款中心设置付款资料,然后将该付款资料与您的 Google Play 开发者帐号相关联。如需了解如何将您的付款资料与帐号相关联,或者了解如何检查您是否已有关联的帐号和付款资料,请参阅将 Google Play 开发者帐号与您的付款资料相关联。 创建商品
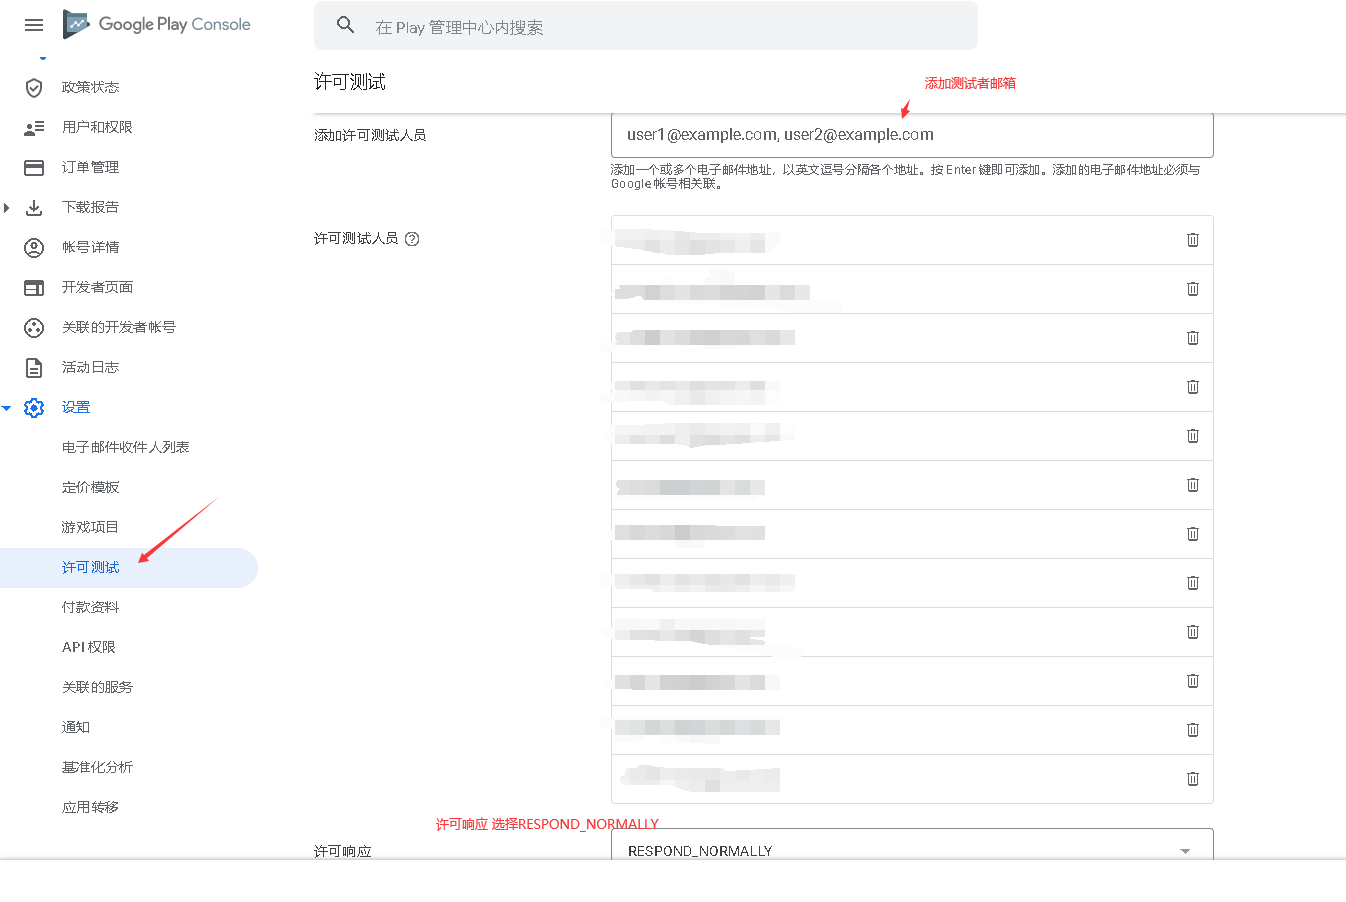
商品创建.png 添加测试账号
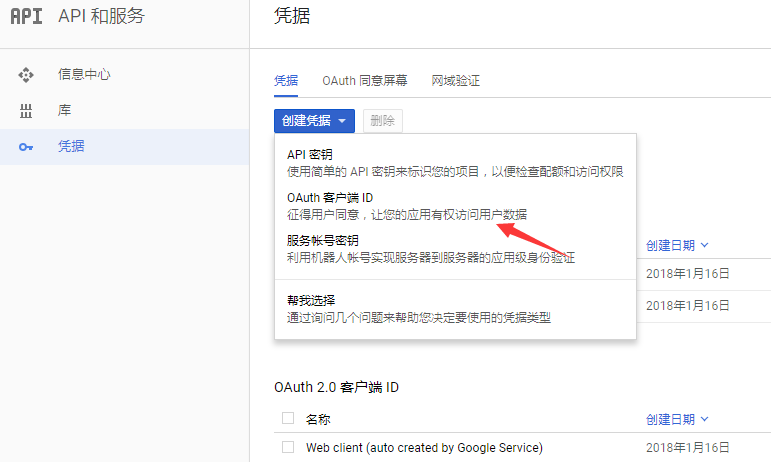
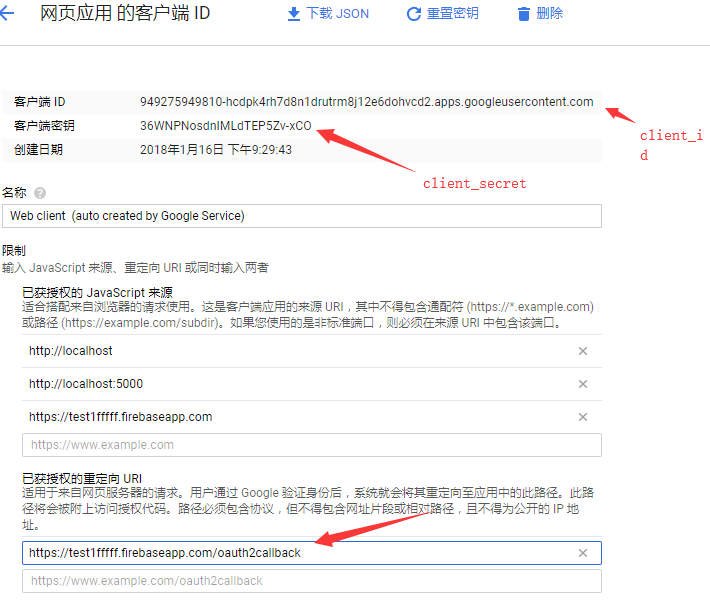
添加测试账号.png 二、集成 implementation 'com.android.billingclient:billing:5.0.0' 三、代码整理GoogleBillingManager :处理支付的启动连接,关闭连接等操作 GoogleBillHelper:处理查询、购买、消耗等操作 GoogleBillingListener:自定义的监听:消耗,购买,查询的监听,(可自定义。不使用) 下面附上相关代码 GoogleBillingManager.java import android.content.Context; import android.util.Log; import androidx.annotation.NonNull; import androidx.annotation.Nullable; import com.android.billingclient.api.BillingClient; import com.android.billingclient.api.BillingClientStateListener; import com.android.billingclient.api.BillingResult; import com.android.billingclient.api.Purchase; import com.android.billingclient.api.PurchasesUpdatedListener; import java.util.List; /** * @author by ddy * Date: 2022/5/23 16:19 * Desc:Google 支付管理 */ public class GoogleBillingManager { private static GoogleBillingManager instance; private BillingClient billingClient; private GoogleBillingListener billingListener; private GoogleBillingManager() { } public static GoogleBillingManager getInstance() { if (instance == null) { synchronized (GoogleBillingManager.class) { if (instance == null) { instance = new GoogleBillingManager(); } } } return instance; } /** * 创建支付客户端 */ public void createClient(Context context) { if (null == context) { return; } billingClient = BillingClient.newBuilder(context.getApplicationContext()) .enablePendingPurchases() .setListener(new PurchasesUpdatedListener() { @Override public void onPurchasesUpdated(@NonNull BillingResult billingResult, @Nullable List purchases) { if (null != billingListener) { billingListener.onPurchasesUpdated(billingResult, purchases); } } }) .build(); //启动支付连接 startConn(); } public BillingClient getBillingClient() { return billingClient; } /** * 添加监听事件 */ public void setBillingListener(GoogleBillingListener billingListener) { this.billingListener = billingListener; } /** * 是否准备好了 * * @return */ public boolean isReady() { return !(null == billingClient || !billingClient.isReady()); } /** * 启动连接 */ private void startConn() { if (isReady()) { return; } billingClient.startConnection(new BillingClientStateListener() { @Override public void onBillingSetupFinished(BillingResult billingResult) { if (billingResult.getResponseCode() == BillingClient.BillingResponseCode.OK) { Log.e("TAG", "连接成功,可以开始操作了~~~"); } } @Override public void onBillingServiceDisconnected() { //连接失败。 可以尝试调用 startConnection 重新建立连接 Log.e("TAG", "连接失败"); } }); } /** * 结束连接 */ public void endConn() { if (null != billingClient) { billingClient.endConnection(); } } }GoogleBillHelper .java package googleBilling; import android.app.Activity; import android.util.Log; import com.android.billingclient.api.BillingClient; import com.android.billingclient.api.BillingFlowParams; import com.android.billingclient.api.ConsumeParams; import com.android.billingclient.api.ConsumeResponseListener; import com.android.billingclient.api.ProductDetails; import com.android.billingclient.api.Purchase; import com.android.billingclient.api.QueryProductDetailsParams; import java.util.ArrayList; import java.util.List; /** * @author by ddy * Date: 2022/5/23 17:03 * Desc:支付的具体操作 * 1.查询 * 2.购买 * 3.消费 */ public class GoogleBillHelper { public static final String TAG = GoogleBillHelper.class.getSimpleName(); /** * 查询商品详情 * * @param billingListener : 接口监听 * @param productIds :商品id 。对应Google 后台的 * @param productType :取值 * BillingClient.ProductType.INAPP(一次性商品) * BillingClient.ProductType.SUBS(订阅) */ public void onQuerySkuDetailsAsync(GoogleBillingListener billingListener, String productType, String... productIds) { if (null == productIds || productIds.length == 0 || !GoogleBillingManager.getInstance().isReady() ) { return; } List skuList = new ArrayList(); for (String productId : productIds) { QueryProductDetailsParams.Product product = QueryProductDetailsParams .Product.newBuilder() .setProductId(productId) .setProductType(productType) .build(); //添加对应的 产品id 去查询详情 skuList.add(product); } QueryProductDetailsParams params = QueryProductDetailsParams .newBuilder() .setProductList(skuList) .build(); GoogleBillingManager.getInstance().getBillingClient().queryProductDetailsAsync(params, (billingResult, list) -> { if (BillingClient.BillingResponseCode.OK == billingResult.getResponseCode()) { if (null != billingListener) { billingListener.onProductDetailsSus(list); } } else { Log.e("TAG", "code : " + billingResult.getResponseCode() + " message : " + billingResult.getDebugMessage()); } }); } /** * 打开支付面板 * * @param billingListener * @param activity * @param details */ public void onOpenGooglePlay(GoogleBillingListener billingListener, Activity activity, ProductDetails details) { if (null == details) { return; } List params = new ArrayList(); //添加购买数据 BillingFlowParams.ProductDetailsParams productDetailsParams = BillingFlowParams.ProductDetailsParams .newBuilder() .setProductDetails(details) .build(); params.add(productDetailsParams); BillingFlowParams billingFlowParams = BillingFlowParams.newBuilder() .setProductDetailsParamsList(params) .build(); //响应code 码 int responseCode = GoogleBillingManager.getInstance().getBillingClient().launchBillingFlow(activity, billingFlowParams).getResponseCode(); //成功换起 if (BillingClient.BillingResponseCode.OK == responseCode) { //添加购买监听 GoogleBillingManager.getInstance().setBillingListener(billingListener); } } /** * 消费商品 * 对于购买类型的商品需要手动调用一次消费方法 (目的:用户可以再次购买此商品) * * @param billingListener * @param purchase */ public void onConsumeAsync(GoogleBillingListener billingListener, Purchase purchase) { if (!GoogleBillingManager.getInstance().isReady()) { return; } ConsumeParams consumeParams = ConsumeParams.newBuilder() .setPurchaseToken(purchase.getPurchaseToken()) .build(); ConsumeResponseListener listener = (billingResult, purchaseToken) -> { if (billingResult.getResponseCode() == BillingClient.BillingResponseCode.OK) { if (null != billingListener) { billingListener.onConsumeSus(purchaseToken); } else { Log.e(TAG, "消费失败 code : " + billingResult.getResponseCode() + " message : " + billingResult.getDebugMessage()); } } }; GoogleBillingManager.getInstance().getBillingClient().consumeAsync(consumeParams, listener); } }GoogleBillingListener.java package googleBilling; import com.android.billingclient.api.BillingResult; import com.android.billingclient.api.ProductDetails; import com.android.billingclient.api.Purchase; import java.util.List; /** * @author by ddy * Date: 2022/5/23 17:12 * Desc:监听 */ public interface GoogleBillingListener { /** * 购买监听 * * @param result * @param purchases */ default void onPurchasesUpdated(BillingResult result, List purchases) { } /** * 查询商品详情成功 * * @param list */ default void onProductDetailsSus(List list) { } /** * 商品消费成功 * * @param purchaseToken */ default void onConsumeSus(String purchaseToken) { } } 三、支付流程步骤1.与Google Play建立支付连接 2.查询购买商品详情数据 3.唤起支付面板 4.支付结果回调 5.消费商品(对于购买类商品在购买完,需将其消费掉) 四、Demo示例 import android.os.Bundle; import android.util.Log; import android.view.View; import androidx.appcompat.app.AppCompatActivity; import com.android.billingclient.api.BillingClient; import com.android.billingclient.api.BillingResult; import com.android.billingclient.api.ProductDetails; import com.android.billingclient.api.Purchase; import java.util.List; import googleBilling.GoogleBillHelper; import googleBilling.GoogleBillingListener; import googleBilling.GoogleBillingManager; public class MainActivity extends AppCompatActivity { private GoogleBillHelper billProxy = new GoogleBillHelper(); private GoogleBillingListenerImpl billingListenerImpl = new GoogleBillingListenerImpl(); @Override protected void onCreate(Bundle savedInstanceState) { super.onCreate(savedInstanceState); setContentView(R.layout.activity_main); //建立连接 GoogleBillingManager.getInstance().createClient(this); } @Override protected void onDestroy() { super.onDestroy(); //结束连接 GoogleBillingManager.getInstance().endConn(); } /** * 点击购买 * 换起Google 支付面前 ,需要查询是否有对应的APP商品 * @param view */ public void onClickGooglePlay(View view) { billProxy .onQuerySkuDetailsAsync( billingListenerImpl, BillingClient.ProductType.INAPP, "谷歌后台的商品id名字"); } //事件监听 private class GoogleBillingListenerImpl implements GoogleBillingListener { /** * 产品查询成功 * * @param list */ @Override public void onProductDetailsSus(List list) { GoogleBillingListener.super.onProductDetailsSus(list); if (null == list || list.size() 后台不一致,查询不到不会返回该商品的详情数据,而3.0.3查询是所传的产品>Google Play 必须存在待续。。。。 五、总结1.在Google Play 控制台创建应用、应用内商品。 2.发布应用到内测版或者正式版。 3.在Google Play 控制台添加测试账号,用这个账号来测试支付。 到此,支付的基本操作已分享。自己动手试一试吧!如果你觉得该文章对你有用,动动你的小手指,举手之劳,赞有余香! 后端php支付验证部分:谷歌支付服务端详细讲解(PHP) - 走看看 (zoukankan.com) 前提:翻墙 1、注册账号google账号 https://accounts.google.com/SignUp 2、注册googleplay开发者账号 https://play.google.com/apps/publish/signup/ 这一步骤需要Google账号和带有Visa或Master等标志的银行卡或者信用卡,资费25美元 3、新建auth2.0应用 登陆 Google Developer Console,地址:https://code.google.com/apis/console/ 在APIs & auth 项中找到 Credentials,点击创建一个auth2.0 的web应用。其中callback的地址一定是可用域名 + /oauth2callback 创建完后,可以获得,client_id, client_secret, redirect_uri
4、get请求获取code 参数: scope=https://www.googleapis.com/auth/androidpublisher response_type=code access_type=offline redirect_uri=上一步获取的 client_id=上一步获取的 浏览器访问:https://accounts.google.com/o/oauth2/auth?scope=https://www.googleapis.com/auth/androidpublisher&response_type=code&access_type=offline&redirect_uri=https://test1fffff.firebaseapp.com/oauth2callback/oauth2callback&client_id=816630003638-5p27m684jfpfa6sh6l9chbpreq2hg9ov.apps.googleusercontent.com 获得:https://test1fffff.firebaseapp.com/oauth2callback/oauth2callback?code=4/CpVOd8CljO_gxTRE1M5jtwEFwf8gRD44vrmKNDi4GSS.kr-GHuseD-oZEnp6UADFXm0E0MD3FlAI该步骤获得code=4/CpVOd8CljO_gxTRE1M5jtwEFwf8gRD44vrmKNDi4GSS.kr-GHuseD-oZEnp6UADFXm0E0MD3FlAI 5、利用code 获取refresh_token (post请求) 地址: $refresh_token_url="https://accounts.google.com/o/oauth2/token"; 请求参数: $data_tmp1 = array( 'grant_type'=>'authorization_code', 'code'=>'',//上一步获取的 'client_id'=>'',//第三步获取 'client_secret'=>'',//第三步获取 'redirect_uri'=>'',//第三步获取 );$http = new http($refresh_token_url,'POST',5); $http->setContent($data_tmp1); $results = $http->exec(); echo $results; 会得到这样一个东西: { "access_token" : "", "token_type" : "Bearer", "expires_in" : 3600, "refresh_token" : "" } 注意:这个refresh_token只会返回一次,后面不会在有,一定要好好保存。 这一步也需要翻墙的,如果在linux上可直接用 curl -d "grant_type=authorization_code&code=4/AA96BteP0IlQj4DW48_2Uw8nVCyAWXswO1FvLftI09q1aomYPaxEo5urHY_Ij9VxKDoNh8rs6cIS8&client_id=5781114-v6f89h1jdlfnsou0ic53m5tie.apps.gooleusercontent.com&client_secret=wKsknqxSxwLPEBvirF&redirect_uri=https://test1fffff.firebaseapp.com" "https://accounts.google.com/o/oauth2/token"6、最后就可以开始写验证脚本了 public function JpGooglePay(){ $google_public_key = "你的公钥(google后台在你的应用下获取)"; $inapp_purchase_data = $_REQUEST['signtureTemp']; $inapp_data_signature = $_REQUEST['signtureDataTemp']; $key = "-----BEGIN PUBLIC KEY----- ".($google_public_key, 64," ").'-----END PUBLIC KEY-----'; $key = openssl_pkey_get_public($key); $signature = ($inapp_data_signature); $ok = openssl_verify($inapp_purchase_data,$signature,$key,OPENSSL_ALGO_SHA1); if (1 == $ok) { // 支付验证成功! //进行二次验证,订单查询 // 1.获取access_token(3600秒有效期) $access_token_url = "https://accounts.google.com/o/oauth2/token"; $data_tmp2 = array( 'grant_type'=>'refresh_token', 'refresh_token'=>'',//长效token 'client_id'=>'', //客户端id 'client_secret'=>'',//客户端密钥 ); $http = new http($access_token_url,'POST',5); $http->setContent($data_tmp2); $result = $http->(); $result = json_decode($contents,true); $access_token = $result['access_token']; //2.通过获得access_token 就可以请求谷歌的API接口,获得订单状态 $packageName=""//包名 $productId="" //产品Id $purchaseToken="" $url = "https://www.googleapis.com/androidpublisher/v2/applications/{$packageName}/purchases/products/{$productId}/tokens/{$purchaseToken}?access_token={$access_token}"; $http = new http($url,'GET',5); $http->setContent($data); $contents = $http->(); $contents = json_decode($contents,true); if($contents['consumptionState'] == 0 && $contents['purchaseState'] == 0){ //验证成功 购买成功并且没有消耗 google支付中客户端如果没有进行消耗是不能再次购买该商品 //处理游戏逻辑 发钻石,通知客户端进行消耗 }else{ //订单验证失败 } }else{ //签名验证失败 } } |
【本文地址】