| Latex 三线表制作,合并单元格, 加粗, 旋转等基于Overleaf | 您所在的位置:网站首页 › 论文怎么做三线表格 › Latex 三线表制作,合并单元格, 加粗, 旋转等基于Overleaf |
Latex 三线表制作,合并单元格, 加粗, 旋转等基于Overleaf
|
1 基础三线表
1.1 表格和图片中的h t b p 和!分别代表什么意思:
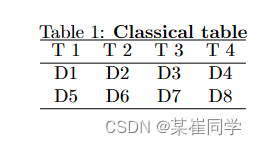
这些统称为Latex的浮动体参数,用于控制当前对象(图、表)等在页面上的相对位置。 h(here):代表将浮动体放在页面上的当前位置;t(top):代表将浮动体放在当前页面顶部;b(bottom):代表将浮动体放置在当前页面的底部;p:表示将浮动体放置在一页上。一般情况下,使用[!htbp]表示浮动体按照当前位置、页面顶部、页面底端和另一页搜寻最优位置。 1.2、经典三线表经典三线格无需依赖任何外置包 \documentclass{article} \begin{document} \begin{table}[!htbp] \caption{\textbf{Classical table}}%title \centering \begin{tabular}{cccc}% four columns \hline %begin the first line T 1 & T 2 & T 3 & T 4 \\ \hline %begin the second line D1 & D2 & D3 & D4 \\ D5 & D6 & D7 & D8 \\ \hline %begin the third line \end{tabular} \end{table} \end{document} 效果图如下:
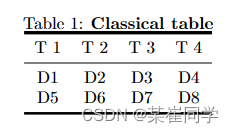
Latex 代码段:加粗主要导入的包有 \usepackage{booktabs}, 其中第一条线和最后一条线设置为2pt的线宽。 \documentclass{article} \usepackage{booktabs} % provide \toprule, \midrule, bottomrule \begin{document} \begin{table}[!htbp] \caption{\textbf{Classical table}}%title \centering \begin{tabular}{cccc}% four columns \toprule[2pt] %change the first line to \toprule T 1 & T 2 & T 3 & T 4 \\ \midrule %change the second line to midrule D1 & D2 & D3 & D4 \\ D5 & D6 & D7 & D8 \\ \bottomrule[2pt] %change the third line to bottomrule \end{tabular} \end{table} \end{document}
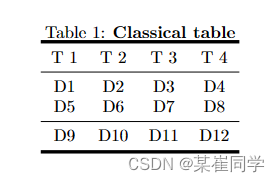
使用四线表的方式比较简单,即多加一行\midrule就能解决: \documentclass{article} \usepackage{booktabs} % provide \toprule, \midrule, bottomrule \begin{document} \begin{table}[!htbp] \caption{\textbf{Classical table}}%title \centering \begin{tabular}{cccc}% four columns \toprule[2pt] %change the first line to \toprule T 1 & T 2 & T 3 & T 4 \\ \midrule %change the second line to midrule D1 & D2 & D3 & D4 \\ D5 & D6 & D7 & D8 \\ \midrule D9 & D10 & D11 & D12 \\ \bottomrule[2pt] %change the third line to bottomrule \end{tabular} \end{table} \end{document}
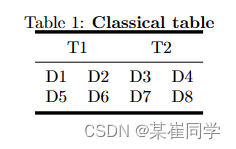
使用 \multicolumn合并行两列 \documentclass{article} \usepackage{booktabs} % provide \toprule, \midrule, bottomrule \begin{document} \begin{table}[!htbp] \caption{\textbf{Classical table}}%title \centering \begin{tabular}{cccc}% four columns \toprule[2pt] %change the first line to \toprule \multicolumn{2}{c}{T1} & \multicolumn{2}{c}{T2} \\ \midrule %change the second line to midrule D1 & D2 & D3 & D4 \\ D5 & D6 & D7 & D8 \\ \bottomrule[2pt] %change the third line to bottomrule \end{tabular} \end{table} \end{document}
注意,这里要修改一下表格整体的列数 \documentclass{article} \usepackage{booktabs} % provide \toprule, \midrule, bottomrule \begin{document} \begin{table}[!htbp] \caption{\textbf{Classical table}}%title \centering \begin{tabular}{ccccc}% four columns \toprule[2pt] %change the first line to \toprule \multicolumn{2}{c}{T1} & \multicolumn{3}{c}{T2} \\ \midrule %change the second line to midrule D1 & D2 & D3 & D4 & D9\\ D5 & D6 & D7 & D8 & D10\\ \bottomrule[2pt] %change the third line to bottomrule \end{tabular} \end{table} \end{document}
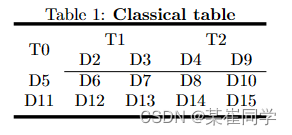
注意,这里需要导入\usepackage{multirow},便于后续的cline(插入不同长短的线)以及合并行操作。 2.3.1 \cline参数例如\cline{2-5},代表了该位置从第二列到第五列画线 \documentclass{article} \usepackage{booktabs} % provide \toprule, \midrule, bottomrule \usepackage{multirow} \begin{document} \begin{table}[!htbp] \caption{\textbf{Classical table}}%title \centering \begin{tabular}{ccccc}% four columns \toprule[2pt] %change the first line to \toprule \multirow{2}*{T0} & \multicolumn{2}{c}{T1} & \multicolumn{2}{c}{T2} \\ & D2 & D3 & D4 & D9\\ \cline{2-5} %change the second line to midrule D5 & D6 & D7 & D8 & D10\\ D11 & D12 & D13 & D14 & D15\\ \bottomrule[2pt] %change the third line to bottomrule \end{tabular} \end{table} \end{document}
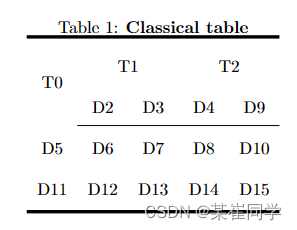
使用\renewcommand\arraystretch{}调整行间距 \documentclass{article} \usepackage{booktabs} % provide \toprule, \midrule, bottomrule \usepackage{multirow} \begin{document} \begin{table}[!htbp] \renewcommand\arraystretch{2.0} \caption{\textbf{Classical table}}%title \centering \begin{tabular}{ccccc}% four columns \toprule[2pt] %change the first line to \toprule \multirow{2}*{T0} & \multicolumn{2}{c}{T1} & \multicolumn{2}{c}{T2} \\ & D2 & D3 & D4 & D9\\ \cline{2-5} %change the second line to midrule D5 & D6 & D7 & D8 & D10\\ D11 & D12 & D13 & D14 & D15\\ \bottomrule[2pt] %change the third line to bottomrule \end{tabular} \end{table} \end{document}
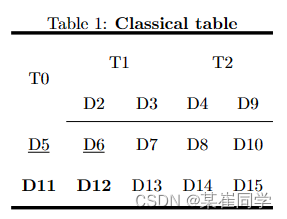
写论文时为了突出方法的有点,可以从大量的数据中表出最大值或者第二大值,使得表格的阅读性更佳。 \documentclass{article} \usepackage{booktabs} % provide \toprule, \midrule, bottomrule \usepackage{multirow} \begin{document} \begin{table}[!htbp] \renewcommand\arraystretch{2.0} \caption{\textbf{Classical table}}%title \centering \begin{tabular}{ccccc}% four columns \toprule[2pt] %change the first line to \toprule \multirow{2}*{T0} & \multicolumn{2}{c}{T1} & \multicolumn{2}{c}{T2} \\ & D2 & D3 & D4 & D9\\ \cline{2-5} %change the second line to midrule \underline{D5} & \underline{D6} & D7 & D8 & D10\\ \textbf{D11} & \textbf{D12} & D13 & D14 & D15\\ \bottomrule[2pt] %change the third line to bottomrule \end{tabular} \end{table} \end{document}
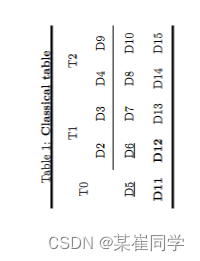
表格过大时需要进行翻转操作,旋转90°。使用sidewaystable代替table环境。 \documentclass{article} \usepackage{booktabs} % provide \toprule, \midrule, bottomrule \usepackage{multirow} \usepackage[figuresright]{rotating} \begin{document} \begin{sidewaystable}[!htbp] \renewcommand\arraystretch{2.0} \caption{\textbf{Classical table}}%title \centering \begin{tabular}{ccccc}% four columns \toprule[2pt] %change the first line to \toprule \multirow{2}*{T0} & \multicolumn{2}{c}{T1} & \multicolumn{2}{c}{T2} \\ & D2 & D3 & D4 & D9\\ \cline{2-5} %change the second line to midrule \underline{D5} & \underline{D6} & D7 & D8 & D10\\ \textbf{D11} & \textbf{D12} & D13 & D14 & D15\\ \bottomrule[2pt] %change the third line to bottomrule \end{tabular} \end{sidewaystable} \end{document}
Reference: reference1 reference2 reference3 |

【本文地址】