| c#开发邮件程序 | 您所在的位置:网站首页 › 江西高等职业学校排名前十 › c#开发邮件程序 |
c#开发邮件程序
|
c#开发邮件程序 Each one of us has our own approach to web development: a preferred editor, some helper tools, a personal project flow, and so on. When we deal with big or complex projects, it is essential to have a clear development path, to both save time and minimize errors. 我们每个人都有自己的Web开发方法:首选的编辑器,一些帮助工具,个人项目流程等。 当我们处理大型或复杂的项目时,至关重要的是要有一条清晰的开发路径,以节省时间并最大程度地减少错误。 In my experience, this is especially important when working on an HTML email project. Email requires so many repetitive tasks that are not particularly complex in themselves (not very often, at least), but which can become problematic because of the sheer number of elements and tasks that need to be checked. 以我的经验,这在处理HTML电子邮件项目时尤其重要。 电子邮件需要这么多重复的任务,这些任务本身并不是特别复杂(至少很少经常),但是由于需要检查的元素和任务数量庞大,因此可能会成为问题。 Here I’ll try to explain my personal workflow for HTML email development. I hope it’s useful for you to cherry-pick the parts you like. 在这里,我将尝试解释我用于HTML电子邮件开发的个人工作流程。 我希望对您喜欢的零件进行挑选对您很有用。 典型的电子邮件开发工作流程 (A Typical Email Development Workflow)A classic email development workflow has three primary steps (see my Crash course article for more details): 经典的电子邮件开发工作流程包括三个主要步骤(有关更多详细信息,请参见我的速成班课程文章 ): Authoring (with preliminary local testing) 创作(经过初步的本地测试) CSS inlining CSS内联 Testing 测试中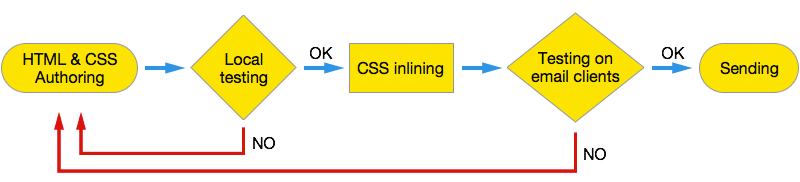
The final testing (with inlined CSS) is the step that requires more time since we’ll probably have to repeat it many times. Moreover, the “CSS inlining” and “Testing” tasks require a little extra work and attention: first, you’ll have to take care of preserving your original working copy from the inlined one. Also, the final testing requires you to send your inlined HTML to various accounts to check your design against various email clients. 最终测试(使用内联CSS)是需要更多时间的步骤,因为我们可能不得不重复多次。 此外,“ CSS内联”和“测试”任务需要一些额外的工作和精力:首先,您必须注意保留内联的原始工作副本。 此外,最终测试还要求您将内联HTML发送到各种帐户,以根据各种电子邮件客户端检查设计。 Sending your code by email is a little tricky, since most clients don’t allow you to compose an email by pasting HTML code in its body (the only one I know is Thunderbird). But every test requires many actions to compose the mail, inline the CSS, paste the code, etc. 通过电子邮件发送代码有些棘手,因为大多数客户端不允许您通过将HTML代码粘贴到邮件正文中来撰写电子邮件(我所知道的唯一一个是Thunderbird )。 但是每个测试都需要许多操作来编写邮件,内联CSS,粘贴代码等。 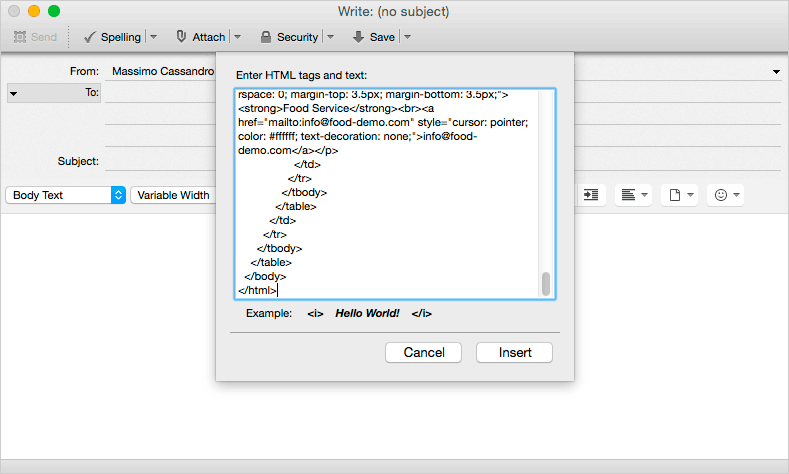
If you have a testing platform account (Litmus, Email On Acid, Campaign Monitor or some other), you can simplify the final testing task by submitting your inlined code to the test platform but in order to perform a more accurate test, you’ll still have to send them your code by mail. In the past, I used a little PHP script to send the test emails, which could save some time, but it still requires repeating certain tasks. 如果您拥有测试平台帐户( 石蕊 , 酸性邮件 , Campaign Monitor或其他),则可以通过将内联代码提交到测试平台来简化最终测试任务,但是为了执行更准确的测试,您将仍然必须通过邮件将代码发送给他们。 过去,我使用了一些PHP脚本来发送测试电子邮件,这可以节省一些时间,但是仍然需要重复执行某些任务。 Going back to CSS, you’ll probably have to deal with two files: one to be inlined and one to be embedded (for the clients that support media queries). 回到CSS,您可能必须处理两个文件:一个要内联,另一个要嵌入(对于支持媒体查询的客户端)。 You’ll have to edit the CSS to be inlined directly into your HTML file, then launch an inliner tool (the Mailchimp inliner, for example), and finally you have to embed the second CSS into the inlined file (It bores me just writing about it!). 您必须编辑要直接内联到HTML文件中CSS,然后启动一个内联工具(例如Mailchimp inliner ),最后您必须将第二个CSS嵌入到内联文件中(这让我无聊关于它!)。 We can now review our workflow scheme in a more detailed way: 现在,我们可以更详细地查看我们的工作流程方案: 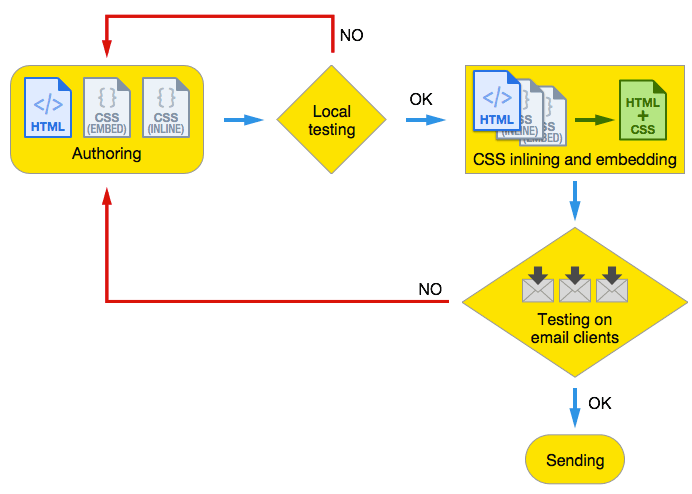
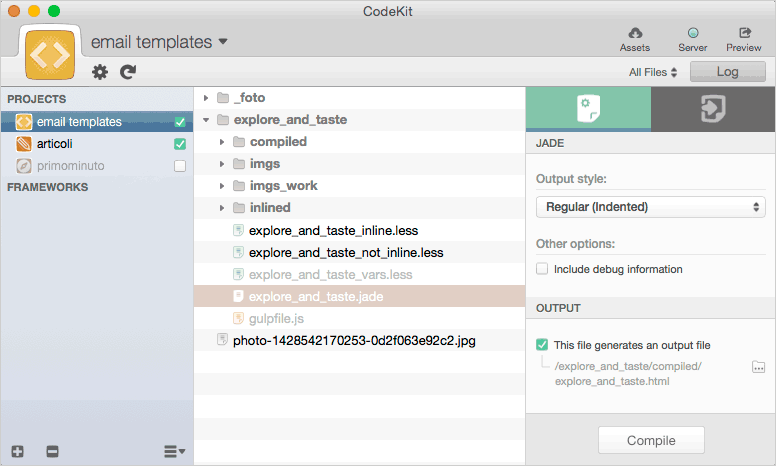
To get a real productive workflow, many issues are still unresolved, and repetitive steps are significantly above the creative ones, which rarely leads to a good job. 为了获得真正高效的工作流程,许多问题仍未解决,并且重复性步骤要比创造性步骤重要得多,这很少能带来出色的工作。 Luckily, we still have some cards to play: Preprocessors and task runners. 幸运的是,我们还有一些玩牌:预处理器和任务运行器。 添加HTML和CSS预处理器 (Adding HTML and CSS Preprocessors)When I began to use preprocessors, I immediately realized how they could be useful for email development. The need for extremely verbose code (especially for HTML), can be easily simplified by a preprocessor, both for HTML and for CSS. 当我开始使用预处理器时,我立即意识到它们如何对电子邮件开发有用。 通过HTML和CSS的预处理器可以轻松地简化对极其冗长的代码(尤其是HTML)的需求。 I mostly use Jade for HTML and Less for CSS, but you can choose the technologies you prefer. Jade is really useful when dealing with repetitive and confusing code, like nested tables. Take a look at the following sample of a three-level deep table. 我主要将Jade用于HTML,将Less用于CSS,但是您可以选择自己喜欢的技术。 当处理重复和令人困惑的代码(例如嵌套表)时,Jade确实有用。 看一下下面的三层深表示例。 cell 1 cell 2 cell 3The Jade lines that produce the same code are as follows: 产生相同代码的Jade行如下: table(width="100%" id="wrapper") tbody tr td(width="100%") table(class="header" align="center") tbody tr td(width="100%") table(width="100%") tbody tr td cell 1 td cell 2 td cell 3As you can see, there are no more problems with unclosed tags and the code is easy to read. 如您所见,未关闭的标签不再存在问题,并且代码易于阅读。 Using Jade you can create complex templates and build your own snippets library, reusing your code in more projects. You can do the same with Less or Sass. 使用Jade,您可以创建复杂的模板并构建自己的摘要库,从而在更多项目中重用代码。 您可以使用Less或Sass进行相同的操作。 You can compile your files with Gulp or Grunt, but in order to have a quick preview of you work, I’ve found that the best solution is offered by Coda and CodeKit. 您可以使用Gulp或Grunt编译文件,但是为了快速预览您的工作,我发现Coda和CodeKit提供了最好的解决方案。 The “local testing” task in our workflow gives us an initial feedback on our work, and it is essential that it doesn’t require additional actions to be performed. 工作流程中的“本地测试”任务为我们提供了有关工作的初步反馈,并且至关重要的是,它不需要执行其他操作。 CodeKit compiles our Jade and Less files on saving, and your project can be previewed in real time. Coda, on the other hand, allows you to edit your files and preview the auto-refreshed compiled file in a unique window: CodeKit会在保存时编译我们的Jade和Less文件,并且您的项目可以实时预览。 另一方面,Coda允许您编辑文件并在一个唯一的窗口中预览自动刷新的编译文件: 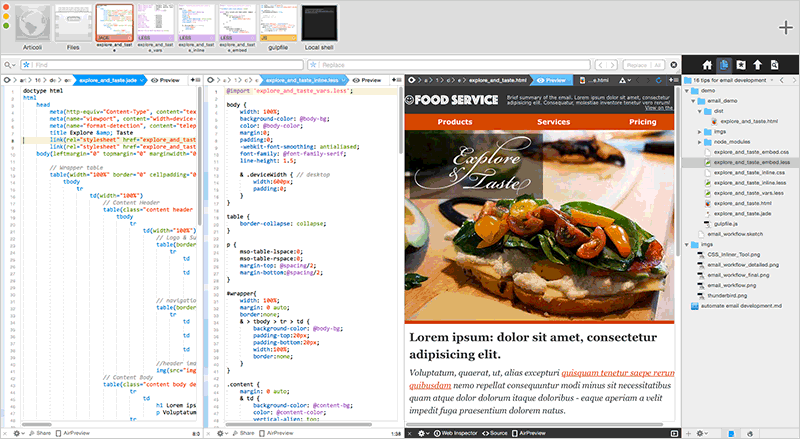
All these steps are completely automated, and you can focus your work on design rather than on less interesting, repetitive tasks. 所有这些步骤都是完全自动化的,您可以将工作集中在设计上,而不是专注于不太有趣的重复性任务。 Now, we have our Jade and Less file for authoring and the compiled HTML and CSS file for preview. The next step is to put it all together for the final test. 现在,我们有了Jade和Less文件来进行创作,并拥有编译后HTML和CSS文件来进行预览。 下一步是将所有内容放在一起进行最终测试。 Gulp快速测试 (Rapid testing with Gulp)I’ve researched a lot for some Gulp or Grunt script to automate the final steps of our workflow. npm offers many solutions, but in the end I chose the Gulp Email Builder package. This package is the Gulp version of a bigger project, and it has a Grunt version too if you prefer. 我已经研究了一些Gulp或Grunt脚本来自动化工作流程的最后步骤。 npm提供了许多解决方案,但最终我选择了Gulp Email Builder软件包 。 这个软件包是更大项目的Gulp版本,如果您愿意,它也具有Grunt版本。 Email Builder allows you to inline or embed CSS files, to perform tests using the Litmus APIs, and to send additional email for testing. Email Builder允许您内联或嵌入CSS文件,使用Litmus API执行测试,以及发送其他电子邮件进行测试。 To use Email Builder, you need, of course, to install Gulp. I’ve just wrote about this in my Customizing Bootstrap Icons using Gulp article, so you can take a look at that for help. In addition, you can read Etienne Margraff’s article on Gulp and Grunt workflows. 要使用电子邮件生成器,您当然需要安装Gulp。 我刚刚在使用Gulp定制引导图标中对此进行了介绍 ,因此您可以查看一下以寻求帮助。 此外,您可以阅读Etienne Margraff关于Gulp和Grunt工作流程的文章 。 Besides Email Builder, we will use the Gulp-Replace package, so you need to install that too. 除了Email Builder之外,我们还将使用Gulp-Replace软件包 ,因此您也需要安装它。 As with every Gulp task, we have to set up gulpfile.js: 与每个Gulp任务一样,我们必须设置gulpfile.js : var gulp = require('gulp'), emailBuilder = require('gulp-email-builder'), replace = require('gulp-replace'); var current_date = new Date().toString(), email_subject = 'Food Service', remote_imgs_basepath = 'http://mydomain.com/path/to/remote/imgs/', email_builder_options = { encodeSpecialChars: true, emailTest : { // Your Email email : '[email protected],' + '[email protected],' + '[email protected]', // Your email Subject subject : email_subject + ' [' + current_date + ']', // Optional transport: { type: 'SMTP', options: { service: 'gmail', auth: { user: '[email protected]', pass: 'my_password' } } } }, litmus : { username : 'Litmus_username', password : 'litmus_password', // Url to your Litmus account url : 'https://myaccount.litmus.com', // Optional, defaults to title of email or yyyy-mm-dd if and options.subject not set subject : email_subject, // Email clients to test for. Find them at https://litmus.com/emails/clients.xml // and use the `application_code` field applications : ['androidgmailapp','gmailnew', 'iphone5s'] } }; gulp.task('default', function() { gulp.src(['./explore_and_taste.html']) .pipe(replace(/src="imgs\//g, 'src="' + remote_imgs_basepath)) .pipe(emailBuilder(email_builder_options)) .pipe(gulp.dest('./ready_to_send')); });First, we include all the packages we need and set four variables: 首先,我们包含所需的所有软件包并设置四个变量: current_date is a string that represent the current date; we will use it to differentiate testing email subject lines, making it easier to distinguish the different versions. current_date是代表当前日期的字符串; 我们将使用它来区分测试电子邮件主题行,从而更容易区分不同版本。 email_subject email_subject remote_imgs_basepath is the url of the remote folder that contains our image. I use this to perform the local test by setting a relative path for images (in this way I can easily make all the changes I need), but the final tests (and the sending task) require that the images are uploaded in a remote folder, thus I change all src attributes with remote_imgs_basepath using Gulp Replace remote_imgs_basepath是包含我们的图像的远程文件夹的url。 我通过设置图像的相对路径来执行本地测试(通过这种方式,我可以轻松进行所需的所有更改),但是最终测试(和发送任务)要求将图像上传到远程文件夹中,因此我使用Gulp Replace更改了remote_imgs_basepath所有src属性 email_builder_options is an object to configure Email builder email_builder_options是用于配置电子邮件构建器的对象 In this example, the email_builder_options object has three elements, you can check out the email-builder-core page for a complete list of all available options. 在此示例中, email_builder_options对象包含三个元素,您可以检出email-builder-core页面以获取所有可用选项的完整列表。 The first element, encodeSpecialChars, ensures that all special characters are encoded to their HTML numerical form. 第一个元素encodeSpecialChars确保将所有特殊字符编码为它们HTML数字形式。 The emailTest element is used to set up email testing. It requires some parameters: emailTest元素用于设置电子邮件测试。 它需要一些参数: email: the comma separated email addresses to which we send the test email. I have an account for each email service I need to test (Gmail, Outlook, Yahoo, etc.), to quickly check them both in their web mail page and in mobile apps. email :用逗号分隔的电子邮件地址,我们将测试电子邮件发送到该电子邮件地址。 对于每个我需要测试的电子邮件服务(Gmail,Outlook,Yahoo等),我都有一个帐户,以便在其网页页面和移动应用程序中快速检查它们。 subject: the subject of the mail (note that I have added the current_date variable to quickly recognize which version I’m dealing with). subject :邮件的主题(请注意,我已经添加了current_date变量以快速识别我正在处理的版本)。 transport: the parameters the sender needs in order to perform this task transport :发送者执行此任务所需的参数 If you are using GMail for the transport parameter, you need to activate the “Allow less secure apps” in your Google account settings, otherwise the sending task will fail (best if you don’t use your personal account for this): 如果您使用GMail作为传输参数,则需要在Google帐户设置中激活“允许安全程度较低的应用程序”,否则发送任务将失败(最好不要为此使用个人帐户): 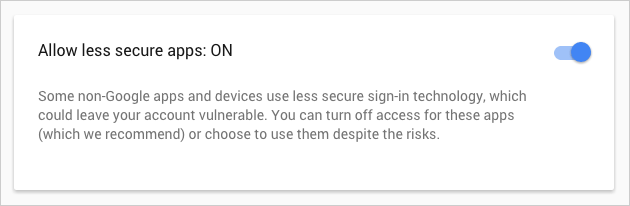
The third parameter allows you to set up a test on the Litmus platform (of course, you need a Litmus account). You must indicate your account parameters, an optional subject (it will be used to group tests, if you execute them more than once), and a list of email clients to be tested. 第三个参数允许您在Litmus平台上设置测试(当然,您需要一个Litmus帐户)。 您必须指出您的帐户参数,一个可选的主题(如果您多次执行它们,将用于对测试进行分组)以及要测试的电子邮件客户端列表。 To add a client, you must use its testing application code. You can get this from the application_code field of the https://litmus.com/emails/clients.xml file (note that you have to be logged in to access this file). 要添加客户端,您必须使用其测试应用程序代码 。 您可以从https://litmus.com/emails/clients.xml文件的application_code字段中获得此文件(请注意,必须登录才能访问此文件)。 In the above example, the line 在上面的示例中, applications : [‘androidgmailapp’,’gmailnew’, ‘iphone5s’]tells Litums to test our email with Gmail App (Android), Gmail (Explorer), and iPhone 5s (iOS7). 告诉Litums使用Gmail App(Android),Gmail(Explorer)和iPhone 5s(iOS7)测试我们的电子邮件。 Results can be viewed on Litmus just like hand-made ones: 可以在石蕊上查看结果,就像手工制作的一样: 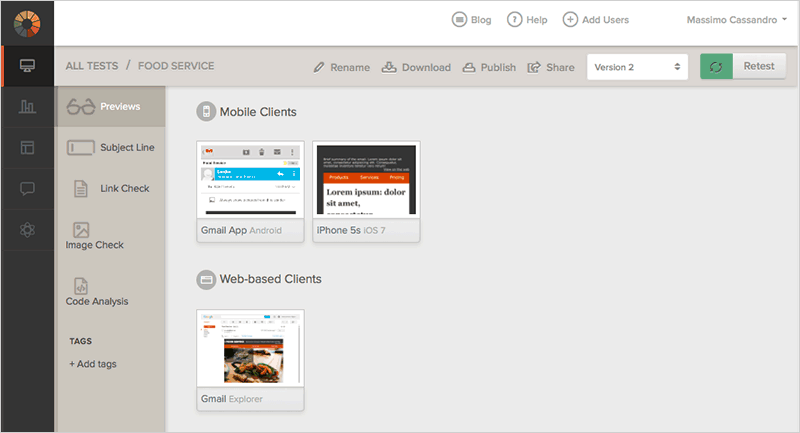
Of course, you can remove the litmus parameter from email_builder_options if you only want to perform email tests. 当然,如果您只想执行电子邮件测试,则可以从email_builder_options删除litmus参数。 The last lines of our gulpfile do all the work: gulpfile的最后gulpfile行完成所有工作: We first tell Gulp to use the explore_and_taste.html file for our job (this is the HTML produced by CodeKit from our Jade file, which we have just used for the first preview) 我们首先告诉Gulp为我们的工作使用explore_and_taste.html文件(这是CodeKit从我们的Jade文件中生成HTML,我们刚刚将其用于第一次预览) Using the replace module, all local paths are replaced with the remote path we’ve previously set (replace(/src="imgs\//g, 'src="' + remote_imgs_basepath)) 使用replace模块,所有本地路径都将替换为我们先前设置的远程路径( replace(/src="imgs\//g, 'src="' + remote_imgs_basepath) )) Finally, the EmailBuilder task is performed, tests are sent to Litmus and to the email addresses, and the ready-to-send file is registered. 最后,执行EmailBuilder任务,将测试发送到Litmus和电子邮件地址,并注册准备发送的文件。 And the CSS files? 还有CSS文件? Email Builder really simplifies this task in a definitive way. You have only to add a data attribute to your link or style tags to manage them: Email Builder确实以一种确定的方式简化了此任务。 您只需向link或style标签添加data属性即可对其进行管理: link or style tags without data attributes will be inlined 没有数据属性的link或style标签将被内联 If they have a data-embed attribute, the CSS rules will be embedded 如果它们具有data-embed属性,则将嵌入CSS规则 Finally, data-embed-ignore allows you to set some CSS rules for development purposes only (they will be ignored on processing). 最后, data-embed-ignore允许您仅出于开发目的设置一些CSS规则(在处理时将忽略它们)。 Again, Coda can simplify Gulp processing, allowing you to use its internal Terminal app: 同样,Coda可以简化Gulp的处理过程,从而允许您使用其内部的Terminal应用程序: 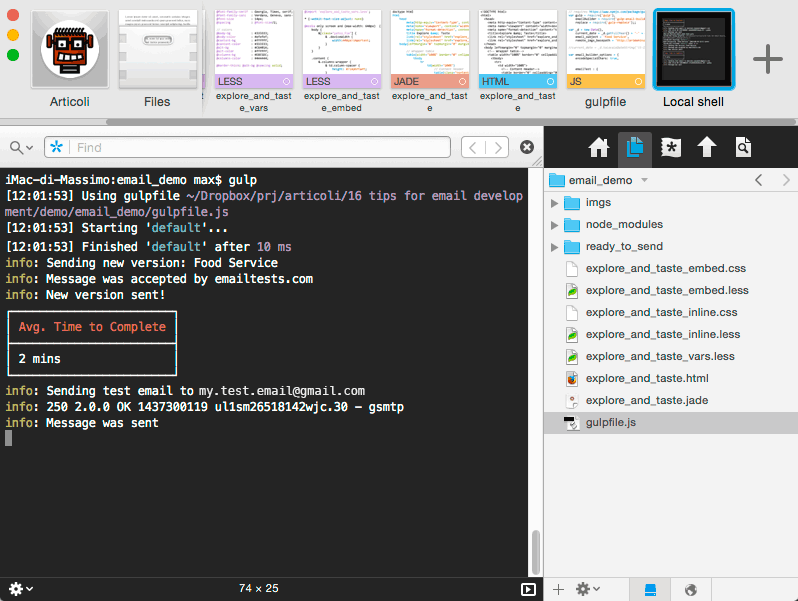 结论 (Conclusion)
Now we can definitively rearrange our workflow: 现在,我们可以确定地重新安排工作流程了: 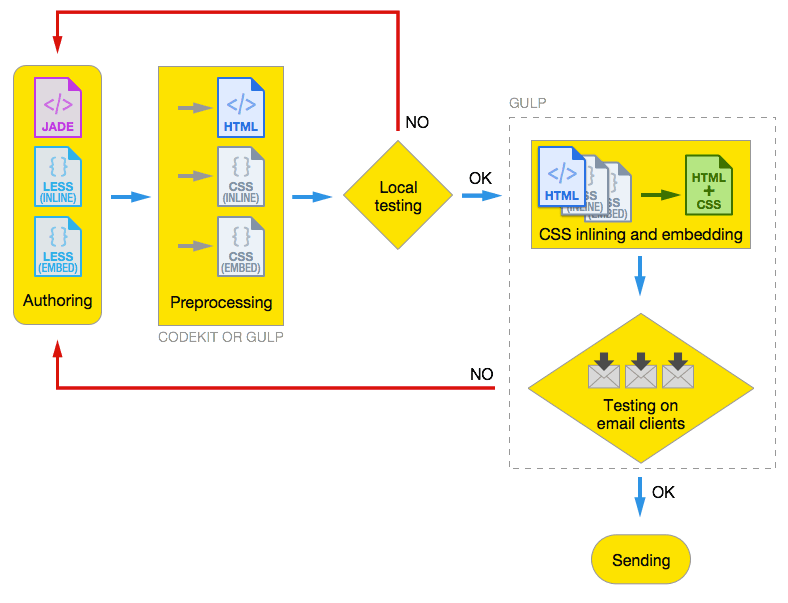
You can customize each of these steps according to your needs, using another editor and not using CodeKit, Grunt instead of Gulp, and Sass instead of Less, and so forth. Whatever technologies you choose, a workflow like this can really improve your productivity. 您可以根据需要,使用另一个编辑器而不使用CodeKit,Grunt代替Gulp以及Sass代替Less,来自定义每个步骤。 无论选择哪种技术,这样的工作流程都可以真正提高您的生产率。 Let me know in the comments if you have your own HTML email workflow and how it differs from the one presented in this tutorial. 在评论中让我知道您是否有自己HTML电子邮件工作流程,以及它与本教程介绍的工作流程有何不同。 翻译自: https://www.sitepoint.com/my-current-html-email-development-workflow/ c#开发邮件程序 |
【本文地址】