| three.js通过CubeTexture加载环境贴图,和RGBELoader加载器加载hdr环境贴图 | 您所在的位置:网站首页 › 模块umsocxocx加载失败 › three.js通过CubeTexture加载环境贴图,和RGBELoader加载器加载hdr环境贴图 |
three.js通过CubeTexture加载环境贴图,和RGBELoader加载器加载hdr环境贴图
|
一、使用CubeTexture进行环境贴图
1.CubeTexture使用介绍
Three.js中可以通过使用CubeTexture进行环境贴图,CubeTexture需要将6张图片(正面、反面、上下左右)包装成一个立方体纹理。下面是一个简单的例子: 首先需要加载六张贴图: var urls = [ 'px.png', 'nx.png', 'py.png', 'ny.png', 'pz.png', 'nz.png' ]; var textureCube = new THREE.CubeTextureLoader().load(urls); textureCube.format = THREE.RGBFormat;然后将这个纹理应用到场景的背景中: scene.background = textureCube;或者将它应用到一个物体上: var material = new THREE.MeshBasicMaterial( { envMap: textureCube } ); 2. 使用CubeTexture实现球体和街道环境贴图接下来我们就动手实践一下吧: 在代码中,可以先创建一个CubeTexture并将其应用到场景的背景中: // 设置cube纹理加载器 const cubeTextureLoader = new THREE.CubeTextureLoader(); // 立方体纹理加载器 const envMapTexture = cubeTextureLoader.load([ // 设置环境贴图 "textures/environmentMaps/3/px.jpg", "textures/environmentMaps/3/nx.jpg", "textures/environmentMaps/3/py.jpg", "textures/environmentMaps/3/ny.jpg", "textures/environmentMaps/3/pz.jpg", "textures/environmentMaps/3/nz.jpg", ]); // 给场景添加背景 scene.background = envMapTexture;然后创建一个具有高光部分的材质,并将envMap参数设置为之前创建的环境贴图: // 创建球体 const sphereGeometry = new THREE.SphereBufferGeometry(1, 20, 20); // 参数:半径、水平分段数、垂直分段数 const material = new THREE.MeshStandardMaterial({ // 创建材质 metalness: 0.7, // 金属度 roughness: 0.1, // 粗糙度 envMap: envMapTexture, // 环境贴图 }); const sphere = new THREE.Mesh(sphereGeometry, material); // 根据几何体和材质创建球体 scene.add(sphere); // 添加到场景中这样,在场景中移动相机时就可以看到物体和房屋内墙壁、地面反射出周围环境的效果。 如图: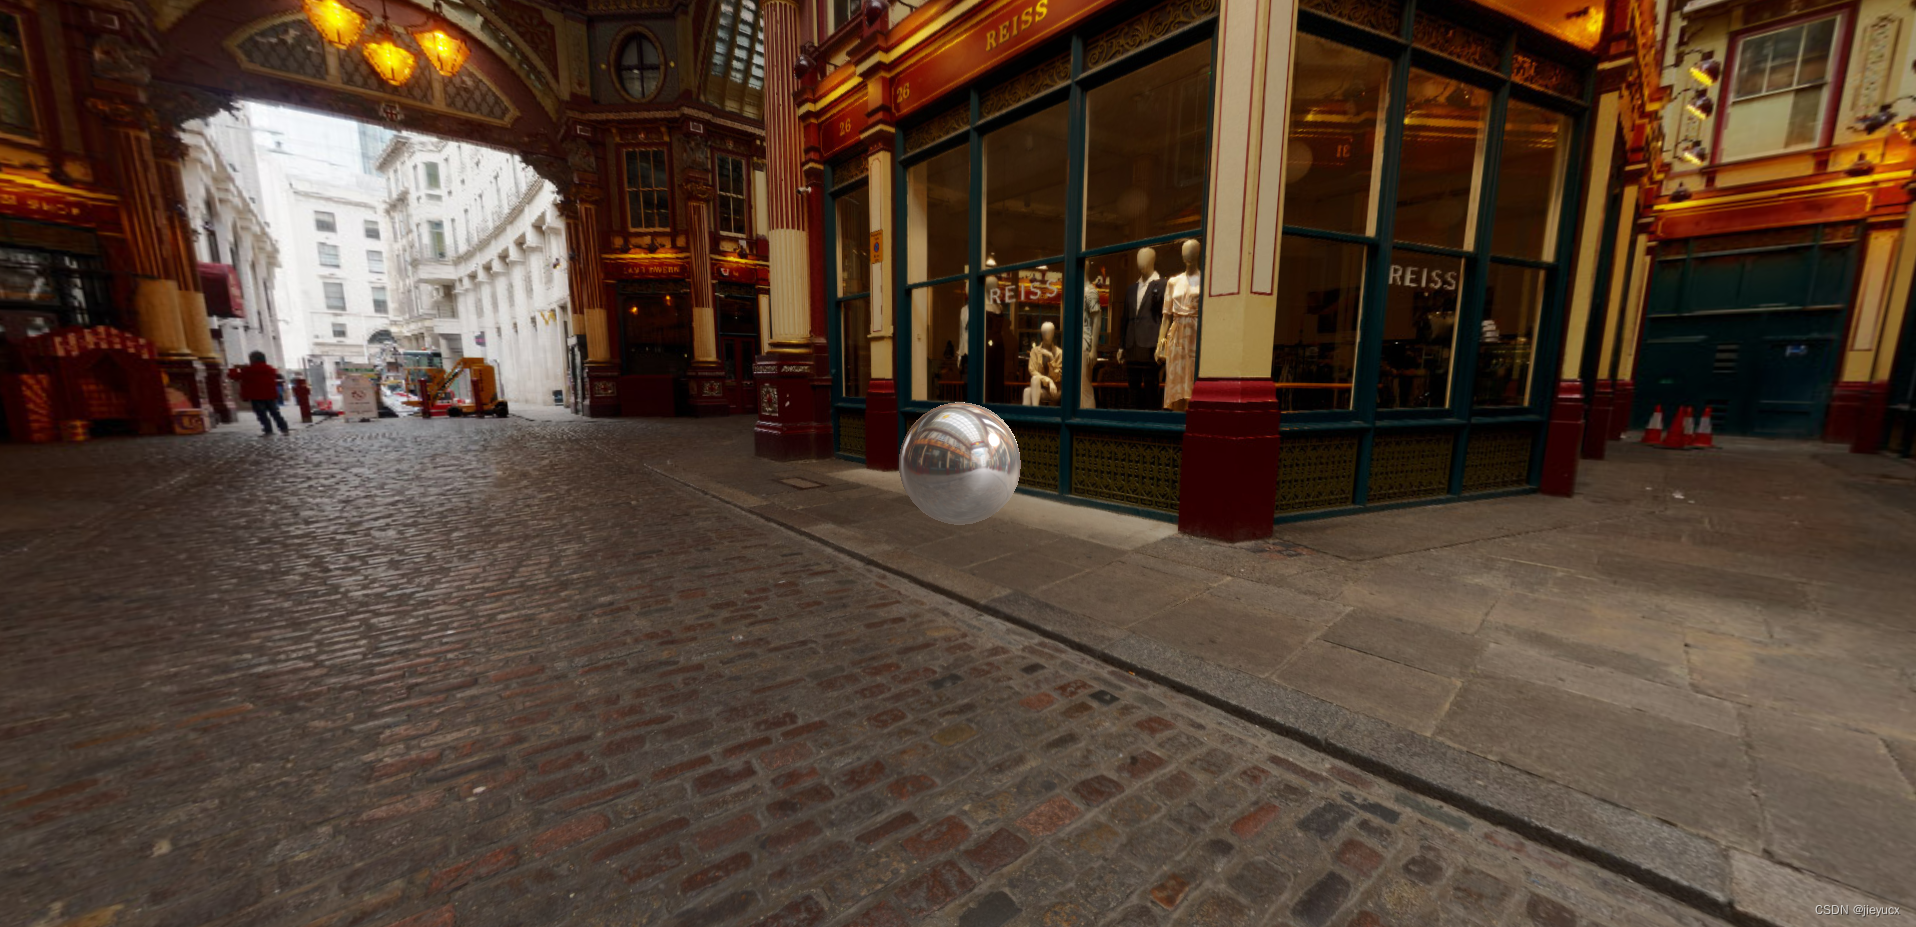 完整代码如下:
import * as THREE from "three";
// 导入轨道控制器
import { OrbitControls } from "three/examples/jsm/controls/OrbitControls";
// 1、创建场景
const scene = new THREE.Scene();
scene.background = new THREE.Color(0x003261); // 将背景色设置为蓝色
// 2、创建相机
const camera = new THREE.PerspectiveCamera(75, window.innerWidth / window.innerHeight, 0.1, 1000);
// 设置相机位置
camera.position.set(0, 0, 10);
scene.add(camera);
// 设置cube纹理加载器
const cubeTextureLoader = new THREE.CubeTextureLoader(); // 立方体纹理加载器
const envMapTexture = cubeTextureLoader.load([ // 设置环境贴图
"textures/environmentMaps/3/px.jpg",
"textures/environmentMaps/3/nx.jpg",
"textures/environmentMaps/3/py.jpg",
"textures/environmentMaps/3/ny.jpg",
"textures/environmentMaps/3/pz.jpg",
"textures/environmentMaps/3/nz.jpg",
]);
// 创建球体
const sphereGeometry = new THREE.SphereBufferGeometry(1, 20, 20); // 参数:半径、水平分段数、垂直分段数
const material = new THREE.MeshStandardMaterial({ // 创建材质
metalness: 0.7, // 金属度
roughness: 0.1, // 粗糙度
envMap: envMapTexture, // 环境贴图
});
const sphere = new THREE.Mesh(sphereGeometry, material); // 根据几何体和材质创建球体
scene.add(sphere); // 添加到场景中
// 给场景添加背景
scene.background = envMapTexture;
// 灯光
// 环境光
// 参数 1:光源颜色 2:光源强度
const light = new THREE.AmbientLight(0xffffff, 0.5); // soft white light
scene.add(light); // 将光源添加到场景中
//直线光源
const directionalLight = new THREE.DirectionalLight(0xffffff, 1); // 参数:光源颜色、光源强度
directionalLight.position.set(10, 10, 10); // 设置光源位置
scene.add(directionalLight); // 将光源添加到场景中
// 初始化渲染器
const renderer = new THREE.WebGLRenderer();
// 设置渲染的尺寸大小
renderer.setSize(window.innerWidth, window.innerHeight);
// 将webgl渲染的canvas内容添加到body
document.body.appendChild(renderer.domElement);
// 创建轨道控制器
const controls = new OrbitControls(camera, renderer.domElement);
// 设置控制器阻尼,让控制器更有真实效果,必须在动画循环里调用.update()。
controls.enableDamping = true;
function render() {
controls.update();
renderer.render(scene, camera);
// 渲染下一帧的时候就会调用render函数
requestAnimationFrame(render);
}
render();
// 监听画面变化,更新渲染画面
window.addEventListener("resize", () => {
// console.log("画面变化了");
// 更新摄像头
camera.aspect = window.innerWidth / window.innerHeight;
// 更新摄像机的投影矩阵
camera.updateProjectionMatrix();
// 更新渲染器
renderer.setSize(window.innerWidth, window.innerHeight);
// 设置渲染器的像素比
renderer.setPixelRatio(window.devicePixelRatio);
});
二、RGBELoader加载器加载hdr环境贴图
1. RGBELoader加载器使用介绍 完整代码如下:
import * as THREE from "three";
// 导入轨道控制器
import { OrbitControls } from "three/examples/jsm/controls/OrbitControls";
// 1、创建场景
const scene = new THREE.Scene();
scene.background = new THREE.Color(0x003261); // 将背景色设置为蓝色
// 2、创建相机
const camera = new THREE.PerspectiveCamera(75, window.innerWidth / window.innerHeight, 0.1, 1000);
// 设置相机位置
camera.position.set(0, 0, 10);
scene.add(camera);
// 设置cube纹理加载器
const cubeTextureLoader = new THREE.CubeTextureLoader(); // 立方体纹理加载器
const envMapTexture = cubeTextureLoader.load([ // 设置环境贴图
"textures/environmentMaps/3/px.jpg",
"textures/environmentMaps/3/nx.jpg",
"textures/environmentMaps/3/py.jpg",
"textures/environmentMaps/3/ny.jpg",
"textures/environmentMaps/3/pz.jpg",
"textures/environmentMaps/3/nz.jpg",
]);
// 创建球体
const sphereGeometry = new THREE.SphereBufferGeometry(1, 20, 20); // 参数:半径、水平分段数、垂直分段数
const material = new THREE.MeshStandardMaterial({ // 创建材质
metalness: 0.7, // 金属度
roughness: 0.1, // 粗糙度
envMap: envMapTexture, // 环境贴图
});
const sphere = new THREE.Mesh(sphereGeometry, material); // 根据几何体和材质创建球体
scene.add(sphere); // 添加到场景中
// 给场景添加背景
scene.background = envMapTexture;
// 灯光
// 环境光
// 参数 1:光源颜色 2:光源强度
const light = new THREE.AmbientLight(0xffffff, 0.5); // soft white light
scene.add(light); // 将光源添加到场景中
//直线光源
const directionalLight = new THREE.DirectionalLight(0xffffff, 1); // 参数:光源颜色、光源强度
directionalLight.position.set(10, 10, 10); // 设置光源位置
scene.add(directionalLight); // 将光源添加到场景中
// 初始化渲染器
const renderer = new THREE.WebGLRenderer();
// 设置渲染的尺寸大小
renderer.setSize(window.innerWidth, window.innerHeight);
// 将webgl渲染的canvas内容添加到body
document.body.appendChild(renderer.domElement);
// 创建轨道控制器
const controls = new OrbitControls(camera, renderer.domElement);
// 设置控制器阻尼,让控制器更有真实效果,必须在动画循环里调用.update()。
controls.enableDamping = true;
function render() {
controls.update();
renderer.render(scene, camera);
// 渲染下一帧的时候就会调用render函数
requestAnimationFrame(render);
}
render();
// 监听画面变化,更新渲染画面
window.addEventListener("resize", () => {
// console.log("画面变化了");
// 更新摄像头
camera.aspect = window.innerWidth / window.innerHeight;
// 更新摄像机的投影矩阵
camera.updateProjectionMatrix();
// 更新渲染器
renderer.setSize(window.innerWidth, window.innerHeight);
// 设置渲染器的像素比
renderer.setPixelRatio(window.devicePixelRatio);
});
二、RGBELoader加载器加载hdr环境贴图
1. RGBELoader加载器使用介绍
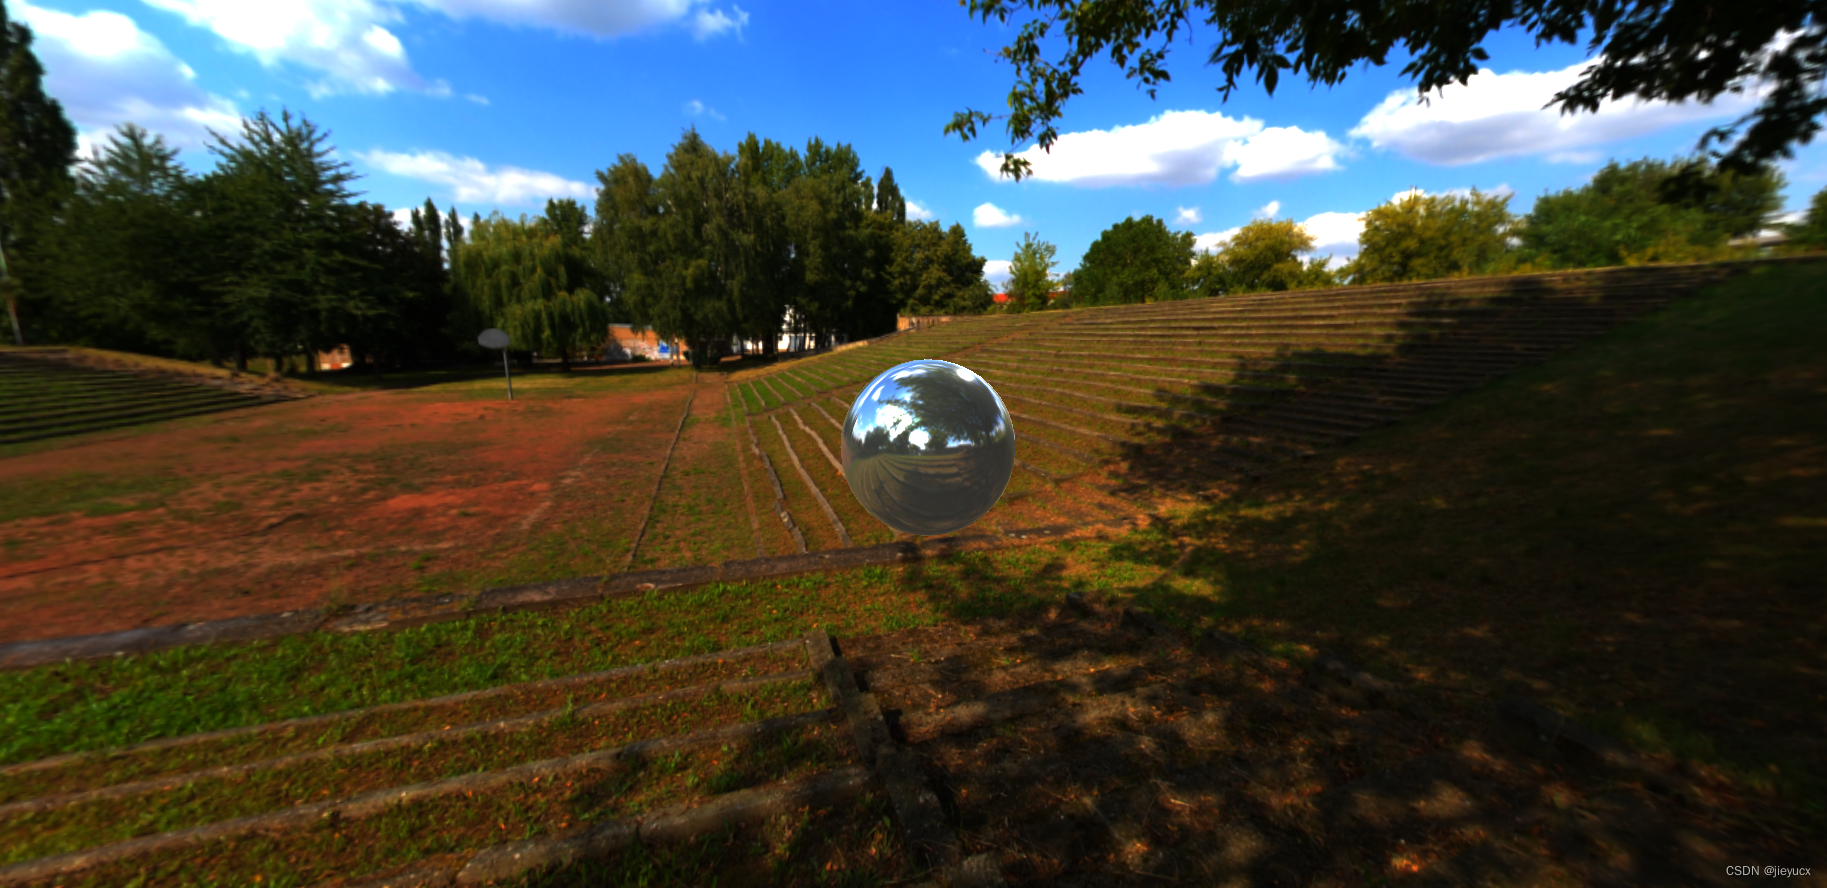
RGBELoader是一个three.js中的纹理加载器,它可以加载HDR格式的纹理。HDR格式有更高的精度和更广的颜色范围,能够更好地表现真实的光照和阴影等细节。RGBELoader的使用方法如下: 导入RGBELoader模块: import { RGBELoader } from 'three/examples/jsm/loaders/RGBELoader.js'; 创建RGBELoader实例: const rgbeLoader = new RGBELoader(); 加载HDR纹理: rgbeLoader.load( '/path/to/texture.hdr', texture => { // do something with loaded texture }, undefined, error => { console.error( 'Error loading HDR texture', error ); } );加载器使用的第一个参数是纹理的路径,第二个参数是加载成功后的回调函数。在回调函数中可以获取加载成功后的texture对象并进行相关操作。第三个参数是加载进度的回调函数,第四个参数是加载失败的回调函数。 举例: 下面是一个简单的three.js场景,使用RGBELoader加载HDR纹理并将其用作环境贴图。 import * as THREE from 'three'; import { RGBELoader } from 'three/examples/jsm/loaders/RGBELoader.js'; import { OrbitControls } from 'three/examples/jsm/controls/OrbitControls.js'; const scene = new THREE.Scene(); const camera = new THREE.PerspectiveCamera( 75, window.innerWidth / window.innerHeight, 0.1, 1000 ); camera.position.set( 0, 0, 5 ); const renderer = new THREE.WebGLRenderer(); renderer.setSize( window.innerWidth, window.innerHeight ); document.body.appendChild( renderer.domElement ); const rgbeLoader = new RGBELoader(); rgbeLoader.load( '/path/to/texture.hdr', texture => { const pmremGenerator = new THREE.PMREMGenerator( renderer ); pmremGenerator.compileEquirectangularShader(); const envMap = pmremGenerator.fromEquirectangular( texture ).texture; scene.background = envMap; scene.environment = envMap; texture.dispose(); pmremGenerator.dispose(); }, undefined, error => { console.error( 'Error loading HDR texture', error ); } ); const controls = new OrbitControls( camera, renderer.domElement ); function animate() { requestAnimationFrame( animate ); controls.update(); renderer.render( scene, camera ); } animate();上面的代码中,除了RGBELoader之外还使用了PMREMGenerator贴图产生器和OrbitControls控制器。通过PMREMGenerator将HDR纹理生成立方体贴图,并将其用作背景和环境光照。OrbitControls控制器用于交互式控制摄像机。 2. 异步加载hdr实战前面介绍了同步用法,这里使用异步加载的方式实现一个球体和周围环境的hdr加载贴图 效果如图: |
【本文地址】
公司简介
联系我们