| 树莓派Pico快速上手教程之MicroPython和C的使用说明 | 您所在的位置:网站首页 › 树莓派pico中文文档 › 树莓派Pico快速上手教程之MicroPython和C的使用说明 |
树莓派Pico快速上手教程之MicroPython和C的使用说明
|
2021年初,树莓派Pico板一面世我就获得了Cytron提供的测试版,并使用微Python和C进行了编程。 当时,我从官方文档件入手,用快速使用树莓派Pico运行Ubuntu 20.04操作系统的计算机入门指南为操作案例,并对每一个细节进行了记录,哪怕是LED闪烁这样微小的事项都被我纳入了收录范围内。这其实与 Windows 和 Mac 操作系统的说明有点类似。 准备硬件从理论上讲开发板是可以单独使用的,但由于板子有一些接头,因此我便借机尝试使用了一下由MINIX NEO P2 USB-C电源供电的Pining64 Pinecil烙铁。 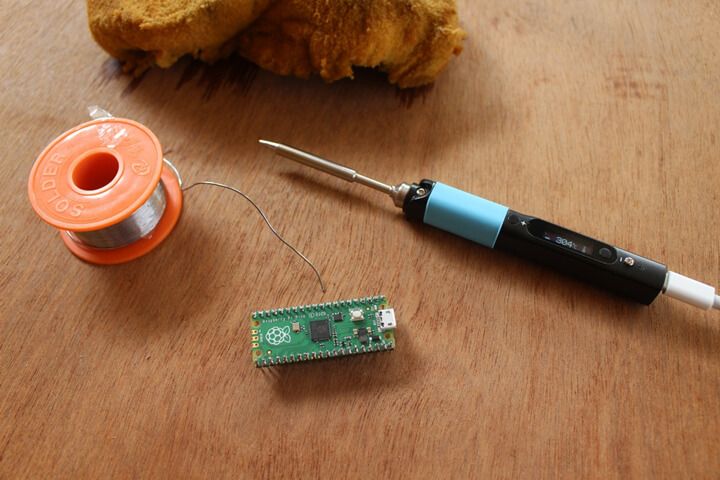 焊接准备工作 焊接准备工作
烙铁工作了大约一分钟,然后就开始出现焊接问题了。看着屏幕,可以看到Zzzz并且温度在下降。因为焊锡不够,所以我没有再移动烙铁,所以未检测到任何活动后它就进入睡眠状态了。不过,更改运动灵敏度或睡眠超时就可以轻松地解决此问题。同时,我也可以完成手头的其他任务了。 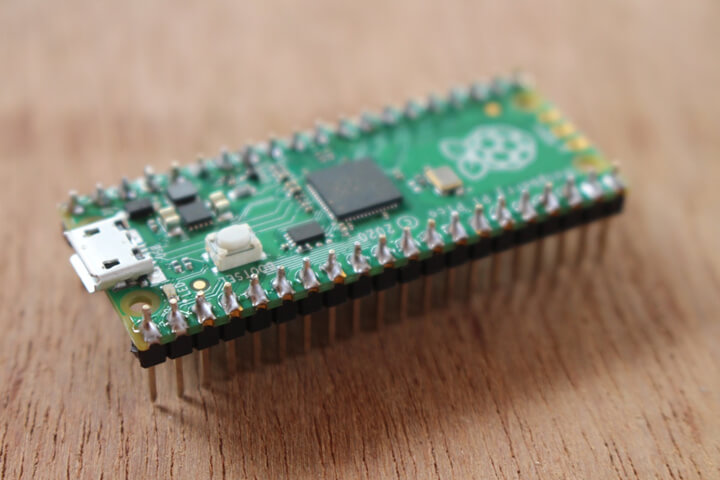 焊接完成图示 焊接完成图示
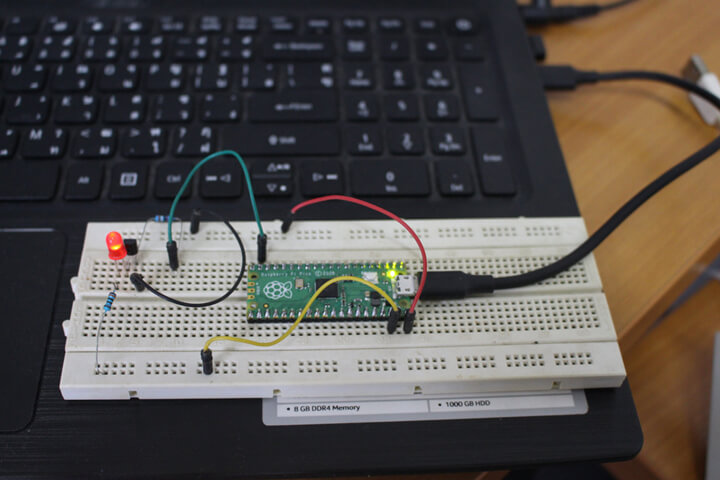
不使用这些头让人感觉有点无能,所以我将树莓派Pico插入到面包板,并增加了一个LED与附带的电路。 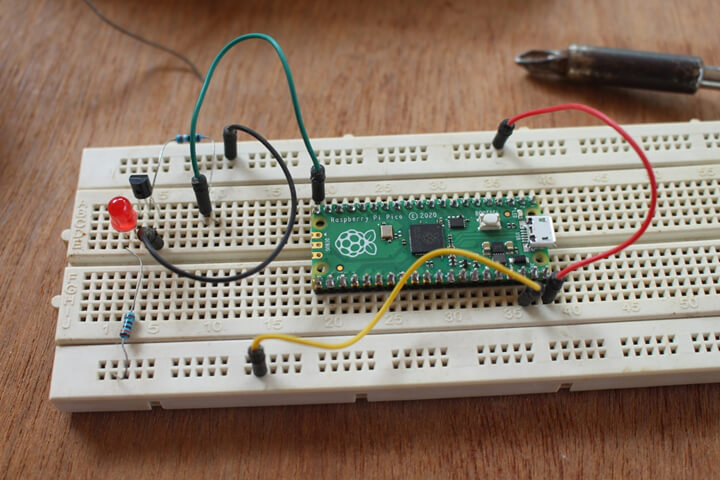 接入面包板 接入面包板
5V 连接到 VBUS(引脚 40),GND 连接到引脚 38,我决定使用最靠近 LED 的 GPIO 即 GP15(引脚 20)。树莓派Pico上的GPIO标记仅显示在板的底部,当板连接到面包板时,原理图会有所帮助。 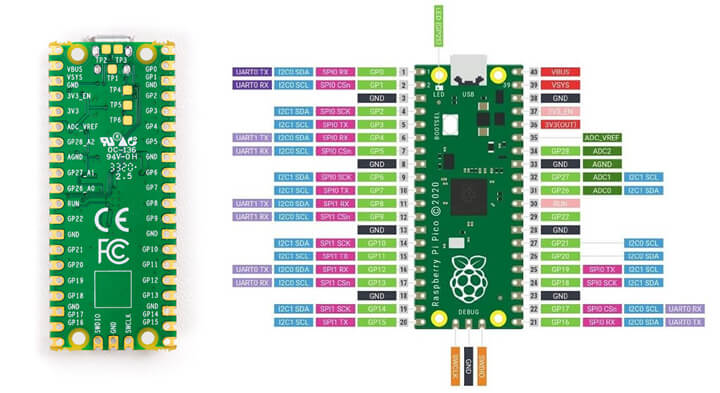 树莓派Pico原理图 树莓派Pico原理图
硬件设置现已完成,我只需要一个微型 USB转 USB-A 电缆将电路板连接到我的笔记本电脑。 树莓派Pico上的MicroPython首先,我们应将MicroPython固件烧录到板中。为此,可从入门指南下载最新的固件(审核时为pico_micropython_20210121.uf2)。 其次,在连接到带有 USB 端口的计算机时按板上的 BOOTSEL 键,并在连接后释放按键。我这样做了,但什么也没发生。那是因为我使用自行车灯的USB电缆,缺乏数据线。 最后,我选择一个适当的Micro USB到USB-A型电缆,树莓派Pico顺利在我的笔记本电脑上正确识别了: 1234567891011121314151617181920 [422070.155550] usb 1-2: new full-speed USB device number 16 using xhci_hcd[422070.330829] usb 1-2: New USB device found, idVendor=2e8a, idProduct=0003, bcdDevice= 1.00[422070.330836] usb 1-2: New USB device strings: Mfr=1, Product=2, SerialNumber=3[422070.330839] usb 1-2: Product: RP2 Boot[422070.330842] usb 1-2: Manufacturer: Raspberry Pi[422070.330845] usb 1-2: SerialNumber: E0C912D24340[422070.415044] usb-storage 1-2:1.0: USB Mass Storage device detected[422070.415349] scsi host2: usb-storage 1-2:1.0[422070.415538] usbcore: registered new interface driver usb-storage[422070.418743] usbcore: registered new interface driver uas[422071.551633] usb 1-2: reset full-speed USB device number 16 using xhci_hcd[422071.727779] scsi 2:0:0:0: Direct-Access RPI RP2 1 PQ: 0 ANSI: 2[422071.728263] sd 2:0:0:0: Attached scsi generic sg2 type 0[422071.728572] sd 2:0:0:0: [sdc] 262144 512-byte logical blocks: (134 MB/128 MiB)[422071.729857] sd 2:0:0:0: [sdc] Write Protect is off[422071.729860] sd 2:0:0:0: [sdc] Mode Sense: 03 00 00 00[422071.731895] sd 2:0:0:0: [sdc] No Caching mode page found[422071.731900] sd 2:0:0:0: [sdc] Assuming drive cache: write through[422071.767149] sdc: sdc1[422071.771908] sd 2:0:0:0: [sdc] Attached SCSI removable disk为RPI-RP2大容量存储设备安装设备。 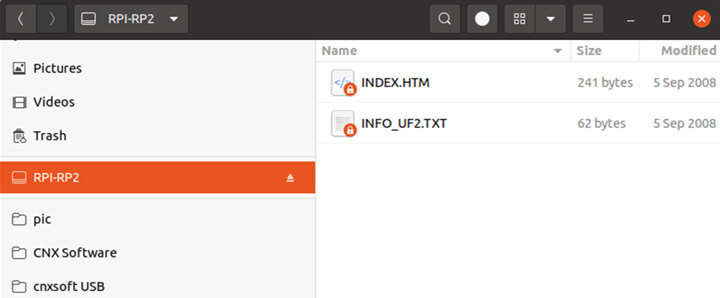 安装的RPI-RP2 安装的RPI-RP2
将pico_micropython_20210121.uf2文件复制到驱动器后, 它会自动卸载且作为串行设备重新启动: 1234567 [422425.812363] usb 1-2: new full-speed USB device number 19 using xhci_hcd[422425.990450] usb 1-2: New USB device found, idVendor=2e8a, idProduct=0005, bcdDevice= 1.00[422425.990459] usb 1-2: New USB device strings: Mfr=1, Product=2, SerialNumber=3[422425.990463] usb 1-2: Product: Board in FS mode[422425.990466] usb 1-2: Manufacturer: MicroPython[422425.990470] usb 1-2: SerialNumber: 000000000000[422426.016529] cdc_acm 1-2:1.0: ttyACM0: USB ACM device在这一点上,树莓派网站上的入门指南不是很有用,我们只好切换到Python SDK文档(PDF)。 该文档使用minicom进行串行控制台,但鉴于Bootterm更容易使用故我更中意它。无论您在何种情况下进行 Linux 编程,请确保当前用户已添加到dialout组,否则您需要将所有程序作为root用户身份运行: 1 sudo usermod -a -G dialout $(whoami)Bootterm正确检测到ttyACM0端口,所以我只运行”bt”来访问MicroPython REPL接口,并键入一些MicroPython命令。 123456789101112131415161718 $ bt -l port | age (sec) | device | driver | description ------+------------+------------+------------------+---------------------- * 0 | 29 | ttyACM0 | cdc_acm | Board CDC $ btNo port specified, using ttyACM0 (last registered). Use -l to list ports.Trying port ttyACM0... Connected to ttyACM0 at 115200 bps.Escape character is 'Ctrl-]'. Use escape followed by '?' for help. >>> print("Hello, Pico!")Hello, Pico!>>> from machine import Pin>>> led = Pin(25, Pin.OUT)>>> led.value(1)>>> led2 = Pin(15, Pin.OUT)>>> led2.value(1)>>>我可以打开板载 LED (GP25), 但当我为面包板上的 LED (GP15)执行相同操作时, 它不起作用。我重新检查了电路,并使用万用表检查电压,发现GP25仍然拉低。网络搜索显示GP15在电路Python中被禁用,源于它会干扰USB接口。 GP15由内部USB外围设备使用,不应故意使用它 MicroPython也是如此,所以我切换到相邻的引脚(GP14,引脚19): 12 >>> led2 = Pin(14, Pin.OUT)>>> led2.value(1)
果然,成功了!如果您想了解有关MicroPython API 的更多信息,请按 Ctrl+B 并输入帮助(): 12345678910111213141516171819202122232425262728293031323334353637383940 >>> raw REPL; CTRL-B to exit>MicroPython v1.13-290-g556ae7914 on 2021-01-21; Raspberry Pi Pico with RP2040Type "help()" for more information.>>> help()Welcome to MicroPython! For online help please visit https://micropython.org/help/. For access to the hardware use the 'machine' module. RP2 specific commandsare in the 'rp2' module. Quick overview of some objects: machine.Pin(pin) -- get a pin, eg machine.Pin(0) machine.Pin(pin, m, [p]) -- get a pin and configure it for IO mode m, pull mode p methods: init(..), value([v]), high(), low(), irq(handler) machine.ADC(pin) -- make an analog object from a pin methods: read_u16() machine.PWM(pin) -- make a PWM object from a pin methods: deinit(), freq([f]), duty_u16([d]), duty_ns([d]) machine.I2C(id) -- create an I2C object (id=0,1) methods: readfrom(addr, buf, stop=True), writeto(addr, buf, stop=True) readfrom_mem(addr, memaddr, arg), writeto_mem(addr, memaddr, arg) machine.SPI(id, baudrate=1000000) -- create an SPI object (id=0,1) methods: read(nbytes, write=0x00), write(buf), write_readinto(wr_buf, rd_buf) machine.Timer(freq, callback) -- create a software timer object eg: machine.Timer(freq=1, callback=lambda t:print(t)) Pins are numbered 0-29, and 26-29 have ADC capabilitiesPin IO modes are: Pin.IN, Pin.OUT, Pin.ALTPin pull modes are: Pin.PULL_UP, Pin.PULL_DOWN Useful control commands: CTRL-C -- interrupt a running program CTRL-D -- on a blank line, do a soft reset of the board CTRL-E -- on a blank line, enter paste mode For further help on a specific object, type help(obj)For a list of available modules, type help('modules')Ubuntu 20.04 确实有Thonny 3.2.7 在其存储库中, 我们可以使用 sudo apt install thonny进行安装,但它不支持树莓派Pico, 因此, 我用pip3安装了最新版本的程序(v3.3.3):我们可以用”Ctrl+”后面跟着”q”退出bootterm。但如果我们想在板上保存Python程序并自动运行呢?我在Python SDK文档中未见到任何关于这一点内容,所以我不得不跳到第三个指南,找到的最佳方法是使用Thonny。 1 pip3 install thonny然后, 我进入Run->Select interpreter… 选择了“MicroPython (树莓派Pico)“. 选择MicroPython 从用户界面,我可以输入一些代码来关闭板载LED: 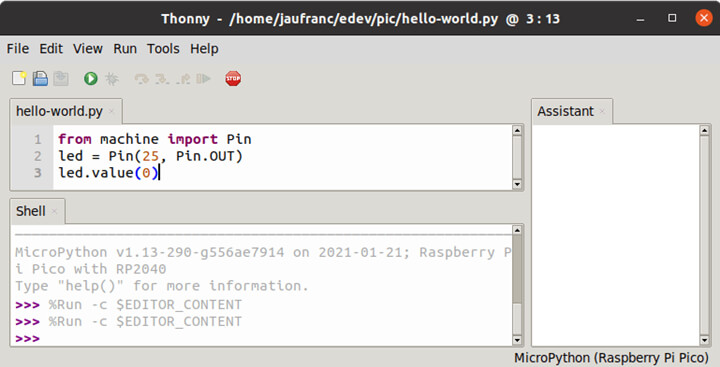 代码示例 代码示例
为了以一秒的间隔闪烁板载 LED 和面包板 LED,我复制并修改了 Python SDK 文档中的一些代码: 123456789101112 from machine import Pin, Timerled = Pin(25, Pin.OUT)led2 = Pin(14, Pin.OUT)led.value(0)led2.value(1)tim = Timer()def tick(timer): global led, led2 led.toggle() led2.toggle() tim.init(freq=1, mode=Timer.PERIODIC, callback=tick)我保存文件作为我的电脑上的blink.py,它运行正常。但是,如果您想在没有 PC 的情况下运行代码,则可以将其保存到树莓派Pico。点击File->Save copy,然后点击”树莓派Pico”按钮, 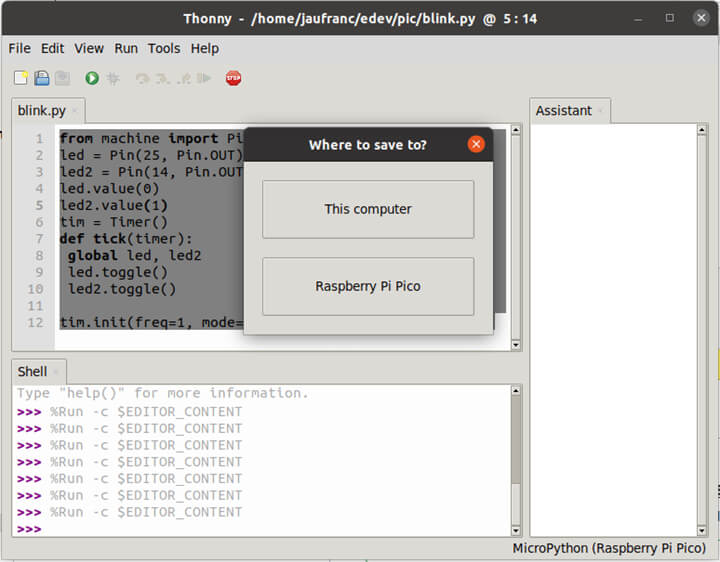 保存文件到树莓派Pico 保存文件到树莓派Pico
并将程序保存为main.py。现在,您可以通过将板连接到任何 USB 电源自动运行程序。 树莓派Pico上的 C/C++让我们尝试一下”C/C++ SDK”,除了一些用 C++ 编写的工具外,基本上都是 C 语言。我们可以回到官方入门文档,在boot模式下,我们被要求将blink.uf2复制到树莓派Pico,它确实使板载 LED 闪烁。它的工作原理非常简单,因为二进制是预构建的,但我们真正想做的是修改源代码,并建立我们自己的二进制文件来使内部和外部 LED 闪烁。 因此,我们必须安装C/C++ SDK、依赖关系和示例,具体如下: 123456 sudo apt install cmake gcc-arm-none-eabi libnewlib-arm-none-eabi build-essentialgit clone https://github.com/raspberrypi/pico-sdkcd pico-sdkgit submodule update --initcd ..git clone -b master https://github.com/raspberrypi/pico-examples.git我们可以看看pico-examples/blink/blink.c的闪烁示例: 12345678910111213141516171819 /** * Copyright (c) 2020 Raspberry Pi (Trading) Ltd. * * SPDX-License-Identifier: BSD-3-Clause */ #include "pico/stdlib.h" int main() { const uint LED_PIN = 25; gpio_init(LED_PIN); gpio_set_dir(LED_PIN, GPIO_OUT); while (true) { gpio_put(LED_PIN, 1); sleep_ms(250); gpio_put(LED_PIN, 0); sleep_ms(250); }}在修改之前,我们应尝试先导出 SDK 路径并配置构建: 123456789101112131415161718192021222324 $ cd pico-examples/blink$ export PICO_SDK_PATH=../../pico-sdk$ cmake ..Using PICO_SDK_PATH from environment ('../../pico-sdk')Pico SDK is located at /home/jaufranc/edev/sandbox/pico-sdkDefaulting PICO_PLATFORM to rp2040 since not specified.Defaulting PICO platform compiler to pico_arm_gcc since not specified.-- Defaulting build type to 'Release' since not specified.PICO compiler is pico_arm_gccPICO_GCC_TRIPLE defaulted to arm-none-eabi-- The C compiler identification is GNU 9.2.1-- The CXX compiler identification is GNU 9.2.1-- The ASM compiler identification is GNU-- Found assembler: /usr/bin/arm-none-eabi-gccDefaulting PICO target board to pico since not specified.Using board configuration from /home/jaufranc/edev/sandbox/pico-sdk/src/boards/include/boards/pico.h-- Found Python3: /usr/bin/python3.8 (found version "3.8.5") found components: Interpreter TinyUSB available at /home/jaufranc/edev/sandbox/pico-sdk/lib/tinyusb/src/portable/raspberrypi/rp2040; adding USB support.-- Could NOT find Doxygen (missing: DOXYGEN_EXECUTABLE) ELF2UF2 will need to be builtPIOASM will need to be built-- Configuring done-- Generating done-- Build files have been written to: /home/jaufranc/edev/sandbox/pico-examples/blink现在可以进入一个blink目录(一个新目录,由cmake生成),然后运行make: 12345678910111213141516171819 $ cd blink$ make -j8Scanning dependencies of target ELF2UF2BuildScanning dependencies of target bs2_default[ 0%] Creating directories for 'ELF2UF2Build'[ 0%] No download step for 'ELF2UF2Build'[ 0%] No patch step for 'ELF2UF2Build'[ 0%] No update step for 'ELF2UF2Build'[ 0%] Building ASM object pico_sdk/src/rp2_common/boot_stage2/CMakeFiles/bs2_default.dir/boot2_w25q080.S.obj[ 0%] Performing configure step for 'ELF2UF2Build'[ 0%] Linking ASM executable bs2_default.elf[ 0%] Built target bs2_default...[ 50%] Building CXX object blink/CMakeFiles/blink.dir/home/jaufranc/edev/sandbox/pico-sdk/src/rp2_common/pico_standard_link/new_delete.cpp.obj[ 50%] Building C object blink/CMakeFiles/blink.dir/home/jaufranc/edev/sandbox/pico-sdk/src/rp2_common/pico_standard_link/binary_info.c.obj[100%] Building C object blink/CMakeFiles/blink.dir/home/jaufranc/edev/sandbox/pico-sdk/src/rp2_common/pico_stdio/stdio.c.obj[100%] Building C object blink/CMakeFiles/blink.dir/home/jaufranc/edev/sandbox/pico-sdk/src/rp2_common/pico_stdio_uart/stdio_uart.c.obj[100%] Linking CXX executable blink.elf[100%] Built target blink现在有一堆文件: 123456789101112 jaufranc@cnx-laptop-4:~/edev/sandbox/pico-examples/blink/blink$ ls -ltotal 636-rwxrwxr-x 1 jaufranc jaufranc 12696 Jan 24 11:42 blink.bin-rw-rw-r-- 1 jaufranc jaufranc 197019 Jan 24 11:42 blink.dis-rwxrwxr-x 1 jaufranc jaufranc 204232 Jan 24 11:42 blink.elf-rw-rw-r-- 1 jaufranc jaufranc 172574 Jan 24 11:42 blink.elf.map-rw-rw-r-- 1 jaufranc jaufranc 35778 Jan 24 11:42 blink.hex-rw-rw-r-- 1 jaufranc jaufranc 25600 Jan 24 11:42 blink.uf2drwxrwxr-x 4 jaufranc jaufranc 4096 Jan 24 11:41 CMakeFiles-rw-rw-r-- 1 jaufranc jaufranc 1004 Jan 24 11:39 cmake_install.cmakedrwxrwxr-x 4 jaufranc jaufranc 4096 Jan 24 11:39 elf2uf2-rw-rw-r-- 1 jaufranc jaufranc 89141 Jan 24 11:39 Makefile最重要的是blink.uf2,我们可以复制到树莓派Pico运行程序,并闪烁.elf,可用于调试器(OpenOCD + GDB),但这是入门指南的范围。 现在,我们知道如何为Pico板编译 C 程序,让我们修改闪烁.c示例,或者打开和关闭连接到 PIN 14 的板载 LED 和外部 LED: 123456789101112131415161718 #include "pico/stdlib.h" int main() { const uint LED_PIN = 25; /* onboard LED */ const uint LED2_PIN = 14; /* external LED */ gpio_init(LED_PIN); gpio_set_dir(LED_PIN, GPIO_OUT); gpio_init(LED2_PIN); gpio_set_dir(LED2_PIN, GPIO_OUT); while (true) { gpio_put(LED_PIN, 1); gpio_put(LED2_PIN, 0); sleep_ms(1000); gpio_put(LED_PIN, 0); gpio_put(LED2_PIN, 1); sleep_ms(1000); }}再次构建程序: 12 cd blinkmake进入boot模式并复制blink.uf2到板,成功了!
实践证明,可以通过 C 或 Python 程序实现相同的结果,另外,我们将在即将发布的帖子中查看 RP2040 的 PIO (可编程 IO) 界面,因为 AFAICT 是树莓派 RP2040 与其他微控制器最大的区别所在。 最后,十分感谢Cytron寄了树莓派Pico给我进行评测。如果你所在的位置在东盟,那么就可以用 4.98 美元的价格购买到他们的板子。其他地区的话,可以用5美元购买到。现在,它已经在全球范围内出售了。  Nicholas Dong 董巷 Nicholas Dong 董巷文章翻译者:Nicholas,技术支持工程师、瑞科慧联(RAK)高级工程师,深耕嵌入式开发技术、物联网行业多年,拥有丰富的行业经验和新颖独到的眼光! 分享这篇文章 |
 带排针的树莓派Pico板
 运行成功的电路
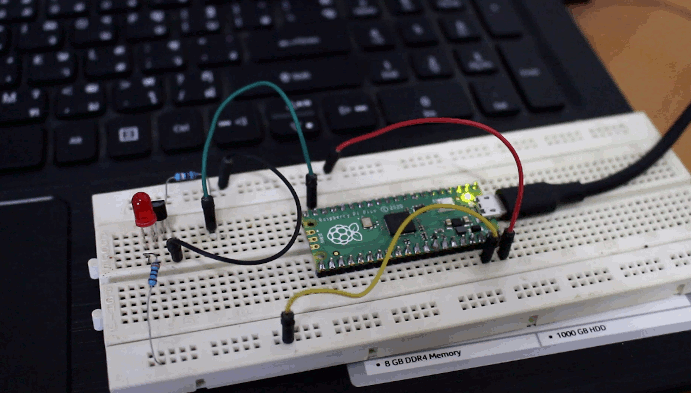
【本文地址】