| 51单片机彩灯控制器的设计(含源代码、编译过的 HEX 文件以及仿真图) | 您所在的位置:网站首页 › 智能彩灯下载 › 51单片机彩灯控制器的设计(含源代码、编译过的 HEX 文件以及仿真图) |
51单片机彩灯控制器的设计(含源代码、编译过的 HEX 文件以及仿真图)
|
题目要求
用16盏以上的LED小灯,实现至少4种彩灯灯光效果(不含全部点亮,全部熄灭);可以用输入按钮在几种灯光效果间切换;可以通过按钮暂停彩灯效果,使小灯全亮,再次按下相同按钮后继续之前的效果;增加自动在几种效果间切换的功能,并设置一个按钮可以在自动模式和手动模式间切换;使用定时中断延时。
运行效果
(为方便演示,速度已调快一倍处理) 顺时针流水灯、逆时针流水灯、交替闪烁、顺时针对角灯、逆时针对角灯、顺时针逐个点亮、顺时针逐个熄灭、逆时针逐个点亮、逆时针逐个熄灭、二进制加法。 完整代码 #include #define false 0 #define true 1 #define uchar unsigned char #define uint unsigned int sbit pause_key = P3^0; //暂停按钮 sbit auto_key = P3^1; //手动模式的效果切换 sbit change_key = P3^2; //手动模式效果切换 sbit pauseLed = P3^6; //暂停、启动指示灯 sbit autoLed = P3^7; //自动、手动模式指示灯 int ledCode[8]={0xfe,0xfd,0xfb,0xf7,0xef,0xdf,0xbf,0x7f}; //led段码(单个显示) int ledCode2[8]={0xfe,0xfc,0xf8,0xf0,0xe0,0xc0,0x80,0x00}; //led段码(半显示半灭) int disCode[10]={0x03,0x9f,0x25,0x0d,0x99,0x49,0x41,0x1f,0x01,0x09}; //数码管段码 0~9 void displayLed(void); //显示led的主函数 void keyScan(void); //键盘扫描处理函数 void Delay10ms(unsigned int n); //延时10ms bit isPause = false; //是否暂停 bit isAuto = true; //是否自动运行 bit isChange = false; //是否要切换下一个效果 uchar time; //计时满0.5s uchar types; //第几种灯光显示方案 uint counts; //灯光的第几个 /******************************************************************************* * 函 数 名 : T0_INT * 函数功能 : T0定时器中断函数 * 输 入 : 无 * 输 出 : 无 *******************************************************************************/ void T0_INT(void) interrupt 1 { TL0= (65536-50000)/256; TH0= (65536-50000)%256; time ++; if(time >= 10) //定时时间:0.5s { time=0; if(isChange == true) //可以变换下一种显示效果了 { counts = 0; types++; //显示下一种效果 if(types > 9) types = 0; P0 = disCode[types]; //更新数码管显示 isChange = false; } displayLed(); counts++; } } /******************************************************************************* * 函 数 名 : main * 函数功能 : 主函数 * 输 入 : 无 * 输 出 : 无 *******************************************************************************/ void main(void) { TMOD=0x61; //0110 0001 //方式一 TL0= (65536-50000)/256; //50ms TH0= (65536-50000)%256; TR0=1; //开启T0 ET0=1; //T0中断允许 EA=1; //总中断开启 time = 0; //定时器时间扩种(0.5s) counts = 0; //灯光的第几次 types = 0; //灯光显示模式 pauseLed = 0; //暂停指示灯灭 P0 = disCode[types]; //更新数码管显示 while(1) { keyScan(); //键盘扫描及处理 } } /******************************************************************************* * 函 数 名 : keyScan * 函数功能 : 键盘扫描处理 * 输 入 : 无 * 输 出 : 无 *******************************************************************************/ void keyScan(void) { if(pause_key == 0) //按下了暂停按钮 { Delay10ms(1); if(pause_key == 0) { isPause = ~isPause; pauseLed = isPause; if(isPause == true) { ET0=0; //关闭T0中断 P0 = 0xfd; //数码管显示 “-” P1 = 0x00; //所有的灯都亮起来 P2 = 0x00; }else{ ET0=1; //T0中断允许 P0 = disCode[types]; //更新数码管显示 displayLed(); } while(pause_key == 0); //防止按键重复检测 } } if(auto_key == 0) //自动、手动切换按键按下 { Delay10ms(1); if(auto_key == 0) { isAuto = ~isAuto; autoLed = isAuto; } while(auto_key == 0); //防止按键重复检测 } if(change_key == 0 && isAuto == false) //手动模式,并且效果切换按下 { Delay10ms(1); if(change_key == 0) { isChange = true; } while(change_key == 0); //防止按键重复检测 } } /******************************************************************************* * 函 数 名 : displayLed * 函数功能 : 显示led灯 * 输 入 : (全局变量 )types:显示效果;counts:当前效果下的第几次 * 输 出 : 无 *******************************************************************************/ void displayLed(void) { switch(types) { case 0: //顺时针旋转led灯 { if(counts >= 16) counts = 0; if(counts >=15) { if(isAuto == true) isChange = true; } if(counts P1 = ledCode[15-counts]; P2 = 0xff; } break; } case 1: //逆时针旋转LED灯 { if(counts >= 16) counts = 0; if(counts >=15) { if(isAuto == true) isChange = true; } if(counts P1 = 0xff; P2 = ledCode[counts-8]; } break; } case 2: //交叉替换 { if(counts >= 16) counts = 0; if(counts >=15) { if(isAuto == true) isChange = true; } if(counts % 2 == 0) //偶数 { P1=0xaa; P2=0xaa; } else { P1=0x55; P2=0x55; } break; } case 3: //对角顺时针 { if(counts >= 8) counts = 0; if(counts >=7) { if(isAuto == true) isChange = true; } P1 = ledCode[7 - counts]; P2 = ledCode[7 - counts]; break; } case 4: //对角逆时针 { if(counts >= 8) counts = 0; if(counts >=7) { if(isAuto == true) isChange = true; } P1 = ledCode[counts]; P2 = ledCode[counts]; break; } case 5: //顺时针逐个点亮 { if(counts >= 17) counts = 0; if(counts P1 = 0x00; P2 = ~ledCode2[15 - counts]; } else //全亮 { P1 = 0x00; P2 = 0x00; if(isAuto == true) isChange = true; } break; } case 6: //顺时针逐个又灭掉 { if(counts >= 17) counts = 0; if(counts P1 = 0xff; P2 = ledCode2[15 - counts]; } else //全灭 { P1 = 0xff; P2 = 0xff; if(isAuto == true) isChange = true; } break; } case 7: //逆时针逐个点亮 { if(counts >= 17) counts = 0; if(counts P1 = ledCode2[counts - 7]; P2 = 0x00; } else //全亮 { P1 = 0x00; P2 = 0x00; if(isAuto == true) isChange = true; } break; } case 8: //逆时针逐个灭掉 { if(counts >= 17) counts = 0; if(counts P1 = ~ledCode2[counts - 7]; P2 = 0xff; } else //全亮 { P1 = 0xff; P2 = 0xff; if(isAuto == true) isChange = true; } break; } case 9: //二进制加法 { if(counts >= 255) counts = 0; if(counts == 254 && isAuto == true) isChange = true; P1 = ~counts; P2 = ~counts; break; } default: types = 0; P0 = disCode[types]; //更新数码管显示 } } /******************************************************************************* * 函 数 名 : Delay10ms (多个) * 函数功能 : 延时函数,延时n*10ms * 输 入 : n-延时次数 * 输 出 : 无 *******************************************************************************/ void Delay10ms(unsigned int n) { unsigned char a, b; for (; n>0; n--) { for (b=38; b>0; b--) { for (a=130; a>0; a--); } } } 完整的 proteus 仿真图布局
源代码、编译过的 HEX 文件以及仿真图已打包上传,下载地址: https://download.csdn.net/download/oqqmoon1234/72026438 |
 一共实现有十钟灯光效果,分别是:
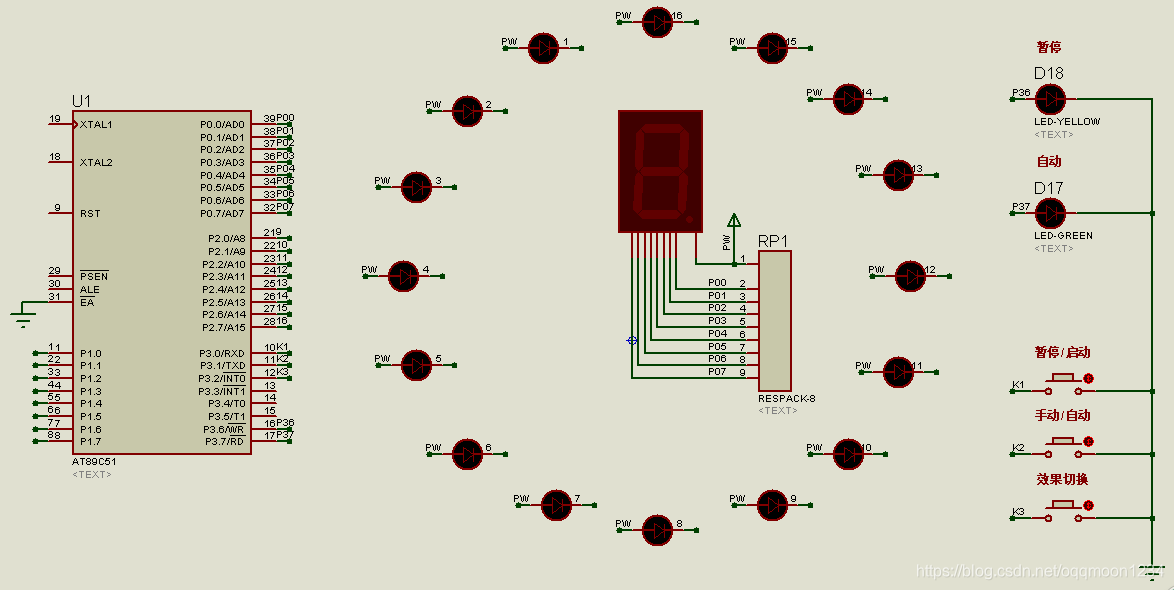
【本文地址】
公司简介
联系我们