| 微信开发者工具+ Visual Studio 2017开发微信小程序Demo | 您所在的位置:网站首页 › 怎么编写微信文件夹 › 微信开发者工具+ Visual Studio 2017开发微信小程序Demo |
微信开发者工具+ Visual Studio 2017开发微信小程序Demo
|
目录 Demo最终效果 开发工具: 开发步骤: 第一步:准备工作,用visual studio写后台数据 第二步:映射外网、路由(TP-LINK)端口,配置IIS发布项目 第三步:小程序访问、调用VS的传过来的JSON字符串,展示数据
刚自己做了一个开发微信小程序的Demo,怕忘了,记录下来。希望以后会跳过那些大坑~~ Demo最终效果 开发工具: (一)微信开发者工具:数据展示,本案例接收的是VS传过来的JSON数据 (二)VS2017:写后台数据 (三)VS开发模式:MVC 开发步骤: 一、准备工作,用visual studio写后台数据 二、配置IIS发布项目,映射外网、路由(TP-LINK)端口,发布网站 三、小程序访问、调用VS的传过来的JSON字符串,展示数据 --------------------------------------------------------------------------------------------------------------------------------- 第一步:准备工作,用visual studio写后台数据 建立MVC项目具体步骤,可以百度到很多资料。例如:https://jingyan.baidu.com/article/a3aad71a160b4ab1fb0096e1.html
1、首先用vs2017建立一个基本的mvc模板,包括model、Controllers和view,但是今天我们的项目和view没关系,是可以删除的。简单的测试数据,如写一个Progream类: public class Progream { public string img { get; set; } //图片 public string shortDesc { get; set; } //描述 public string title { get; set; } //标题 }2、写一个json类:用于把控制器中的值变为json格式:代码如下 ,不想封装方法,也可以添加json包,可参考https://blog.csdn.net/u011720560/article/details/80402357 public static class Json { public static object ToJson(this string Json) { return Json == null ? null : JsonConvert.DeserializeObject(Json); } public static string ToJson(this object obj) { var timeConverter = new IsoDateTimeConverter { DateTimeFormat = "yyyy-MM-dd HH:mm:ss" }; return JsonConvert.SerializeObject(obj, timeConverter); } public static string ToJson(this object obj, string datetimeformats) { var timeConverter = new IsoDateTimeConverter { DateTimeFormat = datetimeformats }; return JsonConvert.SerializeObject(obj, timeConverter); } public static T ToObject(this string Json) { return Json == null ? default(T) : JsonConvert.DeserializeObject(Json); } public static List ToList(this string Json) { return Json == null ? null : JsonConvert.DeserializeObject(Json); } public static DataTable ToTable(this string Json) { return Json == null ? null : JsonConvert.DeserializeObject(Json); } public static JObject ToJObject(this string Json) { return Json == null ? JObject.Parse("{}") : JObject.Parse(Json.Replace(" ", "")); } }3、还需要写一个专门返回的类型AjaxResult类型和枚举,代码如下: public class AjaxResult { /// /// 操作结果类型 /// public object state { get; set; } /// /// 获取 消息内容 /// public string message { get; set; } /// /// 获取 返回数据 /// public object data { get; set; } } /// /// 表示 ajax 操作结果类型的枚举 /// public enum ResultType { /// /// 消息结果类型 /// info = 0, /// /// 成功结果类型 /// success = 1, /// /// 警告结果类型 /// warning = 2, /// /// 异常结果类型 /// error = 3 }4、在控制器中写一个方法,转换为json数据: //设置初始值 List proList = new List(); private void SetPro() { proList.Add(new Progream { img= "http://外网地址号:外网端口号/img/team.png", shortDesc = "java是世界上用的最多的编程语言", title = "精英贷" }); proList.Add(new Progream { img= "http://外网地址号:外网端口号/img/01.png", shortDesc = "java是世界上用的最多的编程语言", title = "月供贷" }); proList.Add(new Progream { img= "http://外网地址号:外网端口号/img/02.png", shortDesc = "java是世界上用的最多的编程语言", title = "保单贷" }); } public ActionResult getProgream01() { SetPro(); //获取数据 return Content(new AjaxResult { state = ResultType.success.ToString(), message = "true", data = proList }.ToJson()); } }
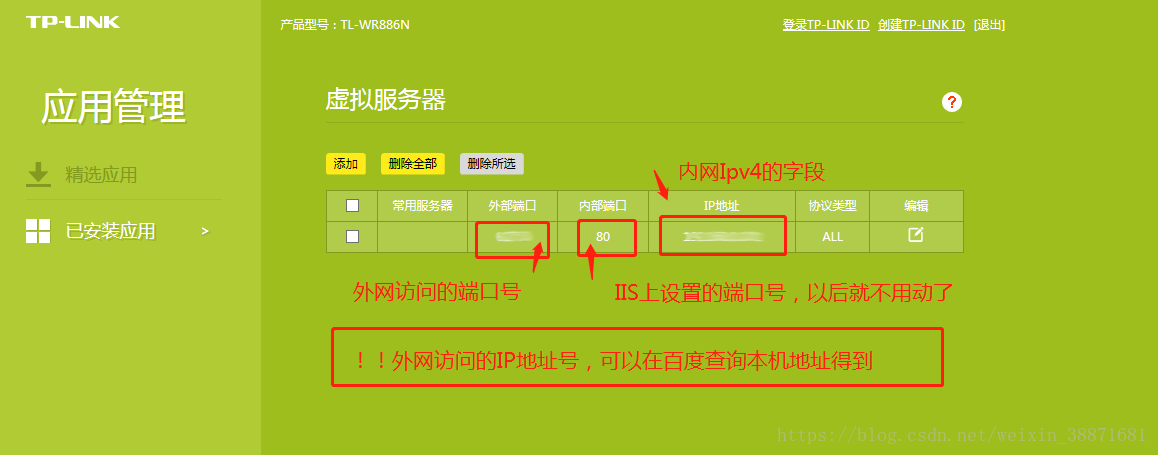
--------------------------------------------------------------------------------------------------------------------------------- 第二步:映射外网、路由(TP-LINK)端口,配置IIS发布项目 1、映射外网端口: (1)登录TP-LINK,在“已安装应用”里找到如下截图,并对应配置
2、配置IIS发布项目:
(1)确认安装了IIS:配置IIS首要确定本机电脑上已安装了IIS,没有可以百度找到很多方法安装 (2)配置IIS:
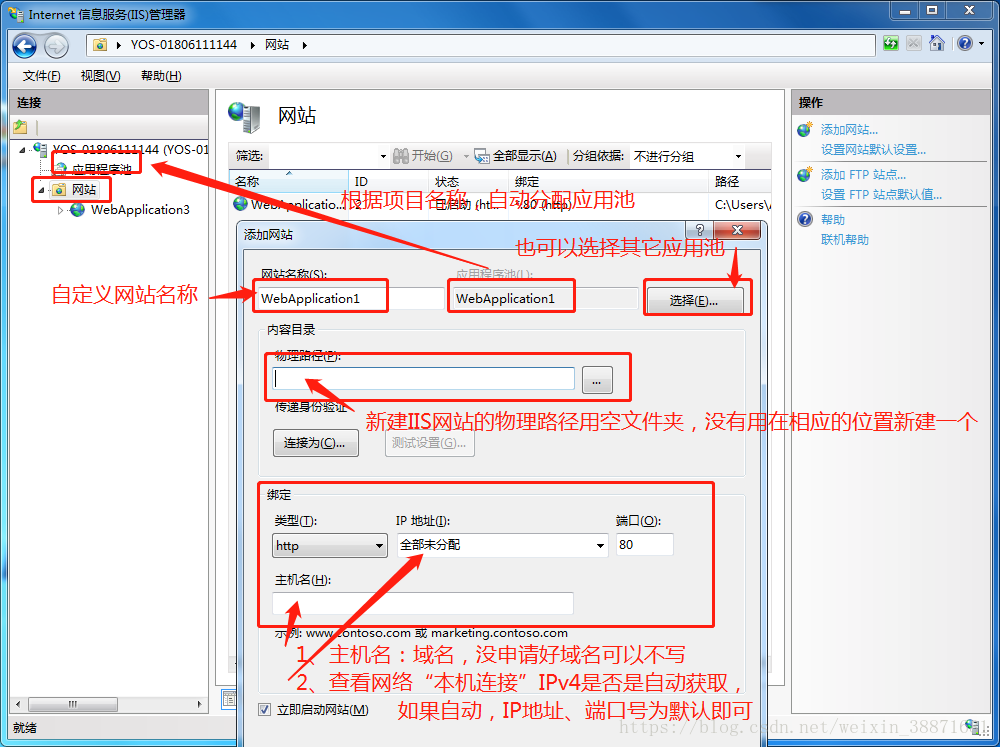
在“网站图标上”右键添加网站
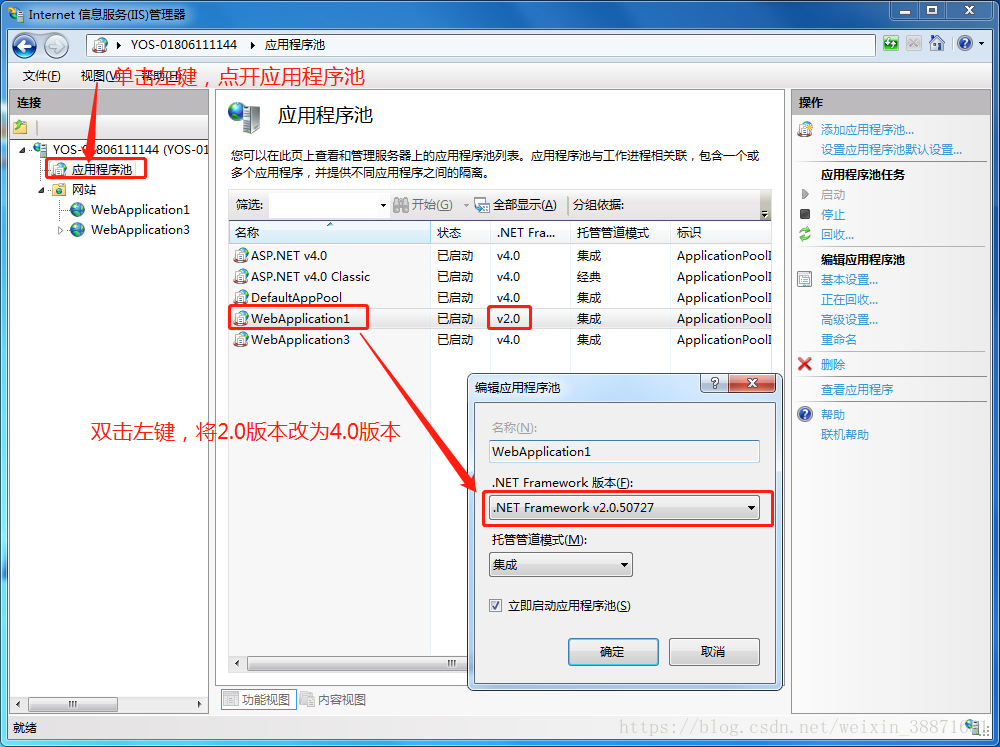
小提示: (1)、添加网站的物理路径为新建文件夹,要与“开发项目”的文件夹名有所区别,本案例新建了一个“网站名”为WebApplication1 ,“物理路径”新建文件夹名为:IIS_WebApplication1,“开发项目”文件夹名为:WebApplication1,“物理路径”与“开发项目”文件夹在同一路径下。 (2)、添加完网站记得“网站”与“应用程序池”图标上再右键刷新一下,此时为一个空网站 (3)打开“应用程序池”,会看到系统自己分配给WebApplication1项目的应用程序池,
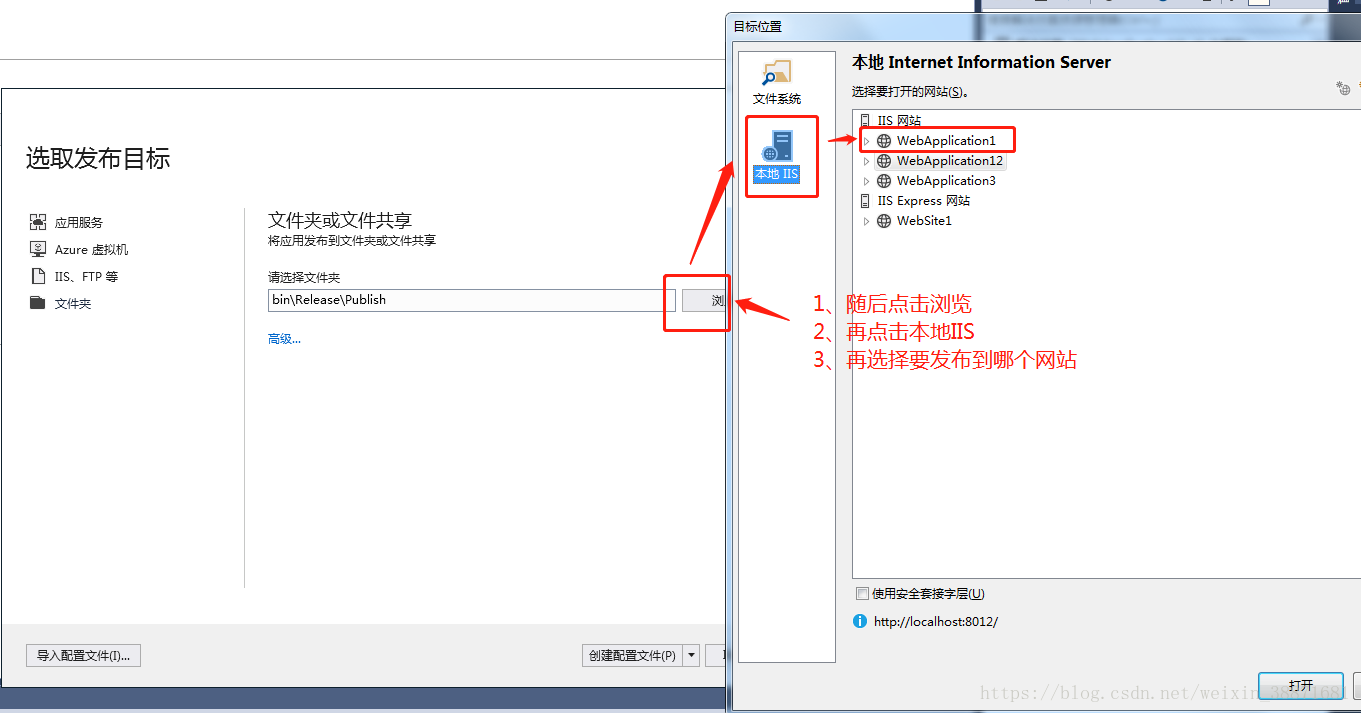
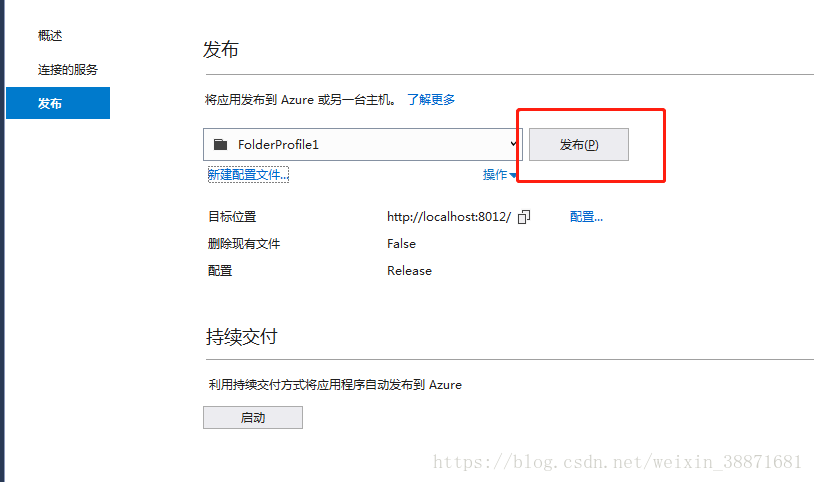
3、发布网站
接下来选择“创建配置文件”按钮,最后确认发布
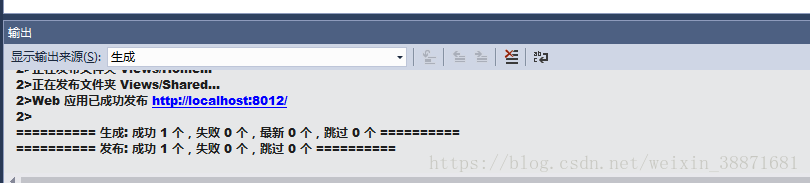
基本上发布的时候不会出现什么错误,就会出现下面的画面,就证明发布成功了。
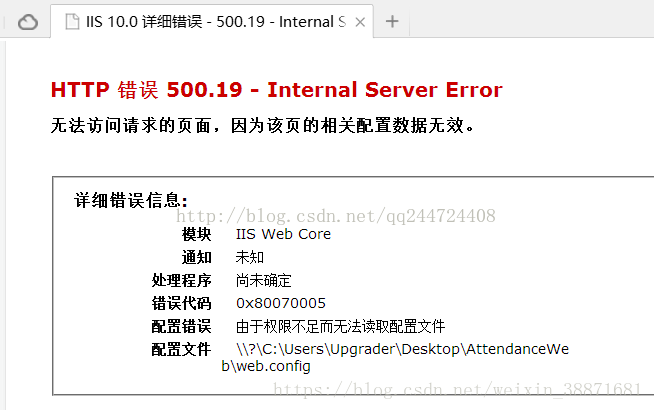
4、容易遇到的问题:随后我们运行网站,可能会遇到各种问题。例如:
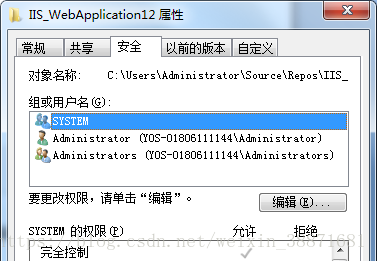
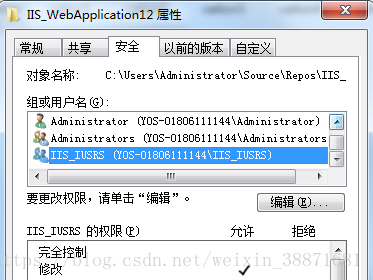
到遇到这个问题的时候可能是权限不足。 我们需要打开发布项目的这个文件夹单击右键选择属性。 然后选择安全,如图。 如果发现组或用户名 中没有IUSR和IIS_IUSRS 这就是问题所在,
点击编辑出来一弹窗是该文件夹的权限,然后点击添加,弹出弹窗为选择用户或组。 这时候输入对象名称来选择,如果你不知道或者记不住 可以选择高级,弹出一弹窗名称也为选择用户或组, 右边有一个立即查找。搜索结果里面有东西了。 选择里面的IUSR和IIS_IUSRS点击确定。然后再次点击确定。 给IUSER和IIS_IUSRS修改的权限,点击应用以后点击确定。 这时文件夹的属性多了IUSR和IIS_IUSRS, 如图
这时我们再运行即可。
5、把这个数据发布到iis中,直接访问/Home/getProgream,可以看到如图所示的数据:
--------------------------------------------------------------------------------------------------------------------------------- 第三步:小程序访问、调用VS的传过来的JSON字符串,展示数据 上代码:主要是index.js里的数据绑定 1、app.json { "pages":[ "pages/index/index", "pages/join/join" ], "window":{ "color": "#fff", "backgroundTextStyle":"drak", "navigationBarBackgroundColor": "#2e5e86", "navigationBarTitleText": "信贷DEMO", "navigationBarTextStyle":"#fff", "enablePullDownRefresh": true }, "tabBar": { "color": "#dcdddd", "selectedColor": "#000000", "list": [ { "pagePath": "pages/index/index", "text": "首页", "iconPath": "images/01.png", "selectedIconPath": "images/01.png" }, { "pagePath": "pages/join/join", "text": "加入", "iconPath": "images/02.png", "selectedIconPath": "images/02.png" }, { "pagePath": "pages/Employee/Employee", "text": "员工", "iconPath": "images/03.png", "selectedIconPath": "images/03.png" } ] }, "debug":true }2、index.js //获取应用实例 const app = getApp() Page({ data: { imgUrls: [ '/images/07.jpg', '/images/06.jpg', '/images/08.jpg' ], indicatorDots: false, autoplay: false, interval: 5000, duration: 1000, proList:null }, //页面加载 onLoad: function (option) { console.log("1111111"); }, onShow:function(){ this.getProList(); }, //数据绑定 getProList:function(){ var self=this; wx.request({ url: 'http://外网地址号:外网端口号/Home/getProgream01', method:"GET", header: { 'content-type': 'application/json' // 默认值 }, success:function(res){ console.log(res); self.setData({ proList: res.data.data, }); } }); } })3、 |


【本文地址】