| OAuth 2.0 (第三方登录)前端流程实现 | 您所在的位置:网站首页 › 微博第三方软件查看访客记录在哪 › OAuth 2.0 (第三方登录)前端流程实现 |
OAuth 2.0 (第三方登录)前端流程实现
|
目录 一、OAuth是什么 二、OAuth 实现,前端需要做什么 (一)数据收集表单 (二)获取后端返回值 (三)重定向地址及后续处理 三、项目地址 一、OAuth是什么OAuth就是让"客户端"安全可控地获取"用户"的授权,与"服务商提供商"进行互动。也就是大家口中熟知的第三方登录,通过微信号或qq号授权去登录各类app或网站。 因为博主目前是一名菜鸡前端,所以对OAuth的后端实现并不是很了解,所以,本篇文章着重讲OAuth的前端实现思路。 想了解后端运作机制的请点击下面这个大佬写的文章。写的还是非常详细的。虽然我看不太懂。理解OAuth 2.0 - 阮一峰的网络日志
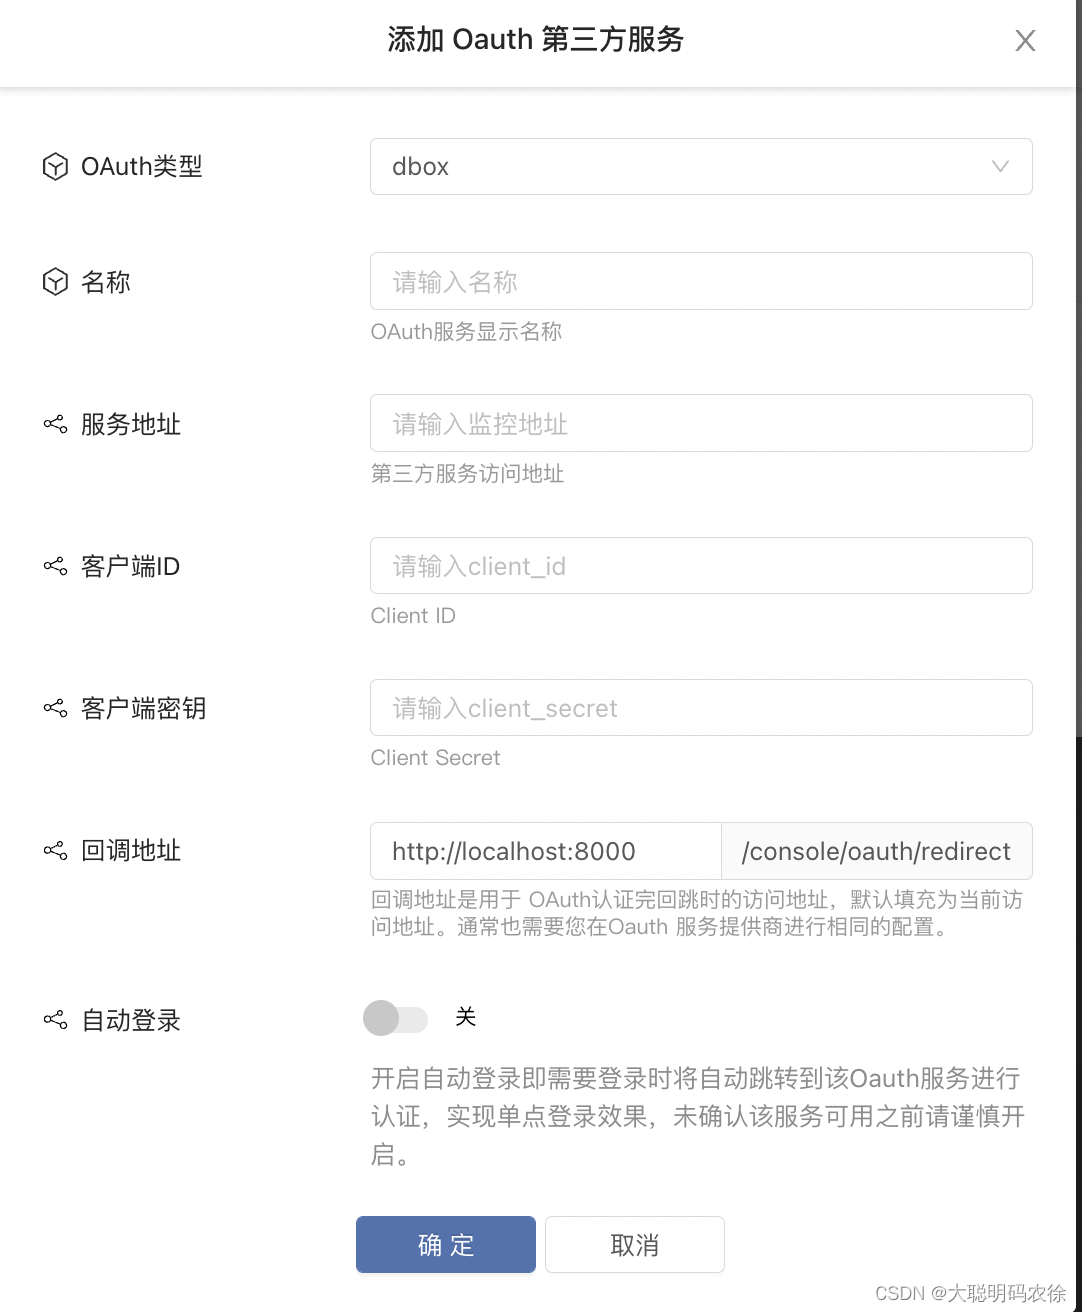
大家对于这个表单可能会有一些不了解的地方,下面我来一一解释一下。 字段解释OAuth类型OAuth类型你可以理解为个个应用对于请求地址的参数上传是不一致的,你需要对个个应用的地址做一些相对应的处理,而OAuth类型就可以作为对这些应用的区分的关键信息。名称顾名思义,就是名称客户端idClient ID 由第三方软件生成的,唯一的值。客户端密钥Client Secret 由第三方软件生成的,唯一的值。回调地址回调地址是用于 OAuth认证完回跳时的访问地址,默认填充为当前访问地址。通常也需要您在Oauth 服务提供商进行相同的配置自动登录这个是平台实现的功能,就是当你已经登录了自己的平台账号,再去点击第三方登录,就跳过第三方的登录页面,直接进入第三方应用。这里是本产品特有的功能。大家可以忽略不计。这里我们通过表单把数据返回给后端,后端再去做一些处理,拼接地址,加密等等。 handleCreatOauth = values => { let { name, client_id, client_secret, oauth_type, home_url, redirect_domain, is_auto_login } = values; oauth_type = oauth_type.toLowerCase(); if (oauth_type === 'github') { home_url = 'https://github.com'; } if (oauth_type === 'aliyun') { home_url = 'https://oauth.aliyun.com'; } if (oauth_type === 'dingtalk') { home_url = 'https://oapi.dingtalk.com'; } const obj = { name, client_id, client_secret, is_auto_login, oauth_type, redirect_uri: `${redirect_domain}/console/oauth/redirect`, home_url, is_console: true }; this.handelRequest(obj); }; handelRequest = (obj = {}, isclone) => { const { dispatch, eid } = this.props; const { oauthInfo, oauthTable, isOpen } = this.state; const arr = [...oauthTable]; obj.eid = eid; oauthInfo ? (obj.service_id = oauthInfo.service_id) : (obj.service_id = null); isclone ? (obj.enable = false) : (obj.enable = true); if (oauthTable && oauthTable.length > 0) { oauthTable.map((item, index) => { const { service_id } = item; arr[index].is_console = true; if (oauthInfo && service_id === obj.service_id) { arr[index] = Object.assign(arr[index], obj); } }); } !oauthInfo && arr.push(obj); dispatch({ type: 'global/creatOauth', payload: { enterprise_id: eid, arr }, callback: data => { if (data && data.status_code === 200) { notification.success({ message: isOpen ? formatMessage({id:'notification.success.open'}) : isclone ? formatMessage({id:'notification.success.close'}) : oauthInfo ? formatMessage({id:'notification.success.edit'}) : formatMessage({id:'notification.success.add'}) }); this.handelOauthInfo(); } } }); };以上代码是本项目提交事件的触发函数。 可以看到,oauth_type就作为识别各类应用\网站的关键信息。通过识别从而返回不同的home_url,发送给后端。 (二)获取后端返回值当我们把完整的信息提交给后端以后,在登录页面,我们就要对接对应的第三方登录入口。
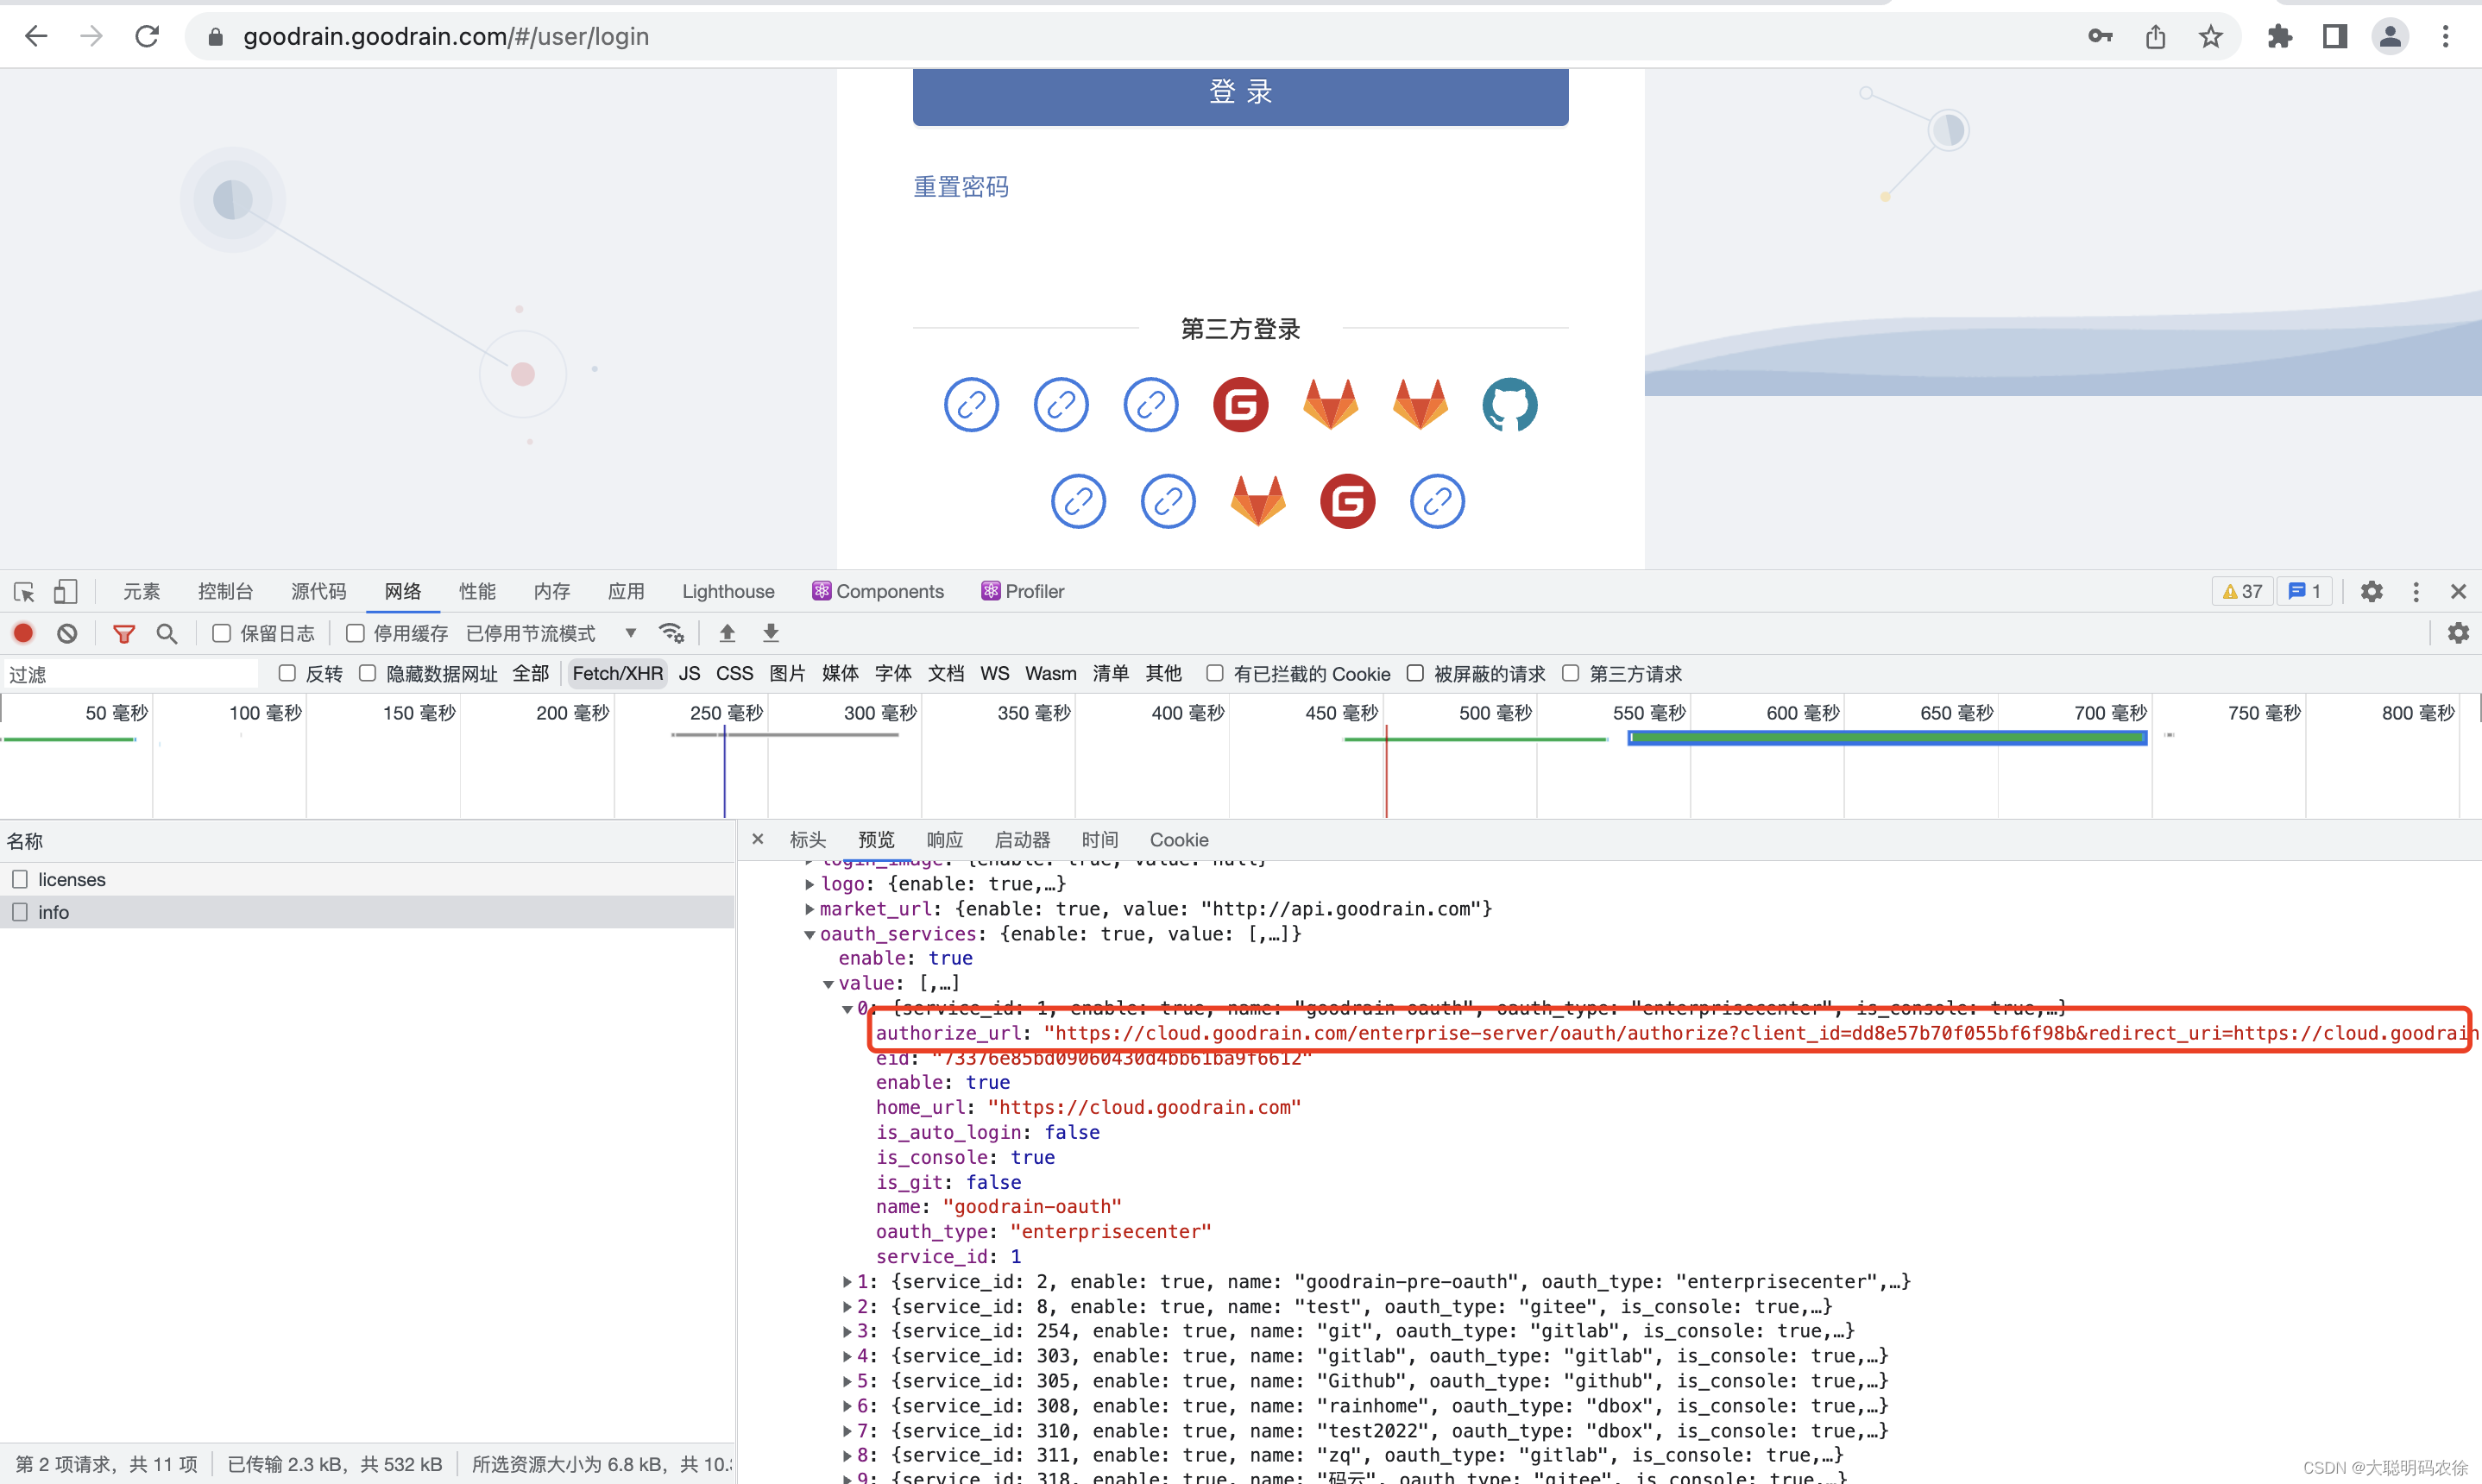
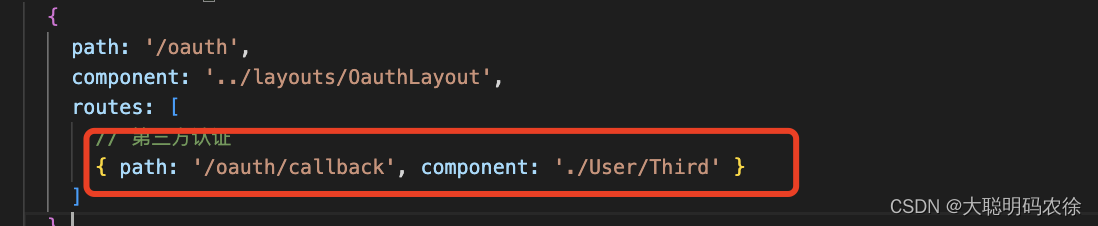
如上图,进入页面以后,先调了一个接口,这里返回了一个关键的信息,就是“authorize_url”。这里我们先暂时不做解释,接着往下看。 {oauthServicesList.map(item => { const { name, service_id } = item; return ( {oauthUtil.getIcon(item)} ); })}这里是html部分,oauthServicesList就是获取的上面那个接口返回的对接好的第三方应用,通过map循环渲染出图标,然后a链接点接以后拿到对应的“item”传进该方法然后return出返回值进行跳转。 getAuthredictURL(item) { if (item) { const { oauth_type: oauthType, client_id: clientId, auth_url: authUrl, redirect_uri: redirectUri, service_id: serviceId, authorize_url: authorizeUrl } = item; if (oauthType === 'enterprisecenter' && authorizeUrl) { const str = authorizeUrl; const agreement = `${window.location.protocol}//`; const content = window.location.host; const suffix = str.substring( str.indexOf('/enterprise-server'), str.length ); const newUrl = agreement + content + suffix; const isRedirectUrl = newUrl.indexOf('redirect_uri=') > -1; const redirectbefore = isRedirectUrl && newUrl.substring(0, newUrl.indexOf('redirect_uri=')); const redirectSuffix = isRedirectUrl && newUrl.substring(newUrl.indexOf('/console'), newUrl.length); const url = isRedirectUrl ? `${`${redirectbefore}redirect_uri=${agreement}${content}`}${redirectSuffix}` : newUrl; return url; } if (authorizeUrl) { return authorizeUrl; } if (oauthType == 'github') { return `${authUrl}?client_id=${clientId}&redirect_uri=${redirectUri}?service_id=${serviceId}&scope=user%20repo%20admin:repo_hook`; } return `${authUrl}?client_id=${clientId}&redirect_uri=${redirectUri}?service_id=${serviceId}&response_type=code`; } return null; },以上就是 getAuthredictURL方法。可以看到oauth_type仍然作为区分各种类型的关键信息。从而返回不同的url。其中一种判定方法就是当authorizUrl不为空时,返回authorizUrl。这里的authorizUrl就是我上文提到的,后端返回的关键信息'authorize_url'。 https://rainhome.goodrain.com/oauth/authorize?client_id=48948d5082eacd0dd4d9&scope=snsapi_login&redirect_uri=http%3A//localhost%3A8080/console/oauth/redirect%3Fservice_id%3D325&response_type=code"可以看到这条url拼接了很多信息,有client_id,redirect_url等等。并且做了相应的加密处理 。 当我们完成这一步时,前端的工作就已经完成了一半了。 (三)重定向地址及后续处理还记得在填写表单时有一个重定向地址吗,'redirect_url',在你点击a链接跳转以后,后端进行一系列操作,然后就会调这个重定向的地址,并在地址栏上返回相应的 code码 和 service_id码。然后再调一个认证接口。 当然事前你要写一个对应的路由地址。 |
【本文地址】