| 什么是HTTPS双向认证(MutualTLSauthentication) | 您所在的位置:网站首页 › 客户端服务器模式简称为什么 › 什么是HTTPS双向认证(MutualTLSauthentication) |
什么是HTTPS双向认证(MutualTLSauthentication)
|
1. 原理1.1 单向认证流程 单向认证流程中,服务器端保存着公钥证书和私钥两个文件,整个握手过程如下: 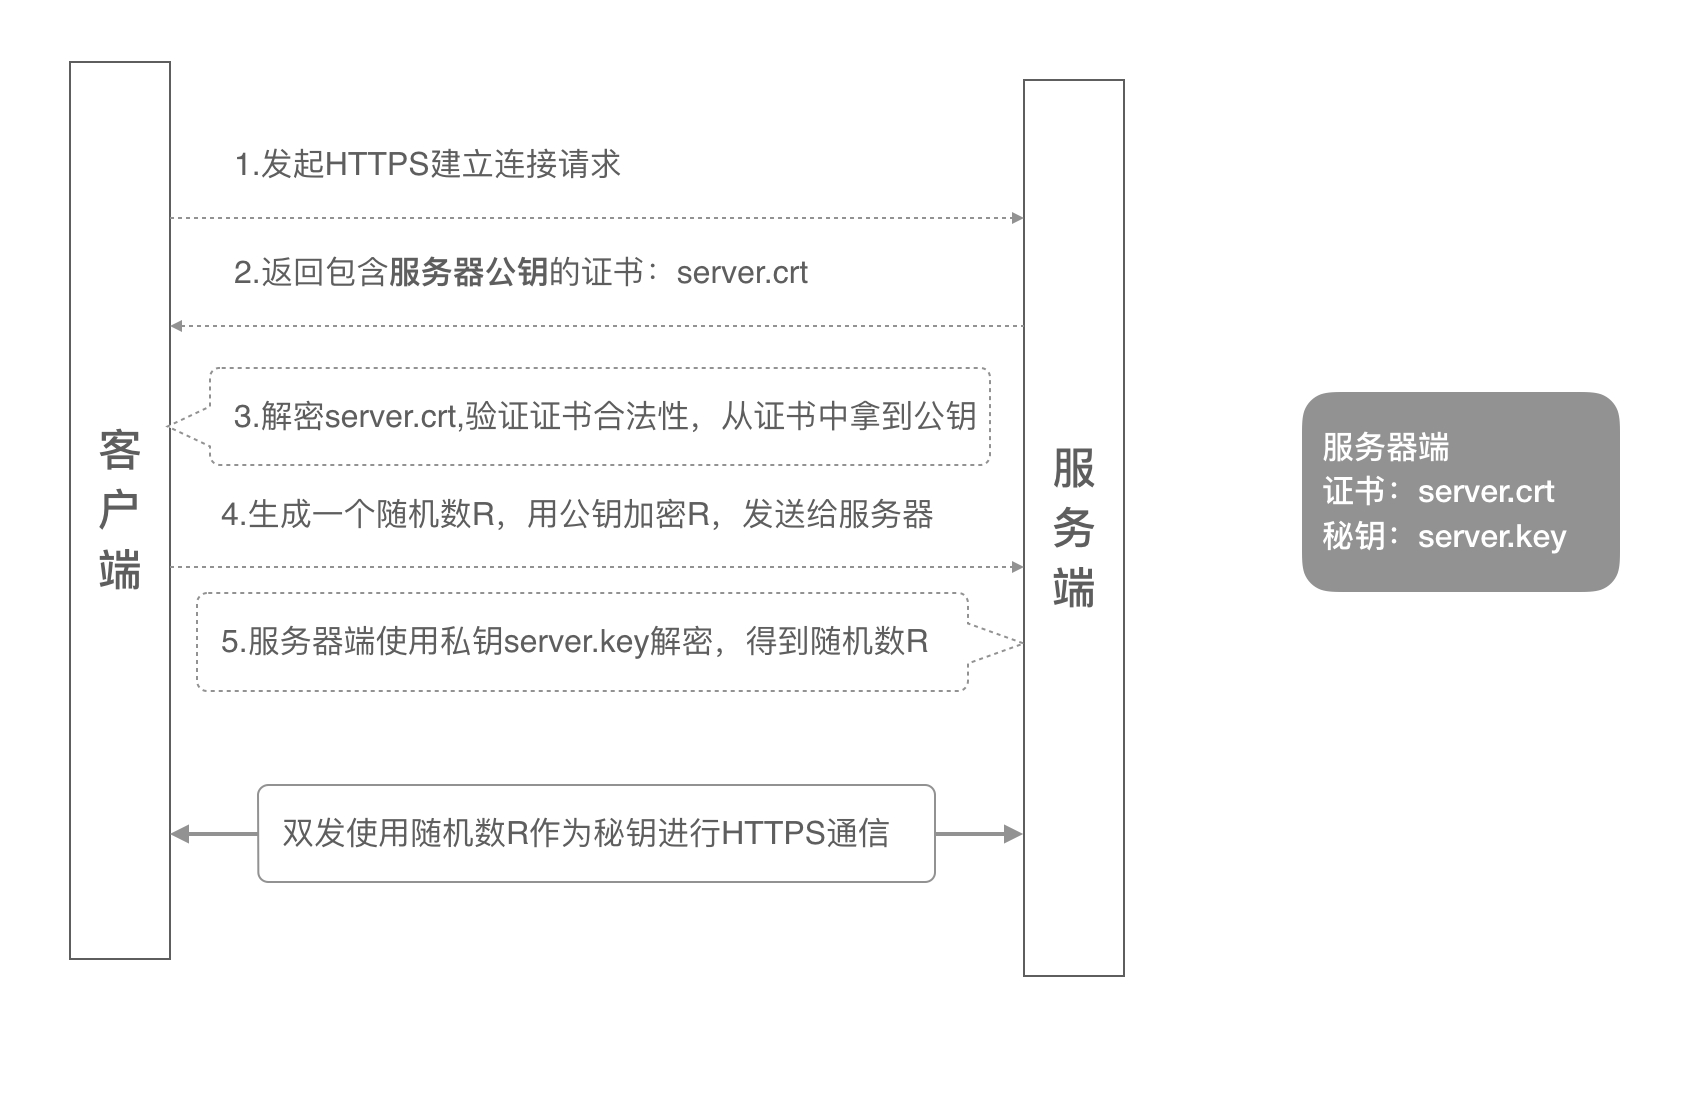 客户端发起建立HTTPS连接请求,将SSL协议版本的信息发送给服务器端; 服务器端将本机的公钥证书(server.crt)发送给客户端; 客户端读取公钥证书(server.crt),取出了服务端公钥; 客户端生成一个随机数(密钥R),用刚才得到的服务器公钥去加密这个随机数形成密文,发送给服务端; 服务端用自己的私钥(server.key)去解密这个密文,得到了密钥R 服务端和客户端在后续通讯过程中就使用这个密钥R进行通信了。 1.2 双向认证流程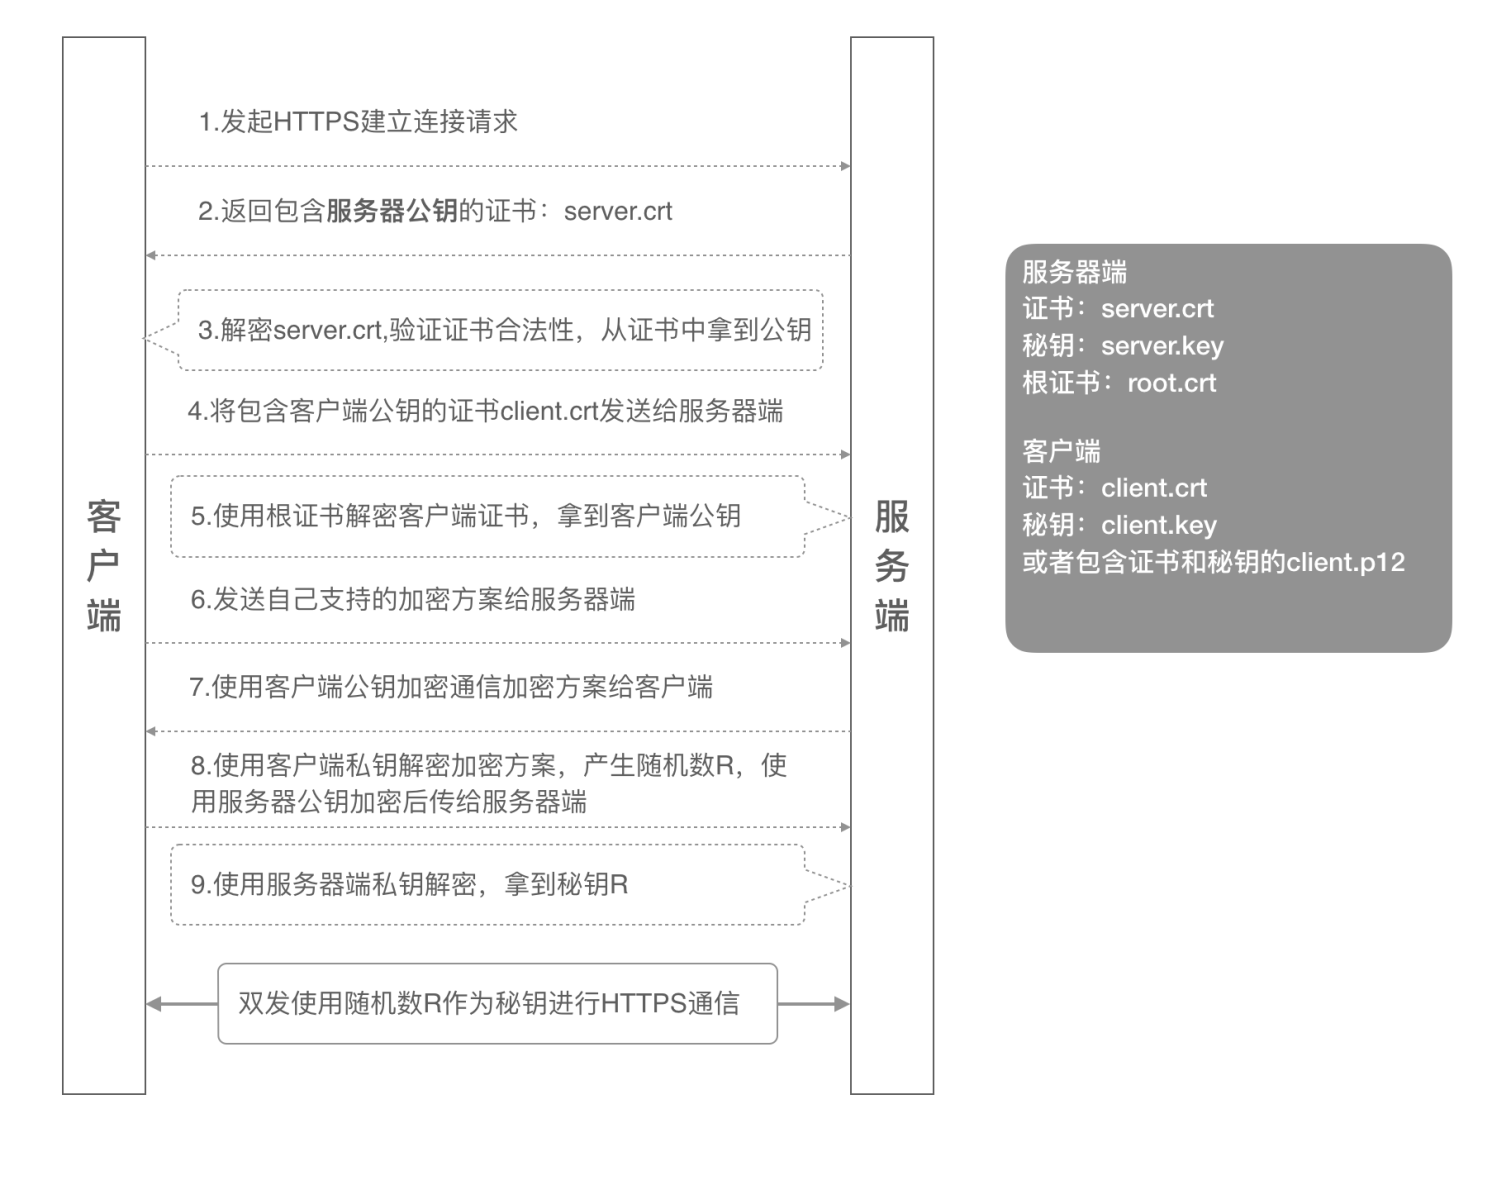 客户端发起建立HTTPS连接请求,将SSL协议版本的信息发送给服务端; 服务器端将本机的公钥证书(server.crt)发送给客户端; 客户端读取公钥证书(server.crt),取出了服务端公钥; 客户端将客户端公钥证书(client.crt)发送给服务器端; 服务器端使用根证书(root.crt)解密客户端公钥证书,拿到客户端公钥; 客户端发送自己支持的加密方案给服务器端; 服务器端根据自己和客户端的能力,选择一个双方都能接受的加密方案,使用客户端的公钥加密后发送给客户端; 客户端使用自己的私钥解密加密方案,生成一个随机数R,使用服务器公钥加密后传给服务器端; 服务端用自己的私钥去解密这个密文,得到了密钥R 服务端和客户端在后续通讯过程中就使用这个密钥R进行通信了。 2. 证书准备从上一章内容中,我们可以总结出来,整个双向认证的流程需要六个证书文件: 服务器端公钥证书:server.crt 服务器端私钥文件:server.key 根证书:root.crt 客户端公钥证书:client.crt 客户端私钥文件:client.key 客户端集成证书(包括公钥和私钥,用于浏览器访问场景):client.p12 所有的这些证书,我们都可以向证书机构去申请签发,一般需要收取一定的证书签发费用,此时我们需要选择大型的证书机构去购买。如果只是企业内部使用,不是给公众使用,也可以自行颁发自签名证书,具体的颁发办法请参见本文第四章。 3.在API网关配置HTTPS双向认证在准备好上一章提到的六个证书文件后,就可以在API网关配置HTTPS的双向认证能力了,在配置之前,我们首先需要在API网关上拥有一个分组,并且在分组下绑定好了您的域名。本节介绍下将域名对应的服务器证书、根证书绑定到API网关来实现HTTPS双向认证的能力。 步骤1. 进入分组详情页面,找到要绑定的域名,点击域名对应的“选择证书”链接; 步骤2. 进入选择证书子页面,选择“手动添加证书”链接; 步骤3. 在手动添加证书页面,将第二章中说到的三个证书分别填写到本页面中: 服务器端公钥证书(server.crt)的内容填写到“证书内容”文本框中; 服务器端私钥文件(server.key)的内容填写到“私钥”文本框中; 根证书(root.crt)的内容填写到“根证书”的文本框中; 通过以上三个步骤就可以在API网关完成配置HTTPS双向认证的配置。 4. 自签名证书生成这一些列证书之前,我们需要先生成一个CA根证书,然后由这个CA根证书颁发服务器公钥证书和客户端公钥证书。为了验证根证书颁发验证客户端证书这个逻辑,我们使用根证书生成两套不同的客户端证书,然后同时用两个客户端证书来发送请求,看服务器端是否都能识别。 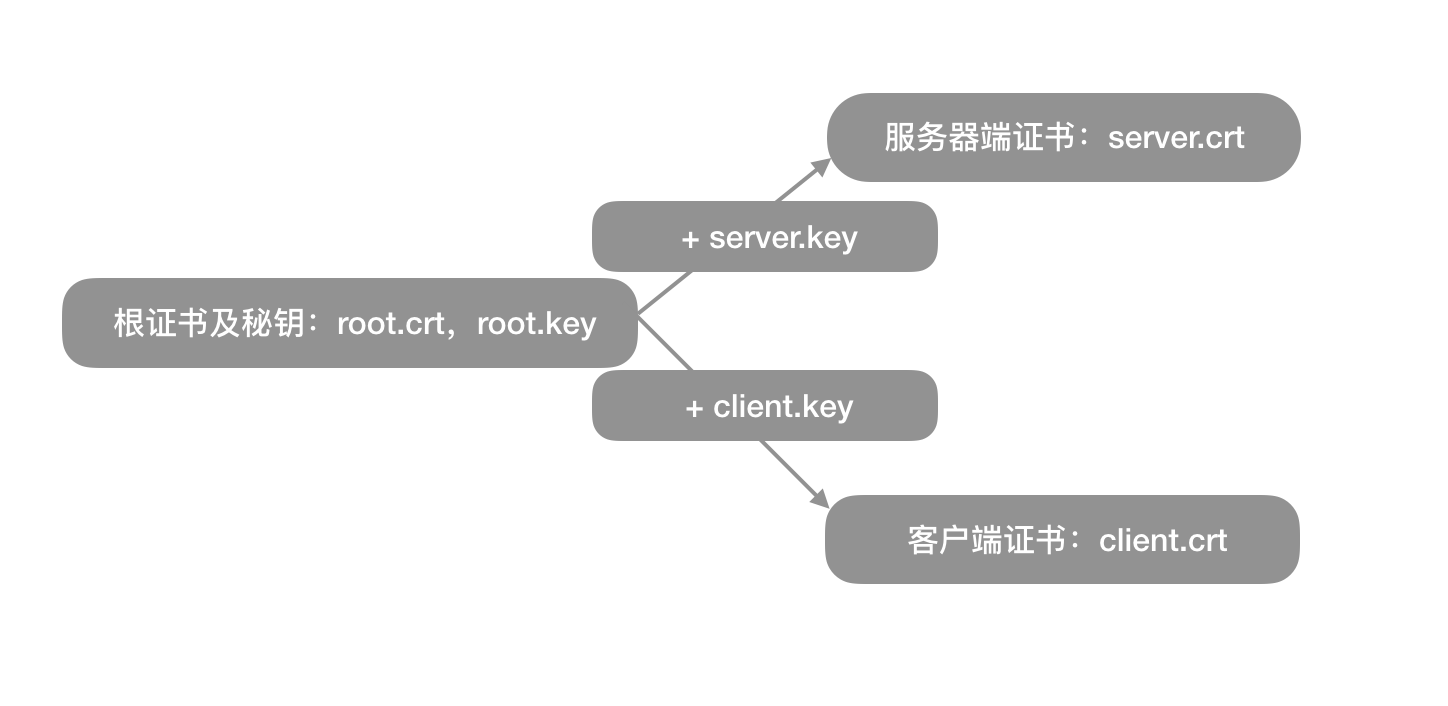 4.1生成自签名根证书 4.1生成自签名根证书(1)创建根证书私钥: openssl genrsa -out root.key 1024(2)创建根证书请求文件: openssl req -new -out root.csr -key root.key后续参数请自行填写,下面是一个例子: Country Name (2 letter code) [XX]:cn State or Province Name (full name) []:bj Locality Name (eg, city) [Default City]:bj Organization Name (eg, company) [Default Company Ltd]:alibaba Organizational Unit Name (eg, section) []:test Common Name (eg, your name or your servers hostname) []:root Email Address []:a.alibaba.com A challenge password []: An optional company name []:(3)创建根证书: openssl x509 -req -in root.csr -out root.crt -signkey root.key -CAcreateserial -days 3650在创建证书请求文件的时候需要注意三点,下面生成服务器请求文件和客户端请求文件均要注意这三点: 根证书的Common Name填写root就可以,所有客户端和服务器端的证书这个字段需要填写域名,一定要注意的是,根证书的这个字段和客户端证书、服务器端证书不能一样; 其他所有字段的填写,根证书、服务器端证书、客户端证书需保持一致最后的密码可以直接回车跳过。 经过上面三个命令行,我们最终可以得到一个签名有效期为10年的根证书root.crt,后面我们可以用这个根证书去颁发服务器证书和客户端证书。 4.2 生成自签名服务器端证书(1)生成服务器端证书私钥: openssl genrsa -out server.key 1024(2) 生成服务器证书请求文件,过程和注意事项参考根证书,本节不详述: openssl req -new -out server.csr -key server.key(3) 生成服务器端公钥证书 openssl x509 -req -in server.csr -out server.crt -signkey server.key -CA root.crt -CAkey root.key -CAcreateserial -days 3650经过上面的三个命令,我们得到: server.key:服务器端的密钥文件 server.crt:有效期十年的服务器端公钥证书,使用根证书和服务器端私钥文件一起生成 4.3 生成自签名客户端证书(1)生成客户端证书密钥: openssl genrsa -out client.key 1024 openssl genrsa -out client2.key 1024(2) 生成客户端证书请求文件,过程和注意事项参考根证书,本节不详述: openssl req -new -out client.csr -key client.key openssl req -new -out client2.csr -key client2.key(3) 生客户端证书 openssl x509 -req -in client.csr -out client.crt -signkey client.key -CA root.crt -CAkey root.key -CAcreateserial -days 3650 openssl x509 -req -in client2.csr -out client2.crt -signkey client2.key -CA root.crt -CAkey root.key -CAcreateserial -days 3650(4) 生客户端p12格式证书,需要输入一个密码,选一个好记的,比如123456 openssl pkcs12 -export -clcerts -in client.crt -inkey client.key -out client.p12 openssl pkcs12 -export -clcerts -in client2.crt -inkey client2.key -out client2.p12重复使用上面的命令,我们得到两套客户端证书: - client.key / client2.key:客户端的私钥文件 - client.crt / client2.key:有效期十年的客户端证书 使用根证书和客户端私钥一起生成 client.p12/client2.p12,这个证书文件包含客户端的公钥和私钥,主要用来给浏览器访问使用 5. 验证使用curl加上证书路径,可以直接测试Nginx的HTTPS双向认证是否配置成功。下面我们测试三个用例: 使用client.crt / client.key这一套客户端证书来调用服务器端 使用client.crt2 / client2.key这一套客户端证书来调用服务器端 不使用证书来调用服务器端 下面是三个用例的测试结果: 5.1 带证书的成功调用#--cert指定客户端公钥证书的路径 #--key指定客户端私钥文件的路径 #-k 使用本参数不校验证书的合法性,因为我们用的是自签名证书 #可以使用-v来观察具体的SSL握手过程 curl --cert ./client.crt --key ./client.key https://integration-fred2.fredhuang.com -k -v * Rebuilt URL to: https://47.93.XX.XX/ * Trying 47.93.XX.XX... * TCP_NODELAY set * Connected to 47.93.XX.XX (47.93.XX.XX) port 443 (#0) * ALPN, offering h2 * ALPN, offering http/1.1 * Cipher selection: ALL:!EXPORT:!EXPORT40:!EXPORT56:!aNULL:!LOW:!RC4:@STRENGTH * successfully set certificate verify locations: * CAfile: /etc/ssl/cert.pem CApath: none * TLSv1.2 (OUT), TLS handshake, Client hello (1): * TLSv1.2 (IN), TLS handshake, Server hello (2): * TLSv1.2 (IN), TLS handshake, Certificate (11): * TLSv1.2 (IN), TLS handshake, Server key exchange (12): * TLSv1.2 (IN), TLS handshake, Request CERT (13): * TLSv1.2 (IN), TLS handshake, Server finished (14): * TLSv1.2 (OUT), TLS handshake, Certificate (11): * TLSv1.2 (OUT), TLS handshake, Client key exchange (16): * TLSv1.2 (OUT), TLS handshake, CERT verify (15): * TLSv1.2 (OUT), TLS change cipher, Client hello (1): * TLSv1.2 (OUT), TLS handshake, Finished (20): * TLSv1.2 (IN), TLS change cipher, Client hello (1): * TLSv1.2 (IN), TLS handshake, Finished (20): * SSL connection using TLSv1.2 / ECDHE-RSA-AES256-GCM-SHA384 * ALPN, server accepted to use http/1.1 * Server certificate: * subject: C=CN; ST=BJ; L=BJ; O=Alibaba; OU=Test; CN=integration-fred2.fredhuang.com; [email protected] * start date: Nov 2 01:01:34 2019 GMT * expire date: Oct 30 01:01:34 2029 GMT * issuer: C=CN; ST=BJ; L=BJ; O=Alibaba; OU=Test; CN=root; [email protected] * SSL certificate verify result: unable to get local issuer certificate (20), continuing anyway. > GET / HTTP/1.1 > host:integration-fred2.fredhuang.com > User-Agent: curl/7.54.0 > Accept: */* > < HTTP/1.1 200 OK < Server: nginx/1.17.5 < Date: Sat, 02 Nov 2019 02:39:43 GMT < Content-Type: text/html < Content-Length: 612 < Last-Modified: Wed, 30 Oct 2019 11:29:45 GMT < Connection: keep-alive < ETag: "5db97429-264" < Accept-Ranges: bytes < Welcome to nginx! body { width: 35em; margin: 0 auto; font-family: Tahoma, Verdana, Arial, sans-serif; } Welcome to nginx!If you see this page, the nginx web server is successfully installed and working. Further configuration is required. For online documentation and support please refer to nginx.org. Commercial support is available at nginx.com. Thank you for using nginx. * Connection #0 to host 47.93.XX.XX left intact使用client2.crt / client2.key这一套客户端证书来调用服务器端 curl --cert ./client2.crt --key ./client2.key https://integration-fred2.fredhuang.com -k Welcome to nginx! body { width: 35em; margin: 0 auto; font-family: Tahoma, Verdana, Arial, sans-serif; } Welcome to nginx!If you see this page, the nginx web server is successfully installed and working. Further configuration is required. For online documentation and support please refer to nginx.org. Commercial support is available at nginx.com. Thank you for using nginx. 5.2 不带证书的调用curl https://integration-fred2.fredhuang.com -k 400 No required SSL certificate was sent 400 Bad Request No required SSL certificate was sent nginx/1.17.5三个用例都符合预期,从第一个测试日志中,我们可以看到,整个通信过程较长,客户端验证服务器端的证书,客户端也将自己的证书上传到服务器端进行验证。使用根证书颁发的两个客户端证书都可以正常发起双向HTTPS认证的调用。没有带客户端证书的调用会被服务器端拒绝服务。 6. 使用Java调用由于使用的是自签名证书,使用ApacheHttpClient去调用的话,需要将服务器证书加入可信任证书库中,才能成功调用,也可以在代码中简单忽略证书。 cd $JAVA_HOME sudo ./bin/keytool -import -alias ttt -keystore cacerts -file /Users/fred/temp/cert5/server.crt将服务器端公钥证书设置为可信证书后,使用以下代码可以直接发起带客户端证书的HTTPS请求: import org.apache.http.HttpEntity; import org.apache.http.clienthods.CloseableHttpResponse; import org.apache.http.clienthods.HttpGet; import org.apache.http.conn.ssl.SSLConnectionSocketFactory; import org.apache.http.impl.client.CloseableHttpClient; import org.apache.http.impl.client.HttpClients; import org.apache.http.ssl.SSLContexts; import org.apache.http.util.EntityUtils; import javax.net.ssl.SSLContext; import java.io.File; import java.io.FileInputStream; import java.io.InputStream; import java.security.KeyStore; public class HttpClientWithClientCert { private final static String PFX_PATH = "/Users/fred/temp/cert5/client.p12"; //客户端证书路径 private final static String PFX_PWD = "123456"; //客户端证书密码 public static String sslRequestGet(String url) throws Exception { KeyStore keyStore = KeyStore.getInstance("PKCS12"); InputStream instream = new FileInputStream(new File(PFX_PATH)); try { keyStore.load(instream, PFX_PWD.toCharArray()); } finally { instream.close(); } SSLContext sslcontext = SSLContexts.custom().loadKeyMaterial(keyStore, PFX_PWD.toCharArray()).build(); SSLConnectionSocketFactory sslsf = new SSLConnectionSocketFactory(sslcontext , new String[] { "TLSv1" } // supportedProtocols ,这里可以按需要设置 , null // supportedCipherSuites , SSLConnectionSocketFactory.getDefaultHostnameVerifier()); CloseableHttpClient httpclient = HttpClients.custom().setSSLSocketFactory(sslsf).build(); try { HttpGet httpget = new HttpGet(url); //httpget.addHeader("host", "integration-fred2.fredhuang.com");// 设置一些heander等 CloseableHttpResponse response = httpclient.execute(httpget); try { HttpEntity entity = response.getEntity(); String jsonStr = EntityUtils.toString(response.getEntity(), "UTF-8");//返回结果 EntityUtils.consume(entity); return jsonStr; } finally { response.close(); } } finally { httpclient.close(); } } public static void main(String[] args) throws Exception { System.out.println(System.getProperty("java.home")); System.out.println(sslRequestGet("https://integration-fred2.fredhuang.com")); } } |
【本文地址】