| MFC编写计算器 | 您所在的位置:网站首页 › 多功能计算器使用教程图片 › MFC编写计算器 |
MFC编写计算器
|
用MFC编写一个简单的计算器在VC++6.0中
大家在初次学习C++时老师肯定会给大家展示一下一个简单的小程序———一个计算器,大家肯定很惊讶,想着自己也想做一个,这么样我们也可以装装IT大佬,哈哈。PS我也是这么样想的哈哈!好了废话不多说了,我们下面来看看一个计算器怎么在我们手中实现的吧! 编写过程(思路)编写思路是我们编写一个程序最关键的东西没有思路我们是不能做出任何东西的! 下面介绍,四步写程序: 打开VC++6.0 ,点击文件—工程——MFC APPWizard[exe],建立工程随便一个盘中;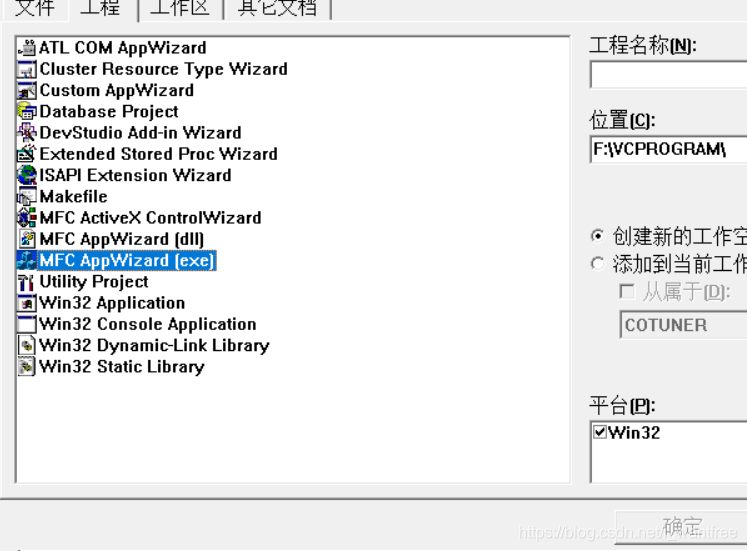 建立了一个MFC后界面出现让你选择MFC的属性,你直接点击基本对话框然后点击下一步,一直下一步(因为这些都不要你管或者你点击几本对话框完成后直接点击完成)然后完成; 建立了一个MFC后界面出现让你选择MFC的属性,你直接点击基本对话框然后点击下一步,一直下一步(因为这些都不要你管或者你点击几本对话框完成后直接点击完成)然后完成;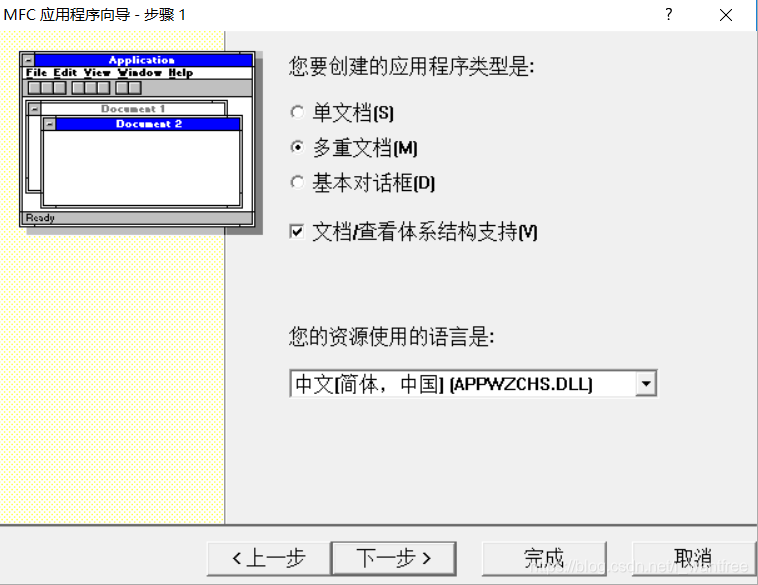 建立完MFC后出现这么一个界面,在右边的控件工具栏设计出一个计算器的外观,任你想的做(ps.删除是用delect键); 建立完MFC后出现这么一个界面,在右边的控件工具栏设计出一个计算器的外观,任你想的做(ps.删除是用delect键);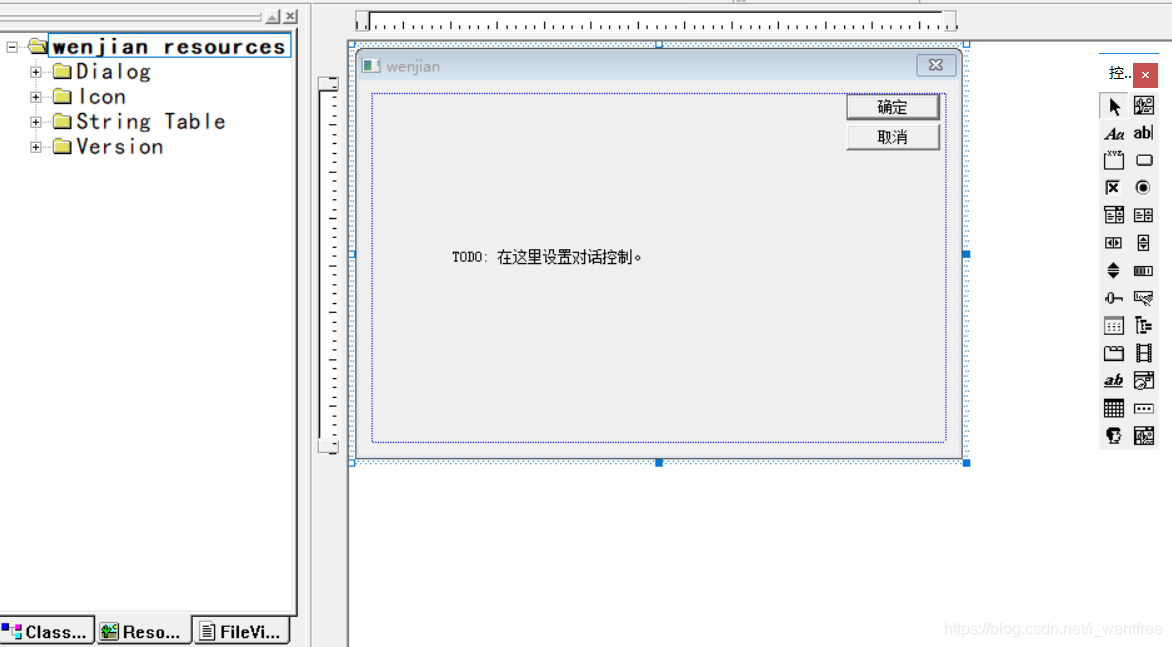 右键按钮或者编辑框,点击属性改他的ID名称,每一个要不一样,不要问为什么不做你就做不出来,ID大写,改标题,弄完后再右键按钮点击建立类导向,出现这些界面,要是你弄的是编辑框你就给编辑框设置一个变量,变量类型就用Cstring,添加变量的过程:点击Member Variables—点击要加变量的编辑框的ID—点击Add Variable—输入变量的名称点击确定,(系统给你自动是Cstring),要使按钮有功能,点击Message Maps—点击按钮ID—点击BN_CLICKED—点击Add Function—点击Edit Code进入编写代码的环境,; 右键按钮或者编辑框,点击属性改他的ID名称,每一个要不一样,不要问为什么不做你就做不出来,ID大写,改标题,弄完后再右键按钮点击建立类导向,出现这些界面,要是你弄的是编辑框你就给编辑框设置一个变量,变量类型就用Cstring,添加变量的过程:点击Member Variables—点击要加变量的编辑框的ID—点击Add Variable—输入变量的名称点击确定,(系统给你自动是Cstring),要使按钮有功能,点击Message Maps—点击按钮ID—点击BN_CLICKED—点击Add Function—点击Edit Code进入编写代码的环境,;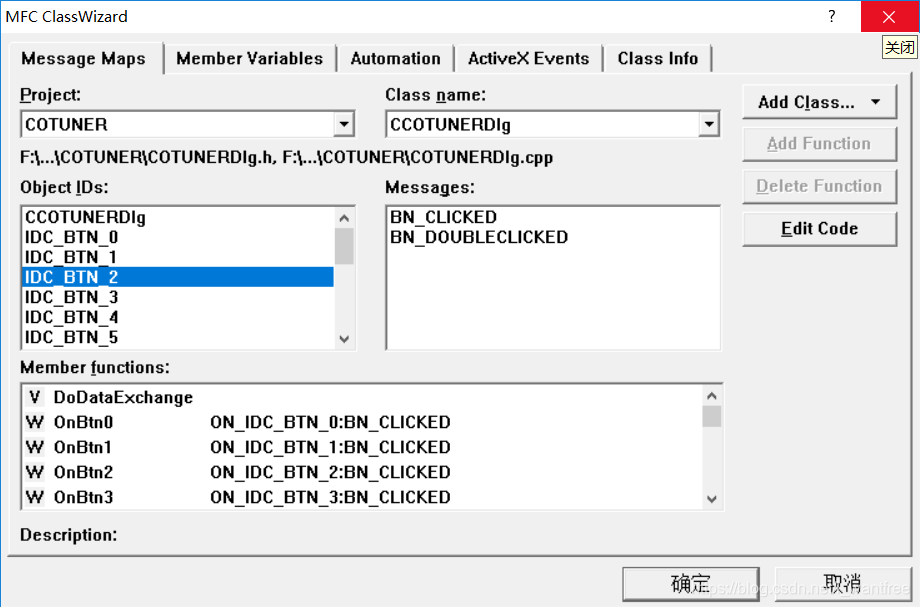 设计完计算器后 ,就是这么一个模样; 设计完计算器后 ,就是这么一个模样;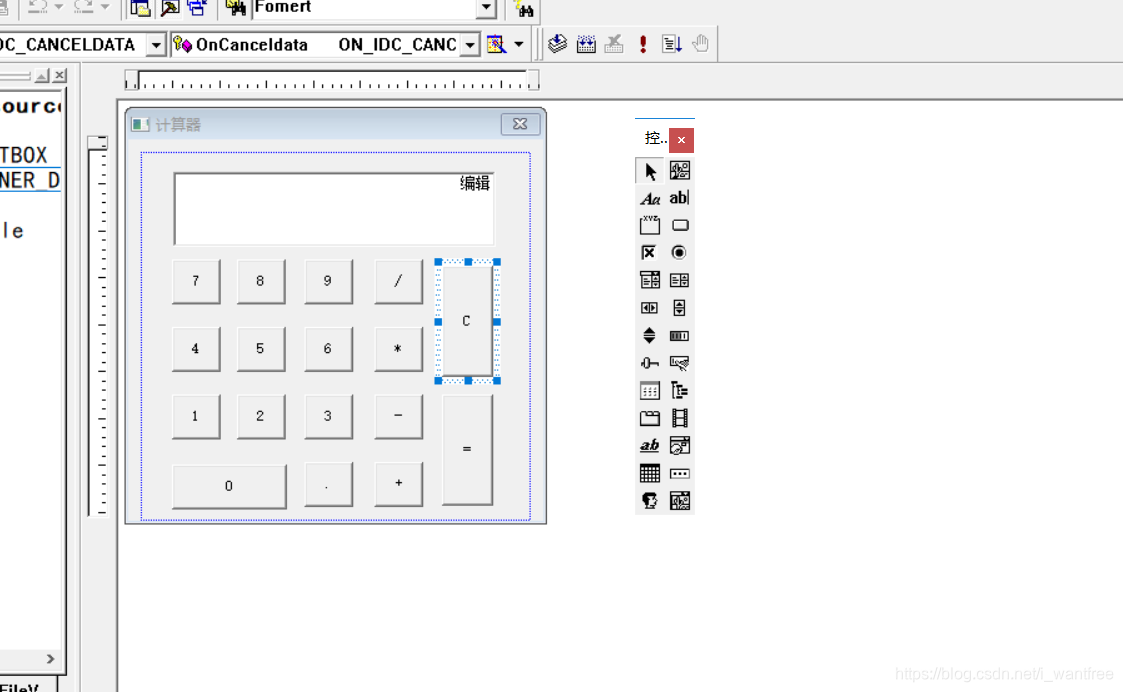 下面是代码
void CCOTUNERDlg::OnBtn1()
{
// TODO: Add your control notification handler code here
m_strResult += "1";
UpdateData(FALSE);
}
void CCOTUNERDlg::OnBtn2()
{
// TODO: Add your control notification handler code here
m_strResult += "2";
UpdateData(FALSE);
}
void CCOTUNERDlg::OnBtn0()
{
// TODO: Add your control notification handler code here
m_strResult += "0";
UpdateData(FALSE);
}
void CCOTUNERDlg::OnBtn3()
{
// TODO: Add your control notification handler code here
m_strResult += "3";
UpdateData(FALSE);
}
void CCOTUNERDlg::OnBtn4()
{
// TODO: Add your control notification handler code here
m_strResult += "4";
UpdateData(FALSE);
}
void CCOTUNERDlg::OnBtn5()
{
// TODO: Add your control notification handler code here
m_strResult += "5";
UpdateData(FALSE);
}
void CCOTUNERDlg::OnBtn6()
{
// TODO: Add your control notification handler code here
m_strResult += "6";
UpdateData(FALSE);
}
void CCOTUNERDlg::OnBtn7()
{
// TODO: Add your control notification handler code here
m_strResult += "7";
UpdateData(FALSE);
}
void CCOTUNERDlg::OnBtn8()
{
// TODO: Add your control notification handler code here
m_strResult += "8";
UpdateData(FALSE);
}
void CCOTUNERDlg::OnBtn9()
{
// TODO: Add your control notification handler code here
m_strResult += "9";
UpdateData(FALSE);
}
void CCOTUNERDlg::OnBtnDiv()
{
// TODO: Add your control notification handler code here
m_strOper1 = m_strResult;
m_strResult = "";
Flag_str = 4;
UpdateData(FALSE);
}
void CCOTUNERDlg::OnBtnMult()
{
// TODO: Add your control notification handler code here
m_strOper1 = m_strResult;
m_strResult = "";
Flag_str = 3;
UpdateData(FALSE);
}
void CCOTUNERDlg::OnBtnSub()
{
// TODO: Add your control notification handler code here
m_strOper1 = m_strResult;
m_strResult = "";
Flag_str = 2;
UpdateData(FALSE);
}
void CCOTUNERDlg::OnBtnAdd()
{
// TODO: Add your control notification handler code here
m_strOper1 = m_strResult;
m_strResult = "";
Flag_str = 1;
UpdateData(FALSE);
}
void CCOTUNERDlg::OnBtnEqal()
{
// TODO: Add your control notification handler code here
m_strOper2 = m_strResult;
double NResult = 0;
double NstrOper1 = atof(m_strOper1);
double NstrOper2 = atof(m_strOper2);
switch(Flag_str)
{
case 1:
NResult = NstrOper1 + NstrOper2;
m_strResult.Format("%lf",NResult);break;
case 2:
NResult = NstrOper1 - NstrOper2;
m_strResult.Format("%lf",NResult);break;
case 3:
NResult = NstrOper1 * NstrOper2;
m_strResult.Format("%lf",NResult);break;
case 4:
if(NstrOper2 == 0)
{
m_strResult.Format("除数不能为0");
}
else
{
NResult = NstrOper1 / NstrOper2;
m_strResult.Format("%lf",NResult);
}break;
default:
MessageBox("正在学习目前无法解答!");
}
UpdateData(FALSE);
}
void CCOTUNERDlg::OnCanceldata()
{
// TODO: Add your control notification handler code here
m_strOper1 = "";
m_strOper2 = "";
m_strResult = "";
UpdateData(FALSE);
}
void CCOTUNERDlg::OnBtnDot()
{
// TODO: Add your control notification handler code here
m_strResult += ".";
UpdateData(FALSE);
}
下面让我们来编译一下,现在我们就可以装装啦!;
下面是代码
void CCOTUNERDlg::OnBtn1()
{
// TODO: Add your control notification handler code here
m_strResult += "1";
UpdateData(FALSE);
}
void CCOTUNERDlg::OnBtn2()
{
// TODO: Add your control notification handler code here
m_strResult += "2";
UpdateData(FALSE);
}
void CCOTUNERDlg::OnBtn0()
{
// TODO: Add your control notification handler code here
m_strResult += "0";
UpdateData(FALSE);
}
void CCOTUNERDlg::OnBtn3()
{
// TODO: Add your control notification handler code here
m_strResult += "3";
UpdateData(FALSE);
}
void CCOTUNERDlg::OnBtn4()
{
// TODO: Add your control notification handler code here
m_strResult += "4";
UpdateData(FALSE);
}
void CCOTUNERDlg::OnBtn5()
{
// TODO: Add your control notification handler code here
m_strResult += "5";
UpdateData(FALSE);
}
void CCOTUNERDlg::OnBtn6()
{
// TODO: Add your control notification handler code here
m_strResult += "6";
UpdateData(FALSE);
}
void CCOTUNERDlg::OnBtn7()
{
// TODO: Add your control notification handler code here
m_strResult += "7";
UpdateData(FALSE);
}
void CCOTUNERDlg::OnBtn8()
{
// TODO: Add your control notification handler code here
m_strResult += "8";
UpdateData(FALSE);
}
void CCOTUNERDlg::OnBtn9()
{
// TODO: Add your control notification handler code here
m_strResult += "9";
UpdateData(FALSE);
}
void CCOTUNERDlg::OnBtnDiv()
{
// TODO: Add your control notification handler code here
m_strOper1 = m_strResult;
m_strResult = "";
Flag_str = 4;
UpdateData(FALSE);
}
void CCOTUNERDlg::OnBtnMult()
{
// TODO: Add your control notification handler code here
m_strOper1 = m_strResult;
m_strResult = "";
Flag_str = 3;
UpdateData(FALSE);
}
void CCOTUNERDlg::OnBtnSub()
{
// TODO: Add your control notification handler code here
m_strOper1 = m_strResult;
m_strResult = "";
Flag_str = 2;
UpdateData(FALSE);
}
void CCOTUNERDlg::OnBtnAdd()
{
// TODO: Add your control notification handler code here
m_strOper1 = m_strResult;
m_strResult = "";
Flag_str = 1;
UpdateData(FALSE);
}
void CCOTUNERDlg::OnBtnEqal()
{
// TODO: Add your control notification handler code here
m_strOper2 = m_strResult;
double NResult = 0;
double NstrOper1 = atof(m_strOper1);
double NstrOper2 = atof(m_strOper2);
switch(Flag_str)
{
case 1:
NResult = NstrOper1 + NstrOper2;
m_strResult.Format("%lf",NResult);break;
case 2:
NResult = NstrOper1 - NstrOper2;
m_strResult.Format("%lf",NResult);break;
case 3:
NResult = NstrOper1 * NstrOper2;
m_strResult.Format("%lf",NResult);break;
case 4:
if(NstrOper2 == 0)
{
m_strResult.Format("除数不能为0");
}
else
{
NResult = NstrOper1 / NstrOper2;
m_strResult.Format("%lf",NResult);
}break;
default:
MessageBox("正在学习目前无法解答!");
}
UpdateData(FALSE);
}
void CCOTUNERDlg::OnCanceldata()
{
// TODO: Add your control notification handler code here
m_strOper1 = "";
m_strOper2 = "";
m_strResult = "";
UpdateData(FALSE);
}
void CCOTUNERDlg::OnBtnDot()
{
// TODO: Add your control notification handler code here
m_strResult += ".";
UpdateData(FALSE);
}
下面让我们来编译一下,现在我们就可以装装啦!;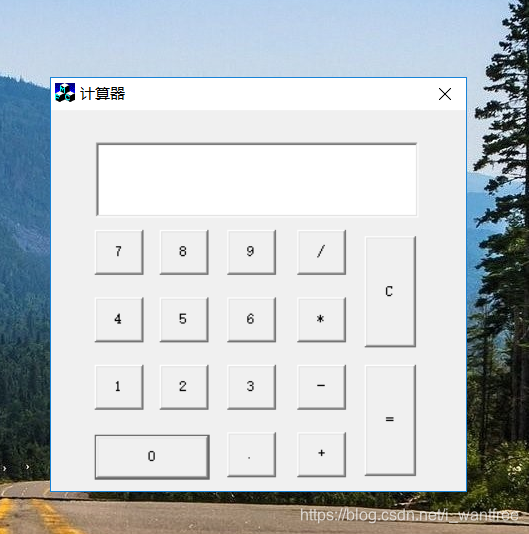 最后提醒:ID一定要改不然你分不清哪个是哪个,添加变量和功能那块可能有点写的不太好你们要看清楚,还有就是你们还有啥子不懂得可以私信问我,要是有大佬还有其他问题的,请多多指教! 最后提醒:ID一定要改不然你分不清哪个是哪个,添加变量和功能那块可能有点写的不太好你们要看清楚,还有就是你们还有啥子不懂得可以私信问我,要是有大佬还有其他问题的,请多多指教!
|
【本文地址】
公司简介
联系我们