| 无需Avatarify 无需剪辑工具 一键生成多人版 “蚂蚁呀嘿“视频 | 您所在的位置:网站首页 › 人脸分类器下载教程手机版 › 无需Avatarify 无需剪辑工具 一键生成多人版 “蚂蚁呀嘿“视频 |
无需Avatarify 无需剪辑工具 一键生成多人版 “蚂蚁呀嘿“视频
|
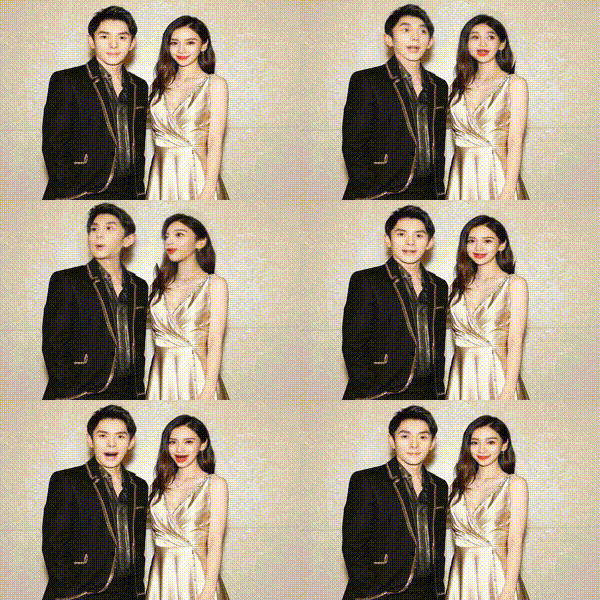
2021年3月1日更新2: 1.调整人脸区域为椭圆,比圆形更贴合脸型,占用的面积变小。 2.修复了人脸出现黑边的问题。 如果人脸区域不合适,可调整ratio参数。 2021年3月1日更新: 1.调整人脸区域为圆形,更贴合脸型,占用的面积变小。 2.增加ratio参数,可以调整人脸区域的面积,默认为1.0,代表圆形区域的半径为脸部的高度。 PaddleGAN套件gitee地址: https://gitee.com/txyugood/PaddleGAN.git 驱动视频以及音频文件下载地址: 链接: https://pan.baidu.com/s/1scHNJtfFAFpYV4X2pGPKRA 提取码: 5m3f 公众号:人工智能研习社,欢迎大家关注。 抖音上的蚂蚁呀嘿火遍全网,很多小伙伴都不知道如何制作。本文抛弃繁琐的操作,利用PaddleHub与PaddleGAN框架一键生成多人版的”蚂蚁呀嘿“视频。 先放一张效果图: 安装方法如下: pip install paddlehub==1.6.0安装之后paddlehub之后,还需要安装一下人脸检测的模型,命令如下: hub install ultra_light_fast_generic_face_detector_1mb_640生成”蚂蚁呀嘿“视频需要用到PaddleGAN套件中的动作迁移功能,所以下一步需要安装PaddleGAN套件。因为我修改了PaddleGAN套件部分代码,所以这个代码已经保存在AIStudio环境中,直接安装就可以了。 AI Stuidio地址:(强烈推荐,fork后可一键运行,无需搭建环境) https://aistudio.baidu.com/aistudio/projectdetail/1285661 也可以从以下地址下载: https://gitee.com/txyugood/PaddleGAN.git 使用以下命令安装PaddleGAN。 cd PaddleGAN/ pip install -v -e .安装PaddleGAN依赖的PaddlePaddle框架。 python -m pip install https://paddle-wheel.bj.bcebos.com/2.0.0-rc0-gpu-cuda10.1-cudnn7-mkl_gcc8.2%2Fpaddlepaddle_gpu-2.0.0rc0.post101-cp37-cp37m-linux_x86_64.whl此处借用了GT大佬 https://aistudio.baidu.com/aistudio/projectdetail/1584416 项目中的驱动视频。 /home/aistudio/1.jpeg是测试的照片,可以使用右侧的上传功能上传自己的照片,然后替换–source_image 后面的路径后,运行脚本即可。 最终/home/aistudio/output/mayiyahei.mp4就是最终生成的"蚂蚁呀嘿"视频。 可以通过ratio参数调整用于动作迁移的人脸的图片尺寸,1.0代表半径等于人脸高度的圆形区域。 运行脚本生成视频: cd /home/aistudio/PaddleGAN/applications/ python -u tools/first-order-mayi.py \ --driving_video /home/aistudio/MaYiYaHei.mp4 \ --source_image /home/aistudio/1.jpeg \ --relative --adapt_scale \ --output /home/aistudio/output \ --ratio 1.0PaddleGAN/application/tools/first-order-mayi.py文件,是生成”蚂蚁呀嘿“视频的主程序。 下面简单解读一下代码: import argparse import os import paddle from ppgan.apps.first_order_predictor import FirstOrderPredictor from skimage import img_as_ubyte import paddlehub as hub import math import cv2 import imageio import numpy as np parser = argparse.ArgumentParser() parser.add_argument("--config", default=None, help="path to config") parser.add_argument("--weight_path", default=None, help="path to checkpoint to restore") parser.add_argument("--source_image", type=str, help="path to source image") parser.add_argument("--driving_video", type=str, help="path to driving video") parser.add_argument("--output", default='output', help="path to output") parser.add_argument("--relative", dest="relative", action="store_true", help="use relative or absolute keypoint coordinates") parser.add_argument( "--adapt_scale", dest="adapt_scale", action="store_true", help="adapt movement scale based on convex hull of keypoints") parser.add_argument( "--find_best_frame", dest="find_best_frame", action="store_true", help= "Generate from the frame that is the most alligned with source. (Only for faces, requires face_aligment lib)" ) parser.add_argument("--best_frame", dest="best_frame", type=int, default=None, help="Set frame to start from.") parser.add_argument("--cpu", dest="cpu", action="store_true", help="cpu mode.") parser.add_argument("--ratio", dest="ratio",type=str,default="1.0", help="area ratio of face") parser.set_defaults(relative=False) parser.set_defaults(adapt_scale=False) if __name__ == "__main__": args = parser.parse_args() if args.cpu: paddle.set_device('cpu') cache_path = os.path.join(args.output,"cache") if not os.path.exists(cache_path): os.makedirs(cache_path) image_path = args.source_image origin_img = cv2.imread(image_path) image_width = origin_img.shape[1] image_hegiht = origin_img.shape[0] ratio = float(args.ratio) #获取人脸模型 module = hub.Module(name="ultra_light_fast_generic_face_detector_1mb_640") #对照片进行人脸检测 face_detecions = module.face_detection(paths = [image_path], visualization=True, output_dir='face_detection_output') #获取人脸检测结果 face_detecions = face_detecions[0]['data'] #截取人脸图片,并保存人脸图片的属性在face_list列表中。 face_list = [] for i, face_dect in enumerate(face_detecions): left = math.ceil(face_dect['left']) right = math.ceil(face_dect['right']) top = math.ceil(face_dect['top']) bottom = math.ceil(face_dect['bottom']) width = right - left height = bottom - top center_x = left + width // 2 center_y = top + height // 2 size = math.ceil(ratio * height) new_left = max(center_x - size, 0) new_right = min(center_x + size, image_width) new_top = max(center_y - size, 0) new_bottom = min(center_y + size, image_hegiht) origin_img = cv2.imread(image_path) face_img = origin_img[new_top:new_bottom, new_left:new_right, :] face_height = face_img.shape[0] face_width = face_img.shape[1] cv2.imwrite(os.path.join(cache_path,'face_{}.jpeg'.format(i)), face_img) face_list.append({"path" : os.path.join(cache_path,'face_{}.jpeg'.format(i)), "width":face_width, "height":face_height, "top":new_top, "bottom":new_bottom, "left":new_left, "right":new_right, "center_x":center_x, "center_y":center_y, "origin_width":width, "origin_height":height}) #遍历face_list,对每一个人脸进行动作迁移。 frames = 0 for face_dict in face_list: predictor = FirstOrderPredictor(output=args.output, weight_path=args.weight_path, config=args.config, relative=args.relative, adapt_scale=args.adapt_scale, find_best_frame=args.find_best_frame, best_frame=args.best_frame) predictions,fps = predictor.run(face_dict["path"], args.driving_video) #将迁移后的结果保存到face_dict中 face_dict['pre'] = predictions frames = len(predictions) images = [] #遍历动作迁移后的帧,将人脸放置到原图上。 for i in range(frames): #从原始图像上拷贝一帧图像 new_frame = origin_img.copy() new_frame = new_frame[:,:,[2,1,0]] for j, face_dict in enumerate(face_list): pre = face_dict["pre"][i] face_width = face_dict["width"] face_height = face_dict["height"] top = face_dict["top"] bottom = face_dict["bottom"] left = face_dict["left"] right = face_dict["right"] img = cv2.resize(pre,(face_width, face_height)) img_expand = np.zeros(origin_img.shape).astype('uint8') img_expand[top:bottom, left:right, :] = img_as_ubyte(img) mask = np.zeros(origin_img.shape[:2]).astype('uint8') center_x = face_dict["center_x"] center_y = face_dict["center_y"] origin_width = face_dict["origin_width"] origin_height = face_dict["origin_height"] #绘制一个椭圆的蒙版,更贴近脸型。 cv2.ellipse(mask, (int(center_x), int(center_y)), (math.ceil(ratio * origin_width) - , math.ceil(ratio * origin_height) - 1), 0,0,360, (255,255,255), -1 ,8 ,0) #利用蒙版将生成后的帧拷贝到原图上。 new_frame = cv2.copyTo(img_expand, mask, new_frame) if isinstance(new_frame, cv2.UMat): new_frame = new_frame.get() # cv2.imwrite("face_{}.jpg".format(i), img_expand) # cv2.imwrite("test_{}.jpg".format(i), new_frame) #方形放置 # new_frame[top:bottom, left:right, :] = img_as_ubyte(img) #将生成后的帧保存。 images.append(new_frame) #将图片合并为视频 imageio.mimsave(os.path.join(args.output, 'result.mp4'), [img_as_ubyte(frame) for frame in images], fps=fps) #合并音视频 os.system("ffmpeg -y -i " + os.path.join(args.output, 'result.mp4') + " -i /home/aistudio/MYYH.mp3 -c:v copy -c:a aac -strict experimental " + os.path.join(args.output, 'mayiyahei.mp4'))该程序目前还有许多可以改进的地方,后续会继续优化。 推荐使用AI Studio运行该程序,不但有免费的V100算力可使用,还可以方便的一键运行脚本生成视频。 欢迎关注我的公众号:人工智能研习社,分享更多的人工智能技术干货。 |
【本文地址】
 首先我们需要安装PaddleHub,利用其中的face detection功能来定位照片中人脸。