| 【D435i深度相机YOLO V5结合实现目标检测】 | 您所在的位置:网站首页 › yolo开源了吗 › 【D435i深度相机YOLO V5结合实现目标检测】 |
【D435i深度相机YOLO V5结合实现目标检测】
|
【D435i深度相机YOLO V5结合实现目标检测】
1. 前言2 分析2.1 关于yolo部分2.2 关于获取三维坐标的部分2.3 关于文件结构部分
3. 代码
1. 前言
参考:Ubutntu下使用realsense d435i(三):使用yolo v5测量目标物中心点三维坐标 欢迎大家阅读2345VOR的博客【D435i深度相机YOLO V5结合实现目标检测】🥳🥳🥳2345VOR鹏鹏主页: 已获得CSDN《嵌入式领域优质创作者》称号👻👻👻,座右铭:脚踏实地,仰望星空🛹🛹🛹本文章属于《Ubuntu学习》和《ROS机器人学习》 :这里主要是记录Ubuntu下简单使用yolov5测试检测效果的过程,我是使用realsense d435i摄像头的RGB图像。👍👍👍
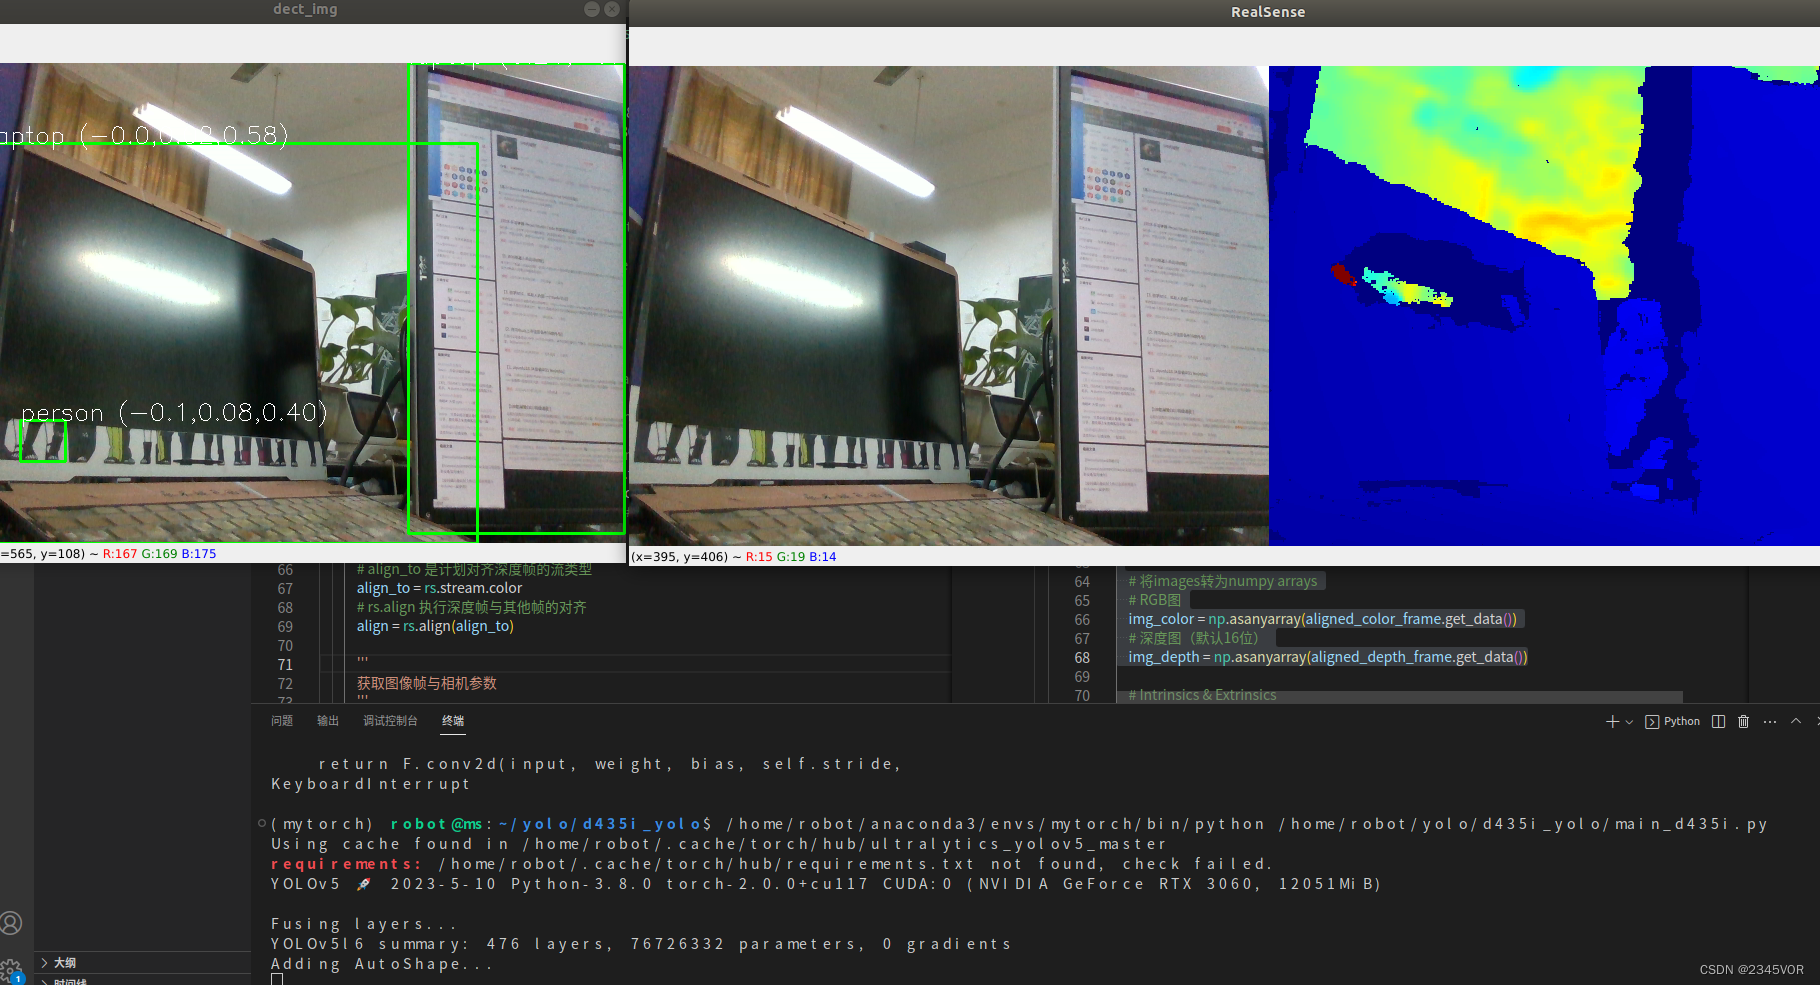
本文下述使用参考的的工程均来自于下面的两个github yolo v5参考的代码:https://github.com/ultralytics/yolov5 本文参考的代码(仅获得深度):https://github.com/killnice/yolov5-D435i Ubuntu环境搭建 【经典Ubuntu20.04版本U盘安装双系统教程】 【Windows10安装或重装ubuntu18.04双系统教程】 【Ubuntu同步系统时间】 【Ubuntu中截图工具】 【Ubuntu安装QQ】 【Ubuntu安装后基本配置】 【Ubuntu启动菜单的默认项】 【ubuntu系统中修改hosts配置】 【18.04Ubuntu中解决无法识别显示屏】 【ROS 开发神器 Visual Studio Code 的安装和设置】 【基于Ubuntu18.04+Melodic的realsense D435安装】 【Ubuntu18配置Anaconda深度学习环境】 【D435i深度相机YOLO V5结合实现目标检测】 ROS学习笔记 【1. Ubuntu18.04安装ROS Melodic】 【2. 在Github上寻找安装ROS软件包】 【3. 初学ROS,年轻人的第一个Node节点】 【4. ROS的主要通讯方式:Topic话题与Message消息】 【5. ROS机器人的运动控制】 【6. 激光雷达接入ROS】 【7. ROS 中的 IMU 惯性测量单元消息包】 上一个github代码,csdn上的讲解:【Ubuntu18.04使用yolov5教程】 我的文件是在yolov5-D435i工程基础上改的,yolov5-D435i是在yolov5工程基础上改的,源码部分参考了冰激凌啊,D435i深度相机YOLO V5结合实现目标检测部分采用彩色图和深度图对齐,根据彩色图进行YOLO V5识别,输出相对于相机坐标系的目标物体中心点的三维坐标。 2 分析主要思路是采用彩色图形用yolo检测,深度图对齐,最后输出检测目标物体及相对位置结果。 2.1 关于yolo部分 https://github.com/ultralytics/yolov5 这是一个比较经典的yolo v5的代码,它提供了一些接口,在README.md中进行了介绍。 可以看到只要在自己写的文件里创建model就可以调用这个结果了。 import torch # Model model = torch.hub.load('ultralytics/yolov5', 'yolov5s') # or yolov5m, yolov5l, yolov5x, custom # Images img = 'https://ultralytics.com/images/zidane.jpg' # or file, Path, PIL, OpenCV, numpy, list # Inference results = model(img) # Results results.print() # or .show(), .save(), .crop(), .pandas(), etc. 2.2 关于获取三维坐标的部分 ❤ https://github.com/killnice/yolov5-D435i里main_debug.py文件的深度获取方法是在中心点附近取一些随机点, 然后深度排序取中值滤波。(这些被随机选择到的中心点,在图中画了蓝色小圆圈标记这些点)猜测这样做是可以避免 realsense获取深度过程中,某点的忽然转换失效,认为深度值为0,如果取周围几个点进行获取深度,并中值滤波,将 大大提高这个深度值在测量过程中的稳定性,避免了realsense忽然某帧某点的深度值为0的情况。 ❤ 我要获得中心点的坐标,可以参考Ubutntu下使用realsense d435i(二):获取某二维像素点的三维坐标修改get_mid_pos()函数,根据中心点的坐标以及中心点对应的深度获取中心点的三维坐标。 但是这样做也面临一个问题,就是上面提到的,仅仅测量中心点的深度,当忽然这个深度值为0,他的三维坐标转换就会出错,如果把这个值设为机械臂的目标点,就会导致机械臂一瞬间点的位置出错。 把realsense相机画面的频率降低会对这个现象改善一点,但还是存在,所以考虑可以参考上述深度值得解决办法,也获取周围点,做一个中值滤波。 另外就是考虑相机还没有标定,参考realsense d435相机标定,现在确实照墙壁时深度图像有很多“黑洞”,这有可能也是忽然深度值为0的原因。 ❤ 未来要修改的地方 ① 把【像素x,像素y,深度值z】进行一个数据结构的保存(是选择元祖、数组还是什么结构还没有想好) ② 利用随机数获取周边的一些点,同样获得这些点的【像素x,像素y,深度值z】 ③ 把所有点根据深度值z进行排序和中值滤波,选择排序中间的那一个点,根据深度值以及与其对应的像素x,y,获得该点的三维坐标,并以此为目标物的三维坐标。 2.3 关于文件结构部分 由于yolo的测试程序以及对外开放了接口,所以我们只需要在原来的YOLO v5中(https://github.com/ultralytics/yolov5),再创建一个my_realsense_detect.py程序(不需要替换原来的detect.py程序),就可以了。 也就是说,把my_realsense_detect.py程序放到最开始提到的2个github程序中都可以运行。如果想放到其他的yolo程序,需要看看他具体提到的模型接口,结果接口都是什么。 3. 代码首先我下载了https://github.com/killnice/yolov5-D435i。 我的文件是在yolov5-D435i工程基础上改的,yolov5-D435i是在yolov5工程基础上改的。 git clone https://github.com/killnice/yolov5-D435i.git d435i_yolo code d435i_yolo/ 选择环境参考:https://blog.csdn.net/vor234/article/details/130480581 pip install -r requirements.txt pip install pyrealsense2 python main_debug.py然后是在main_debug.py文件的基础上进行了修改,并把它重命名为了d435i_detect.py 说明:在yolov5-D435i工程中的main.py、main_debug.py和try.py都是可以删除的,只要运行d435i_detect.py就可以 在yolov5工程中,只要把my_realsense_detect.py文件复制进去就也可以运行啦接下来是我的代码,具体可以根据yolov5-D435i工程中的main_debug.py文件进行修改。 import pyrealsense2 as rs import numpy as np import cv2 import random import torch import time # model = torch.hub.load('ultralytics/yolov5', 'yolov5s') # model = torch.hub.load('ultralytics/yolov5', 'yolov5l6') model.conf = 0.5 def get_mid_pos(aligned_depth_frame,box): mid_pixel = [(box[0] + box[2])//2, (box[1] + box[3])//2] #确定索引深度的中心像素位置 # 注意mid_pixel是float,但是get_distance()的参数需要是int [x, y] = [int(mid_pixel[0]), int(mid_pixel[1])] depth_intrin = aligned_depth_frame.profile.as_video_stream_profile().intrinsics # 获取相机深度参数 dis = aligned_depth_frame.get_distance(x, y) # 获取该像素点对应的深度 # print ('depth: ',dis) # 深度单位是m camera_coordinate = rs.rs2_deproject_pixel_to_point(depth_intrin, [x, y], dis) # print ('camera_coordinate: ',camera_coordinate) return camera_coordinate def dectshow(org_img, boxs,aligned_depth_frame): img = org_img.copy() for box in boxs: cv2.rectangle(img, (int(box[0]), int(box[1])), (int(box[2]), int(box[3])), (0, 255, 0), 2) point_3d = dist = get_mid_pos(aligned_depth_frame,box) [x, y, z] = point_3d # cv.putText 图片,添加的文字,左上角坐标,字体,字体大小,颜色,字体粗细 cv2.putText(img, box[-1] + ' (' + str(x)[:4] + ',' + str(y)[:4] + ',' + str(z)[:4] + ')', (int(box[0]), int(box[1])), cv2.FONT_HERSHEY_SIMPLEX, 0.8, (255, 255, 255), 1) cv2.imshow('dect_img', img) if __name__ == "__main__": # Configure depth and color streams pipeline = rs.pipeline() config = rs.config() config.enable_stream(rs.stream.depth, 640, 480, rs.format.z16, 60) config.enable_stream(rs.stream.color, 640, 480, rs.format.bgr8, 60) # Start streaming pipe_profile = pipeline.start(config) try: while True: # # Wait for a coherent pair of frames: depth and color # frames = pipeline.wait_for_frames() # depth_frame = frames.get_depth_frame() # color_frame = frames.get_color_frame() # if not depth_frame or not color_frame: # continue # # Convert images to numpy arrays # depth_image = np.asanyarray(depth_frame.get_data()) # color_image = np.asanyarray(color_frame.get_data()) # Depth scale - units of the values inside a depth frame, i.e how to convert the value to units of 1 meter # 获取深度传感器的深度标尺(参见rs - align示例进行说明) depth_sensor = pipe_profile.get_device().first_depth_sensor() depth_scale = depth_sensor.get_depth_scale() # print("Depth Scale is: ", depth_scale) # ('Depth Scale is: ', 0.0010000000474974513) # 创建对齐对象与color流对齐 # align_to 是计划对齐深度帧的流类型 align_to = rs.stream.color # rs.align 执行深度帧与其他帧的对齐 align = rs.align(align_to) ''' 获取图像帧与相机参数 ''' # 等待获取图像帧,获取颜色和深度的框架集 frames = pipeline.wait_for_frames() # frames.get_depth_frame()是640x360深度图像 # 获取对齐帧,将深度框与颜色框对齐 aligned_frames = align.process(frames) # 获取对齐帧中的的depth帧 aligned_depth_frame = aligned_frames.get_depth_frame() # aligned_depth_frame是640x480深度图像 # 获取对齐帧中的的color帧 aligned_color_frame = aligned_frames.get_color_frame() # 将images转为numpy arrays # RGB图 color_image = np.asanyarray(aligned_color_frame.get_data()) # 深度图(默认16位) depth_image = np.asanyarray(aligned_depth_frame.get_data()) results = model(color_image) boxs= results.pandas().xyxy[0].values #boxs = np.load('temp.npy',allow_pickle=True) dectshow(color_image, boxs, aligned_depth_frame) # Apply colormap on depth image (image must be converted to 8-bit per pixel first) depth_colormap = cv2.applyColorMap(cv2.convertScaleAbs(depth_image, alpha=0.03), cv2.COLORMAP_JET) # Stack both images horizontally images = np.hstack((color_image, depth_colormap)) # Show images cv2.namedWindow('RealSense', cv2.WINDOW_AUTOSIZE) cv2.imshow('RealSense', images) key = cv2.waitKey(1) # Press esc or 'q' to close the image window if key & 0xFF == ord('q') or key == 27: cv2.destroyAllWindows() break finally: # Stop streaming pipeline.stop()运行效果如下: 这个程序需要说明的是像素坐标的中点是float形式,而get_distance(x, y)函数的参数是int形式,需要进行强制转换。 |
【本文地址】