| Tensorflow 的Object Detection物件辨識的問題(標籤label讀取問題) | 您所在的位置:网站首页 › websocket版本14 › Tensorflow 的Object Detection物件辨識的問題(標籤label讀取問題) |
Tensorflow 的Object Detection物件辨識的問題(標籤label讀取問題)
|
首先我的電腦版本只能與TF1.14相容 目前我已經依照以下網址 https://tensorflow-object-detection-api-tutorial.readthedocs.io/en/tensorflow-1.14/training.html 完成到最後1個步驟 已經匯出export_inference_graph完成了 然後tf教學網址 卻沒有最後步驟.......... 於是我在該網址"下載object-detection程式" 下載object-detection程式網址 下載程式Download Python source code:plot_object_detection_saved_model_tf1.py 並運用PyCharm去執行 Object Detection Demo 接著內容裡有些問題,也經過re.Zero大大的幫忙下,該檔案已經可以讀取圖片了 以下是完成物件辨識的程式 #!/usr/bin/env python # coding: utf-8 ###PATH_TO_LABELS = 'D:\TensorFlow\workspace\training_demo\annotations\label_map.pbtxt' ###IMAGE_PATHS=[] ###myBasePath = r'D:\TensorFlow\workspace\training_demo\images\test\RGB' ###myFileNames = ['C130_Test_1.jpg','C130_test_2.jpg'] """ Object Detection From TF1 Saved Model ===================================== """ # %% # This demo will take you through the steps of running an "out-of-the-box" TensorFlow 1 compatible # detection model on a collection of images. More specifically, in this example we will be using # the `Saved Model Format `__ to load the model. # %% # Download the test images # ~~~~~~~~~~~~~~~~~~~~~~~~ # First we will download the images that we will use throughout this tutorial. The code snippet # shown bellow will download the test images from the `TensorFlow Model Garden `_ # and save them inside the ``data/images`` folder. import os os.environ['TF_CPP_MIN_LOG_LEVEL'] = '2' # Suppress TensorFlow logging (1) import pathlib import tensorflow as tf tf.get_logger().setLevel('ERROR') # Suppress TensorFlow logging (2) # Enable GPU dynamic memory allocation gpus = tf.config.experimental.list_physical_devices('GPU') for gpu in gpus: tf.config.experimental.set_memory_growth(gpu, True) def download_images(): base_url = 'https://raw.githubusercontent.com/tensorflow/models/master/research/object_detection/test_images/' filenames = ['image1.jpg', 'image2.jpg'] image_paths = [] for filename in filenames: image_path = tf.keras.utils.get_file(fname=filename, origin=base_url + filename, untar=False) image_path = pathlib.Path(image_path) image_paths.append(str(image_path)) return image_paths #IMAGE_PATHS = download_images() IMAGE_PATHS=[] myBasePath = r'D:\TensorFlow\workspace\training_demo\images\test\RGB' ## myOutputPath: 用指定輸出檔案用目錄,不然會跟輸入用檔案混雜; myOutputPath = os.path.join(myBasePath, 'Output') ## 亦可用後面指令指派目錄位置: myOutputPath = r'D:\TensorFlow\workspace\training_demo\images\test\RGB_Out' """ #(問題1)下面程式只能讀取兩張圖片,該怎樣能讀取全部??? myFileNames = ['P3C_Test_1.jpg','P3C_Test_2.jpg'] """ ## def getDirFiles(path): """ 取得目錄的所有檔案之列表; """ return [ i for i in os.listdir(path) if os.path.isfile(os.path.join(path, i)) ] ## for i in getDirFiles(myBasePath): IMAGE_PATHS.append(os.path.join(myBasePath, i)) ## 重建輸出檔案用目錄; import shutil def reMkDir(path): """ 重建(刪除並建立)目錄; """ if os.path.exists(path): shutil.rmtree(path) os.makedirs(path, exist_ok = True) reMkDir(myOutputPath) ## # %% # Download the model # ~~~~~~~~~~~~~~~~~~ # The code snippet shown below is used to download the pre-trained object detection model we shall # use to perform inference. The particular detection algorithm we will use is the # `SSD MobileNet v2`. More models can be found in the `TensorFlow 1 Detection Model Zoo `_. # To use a different model you will need the URL name of the specific model. This can be done as # follows: # # 1. Right click on the `Model name` of the model you would like to use; # 2. Click on `Copy link address` to copy the download link of the model; # 3. Paste the link in a text editor of your choice. You should observe a link similar to ``download.tensorflow.org/models/object_detection/XXXXXXXXX.tar.gz``; # 4. Copy the ``XXXXXXXXX`` part of the link and use it to replace the value of the ``MODEL_NAME`` variable in the code shown below; # # For example, the download link for the model used below is: ``download.tensorflow.org/models/object_detection/ssd_mobilenet_v2_coco_2018_03_29.tar.gz`` # Download and extract model def download_model(model_name): base_url = 'http://download.tensorflow.org/models/object_detection/' model_file = model_name + '.tar.gz' model_dir = tf.keras.utils.get_file(fname=model_name, origin=base_url + model_file, untar=True) return str(model_dir) #這邊修想要的模型,就可以去下載模型 MODEL_NAME = 'faster_rcnn_resnet101_coco_2018_01_28' PATH_TO_MODEL_DIR = download_model(MODEL_NAME) # %% # Download the labels # ~~~~~~~~~~~~~~~~~~~ # The coode snippet shown below is used to download the labels file (.pbtxt) which contains a list # of strings used to add the correct label to each detection (e.g. person). Since the pre-trained # model we will use has been trained on the COCO dataset, we will need to download the labels file # corresponding to this dataset, named ``mscoco_label_map.pbtxt``. A full list of the labels files # included in the TensorFlow Models Garden can be found `here `__. # Download labels file ''' #以下是原本的網路上的label資料,我先用'引號不去使用,我改用自己label檔案的路徑 def download_labels(filename): base_url = 'https://raw.githubusercontent.com/tensorflow/models/master/research/object_detection/data/' label_dir = tf.keras.utils.get_file(fname=filename, origin=base_url + filename, untar=False) label_dir = pathlib.Path(label_dir) return str(label_dir) LABEL_FILENAME = 'mscoco_label_map.pbtxt' PATH_TO_LABELS = download_labels(LABEL_FILENAME) ''' #(問題3)用自己的LABEL檔,讀出的檔案,並不是正確的飛機標示 PATH_TO_LABELS = r'D:\TensorFlow\workspace\training_demo\annotations\label_map.pbtxt' # %% # Load the model # ~~~~~~~~~~~~~~ # Next we load the downloaded model import time from object_detection.utils import label_map_util from object_detection.utils import visualization_utils as viz_utils PATH_TO_SAVED_MODEL = PATH_TO_MODEL_DIR + "/saved_model" print('Loading model...', end='') start_time = time.time() # Load saved model and build the detection function model = tf.saved_model.load(PATH_TO_SAVED_MODEL) detect_fn = model.signatures['serving_default'] end_time = time.time() elapsed_time = end_time - start_time print('Done! Took {} seconds'.format(elapsed_time)) # %% # Load label map data (for plotting) # ~~~~~~~~~~~~~~~~~~~~~~~~~~~~~~~~~~~ # Label maps correspond index numbers to category names, so that when our convolution network # predicts `5`, we know that this corresponds to `airplane`. Here we use internal utility # functions, but anything that returns a dictionary mapping integers to appropriate string labels # would be fine. category_index = label_map_util.create_category_index_from_labelmap(PATH_TO_LABELS, use_display_name=True) # %% # Putting everything together # ~~~~~~~~~~~~~~~~~~~~~~~~~~~ # The code shown below loads an image, runs it through the detection model and visualizes the # detection results, including the keypoints. # # Note that this will take a long time (several minutes) the first time you run this code due to # tf.function's trace-compilation --- on subsequent runs (e.g. on new images), things will be # faster. # # Here are some simple things to try out if you are curious: # # * Modify some of the input images and see if detection still works. Some simple things to try out here (just uncomment the relevant portions of code) include flipping the image horizontally, or converting to grayscale (note that we still expect the input image to have 3 channels). # * Print out `detections['detection_boxes']` and try to match the box locations to the boxes in the image. Notice that coordinates are given in normalized form (i.e., in the interval [0, 1]). # * Set ``min_score_thresh`` to other values (between 0 and 1) to allow more detections in or to filter out more detections. import numpy as np from PIL import Image import matplotlib.pyplot as plt import warnings warnings.filterwarnings('ignore') # Suppress Matplotlib warnings def load_image_into_numpy_array(path): """Load an image from file into a numpy array. Puts image into numpy array to feed into tensorflow graph. Note that by convention we put it into a numpy array with shape (height, width, channels), where channels=3 for RGB. Args: path: the file path to the image Returns: uint8 numpy array with shape (img_height, img_width, 3) """ return np.array(Image.open(path)) for image_path in IMAGE_PATHS: print('Running inference for {}... '.format(image_path), end='') image_np = load_image_into_numpy_array(image_path) # Things to try: # Flip horizontally # image_np = np.fliplr(image_np).copy() # Convert image to grayscale # image_np = np.tile( # np.mean(image_np, 2, keepdims=True), (1, 1, 3)).astype(np.uint8) # The input needs to be a tensor, convert it using `tf.convert_to_tensor`. input_tensor = tf.convert_to_tensor(image_np) # The model expects a batch of images, so add an axis with `tf.newaxis`. input_tensor = input_tensor[tf.newaxis, ...] detections = detect_fn(input_tensor) # All outputs are batches tensors. # Convert to numpy arrays, and take index [0] to remove the batch dimension. # We're only interested in the first num_detections. num_detections = int(detections.pop('num_detections')) detections = {key: value[0, :num_detections].numpy() for key, value in detections.items()} detections['num_detections'] = num_detections # detection_classes should be ints. detections['detection_classes'] = detections['detection_classes'].astype(np.int64) image_np_with_detections = image_np.copy() viz_utils.visualize_boxes_and_labels_on_image_array( image_np_with_detections, detections['detection_boxes'], detections['detection_classes'], detections['detection_scores'], category_index, use_normalized_coordinates=True, max_boxes_to_draw=200, min_score_thresh=.30, agnostic_mode=False) #eps, jpeg, jpg, pdf, pgf, png, ps, raw, rgba, svg, svgz, tif, tiff) plt.figure() ## 建立圖形(figure); plt.imshow(image_np_with_detections) ## 將資料顯示為影像; #plt.savefig(f'{image_path}.test101_2.png') ## 多這行而已: 將圖形存入檔案; plt.savefig(os.path.join( myOutputPath, f'{os.path.basename(image_path)}.101.png' )) print('Done') plt.show() # sphinx_gallery_thumbnail_number = 2但是
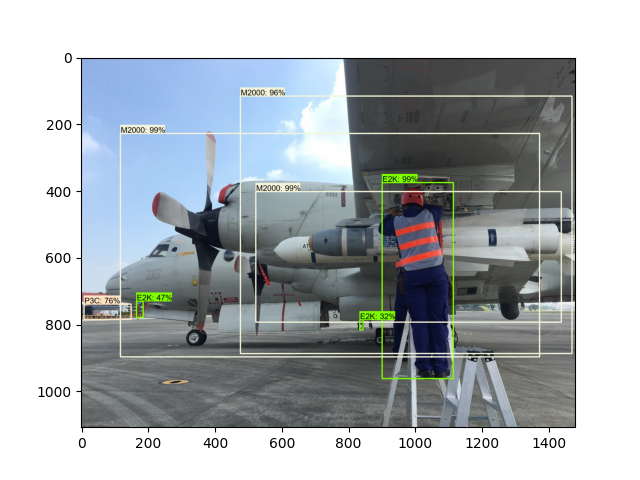
我自己建置的LABEL標示的檔案
卻無法依據我的標籤去辨識
基本上我有訓練好模型了, 照道理 程式內容應該要修改 我""訓練好模型的路徑Evaluating the Model (Optional)""路徑 或是我產出的"Exporting a Trained Inference Graph"路徑 但是我實在不知道 程式裡 是哪裡的路徑該修改 請求有使用tensorflow的大大幫忙 |
【本文地址】
公司简介
联系我们