| Unity GUI 图像边缘显示黑边或白边的解决办法 | 您所在的位置:网站首页 › unitybutton透明 › Unity GUI 图像边缘显示黑边或白边的解决办法 |
Unity GUI 图像边缘显示黑边或白边的解决办法
|
原作:2021-11-23 更新:2022-07-09 背景近期制作一套 UI 皮肤替换 Unity Built-in Resource 中的默认 UGUI 皮肤。皮肤元素位于同一张图像内,彼此没有间隔;图像是在 Photoshop 中由路径创建的,因此不存在“没擦干净”的像素(下图即为此皮肤)。
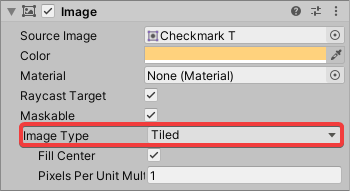
在 Image 中,图像(现已为 Sprite)显示不正常。 问题 1左侧第一列显示 1.5 个像素,右侧第一列显示 0.5 个像素。这种情况发生在所有 Image 中。 在某个高度范围内,左边第二列像素出现与第一列像素相同的颜色;右边第一列显示白边。这种情况只发生在个别 Image 中,且可以随着 Image 尺寸变化自行消失或出现。 左右边缘正常。 在 Import Settings 中将 Filter Mode 改为 Point (no filter),即可解决问题 1,和一部分 Image 中的问题 2。 如果未起效,改变 Image 的位置(就是 RectTransform 中的那个位置),尤其是沿着出问题的轴向来回移动 Image,直到问题消失。通常情况下,使其变化 1 个像素以内(如:增减 0.01),问题即可解决。 对于仍然存在问题 2 的 Image,将其 Image Type 设为 Tiled 而非 Sliced,即可解决问题 2。但这仅对于含有 Border 的 Sprite 有效,而且会轻微影响性能,具体情况和优化方法,见 Image -> Edit Script 中关于 Type.Tiled 枚举项的注释(下面节选了一段)。 下列方法任选其一: 将出现问题的 Image 所在的 RectTransform 的尺寸增大或缩小 1 个像素以内(如:宽度 100 改为 100.05)。将 Import Settings 中的 Pixels Per Unit 增大或缩小 1 个单位以内(如:将 100 改为 99.9);同理,也可以将 Image 中的 Pixels Per Unit Multipler 增大或缩小 1 个单位以内(如:将 1 改为 1.01)。或考虑 Unity Built-in Resource(就是 UGUI 自带的那些 Sprite 比如按钮背景之类的)的解决方案(尚未测试): 制图时,将图片长、宽分别放大到原图的 2 倍制图,且笔刷长、宽,也就是线条粗细,均放大到原来的 2 倍。相当于做了个原图按比例放大 4 倍的图。导入时,将 Pixels Per Unit 设为 200,Filter Mode 可能也需要改为 Point (no filter)。其他配置无需改变(包括无需设置 Image 和 Image 位置等),直接当做正常 Sprite 使用即可,应该能够解决边缘出现黑白边的问题。此方法是笔者发现 UGUI 自带的那些 Sprite 无论如何都不会发生黑白边问题,想一探究竟,但发现它们均被封装在 Unity Built-in Resource 中,无法直接查看或编辑。故使用 Asset Studio 先对已经 Build 的工程的 Unity Built-in Resource 进行提取,将提取到的 UGUI Sprite 图片文件导进 Unity Editor,发现导入时经过上述设置,可还原出 UGUI 的效果。 其他经测试未起效的方法仅此记录,以供不时之需: 图像尺寸和导入问题:Make sure you’re set to Point filtering mode, make sure yo’u using textures with power-of-2 dimensions, and make sure you’re only placing them in position that are multiples of 0.02, so set your snap settings for example to 0.16 if you have a 100 pixels to unit ratio. Or set your pixel ration to something like 64 and just move it by single units or half units. (来自:https://forum.unity.com/threads/black-lines-on-the-edges-of-tiled-sprites.226919/#post-1511836)Photoshop 制图问题(见:https://answers.unity.com/questions/10302/messy-alpha-problem-white-around-edges.html)Photoshop 制图时下衬一层和 SuperPNG 插件(见:https://forum.unity.com/threads/white-borders-around-transparent-png.212972/)使用材质渲染;关闭抗锯齿:#1 You need to create a material, apply one of the default sprite shaders and then click “Snap To Pixel” checkbox. Use this material to render your sprite. #2 Turn on Pixel Snap in the Renderer Material of your object and turn of anti aliasing in Edit/Projectsettings/Quality (来自:https://answers.unity.com/questions/599038/black-lines-between-tile-sprites.html)设置 Wrap Mode 为 Clamp;对图集中的图设置间隔(Padding,其他帖子说至少 2 像素);使用 RGBA32 压缩(见:https://forum.unity.com/threads/non-existent-white-pixels-at-edge-of-sprite.235754/)图集打包问题(见:https://blog.csdn.net/suntaojiaxin/article/details/42532297;见:https://blog.csdn.net/CodeKsky/article/details/51036805)UGUI 采样问题,通过理解其原理并修改源代码解决(见:https://blog.csdn.net/weixin_34007291/article/details/90688336) |
 在 Unity 中已经配置了 Import Settings,并通过 Sprite Editor 设置了 Border 以适应动态大小(如下两图)。


【本文地址】