| 【Java】使用IntelliJ IDEA搭建SSM(MyBatis | 您所在的位置:网站首页 › ssm框架怎么连接mysql数据库 › 【Java】使用IntelliJ IDEA搭建SSM(MyBatis |
【Java】使用IntelliJ IDEA搭建SSM(MyBatis
步骤
0 准备工作1 创建Maven项目2 配置Maven依赖3 配置数据源4 项目结构5 创建实体类6 创建数据访问层7 创建服务层8 创建Controller层9 启动项目10 使用Postman测试接口
0 准备工作
下载并安装 IntelliJ IDEA下载并安装 MySQL 数据库下载并安装Postman测试工具使用 Navicat 创建一个 MySQL 数据库
1 创建Maven项目
打开 IntelliJ IDEA,选择 "File"→ “New” → “Project”。选择"Maven"作为项目类型,并设置项目名称、项目位置。设置Group Id和Artifact Id,点击"Create"创建项目。  2 配置Maven依赖
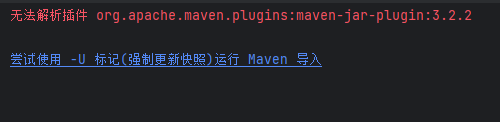
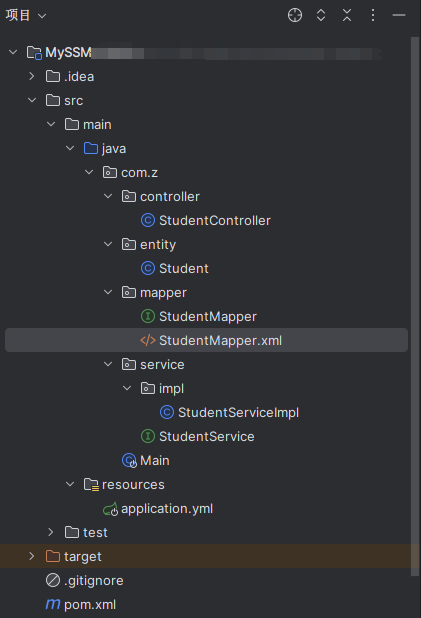
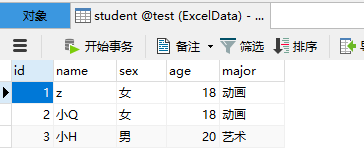
在pom.xml文件中添加SpringBoot和MyBatis-Plus等的依赖: 4.0.0 org.springframework.boot spring-boot-starter-parent 2.7.17 com.z MySSM 0.0.1-SNAPSHOT MySSM MySSM 1.8 org.springframework.boot spring-boot-starter-web org.mybatis.spring.boot mybatis-spring-boot-starter 2.3.1 com.mysql mysql-connector-j runtime org.projectlombok lombok true org.springframework.boot spring-boot-starter-test test com.baomidou mybatis-plus-boot-starter 3.4.3 io.swagger swagger-annotations 1.5.22 org.springframework.boot spring-boot-maven-plugin paketobuildpacks/builder-jammy-base:latest org.projectlombok lombok使用Maven工具或IDEA的自动构建功能,下载依赖。 若出现如下错误: 在application.yml文件中配置数据库连接等信息: server: # 端口 port: 8080 spring: # 数据源配置 datasource: driver-class-name: com.mysql.cj.jdbc.Driver url: jdbc:mysql://localhost:3306/your_database_name?characterEncoding=utf-8 username: your_username password: your_password jackson: time-zone: GMT+8 date-format: yyyy-MM-dd HH:mm:ss mybatis-plus: # mapper文件映射路径 mapper-locations: classpath*:mapper/*.xml configuration: # 打印SQL语句 log-impl: org.apache.ibatis.logging.stdout.StdOutImpl替换上面的示例中的your_database_name、your_username、your_password为实际数据库中的信息和数据。 4 项目结构项目结构如下图所示: 创建实体类(entity),例如Student.java: package com.z.entity; import com.baomidou.mybatisplus.annotation.IdType; import com.baomidou.mybatisplus.annotation.TableId; import com.baomidou.mybatisplus.annotation.TableName; import io.swagger.annotations.ApiModelProperty; import lombok.Data; import java.io.Serializable; @Data @TableName("student") public class Student implements Serializable { private static final long serialVersionUID = 1L; /**id*/ @TableId(type = IdType.AUTO) @ApiModelProperty(value = "id") private Integer id; @ApiModelProperty(value = "姓名") private String name; @ApiModelProperty(value = "性别") private String sex; @ApiModelProperty(value = "年龄") private Integer age; @ApiModelProperty(value = "专业") private String major; } 6 创建数据访问层创建数据访问层(mapper),例如StudentMapper.java: package com.z.mapper; import com.baomidou.mybatisplus.core.mapper.BaseMapper; import com.z.entity.Student; import org.apache.ibatis.annotations.Mapper; @Mapper public interface StudentMapper extends BaseMapper { }创建对应的XML文件: DOCTYPE mapper PUBLIC "-//mybatis.org//DTD Mapper 3.0//EN" "http://mybatis.org/dtd/mybatis-3-mapper.dtd"> 7 创建服务层创建服务层(service)及其实现,例如StudentService.java: Service层: package com.z.service; import com.baomidou.mybatisplus.extension.service.IService; import com.z.entity.Student; public interface StudentService extends IService { }Service实现层: package com.z.service.impl; import com.baomidou.mybatisplus.extension.service.impl.ServiceImpl; import com.z.entity.Student; import com.z.mapper.StudentMapper; import com.z.service.StudentService; import org.springframework.stereotype.Service; @Service public class StudentServiceImpl extends ServiceImpl implements StudentService { } 8 创建Controller层创建Controller层,处理业务逻辑,例如StudentController.java(以返回数据列表为例): package com.z.controller; import com.z.entity.Student; import com.z.service.StudentService; import org.springframework.beans.factory.annotation.Autowired; import org.springframework.web.bind.annotation.*; import java.util.List; @RestController @RequestMapping("/test") public class StudentController { @Autowired private StudentService studentService; @GetMapping("/list") public List listStudent() { return studentService.list(); } } 9 启动项目编写Main.java运行项目,并通过IDEA的启动按钮启动项目: package com.z; import org.springframework.boot.SpringApplication; import org.springframework.boot.autoconfigure.SpringBootApplication; @SpringBootApplication public class Main { public static void main(String[] args) { SpringApplication.run(Main.class, args); } } 10 使用Postman测试接口在MySQL数据库中新建一个数据表student,其中存放几条测试数据: 打开Postman,新建一个Get请求,并输入对应Controller中的请求URL进行测试,测试结果如下: |
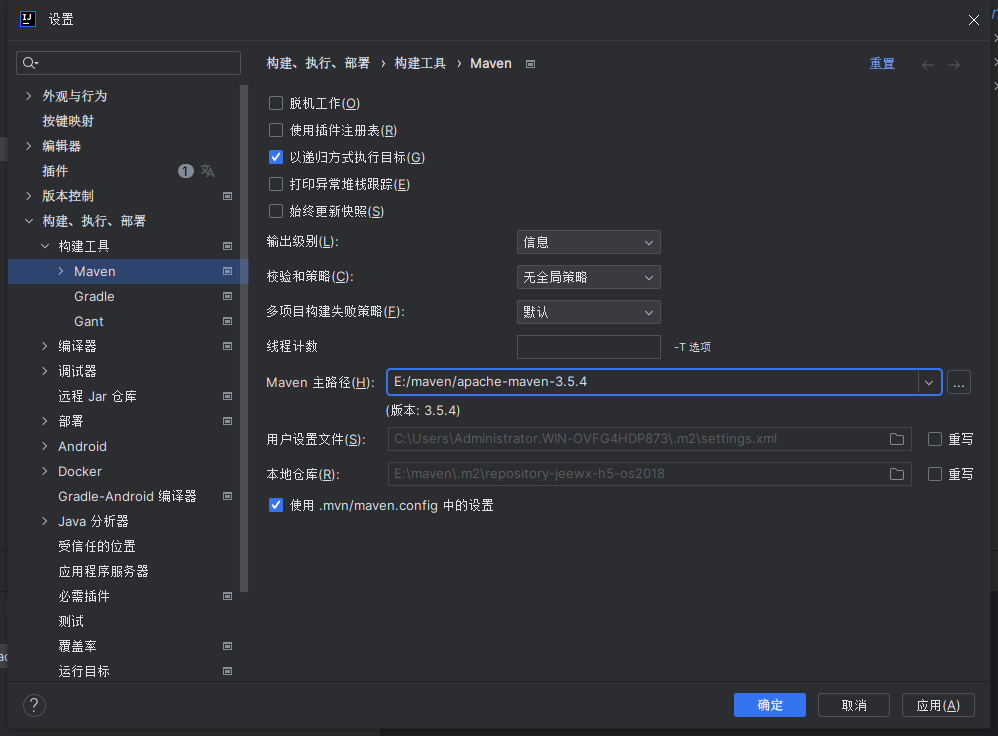
 那么点击Maven设置,选择Maven主路径为本地的Maven下载路径:
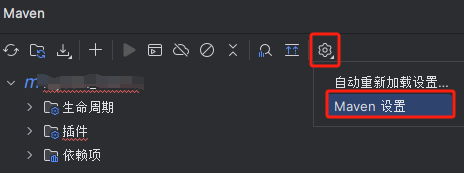
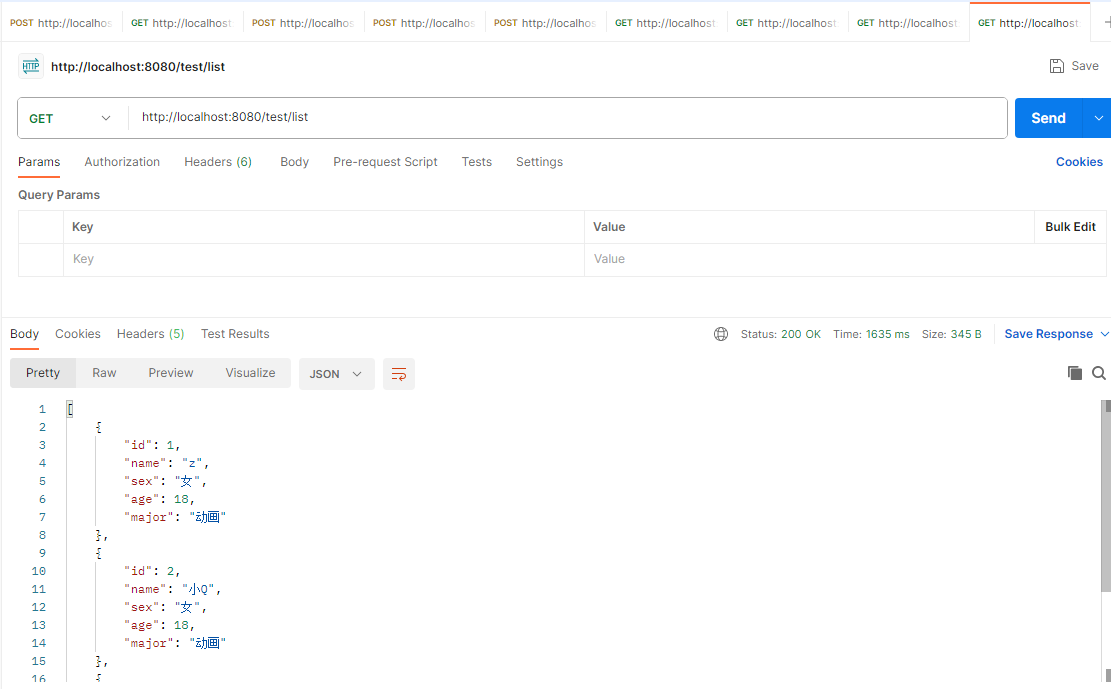 前端界面可通过该接口展示数据表中的数据。
【本文地址】
公司简介
联系我们