| Spring系列 | 您所在的位置:网站首页 › spring中实例a依赖实例b › Spring系列 |
Spring系列
|
背景:
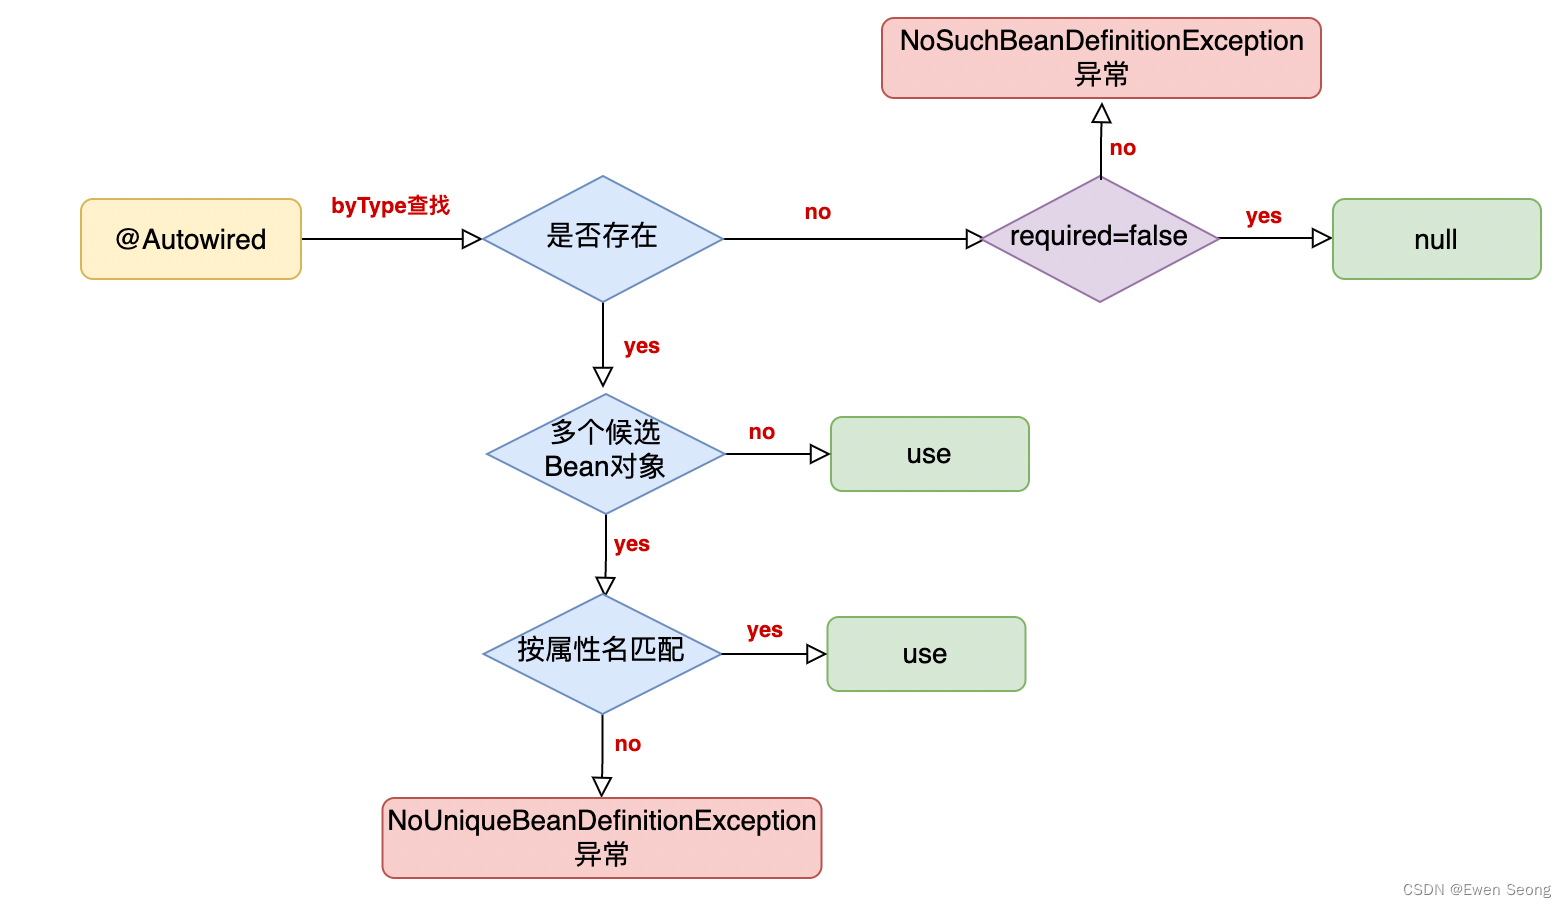
Spring管理着Bean对象的生命周期,包括实例化、属性设置、初始化、销毁等;其中实例化和属性设置过程中存在着依赖注入。 本文承接上文 Spring系列-2 Bean的生命周期,重点介绍Bean生命周期中的实例化与依赖注入过程,介绍原理时会结合Spring源码进行。 1.依赖注入本文介绍的依赖注入包括属性注入和构造函数注入,方法注入和工厂方法注入(不常见)不是本文关注的对象。 常见的注入方式有属性注入和构造函数注入。属性注入方式要求JavaBean中存在默认构造函数以及对应的设置方法(而不是对应的属性);构造函数注入方式要求JavaBean中存在匹配的构造函数。 选择何种方式依赖于实际应用。如果JavaBean属性较为固定或重要,不能对外开放设值能力,此时可以使用构造函数注入;如果JavaBean的属性较多且类型接近时,使用构造函数会影响代码的可读性,此时可使用属性注入方式。 另外:使用属性注入方式时需要处理好JavaBean的变量名规范化以及属性设置方法的匹配问题等;使用构造函数注入时,需要考虑到循环依赖问题。 2.使用与介绍 //【⚠️伪代码】 // 一个位置信息 Address 拥有一个坐标属性(经纬度); public class Address { private Location location; } public class Location { // 经度坐标 private Long longtitude; // 纬度坐标 private Long latitude; } 2.1 构造函数注入使用构造函数注入时,需要为其添加构造函数: //Location类中添加构造函数: public class Address { private Location location; public Location(Long longitude,Long latitude) { this.longitude = longitude; this.latitude = latitude; } } //Address类中添加构造函数: public class Location { // 经度坐标 private Long longtitude; // 纬度坐标 private Long latitude; public Address(Location location) { this.location = location; } } 2.1.1 使用配置文件方式:用例如下: @Slf4j public class SpringDemoApplication { public static void main(String[] args) { ClassPathXmlApplicationContext context = new ClassPathXmlApplicationContext("spring-context.xml"); Address address = (Address) context.getBean("address"); LOGGER.info("address is{}.", address); } }得到输出结果: 对Address和Location类添加@Component注解,将其加入注入到IOC容器中: @Component public class Address { private Location location; public Address(Location location) { this.location = location; } } @Component public class Location { // 经度坐标 private Long longitude; // 纬度坐标 private Long latitude; public Location() { this.longitude = 118L; this.latitude = 32L; } }测试用例如下: @Slf4j @RunWith(SpringRunner.class) @SpringBootTest public class AddressTest { @Autowired private Address address; @Test public void testAddress() { LOGGER.info("[Test] address is {}.", address); } }输出结果如下: 构造函数推断时存在优先级:被@Autowired注解的构造函数 > 无参构造函数 > 其他构造函数。 使用注解进行构造函数注入时,与配置文件方式不同未明确指定所使用的构造函数,因此存在一个构造函数推断流程: 考虑到构造函数推断,为减少风险🥸建议一个类使用一个构造函数;可使用Lombok的@RequiredArgsConstructor注解实现: @Component @RequiredArgsConstructor public class Address { private final Location location; }Tips:对需要注入的属性🥷使用final进行修饰,Lombok注解相关可参考Lombok使用说明。 注意:使用构造函数时,需要注意避免循环依赖问题。 2.2 属性注入属性注入要求类型具有无参构造函数(用于实例化对象)和必要的set方法(用于注入): @Component public class Address { private Location location; public void setLocation(Location location) { this.location = location; } } @Component public class Location { // 经度坐标 private Long longitude; // 纬度坐标 private Long latitude; public void setLongitude(Long longitude) { this.longitude = longitude; } public void setLatitude(Long latitude) { this.latitude = latitude; } } 2.2.1 使用配置文件方式:用例如下: @Slf4j public class SpringDemoApplication { public static void main(String[] args) { ClassPathXmlApplicationContext context = new ClassPathXmlApplicationContext("spring-context.xml"); Address address = (Address) context.getBean("address"); LOGGER.info("address is{}.", address); } }得到输出结果: 如2.1.2 中的测试用例: @Slf4j @RunWith(SpringRunner.class) @SpringBootTest public class AddressTest { @Autowired private Address address; @Test public void testAddress() { LOGGER.info("[Test] address is {}.", address); } }Address对象通过属性注入方式被注入到AddressTest类型中。 2.2.3 @Autowired和@Resource使用属性注入时,除@Autowired、@Resource注解之外,还可以使用Spring系列-6 占位符使用和原理文中介绍的@Value、@PropertySource、@ConfigurationProperties等注解对Bean对象进行注入。@Autowired和@Resource注解是本文的重点介绍对象,整体上看: [1] 首先@Autowired类是Spring定义的,而@Resource来自JDK; [2] @Autowired和@Resource都可以注解在字段或者setter方法上;@Autowired还可注解在构造函数上,而@Resource不允许; [3] @Autowired可以通过设置required=false避免注入失败抛出异常; 详细流程如下所示: @Autowired流程 如上图所示,使用@Autowired注解进行依赖注入时,先根据待注入属性的类型从IOC容器中查找Bean对象,得到候选Bean对象集合: (1) 如果该集合为空,表示IOC容器中不存在此类型的Bean对象;此时会根据是否必须注入(required==false)确定将属性值设置为null或抛出异常; (2) 如果集合不为空且只有一个对象,则直接使用该Bean对象注入; (3) 如果集合不为空且未对候选Bean对象集合设置过滤条件,以待注入的属性名为beanName从候选Bean对象集合中进行过滤:存在——则使用过滤得到的Bean对象进行注入,否则抛出NoUniqueBeanDefinitionException异常。 @Resource流程 不同之处: 通过@Autowired的required属性可以设置依赖注入是否必须;而@Resource不存在该属性,即要求注入必须完成,否则抛出异常。@Autowired先根据类型从IOC容器中过滤出候选Bean对象,若候选Bean对象不唯一,再根据属性名称进行过滤;@Resource先根据属性名称进行查找,若未找到候选Bean对象,再根据类型进行查找。 2.2.4 @Qualifier和@Primary和@PriorityNoUniqueBeanDefinitionException:一个属性存在多个候选Bean对象而Spring容器无法确定该使用哪个Bean对象进行注入时,Spring会抛出NoUniqueBeanDefinitionException异常。 围绕着NoUniqueBeanDefinitionException异常,Spring提供了三个注解类(@Qualifier、@Primary、@Priority) 用于解决该异常。 优先级高低:@Qualifier > @Primary > @Priority @Qualifier当根据类型获取到多个候选的Bean对象时,可以使用@Qualifier的beanName进行过滤,得到的Bean对象不为空,则用于依赖注入,否则抛出异常。 用法如下: @Autowired @Qualifier("address1") private Address address; @Autowired(required = false) @Qualifier("location1") private Location location;此时要求注入到address属性的Bean对象为Address类型且beanName为"address1",若不存在,则抛出异常。 同理location属性要求Bean对象为Location类型且beanName为"location1",若不存在,location属性值为null。 注意:当使用@Resource注解时若指定了名称,会导致@Qualifier逻辑短路而不生效。 @Primary@Primary注解的Bean对象为默认对象(Spring无法筛选时,使用该Bean对象),对同类型只能注解在一个Bean对象上,否则会抛出异常。 @Bean @Primary public PrimaryBean primaryBean1() { PrimaryBean primarybean = new PrimaryBean(); primarybean.setName("bean1"); return primarybean; } @Bean public PrimaryBean primaryBean2() { PrimaryBean primarybean = new PrimaryBean(); primarybean.setName("bean2"); return primarybean; }未通过@Resource和@Qualifier指定beanName时,对于PrimaryBean类型,"primaryBean1"相对于"primaryBean2"有更高的优先级,可参考如下测试用例: @Slf4j @RunWith(SpringRunner.class) @SpringBootTest public class PrimaryBeanTest { @Resource(name = "primaryBean2") private PrimaryBean primaryBeanTest1; @Autowired @Qualifier("primaryBean2") private PrimaryBean primaryBeanTest2; @Autowired private PrimaryBean primaryBeanTest3; @Test public void testPrimaryBean() { LOGGER.info("[Test] primaryBeanTest1.name is {}.", primaryBeanTest1.getName()); LOGGER.info("[Test] primaryBeanTest2.name is {}.", primaryBeanTest2.getName()); LOGGER.info("[Test] primaryBeanTest3.name is {}.", primaryBeanTest3.getName()); } }得到的输出结果: 注意:同类型的Bean对象只有一个可以被注解@Primary,当被注入的属性为父类且有多个子类被注解了@Primary时,也会抛出异常。 @Priority当代码未使用@Qualifier和@Primary注解且存在多个候选的Bean对象时,@Priority注解可以提供一个解决方案。@Priority注解的特性在于其需要注解在类定义上,且存在一个必填的value属性(value值越小优先级越高),适用于父类有多个子类的场景。 // LocationName接口存在两个子类LocationNameImpl1和LocationNameImpl2 // LocationNameImpl1的优先级高于LocationNameImpl2 public interface LocationName { String name(); } @Component @Priority(1) public class LocationNameImpl1 implements LocationName { @Override public String name() { return "name-1"; } } @Component @Priority(2) public class LocationNameImpl2 implements LocationName { @Override public String name() { return "name-2"; } }测试用例如下: @Slf4j @RunWith(SpringRunner.class) @SpringBootTest public class LocationNameTest { @Autowired private LocationName locationName; @Test public void testPrimaryBean() { LOGGER.info("[Test] locationName.name is {}.", locationName.name()); } }得到如下结果: 另外,三者可以组合使用,按照优先级 @Qualifier > @Primary > @Priority生效。 在考虑到@Qualifier、@Primary、@Priority注解后,2.2.3章节中的流程图可以扩展为: @Autowired逻辑: @Resource逻辑:
构造函数注入原理较为简单,在实例化Bean对象阶段,通过构造函数完成对象的属性注入,可参考 Spring系列-2 Bean的生命周期。 3.2 属性注入@Autowired注解完成依赖注入依赖于AutowiredAnnotationBeanPostProcessor类,而@Resource对应CommonAnnotationBeanPostProcessor;二者都继承或者间接继承了MergedBeanDefinitionPostProcessor和InstantiationAwareBeanPostProcessor接口,如下图所示: AutowiredAnnotationBeanPostProcessor和CommonAnnotationBeanPostProcessor的代码重复度较高,区别在于获取并封装注解信息上:AutowiredAnnotationBeanPostProcessor中获取指定类中@Autowired注解的信息,而CommonAnnotationBeanPostProcessor获取指定类中@Resource注解的信息;获取注解信息后二者将注解信息封装成InjectionMetadata对象,并委托给该InjectionMetadata对象实现依赖注入。因此本文以AutowiredAnnotationBeanPostProcessor为对象介绍依赖注入原理。 postProcessMergedBeanDefinition接口主要功能:根据Bean的类型信息获取所有被Autowired注解的属性及注解信息(required字段),并将结果缓存在内存中。 源码如下: public void postProcessMergedBeanDefinition(RootBeanDefinition beanDefinition, Class beanType, String beanName) { InjectionMetadata metadata = this.findAutowiringMetadata(beanName, beanType, (PropertyValues)null); metadata.checkConfigMembers(beanDefinition); }逻辑较为清晰,this.findAutowiringMetadata(beanName, beanType, (PropertyValues)null);根据Bean元信息获取并封装成InjectionMetadata对象,并将InjectionMetadata对象等信息存入内存;metadata.checkConfigMembers(beanDefinition);进行校验,防止属性被重复注入。 跟进this.findAutowiringMetadata(beanName, beanType, (PropertyValues)null)方法: private InjectionMetadata findAutowiringMetadata(String beanName, Class clazz, @Nullable PropertyValues pvs) { String cacheKey = (StringUtils.hasLength(beanName) ? beanName : clazz.getName()); InjectionMetadata metadata = this.injectionMetadataCache.get(cacheKey); if (InjectionMetadata.needsRefresh(metadata, clazz)) { synchronized (this.injectionMetadataCache) { metadata = this.injectionMetadataCache.get(cacheKey); if (InjectionMetadata.needsRefresh(metadata, clazz)) { if (metadata != null) { metadata.clear(pvs); } metadata = buildAutowiringMetadata(clazz); this.injectionMetadataCache.put(cacheKey, metadata); } } } return metadata; }主线逻辑:根据beanName从AutowiredAnnotationBeanPostProcessor对象的injectionMetadataCache属性中获取InjectionMetadata对象,如果获取成功则返回该对象;否则调用buildAutowiringMetadata(clazz)构造InjectionMetadata对象,并将其添加入缓存。 跟进buildAutowiringMetadata(clazz)方法: private InjectionMetadata buildAutowiringMetadata(Class clazz) { // ⚠️ autowiredAnnotationTypes集合包括 Autowired.class 和 Value.class 对象 if (!AnnotationUtils.isCandidateClass(clazz, this.autowiredAnnotationTypes)) { return InjectionMetadata.EMPTY; } List elements = new ArrayList(); Class targetClass = clazz; do { final List currElements = new ArrayList(); ReflectionUtils.doWithLocalFields(targetClass, field ->{...}); // 文本忽略注解在方法上的@Autowired注解(与属性相似,请读者自行阅读) ReflectionUtils.doWithLocalMethods(targetClass, method ->{...}); elements.addAll(0, currElements); targetClass = targetClass.getSuperclass(); } while (targetClass != null && targetClass != Object.class); return InjectionMetadata.forElements(elements, clazz); }整体来看,该方法的入参为字节码对象,返回结果为InjectionMetadata对象,明显需要通过反射获取该类型上所有属性关于@Autowired的注解信息,并封装为injectionMetadata对象返回。 由3块逻辑组成:(1) 校验是否包含@Autowired或@Value注解;(2)根据字节码对象循环获取InjectedElement,整合得到InjectedElement列表;(3)根据字节码对象和InjectedElement列表构建InjectionMetadata对象并返回。 AutowiredAnnotationBeanPostProcessor的autowiredAnnotationTypes属性是个集合,包括 Autowired.class 和 Value.class 对象;如果入参clazz对象不包含@Autowired和@Value注解会返回一个空的InjectionMetadata对象。 代码中存在一个循环逻辑: do { // 根据targetClass获取注解信息 targetClass = targetClass.getSuperclass(); } while (targetClass != null && targetClass != Object.class);功能是遍历入参clazz对象的所有父类,收集clazz对象及其所有父类中被@Autowired注解的属性及其注解信息。 从字节码对象获取InjectedElement(AutowiredFieldElement是InjectedElement的子类)列表的责任落在了ReflectionUtils.doWithLocalFields方法上: ReflectionUtils.doWithLocalFields(targetClass, field -> { MergedAnnotation ann = findAutowiredAnnotation(field); if (ann != null) { if (Modifier.isStatic(field.getModifiers())) { if (logger.isInfoEnabled()) { logger.info("Autowired annotation is not supported on static fields: " + field); } return; } boolean required = determineRequiredStatus(ann); currElements.add(new AutowiredFieldElement(field, required)); } });从中可以看出AutowiredFieldElement封装了字段和required的值。 注意:注解在static属性的字段不进行依赖注入。 跟进InjectionMetadata.forElements(elements, clazz),得到: public static InjectionMetadata forElements(Collection elements, Class clazz) { return (elements.isEmpty() ? new InjectionMetadata(clazz, Collections.emptyList()) : new InjectionMetadata(clazz, elements)); } public InjectionMetadata(Class targetClass, Collection elements) { this.targetClass = targetClass; this.injectedElements = elements; }即:将如参elements赋值给injectedElements属性(后面用到);将字节码对象赋值给targetClass属性。 跟进metadata.checkConfigMembers(beanDefinition)方法: public void checkConfigMembers(RootBeanDefinition beanDefinition) { Set checkedElements = new LinkedHashSet(this.injectedElements.size()); for (InjectedElement element : this.injectedElements) { Member member = element.getMember(); if (!beanDefinition.isExternallyManagedConfigMember(member)) { beanDefinition.registerExternallyManagedConfigMember(member); checkedElements.add(element); } } this.checkedElements = checkedElements; }InjectionMetadata类中有两个属性需要注意,分别是injectedElements和checkedElements。injectedElements在前面已被赋值(需要被注入的属性集合)。引入checkedElements是为了校验,防止对同一个注入点进行了重复注入:是否重复信息保存在全局的beanDefinition中,通过案例进行介绍: @Data @Component public class Address { @Resource @Autowired private Location location; }Address类型的location属性同时被@Resource和@Autowired注解了,Spring设计时需要考虑不能对location属性进行两次注入。 当CommonAnnotationBeanPostProcessor执行依赖注入时:Address对应的beanDefinition(externallyManagedConfigMembers字段)中不包含location相关Member信息,此时会将location对应的InjectedElement信息添加到checkedElements属性中,同时在Address的beanDefinition中添加location相关Member信息; 当CommonAnnotationBeanPostProcessor执行依赖注入时:Address对应的beanDefinition(externallyManagedConfigMembers字段)中已包含location相关Member信息,此时checkedElements不会将location对应的InjectedElement信息添加到checkedElements属性中。 后续注入流程会从checkedElements属性中取值,从而避免了重复注入。 postProcessProperties接口主要功能:根据Bean的类型信息从缓存中获取InjectionMetadata对象,委托InjectionMetadata对象通过反射实现依赖注入。 源码如下(去除异常相关的try-catch后): public PropertyValues postProcessProperties(PropertyValues pvs, Object bean, String beanName) { InjectionMetadata metadata = this.findAutowiringMetadata(beanName, bean.getClass(), pvs); metadata.inject(bean, beanName, pvs); return pvs; }逻辑也很清晰,this.findAutowiringMetadata(beanName, bean.getClass(), pvs);从缓存中获取InjectionMetadata对象;metadata.inject(bean, beanName, pvs);调用InjectionMetadata对象的inject方法实现依赖注入。 在postProcessMergedBeanDefinition接口中已将获取的InjectionMetadata对象存入内存,因此这里再次调用this.findAutowiringMetadata(beanName, bean.getClass(), pvs);时会直接从内存中获取对象。 跟进metadata.inject(bean, beanName, pvs)方法: public void inject(Object target, @Nullable String beanName, @Nullable PropertyValues pvs) throws Throwable { Collection checkedElements = this.checkedElements; Collection elementsToIterate = (checkedElements != null ? checkedElements : this.injectedElements); if (!elementsToIterate.isEmpty()) { for (InjectedElement element : elementsToIterate) { element.inject(target, beanName, pvs); } } }方法的主线逻辑是遍历checkedElements属性,并调用元素的inject方法完成注入。 跟进element.inject(target, beanName, pvs)方法(省略try-catch异常): protected void inject(Object bean, @Nullable String beanName, @Nullable PropertyValues pvs) throws Throwable { Field field = (Field) this.member; Object value; if (this.cached) { value = resolvedCachedArgument(beanName, this.cachedFieldValue); } else { value = resolveFieldValue(field, bean, beanName); } if (value != null) { ReflectionUtils.makeAccessible(field); field.set(bean, value); } }该方法的主线逻辑是通过resolveFieldValue(field, bean, beanName)或resolvedCachedArgument(beanName, this.cachedFieldValue)从IOC容器中获取Bean对象并赋值给value变量,再通过反射field.set(bean, value)进行属性的赋值,从而完成依赖注入。 鉴于本文篇幅长度考虑,resolveFieldValue和resolvedCachedArgument方法内容以及相关的Spring三级缓存放在Spring系列-3 Bean实例化与依赖注入和Spring系列-4 循环依赖与三级缓存 中进行介绍。 |


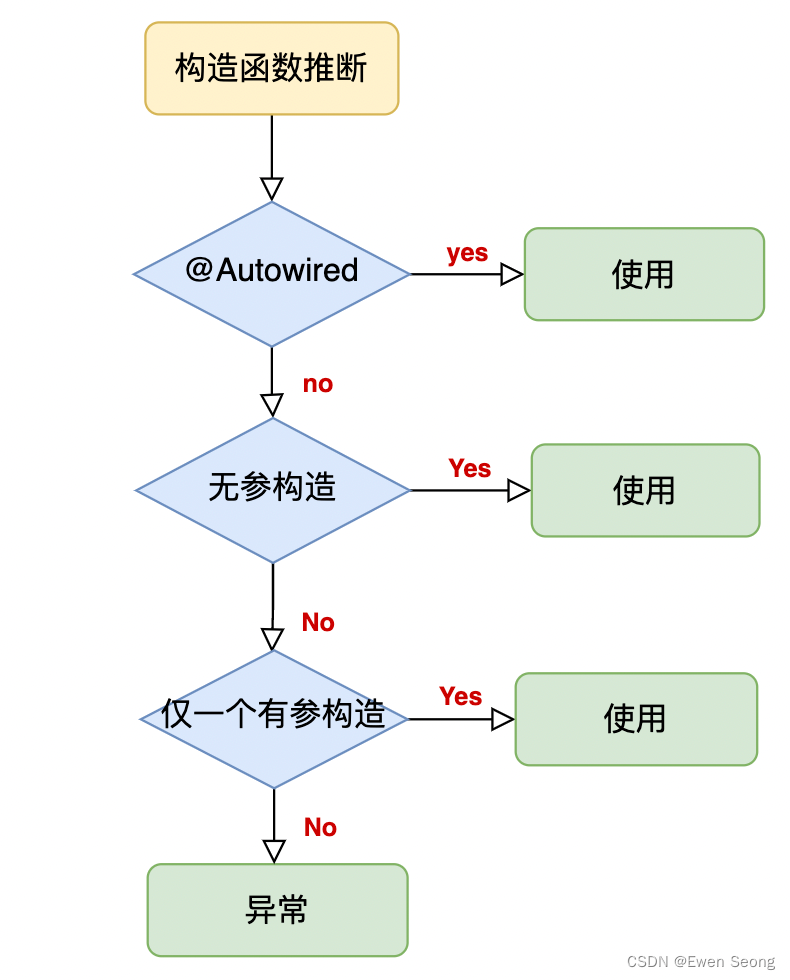 如上图所示,推断流程可以表述为: [1] 当存在@Autowired注解的构造函数时,直接使用该函数; [2] 当存在无参构造函数时,直接使用该函数; [3] 当类中仅存在一个构造函数时,直接使用该函数; [4] 当类中存在多个构造函数时,抛出异常。 注意:一个类中只能有一个构造函数可以被@Autowired注解,否则抛出异常。当一个类中定义了多个构造函数且未使用@Autowired进行注解时,Spring默认会使用无参构造函数;因此当不存在无参构造时,会抛出找不到无参构造函数的异常。
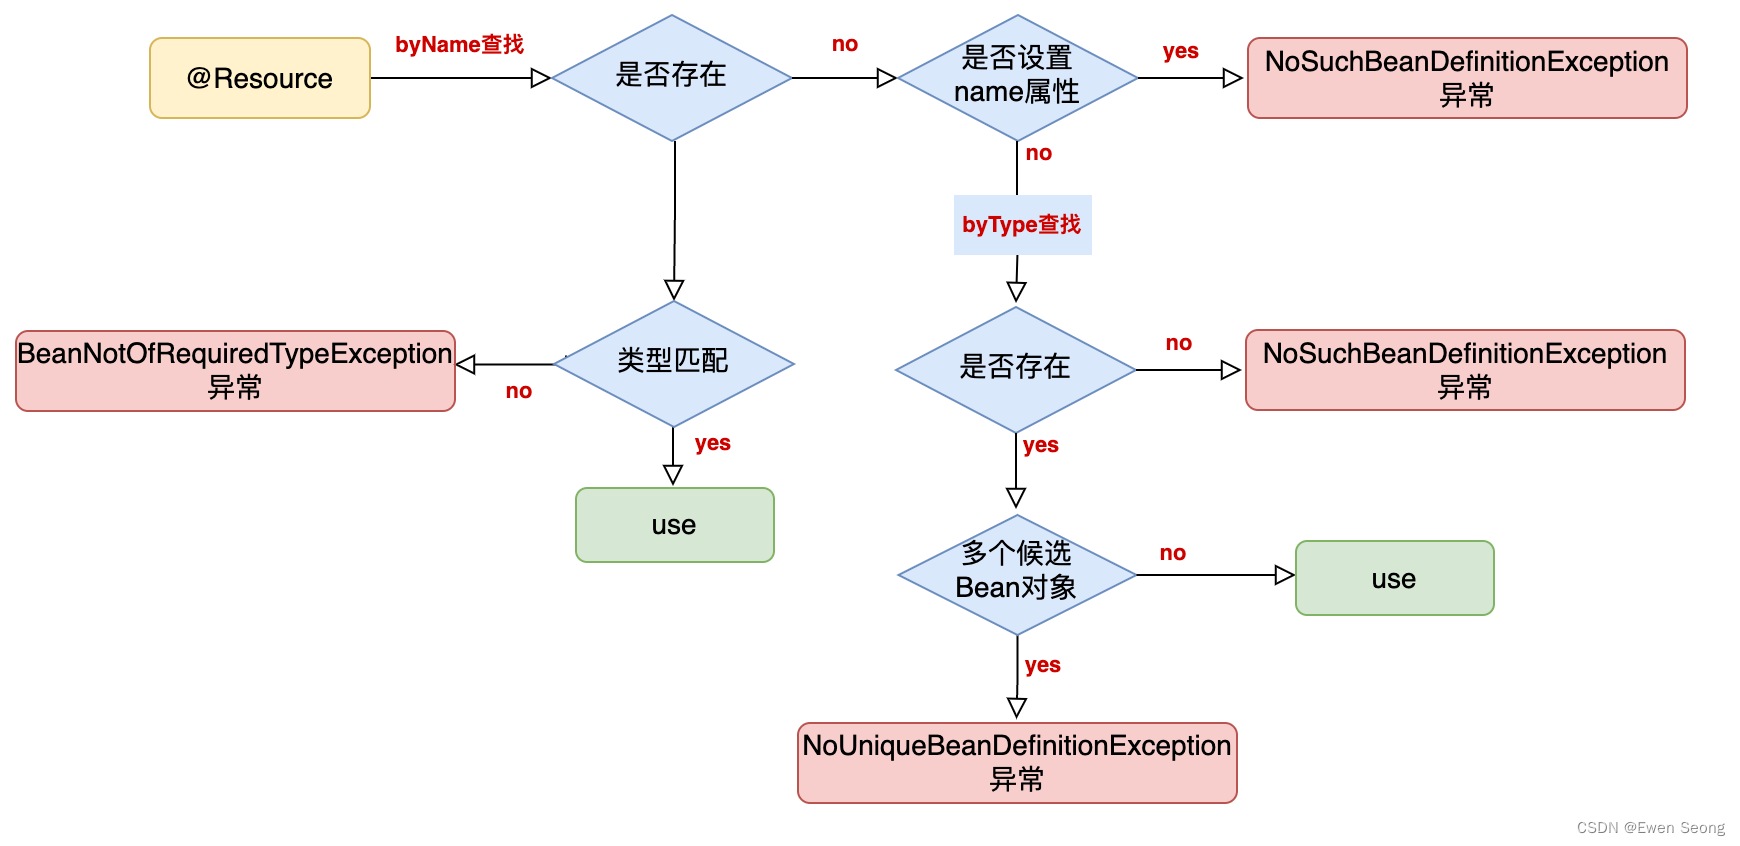 如上图所示,使用@Resource注解进行依赖注入时,先根据待注入属性名(@Resource的name属性指定名称时,使用@Resource的name属性)从IOC容器中查找Bean对象: (1) 如果存在:类型匹配——使用该Bean对象注入,类型不匹配——抛出BeanNotOfRequiredTypeException异常。 (2) 如果不存在,表示IOC容器中不存在以该属性名(@Resource的name属性指定名称时,使用@Resource的name属性)为beanName的Bean对象: 2-1)若@Resource的name属性指定了名称,则抛出NoSuchBeanDefinitionException异常; 2-2)@Resource未指定name时会根据待注入属性的类型从IOC容器中查找Bean对象,得到候选Bean对象集合; 2-3)如果该集合为空,抛出NoSuchBeanDefinitionException异常; 2-4)如果集合不为空且只有一个对象,则直接使用该Bean对象注入; 2-5)如果集合不为空且存在多个对象,若未对候选Bean对象集合设置过滤条件,则抛出NoUniqueBeanDefinitionException异常。


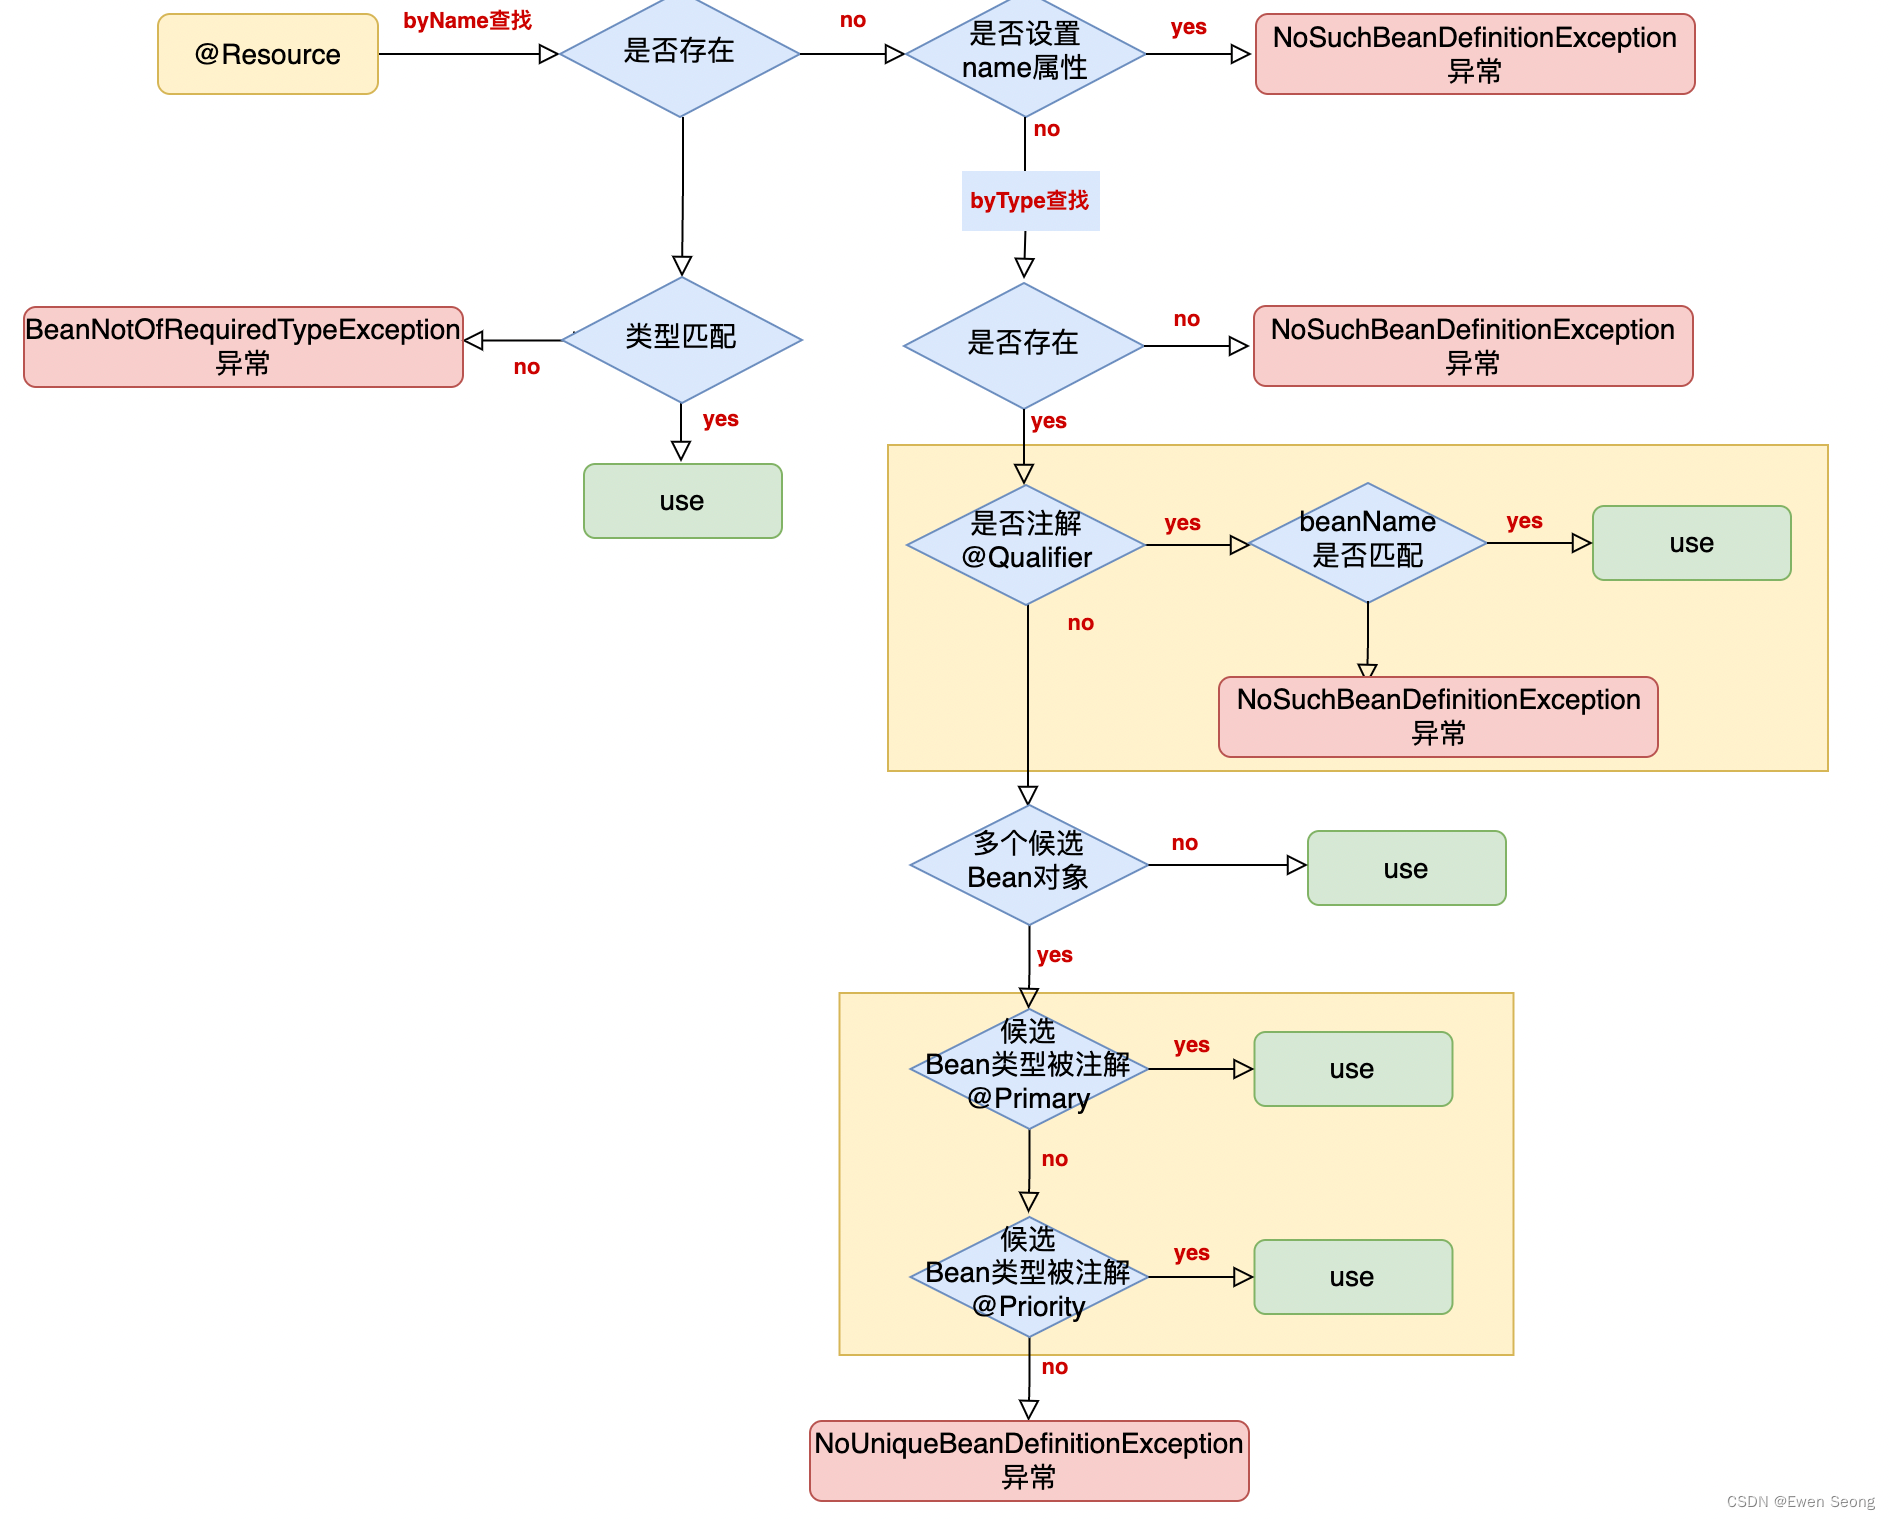 黄色区域为新增区域,在代码中添加了@Qualifier、@Primary、@Priority注解才会涉及。
 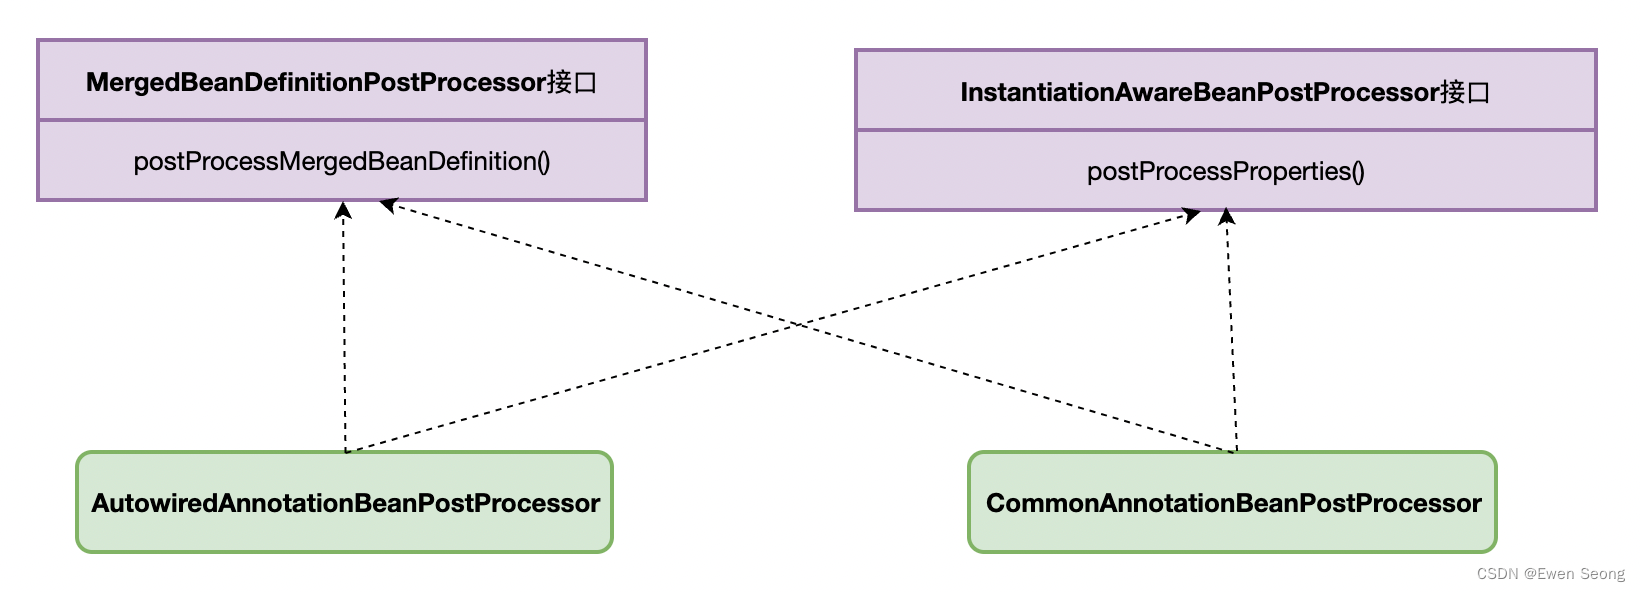 AutowiredAnnotationBeanPostProcessor和CommonAnnotationBeanPostProcessor因上述继承关系而存在两个钩子函数(postProcessMergedBeanDefinition方法和postProcessProperties方法),二者在Bean生命周期的不同阶段被调用(如下图上面黄色区域),组合形成依赖注入能力。
 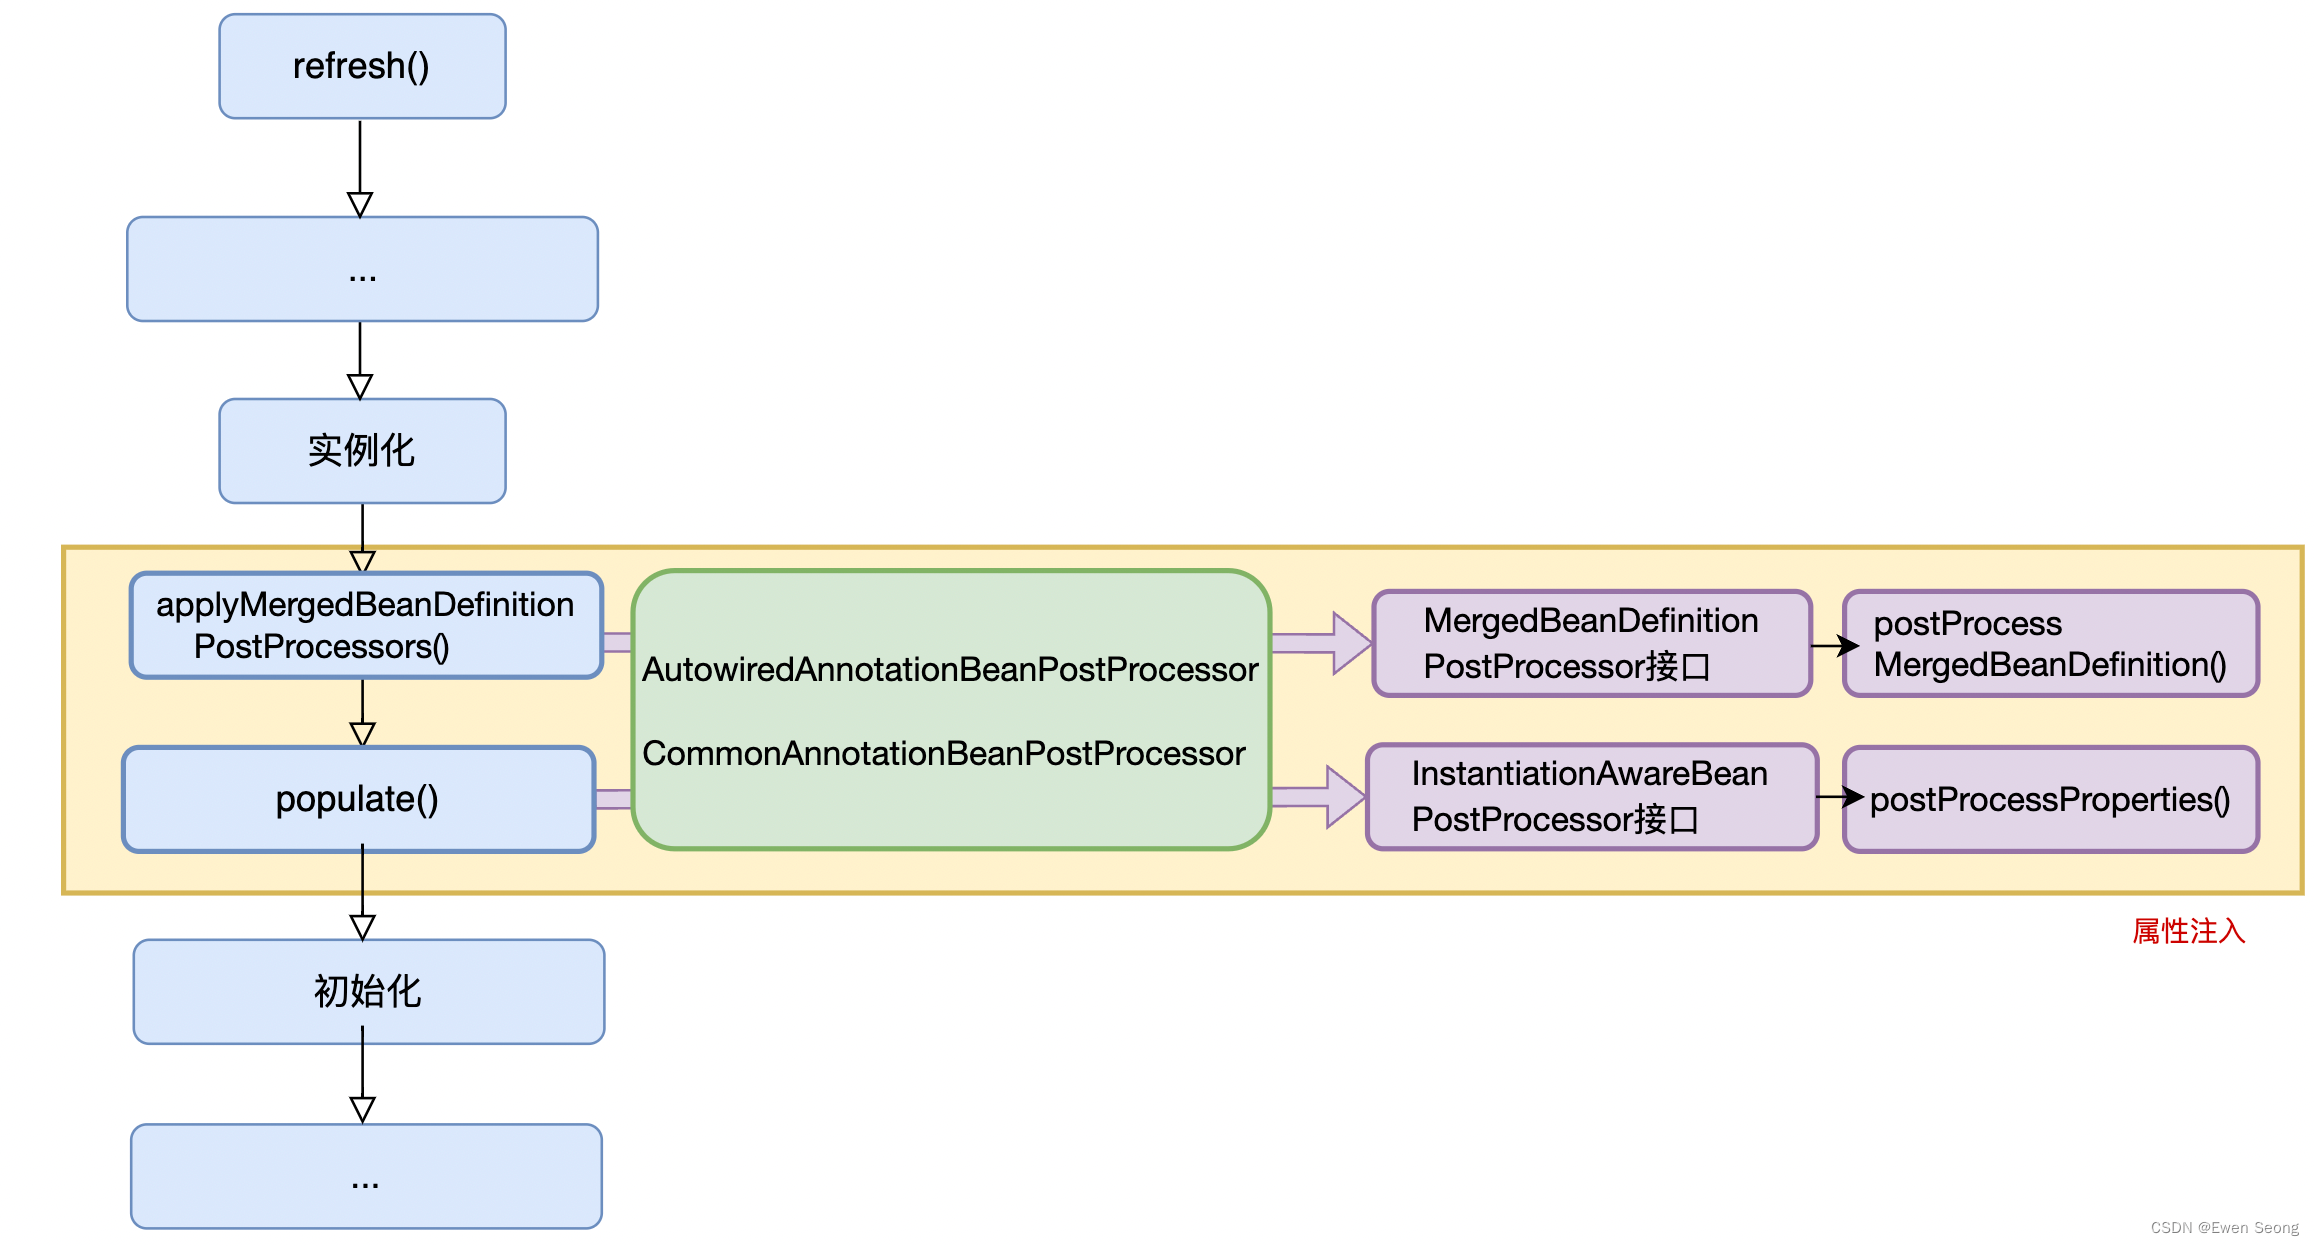 上图是 Spring系列-2 Bean的生命周期中Bean生命周期图的简化表示。其中,属性注入在实例化后、初始化前进行,对应两个步骤applyMergedBeanDefinitionPostProcessors()和populate(): (1) applyMergedBeanDefinitionPostProcessors()中依次调用CommonAnnotationBeanPostProcessor和AutowiredAnnotationBeanPostProcessor的postProcessMergedBeanDefinition方法,完成准备和校验工作; (2) populate()中依次调用CommonAnnotationBeanPostProcessor和AutowiredAnnotationBeanPostProcessor的postProcessProperties方法,完成注入工作。
【本文地址】
| 今日新闻 |
| 推荐新闻 |
| 专题文章 |