| 利用spring+springMvc对单点登录(SSO)的简单实现(含源码) | 您所在的位置:网站首页 › springmvc实现过滤器 › 利用spring+springMvc对单点登录(SSO)的简单实现(含源码) |
利用spring+springMvc对单点登录(SSO)的简单实现(含源码)
|
一、简介
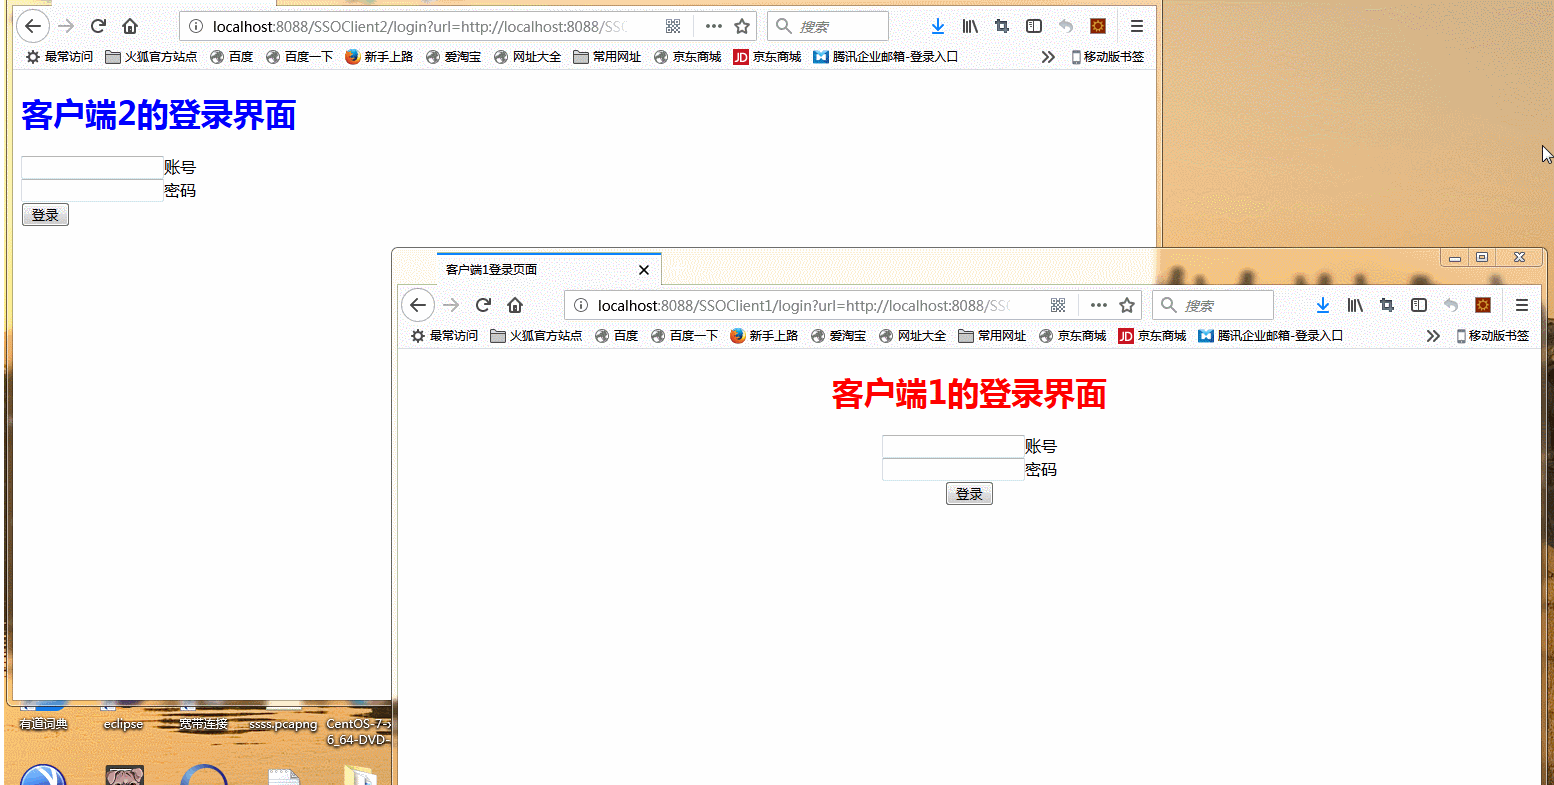
继上一次的第三方登录后,趁热打铁,继续学习了一下单点登录。和oauth2.0的原理有些相似。都是客户端登录的时候需要去服务端认证一下。认证通过才能进行登录。不同的是,单点登录需要自己去维持一个认证服务器与用户浏览器的全局会话、客户端端与用户浏览器的局部会话,通过判断确认用户是否登录。 详细原理不介绍了,如果不知道原理不建议直接实现过程,需要先去补一补原理。推荐一篇我学习的时候看到大神写的文章,通俗易懂 : 单点登录原理与简单实现 当然自己写过一遍,也遇到一些问题和疑惑的地方,下面来一一列举。 为了方便,需要从上面文章扣一个图和简易说明过来,单点登录的流程图。 简要说明(标红地方为我当初困惑的地方以及实现起来遇到问题的地方) 用户访问系统1的受保护资源,系统1发现用户未登录,跳转至sso认证中心,并将自己的地址作为参数sso认证中心发现用户未登录,将用户引导至登录页面用户输入用户名密码提交登录申请sso认证中心校验用户信息,创建用户与sso认证中心之间的会话,称为全局会话,同时创建授权令牌sso认证中心带着令牌跳转会最初的请求地址(系统1)系统1拿到令牌,去sso认证中心校验令牌是否有效sso认证中心校验令牌,返回有效,注册系统1系统1使用该令牌创建与用户的会话,称为局部会话,返回受保护资源用户访问系统2的受保护资源系统2发现用户未登录,跳转至sso认证中心,并将自己的地址作为参数sso认证中心发现用户已登录,跳转回系统2的地址,并附上令牌系统2拿到令牌,去sso认证中心校验令牌是否有效sso认证中心校验令牌,返回有效,注册系统2系统2使用该令牌创建与用户的局部会话,返回受保护资源解释: 问题1:sso认证中心校验用户信息,创建用户与sso认证中心之间的会话,称为全局会话,同时创建授权令牌中,为什么要建立全局会话?作用是什么?怎么创建? 答:认证中心需要根据是否建立全局会话来判断用户是不是在某个客户端系统中登录过。用上图解释就是,在系统1登录过后,认证中心建立起全局会话,当系统2再来认证中心进行登录请求的时候,我们发现存在全局会话,就可以看做用户已经在系统1中登录过,无需在继续跳转登录页面,而是直接携带信息返回给系统2。我这边实现的全局会话为了简便是利用tomcat的session建立的,在登录成功后执行以下代码 request.getSession().setAttribute("isLogin", userName); 问题2:sso认证中心校验令牌,返回有效,注册系统1 中为什么要在认证服务器中注册系统1? 答:注册系统1到认证中心是为了方便实现用户退出时候的单点退出。单点退出和登录一个道理,一个客户端系统退出,所有系统全部退出。当系统集群中,在某一个系统中用户退出后,认证中心收到退出请求,将会逐个发消息到注册在认证中心的子系统中去,确保所有子系统全部退出。 问题3:系统1使用该令牌创建与用户的会话,称为局部会话,返回受保护资源 中局部会话的作用是什么?怎么创建? 答:局部会话是子系统和用户之间(浏览器)建立的会话,用来验证用户是否已经登录,就如同传统的web应用登录后创建的会话一样。如果检测到局部会话存在则表示该系统已经登录过,无需去认证中心进行验证,反过来也是一样,局部会话不存在就需要去认证中心验证。同样为了简便,我也是利用tomcat的session建立的,和建立全局会话相同。 问题4:sso认证中心发现用户已登录,跳转回系统2的地址,并附上令牌 中,怎么验证用户已经登录? 答:这个问题是我当初最疑惑的地方,后来发现是自己没有执行看文章,多仔细看几遍就发现是通过检查是否存在全局会话来判断用户是否登录的,这同样是为什么要建立全局会话的原因。 三、代码正常来说,客户端和认证中心都需要配置拦截器或者过滤器,我这为了偷懒,直接在controller中进行判断。但是并不是所有的子系统或者认证中心都利用了springMvc,甚至有系统直接连开发语言都不一样。所以要根据实际情况来选择。怎么方便、怎么舒服就怎么选。还有我选这个的原因就是。。。。。。我对拦截器这些不太熟,工作中没有用到过,当初学习的时候用过但是都忘了,都忘了,忘了。代码狗就是无尽的学习以及复习。 废话不多说,直接上代码。 客户端部分contoller部分,为方便。很多的跳转路径都是写死的。 package com.yzz.ssoclient1.controller; import java.io.IOException; import java.util.Enumeration; import java.util.HashMap; import java.util.Map; import java.util.Set; import javax.servlet.http.HttpServletRequest; import javax.servlet.http.HttpSession; import org.apache.commons.httpclient.HttpClient; import org.apache.commons.httpclient.HttpException; import org.apache.commons.httpclienthods.PostMethod; import org.springframework.stereotype.Controller; import org.springframework.ui.ModelMap; import org.springframework.web.bind.annotation.RequestMapping; import org.springframework.web.servlet.ModelAndView; import com.alibaba.fastjson.JSONObject; import com.yzz.ssoclient1.util.SessionUtil; /** * * @author yzz *客户端部分,本想只用一个session存储局部会话,收到服务端的退出请求后直接调用request.getSession().removeAttribute("token")清空局部会话; *结果发现,服务端利用httpClient通知客户端的时候是新建立的一个会话,此时的session和我们局部建立的session并不是同一个。 *解决办法: *自己维护一个session管理类,利用map将局部会话的session对象和id存储起来。收到请求后再销毁该session */ @Controller public class SSOClientController { //拦截所有获取资源请求 @RequestMapping("") public String ssoClient(HttpServletRequest request,ModelMap map){ //判断请求的链接中是否有token参数 String token=request.getParameter("token"); String url=request.getParameter("url"); if(token!=null){ //如果有表示是认证服务器返回的 String allSessionId=request.getParameter("allSessionId"); return "redirect:http://localhost:8088/SSOClient1/checkToken?token="+token+"&allSessionId="+allSessionId; }else if(url!=null){ return "redirect:http://localhost:8088/SSOClient1/login?url="+url; }else{ //其他请求,继续判断是否创建了和用户之间的局部会话 JSONObject j=(JSONObject) request.getSession().getAttribute("token"); if(j!=null){ System.out.println("客户端1已经登录,存在局部会话:"+j); System.out.println("本次局部会话的localSessionId:"+request.getSession().getId()); map.addAttribute("userName", j.getString("userName")); map.addAttribute("allSessionId", j.getString("allSessionId")); return "index"; }else{ //未登录 return "redirect:http://localhost:8088/SSOServer?clientUrl=http://localhost:8088/SSOClient1"; } } } //客户端接收token并且进行验证 @RequestMapping(value="/checkToken") public String checkToken(HttpServletRequest request,ModelMap map){ String token=request.getParameter("token"); String allSessionId=request.getParameter("allSessionId"); //利用httpClient进行验证 String basePath = request.getScheme() + "://" + request.getServerName() + ":" + request.getServerPort() + request.getContextPath(); HttpClient httpClient = new HttpClient(); PostMethod postMethod = new PostMethod("http://localhost:8088/SSOServer/tokenCheck"); postMethod.addParameter("token", token); postMethod.addParameter("allSessionId", allSessionId); postMethod.addParameter("clientUrl",basePath); try { httpClient.executeMethod(postMethod); String resultJson = postMethod.getResponseBodyAsString(); postMethod.releaseConnection(); //用httpClient得到的json数据默认被转义了两次变成了"{\\"header\\":\\"认证成功!\\",\\"userName\\":\\"admin\\",\\"erroeCode\\":0}" //需要数据还原 \\" 变成 " 同时去掉前后的双引号 resultJson=resultJson.replaceAll("\\\\\"", "\""); resultJson=resultJson.substring(1, resultJson.length()-1); JSONObject j=JSONObject.parseObject(resultJson); j.put("allSessionId", allSessionId); int errorCode=j.getIntValue("erroeCode"); if(errorCode==0){ //创建客户端和用户的局部会话 request.getSession().setAttribute("token", j); String localSessionId=request.getSession().getId(); HttpSession localSession=request.getSession(); System.out.println("创建局部会话,localSessionId是:"+request.getSession().getId()); map.addAttribute("userName", j.getString("userName")); map.addAttribute("allSessionId", j.getString("allSessionId")); //存储局部会话 SessionUtil.setSession(localSessionId, localSession); //存储对应关系 SessionUtil.setLink(allSessionId, localSessionId); }else{ } } catch (HttpException e) { // TODO Auto-generated catch block e.printStackTrace(); } catch (IOException e) { // TODO Auto-generated catch block e.printStackTrace(); } return "index"; } //客户端登录 @RequestMapping(value="/login") public ModelAndView login(HttpServletRequest request){ String url=request.getParameter("url"); ModelAndView model=new ModelAndView(); model.setViewName("login"); model.addObject("url", url); return model; } //退出 @RequestMapping(value="/logout") public void logout(String allSessionId){ System.out.println("客户端1收到退出请求"); String localSessionId=SessionUtil.getLocalSessionId(allSessionId); HttpSession localSession=SessionUtil.getSession(localSessionId); localSession.removeAttribute("token"); //localSession.invalidate(); } }客户端session管理类 SessionUtil.java package com.yzz.ssoclient1.util; import java.util.HashMap; import java.util.Map; import javax.servlet.http.HttpSession; public class SessionUtil { private static Map SESSIONMAP=new HashMap(); private static Map sessionLink=new HashMap(); public static HttpSession getSession(String localSessionId){ return SESSIONMAP.get(localSessionId); } public static void setSession(String localSessionId,HttpSession localSession){ SESSIONMAP.put(localSessionId, localSession); } public static void remove(String localSessionId){ SESSIONMAP.remove(localSessionId); } public static String getLocalSessionId(String allSessionId){ return sessionLink.get(allSessionId); } public static void setLink(String allSessionId,String localSessionId){ sessionLink.put(allSessionId, localSessionId); } public static void removeL(String allSessionId,String localSessionId){ sessionLink.remove(allSessionId); } }mavn配置的pom.xml 4.0.0 com.yzz.ssoclient1 SSOClient1 war 0.0.1-SNAPSHOT SSOClient1 Maven Webapp http://maven.apache.org 4.0.2.RELEASE junit junit 3.8.1 test org.codehaus.jackson jackson-mapper-asl 1.9.13 org.springframework spring-core ${spring.version} org.springframework spring-web ${spring.version} org.springframework spring-oxm ${spring.version} org.springframework spring-tx ${spring.version} org.springframework spring-jdbc ${spring.version} org.springframework spring-webmvc ${spring.version} org.springframework spring-aop ${spring.version} org.springframework spring-context-support ${spring.version} org.springframework spring-test ${spring.version} commons-httpclient commons-httpclient 3.1 commons-io commons-io 2.4 commons-codec commons-codec 1.9 commons-dbcp commons-dbcp 1.4 mysql mysql-connector-java 5.1.30 javax javaee-api 7.0 jstl jstl 1.2 com.alibaba fastjson 1.2.24 SSOClient1还有两个jsp页面,一个登陆的,一个显示的。比较简单不贴出来了。web.xml和spring-mvc.xml都是用的以前第三方登录项目的,稍微改了下,不重复列了。第三方登录项目链接 客户端的工程结构图如下 篇幅问题,我就只列出关键部分代码 验证部分 SSOServerContoller package com.yzz.ssoserver.controller; import java.util.UUID; import javax.json.JsonObject; import javax.servlet.http.HttpServletRequest; import org.springframework.http.HttpEntity; import org.springframework.stereotype.Controller; import org.springframework.web.bind.annotation.RequestMapping; import org.springframework.web.bind.annotation.RequestMethod; import org.springframework.web.bind.annotation.ResponseBody; import com.alibaba.fastjson.JSON; import com.alibaba.fastjson.JSONArray; import com.alibaba.fastjson.JSONObject; import com.yzz.ssoserver.util.TokenUtil; import com.yzz.ssoserver.util.UrlUtil; @Controller public class SSOServerController { //判断用户是否登录,偷懒,利用controller代替拦截器 @RequestMapping("") public String loginCheck(String clientUrl,HttpServletRequest request){ String userName=(String)request.getSession().getAttribute("isLogin"); //未登录跳转到客户端登录页面(也可以是服务器自身拥有登录界面) if(userName==null){ System.out.println("路径:"+clientUrl+" 未登录,跳转登录页面"); return "redirect:"+clientUrl+"?url=http://localhost:8088/SSOServer/user/login"; }else{ //以登录携带令牌原路返回 String token = UUID.randomUUID().toString(); System.out.println("已经登录,登录账号:"+userName+"服务端产生的token:"+token); //存储 TokenUtil.put(token, userName); return "redirect:"+clientUrl+"?token="+token+"&allSessionId="+request.getSession().getId(); } } //令牌验证 @ResponseBody @RequestMapping(value="/tokenCheck",method=RequestMethod.POST) public String tokenCheck(String token,String clientUrl,String allSessionId){ JSONObject j=new JSONObject(); String userName=TokenUtil.get(token); //token一次性的,用完即毁 TokenUtil.remove(token); if(userName!=null){ //设置返回消息 j.put("erroeCode", 0); j.put("header", "认证成功!"); j.put("userName", userName); //存储地址信息,用于退出时销毁 String url=UrlUtil.get(allSessionId); if(url==null){ url=clientUrl; }else{ url+=","+clientUrl; } UrlUtil.put(allSessionId, url); } return j.toJSONString(); } }用户管理部分 UserController package com.yzz.ssoserver.controller; import java.io.BufferedReader; import java.io.IOException; import java.io.InputStream; import java.io.InputStreamReader; import java.io.OutputStream; import java.io.OutputStreamWriter; import java.net.HttpURLConnection; import java.net.MalformedURLException; import java.net.URL; import java.util.UUID; import javax.servlet.http.Cookie; import javax.servlet.http.HttpServletRequest; import javax.servlet.http.HttpServletResponse; import org.apache.commons.httpclient.HttpClient; import org.apache.commons.httpclient.HttpException; import org.apache.commons.httpclienthods.PostMethod; import org.springframework.beans.factory.annotation.Autowired; import org.springframework.stereotype.Controller; import org.springframework.web.bind.annotation.RequestMapping; import org.springframework.web.bind.annotation.RequestMethod; import org.springframework.web.servlet.ModelAndView; import com.yzz.ssoserver.bean.User; import com.yzz.ssoserver.dao.UserDao; import com.yzz.ssoserver.util.TokenUtil; import com.yzz.ssoserver.util.UrlUtil; /** * * @author Administrator * */ @RequestMapping("/user") @Controller public class UserController { @Autowired private UserDao baseDao; @RequestMapping("/getName") public ModelAndView getName(){ ModelAndView model=new ModelAndView("index"); String userName=baseDao.getName(); model.addObject("userName",userName); return model; } //登录验证 @RequestMapping(value="/login",method=RequestMethod.POST) public String login(HttpServletRequest request,HttpServletResponse response){ ModelAndView model=new ModelAndView(); String userName=request.getParameter("userName"); String userPassword=request.getParameter("userPassword"); String redirectUrl=request.getParameter("redirectUrl"); User user=baseDao.login(userName,userPassword); if(user!=null){ //设置状态(通过session判断该浏览器与认证中心的全局会话是否已经建立),生成令牌 request.getSession().setAttribute("isLogin", userName); String token = UUID.randomUUID().toString(); //存储 TokenUtil.put(token, userName); /*设置cookie到浏览器 Cookie cookie=new Cookie("sso", userName); cookie.setMaxAge(60); response.addCookie(cookie); */ //将token发送给客户端,附带本次全局会话的sessionId String allSessionId=request.getSession().getId(); System.out.println("全局会话allSessionId:"+allSessionId); return "redirect:"+redirectUrl+"?token="+token+"&allSessionId="+allSessionId; } return "redirect:http://localhost:8088/SSOServer/redirectUrl?msg=loginError"; } @RequestMapping(value="/redirectUrl",method=RequestMethod.POST) public ModelAndView redirectUrl(HttpServletRequest request){ ModelAndView model=new ModelAndView(); String msg=request.getParameter("msg"); if(msg.equals("loginError")){ msg="账号密码错误"; model.setViewName("error"); model.addObject("msg",msg); } return model; } //登出 @RequestMapping(value="/logout") public String logOut(String allSessionId,String redirectUrl,HttpServletRequest request){ String url=UrlUtil.get(allSessionId); UrlUtil.remove(allSessionId); //删除全局会话 request.getSession().removeAttribute("isLogin"); //通知各个客户端删除局部会话 String [] urls=url.split(","); //使用httpClient通知客户端的时候发现是新建立了一个服务器与客户端的会话,导致sessionId和客户建立的局部会话id不相同,无法做到删除局部会话 HttpClient httpClient=new HttpClient(); PostMethod postMethod=new PostMethod(); for (String u : urls) { postMethod.setPath(u+"/logout"); postMethod.addParameter("allSessionId", allSessionId); try { httpClient.executeMethod(postMethod); postMethod.releaseConnection(); } catch (HttpException e) { // TODO Auto-generated catch block e.printStackTrace(); } catch (IOException e) { // TODO Auto-generated catch block e.printStackTrace(); } } return "redirect:"+redirectUrl; } }数据库部分以及dao部分,图省事,直接使用的是sping 的jdbcTemplate。实现简单的验证的话也可以不用数据库,直接定死用户名和密码。 dao package com.yzz.ssoserver.dao; import java.sql.ResultSet; import java.util.ArrayList; import java.util.List; import javax.swing.text.html.HTMLDocument.HTMLReader.ParagraphAction; import javax.swing.tree.RowMapper; import javax.swing.tree.TreePath; import org.springframework.beans.factory.annotation.Autowired; import org.springframework.jdbc.core.JdbcTemplate; import org.springframework.stereotype.Repository; import com.yzz.ssoserver.bean.User; import com.yzz.ssoserver.mapping.UserMapping; @Repository public class UserDao { @Autowired private JdbcTemplate jdbcTemplate; public String getName(){ return jdbcTemplate.queryForObject("select user_name from user_info where user_id=1", String.class); } public User login(String userName,String userPassword){ User u=new User(); String sql=" select * from user_info where user_name=? and user_password=? "; Object[] param= new Object[]{userName,userPassword}; u=jdbcTemplate.queryForObject(sql, new UserMapping(), param); return u; } }spring.xml,在客户端的xml基础中中加入如下配置 还有一些工具类,都是简单的map操作和客户端的sessionUtil差不多。bean以及RowMapper的实现就不列了。db.properties和sql我直接用的是以前第三方登录的项目,可以再以前文章找,上面再客户端代码介绍部分有链接。 pom.xml和web.xml和客户端的差不多,也不列了。 其中需要用多个客户端进行测试,客户端的代码全相同,自己重新建项目复制代码就好。 四、展示打开浏览器分别访问两个子系统 localhost:8088/SSOClient1 和localhost:8088/SSOClient2,如下将全部提示需要登录。 随便在一个中登录,在重新访问另外一个,将出现如下效果,这是在客户端1中登录,在去访问客户端2,此时显示已登录。
现在已经出现很多的sso单点登录的集成框架,用的最多的是CAS框架:CAS(Central Authentication Service)。也有很多公司提供了直接的SSO模块。但是原理还是需要自己掌握。这个demo还有许多地方要完善,例如,没有拦截器。没有完善的授权控制,这儿默认一次性,用完即删。没有控制完善的会话检测功能,每次登录还需要直接从新输入地址,没有考虑跨域之类的(如果需要实现跨域的话可以考虑在ajax中利用jsonp来请求数据,或者是在过滤器中进行处理)。 源码下载 别想着把源码下载了就能直接运行。我可以肯定的告诉那些想着下了源码就用的人,100%是报错的。这个的主要作用是参考,每人的机器环境都不一样的。我把这个项目从公司电脑换的自己的电脑照样报错。mavn配置不同、tomcat配置不同、jdk不同都会报错。重要的代码和架构全在这儿贴出来了。 如果实在是想把源码拿来就用的话,那就去看看我的另外一篇解决移植错误的博客吧:MAVEN项目移植错误的解决方法。最后自己改一下对应的tomcat端口已经路径。 重新复习了下过滤器和拦截器部分的知识,对这个简单的demo进行了部分修改,修改如下。(无法更改以删除资源,改的部分贴着直接贴出来算了) 1、客户端1部分使用拦截器interceptor实现登录验证以及部分请求验证。 2、客户端2部分使用过滤器OncePerRequestFilter 实现登录验证以及部分请求验证。 3、服务器部分少部分返回路径进行修改。修改后的效果:只要其中一个客户端登录状态发生变化,另外一个客户端只需要刷新页面或者进行任何操作就能对应的更改状态。无需浏览器手动重新输入地址,更加人性化。 例如:客户端1登录后,客户端2在现有的任意界面里刷新一下直接跳转到显示界面。无需重新手动输入项目路径。退出也是相同的道理。 客户端1使用拦截器 package com.yzz.ssoclient1.interceptor; import java.io.PrintWriter; import javax.servlet.http.HttpServletRequest; import javax.servlet.http.HttpServletResponse; import org.springframework.web.servlet.HandlerInterceptor; import org.springframework.web.servlet.ModelAndView; import com.alibaba.fastjson.JSONObject; import com.yzz.ssoclient1.controller.SSOClientController; import com.yzz.ssoclient1.util.SessionUtil; /** * 拦截器模块,用于对资源请求的过滤 * @author yzz * */ public class SSOInterceptor implements HandlerInterceptor{ private static boolean type=false; //请求完全处理完之后调用,一般用于清理资源 public void afterCompletion(HttpServletRequest arg0, HttpServletResponse arg1, Object arg2, Exception arg3) throws Exception { // TODO Auto-generated method stub } //业务请求完成后,视图生成之前调用 public void postHandle(HttpServletRequest arg0, HttpServletResponse arg1, Object arg2, ModelAndView arg3) throws Exception { // TODO Auto-generated method stub } //业务请求之前调用 public boolean preHandle(HttpServletRequest request, HttpServletResponse response, Object handler) throws Exception { // TODO Auto-generated method stub //任何请求路径,先判断是否登录,可在xml中进行配置,设置拦截哪一些,不拦截哪一些 JSONObject j=(JSONObject) request.getSession().getAttribute("token"); String token=request.getParameter("token"); String url=request.getParameter("url"); String allSessionId=request.getParameter("allSessionId"); SSOClientController c=new SSOClientController(); response.setContentType("text/html;charset=UTF-8"); if(j==null){//未登录,继续判断。未登录包括几种情况 if(token!=null){ //带有参数token,表示是服务端返回到客户端的token验证部分 return true; }else if(url!=null){ //带有url参数,表示服务器判断未登录后跳转到客户端对应的登界面 //对特殊情况进行验证,即客户端1还未登录,卡在输入账号密码的页面,但是客户端2登录了,此时只要刷新客户端1的页面应改为登录状态 if(SessionUtil.getNum()==0){ PrintWriter out = response.getWriter(); StringBuilder builder = new StringBuilder(); builder.append(""); builder.append("window.top.location.href=\""); builder.append("http://localhost:8088/SSOServer"); //这里是http://ip:port/项目名 builder.append("?clientUrl=http://localhost:8088/SSOClient1\";"); //这里是重新登录的页面url out.print(builder.toString()); out.close(); SessionUtil.addNum(); return false; }else{ SessionUtil.removeNum(); return true; } }else if(allSessionId!=null && token==null){//只有allSessionId的时候,表示退出登录 return true; }else{ //跳转到服务端登录引导页面 PrintWriter out = response.getWriter(); StringBuilder builder = new StringBuilder(); builder.append(""); builder.append("window.top.location.href=\""); builder.append("http://localhost:8088/SSOServer"); //这里是http://ip:port/项目名 builder.append("?clientUrl=http://localhost:8088/SSOClient1\";"); //这里是重新登录的页面url out.print(builder.toString()); out.close(); return false; } }else{ //已经登录,执行请求 return true; } } }客户端1拦截器xml配置 客户端2,使用过滤器 package com.yzz.ssoclient2.filter; import java.io.IOException; import javax.servlet.Filter; import javax.servlet.FilterChain; import javax.servlet.FilterConfig; import javax.servlet.ServletException; import javax.servlet.ServletRequest; import javax.servlet.ServletResponse; import javax.servlet.annotation.WebFilter; import javax.servlet.http.HttpServletRequest; import javax.servlet.http.HttpServletResponse; import javax.servlet.http.HttpSession; import org.springframework.web.filter.OncePerRequestFilter; import com.alibaba.fastjson.JSONObject; import com.yzz.ssoclient2.util.SessionUtil; public class SSOClientFilter extends OncePerRequestFilter{ @Override protected void doFilterInternal(HttpServletRequest request, HttpServletResponse response, FilterChain filterChain) throws ServletException, IOException { // TODO Auto-generated method stub request.setCharacterEncoding("UTF-8"); response.setCharacterEncoding("UTF-8"); //判断请求的链接中是否有token参数 HttpServletRequest servletRequest = (HttpServletRequest) request; HttpServletResponse servletResponse = (HttpServletResponse) response; HttpSession session = servletRequest.getSession(); JSONObject j=(JSONObject) session.getAttribute("token"); String token=request.getParameter("token"); String url=request.getParameter("url"); String allSessionId=request.getParameter("allSessionId"); if(j==null){//未登录,继续判断。未登录包括几种情况 if(token!=null){ //带有参数token,表示是服务端返回到客户端的token验证部分 filterChain.doFilter(request, response); }else if(url!=null){ //带有url参数,表示服务器判断未登录后跳转到客户端对应的登界面 //对特殊情况进行验证,即客户端2还未登录,卡在输入账号密码的页面,但是客户端1登录了,此时只要刷新客户端2的页面应改为登录状态 if(SessionUtil.getNum()==0){ // PrintWriter out = response.getWriter(); // StringBuilder builder = new StringBuilder(); // builder.append(""); // builder.append("window.top.location.href=\""); // builder.append("http://localhost:8088/SSOServer"); //这里是http://ip:port/项目名 // builder.append("?clientUrl=http://localhost:8088/SSOClient1\";"); //这里是重新登录的页面url // out.print(builder.toString()); // out.close(); SessionUtil.addNum(); servletResponse.sendRedirect("http://localhost:8088/SSOServer?clientUrl=http://localhost:8088/SSOClient2"); // return false; }else{ SessionUtil.removeNum(); filterChain.doFilter(request, response); } }else if(allSessionId!=null && token==null){//只有allSessionId的时候,表示退出登录 filterChain.doFilter(request, response); }else{ //跳转到服务端登录引导页面 // PrintWriter out = response.getWriter(); // StringBuilder builder = new StringBuilder(); // builder.append(""); // // builder.append("window.top.location.href=\""); // builder.append("http://localhost:8088/SSOServer"); //这里是http://ip:port/项目名 // builder.append("?clientUrl=http://localhost:8088/SSOClient1\";"); //这里是重新登录的页面url // out.print(builder.toString()); // out.close(); servletResponse.sendRedirect("http://localhost:8088/SSOServer?clientUrl=http://localhost:8088/SSOClient2"); //return false; } }else{ //已经登录,执行请求 filterChain.doFilter(request, response); } } }客户端2过滤器xml配置 ssoClientFilter com.yzz.ssoclient2.filter.SSOClientFilter ssoClientFilter /*两个客户端的controlller部分去掉原来拦截所有的部分,也就是注解@RequestMapping("")的部分,增加以下代码 //显示页面 @RequestMapping(value="/show") public String show(String allSessionId){ return "index"; }同时两个客户端工具类增加一个计数器,比较简单就不列了。服务端部分只改了几个返回路径,自己过一边就能发现。 |


 退出也是同样的道理,随便在一个里面退出。在去访问另外一个地址。你会发现需要登录。

【本文地址】