| SpringBoot基础(详细版知识总结) | 您所在的位置:网站首页 › springboot环境搭建总结心得体会 › SpringBoot基础(详细版知识总结) |
SpringBoot基础(详细版知识总结)
|
SpringBoot基础
目录:
能够理解Spring的优缺点能够理解SpringBoot的特点能够理解SpringBoot的核心功能能够搭建SpringBoot的环境能够完成application.properties配置文件的配置能够完成application.yml配置文件的配置能够使用SpringBoot集成Mybatis能够使用SpringBoot集成Junit能够使用SpringBoot集成SpringData JPA
一、SpringBoot简介
1.1 原有Spring优缺点分析
1.1.1 Spring的优点分析
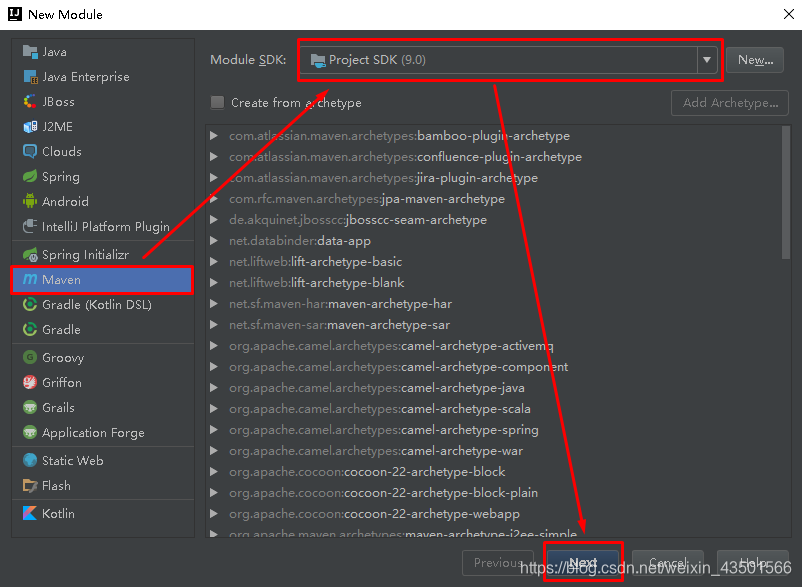
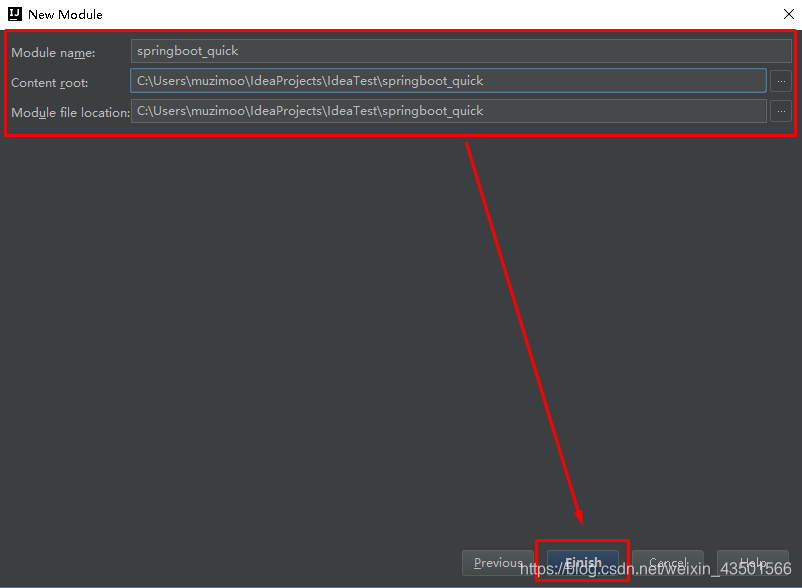
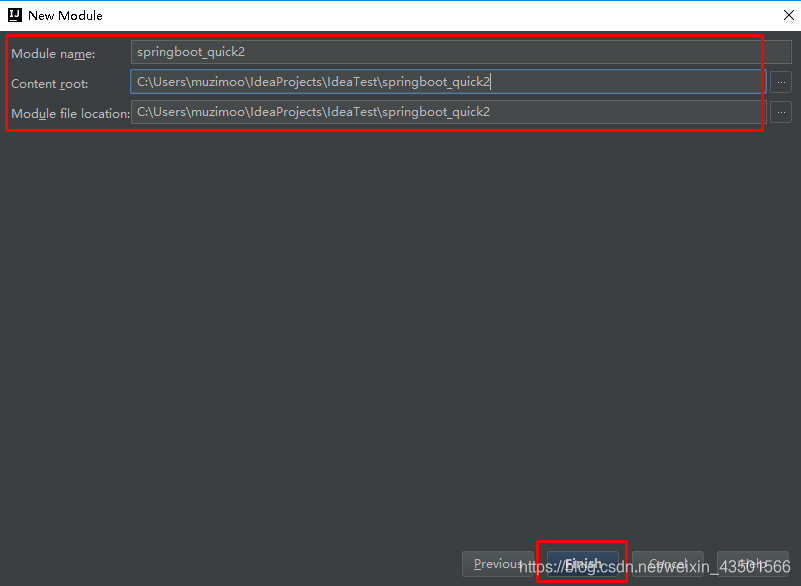
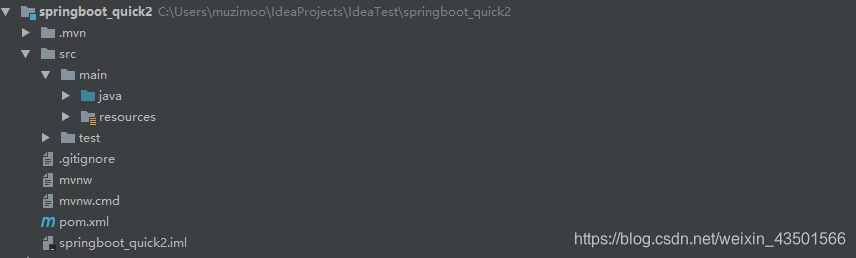
Spring是Java企业版(Java Enterprise Edition,JEE,也称J2EE)的轻量级代替品。无需开发重量级的Enterprise JavaBean(EJB),Spring为企业级Java开发提供了一种相对简单的方法,通过依赖注入和面向切面编程,用简单的Java对象(Plain Old Java Object,POJO)实现了EJB的功能。 1.1.2 Spring的缺点分析虽然Spring的组件代码是轻量级的,但它的配置却是重量级的。一开始,Spring用XML配置,而且是很多XML配置。Spring 2.5引入了基于注解的组件扫描,这消除了大量针对应用程序自身组件的显式XML配置。Spring 3.0引入了基于Java的配置,这是一种类型安全的可重构配置方式,可以代替XML。 所有这些配置都代表了开发时的损耗。因为在思考Spring特性配置和解决业务问题之间需要进行思维切换,所以编写配置挤占了编写应用程序逻辑的时间。和所有框架一样,Spring实用,但与此同时它要求的回报也不少。 除此之外,项目的依赖管理也是一件耗时耗力的事情。在环境搭建时,需要分析要导入哪些库的坐标,而且还需要分析导入与之有依赖关系的其他库的坐标,一旦选错了依赖的版本,随之而来的不兼容问题就会严重阻碍项目的开发进度。 1.2 SpringBoot的概述 1.2.1 SpringBoot解决上述Spring的缺点SpringBoot对上述Spring的缺点进行的改善和优化,基于约定优于配置的思想,可以让开发人员不必在配置与逻辑业务之间进行思维的切换,全身心的投入到逻辑业务的代码编写中,从而大大提高了开发的效率,一定程度上缩短了项目周期。 1.2.2 SpringBoot的特点 为基于Spring的开发提供更快的入门体验开箱即用,没有代码生成,也无需XML配置。同时也可以修改默认值来满足特定的需求提供了一些大型项目中常见的非功能性特性,如嵌入式服务器、安全、指标,健康检测、外部配置等SpringBoot不是对Spring功能上的增强,而是提供了一种快速使用Spring的方式 1.2.3 SpringBoot的核心功能起步依赖 起步依赖本质上是一个Maven项目对象模型(Project Object Model,POM),定义了对其他库的传递依赖,这些东西加在一起即支持某项功能。 简单的说,起步依赖就是将具备某种功能的坐标打包到一起,并提供一些默认的功能。 自动配置 Spring Boot的自动配置是一个运行时(更准确地说,是应用程序启动时)的过程,考虑了众多因素,才决定Spring配置应该用哪个,不该用哪个。该过程是Spring自动完成的。 注意:起步依赖和自动配置的原理剖析会在第三章《SpringBoot原理分析》进行详细讲解 二、SpringBoot快速入门 2.1 代码实现 2.1.1 创建Maven工程使用idea工具创建一个maven工程,该工程为普通的java工程即可
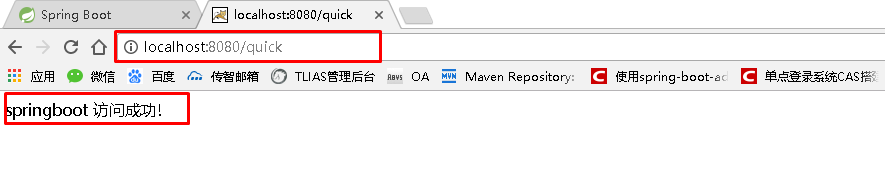
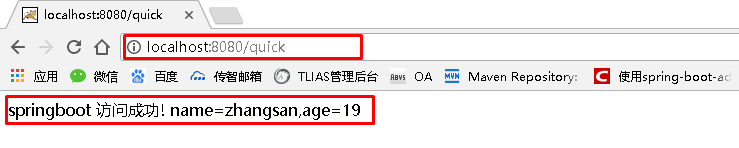
SpringBoot要求,项目要继承SpringBoot的起步依赖spring-boot-starter-parent org.springframework.boot spring-boot-starter-parent 2.0.1.RELEASESpringBoot要集成SpringMVC进行Controller的开发,所以项目要导入web的启动依赖 org.springframework.boot spring-boot-starter-web 2.1.3 编写SpringBoot引导类要通过SpringBoot提供的引导类起步SpringBoot才可以进行访问 package com.itheima; import org.springframework.boot.SpringApplication; import org.springframework.boot.autoconfigure.SpringBootApplication; @SpringBootApplication public class MySpringBootApplication { public static void main(String[] args) { SpringApplication.run(MySpringBootApplication.class); } } 2.1.4 编写Controller在引导类MySpringBootApplication同级包或者子级包中创建QuickStartController package com.itheima.controller; import org.springframework.stereotype.Controller; import org.springframework.web.bind.annotation.RequestMapping; import org.springframework.web.bind.annotation.ResponseBody; @Controller public class QuickStartController { @RequestMapping("/quick") @ResponseBody public String quick(){ return "springboot 访问成功!"; } } 2.1.5 测试执行SpringBoot起步类的主方法,控制台打印日志如下: . ____ _ __ _ _ /\\ / ___'_ __ _ _(_)_ __ __ _ \ \ \ \ ( ( )\___ | '_ | '_| | '_ \/ _` | \ \ \ \ \\/ ___)| |_)| | | | | || (_| | ) ) ) ) ' |____| .__|_| |_|_| |_\__, | / / / / =========|_|==============|___/=/_/_/_/ :: Spring Boot :: (v2.0.1.RELEASE) 2018-05-08 14:29:59.714 INFO 5672 --- [ main] com.itheima.MySpringBootApplication : Starting MySpringBootApplication on DESKTOP-RRUNFUH with PID 5672 (C:\Users\muzimoo\IdeaProjects\IdeaTest\springboot_quick\target\classes started by muzimoo in C:\Users\muzimoo\IdeaProjects\IdeaTest) ... ... ... o.s.w.s.handler.SimpleUrlHandlerMapping : Mapped URL path [/**] onto handler of type [class org.springframework.web.servlet.resource.ResourceHttpRequestHandler] 2018-05-08 14:30:03.126 INFO 5672 --- [ main] o.s.j.e.a.AnnotationMBeanExporter : Registering beans for JMX exposure on startup 2018-05-08 14:30:03.196 INFO 5672 --- [ main] o.s.b.w.embedded.tomcat.TomcatWebServer : Tomcat started on port(s): 8080 (http) with context path '' 2018-05-08 14:30:03.206 INFO 5672 --- [ main] com.itheima.MySpringBootApplication : Started MySpringBootApplication in 4.252 seconds (JVM running for 5.583)通过日志发现,Tomcat started on port(s): 8080 (http) with context path ‘’ tomcat已经起步,端口监听8080,web应用的虚拟工程名称为空 打开浏览器访问url地址为:http://localhost:8080/quick
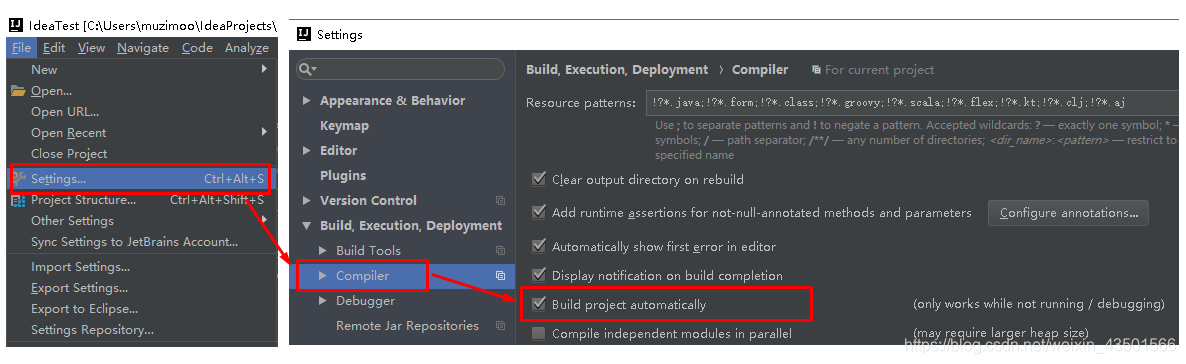
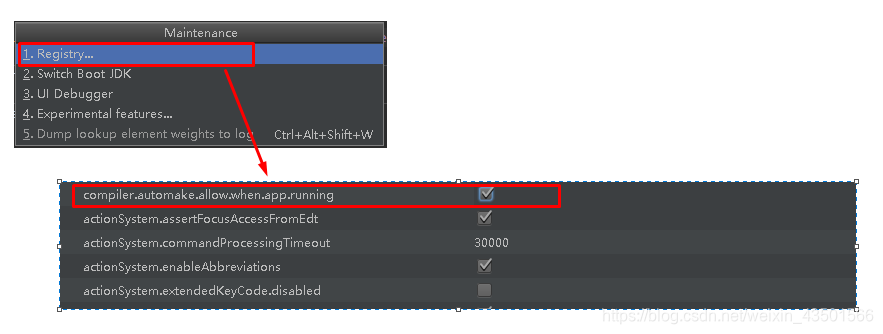
我们在开发中反复修改类、页面等资源,每次修改后都是需要重新启动才生效,这样每次启动都很麻烦,浪费了大量的时间,我们可以在修改代码后不重启就能生效,在 pom.xml 中添加如下配置就可以实现这样的功能,我们称之为热部署。 org.springframework.boot spring-boot-devtools注意:IDEA进行SpringBoot热部署失败原因 出现这种情况,并不是热部署配置问题,其根本原因是因为Intellij IEDA默认情况下不会自动编译,需要对IDEA进行自动编译的设置,如下:
然后 Shift+Ctrl+Alt+/,选择Registry
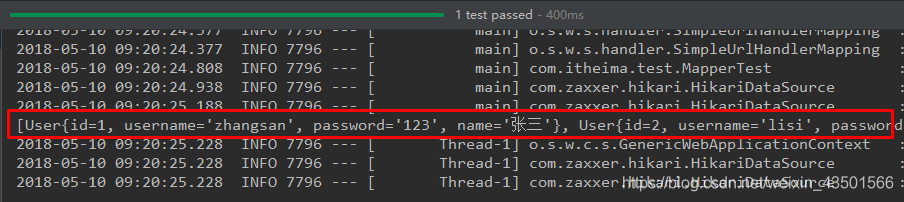
通过idea快速创建的SpringBoot项目的pom.xml中已经导入了我们选择的web的起步依赖的坐标 4.0.0 com.itheima springboot_quick2 0.0.1-SNAPSHOT jar springboot_quick2 Demo project for Spring Boot org.springframework.boot spring-boot-starter-parent 2.0.1.RELEASE UTF-8 UTF-8 9 org.springframework.boot spring-boot-starter-web org.springframework.boot spring-boot-starter-test test org.springframework.boot spring-boot-maven-plugin可以使用快速入门的方式创建Controller进行访问,此处不再赘述 三、SpringBoot原理分析 3.1 起步依赖原理分析 3.1.1 分析spring-boot-starter-parent按住Ctrl点击pom.xml中的spring-boot-starter-parent,跳转到了spring-boot-starter-parent的pom.xml,xml配置如下(只摘抄了部分重点配置): org.springframework.boot spring-boot-dependencies 2.0.1.RELEASE ../../spring-boot-dependencies按住Ctrl点击pom.xml中的spring-boot-starter-dependencies,跳转到了spring-boot-starter-dependencies的pom.xml,xml配置如下(只摘抄了部分重点配置): 5.15.3 2.7.7 1.9.63 2.4.0 1.8.13 3.9.1 4.0.6 2.1.4 3.0.0 1.7.11 ... ... ... org.springframework.boot spring-boot 2.0.1.RELEASE org.springframework.boot spring-boot-test 2.0.1.RELEASE ... ... ... org.jetbrains.kotlin kotlin-maven-plugin ${kotlin.version} org.jooq jooq-codegen-maven ${jooq.version} org.springframework.boot spring-boot-maven-plugin 2.0.1.RELEASE ... ... ...从上面的spring-boot-starter-dependencies的pom.xml中我们可以发现,一部分坐标的版本、依赖管理、插件管理已经定义好,所以我们的SpringBoot工程继承spring-boot-starter-parent后已经具备版本锁定等配置了。所以起步依赖的作用就是进行依赖的传递。 3.1.2 分析spring-boot-starter-web按住Ctrl点击pom.xml中的spring-boot-starter-web,跳转到了spring-boot-starter-web的pom.xml,xml配置如下(只摘抄了部分重点配置): 4.0.0 org.springframework.boot spring-boot-starters 2.0.1.RELEASE org.springframework.boot spring-boot-starter-web 2.0.1.RELEASE Spring Boot Web Starter org.springframework.boot spring-boot-starter 2.0.1.RELEASE compile org.springframework.boot spring-boot-starter-json 2.0.1.RELEASE compile org.springframework.boot spring-boot-starter-tomcat 2.0.1.RELEASE compile org.hibernate.validator hibernate-validator 6.0.9.Final compile org.springframework spring-web 5.0.5.RELEASE compile org.springframework spring-webmvc 5.0.5.RELEASE compile从上面的spring-boot-starter-web的pom.xml中我们可以发现,spring-boot-starter-web就是将web开发要使用的spring-web、spring-webmvc等坐标进行了“打包”,这样我们的工程只要引入spring-boot-starter-web起步依赖的坐标就可以进行web开发了,同样体现了依赖传递的作用。 3.2 自动配置原理解析按住Ctrl点击查看启动类MySpringBootApplication上的注解@SpringBootApplication @SpringBootApplication public class MySpringBootApplication { public static void main(String[] args) { SpringApplication.run(MySpringBootApplication.class); } }注解@SpringBootApplication的源码 @Target(ElementType.TYPE) @Retention(RetentionPolicy.RUNTIME) @Documented @Inherited @SpringBootConfiguration @EnableAutoConfiguration @ComponentScan(excludeFilters = { @Filter(type = FilterType.CUSTOM, classes = TypeExcludeFilter.class), @Filter(type = FilterType.CUSTOM, classes = AutoConfigurationExcludeFilter.class) }) public @interface SpringBootApplication { /** * Exclude specific auto-configuration classes such that they will never be applied. * @return the classes to exclude */ @AliasFor(annotation = EnableAutoConfiguration.class) Class[] exclude() default {}; ... ... ... }其中, @SpringBootConfiguration:等同与@Configuration,既标注该类是Spring的一个配置类 @EnableAutoConfiguration:SpringBoot自动配置功能开启 按住Ctrl点击查看注解@EnableAutoConfiguration @Target(ElementType.TYPE) @Retention(RetentionPolicy.RUNTIME) @Documented @Inherited @AutoConfigurationPackage @Import(AutoConfigurationImportSelector.class) public @interface EnableAutoConfiguration { ... ... ... }其中,@Import(AutoConfigurationImportSelector.class) 导入了AutoConfigurationImportSelector类 按住Ctrl点击查看AutoConfigurationImportSelector源码 public String[] selectImports(AnnotationMetadata annotationMetadata) { ... ... ... List configurations = getCandidateConfigurations(annotationMetadata, attributes); configurations = removeDuplicates(configurations); Set exclusions = getExclusions(annotationMetadata, attributes); checkExcludedClasses(configurations, exclusions); configurations.removeAll(exclusions); configurations = filter(configurations, autoConfigurationMetadata); fireAutoConfigurationImportEvents(configurations, exclusions); return StringUtils.toStringArray(configurations); } protected List getCandidateConfigurations(AnnotationMetadata metadata, AnnotationAttributes attributes) { List configurations = SpringFactoriesLoader.loadFactoryNames( getSpringFactoriesLoaderFactoryClass(), getBeanClassLoader()); return configurations; }其中,SpringFactoriesLoader.loadFactoryNames 方法的作用就是从META-INF/spring.factories文件中读取指定类对应的类名称列表 [外链图片转存失败,源站可能有防盗链机制,建议将图片保存下来直接上传(img-Au2l6F2W-1596349973387)(img\11.png)] spring.factories 文件中有关自动配置的配置信息如下: ... ... ... org.springframework.boot.autoconfigure.web.reactive.function.client.WebClientAutoConfiguration,\ org.springframework.boot.autoconfigure.web.servlet.DispatcherServletAutoConfiguration,\ org.springframework.boot.autoconfigure.web.servlet.ServletWebServerFactoryAutoConfiguration,\ org.springframework.boot.autoconfigure.web.servlet.error.ErrorMvcAutoConfiguration,\ org.springframework.boot.autoconfigure.web.servlet.HttpEncodingAutoConfiguration,\ org.springframework.boot.autoconfigure.web.servlet.MultipartAutoConfiguration,\ ... ... ...上面配置文件存在大量的以Configuration为结尾的类名称,这些类就是存有自动配置信息的类,而SpringApplication在获取这些类名后再加载 我们以ServletWebServerFactoryAutoConfiguration为例来分析源码: @Configuration @AutoConfigureOrder(Ordered.HIGHEST_PRECEDENCE) @ConditionalOnClass(ServletRequest.class) @ConditionalOnWebApplication(type = Type.SERVLET) @EnableConfigurationProperties(ServerProperties.class) @Import({ ServletWebServerFactoryAutoConfiguration.BeanPostProcessorsRegistrar.class, ServletWebServerFactoryConfiguration.EmbeddedTomcat.class, ServletWebServerFactoryConfiguration.EmbeddedJetty.class, ServletWebServerFactoryConfiguration.EmbeddedUndertow.class }) public class ServletWebServerFactoryAutoConfiguration { ... ... ... }其中, @EnableConfigurationProperties(ServerProperties.class) 代表加载ServerProperties服务器配置属性类 进入ServerProperties.class源码如下: @ConfigurationProperties(prefix = "server", ignoreUnknownFields = true) public class ServerProperties { /** * Server HTTP port. */ private Integer port; /** * Network address to which the server should bind. */ private InetAddress address; ... ... ... }其中, prefix = “server” 表示SpringBoot配置文件中的前缀,SpringBoot会将配置文件中以server开始的属性映射到该类的字段中。映射关系如下: [外链图片转存失败,源站可能有防盗链机制,建议将图片保存下来直接上传(img-pGpFulQ9-1596349973388)(img\12.png)] 四、SpringBoot的配置文件 4.1 SpringBoot配置文件类型 4.1.1 SpringBoot配置文件类型和作用SpringBoot是基于约定的,所以很多配置都有默认值,但如果想使用自己的配置替换默认配置的话,就可以使用application.properties或者application.yml(application.yaml)进行配置。 SpringBoot默认会从Resources目录下加载application.properties或application.yml(application.yaml)文件 其中,application.properties文件是键值对类型的文件,之前一直在使用,所以此处不在对properties文件的格式进行阐述。除了properties文件外,SpringBoot还可以使用yml文件进行配置,下面对yml文件进行讲解。 4.1.2 application.yml配置文件 4.1.2.1 yml配置文件简介YML文件格式是YAML (YAML Aint Markup Language)编写的文件格式,YAML是一种直观的能够被电脑识别的的数据数据序列化格式,并且容易被人类阅读,容易和脚本语言交互的,可以被支持YAML库的不同的编程语言程序导入,比如: C/C++, Ruby, Python, Java, Perl, C#, PHP等。YML文件是以数据为核心的,比传统的xml方式更加简洁。 YML文件的扩展名可以使用.yml或者.yaml。 4.1.2.2 yml配置文件的语法 4.1.2.2.1 配置普通数据语法: key: value 示例代码: name: haohao注意:value之前有一个空格 4.1.2.2.2 配置对象数据语法: key: key1: value1 key2: value2 或者: key: {key1: value1,key2: value2} 示例代码: person: name: haohao age: 31 addr: beijing #或者 person: {name: haohao,age: 31,addr: beijing}注意:key1前面的空格个数不限定,在yml语法中,相同缩进代表同一个级别 4.1.2.2.2 配置Map数据同上面的对象写法 4.1.2.2.3 配置数组(List、Set)数据语法: key: - value1 - value2 或者: key: [value1,value2] 示例代码: city: - beijing - tianjin - shanghai - chongqing #或者 city: [beijing,tianjin,shanghai,chongqing] #集合中的元素是对象形式 student: - name: zhangsan age: 18 score: 100 - name: lisi age: 28 score: 88 - name: wangwu age: 38 score: 90注意:value1与之间的 - 之间存在一个空格 4.1.3 SpringBoot配置信息的查询上面提及过,SpringBoot的配置文件,主要的目的就是对配置信息进行修改的,但在配置时的key从哪里去查询呢?我们可以查阅SpringBoot的官方文档 文档URL:https://docs.spring.io/spring-boot/docs/2.0.1.RELEASE/reference/htmlsingle/#common-application-properties 常用的配置摘抄如下: # QUARTZ SCHEDULER (QuartzProperties) spring.quartz.jdbc.initialize-schema=embedded # Database schema initialization mode. spring.quartz.jdbc.schema=classpath:org/quartz/impl/jdbcjobstore/tables_@@platform@@.sql # Path to the SQL file to use to initialize the database schema. spring.quartz.job-store-type=memory # Quartz job store type. spring.quartz.properties.*= # Additional Quartz Scheduler properties. # ---------------------------------------- # WEB PROPERTIES # ---------------------------------------- # EMBEDDED SERVER CONFIGURATION (ServerProperties) server.port=8080 # Server HTTP port. server.servlet.context-path= # Context path of the application. server.servlet.path=/ # Path of the main dispatcher servlet. # HTTP encoding (HttpEncodingProperties) spring.http.encoding.charset=UTF-8 # Charset of HTTP requests and responses. Added to the "Content-Type" header if not set explicitly. # JACKSON (JacksonProperties) spring.jackson.date-format= # Date format string or a fully-qualified date format class name. For instance, `yyyy-MM-dd HH:mm:ss`. # SPRING MVC (WebMvcProperties) spring.mvc.servlet.load-on-startup=-1 # Load on startup priority of the dispatcher servlet. spring.mvc.static-path-pattern=/** # Path pattern used for static resources. spring.mvc.view.prefix= # Spring MVC view prefix. spring.mvc.view.suffix= # Spring MVC view suffix. # DATASOURCE (DataSourceAutoConfiguration & DataSourceProperties) spring.datasource.driver-class-name= # Fully qualified name of the JDBC driver. Auto-detected based on the URL by default. spring.datasource.password= # Login password of the database. spring.datasource.url= # JDBC URL of the database. spring.datasource.username= # Login username of the database. # JEST (Elasticsearch HTTP client) (JestProperties) spring.elasticsearch.jest.password= # Login password. spring.elasticsearch.jest.proxy.host= # Proxy host the HTTP client should use. spring.elasticsearch.jest.proxy.port= # Proxy port the HTTP client should use. spring.elasticsearch.jest.read-timeout=3s # Read timeout. spring.elasticsearch.jest.username= # Login username.我们可以通过配置application.poperties 或者 application.yml 来修改SpringBoot的默认配置 例如: application.properties文件 server.port=8888 server.servlet.context-path=demoapplication.yml文件 server: port: 8888 servlet: context-path: /demo 4.2 配置文件与配置类的属性映射方式 4.2.1 使用注解@Value映射我们可以通过@Value注解将配置文件中的值映射到一个Spring管理的Bean的字段上 例如: application.properties配置如下: person: name: zhangsan age: 18或者,application.yml配置如下: person: name: zhangsan age: 18实体Bean代码如下: @Controller public class QuickStartController { @Value("${person.name}") private String name; @Value("${person.age}") private Integer age; @RequestMapping("/quick") @ResponseBody public String quick(){ return "springboot 访问成功! name="+name+",age="+age; } }浏览器访问地址:http://localhost:8080/quick 结果如下: 通过注解@ConfigurationProperties(prefix=“配置文件中的key的前缀”)可以将配置文件中的配置自动与实体进行映射 application.properties配置如下: person: name: zhangsan age: 18或者,application.yml配置如下: person: name: zhangsan age: 18实体Bean代码如下: @Controller @ConfigurationProperties(prefix = "person") public class QuickStartController { private String name; private Integer age; @RequestMapping("/quick") @ResponseBody public String quick(){ return "springboot 访问成功! name="+name+",age="+age; } public void setName(String name) { this.name = name; } public void setAge(Integer age) { this.age = age; } }浏览器访问地址:http://localhost:8080/quick 结果如下 注意:使用@ConfigurationProperties方式可以进行配置文件与实体字段的自动映射,但需要字段必须提供set方法才可以,而使用@Value注解修饰的字段不需要提供set方法 五、SpringBoot与整合其他技术 5.1 SpringBoot整合Mybatis 5.1.1 添加Mybatis的起步依赖 org.mybatis.spring.boot mybatis-spring-boot-starter 1.1.1 5.1.2 添加数据库驱动坐标 mysql mysql-connector-java 5.1.3 添加数据库连接信息在application.properties中添加数据量的连接信息 #DB Configuration: spring.datasource.driverClassName=com.mysql.jdbc.Driver spring.datasource.url=jdbc:mysql://127.0.0.1:3306/test?useUnicode=true&characterEncoding=utf8 spring.datasource.username=root spring.datasource.password=root 5.1.4 创建user表在test数据库中创建user表 -- ---------------------------- -- Table structure for `user` -- ---------------------------- DROP TABLE IF EXISTS `user`; CREATE TABLE `user` ( `id` int(11) NOT NULL AUTO_INCREMENT, `username` varchar(50) DEFAULT NULL, `password` varchar(50) DEFAULT NULL, `name` varchar(50) DEFAULT NULL, PRIMARY KEY (`id`) ) ENGINE=InnoDB AUTO_INCREMENT=10 DEFAULT CHARSET=utf8; -- ---------------------------- -- Records of user -- ---------------------------- INSERT INTO `user` VALUES ('1', 'zhangsan', '123', '张三'); INSERT INTO `user` VALUES ('2', 'lisi', '123', '李四'); 5.1.5 创建实体Bean public class User { // 主键 private Long id; // 用户名 private String username; // 密码 private String password; // 姓名 private String name; //此处省略getter和setter方法 .. .. } 5.1.6 编写Mapper @Mapper public interface UserMapper { public List queryUserList(); }注意:@Mapper标记该类是一个mybatis的mapper接口,可以被spring boot自动扫描到spring上下文中 5.1.7 配置Mapper映射文件在src\main\resources\mapper路径下加入UserMapper.xml配置文件" select * from user 5.1.8 在application.properties中添加mybatis的信息 #spring集成Mybatis环境 #pojo别名扫描包 mybatis.type-aliases-package=com.itheima.domain #加载Mybatis映射文件 mybatis.mapper-locations=classpath:mapper/*Mapper.xml 5.1.9 编写测试Controller @Controller public class MapperController { @Autowired private UserMapper userMapper; @RequestMapping("/queryUser") @ResponseBody public List queryUser(){ List users = userMapper.queryUserList(); return users; } } 5.1.10 测试
其中, SpringRunner继承自SpringJUnit4ClassRunner,使用哪一个Spring提供的测试测试引擎都可以 public final class SpringRunner extends SpringJUnit4ClassRunner@SpringBootTest的属性指定的是引导类的字节码对象 5.2.3 控制台打印信息
注意:如果是jdk9,执行报错如下:
原因:jdk缺少相应的jar 解决方案:手动导入对应的maven坐标,如下: javax.xml.bind jaxb-api 2.3.0 5.4 SpringBoot整合Redis 5.4.1 添加redis的起步依赖 org.springframework.boot spring-boot-starter-data-redis 5.4.2 配置redis的连接信息 #Redis spring.redis.host=127.0.0.1 spring.redis.port=6379 5.4.3 注入RedisTemplate测试redis操作 @RunWith(SpringRunner.class) @SpringBootTest(classes = SpringbootJpaApplication.class) public class RedisTest { @Autowired private UserRepository userRepository; @Autowired private RedisTemplate redisTemplate; @Test public void test() throws JsonProcessingException { //从redis缓存中获得指定的数据 String userListData = redisTemplate.boundValueOps("user.findAll").get(); //如果redis中没有数据的话 if(null==userListData){ //查询数据库获得数据 List all = userRepository.findAll(); //转换成json格式字符串 ObjectMapper om = new ObjectMapper(); userListData = om.writeValueAsString(all); //将数据存储到redis中,下次在查询直接从redis中获得数据,不用在查询数据库 redisTemplate.boundValueOps("user.findAll").set(userListData); System.out.println("===============从数据库获得数据==============="); }else{ System.out.println("===============从redis缓存中获得数据==============="); } System.out.println(userListData); } } |


【本文地址】