| SpringBoot启动流程和自动配置(超级详细) | 您所在的位置:网站首页 › springboot启动过程如何自动配置 › SpringBoot启动流程和自动配置(超级详细) |
SpringBoot启动流程和自动配置(超级详细)
|
一,启动流程
如下是Springboot的启动入口 @SpringBootApplication public class SpringApplication { public static void main(String[] args) { SpringApplication.run(SpringApplication.class, args); } }点击进入.run()方法会看到如下步骤: 点击查看new SpringApplication方法: 这里重点看这个方法:SpringFactoriesLoader.loadFactoryNames():
接下来对以上ru()中的几个重点方法进行探究: 1. getRunListeners():获取监听器和new SpringApplication时一样 private SpringApplicationRunListeners getRunListeners(String[] args) { Class[] types = new Class[] { SpringApplication.class, String[].class }; return new SpringApplicationRunListeners(logger, getSpringFactoriesInstances( SpringApplicationRunListener.class, types, this, args)); } private Collection getSpringFactoriesInstances(Class type) { return getSpringFactoriesInstances(type, new Class[] {}); } private Collection getSpringFactoriesInstances(Class type, Class[] parameterTypes, Object... args) { ClassLoader classLoader = getClassLoader(); // Use names and ensure unique to protect against duplicates Set names = new LinkedHashSet( SpringFactoriesLoader.loadFactoryNames(type, classLoader)); List instances = createSpringFactoriesInstances(type, parameterTypes, classLoader, args, names); AnnotationAwareOrderComparator.sort(instances); return instances; }2. 准备环境: /** * 创建并配置SpringBooty应用j将要使用的Environment * * @param listeners * @param bootstrapContext * @param applicationArguments * @return */ private ConfigurableEnvironment prepareEnvironment(SpringApplicationRunListeners listeners, DefaultBootstrapContext bootstrapContext, ApplicationArguments applicationArguments) { // 根据不同的web类型创建不同实现的Environment对象 ConfigurableEnvironment environment = getOrCreateEnvironment(); // 配置环境 configureEnvironment(environment, applicationArguments.getSourceArgs()); ConfigurationPropertySources.attach(environment); // 发送环境已准备完成事件 listeners.environmentPrepared(bootstrapContext, environment); DefaultPropertiesPropertySource.moveToEnd(environment); // 根据命令行参数中spring.profiles.active属性配置Environment对象中的activeProfile(比如dev、prod、test) configureAdditionalProfiles(environment); // 绑定环境中spring.main属性绑定到SpringApplication对象中 bindToSpringApplication(environment); // 如果用户使用spring.main.web-application-type属性手动设置了webApplicationType if (!this.isCustomEnvironment) { // 将环境对象转换成用户设置的webApplicationType相关类型,他们是继承同一个父类,直接强转 environment = new EnvironmentConverter(getClassLoader()).convertEnvironmentIfNecessary(environment, deduceEnvironmentClass()); } ConfigurationPropertySources.attach(environment); return environment; }3. spring前置处理器: /** * Spring容器准备 */ private void prepareContext(DefaultBootstrapContext bootstrapContext, ConfigurableApplicationContext context, ConfigurableEnvironment environment, SpringApplicationRunListeners listeners, ApplicationArguments applicationArguments, Banner printedBanner) { // 设置上下文环境 context.setEnvironment(environment); postProcessApplicationContext(context); // 执行所有ApplicationContextInitializer对象的initialize方法(这些对象是通过读取spring.factories加载) applyInitializers(context); // 发布上下文准备完成事件到所有监听器 listeners.contextPrepared(context); bootstrapContext.close(context); if (this.logStartupInfo) { logStartupInfo(context.getParent() == null); logStartupProfileInfo(context); } ConfigurableListableBeanFactory beanFactory = context.getBeanFactory(); beanFactory.registerSingleton("springApplicationArguments", applicationArguments); if (printedBanner != null) { beanFactory.registerSingleton("springBootBanner", printedBanner); } if (beanFactory instanceof DefaultListableBeanFactory) { ((DefaultListableBeanFactory) beanFactory) .setAllowBeanDefinitionOverriding(this.allowBeanDefinitionOverriding); } if (this.lazyInitialization) { context.addBeanFactoryPostProcessor(new LazyInitializationBeanFactoryPostProcessor()); } // Load the sources Set sources = getAllSources(); Assert.notEmpty(sources, "Sources must not be empty"); // 加载bean到上下文 load(context, sources.toArray(new Object[0])); // 发送上下文加载完成事件 listeners.contextLoaded(context); }4. 刷新上下文: /** * 刷新应用程序上下文 * @param context */ private void refreshContext(ConfigurableApplicationContext context) { // 注册一个关闭钩子,在jvm停止时会触发,然后退出时执行一定的退出逻辑 if (this.registerShutdownHook) { try { // 添加:Runtime.getRuntime().addShutdownHook() // 移除:Runtime.getRuntime().removeShutdownHook(this.shutdownHook) context.registerShutdownHook(); } catch (AccessControlException ex) { // Not allowed in some environments. } } // ApplicationContext真正开始初始化容器和创建bean的阶段 refresh((ApplicationContext) context); } protected void refresh(ApplicationContext applicationContext) { Assert.isInstanceOf(AbstractApplicationContext.class, applicationContext); ((AbstractApplicationContext) applicationContext).refresh(); }接下来主要看上述的refresh()方法: 这个refresh是抽象类AbstractApplicationContext中的方法,而AbstractApplicationContext则是Spring中初刷新上下文的方法来自org.springframework.context.support.AbstractApplicationContext: @Override public void refresh() throws BeansException, IllegalStateException { synchronized (this.startupShutdownMonitor) { StartupStep contextRefresh = this.applicationStartup.start("spring.context.refresh"); // 第一步:准备更新上下时的预备工作 prepareRefresh(); // 第二步:获取上下文内部BeanFactory ConfigurableListableBeanFactory beanFactory = obtainFreshBeanFactory(); // 第三步:对BeanFactory做预备工作 prepareBeanFactory(beanFactory); try { // 第四步:允许在上下文子类中对bean工厂进行post-processing postProcessBeanFactory(beanFactory); StartupStep beanPostProcess = this.applicationStartup.start("spring.context.beans.post-process"); // 第五步:调用上下文中注册为bean的工厂 BeanFactoryPostProcessor invokeBeanFactoryPostProcessors(beanFactory); // 第六步:注册拦截bean创建的拦截器 registerBeanPostProcessors(beanFactory); beanPostProcess.end(); // 第七步:初始化MessageSource(国际化相关) initMessageSource(); // 第八步:初始化容器事件广播器(用来发布事件) initApplicationEventMulticaster(); // 第九步:初始化一些特殊的bean onRefresh(); // 第十步:将所有监听器注册到前两步创建的事件广播器中 registerListeners(); // 第十一步:结束bean的初始化工作(主要将所有单例BeanDefinition实例化) finishBeanFactoryInitialization(beanFactory); // 第十二步:afterRefresh(上下文刷新完毕,发布相应事件) finishRefresh(); } catch (BeansException ex) { if (logger.isWarnEnabled()) { logger.warn("Exception encountered during context initialization - " + "cancelling refresh attempt: " + ex); } // Destroy already created singletons to avoid dangling resources. destroyBeans(); // Reset 'active' flag. cancelRefresh(ex); // Propagate exception to caller. throw ex; } finally { // Reset common introspection caches in Spring's core, since we // might not ever need metadata for singleton beans anymore... resetCommonCaches(); contextRefresh.end(); } } }其中,我们这里是servlet应用,所以实现类是ServletWebServerApplicationContext,我们看下这个类refresh()的代码: @Override public final void refresh() throws BeansException, IllegalStateException { try { super.refresh(); } catch (RuntimeException ex) { WebServer webServer = this.webServer; if (webServer != null) { webServer.stop(); } throw ex; } }5. 后置处理器:是一个空方法 protected void afterRefresh(ConfigurableApplicationContext context, ApplicationArguments args) { } 二,自动配置SpringBoot的自动装配是依靠@SpringBootApplication来完成的:
@SpringBootConfiguration: 本质是他是一个@Configuration,一个JavaConfig配置类:
@AutoConfigurationPackage :自动配置包 @Import({Registrar.class}) public @interface AutoConfigurationPackage { }@import :Spring底层注解@import , 给容器中导入一个组件 Registrar.class 作用:将主启动类的所在包及包下面所有子包里面的所有组件扫描到Spring容器 ; @Import({AutoConfigurationImportSelector.class}) :给容器导入组件 ; AutoConfigurationImportSelector:自动配置导入选择器 这个类的**selectImports()**方法最终调用了SpringFactoriesLoader.loadFactoryNames()方法,从classpath中搜寻所有的META-INF/spring.factories配置文件并加载到了IOC容器中; 总结: Spring Boot启动的时候会通过@EnableAutoConfiguration注解找到META-INF/spring.factories配置文件中的所有自动配置类,并对其进行加载,而这些自动配置类都是以AutoConfiguration结尾来命名的,它实际上就是一个JavaConfig形式的Spring容器配置类,它能通过以Properties结尾命名的类中取得在全局配置文件中配置的属性如:server.port,而XxxxProperties类是通过@ConfigurationProperties注解与全局配置文件中对应的属性进行绑定的。 借用一张图总结: |
 目前看到启动的步骤分为了两步:new SpringApplication(primarySources)和run(args),我们称之为创建SpringApplication对象和执行run方法。下面分别进行探究,先上一张网上找到的详细的图:
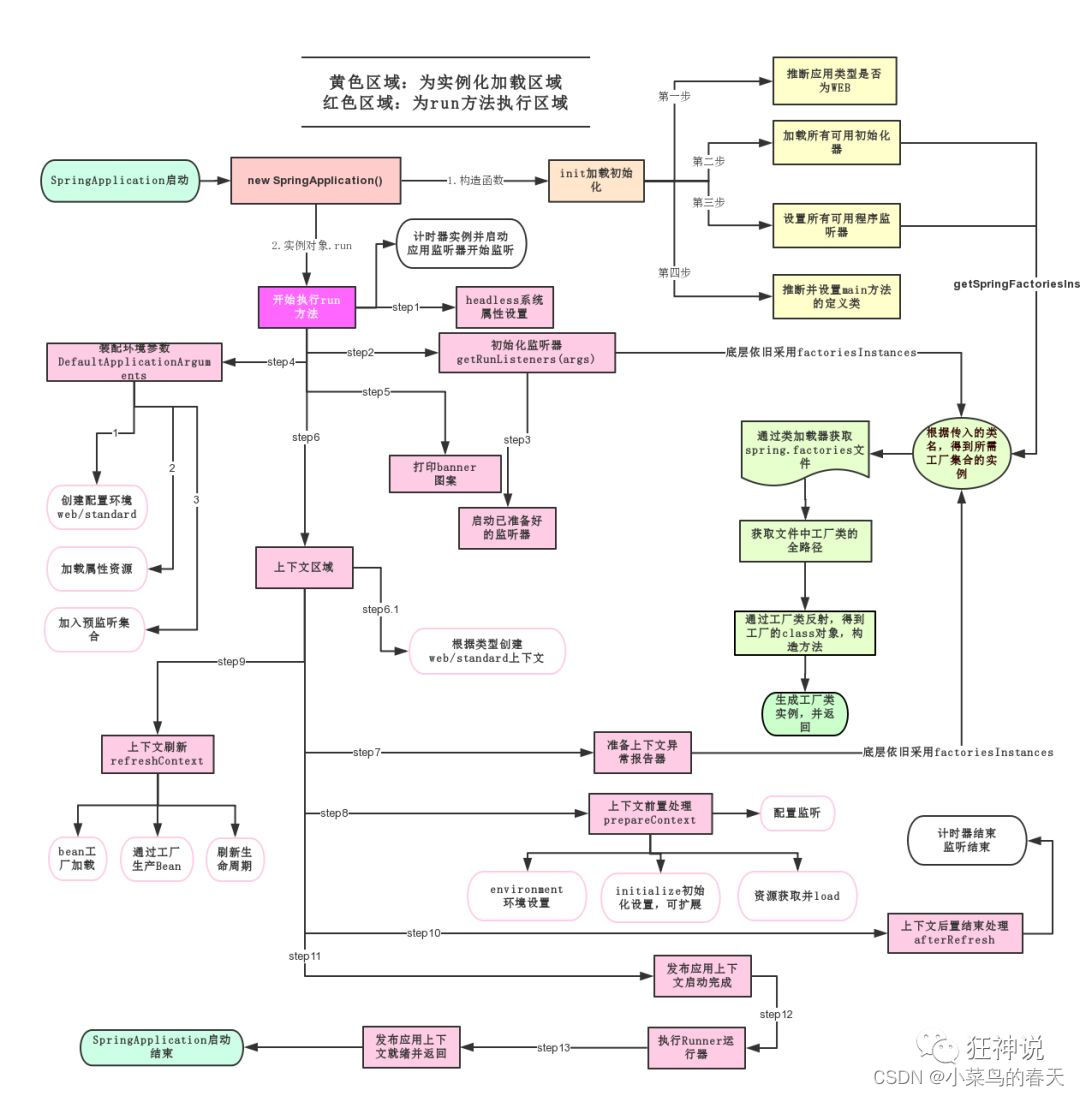 上图较为详细的描述了两个步骤的具体行为,为了加强理解,我们结合代码再次学习:
 这里重点关注两个方法:setInitializers()和setListeners(),这两个方法参数里面都有一个共同的方法:getSpringFactoriesInstances(),Spring就是通过这个方法发读取配置信息的。
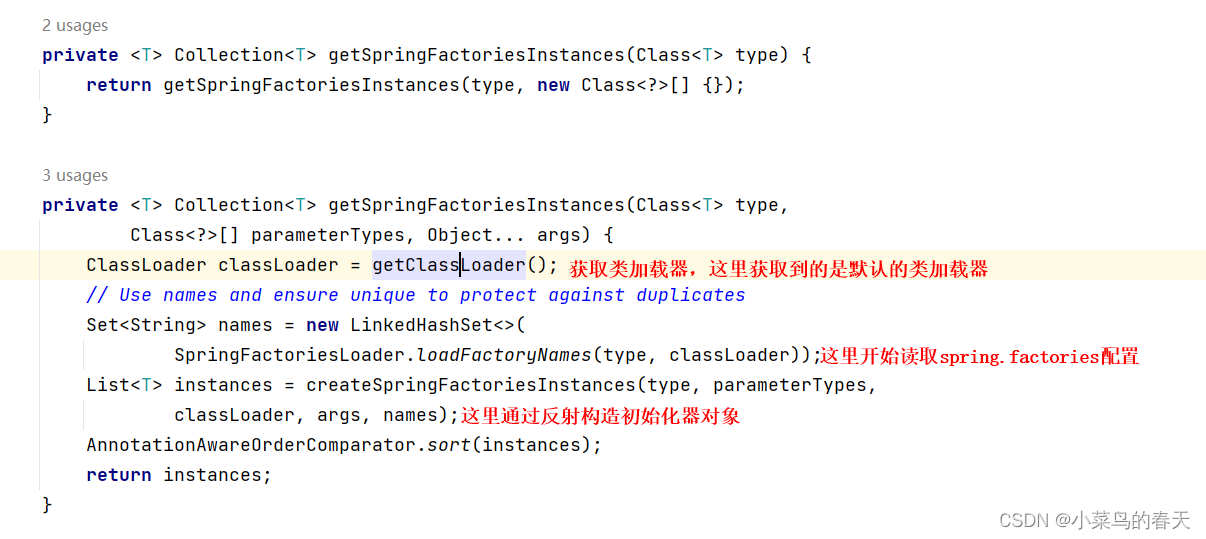
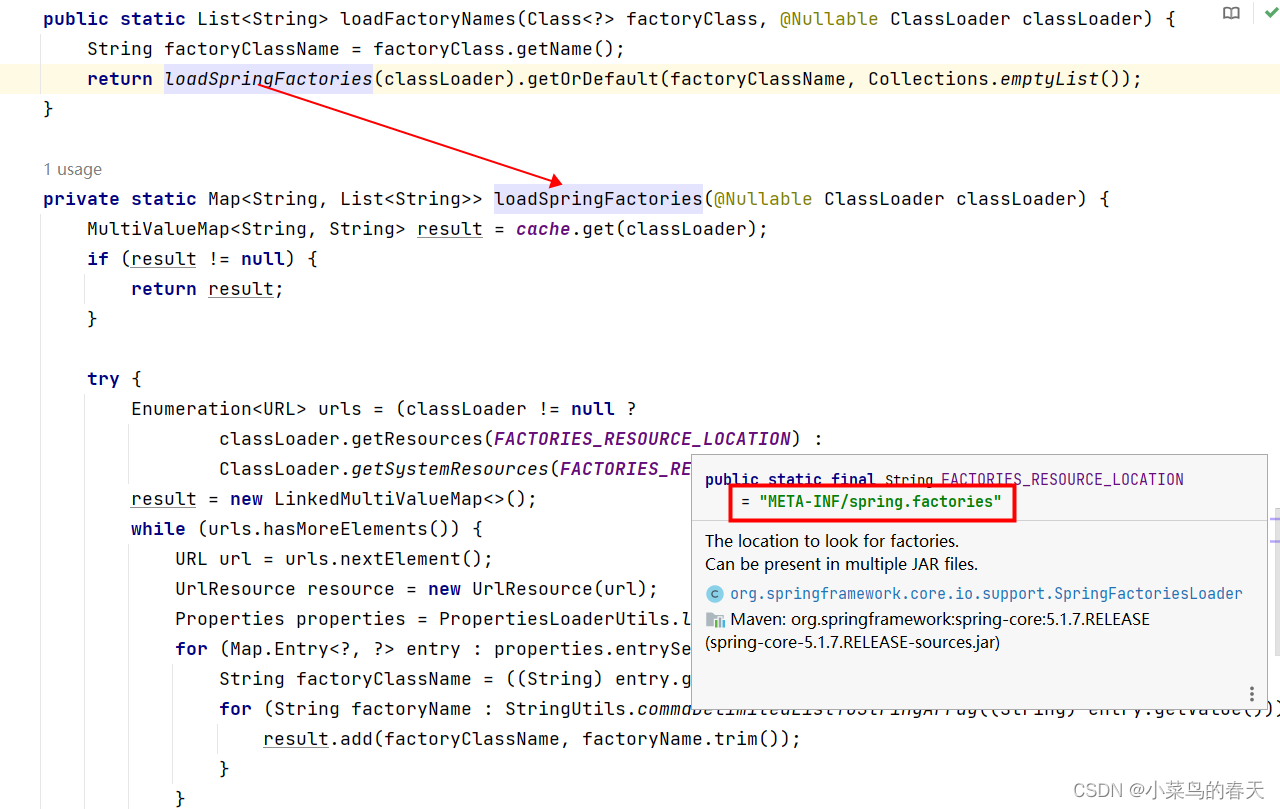 这里加载的是项目下面所有的jar里面的spring.factories而不是当前jar里面的。以下是读取到的内容:
  然后会在getOrDefault方法中根据factoryClassName的值(org.springframework.context.ApplicationContextInitializer)在以上读取到的所有的配置信息中获取到org.springframework.context.ApplicationContextInitializer:
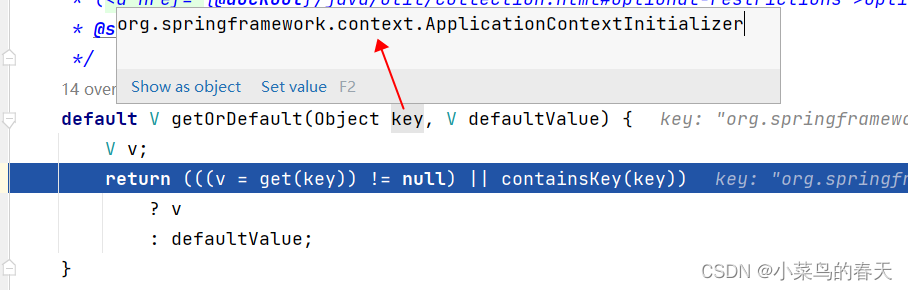
 setListeners()中的步骤和setInitializers()中的步骤一样,不过传的参数不一样,为ApplicationLister,这里不做赘述。
 @SpringBootApplication中有包含了三个注解@SpringBootConfiguration,@EnableAutoConfiguration,@ComponentScan
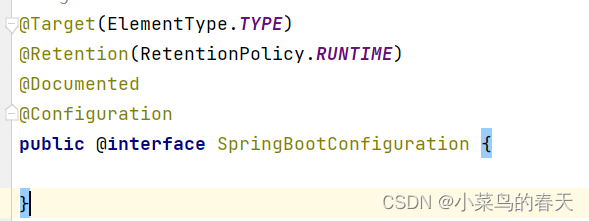 那我们使用JavaConfig不就是用来配置bean吗,所以有了这个注解之后我们可以在SpringBoot运行的主类中使用@Bean标签配置类了,如下图所示:
 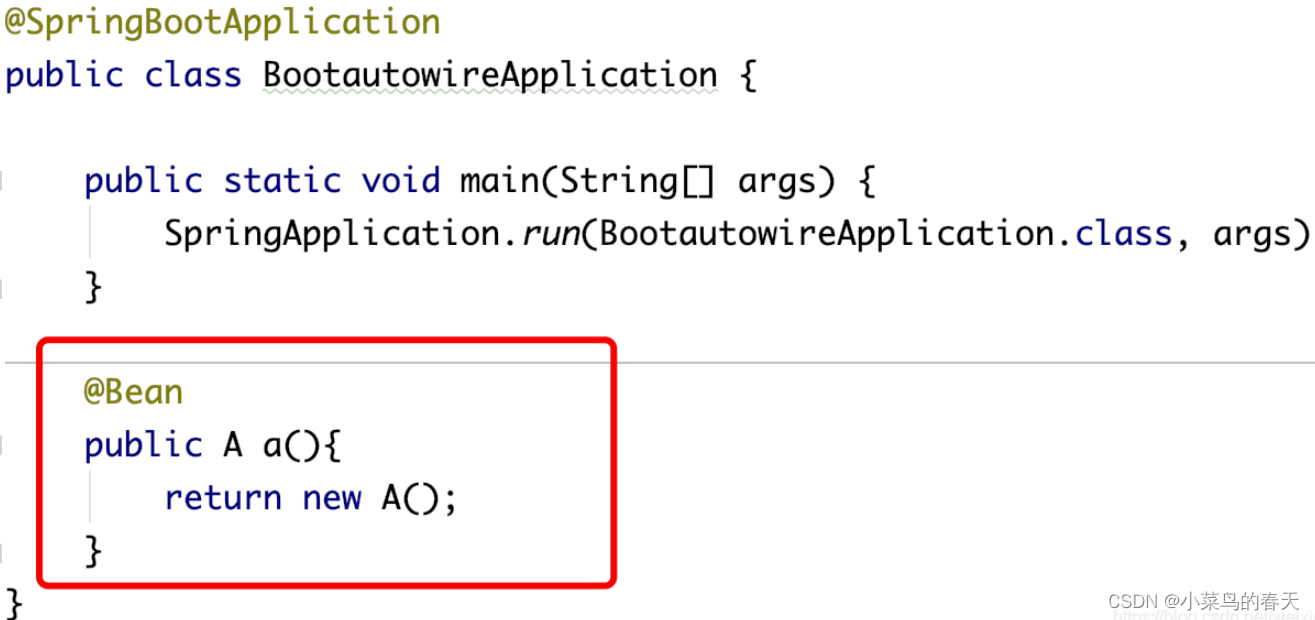 @ComponentScan: 这个注解是为了开启组件扫描,自动扫描并加载符合条件的组件或者bean , 将这个bean定义加载到IOC容器中。扫描的范围是:SpringBoot主启动类的同级路径及子路径
 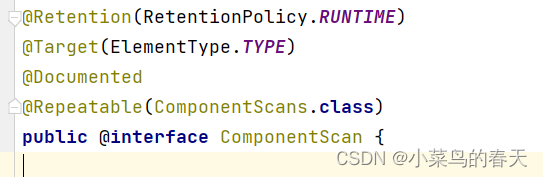 核心注解:@EnableAutoConfiguration 作用:开启自动配置功能
 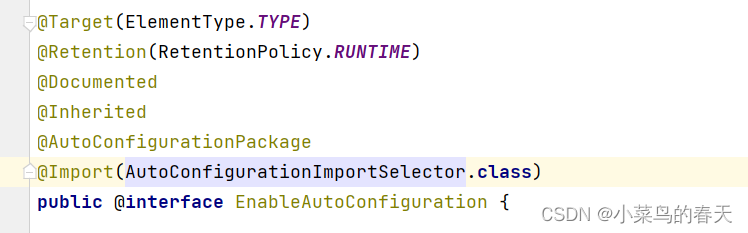 其中包含两个重要的注解:
【本文地址】