| 如何在 Eclipse IDE 中使用web.xml创建和运行 Servlet | 您所在的位置:网站首页 › servers在eclipse什么地方 › 如何在 Eclipse IDE 中使用web.xml创建和运行 Servlet |
如何在 Eclipse IDE 中使用web.xml创建和运行 Servlet
|
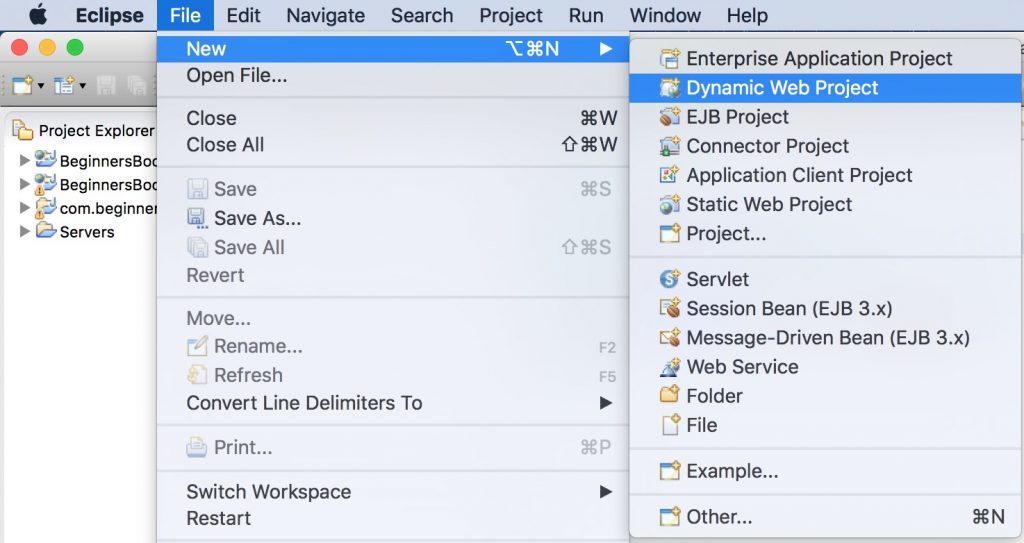
这是安装 Eclipse、设置 apache tomcat 服务器和运行您的第一个 hello world servlet 应用程序的完整指南。 下载 Eclipse IDE在 Windows 上安装 Eclipse 转到此链接Eclipse Downloads | The Eclipse Foundation。在“Get Eclipse Oxygen”下❯点击“Download Packages”❯下载“Eclipse IDE for Java Developers”。您会在右侧看到两个选项(32 位和 64 位),如果您的系统是 32 位,请单击 32 位,否则单击 64 位。这将在您的系统上下载一个压缩文件。 要安装 Eclipse,解压缩下载的文件并将解压缩的文件夹复制到所需位置。 在 Mac OS X 上安装 Eclipse 转到此链接Eclipse Downloads | The Eclipse Foundation。在“Get Eclipse Oxygen”下❯点击“Download Packages”❯下载“Eclipse IDE for Java Developers”。要下载点击 64 位,它将下载一个 TAR 文件。 下载完成后,双击 TAR 文件,它会将文件的内容提取到一个文件夹中。将文件夹拖到“应用程序”文件夹。 要启动 Eclipse,请单击 Eclipse 文件夹中的 Eclipse 图标。Mac 用户可以将它拖到 Dock 区域以从桌面快速启动 Eclipse,同样 Windows 可以在桌面上创建 Eclipse 的快捷方式。 在 Eclipse 中安装和配置 Apache Tomcat 服务器为了在 Eclipse IDE 中运行 Servlet,您需要在 Eclipse IDE 中配置 Apache tomcat Server。 如果您没有,请参阅本教程:如何在 Eclipse IDE 中下载和配置 Apache Tomcat 服务器。 注意:我上面提供的链接属于 JSP 教程,但 Servlet 的步骤也相同。 在 Eclipse IDE 中创建 Servlet 第 1 步:创建项目:让我们在 Eclipse 中创建一个 Servlet 应用程序。打开 Eclipse,然后单击 File ❯ New ❯ 单击 Dynamic Web Project。
如果您在 Eclipse 中没有看到动态 Web 项目选项,请参阅本教程:如何修复 Eclipse 问题中缺少的“动态 Web 项目” 提供项目名称,然后单击下一步。
勾选生成 web.xml 部署描述符的复选框
初始项目结构: 创建项目后,层次结构(项目结构)如下所示:
我们通过扩展 HttpServlet 类来创建一个 Http Servlet。右键单击 src 文件夹并创建一个新的类文件,将文件命名为 MyServletDemo。文件路径应如下所示:Java Resources/src/default package/MyServletDemo.java
MyServletDemo.java import java.io.*; import javax.servlet.*; import javax.servlet.http.*; // Extend HttpServlet class to create Http Servlet public class MyServletDemo extends HttpServlet { private String mymsg; public void init() throws ServletException { mymsg = "Hello World!"; } public void doGet(HttpServletRequest request, HttpServletResponse response) throws ServletException, IOException { // Setting up the content type of webpage response.setContentType("text/html"); // Writing message to the web page PrintWriter out = response.getWriter(); out.println("" + mymsg + ""); } public void destroy() { /* * leaving empty for now this can be used when we want to do something at the * end of Servlet life cycle */ } } 第三步:创建一个html页面来调用网页上的servlet类我们正在创建一个 html 文件,一旦我们单击网页上的链接,它将调用 servlet。在 WebContent 文件夹中创建此文件。文件的路径应如下所示:WebContent/index.htmlindex.html BeginnersBook Servlet Demo Click to call Servlet编辑 web.xml 文件 这个文件可以在这个路径 WebContent/WEB-INF/web.xml 中找到。在这个文件中,我们将 Servlet 映射到特定的 URL。由于我们在单击 index.html 页面上的链接时调用欢迎页面,因此我们将欢迎页面映射到我们在上面创建的 Servlet 类。 BeginnersBookDemo index.html index.htm index.jsp default.html default.htm default.jsp MyHttpServletDemo MyServletDemo MyHttpServletDemo /welcome最终项目结构
运行项目: 右键点击index.html,在服务器上运行。
单击全部添加以在服务器上部署项目。点击完成
输出:
单击链接后,您将看到此屏幕: 
|


【本文地址】
| 今日新闻 |
| 推荐新闻 |
| 专题文章 |