| V | 您所在的位置:网站首页 › rep用什么打开 › V |
V
|
本博客同时发布于个人主页:www.doctorsrn.cn 本博客续:V-rep机器人仿真软件使用的学习笔记-续 相关博客:V-rep中机械臂惯性参数的获取方法 前言这篇博客主要是记录自己学习和使用机器人仿真软件V-rep过程中的一些知识点和踩的坑。首先从下面两个问题展开: 常用的机器人仿真软件有哪些?为什么选择V-rep? 目前常用的机器人物理仿真软件有Gazebo、V-rep、Webots等,这三款都是开源软件,自己使用过前两种,Gazebo配合ROS使用功能十分强大,但是要在Linux系统下使用,会有些不方便;V-rep是一个跨平台的仿真软件,在windows和Linux下都可以很稳定的运行,而且软件体积较小。考虑到要在windows下使用仿真软件,以及V-rep方便的Python API接口和易用性,最终选择使用V-rep。V-rep在自己项目的应用情况? 自己使用V-rep主要用来进行机械臂规划和控制方面算法的验证和仿真实验,主要用于以下两个方面: 利用V-rep的物理仿真环境,建立类似OpenAI Gym的交互环境,进行基于强化学习的机械臂规划和控制方法方面的仿真实验。利用V-rep进行双臂机器人协作规划和控制算法研究V-rep中内置了很多商用机械臂模型。如果使用Gazebo,可以搭配ROS Moveit!进行机械臂相关的仿真和实物规划与控制。 PS: 本文内容对应的V-rep的版本:V-rep 3.6.1 rev3, 学习过程有问题可以去V-rep的社区提问,感觉管理者的反馈很快而且很负责任,自己在使用过程去社区报了遇到的BUG,管理员还给自己发邮件确认姓名,说要在新版本的更新log中将自己加入贡献人中,然后在新版本的log中就发现了自己的姓名,还是很开心的~
Lua中的脚本包括: main scriptchild scriptTips:v-rep是默认打开19997端口 2.1 main scriptmain script主脚本相当于主函数,有且只有一个。主脚本由以下几个函数组成: 初始化函数sysCall_init:在仿真开始阶段执行一次执行函数sysCall_actuation:在每个仿真回合都会执行,用于控制所有仿真对象的执行函数。有三个函数比较重要: sim.launchThreadedChildScriptssim.resumeThreadssim.handleChildScripts 传感器函数sysCall_sensing:在每个仿真回合都会执行,用于控制所有传感器函数。有三个函数比较重要: sim.resumeThreadssim.handleChildScripts 恢复函数sysCall_cleanup:仅在仿真结束时执行一次,用于将仿真环境恢复为仿真开始前的状态。 2.2 child scriptschild script数量不限,与仿真场景中的物体相关联,被main scripts调用。child script与场景中物体的关联有以下优势:很好的可移植性和继承性、不同版本模型间没有冲突、和仿真循环很好的进行同步。 child script有两种类型 non-threaded child scripts(非线程子脚本) 和threaded child scripts(线程子脚本): non-threaded child scripts包含一组阻塞函数,即每次被调用时将执行一些任务,然后返回控制权,如果没有返回则整个仿真一直停滞。每个仿真间隔中non-threaded child scripts将被main script调用两次:main script’s actuation and sensing 。 Tip:优先选择non-threaded child scripts来写子脚本。 non-threaded child scripts应当被分为4个函数来写: 初始化函数sysCall_init:仅在child script被调用时执行一次执行函数sysCall_actuation:每个仿真循环都被调用传感器函数sysCall_sensing:每个仿真循环都被调用恢复函数sysCall_cleanup:仅在仿真结束被调用一次 2.2.2 threaded child scriptsthreaded child scripts将会启用一个线程,线程的启用和恢复由主脚本的sim.launchThreadedChildScripts和sim.resumeThreads函数控制。当线程子脚本正在执行时,不会二次启动它。 Tips:threaded child scripts存在耗时的问题 threaded child scripts包括两个函数部分: 线程主部分函数sysCall_threadmain恢复函数sysCall_cleanup可以通过以下三个函数控制threaded child scripts的执行: sim.setThreadSwitchTiming、sim.setThreadAutomaticSwitch、sim.switchThread 2.3 Script simulation parameters脚本仿真参数,在脚本中可以通过以下函数读取和设置仿真参数: sim.getScriptSimulationParametersim.setScriptSimulationParameter 2.4 Customization scripts自定义脚本主要用于对仿真场景的拓展,比如控制仿真地面的大小: 回调函数包括以下三种; Dynamics callback functions:动态回调函数,通常被non-threaded child script或customization script使用。Joint callback functions:关节回调函数,通常用于编写低级的控制程序(PID控制),每个仿真间隔将被调用10次以上。The contact callback function:用于物理引擎检测障碍物,满足某个条件时触发contact callback function。 2.5 Script dialog可以通过脚本对话框Script dialog:[Menu bar --> Tools --> Scripts]自行添加脚本文件。 2.6 Script execution order脚本的执行顺序如下: threaded child scripts are launched/resumed (order can be adjusted via sim.setThreadResumeLocation)non-threaded child scripts are calledcustomization scripts are calledadd-on scripts are called 3.遇到的Vrep中Python Api函数–>属于client端的远程API函数 simxCallScriptFunction: 调用Vrep中Lua脚本中的函数simxStart:其中timeOutInMs参数为正数时,表示初次连接等待时间,而函数执行的阻塞时间为默认5000ms;当该参数为负数时,正数部分为函数执行的阻塞时间,而初次连接的等待时间为5000ms。simxStartSimulation:启动仿真。vrep端可以不用提前启动,而通过该函数来启动仿真。simxGetObjectHandle:获取物体句柄函数,物体名字后需要添加“#”,因为vrep默认的取名风格objectName#x。 4.遇到的Vrep中Lua Api函数–>属于server端的常规API函数,在Regular API目录下查找API文档单位使用说明:所有API的单位都是米、千克、秒和弧度,或者它们的组合(除非另有明确说明)。用户界面的单位是米、千克、秒和度。 一般函数: sim.getObjectName:获取物体名称,得到的名称带有下标(e.g. “myRobot#42”)sim.getNameSuffix:从带有下标的物体名称中取出下标和名称前部分sim.getObjectHandle:获取物体句柄sim.getJointPosition:获取关节位置sim.displayDialog:显示消息对话框sim.getObjectMatrix:获取物体的位姿矩阵,以table形式返回,表中元素数为12(类似作用的函数有:sim.getObjectOrientation,sim.getObjectPosition)sim.setObjectMatrix: 设置物体的变换矩阵sim.getCollectionHandle:根据集合句柄的名称获取集合句柄sim.getObjectSpecialProperty:获取场景对象的特殊属性,:collidable、measurable.etcsim.boolOr32:在两个数字之间执行32位布尔或运算sim.addDrawingObject:添加将在场景中显示的绘图对象sim.setJointPosition:设置关节的固有位置sim.addDrawingObjectItem:向之前的绘图对象插入新的属性,绘图主函数getObjectAssociatedWithScript:获取脚本所对应的对象的句柄sim.getSimulationState:获取当前的仿真状态sim.setThreadAutomaticSwitch:是否允许控制线程进行自动切换sim.switchThread:允许指定当前线程切换到另一个线程的确切时刻sim.clearStringSignal:清除字符串信号路径规划相关函数: sim.getIkGroupHandle:获取逆运动学解算IK组的句柄sim.getConfigForTipPose:随机搜索与给定末端执行器位置/方向匹配的机械手关节配置,若存在则返回一组关节角。通过返回值判断目标位置对应的末端执行器是否存在且是否产生碰撞。sim.generateIkPath:生成一条直线(即笛卡尔空间中的最短路径)驱动机器人从当前配置到目标配置的路径。sim.setStringSignal: 设置字符串信号的值sim.getStringSignal:获取字符串信号的值sim.packFloatTable:将浮点数表打包成字符串常见的常量: sim.objectspecialproperty_collidable:物体可碰撞属性OMPL API: 目录:V-REP API framework–>Other Interfaces–>OMPL Plugin API reference或者More details here. 使用OMPL进行运动规划的一般步骤 创建任务–>选定规划算法–>设置状态空间–>设置碰撞对–>设置开始和目标状态–>计算出一条或多条路径–>销毁创建的任务 常见函数 simOMPL.createTask:创建任务simOMPL.setAlgorithm:选定规划算法simOMPL.createStateSpace:为每个关节创建状态空间simOMPL.setStateSpace:设置整个任务的状态空间simOMPL.setCollisionPairs:设置碰撞对simOMPL.setStartState/simOMPL.setGoalState:设置起始和目标状态simOMPL.addGoalState:添加目标状态,但不清除以前设置的目标状态(如果有)。simOMPL.setStateValidityCheckingResolution:设置状态有效性检验的分辨率,表示为状态空间范围的分数simOMPL.compute:使用OMPL找到此运动规划任务的解决方案。 OMPL运动规划库中常见的规划器介绍 规划器非常多,根据不同的用途和要求进行选择。中文介绍参考网站:https://zhenshenglee.github.io/2016/09/03/160903-ompl1/ 5.Vrep中子脚本线程执行Vrep中thread script的执行是以协程模拟多线程的方式进行的,即执行多线程过程分为很多个时间片,自动在不同的线程中切换,实现多线程的效果。所以在实际使用thread script时,要合理控制线程切换,使程序执行时间合理。 在目录:Writing code in and around V-REP–>Embedded scripts–>Simulation scripts–>The main and child scripts–>Child scripts 参考博客,线程切换控制的常用函数: sim.setThreadAutomaticSwitch()sim.switchthread()sim.setThreadSwitchTiming示例代码,路径规划中机械臂响应位置控制指令的thread script: -- This threaded script is only used for executing some precalculated motion on this robot function sysCall_threadmain() -- Initialization: jh={-1,-1,-1,-1,-1,-1} for i=1,6,1 do jh[i]=sim.getObjectHandle('IRB4600_joint'..i) end model=sim.getObjectAssociatedWithScript(sim.handle_self) modelName=sim.getObjectName(model) -- Main function: while sim.getSimulationState()~=sim.simulation_advancing_abouttostop do local path=sim.getStringSignal(modelName..'runPath') if path and #path>0 then path=sim.unpackFloatTable(path) sim.setThreadAutomaticSwitch(false) --the thread switching is temporarily disabled for i=1,#path/6,1 do for j=1,6,1 do sim.setJointPosition(jh[j],path[(i-1)*6+j]) end sim.switchThread() end sim.setThreadAutomaticSwitch(false) sim.clearStringSignal(modelName..'runPath') end sim.switchThread() end end 6.Vrep中路径规划的两种情况具体程序参考Vrep的Python程序例程:pathPlanningTest.py 目标点由笛卡尔空间的位姿点给出,此时的思路是: 位姿点–>逆解算得到配置空间对应的多个关节坐标(满足一定的精度即可,space metric作为判定条件。然后根据起始点和目标点坐标的配置空间距离进行排序),并验证关节坐标的无碰撞和可行性–>在配置空间进行路径规划目标点由配置空间的关节坐标直接给出,此时的思路是: 在配置空间直接进行路径规划路径规划要考虑的四要素: 机械臂运动学关节限位机械臂防自碰撞机械臂与障碍物间的防碰撞Tips: 早期Vrep内建路径规划功能(不建议使用) 7.关于Vrep自带模型的D-H参数获取的办法 使用vrep在tool目录下提供的D-H参数提取工具DH_extractor进行获取根据机械臂的名称去官网下载其CAD模型,利用CAD软件进行获取 8.远程API工作方式分析(官方文档)API函数操作模式: simx_opmode_oneshotsimx_opmode_oneshot_waitsimx_opmode_streamingsimx_opmode_oneshot_splitsimx_opmode_discontinuesimx_opmode_buffersimx_opmode_remove 阻塞式和非阻塞式 一个重要例子:通过远程API控制多个关节同时转动,可以通过先暂停通信线程,发送完指令后再恢复通信线程实现。暂停通信线程时,远程客户端不会与远程服务器之间进行通信。示例代码: # 控制命令需要同时方式,故暂停通信,用于存储所有控制命令一起发送 vrep.simxPauseCommunication(clientID, True) for i in range(jointNum): vrep.simxSetJointTargetPosition(clientID, jointHandle[i], 120/RAD2DEG, vrep.simx_opmode_oneshot) vrep.simxPauseCommunication(clientID, False)数据流的形式 实现的效果是定时从某个句柄中获取需要的数据,通过simx_opmode_streaming和simx_opmode_buffer实现,示例代码: // Streaming operation request (subscription) (function returns immediately (non-blocking)): simxGetJointPosition(clientID,jointHandle,&jointPosition,simx_opmode_streaming); // The control loop: while (simxGetConnectionId(clientID)!=-1) // while we are connected to the server.. { // Fetch the newest joint value from the inbox (func. returns immediately (non-blocking): if (simxGetJointPosition(clientID,jointHandle,&jointPosition,simx_opmode_buffer==simx_return_ok) { // here we have the newest joint position in variable jointPosition! } else { // once you have enabled data streaming, it will take a few ms until the first value has arrived. So if // we landed in this code section, this does not always mean we have an error!!! } } // Streaming operation is enabled/disabled individually for each command and // object(s) the command applies to. In above case, only the joint position of // the joint with handle jointHandle will be streamed.同步操作 。。。 9.Vrep中关节不同的属性参考文档:Entities–>Scene objects–>Joint–>Joint types and operation 不同的关节属性对应不同要的仿真要求,比如位置控制、动力学仿真、关节力矩控制等。 根据关节的属性使用不同函数设置关节的位置、速度: simSetJointPosition() (when your joint is not in force/torque mode 比如说inverse kinema模式)simSetJointTargetPosition() (when your joint is in force/torque mode, its motor enabled and its control loop also enabled)simSetJointTargetVelocity (when your joint is in force/torque mode, its motor enabled, and its control loop NOT enabled) 10.Vrep中仿真过程不同状态的介绍仿真状态分为:停止、开始、暂停三个状态。在仿真内部还有一些内部状态用来表示下一时刻的状态,使程序更好地控制仿真过程,状态切换图如下: 与之前版本的Remote API相比,新版本的Vrep推荐b0RemoteApi,官方说这种方式更灵活好用。 运行C:\Program Files\V-REP3\V-REP_PRO_EDU\programming\b0RemoteApiBindings\python目录下的simpleTest.py程序,遇到如下错误: OSError: [WinError 193] %1 不是有效的 Win32 应用程序。 解决过程: 开始参考如下网站使用anaconda重建一个32位的python环境: https://blog.csdn.net/vample/article/details/88877745 ,最终发现并不是这个原因导致的,因为提供的DLL文件都是64位的,所以不是因为python版本不匹配的原因报错;最终google之后发现解决办法:https://stackoverflow.com/questions/19849077/error-loading-dll-in-python-not-a-valid-win32-application 是因为之前添加的DLL不够全,将C:\Program Files\V-REP3\V-REP_PRO_EDU目录下所有DLL文件添加至\programming\b0RemoteApiBindings\python目录下,然后即可正常simpleTest.py程序。常用conda命令: # 设置32位set CONDA_FORCE_32BIT=1 # 切回系统默认set CONDA_FORCE_32BIT= # 查看当前环境详细信息 conda info # 查看当前环境信息 conda info --envs # 切换环境 conda activate env_name,conda deactivate env_name # 移除环境 conda remove -n env_name --all # 安装包:activate env_name,conda install pandas 1.0 Vrep b0RemoteApi工作模式解析类似ROS中的松耦合通讯机制。 与vrep regular API相比,B0-based remote API函数需要一个额外的参数:用于执行函数调用的话题(Topic)或者通讯频道(communication channel)参数。Topic可以从以下5个函数的返回值获取: simxServiceCall: 用于阻塞模式,即client发送命令到server端执行后,等待server返回一个响应给client。通常用于只需要server端执行一次的命令,比如simxGetObjectHandlesimxDefaultPublisher: 用于非阻塞模式,client端向server端发送命令后不等待server端的回应。比如simxSetJointPositionsimxDefaultSubscriber: 该方式让server端持续执行某函数,并且将函数的响应结果持续返回至client端,client端在回调函数中收到返回的数据流。通常用于需要在server端持续执行的命令,比如simxGetJointForce。此外,传入的回调函数将通过执行simxSpinOnce函数进行调用。simxCreatePublisher: 与simxDefaultPublisher类似,不同的是创建一个专用的publisher Topic,即创建一个专用的发布数据的频道。主要用于特定的命令或者函数,比如数据量大的函数simxSetVisionSensorImage。simxCreateSubscriber: 与simxDefaultSubscriber类似,不同的是创建一个专用的subscriber Topic,即创建一个专用的订阅数据的频道。主要用于特定的命令或者函数,比如数据量大的函数simxGetVisionSensorImage。原文如下: 默认情况下,B0-based remote API的Client和Server之间是异步工作的。可以通过设置使Client单独触发每个仿真时间片,达到同步工作模式。以下是Python形式Client端同步工作模式的示例代码: import b0RemoteApi import time with b0RemoteApi.RemoteApiClient('b0RemoteApi_pythonClient','b0RemoteApi') as client: doNextStep=True def simulationStepStarted(msg): simTime=msg[1][b'simulationTime']; print('Simulation step started. Simulation time: ',simTime) def simulationStepDone(msg): simTime=msg[1][b'simulationTime']; print('Simulation step done. Simulation time: ',simTime); global doNextStep doNextStep=True client.simxSynchronous(True) client.simxGetSimulationStepStarted(client.simxDefaultSubscriber(simulationStepStarted)); client.simxGetSimulationStepDone(client.simxDefaultSubscriber(simulationStepDone)); client.simxStartSimulation(client.simxDefaultPublisher()) startTime=time.time() while time.time()V-REP API framework–>Remote API–>BØ-based remote API–>Enabling the B0-based remote API - server side 直接通过File–>Load Model将Models/tools/B0 remote Api server.ttm添加至当前场景即可。 1.1 vrep b0RemoteApi工作模式下API之间的关系:
Client端:使用B0-based remote API:b0RemoteApi.py,实现方式是直接将server端b0 API中的函数名进行再次封装,然后发送至server端。Server端:使用server端b0 API,API文件为C:\Program Files\V-REP3\V-REP_PRO_EDU\lua\b0RemoteApiServer.lua,server端b0 API文件b0RemoteApiServer.lua内部实现主要是将regular API进行封装。
2. vrep中吸盘工具suction pad的使用
1.1 vrep b0RemoteApi工作模式下API之间的关系:
Client端:使用B0-based remote API:b0RemoteApi.py,实现方式是直接将server端b0 API中的函数名进行再次封装,然后发送至server端。Server端:使用server端b0 API,API文件为C:\Program Files\V-REP3\V-REP_PRO_EDU\lua\b0RemoteApiServer.lua,server端b0 API文件b0RemoteApiServer.lua内部实现主要是将regular API进行封装。
2. vrep中吸盘工具suction pad的使用
参考以下资料: 场景C:\Program Files\V-REP3\V-REP_PRO_EDU\scenes\reflexxesMotionLibraryType2Demo.ttt中有吸盘工具的使用模型C:\Program Files\V-REP3\V-REP_PRO_EDU\models\robots\non-mobile\MTB robot.ttm中有吸盘工具的使用http://www.forum.coppeliarobotics.com/viewtopic.php?f=9&t=5317&p=21341&hilit=vrep+suction+pad#p21341添加吸盘工具至机械臂末端,根据吸盘的子程序: function sysCall_init() s=sim.getObjectHandle('suctionPadSensor') l=sim.getObjectHandle('suctionPadLoopClosureDummy1') l2=sim.getObjectHandle('suctionPadLoopClosureDummy2') b=sim.getObjectHandle('suctionPad') suctionPadLink=sim.getObjectHandle('suctionPadLink') infiniteStrength=sim.getScriptSimulationParameter(sim.handle_self,'infiniteStrength') maxPullForce=sim.getScriptSimulationParameter(sim.handle_self,'maxPullForce') maxShearForce=sim.getScriptSimulationParameter(sim.handle_self,'maxShearForce') maxPeelTorque=sim.getScriptSimulationParameter(sim.handle_self,'maxPeelTorque') sim.setLinkDummy(l,-1) sim.setObjectParent(l,b,true) m=sim.getObjectMatrix(l2,-1) sim.setObjectMatrix(l,-1,m) end function sysCall_cleanup() sim.setLinkDummy(l,-1) sim.setObjectParent(l,b,true) m=sim.getObjectMatrix(l2,-1) sim.setObjectMatrix(l,-1,m) end function sysCall_sensing() parent=sim.getObjectParent(l) if (sim.getScriptSimulationParameter(sim.handle_self,'active')==false) then if (parent~=b) then sim.setLinkDummy(l,-1) sim.setObjectParent(l,b,true) m=sim.getObjectMatrix(l2,-1) sim.setObjectMatrix(l,-1,m) end else if (parent==b) then -- Here we want to detect a respondable shape, and then connect to it with a force sensor (via a loop closure dummy dummy link) -- However most respondable shapes are set to "non-detectable", so "sim.readProximitySensor" or similar will not work. -- But "sim.checkProximitySensor" or similar will work (they don't check the "detectable" flags), but we have to go through all shape objects! index=0 while true do shape=sim.getObjects(index,sim.object_shape_type) if (shape==-1) then break end if (shape~=b) and (sim.getObjectInt32Parameter(shape,sim.shapeintparam_respondable)~=0) and (sim.checkProximitySensor(s,shape)==1) then -- Ok, we found a respondable shape that was detected -- We connect to that shape: -- Make sure the two dummies are initially coincident: sim.setObjectParent(l,b,true) m=sim.getObjectMatrix(l2,-1) sim.setObjectMatrix(l,-1,m) -- Do the connection: sim.setObjectParent(l,shape,true) sim.setLinkDummy(l,l2) break end index=index+1 end else -- Here we have an object attached if (infiniteStrength==false) then -- We might have to conditionally beak it apart! result,force,torque=sim.readForceSensor(suctionPadLink) -- Here we read the median value out of 5 values (check the force sensor prop. dialog) if (result>0) then breakIt=false if (force[3]>maxPullForce) then breakIt=true end sf=math.sqrt(force[1]*force[1]+force[2]*force[2]) if (sf>maxShearForce) then breakIt=true end if (torque[1]>maxPeelTorque) then breakIt=true end if (torque[2]>maxPeelTorque) then breakIt=true end if (breakIt) then -- We break the link: sim.setLinkDummy(l,-1) sim.setObjectParent(l,b,true) m=sim.getObjectMatrix(l2,-1) sim.setObjectMatrix(l,-1,m) end end end end end end可以发现吸盘子程序已经很完善,会根据吸盘末端和物体之间的距离来判断是否吸取物体,同时吸盘子程序设置了以下参数:active,infiniteStrength,maxPullForce,maxShearForce,maxPeelTorque,前两个分别表示吸盘是否激活、吸盘吸力是否无穷大,默认吸盘激活且吸力无穷大,参数可以通过吸盘子程序的参数服务器修改: 添加force sensor:add->force sensor,然后使用力传感器刚性地连接两个物体后就可以测量力和力矩。 具体过程:以C:\Program Files\V-REP3\V-REP_PRO_EDU\models\robots\non-mobile\MTB robot.ttm为例。通过File->Load Model载入MTB robot.ttm,可以看到机械臂末端连接了吸盘:  之后再参考博客添加一个Graph,并将Force_sensor的Z轴方向的力作为显示数据添加至Graph,运行MTB robot.ttm就可以看到物体的重力。 之后再参考博客添加一个Graph,并将Force_sensor的Z轴方向的力作为显示数据添加至Graph,运行MTB robot.ttm就可以看到物体的重力。
Tips: 吸盘工具自带了力传感器,suctionPad就是一个力传感器。 参考资料: 官方文档:Entities->Scene objects->Force sensors测量值不稳定的解决:http://www.forum.coppeliarobotics.com/viewtopic.php?f=9&t=6614相关博客:https://blog.csdn.net/weixin_34375054/article/details/85882691 4. Vrep中不同物理仿真引擎的使用Bullet和ODE主要用于游戏中,而Vortex专注于科学物理仿真,计算准确度以及稳定性肯定会比游戏物理引擎要好。所以VREP提供了4个物理引擎还是有道理的,要根据它们的长处来选择合适的引擎进行仿真,不能总是用默认的Bullet。 经验分享: 关于物理引擎 “Bullet, ODE, 和 Newton” (Vortex 自动忽略)使用经验,对于复杂系统(32个自由度),如果涉及到 V-rep 和 MATLAB, Python, 或 ROS 某一个或者某几个之间的通讯问题,ODE 最佳,Bullet 可用,Newton 不推荐。 不涉及通讯,直接 LUA,ODE 依然最佳,Newton 相差无几,甚至会比 ODE 更稳定,Bullet 也可用。 V-REP与Vortex Studio的安装,需要申请License,暂且没有操作做成功。 5. 使用Vrep控制实物机器人的思路http://www.forum.coppeliarobotics.com/viewtopic.php?t=5780 6. 使用Reflexxes Motion Library(在线运动轨迹生成库)进行轨迹规划Reflexxes Motion Library是在线运动轨迹生成库,在其官网有关于功能方面详细的介绍。在完成实时轨迹规划时,算法的输入输出如下图: Vrep集成了Reflexxes Motion Library,具体API在Regular API function-->Reflexxes Motion Library type II or IV: sim.rmlMoveToJointPositions()和sim.rmlMoveToPosition()分别在关节空间和迪卡文空间进行轨迹规划,这两个函数均为阻塞型函数。**使用sim.rmlMoveToPosition()并配合逆运动学可以实现机器人的路径控制,**具体操作可以参考该博客内容。 参考资料: Reflexxes Motion Library的使用:https://www.cnblogs.com/21207-iHome/p/6344467.htmlReflexxes Motion Library API结构介绍:https://www.cnblogs.com/21207-iHome/p/7724694.htmlReflexxes Motion Library官方API结构介绍:http://www.reflexxes.ws/software/typeiirml/v1.2.6/docs/page__source_code.html 7.vrep不同类型的刚体表示,作用不同
添加kuka LBR4p机械臂,所有关节原始工作模式是Torque or force mode,将所有关节改为Inverse kinematics mode后运行仿真会出现机械臂散架的问题,这个时候问题解决。  将kuka LBR4p机械臂安装在Onmirob移动底盘上。对应的逆解对LBR4p_ik_target和LBR4p_ik_tip,以及逆解算组已经设置好,重写LBR4p原始脚本,进行sim.getConfigForTipPose的测试:
-- This is a threaded script, and is just an example!
ikTest=function()
-- Initialization phase:
jh={-1,-1,-1,-1,-1,-1,-1}
for i=1,7,1 do
jh[i]=sim.getObjectHandle('LBR4p_joint'..i)
end
ikGroup=sim.getIkGroupHandle('LBR4p')
ikTarget=sim.getObjectHandle('LBR4p_ik_target')
collisionPairs={sim.getCollectionHandle('LBR4PP'),sim.getCollectionHandle('not_LBR4PP')}
target1=sim.getObjectHandle('testTarget3')
--approachDirectionObstacle=sim.getObjectHandle('approachDirectionObstacle')
metric={0.5,1,1,0.5,0.1,0.2,0.1}
forbidLevel=0
ikShift=0.1
ikSteps=50
--------------------------
------for ik test---------
local m=sim.getObjectMatrix(target1,-1)
sim.setObjectMatrix(ikTarget,-1,m)
local c=sim.getConfigForTipPose(ikGroup,jh,0.65,10,nil,collisionPairs)
print(c)
while true do
local m=sim.getObjectMatrix(target1,-1)
sim.setObjectMatrix(ikTarget,-1,m)
local c=sim.getConfigForTipPose(ikGroup,jh,0.65,10,nil,collisionPairs)
print(c)
if c then
local gc = c
sim.rmlMoveToJointPositions(jointHandles,-1,currentVel,currentAccel,maxVel,maxAccel,maxJerk,gc,targetVel)
end
end
------for ik test---------
--------------------------
end
function sysCall_threadmain()
jointHandles={-1,-1,-1,-1,-1,-1,-1}
for i=1,7,1 do
jointHandles[i]=sim.getObjectHandle('LBR4p_joint'..i)
end
-- Set-up some of the RML vectors:
vel=110
accel=40
jerk=80
currentVel={0,0,0,0,0,0,0}
currentAccel={0,0,0,0,0,0,0}
maxVel={vel*math.pi/180,vel*math.pi/180,vel*math.pi/180,vel*math.pi/180,vel*math.pi/180,vel*math.pi/180,vel*math.pi/180}
maxAccel={accel*math.pi/180,accel*math.pi/180,accel*math.pi/180,accel*math.pi/180,accel*math.pi/180,accel*math.pi/180,accel*math.pi/180}
maxJerk={jerk*math.pi/180,jerk*math.pi/180,jerk*math.pi/180,jerk*math.pi/180,jerk*math.pi/180,jerk*math.pi/180,jerk*math.pi/180}
targetVel={0,0,0,0,0,0,0}
targetPos1={90*math.pi/180,90*math.pi/180,170*math.pi/180,90*math.pi/180,90*math.pi/180,90*math.pi/180,0}
--sim.rmlMoveToJointPositions(jointHandles,-1,currentVel,currentAccel,maxVel,maxAccel,maxJerk,targetPos1,targetVel)
targetPos2={-90*math.pi/180,90*math.pi/180,180*math.pi/180,90*math.pi/180,90*math.pi/180,90*math.pi/180,0}
--sim.rmlMoveToJointPositions(jointHandles,-1,currentVel,currentAccel,maxVel,maxAccel,maxJerk,targetPos2,targetVel)
targetPos3={0,0,0,0,0,0,0}
--sim.rmlMoveToJointPositions(jointHandles,-1,currentVel,currentAccel,maxVel,maxAccel,maxJerk,targetPos3,targetVel)
ikTest()
end 将kuka LBR4p机械臂安装在Onmirob移动底盘上。对应的逆解对LBR4p_ik_target和LBR4p_ik_tip,以及逆解算组已经设置好,重写LBR4p原始脚本,进行sim.getConfigForTipPose的测试:
-- This is a threaded script, and is just an example!
ikTest=function()
-- Initialization phase:
jh={-1,-1,-1,-1,-1,-1,-1}
for i=1,7,1 do
jh[i]=sim.getObjectHandle('LBR4p_joint'..i)
end
ikGroup=sim.getIkGroupHandle('LBR4p')
ikTarget=sim.getObjectHandle('LBR4p_ik_target')
collisionPairs={sim.getCollectionHandle('LBR4PP'),sim.getCollectionHandle('not_LBR4PP')}
target1=sim.getObjectHandle('testTarget3')
--approachDirectionObstacle=sim.getObjectHandle('approachDirectionObstacle')
metric={0.5,1,1,0.5,0.1,0.2,0.1}
forbidLevel=0
ikShift=0.1
ikSteps=50
--------------------------
------for ik test---------
local m=sim.getObjectMatrix(target1,-1)
sim.setObjectMatrix(ikTarget,-1,m)
local c=sim.getConfigForTipPose(ikGroup,jh,0.65,10,nil,collisionPairs)
print(c)
while true do
local m=sim.getObjectMatrix(target1,-1)
sim.setObjectMatrix(ikTarget,-1,m)
local c=sim.getConfigForTipPose(ikGroup,jh,0.65,10,nil,collisionPairs)
print(c)
if c then
local gc = c
sim.rmlMoveToJointPositions(jointHandles,-1,currentVel,currentAccel,maxVel,maxAccel,maxJerk,gc,targetVel)
end
end
------for ik test---------
--------------------------
end
function sysCall_threadmain()
jointHandles={-1,-1,-1,-1,-1,-1,-1}
for i=1,7,1 do
jointHandles[i]=sim.getObjectHandle('LBR4p_joint'..i)
end
-- Set-up some of the RML vectors:
vel=110
accel=40
jerk=80
currentVel={0,0,0,0,0,0,0}
currentAccel={0,0,0,0,0,0,0}
maxVel={vel*math.pi/180,vel*math.pi/180,vel*math.pi/180,vel*math.pi/180,vel*math.pi/180,vel*math.pi/180,vel*math.pi/180}
maxAccel={accel*math.pi/180,accel*math.pi/180,accel*math.pi/180,accel*math.pi/180,accel*math.pi/180,accel*math.pi/180,accel*math.pi/180}
maxJerk={jerk*math.pi/180,jerk*math.pi/180,jerk*math.pi/180,jerk*math.pi/180,jerk*math.pi/180,jerk*math.pi/180,jerk*math.pi/180}
targetVel={0,0,0,0,0,0,0}
targetPos1={90*math.pi/180,90*math.pi/180,170*math.pi/180,90*math.pi/180,90*math.pi/180,90*math.pi/180,0}
--sim.rmlMoveToJointPositions(jointHandles,-1,currentVel,currentAccel,maxVel,maxAccel,maxJerk,targetPos1,targetVel)
targetPos2={-90*math.pi/180,90*math.pi/180,180*math.pi/180,90*math.pi/180,90*math.pi/180,90*math.pi/180,0}
--sim.rmlMoveToJointPositions(jointHandles,-1,currentVel,currentAccel,maxVel,maxAccel,maxJerk,targetPos2,targetVel)
targetPos3={0,0,0,0,0,0,0}
--sim.rmlMoveToJointPositions(jointHandles,-1,currentVel,currentAccel,maxVel,maxAccel,maxJerk,targetPos3,targetVel)
ikTest()
end
问题原因 sim.getConfigForTipPose无法正常输出有效值的主要是因为该函数的collisionPairs参数没有正确设置的问题,开始时设置的碰撞对为kuka LBR4p机械臂本体和除开kuka LBR4p机械臂本体以外的物体: 解决办法 将机械臂和移动底盘整体设为一个collection,除外的部分设为另一个collection,对应图中Collections的LBR4PP和not_LBR4PP。此时sim.getConfigForTipPose可以正常输出对应的关节坐标。 其他问题: 开启碰撞检测功能后,即上图Calculation Modules中的collision功能,机械臂显示为碰撞状态,这是因为将机械臂和移动底盘检测为发生碰撞,此时可以考虑将基座连杆部分的碰撞属性取消,然后碰撞状态消失: Traceback (most recent call last): File “b0_drl.py”, line 111, in client.simxDefaultPublisher()) File “C:\Sam\Robotics\V-rep\Vrep_Python\python_b0\b0RemoteApi.py”, line 44, in exit self._handleFunction(‘Ping’,[0],self.simxDefaultSubscriber(self._pingCallback)) File “C:\Sam\Robotics\V-rep\Vrep_Python\python_b0\b0RemoteApi.py”, line 118, in simxDefaultSubscriber self._handleFunction(‘setDefaultPublisherPubInterval’,[topic,publishInterval],channel) File “C:\Sam\Robotics\V-rep\Vrep_Python\python_b0\b0RemoteApi.py”, line 70, in _handleFunction rep = msgpack.unpackb(self._serviceClient.call(packedData)) File “C:\Sam\Robotics\V-rep\Vrep_Python\python_b0\b0.py”, line 234, in call rep_bytes = bytearray(outarr.contents) ValueError: NULL pointer access 2019-04-25 19:38:26 error: HB: Context was terminated 在V-rep社区提问后得到问题原因和解决办法: 问题原因是: client端simxCallScriptFunction调用server端的函数时,server端被调用函数是阻塞型的,在b0RemoteApi.py的第25行self._serviceClient.set_option(3,1000)参数设置server在1000ms不返回数据就会报上述错误所以解决办法是:将这一行代码里的参数进行修改,改为self._serviceClient.set_option(3,25000) #read timeout of 1000ms,然后就解决了上述问题。 4.Vrep动力学仿真的注意事项官方文档关于动力学仿真实验设计:如果要使关节进行动力学仿真或者力传感器可以进行动力学仿真,必须要遵循一定的设计规则: sim.setJointPosition函数不能用于关节处于torque/force mode的模式,如果关节处于torque/force mode模式则sim.setJointPosition无效。在关节处于torque/force mode的模式时,使用sim.setJointTargetPosition控制关节转动,此时可以设置转动过程的控制参数,包括PID参数和速度限制。 6.机械臂运动至目标点存在漂移的问题可能的原因: 机械臂的关节工作在非torque/force mode模式,同时开启hybrid模式,此时可能由于重力原因机械臂发生漂移 thread script的主循环存在比较耗时的操作
7.vrep同步模式的基本知识
b0-based api:http://www.coppeliarobotics.com/helpFiles/en/b0RemoteApiOverview.htmchild script:http://www.coppeliarobotics.com/helpFiles/en/childScripts.htm
8.vrep机械臂末端抖动的问题 thread script的主循环存在比较耗时的操作
7.vrep同步模式的基本知识
b0-based api:http://www.coppeliarobotics.com/helpFiles/en/b0RemoteApiOverview.htmchild script:http://www.coppeliarobotics.com/helpFiles/en/childScripts.htm
8.vrep机械臂末端抖动的问题
该问题主要原因是: 机械臂安装在移动底盘上,而移动底盘的车轮在仿真时有漂移现象发生,所以导致机械臂一直在抖动。不同的物理仿真引擎也会导致这种情况出现,使用Bullet 2.78引擎时,抖动现象最弱。 9.vrep存在有的逆解路径无法到达的问题可能是因为使用伪逆法求逆解得到的路径在奇异点附近运行困难。 但是换成数值解法之后无法得到有效解。 TODO:待解决上述问题。 10.初始仿真时物体属性设置的一些tricks
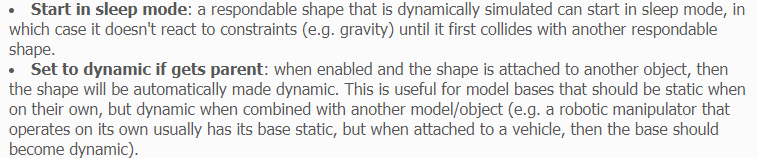
查看官方文档后,发现Start in sleep mode和Set to dynamic if gets parent这两个属性很有用,官方解释: 勾选上述两个设置后,仿真开始后物体就不会掉落,移动机械臂吸取物体后,物体将使能dynamic属性,然后就可以进行动力学仿真。 上述方法仍然可能存在如下问题:在吸盘接触物体的一瞬间物体变为"dynamic",吸盘没有吸取到物体时物体就掉落。 解决该问题的小trick:在物体下方添加一个小立方体来支撑物体,将其dynamic属性取消,并设置为透明,设置如下: 基于V-rep模仿OpenAI Gym搭建V-rep强化学习环境,所实现的代码放置于代码仓库gym_vrep.使用强化学习方法主要来解决双臂机器人在板材安装过程中压紧过程的规划和控制问题。 1.遵照OpenGym环境的格式搭建V-rep强化学习环境参考示例: https://zhuanlan.zhihu.com/p/33553076https://github.com/openai/gym-soccerhttps://github.com/apoddar573/Tic-Tac-Toe-Gym_Environment主要是自定义__init__(),step(),reset(),render(),close()等函数。 2.windows下tensorboard使用出现tensorboard 无法访问此网站的问题,将tensorboard的网址改成:http://localhost:6006/即可正常访问。 参考:https://blog.csdn.net/wangqi_qiangku/article/details/79835801 3.加速Vrep仿真的方法 将仿真时间步调大。 参考: http://www.forum.coppeliarobotics.com/viewtopic.php?f=9&t=2247http://www.coppeliarobotics.com/helpFiles/en/simulation.htm仿真设置界面:http://www.coppeliarobotics.com/helpFiles/en/simulationPropertiesDialog.htm 关闭图像引擎,使用命令行模式 http://www.forum.coppeliarobotics.com/viewtopic.php?t=7http://www.forum.coppeliarobotics.com/viewtopic.php?t=6359 可以使用如下命令关闭图像引擎的渲染:simSetBooleanParameter(sim_boolparam_display_enabled,false) 开启单独的图像引擎线程 http://www.coppeliarobotics.com/helpFiles/en/simulation.htm仿真属性设置:http://www.coppeliarobotics.com/helpFiles/en/simulationPropertiesDialog.htm 附录 1. 贝塞尔曲线的解释 讲解在线仿真前端应用 2. 3维绘图软件inventor:Autodesk公司出品,可以用来绘制机械臂3维模型。 |


 获取状态的函数为:sim.getSimulationState,返回的状态即为上图中的状态。
 我们需要控制的就是移动机械臂,使末端接近被吸物体,然后吸盘就会自动吸取物体。需要将被吸物体释放时,需要修改吸盘子程序并添加自定义程序,一种思路是根据某个条件设置active参数为false,然后释放被吸物体即可,参考模型C:\Program Files\V-REP3\V-REP_PRO_EDU\models\robots\non-mobile\MTB robot.ttm中吸盘工具的使用。
 接下来的目标是:在机械臂末端和吸盘之间添加力传感器,测量被吸物体对机械臂末端施加的重力,步骤如下:
 基于位置的在线轨迹规划详细输入输出如下图:
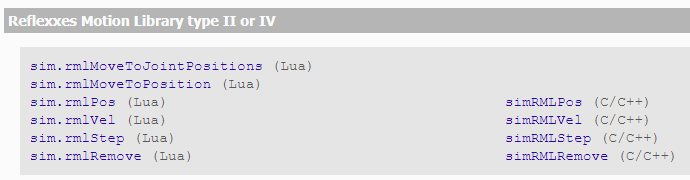 在空白场景中拖入UR5型机械臂,打开机械臂对应的子脚本程序,可以看到Reflexxes Motion Library API的使用:
 所以此时机械臂处于Inverse kinematics mode+Torque or force mode的模式,即使配置好ik target-tip,因为关节之间存在力矩,所以在移动target时机械臂无法完成逆解运动。
 对应图中Collections的LBR4p和not_LBR4p。这样设置的问题是因为LBR4p机械臂安装在移动底盘上,移动底盘和机械臂之间也会进行碰撞检测,因此导致sim.getConfigForTipPose无法正常输出有效值。

 如上图的场景,想要初始状态是吸盘吸取物体。如果物体属性设置为“Body is dynamic”,仿真开始的一瞬间物体就会掉落下去,下图是物体的初始属性:
 当吸盘成功吸取物体后移开该立方体,可以重设该立方体的位置即可:示例命令sim.setObjectPosition(190,-1,{0.6,0.6,0.5})
【本文地址】