|
一. 说明
通过微控制器控制 PS4 手柄大概有两套方案,第一种是使用 PS4-esp32 库,通过 ESP32 芯片的蓝牙与 PS4 建立连接。另一种是使用 USB_Host_Shield_2.0 中的 PS4BT 库,通过蓝牙接收器和 PS4 手柄配对,再通过 USB 芯片完成主控和蓝牙接收器间的通信。
我采用的是第一种方案,成功使用一块 ESP32 开发板实现对 PS4 的控制,但我非常不推荐这种方案,因为它还有很多问题没有解决,我把我尝试的整个流程记录下来也只是方便其他人继续研发,如果是基于成本考虑,或者是完全出于兴趣,可以尝试这种方案;如果只是想快速稳定地建立手柄和控制器间的连接,我还是推荐第二种成熟的方案。
二. 准备工作
1. PS4 手柄
PS4 手柄尽量选择正版,盗版手柄有可能无法连接(事实上我没有遇到这个问题),在 Issue#7、Issue#19 和 Issue#38 中提到了这个问题,没有人给出解决方案,也没有确定可以使用 PS4-esp32 库的盗版手柄。
判别手柄是否为正版可以参考这篇文章。
2. ESP32 开发板
PS4 仅支持使用 BT (Bluetooth) 进行连接,故要选择 ESP32 芯片,C2, C3, S2, S3 系列芯片均不支持 BT (Bluetooth) ( 注意 Bluetooth 和 Bluetooth LE 的区别 ),详见 芯片概览。我使用的是 NodeMCU-32S 开发板。
3. 修改手柄 Mac 地址
必须保证 ESP32 的 Mac 地址和手柄的 Mac 地址相同才可以连接,使用 SixaxisPairTool 工具读取并修改手柄的 Mac 地址,Mac 地址在保证单播的情况下可以任取,例如1a:2b:3c:01:01:01。记住此处设置的手柄的 Mac 地址,之后要填写到 ESP32 的程序中。
注意:如果之前手柄已经和电脑配过对,此时手柄的 Mac 地址会被修改成电脑蓝牙的 Mac 地址,不要使用和电脑蓝牙相同的 Mac 地址!!
三. 程序编写
使用 VSCode + PlatformIO 基于 Arduino 框架进行开发。
新建 PlatformIO 工程,根据所用板子型号配置 platformio.ini 文件。
; platformio.ini
[env:nodemcu-32s]
platform = espressif32
board = nodemcu-32s
framework = arduino
monitor_speed = 115200
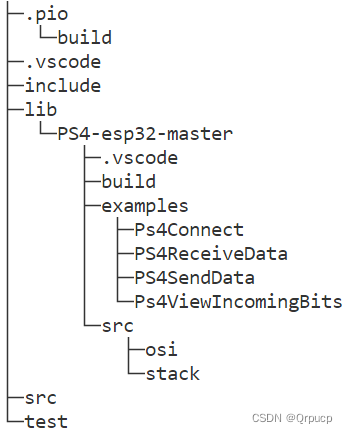
将整个 PS4-esp32 项目放到工程的 lib 文件夹下,文件树如下图所示:
 编写 main.cpp: 编写 main.cpp:
/*main.cpp*/
#include
#include
#include
int r = 255, g = 0, b = 0;
// Calculates the next value in a rainbow sequence
void nextRainbowColor()
{
if (r > 0 && b == 0)
{
r--;
g++;
}
if (g > 0 && r == 0)
{
g--;
b++;
}
if (b > 0 && g == 0)
{
r++;
b--;
}
}
void setup()
{
Serial.begin(115200);
PS4.begin("14:5A:FC:1B:02:CE"); // 替换此处的Mac地址!
Serial.println("Ready.");
}
void loop()
{
int cnt = 0;
// Below has all accessible outputs from the controller
if (PS4.isConnected())
{
if(++cnt == 100) // 1000ms
{
if (PS4.LStickX()) Serial.printf("Left Stick x at %d\n", PS4.LStickX());
if (PS4.LStickY()) Serial.printf("Left Stick y at %d\n", PS4.LStickY());
if (PS4.RStickX()) Serial.printf("Right Stick x at %d\n", PS4.RStickX());
if (PS4.RStickY()) Serial.printf("Right Stick y at %d\n", PS4.RStickY());
if (PS4.Charging()) Serial.println("The controller is charging");
if (PS4.Audio()) Serial.println("The controller has headphones attached");
if (PS4.Mic()) Serial.println("The controller has a mic attached");
Serial.printf("Battery Level : %d\n", PS4.Battery());
Serial.println();
nextRainbowColor();
cnt = 0;
}
if (PS4.Right()) Serial.println("Right Button");
if (PS4.Down()) Serial.println("Down Button");
if (PS4.Up()) Serial.println("Up Button");
if (PS4.Left()) Serial.println("Left Button");
if (PS4.Square()) Serial.println("Square Button");
if (PS4.Cross()) Serial.println("Cross Button");
if (PS4.Circle()) Serial.println("Circle Button");
if (PS4.Triangle()) Serial.println("Triangle Button");
if (PS4.UpRight()) Serial.println("Up Right");
if (PS4.DownRight()) Serial.println("Down Right");
if (PS4.UpLeft()) Serial.println("Up Left");
if (PS4.DownLeft()) Serial.println("Down Left");
if (PS4.L1()) Serial.println("L1 Button");
if (PS4.R1()) Serial.println("R1 Button");
if (PS4.Share()) Serial.println("Share Button");
if (PS4.Options()) Serial.println("Options Button");
if (PS4.L3()) Serial.println("L3 Button");
if (PS4.R3()) Serial.println("R3 Button");
if (PS4.PSButton()) Serial.println("PS Button");
if (PS4.Touchpad()) Serial.println("Touch Pad Button");
if (PS4.L2()) Serial.printf("L2 button at %d\n", PS4.L2Value());
if (PS4.R2()) Serial.printf("R2 button at %d\n", PS4.R2Value());
// Sets the color of the controller's front light
// Params: Red, Green,and Blue
// See here for details: https://www.w3schools.com/colors/colors_rgb.asp
PS4.setLed(r, g, b);
// Sets how fast the controller's front light flashes
// Params: How long the light is on in ms, how long the light is off in ms
// Range: 0->2550 ms, Set to 0, 0 for the light to remain on
PS4.setFlashRate(PS4.LStickY() * 10, PS4.RStickY() * 10);
// Sets the rumble of the controllers
// Params: Weak rumble intensity, Strong rumble intensity
// Range: 0->255
PS4.setRumble(PS4.L2Value(), PS4.R2Value());
// Sends data set in the above three instructions to the controller
PS4.sendToController();
// Don't send data to the controller immediately, will cause buffer overflow
delay(10);
}
else
{
Serial.println("Connecting...");
delay(1000);
}
}
使用 PlatformIO 插件编译并上传代码。
四. 其他
如果不能连接,尝试擦除 ESP32 的闪存并重新烧录,可能需要 ESP32 每次上电前都擦除一次: pip install esptool
esptool --chip esp32 erase_flash
该问题在 Issue#2、Issue#4、Issue#9 和 Issue#18 中被提到过。 rickwinter2 提到使用 esp-wroom-32 dev module v3 连接会更稳定,不需要频繁地擦除闪存,我没有进行尝试。 之前出现过的很多问题都是蓝牙配对/连接的方式导致的,比如盗版手柄可以很容易的和 PS 主机或者电脑进行连接,但却无法和 ESP32 进行连接,本质上其实是 PS4-esp32 库没办法模拟与 PS4 手柄配对的过程。 关于 PS4-esp32 库与 PS4 手柄的配对问题,作者在 Issue#11 中进行了解释,我没有完全理解,大意是由于 ESP32 硬件的限制,ESP32 不像无线蓝牙接收器那样支持很多配对协议。 对 PS4 配对过程和 ESP32 芯片的蓝牙功能进行进一步研究,解决好配对问题,PS4-esp32 库 + ESP32 的方案一定会成为主流,毕竟 USB_Host_Shield_2.0 方案需要昂贵的蓝牙接收器和 USB 芯片,接收器和板子的价格甚至与一个盗版手柄的价格相当。因为我只是想快速制作一个机器人遥控器,并没有兴趣与时间去深入研究蓝牙,故转向了 USB_Host_Shield_2.0 方案。
|