| OpenWrt 安装 4.4.2 版本的 qbittorrent | 您所在的位置:网站首页 › openwrt安装插件错误 › OpenWrt 安装 4.4.2 版本的 qbittorrent |
OpenWrt 安装 4.4.2 版本的 qbittorrent
|
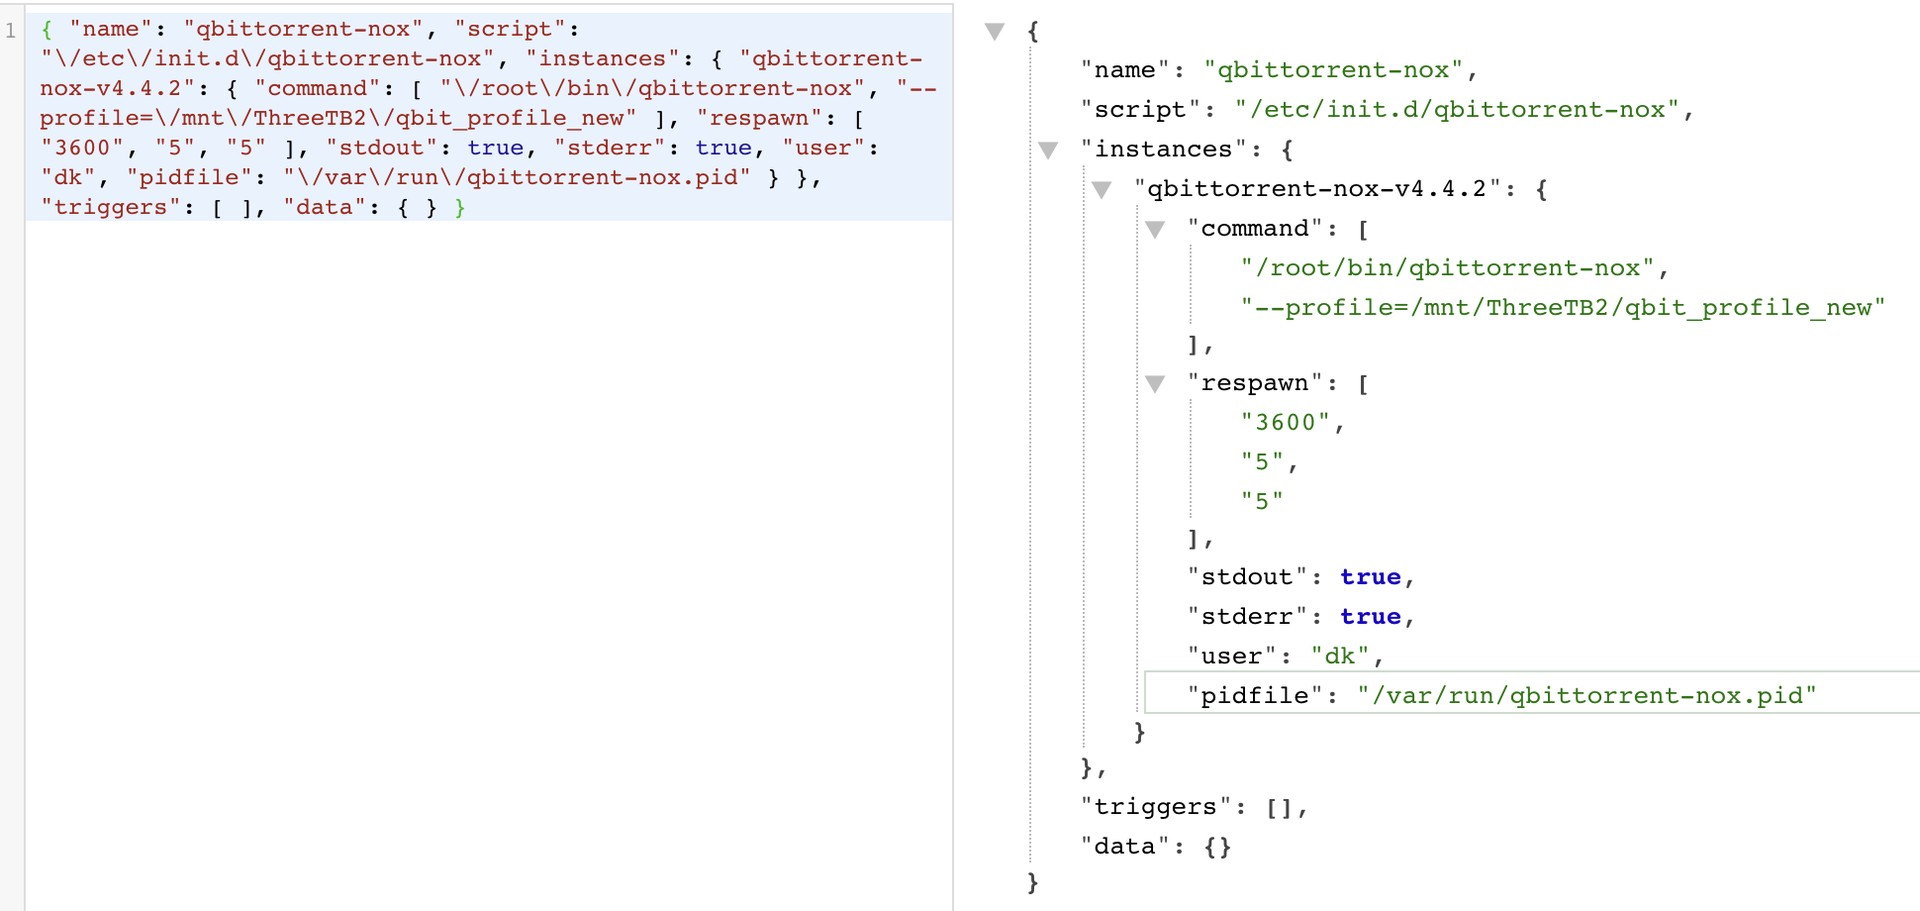
我之前一直在用固件自带的 qbittorrent 客户端,版本号是 4.1.9,有好几次高负荷下载之后无法进入 webui 的经历。前几天又遇到了,这一次我没有选择忽视它,而是直面这个问题,并试图解决它。 前天在 V2EX 发布了一个帖子: 请教一个 Linux 上的 qbittorrent-nox 问题:在大负荷下载之后 webui 不工作 还是有不少收获的,感谢评论区 v 友们的相助。我现在决定在 OpenWrt 上安装一个高版本 4.4.x 的客户端。由于 OpenWrt 官方 opkg 源里都没有 qbit 程序,所以网上流传的多是一些大神们自己编译的,甚至有 Enhanced Edition(就是 qbit ee 增强版)。在我检索了一些资料之后,我安装了本文这个 4.4.2 版本。 项目地址是 https://github.com/userdocs/qbittorrent-nox-static 我这是 x86_64(amd64) 的 OpenWrt,安装命令就如下 (以 root 用户登录) # mkdir -p ~/bin # wget -qO ~/bin/qbittorrent-nox https://github.com/userdocs/qbittorrent-nox-static/releases/latest/download/x86_64-qbittorrent-nox # chmod 755 ~/bin/qbittorrent-nox这里我为什么使用 755 的权限设定,因为我是打算使用 dk 这个用户运行程序的。在 pt 下载的目录下载好的文件也将是 dk 所拥有的。后面 samba 等等服务也是通过 dk 这个用户登录的。 由于我的 OpenWrt 安装在一个闪迪酷豆 U 盘里,所以我不打算直接运行程序,因为后续系统损坏或者什么的,会导致我的 BT_backup 里数据不完整(不是最新)。于是我带上了 --profile 参数运行 qbittorrent-nox 程序 --profile= 保存配置文件于 上面这段引用是程序的帮助文档里的,实际上不仅是配置文件保存于这个路径,缓存、数据(主要是 *.fastresume 和 *.torrent 文件)都会保存在这个路径下。 使用 tree 来观察一下文件夹结构 # tree -L 3 /mnt/ThreeTB2/qbit_profile_new /mnt/ThreeTB2/qbit_profile_new └── qBittorrent ├── cache ├── config │ ├── categories.json │ ├── ipc-socket │ ├── lockfile │ ├── qBittorrent-data.conf │ ├── qBittorrent.conf │ ├── rss │ └── watched_folders.json └── data ├── BT_backup ├── GeoDB ├── logs ├── nova └── rss 10 directories, 6 files然后我们将之前程序的相关数据通过 rsync 复制到现在新的 profile 路径下,以后启动就使用这个 profile。 下面开始编写一个 init.d 启动/管理脚本。较新的 OpenWrt PID 为 1 的 init 进程被 procd 这个程序代替,实际上我们就是编写一个 /etc/init.d/your_service cat /etc/init.d/qbittorrent-nox #!/bin/sh /etc/rc.common # Licensed to the public under the Apache License 2.0. # ubus call service list USE_PROCD=1 START=95 STOP=15 #打开 procd 的 debug 模式 #PROCD_DEBUG=1 #INIT_TRACE=1 /etc/init.d/qbittorrent-nox $start NAME=qbittorrent-nox ARGS=/root/bin/qbittorrent-nox QBIT_PROFILE=/mnt/ThreeTB2/qbit_profile_new #QBIT_PROFILE=/root/.config/qBittorrent QBIT_PID_FILE=/var/run/qbittorrent-nox.pid # 定义此处配置文件变化,配合 procd_set_param file /path/to/file 可以 auto reload your service #QBIT_INI_FILE=/tmp/qBittorrent/config/qBittorrent.conf QBIT_INSTANCE="qbittorrent-nox-v4.4.2" start_service() { procd_open_instance $QBIT_INSTANCE # 给服务实例定义一个名称 procd_set_param command $ARGS # 需要在前台被执行的服务 procd_append_param command --profile="$QBIT_PROFILE" # 给以上命令附加的指令参数 # 如果服务意外中止了,定义 redpawn 可以自动重启它,如果服务命令的确只需要运行一次,需要谨慎设定这里 # 如果进程在 respawn_threshold 定义的时间内结束了,则判定为进程崩溃并尝试重启它,尝试5次后会停止重启 procd_set_param respawn ${respawn_threshold:-3600} ${respawn_timeout:-5} ${respawn_retry:-5} #procd_set_param file /var/etc/your_service.conf # 如果此处定义的文件发生了变化,则会触发 /etc/init.d/your_service reload 重启进程 #procd_set_param netdev dev # likewise, except if dev's ifindex changes. #procd_set_param data name=value ... # likewise, except if this data changes. procd_set_param stdout 1 # 转发 stdout 输出到 logd procd_set_param stderr 1 # same for stderr procd_set_param user dk # 以 dk 用户运行服务 procd_set_param pidfile $QBIT_PID_FILE # 在服务启动时写入一个 pid 文件,在停止服务时删除此 pid 文件 procd_close_instance # 结束服务实例配置 } #stop_service() { # PID=`ps aux |grep 'qbit' |grep -v 'grep' |awk '{print $2}'` # echo "starting to kill $PID" # # 杀死 qbit 进程 pid # #kill -9 `ps aux |grep 'qbit' |grep -v 'grep' |awk '{print $2}'` # kill -9 $PID #} reload_service() { restart } restart() { echo "ready to restart qbittorrent-nox service" stop sleep 5 start }下面是一个“比较干净的”版本(没有过多注释) cat /etc/init.d/qbittorrent-nox #!/bin/sh /etc/rc.common # Licensed to the public under the Apache License 2.0. # ubus call service list USE_PROCD=1 START=95 STOP=15 NAME=qbittorrent-nox ARGS=/root/bin/qbittorrent-nox QBIT_PROFILE=/mnt/ThreeTB2/qbit_profile_new QBIT_PID_FILE=/var/run/qbittorrent-nox.pid QBIT_INSTANCE="qbittorrent-nox-v4.4.2" start_service() { procd_open_instance $QBIT_INSTANCE # 给服务实例定义一个名称 procd_set_param command $ARGS # 需要在前台被执行的服务 procd_append_param command --profile="$QBIT_PROFILE" # 给以上命令附加的指令参数 # 如果服务意外中止了,定义 redpawn 可以自动重启它,如果服务命令的确只需要运行一次,需要谨慎设定这里 # 如果进程在 respawn_threshold 定义的时间内结束了,则判定为进程崩溃并尝试重启它,尝试5次后会停止重启 procd_set_param respawn ${respawn_threshold:-3600} ${respawn_timeout:-5} ${respawn_retry:-5} procd_set_param stdout 1 # 转发 stdout 输出到 logd procd_set_param stderr 1 # same for stderr procd_set_param user dk # 以 dk 用户运行服务 procd_set_param pidfile $QBIT_PID_FILE # 在服务启动时写入一个 pid 文件,在停止服务时删除此 pid 文件 procd_close_instance # 结束服务实例配置 } reload_service() { restart } restart() { echo "ready to restart qbittorrent-nox service" stop sleep 5 start }给 qbittorrent-nox 设置权限 # chmod 755 /etc/init.d/qbittorrent-nox # chown root:root /etc/init.d/qbittorrent-nox没有 luci 页面没有关系,4.4.2 版本的 qbit 才是最需要的。 管理开机自启 # /etc/init.d/qbittorrent-nox enable # /etc/init.d/qbittorrent-nox start一点点注意事项 /root/bin/qbittorrent-nox 该文件的权限,可以设置为 0755 归属 root 用户和组,但是我的程序是在 dk 用户下运行的,所以设置为 0755 就保证了 dk 可以执行这个程序 --profile 程序的配置和数据目录 --profile= 保存配置文件于 把配置和数据通过 rsync 复制过去即可使用新的 profile 而且也持久化到了硬盘里。此时我的系统运行在一个u盘中,所以把这些数据保存在 / 下不好 不需要写 stop_service() 函数,直接使用 stop 停止 procd 的子进程 参考与感谢 a nice qbit client for OpenWrt(go to releases page to download): https://github.com/userdocs/qbittorrent-nox-static it's document page: https://userdocs.github.io/qbittorrent-nox-static/#/README https://blog.niekun.net/archives/2277.html https://oldwiki.archive.openwrt.org/inbox/procd-init-scripts https://openwrt.org/docs/guide-developer/procd-init-script-example https://openwrt.org/zh-cn/inbox/procd-init-scripts如果你想更加个性的自定义你的 procd 启动脚本,启动时遇到问题,可以添加 debug 选项 PROCD_DEBUG=1 打开 debug 模式 打开 debug 模式看到的 procd instance 信息
qbittorrent-nox 4.4.2  抱歉图裂了,也没有备份 有什么问题,欢迎留言。 |
【本文地址】