| LDAP安装和使用 | 您所在的位置:网站首页 › openldap可视化客户端 › LDAP安装和使用 |
LDAP安装和使用
|
LDAP安装和使用
最近项目的CDH集群要加LDAP认证。 做完了之后我把过程记录一下,方便以后有用的话来看看。
安装基础依赖 1yum install -y zlib-devel bzip2-devel openssl-devel ncurses-devel epel-release gcc gcc-c++ xz-devel readline-devel gdbm-devel sqlite-devel tk-devel db4-devel libpcap-devel libffi-devel e2fsprogs e2fsprogs-libs glibc-devel krb5-devel libcom_err-devel libselinux-devel libss安装软件 1yum -y install openldap-servers pam_ldap bind-utils 1.2 配置OpenLDAP日志12echo local4.* /var/log/ldap.log >> /etc/rsyslog.confsystemctl restart rsyslog.service 2 OpenLDAP服务配置将默认的配置文件复制到特定目录 1cp /usr/share/openldap-servers/slapd.ldif /etc/openldap/slapd.ldif修改配置文件 后面加了# ************************的是需要改动的 注意:配置文件中需要注意的TLS Settings配置,如果不启用则可以将相关的配置注释。 1vim /etc/openldap/slapd.ldif 1234567891011121314151617181920212223242526272829303132333435363738394041424344454647484950515253545556575859606162636465666768697071## See slapd-config(5) for details on configuration options.# This file should NOT be world readable.#dn: cn=configobjectClass: olcGlobalcn: configolcArgsFile: /var/run/openldap/slapd.argsolcPidFile: /var/run/openldap/slapd.pid## TLS settings##olcTLSCACertificatePath: /etc/openldap/certs # ************************#olcTLSCertificateFile: /etc/openldap/certs/ldap.crt # ************************#olcTLSCertificateKeyFile: /etc/openldap/certs/ldap.key # **************K********## Schema settings#dn: cn=schema,cn=configobjectClass: olcSchemaConfigcn: schemainclude: file:///etc/openldap/schema/corba.ldif # ************************include: file:///etc/openldap/schema/core.ldif # ************************include: file:///etc/openldap/schema/cosine.ldif # ************************include: file:///etc/openldap/schema/duaconf.ldif # ************************include: file:///etc/openldap/schema/dyngroup.ldif # ************************include: file:///etc/openldap/schema/inetKorgperson.ldif # ************************include: file:///etc/openldap/schema/java.ldif # ************************include: file:///etc/openldap/schema/misc.ldif # ************************include: file:///etc/openldap/schema/nis.ldif # ************************include: file:///etc/openldap/schema/openldap.ldif # ************************include: file:///etc/openldap/schema/ppolicy.ldif # ************************include: file:///etc/openldap/schema/collective.ldif # ************************## Frontend settings#dn: olcDatabase=frontend,cn=configobjectClass: olcDatabaseConfigobjectClass: olcFrontendConfigolcDatabase: frontend## Configuration database#dn: olcDatabase=config,cn=configobjectClass: olcDatabaseConfigolcDatabase: configolcAccess: to * by dn.base="gidNumber=0+uidNumber=0,cn=peercred,cn=external,cn=auth" manage by * none## Server status monitoring#dn: olcDatabase=monitor,cn=configobjectClass: olcDatabaseConfigolcDatabase: monitorolcAccess: to * by dn.base="gidNumber=0+uidNumber=0,cn=peercred,cn=external,cn=auth" read by dn.base="cn=Manager,dc=bigdata,dc=hex,dc=com" read by * none # ************************## Backend database definitions#dn: olcDatabase=hdb,cn=configobjectClass: olcDatabaseConfigobjectClass: olcHdbConfigolcDatabase: hdbolcSuffix: dc=bigdata,dc=hex,dc=com # ************************olcRootDN: cn=Manager,dc=bigdata,dc=hex,dc=com # ************************olcRootPW: 123456 # ************************olcDbDirectory: /var/lib/ldap olcDbIndex: objectClass eq,presolcDbIndex: ou,cn,mail,surname,givenname eq,pres,subolcDbIndex: uidNumber,gidNumber,loginShell eq,presolcDbIndex: uid,memberUid eq,pres,subolcDbIndex: nisMapName,nisMapEntry eq,pres,sub重新生成OpenLDAP的配置 12345678910# 删除/var/lib/ldap中旧数据(slapd启动时会根据/etc/openldap/slapd.d中配置生成数据)rm -rf /var/lib/ldap/*# 删除/etc/openldap/slapd.d/中旧的配置rm -rf /etc/openldap/slapd.d/*# 生产/etc/openldap/slapd.d/中新的配置slapadd -F /etc/openldap/slapd.d -n 0 -l /etc/openldap/slapd.ldif# 测试新的配置文件是否正确,返回"config file testing succeeded"则表示配置文件正确。slaptest -u -F /etc/openldap/slapd.d# 将默认的配置文件复制到特定目录cp /usr/share/openldap-servers/DB_CONFIG.example /var/lib/ldap/DB_CONFIG修改相关目录权限 12chown -R ldap:ldap /etc/openldap/slapd.dchown -R ldap:ldap /var/lib/ldap启动LDAP服务 12345systemctl start slapdsystemctl restart slapdsystemctl status slapdsystemctl enable slapdsystemctl is-enabled slapd 3 OpenLDAP客户端安装3.1 安装openldap-clients软件1yum -y install openldap-clients 3.2 修改配置文件1vim /etc/openldap/ldap.conf 12BASE dc=bigdata,dc=hex,dc=comURI ldap://192.168.1.61:389该配置文件主要用于客户端命令访问LDAP,例如ldapsearch 注意:如果未配置/etc/openldap/ldap.conf文件则需要在ldapsearch命令后加 -h 192.168.1.61 -p 389 -b “dc=bigdata,dc=hex,dc=com” 参数。 4 OpenLDAP客户端命令4.1 添加根域及管理员账号1vim root.ldif 123456789dn: dc=bigdata,dc=hex,dc=comdc: bigdataobjectClass: topobjectClass: domaindn: cn=Manager,dc=bigdata,dc=hex,dc=comcn: ManagerobjectClass: organizationalRole 1ldapadd -x -D "cn=Manager,dc=bigdata,dc=hex,dc=com" -w 123456 -f root.ldif 4.2 添加基础文件和用户组1vim base.ldif 12345678910dn: ou=People,dc=bigdata,dc=hex,dc=comou: PeopleobjectClass: topobjectClass: organizationalUnitdn: ou=Group,dc=bigdata,dc=hex,dc=comou: GroupobjectClass: topobjectClass: organizationalUnit 1ldapadd -x -D "cn=Manager,dc=bigdata,dc=hex,dc=com" -w 123456 -f base.ldif 4.3 添加用户和用户组1vim xiaoma.ldif 12345678910111213141516171819dn: cn=xiaoma,ou=Group,dc=bigdata,dc=hex,dc=comobjectClass: posixGroupobjectClass: topcn: xiaomagidNumber: 1001memberUid: xiaomadn: uid=xiaoma,ou=People,dc=bigdata,dc=hex,dc=comuid: xiaomacn: xiaomaobjectClass: accountobjectClass: posixAccountobjectClass: topuserPassword: xiaoma123loginShell: /bin/bashuidNumber: 1001gidNumber: 1001homeDirectory: /home/xiaoma 1ldapadd -x -D "cn=Manager,dc=bigdata,dc=hex,dc=com" -w 123456 -f xiaoma.ldif 4.4 修改用户密码1vim changepasswd.ldif 1234dn: uid=xiaoma,ou=People,dc=bigdata,dc=hex,dc=comchangetype: modifyreplace: userPassworduserPassword: 1234567 1ldapmodify -x -D "cn=Manager,dc=bigdata,dc=hex,dc=com" -w 123456 -f changepasswd.ldif 4.5 查看用户信息1ldapsearch -x -D 'cn=Manager,dc=bigdata,dc=hex,dc=com' -w 123456 -b 'ou=People,dc=bigdata,dc=hex,dc=com' 4.6 查看用户组信息1ldapsearch -x -D 'cn=Manager,dc=bigdata,dc=hex,dc=com' -w 123456 -b 'ou=Group,dc=bigdata,dc=hex,dc=com' 4.7 删除用户信息1ldapdelete -x -D "cn=Manager,dc=bigdata,dc=hex,dc=com" -w 123456 'uid=xiaoma,ou=People,dc=bigdata,dc=hex,dc=com' 4.8 删除组信息1ldapdelete -x -D "cn=Manager,dc=bigdata,dc=hex,dc=com" -w 123456 'cn=Manager,ou=Group1,dc=bigdata,dc=hex,dc=com' 5 OpenLDAP可视化工具5.1 安装Apache Directory Studio下载地址:https://directory.apache.org/studio/downloads.html(注意:如果安装提示jdk需要11+之类的,换个低版本的下载即可)
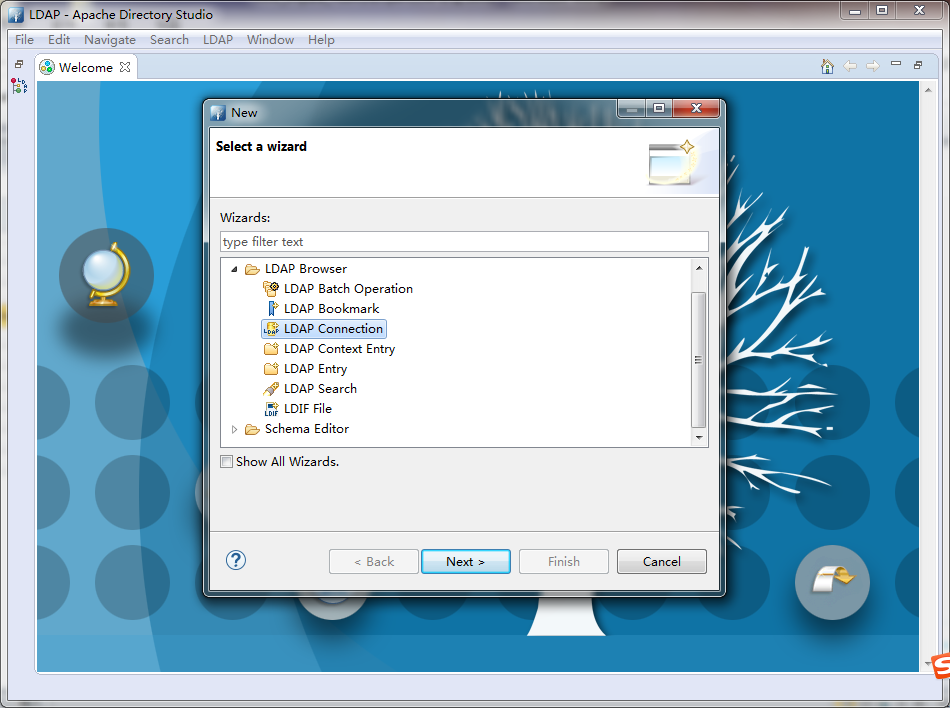
点击File > New
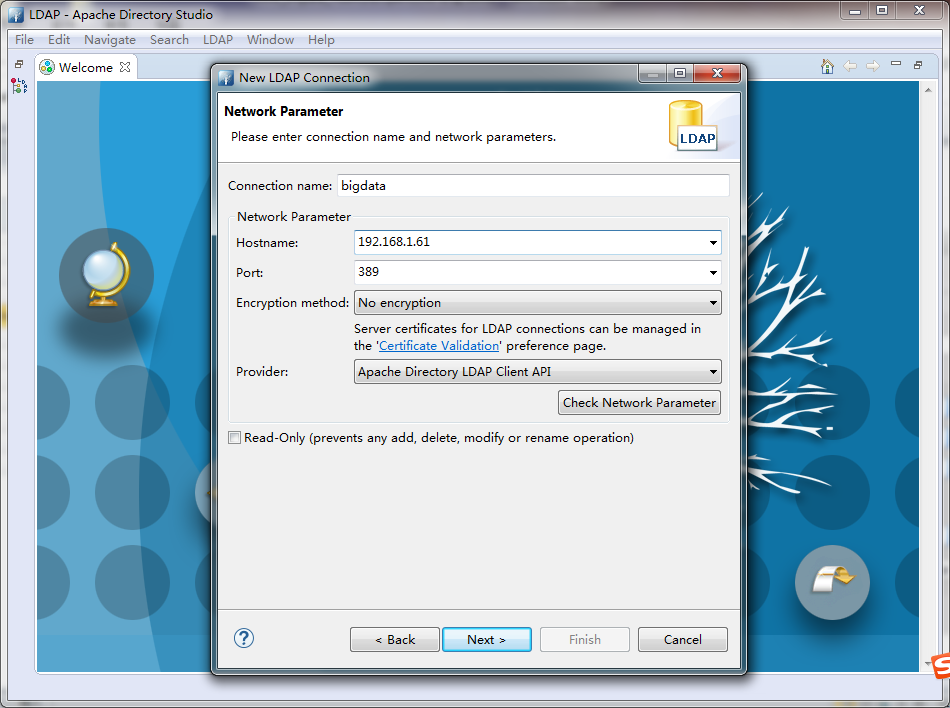
设置LDAP服务器地址
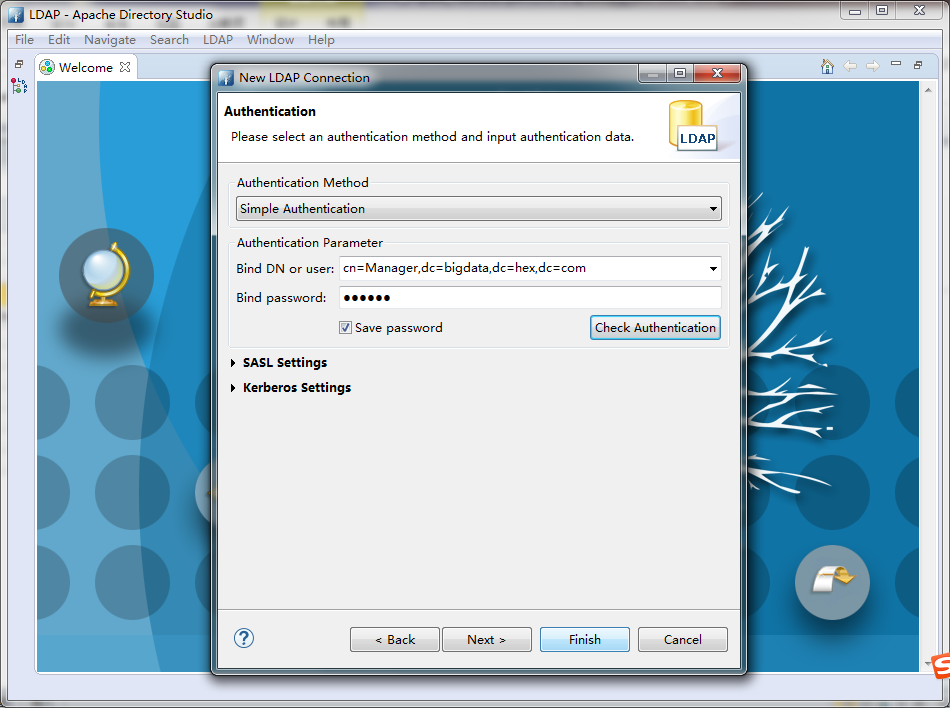
设置认证账户密码,使用LDAP超级用户Manager
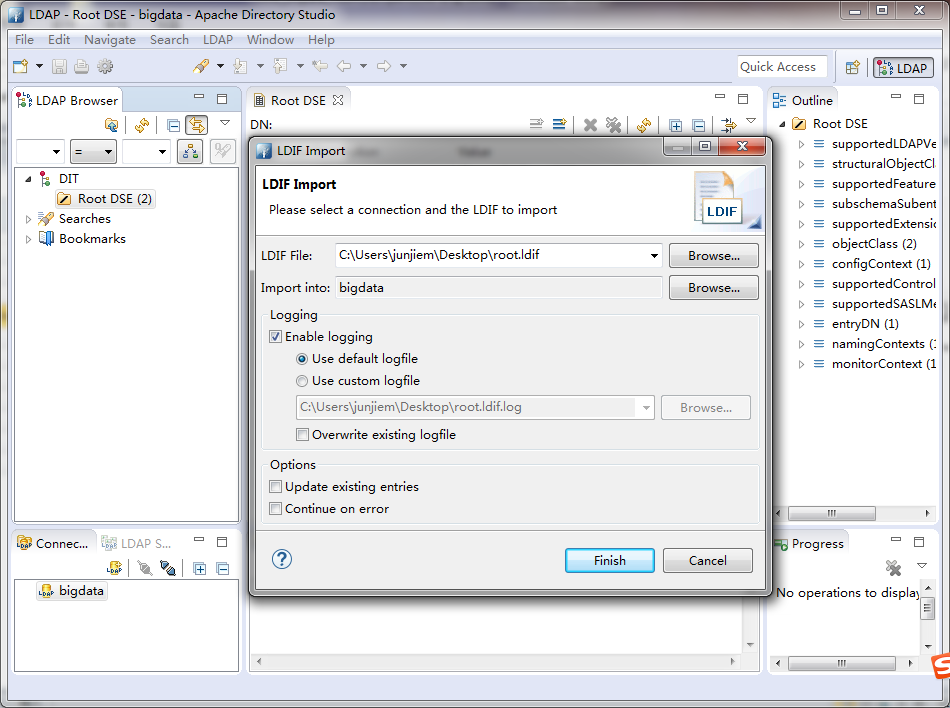
设置完毕后,点击Check Authentication确认输入的账户密码是否可以登录 5.3 初始化LDAP根节点编写root.ldif文件 (创建在本机,到时通过界面导入,注意”,”间不能有空格) 123456# root nodedn: dc=bigdata,dc=hex,dc=comdc: bigdataobjectClass: dcObjectobjectClass: organizationalUnitou: bigdata,hex,com导入root.ldfi 点击Root DSE右键 > Import > LDIF Import
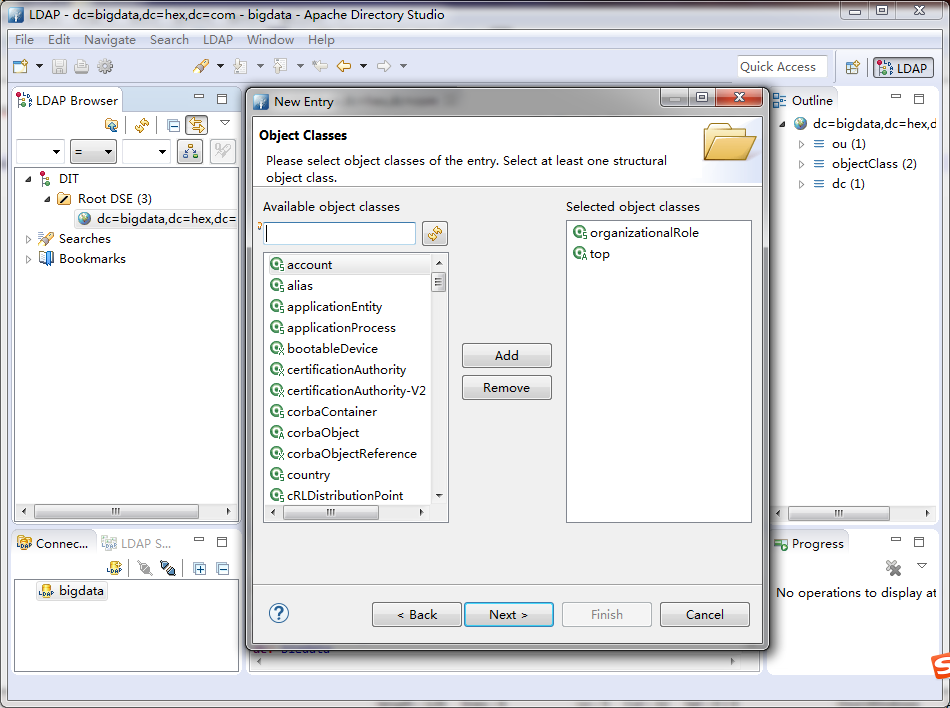
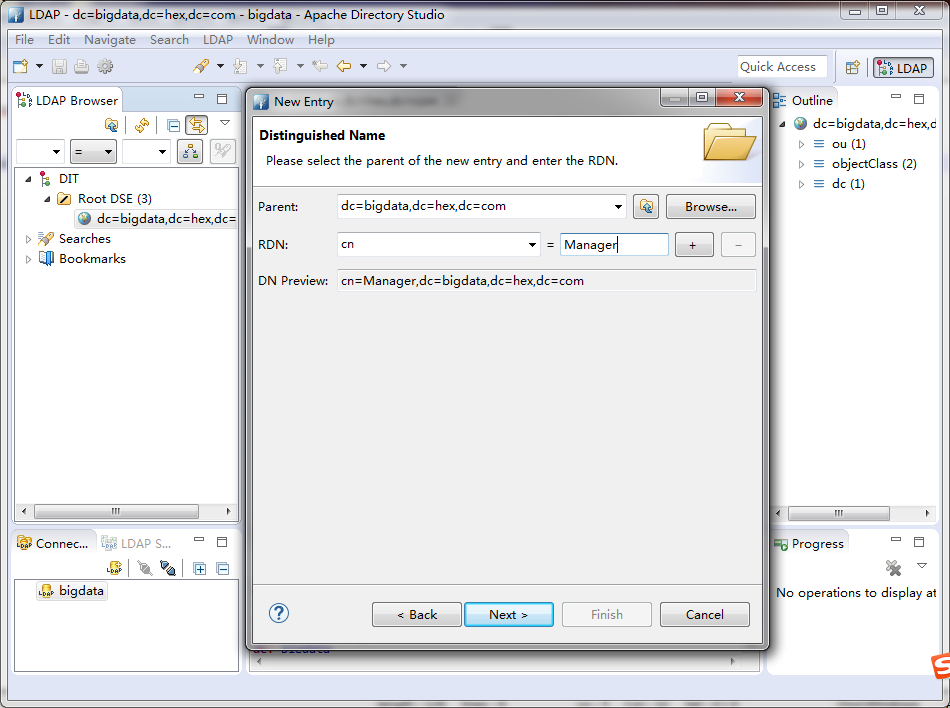
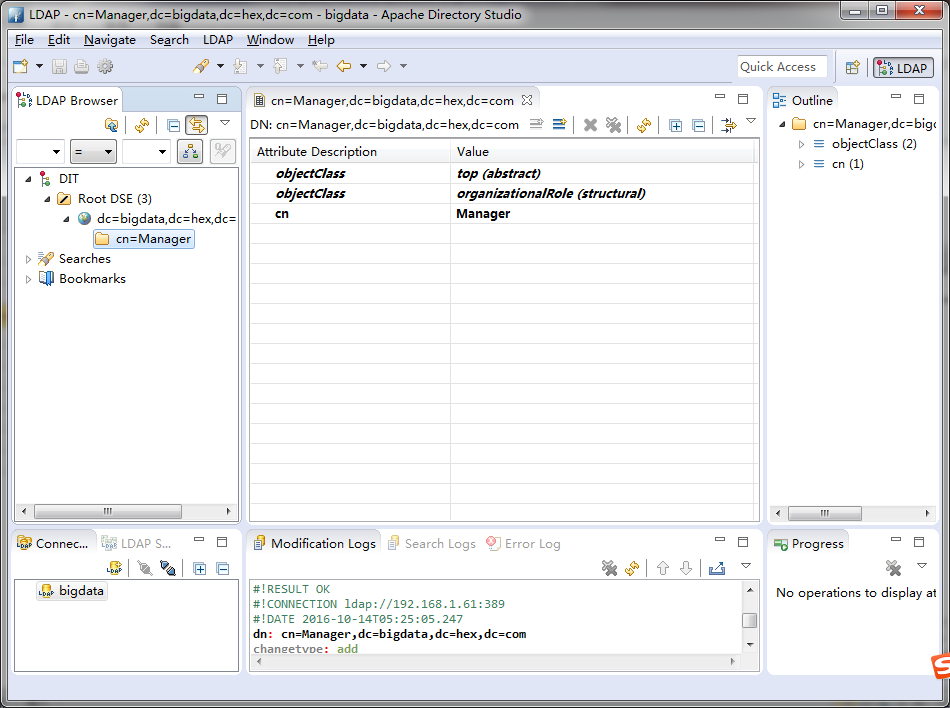
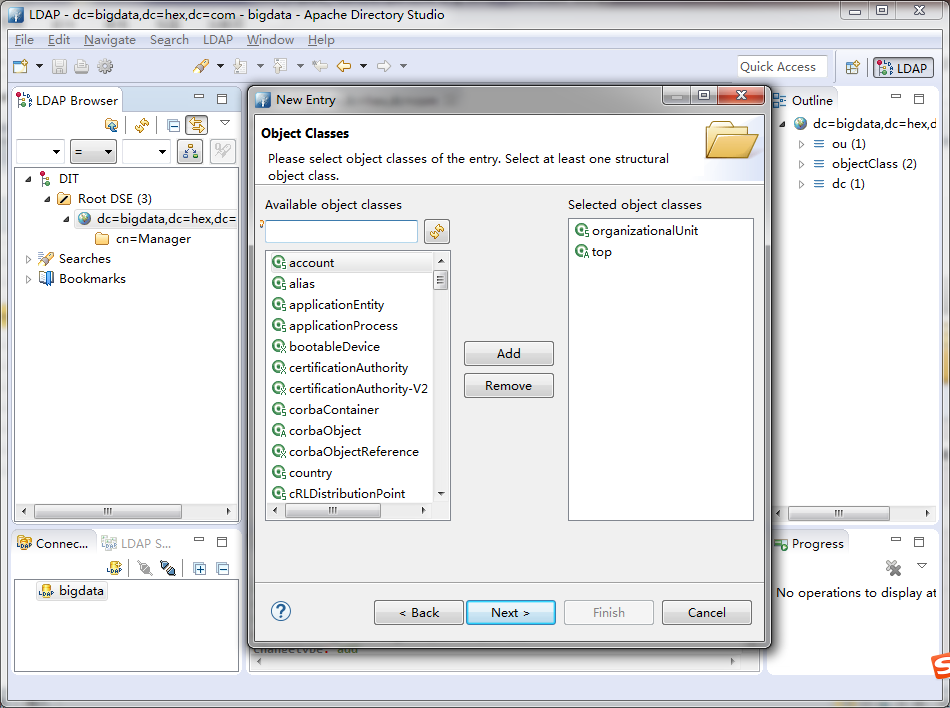
点击dc=bigdata,dc=hex,dc=com右键 > New > New Entry
点击dc=bigdata,dc=hex,dc=com右键 > New > New Entry
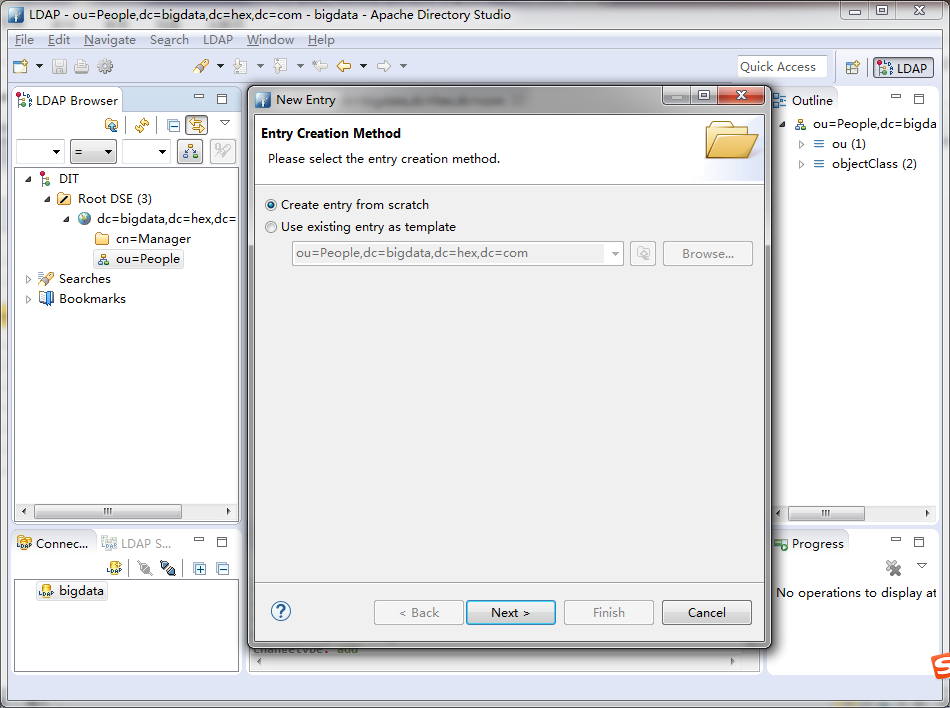
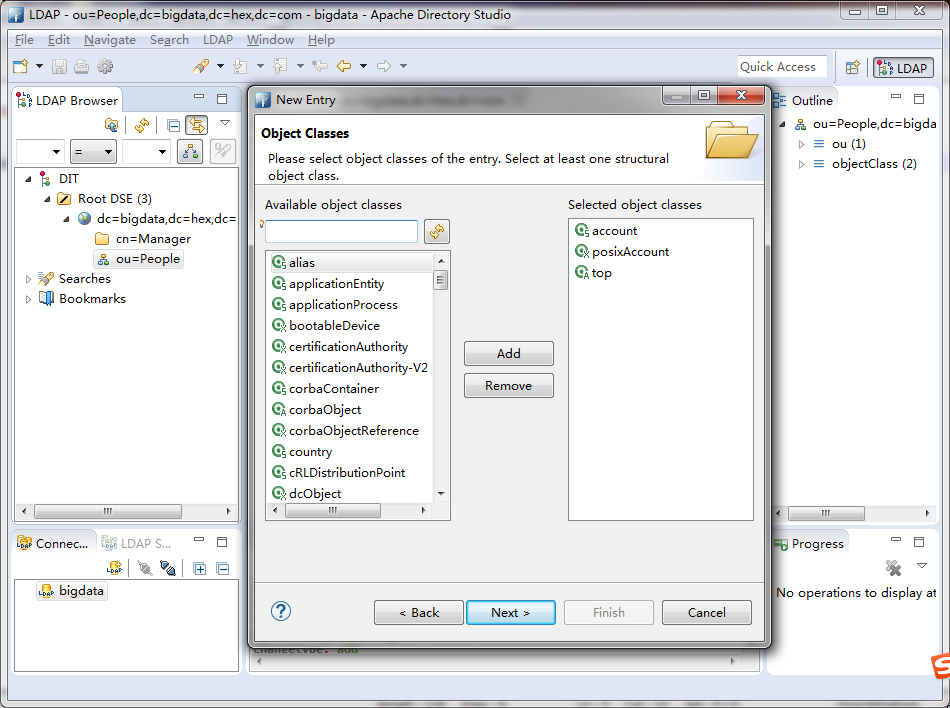
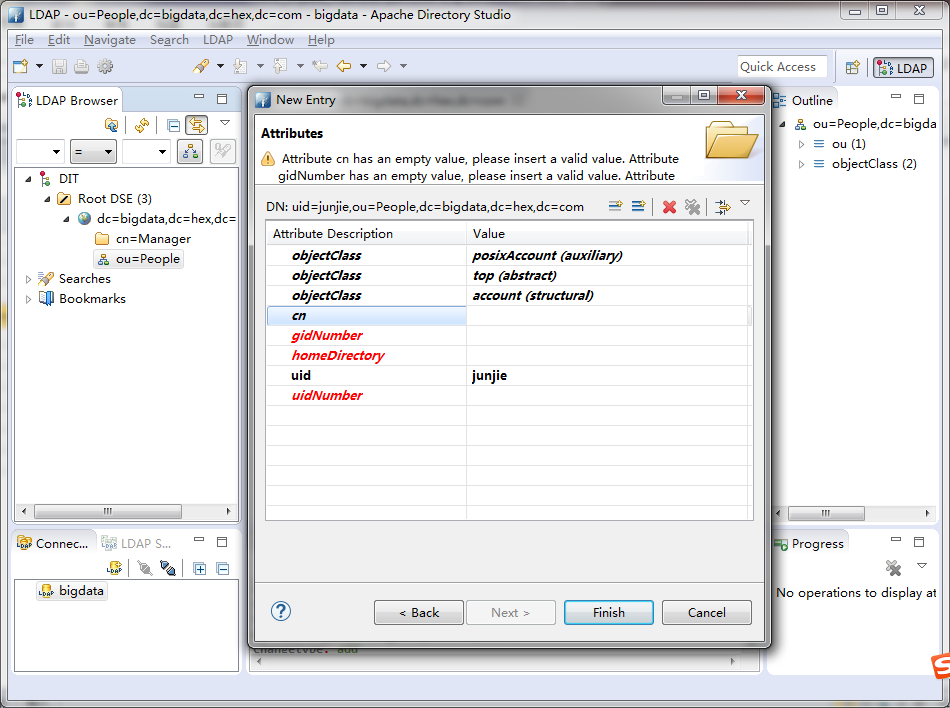
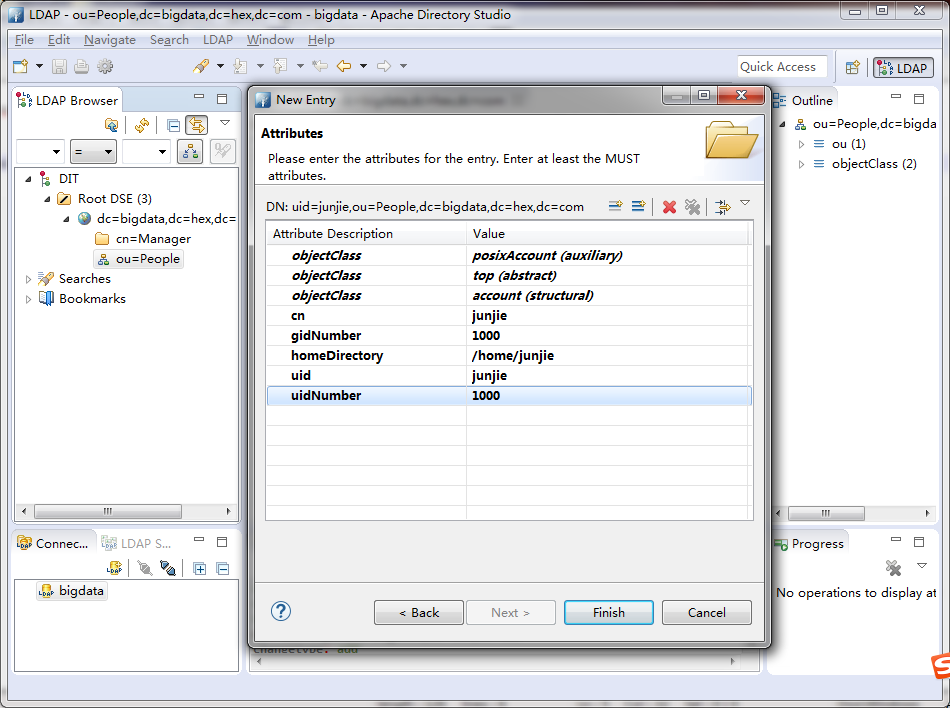
点击ou=People右键 > New > New Entry
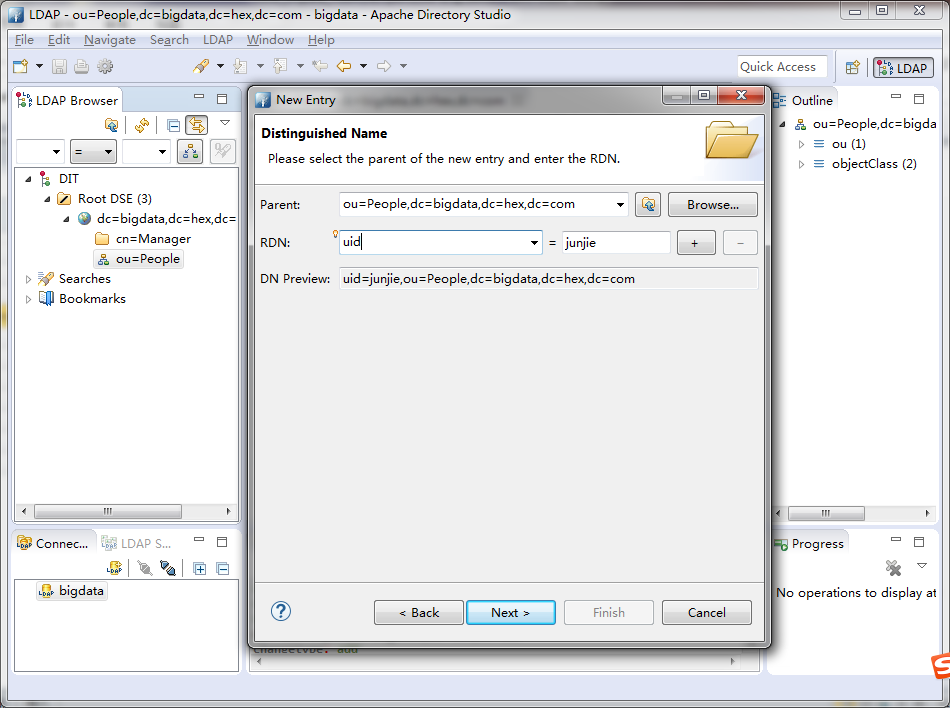
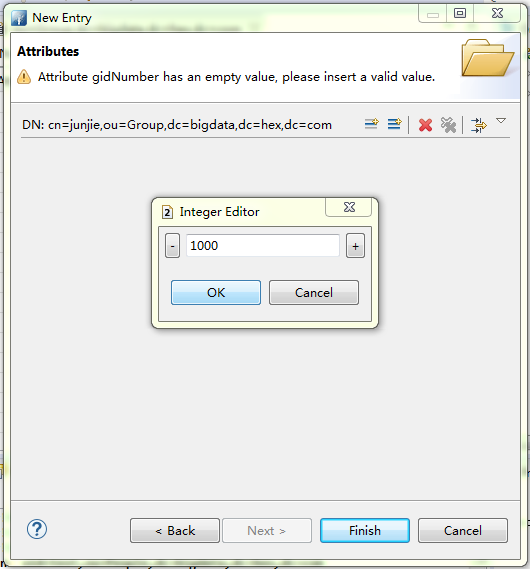
注:这里的gidNumber和uidNumber需要大于999,小于999的为系统保留用户,推荐使用2000之后的值作为id。
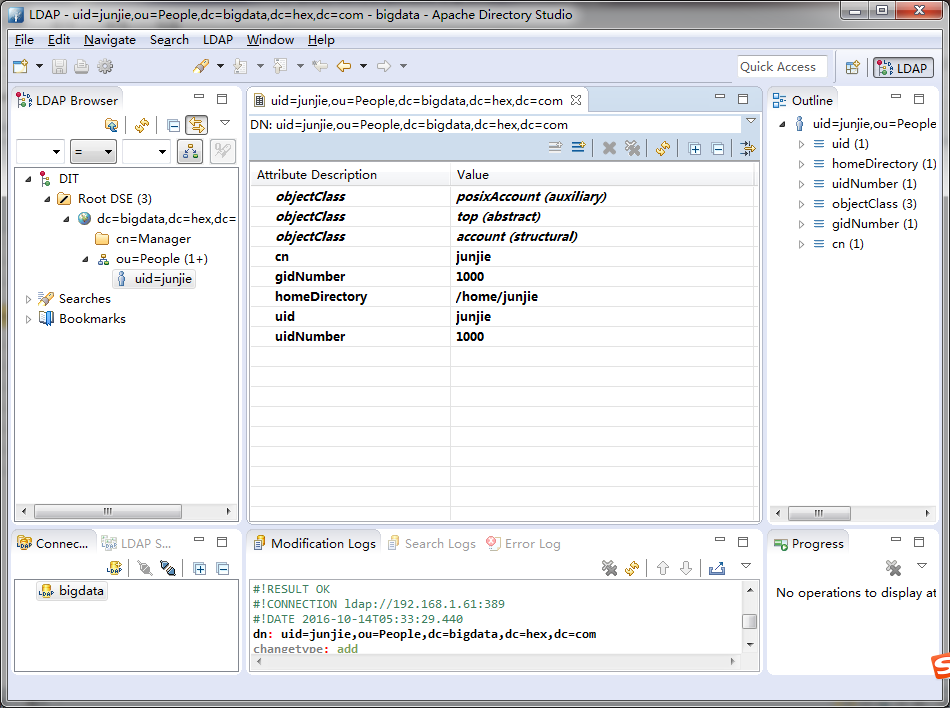
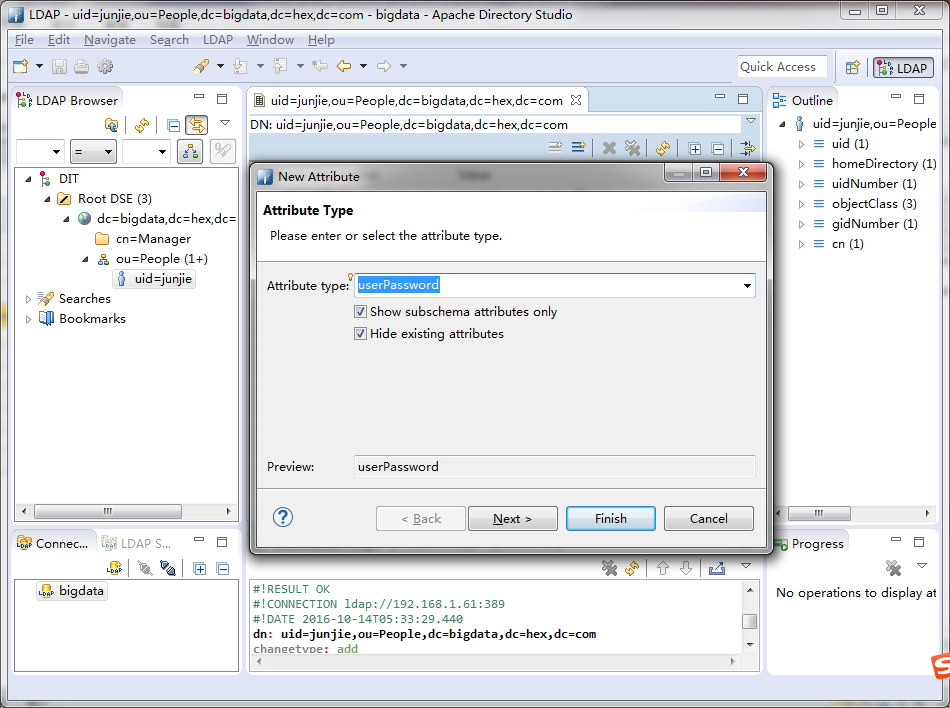
设置junjie的密码: 点击uid=junjie,在右侧属性栏右键 > New Attribute
这里设置为111111 同上再设置loginShell=/bin/bash 5.7 创建一个名为Group的organization unit,创建过程同People
点击ou=Group右键 > New > New Entry
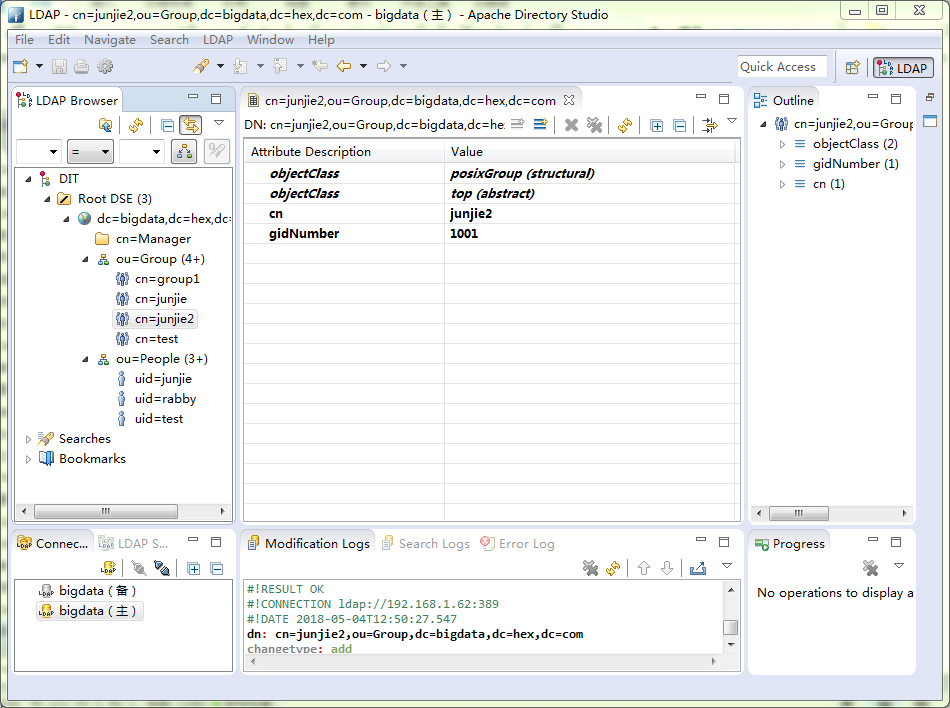
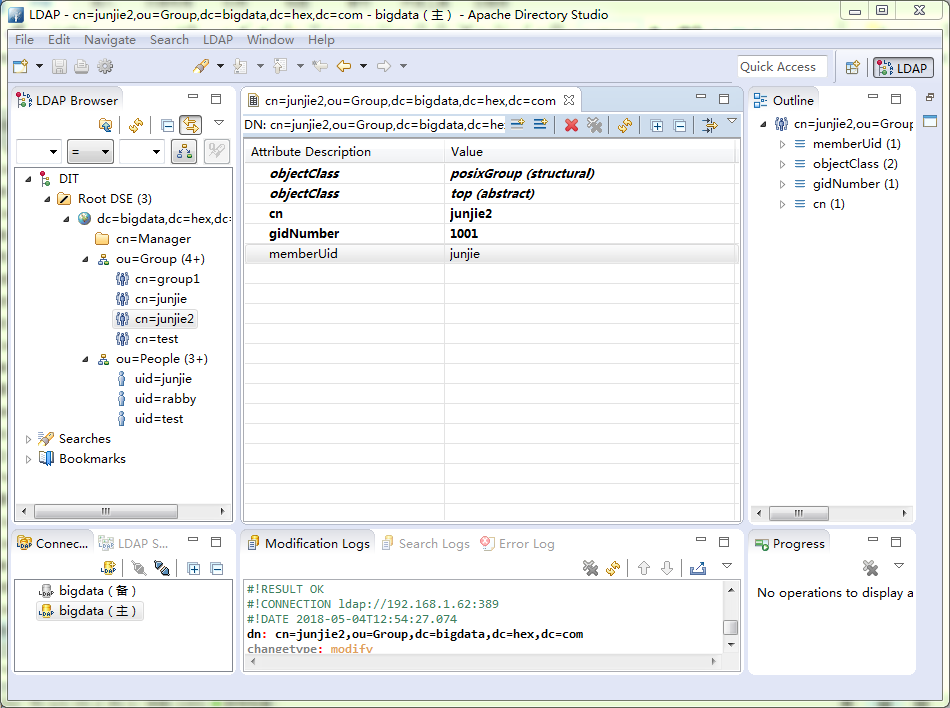
注:这里的值(gidNumber)与对应的junjie用户中输入的值(gidNumber)一致,表示junjie这个用户属于junjie这个组。这里只做一个用户属于其同名的组。
点击ou=Group右键 > New > New Entry
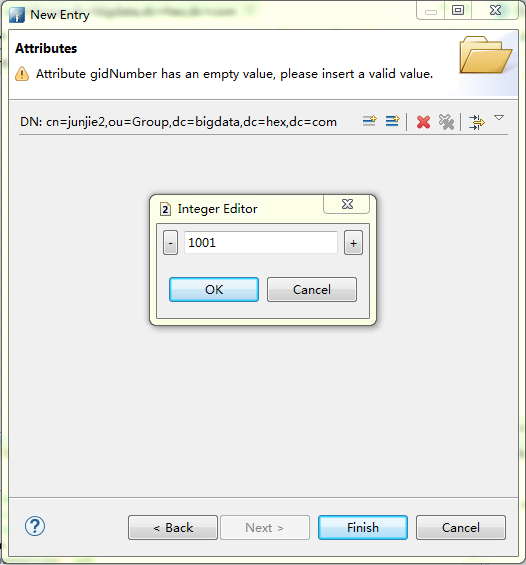
注:这里的值(gidNumber)不能与之前junjie组的值(gidNumber)一样。
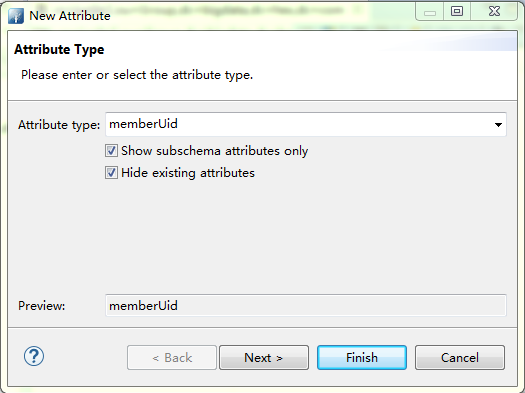
设置成员的UID: 点击cn=junjie2,在右侧属性栏右键 > New Attribute
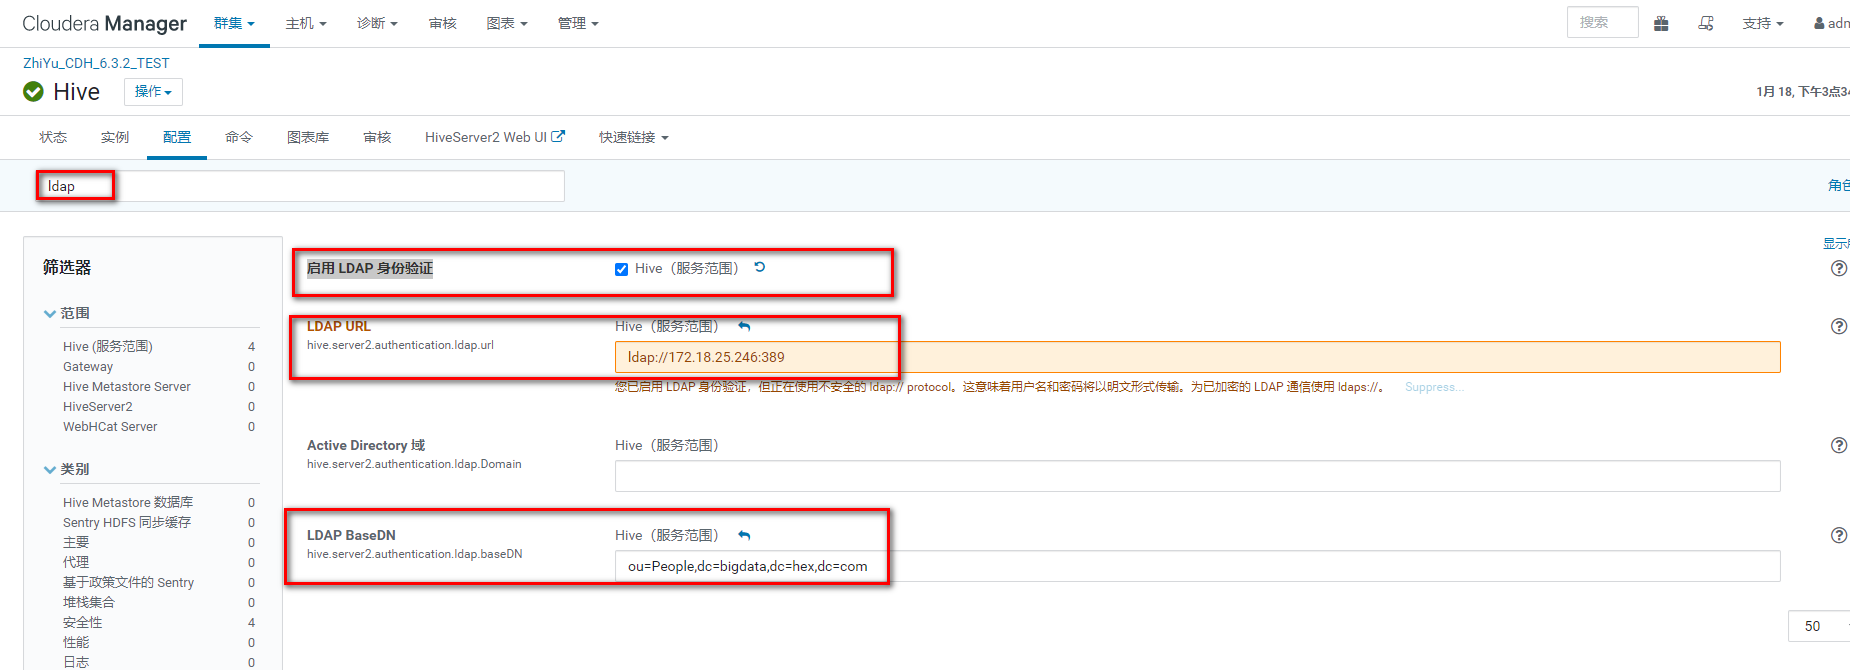
memberUid中输入用户的uid,这里memberUid可以有多个。 6 各组件开启LDAP6.1 Hive开启LDAP搜索ldap 1 启用 LDAP 身份验证 改为true 2 LDAP URL添加ldap://172.18.25.246:389 注:如果OpenLDAP实现了主主同步HA,则这里输入类似如下的配置”ldap://172.18.25.246:389 ldap://172.18.25.247:389”。 3 LDAP BaseDN添加ou=People,dc=bigdata,dc=hex,dc=com 该配置必须指向用户所在的Organization Unit(ou),因为Hive会直接使用uid+baseDN作为该用户的dn在LDAP中进行查询。 4 重启hive等相关服务
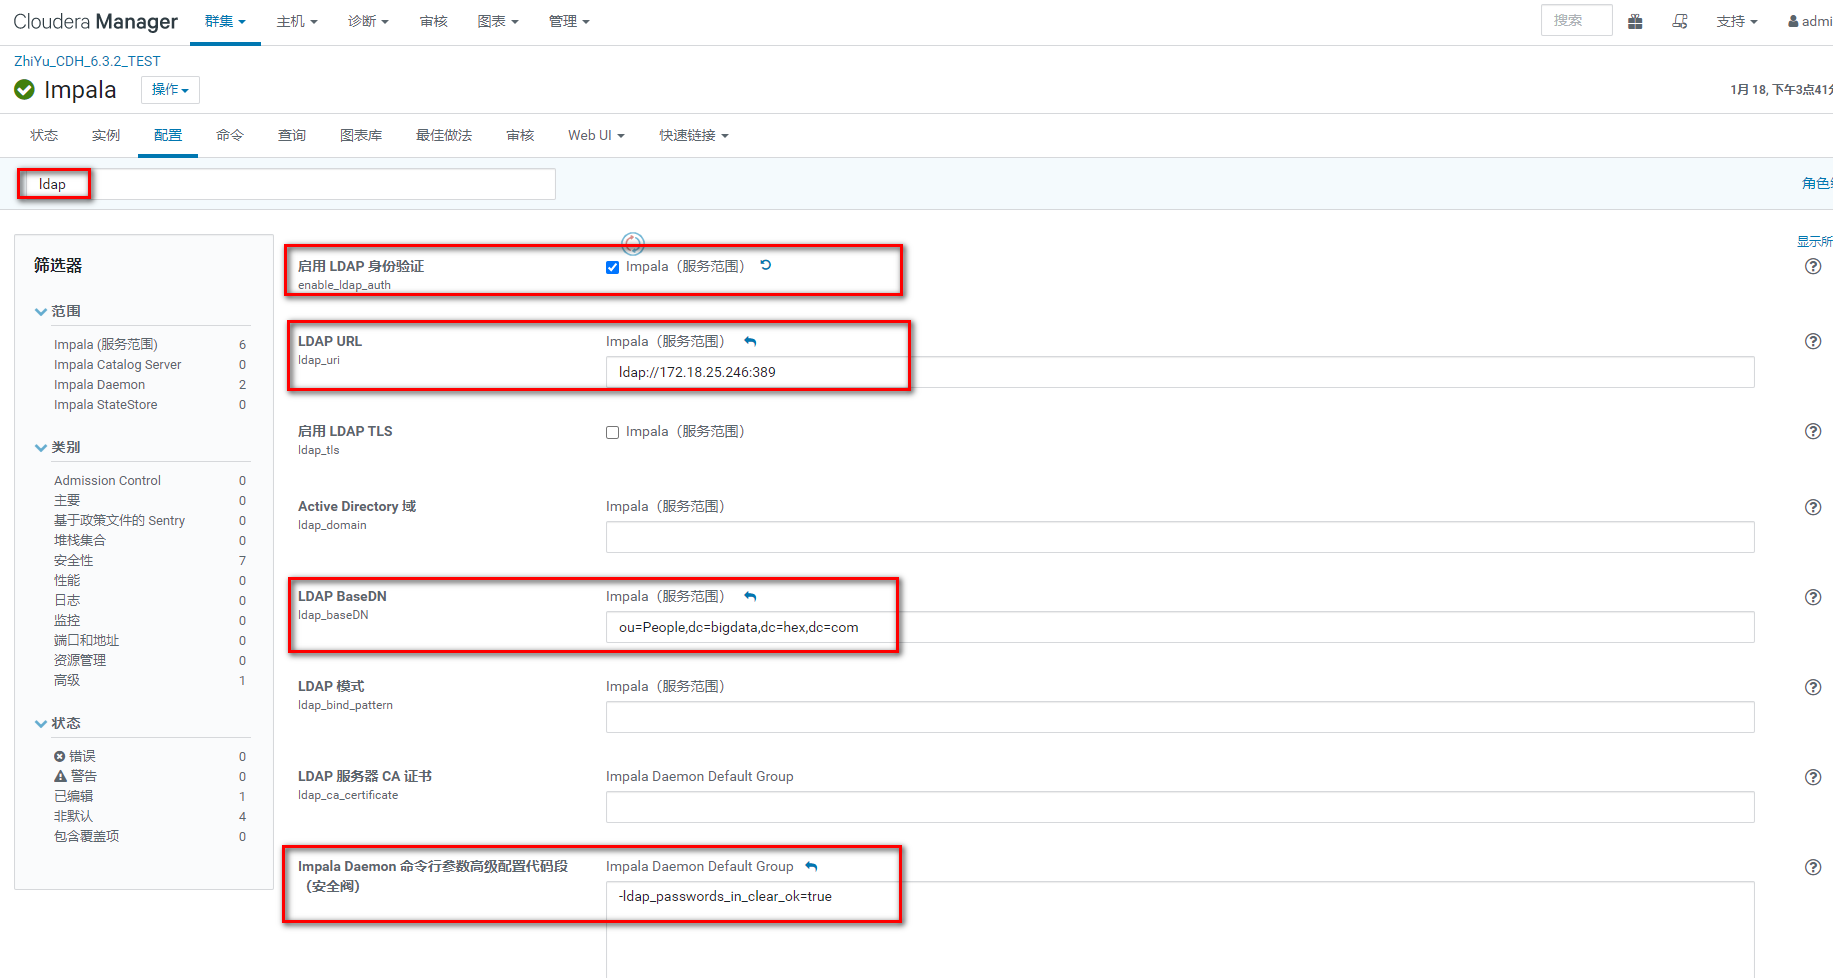
搜索ldap 1 启用 LDAP 身份验证 改为true 2 LDAP URL添加ldap://172.18.25.246:389 注:如果OpenLDAP实现了主主同步HA,则这里输入类似如下的配置”ldap://172.18.25.246:389 ldap://172.18.25.247:389”。 3 LDAP BaseDN添加ou=People,dc=bigdata,dc=hex,dc=com 4 Impala Daemon 命令行参数高级配置代码段(安全阀)添加-ldap_passwords_in_clear_ok=true 没有启用LDAP TLS时(搜索”ldap_tls”可以查看是否启用),需要在”Impala Daemon命令行参数高级配置代码段(安全阀)”添加”-ldap_passwords_in_clear_ok=true” 5 重启impala等相关服务
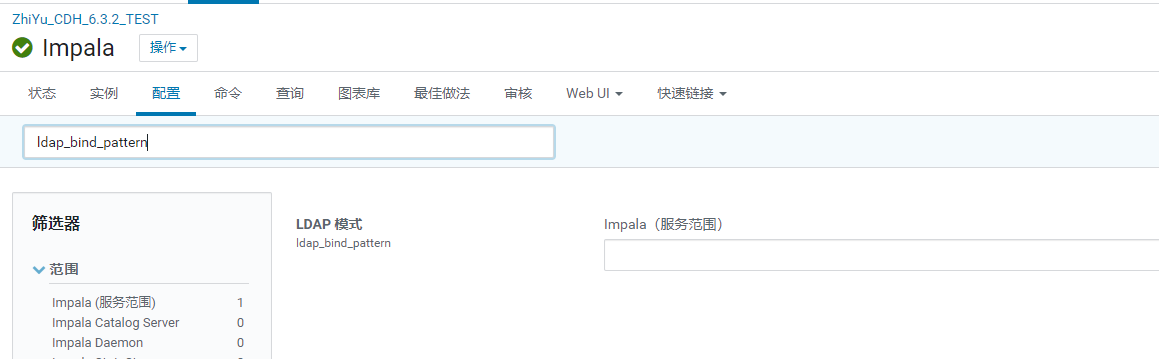
注意1:仅当需要做严格的用户绑定,或用户名不是通过uid指定时,配置"LDAP 模式"。此参数与 LDAP 域和 LDAP BaseDN 相互排斥。(我们这里不做这个配置) 搜索”ldap_bind_pattern”添加”uid=#UID,ou=People,dc=bigdata,dc=hex,dc=com”
使用hive驱动 1234567PoolProperties poolProperties = getPoolProperties();properties.setInitialSize(1);DataSource dataSource = new DataSource(poolProperties);dataSource.setDriverClassName("org.apache.hive.jdbc.HiveDriver");dataSource.setUrl("jdbc:hive2://172.18.25.246:21050");dataSource.setUsername(username);dataSource.setPassword(password);使用impala驱动 1234567PoolProperties poolProperties = getPoolProperties();properties.setInitialSize(1);DataSource dataSource = new DataSource(poolProperties);dataSource.setDriverClassName("com.cloudera.impala.jdbc41.Drive");dataSource.setUrl("jdbc:impala://172.18.25.246:21050;AuthMech=3");dataSource.setUsername(username);dataSource.setPassword(password); Finally 躺板板红伞伞白杆杆,吃完一起躺板板 躺板板埋山山,亲朋都来吃饭饭 饭饭里有红伞伞,吃完全村埋山山,来年长满红伞伞 关注博主不迷路
本博客所有文章除特别声明外,均为原创。版权归博主小马所有。任何团体、机构、媒体、网站、公众号及个人不得转载。如需转载,请联系博主(关于页面)。如其他团体、机构、媒体、网站、博客或个人未经博主允许擅自转载使用,请自负版权等法律责任! Docker_Compose安装和使用 上一篇 Python离线安装 下一篇 |


【本文地址】