| PXE全自动批量安装linux系统【全程干货详解 | 您所在的位置:网站首页 › linux服务器网络配置详解图 › PXE全自动批量安装linux系统【全程干货详解 |
PXE全自动批量安装linux系统【全程干货详解
|
一、PXE概述(一)、PXE批量部署的优点规模化:同时装配多台服务器自动化:安装系统、配置各种服务远程实现:不需要光盘、U盘等安装介质 PXE(Preboot eXcution Environment) 预启动执行环境,在操作系统之前运行 服务端 运行DHCP服务,用来分配地址、定位引导程序 运行TFTP服务,提供引导程序下载 客户端 网卡支持PXE协议 主板支持网络引导 (二)、基本部署过程准备CentOS 7 安装源(YUM仓库) 安装并启用TFTP服务 提供Linux内核、PXE引导程序等 安装并启用DHCP服务 配置启动菜单 (三)、部署PXE网络体系要求若要搭建 PXE 网络体系,必须满足以下几个前提条件: 客户端: 1.客户机的网卡要支持PXE协议(集成BOOTROM芯片),且主板支持网络引导。一般大多数服务器主机都支持,只需在BIOS设置中允许从 Network 或 LAN 启动即可。 服务端: 2.网络中有一台 DHCP 服务器以便为客户机自动分配地址、指定引导文件位置。 3.服务器要通过 TFTP服务(简单文件传输协议)来提供系统内核和引导镜像文件的下载 (四)、搭建 PXE 远程安装服务器步骤PXE 远程安装服务器集成了 CentOS 7 安装源、TFTP 服务、DHCP 服务、FTP 服务,能够向客户机裸机发送 PXE引导程序、Linux 内核、启动菜单等数据,以及提供安装文件。 TFTP(简单文件传输协议),是一个基于UDP协议实现的用于在客户机和服务器之间进行简单文件传输的协议,适合于小文件传输的应用场合。TFTP服务默认由xinetd服务进行管理,使用UDP 端口69 xinetd是新一代的网络守护进程服务程序,又叫超级服务器,常用来管理多种轻量级Internet服务 1、安装并启用 TFTP 服务yum -y install tftp-server xinetd修改TFTP服务的配置文件 # vim /etc/xinetd.d/tftp protocol = udp # TFTP默认使用UDP协议 wait = no # no表示客户机可以多台一起连接,yes表示客户机只能一台一台连接 server_args = -s /var/lib/tftpboot # 指定TFTP根目录(引导文件的存储路径) disable = no # no表示开启TFTP服务重启服务 systemctl start tftp systemctl enable tftp systemctl start xinetd systemctl enable xinetd2、安装并启用 DHCP 服务yum -y install dhcp cp /usr/share/doc/dhcp-4.2.5/dhcpd.conf.example /etc/dhcp/dhcpd.conf 修改DHCP服务的配置文件 # vim /etc/dhcp/dhcpd.conf # dhcpd.conf # # Sample configuration file for ISC dhcpd # # option definitions common to all supported networks... log-facility local7; subnet 10.0.0.0 netmask 255.0.0.0 { #指定为那个网段分配网络参数 range 10.0.0.50 10.0.0.100; #设置准备为客户端分配的IP地址范围 option domain-name-servers 10.0.0.12; #设置分配给客户端的DNS服务器地址 option routers 10.0.0.2; #设置分配给客户端的网关地址。 # option broadcast-address 10.5.5.31; #广播地址,注释掉后用默认的 default-lease-time 600; # 地址租赁时间 600秒后失效 max-lease-time 7200; next-server 10.0.0.12; # 下一个要访问的地址,就是tftp地址。 filename "pxelinux.0"; #要访问tftp上哪一个文件。 }重启服务并设置自启动 systemctl start dhcpd systemctl enable dhcpd ss -tulanp|grep -w 67 #查看端口3、准备 Linux 内核、初始化镜像文件mount /opt/CentOS-7-x86_64-DVD-2009.iso /mnt #先挂载光盘镜像 # 这里需要将两个重要文件复制到/var/lib/tftpboot/(vmlinuz、initrd.img) cd /mnt/images/pxeboot cp vmlinuz /var/lib/tftpboot/ #复制 Linux系统的内核文件 到TFTP根目录下 cp initrd.img /var/lib/tftpboot/ #复制 初始化镜像文件(linux引导加载模块)到TFTP根目录下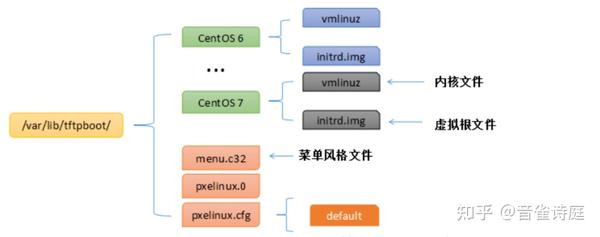 4.准备 PXE 引导程序yum -y install syslinux # PXE引导程序由软件包 syslinux 提供
cp /usr/share/syslinux/pxelinux.0 /var/lib/tftpboot/ # 复制 PXE引导程序 到TFTP根目录下5.安装FTP服务,准备CentOS 7 安装源yum -y install vsftpd # 安装vsftpd服务
mkdir /var/ftp/centos7 # 新建centos7目录,并将光盘镜像下的文件全部复制到centos7目录下
cp -rf /mnt/* /var/ftp/centos7/
systemctl enable vsftpd
systemctl start vsftpd6.配置启动菜单文件# 默认的启动菜单文件在TFTP根目录的 pxelinux.cfg子目录下,文件名为default
mkdir /var/lib/tftpboot/pxelinux.cfg # 需要在ftfpboot目录下创建pxelinux.cfg
# vim /var/lib/tftpboot/pxelinux.cfg/default # 在pxelinux.cfg目录下创建default并编辑配置文件
default auto
prompt 1
label auto
kernel vmlinuz
append initrd=initrd.img method=ftp://10.0.0.12/centos7 # 为ftp服务器地址
label linux text
kernel vmlinuz
append text initrd=initrd.img method=ftp://10.0.0.12/centos7
label linux rescue
kernel vmlinuz
append rescue initrd=initrd.img method=ftp://10.0.0.12/centos7
# 重启TFTP服务
systemctl restart tftp7.关闭防火墙,验证 PXE 网络安装 4.准备 PXE 引导程序yum -y install syslinux # PXE引导程序由软件包 syslinux 提供
cp /usr/share/syslinux/pxelinux.0 /var/lib/tftpboot/ # 复制 PXE引导程序 到TFTP根目录下5.安装FTP服务,准备CentOS 7 安装源yum -y install vsftpd # 安装vsftpd服务
mkdir /var/ftp/centos7 # 新建centos7目录,并将光盘镜像下的文件全部复制到centos7目录下
cp -rf /mnt/* /var/ftp/centos7/
systemctl enable vsftpd
systemctl start vsftpd6.配置启动菜单文件# 默认的启动菜单文件在TFTP根目录的 pxelinux.cfg子目录下,文件名为default
mkdir /var/lib/tftpboot/pxelinux.cfg # 需要在ftfpboot目录下创建pxelinux.cfg
# vim /var/lib/tftpboot/pxelinux.cfg/default # 在pxelinux.cfg目录下创建default并编辑配置文件
default auto
prompt 1
label auto
kernel vmlinuz
append initrd=initrd.img method=ftp://10.0.0.12/centos7 # 为ftp服务器地址
label linux text
kernel vmlinuz
append text initrd=initrd.img method=ftp://10.0.0.12/centos7
label linux rescue
kernel vmlinuz
append rescue initrd=initrd.img method=ftp://10.0.0.12/centos7
# 重启TFTP服务
systemctl restart tftp7.关闭防火墙,验证 PXE 网络安装使用 VMware创建的虚拟机进行测试,虚拟机内存至少需要 2GB,否则在启动安装时可能会报错。 开启虚拟机, 在提示字符串“boot: ”后直接按Enter键(或执行“auto”命令),将会自动通过网络下载安装文件,并进入默认的图形安装入口; 若执行“linux text”命令,则进入文本安装入口; 若执行 “linux rescue”命令,则进入救援模式。 当vsftp、tftp、syslinux、dhcp服务建立起来且/etc/xinetd.d/tftp,/var/lib/tftpboot/pxelinux.cfg/default和/etc/dhcp/dhcpd.conf文件配置完成后即可成功引导客户机进行Linux装机,但此时仍需手动操作 下面将介绍通过kickstart无人值守自动装机 (五)、自动化安装linux系统8、准备安装应答文件(1)安装system-config-kickstart 工具 yum install -y system-config-kickstart # 需要图形化机器支持,没有图形化直接跳过(2)打开“Kickstart 配置程序”窗口 通过桌面菜单“应用程序”-->“系统工具”-->“Kickstart” 打开 或执行 “system-config-kickstart” 命令打开 # 生成kickstart模板文件 centos7.cfg # 放到/var/ftp/ 与centos文件夹一个目录,或者centos里面也行,但是default文件里的配置路径要更改 # 检查ks文件语法是否有错 ksvalidator centos7.cfg #platform=x86, AMD64, or Intel EM64T #version=DEVEL # Install OS instead of upgrade install # Keyboard layouts keyboard --vckeymap=us --xlayouts='us' ##键盘布局为美式键盘 # Root password sha512 123456 #root用户密码的设定,可利用openssl命令设定(用法见百度) rootpw --iscrypted $1$8ZQVKeWY$hfGqJgqcymbGI3rvUWT310 # System language lang en_US.UTF-8 --addsupport=zh_CN.UTF-8 ##系统支持的语言 # System authorization information auth --useshadow --passalgo=sha512 # Use graphical install text ##安装过程不开图形 # graphical ##安装过程开启图形 # SELinux configuration selinux --disabled # Do not configure the X Window System skipx ##安装完成后开机不启动图形 # Run the Setup Agent on first boot firstboot --disabled # Firewall configuration firewall --disabled # Network information network --bootproto=dhcp --device=eth0 --onboot=on --device=link --activate ## 网卡设定 # 静态网址设定 不能使用反斜线 \ 拼接换行,如果一行不够用,请使用多行 network 参数 # network --bootproto=static --ip=10.0.0.100 --netmask=255.255.255.0 --gateway=10.0.0.2 --nameserver=10.0.0.2 --device=eth0 --onboot=on --device=link --activate network --hostname=localhost.localdomain ##主机名设定 # Reboot after installation reboot # System timezone timezone Asia/Shanghai # Use network installation url --url="ftp://10.0.0.12/centos7" ###系统安装资源 # System bootloader configuration bootloader --location=mbr # Clear the Master Boot Record zerombr # Partition clearing information ignoredisk --only-use=sda ##只是用我们系统中的第一块硬盘 clearpart --all --initlabel # 分区信息 # 分区要注意不能分的太大了,要结合自己实际硬盘情况,不然安装的时候会报错 # Disk partitioning information part /boot --fstype="xfs" --asprimary --size=2048 part / --fstype="xfs" --grow --asprimary --size=1 # 系统服务 # System services services --disabled="firewalld" --enabled="sshd,network" ##在开机时开启或关闭的服务 # 安装软件包 %packages @^minimal @core @development @system-admin-tools gcc glibc gcc-c++ openssl-devel openssh tree nmap sysstat lrzsz vim wget %end # 系统安装前运行脚本 %pre --interpreter=/bin/bash echo "beginning install OS..." %end # 系统安装后运行脚本 %post --interpreter=/bin/bash # 安装wget yum install -y wget # 备份初始yum源文件并配置阿里yum源和epel源 repobackup=/etc/yum.repos.d/repo-backup if [ ! -d $repobackup ] then mkdir -p $repobackup mv /etc/yum.repos.d/*.repo $repobackup echo "初始repo文件备份完毕,正在更新新的yum源,请稍后......" #centOS-7 yum源 wget -O /etc/yum.repos.d/CentOS-Base.repo https://mirrors.aliyun.com/repo/Centos-7.repo #centOS-7 epel源 wget -O /etc/yum.repos.d/epel.repo http://mirrors.aliyun.com/repo/epel-7.repo #else fi # 设置pipy源 if [ ! -d ~/.pip ] then echo "~/.pip不存在,正在创建" mkdir ~/.pip cat > ~/.pip/pip.conf |
【本文地址】