| 【一文秒懂】Linux内核调试工具 | 您所在的位置:网站首页 › linux内核程序存在哪个硬件中 › 【一文秒懂】Linux内核调试工具 |
【一文秒懂】Linux内核调试工具
【一文秒懂】Linux内核调试工具——Debugfs
# 1、介绍
# 1、介绍
#Debugfs其存在的主要意义是为了内核开发者向用户空间传递更多有用的信息,与proc不同,proc只提供进程相关的信息;同时也与sysfs不同,sysfs对每个文件都要求一定的规则,而Debugfs没有任何的规则。 简而言之,Debugfs是一种用于内核调试的虚拟文件系统。 2、如何调试 #2.1 配置Debugfs #
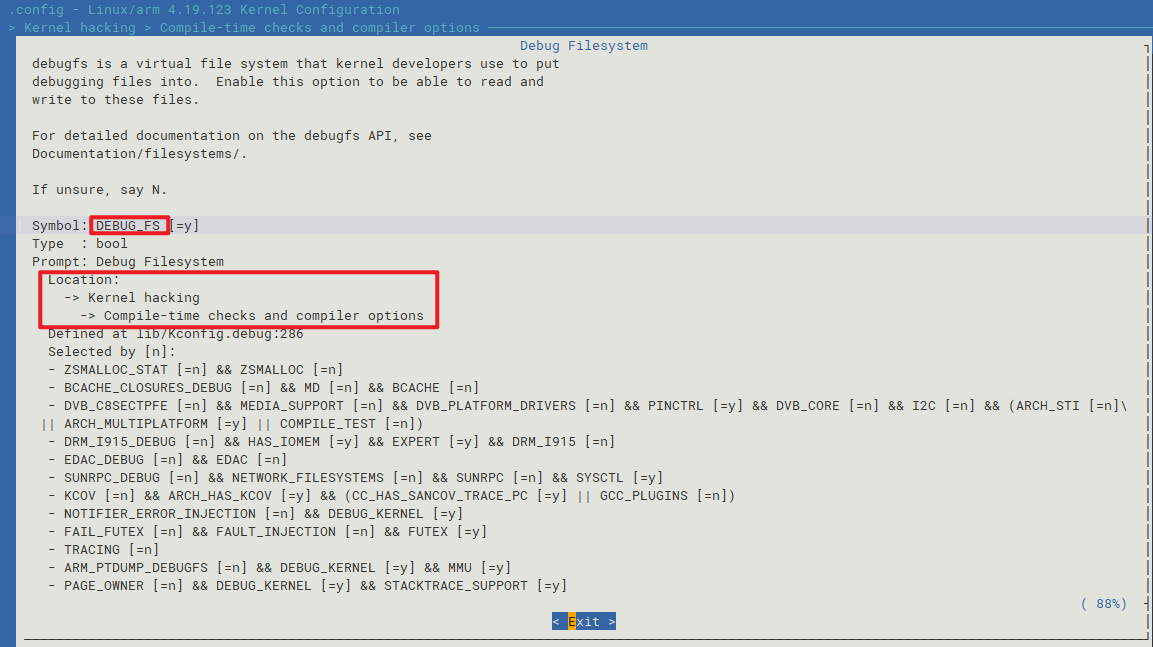
进去menuconfig选项中,按下/搜索CONFIG_DEBUG_FS关键词即可! 当然,可以看Location在内核中的位置。 2.2 挂载Debugfs #mount -t debugfs none /sys/kernel/debug #挂载 mount #查看挂载情况 ___ none on /sys/kernel/debug type debugfs (rw,relatime) 2.3 GPIO调试 #cat gpio gpio-43 ( |wakeup ) in lo IRQ gpio-64 ( |cd ) in lo IRQ上述只是简单的调试GPIO的方法,而Debugfs功能远不止于此,其提供了一些API接口,方便我们在内核中Debug使用。 而我们要做的,就是在我们想要进行Debug的地方,注册debugfs接口,然后查看我们要调试的信息。 2.4 GPIO的实现 #文件kernel\drivers\gpio\gpiolib.c中 `static const struct file_operations gpiolib_operations = { .owner = THIS_MODULE, .open = gpiolib_open, .read = seq_read, .llseek = seq_lseek, .release = seq_release, }; static int __init gpiolib_debugfs_init(void) { /* /sys/kernel/debug/gpio */ (void) debugfs_create_file("gpio", S_IFREG | S_IRUGO, NULL, NULL, &gpiolib_operations); return 0; } subsys_initcall(gpiolib_debugfs_init);` 3、如何使用 #3.1 使用步骤 #想要使用Debugfs功能,首先要做的就是要包含 头文件使用debugfs_create_dir接口,创建一个文件夹,用于保存debugfs所操作的文件使用debugfs_create_file接口,创建多个文件进行操作3.2 接口介绍 #debugfs_create_dirstruct dentry *debugfs_create_dir(const char *name, struct dentry *parent);name:文件夹名称 parent:父目录,如果为NULL,则在root根目录下 debugfs_create_filestruct dentry *debugfs_create_file(const char *name, umode_t mode, struct dentry *parent, void *data, const struct file_operations *fops);name:文件名 mode :文件访问权限 parent:父目录,用于保存该文件 data:保存一些数据等 fops:文件操作接口 一些类似的接口void debugfs_create_u8(const char *name, umode_t mode, struct dentry *parent, u8 *value); //创建一个文件,表示一个u8的值 void debugfs_create_u16(const char *name, umode_t mode, struct dentry *parent, u16 *value); //创建一个文件,表示一个u16的值 void debugfs_create_u32(const char *name, umode_t mode, struct dentry *parent, u32 *value); void debugfs_create_u64(const char *name, umode_t mode, struct dentry *parent, u64 *value); void debugfs_create_bool(const char *name, umode_t mode, struct dentry *parent, bool *value); 4、demo分享 ##include #include #include static struct dentry *dir = NULL; static unsigned int debugfs_hello; static u32 sum = 0; static int add_write(void *data, u64 value) { sum += value; return 0; } DEFINE_SIMPLE_ATTRIBUTE(add_ops, NULL, add_write, "%llu\n"); static __init int hello_init(void) { struct dentry *tmp_dir = NULL; /* create /sys/kernel/debug/debugfs_hello/ directory */ dir = debugfs_create_dir("debugfs_hello", NULL); if (!dir) { printk(KERN_ALERT "debugfs_create_dir failed\n"); return -1; } /* create /sys/kernel/debug/debugfs_hello/hello value, mode: rw*/ tmp_dir = debugfs_create_u32("hello", 00666, dir, &debugfs_hello); if (!tmp_dir) { printk(KERN_ALERT "debugfs_create_u32 failed\n"); return -1; } /* create /sys/kernel/debug/debugfs_hello/add value, mode: w*/ tmp_dir = debugfs_create_file("add", 0222, dir, NULL, &add_ops); if (!tmp_dir) { printk(KERN_ALERT "debugfs_create_file failed\n"); return -1; } /* create /sys/kernel/debug/debugfs_hello/sum value, mode: r*/ tmp_dir = debugfs_create_u32("sum", 0444, dir, &sum); if (!tmp_dir) { printk(KERN_ALERT "debugfs_create_u32 failed\n"); return -1; } return 0; } static void __exit hello_exit(void) { printk(KERN_INFO "Exit debugfs_hello module\n"); debugfs_remove_recursive(dir); dir = NULL; } module_init(hello_init); module_exit(hello_exit); MODULE_LICENSE("Dual BSD/GPL"); MODULE_DESCRIPTION("Debugfs hello examle"); 5、参考文章 #[1]:https://www.kernel.org/doc/html/latest/filesystems/debugfs.html [2]:https://xuesong.blog.csdn.net/article/details/114383866 欢迎关注【嵌入式艺术】,董哥原创!
|
【本文地址】
公司简介
联系我们