| windows环境elasticsearch设置登录用户名、密码 | 您所在的位置:网站首页 › Windows用户密码要求 › windows环境elasticsearch设置登录用户名、密码 |
windows环境elasticsearch设置登录用户名、密码
|
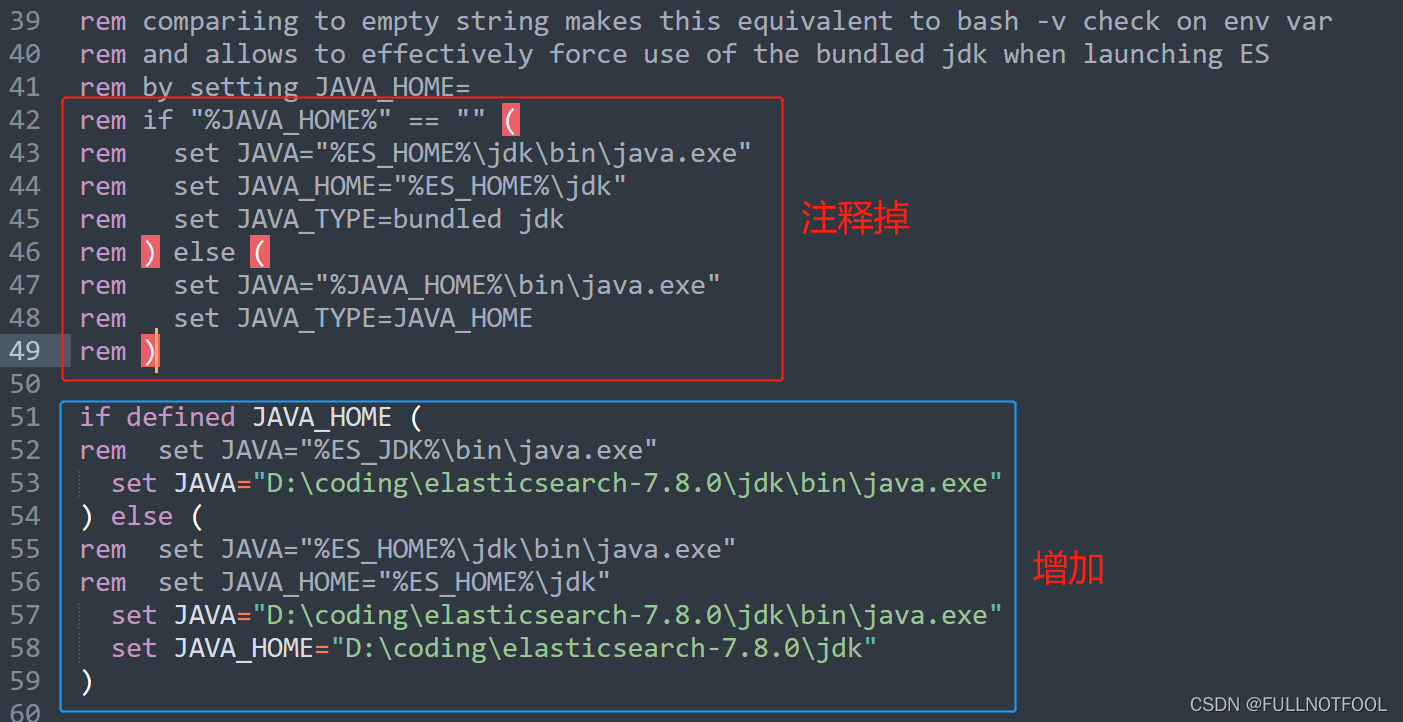
一般elasticsearch是没有设置用户名、密码的,数据有安全性问题。需要给elasticsearch访问的时候设置用户名、密码。当用kibana访问时需要输入用户名、密码后才能登录。 1、修改elasticsearch.yml(报无效认证),重启elasticsearch http.cors.enabled: true http.cors.allow-origin: "*" http.cors.allow-headers: Authorization xpack.security.enabled: true xpack.security.transport.ssl.enabled: true如上修改后,双击启动elasticsearch.bat文件报如下错: elasitcsearch 开启认证后,报DecoderException: javax.net.ssl.SSLHandshakeException: No available authentic异常================================================================= 解决办法参考:elasitcsearch 开启认证后,报DecoderException: javax.net.ssl.SSLHandshakeException: No available authentic异常_猿界汪汪队的博客-CSDN博客 第一步:在ES的根目录生成CA证书 elasticsearch-7.4.2\bin>elasticsearch-certutil ca 中间需要设置密码,直接回车可以不设置(慎重考虑)。 第二步:使用第一步生成的证书,产生p12密钥 elasticsearch-7.4.2\bin>elasticsearch-certutil cert --ca elastic-stack-ca.p12 此时文件大概如下: 第三步:在config目录下创建certs目录 第四步:拷贝两个p12文件至certs目录 第五步:修改设置 修改elasticsearch.yml配置如下(http开头的不改,替换xpack开头的就行): xpack.security.enabled: true xpack.license.self_generated.type: basic xpack.security.transport.ssl.enabled: true xpack.security.transport.ssl.verification_mode: certificate xpack.security.transport.ssl.keystore.path: certs/elastic-certificates.p12 xpack.security.transport.ssl.truststore.path: certs/elastic-certificates.p12第六步:重启ES,错误消失 2、修改elasticsearch密码(要java11问题解决),重启elasticsearch elasticsearch-7.4.2\bin>elasticsearch-setup-passwords interactive ================================================================= 解决方法参考: ElasticSearch 提示 future versions of Elasticsearch will require Java 11解决方法_AB教程网 如果是window系统,打开elasticsearch-env.bat 找到42行,注释掉默认使用系统的jdk的设置,增加使用es里自带的jdk11
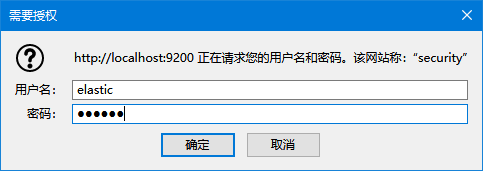
我的修改如下: if defined JAVA_HOME ( rem set JAVA="%JAVA_HOME%\bin\java.exe" set JAVA="C:\Users\lenovo\Desktop\QWJS\Archive\elasticsearch-7.5.1\jdk\bin\java.exe" set JAVA_TYPE=JAVA_HOME ) else ( rem set JAVA="%ES_HOME%\jdk\bin\java.exe" set JAVA="C:\Users\lenovo\Desktop\QWJS\Archive\elasticsearch-7.5.1\jdk\bin\java.exe" rem set JAVA_HOME="%ES_HOME%\jdk" set JAVA_HOME="C:\Users\lenovo\Desktop\QWJS\Archive\elasticsearch-7.5.1\jdk" set JAVA_TYPE=bundled jdk )3、给elasticsearch设置密码(前提执行了前面1、2、然后启动elasticsearch成功的状态下) 参考网址: 设置elasticsearch 7.x用户名和密码_程裕强的博客-CSDN博客_elasticsearch密码设置 elasticsearch-7.4.2\bin>elasticsearch-setup-passwords interactive D:\app\elasticsearch-7.4.2\bin>elasticsearch-setup-passwords interactive Initiating the setup of passwords for reserved users elastic,apm_system,kibana,logstash_system,beats_system,remote_monitoring_user. You will be prompted to enter passwords as the process progresses. Please confirm that you would like to continue [y/N]y Enter password for [elastic]: Reenter password for [elastic]: Enter password for [apm_system]: Reenter password for [apm_system]: Enter password for [kibana]: Reenter password for [kibana]: Enter password for [logstash_system]: Reenter password for [logstash_system]: Enter password for [beats_system]: Reenter password for [beats_system]: Enter password for [remote_monitoring_user]: Reenter password for [remote_monitoring_user]: Changed password for user [apm_system] Changed password for user [kibana] Changed password for user [logstash_system] Changed password for user [beats_system] Changed password for user [remote_monitoring_user] Changed password for user [elastic] D:\app\elasticsearch-7.4.2\bin>密码修改完成后、访问elasticsearch。 浏览器输入http://localhost:9200需要输入用户名:elastic 密码:自己设置的密码
4、连接elasticsearch的插件Kibana设置链接的地址跟连接用户名,启动后访问全文检索数据 修改kibana组件config文件夹下kibana.yml
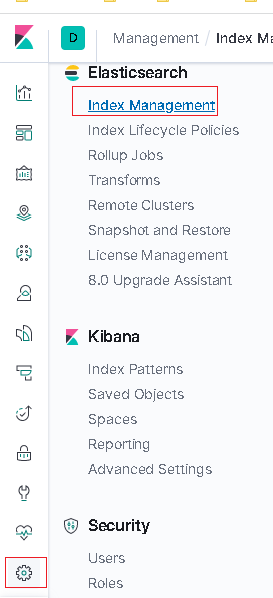
修改完成保存后,点击kibana-7.5.1-windows-x86_64\bin下面的kibana.bat启动 浏览器访问http://localhost:8088/,输入登陆用户名:elastic 密码:前面elasticsearch设置的密码 登陆后查看索引库信息:
5、由于elasticsearch设置了用户名、密码,所以在全文检索的代码也要做修改把用户名、密码带进去连接全文检索
|


【本文地址】