| 【Django富文本编辑】Ckeditor的配置、使用和踩坑(应该全) | 您所在的位置:网站首页 › VUE中的样式可以在django中使用吗 › 【Django富文本编辑】Ckeditor的配置、使用和踩坑(应该全) |
【Django富文本编辑】Ckeditor的配置、使用和踩坑(应该全)
|
目录
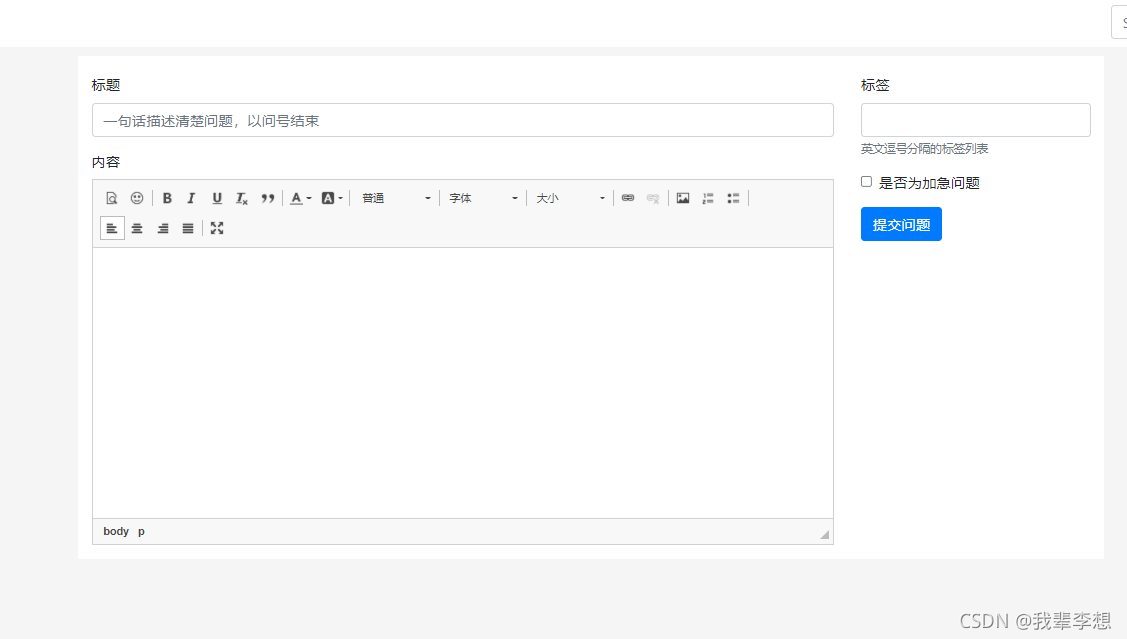
一、基本应用 1.安装 2.配置ckeditor 3.models字段使用,引用步骤2中的ckeditor配置 4.forms字段使用 5.admin后台使用 二、前端应用 1.基本使用中的全部执行完后可以设置前端页面了(没有步骤5也可以) 2.urls路由 3.views配置 4.html页面配置 5.post后台处理数据 三、带图片上传的编辑器 1.安装pillow(所有屠屏功能都需要这个库) 2.添加配置ckeditor 3.urls文件配置 4.修改modes 5.修改forms 四、踩坑 1.Browse for the image you want, then click ‘Embed Image‘ to continue... 2.ckeditor更换版本会出现的bug,TypeError: render() got an unexpected keyword argument 'renderer' 3.前端图片里没有上传选项 一、基本应用虚拟环境下安装(虚拟环境参考:Python版本控制和虚拟环境_我辈李想的博客-CSDN博客) 1.安装 pip install django-ckeditor 2.配置ckeditor在项目的settings.py文件的INSTALLED_APPS中加上ckeditor INSTALLED_APPS = [ 'django.contrib.admin', 'django.contrib.auth', 'django.contrib.contenttypes', 'django.contrib.sessions', 'django.contrib.messages', 'django.contrib.staticfiles', 'ckeditor',#这个 ]在项目的settings.py文件的最下边加上ckeditor配置内容(使用界面上的功能) #使用ck的工具栏并修改,宽度自适应 CKEDITOR_CONFIGS = { # django-ckeditor默认使用default配置 'default': { # 编辑器宽度自适应 'width':'auto', 'height':'300px', # tab键转换空格数 'tabSpaces': 4, # 工具栏风格 'toolbar': 'Custom', # 工具栏按钮 'toolbar_Custom': [ # 预览、表情 ['Preview','Smiley'], # 字体风格 ['Bold', 'Italic', 'Underline', 'RemoveFormat', 'Blockquote'], # 字体颜色 ['TextColor', 'BGColor'], #格式、字体、大小 ['Format','Font','FontSize'], # 链接 ['Link', 'Unlink'], # 列表 ['Image', 'NumberedList', 'BulletedList'], #居左,居中,居右 ['JustifyLeft','JustifyCenter','JustifyRight','JustifyBlock'], # 最大化 ['Maximize'] ], # 加入代码块插件 'extraPlugins': ','.join(['codesnippet','image2','filebrowser','widget', 'lineutils']), }, #评论 'comment': { # 编辑器宽度自适应 'width': 'auto', 'height': '140px', # tab键转换空格数 'tabSpaces': 4, # 工具栏风格 'toolbar': 'Custom', # 工具栏按钮 'toolbar_Custom': [ # 表情 代码块 ['Smiley', 'CodeSnippet'], # 字体风格 ['Bold', 'Italic', 'Underline', 'RemoveFormat', 'Blockquote'], # 字体颜色 ['TextColor', 'BGColor'], # 链接 ['Link', 'Unlink'], # 列表 ['NumberedList', 'BulletedList'], ], # 加入代码块插件 'extraPlugins': ','.join(['codesnippet']), } } 3.models字段使用,引用步骤2中的ckeditor配置 from ckeditor.fields import RichTextField class QAmodel(models.Model): content = RichTextField(verbose_name='正文内容',config_name='default')#config_name指定ckeditor配置文件,不指定就使用default 4.forms字段使用 from django import forms from ckeditor.fields import RichTextFormField from .models import QAmodel class Add_questionsForm(forms.ModelForm): content = RichTextFormField(label='内容',config_name='default') class Meta: model = QAmodel fields = ['content',] 5.admin后台使用我这里后台是xadmin import xadmin from .models import QAmodel,Tags_QA class QAmodeladmin(object): list_display = ['start_time','content','conclusion','delete_state'] xadmin.site.register(QAmodel,QAmodeladmin) 二、前端应用 1.基本使用中的全部执行完后可以设置前端页面了(没有步骤5也可以)一种的CKEDITOR_CONFIGS,需要深入了解下,里边有一些插件,看实际情况。 2.urls路由 from django.urls import path,include from .views import Add_questions, urlpatterns = [ path('', home,name='home'), #添加问题 path('add_questions/', Add_questions.as_view(), name='add_questions'), ] 3.views配置 from django.contrib.auth.decorators import login_required from django.utils.decorators import method_decorator from django.views.generic.base import View from .forms import Add_questionsForm class Add_questions(View): @method_decorator(login_required(login_url='/users/login')) def get(self,request): add_questionsForm = Add_questionsForm() content = {} content['add_questionsForm'] = add_questionsForm return render(request, 'qatemplates/add_questions.html',content) 4.html页面配置 内容 {{ add_questionsForm.media }} {{ add_questionsForm.content }}现在界面已经是下图的样子了
这里接刚才的views,上边是get,这里是post from django.contrib.auth.decorators import login_required from django.utils.decorators import method_decorator from django.views.generic.base import View from django.shortcuts import render,HttpResponse,HttpResponseRedirect from .forms import Add_questionsForm #提问页 class Add_questions(View): @method_decorator(login_required(login_url='/users/login')) def get(self,request): add_questionsForm = Add_questionsForm() content = {} content['add_questionsForm'] = add_questionsForm return render(request, 'qatemplates/add_questions.html',content) def post(self,request): add_questionsForm = Add_questionsForm(request.POST) if add_questionsForm.is_valid(): add_question = add_questionsForm.save(commit=False) add_question.author = request.user add_question.save() # 新增代码,保存 tags 的多对多关系 add_questionsForm.save_m2m() return HttpResponseRedirect(reverse("home"))#home是首页 # redirect(request.GET.get('from',reversed('home'))) content = {} content['add_questionsForm'] = add_questionsForm return render(request, 'qatemplates/add_questions.html',content) 三、带图片上传的编辑器一和二中实现的是布袋图片上传的,在此基础上稍加修改就可以实现图片上传。 1.安装pillow(所有屠屏功能都需要这个库) pip install pillow 2.添加配置ckeditor在项目的settings.py文件的INSTALLED_APPS中加上ckeditor,ckeditor_uploader INSTALLED_APPS = [ 'django.contrib.admin', 'django.contrib.auth', 'django.contrib.contenttypes', 'django.contrib.sessions', 'django.contrib.messages', 'django.contrib.staticfiles', 'ckeditor',#这个 'ckeditor_uploader',#带图片上传的ckeditor ]在项目的settings.py文件的最下边添加文件存储相关配置,最好在CKEDITOR_CONFIGS上边 MEDIA_URL = '/media/' # 上传图片的路径 MEDIA_ROOT = os.path.join(BASE_DIR, '/media/') # 上传图片的根路径 #CK CKEDITOR_UPLOAD_PATH = "uploads/"#文件保存为止,因为上边配置了media, 图片将保存至media/uploads下在项目的settings.py文件的CKEDITOR_CONFIGS,中配置图片上传的类型,我这里使用的是image2 3.urls文件配置 from django.urls import path,include,re_path import xadmin from django.views.static import serve from .settings import MEDIA_ROOT urlpatterns = [ path('xadmin/', xadmin.site.urls), #上传media的文件可以被查看,这个很重要,更后边的一个bug有关 re_path(r'^media/(?P.*)$', serve, {"document_root": MEDIA_ROOT}), #ckckeditor图片上传 path('ckeditor/', include('ckeditor_uploader.urls')), ] 4.修改modes from ckeditor.fields import RichTextField from ckeditor_uploader.fields import RichTextUploadingField class QAmodel(models.Model): content = RichTextUploadingField(verbose_name='正文内容',config_name='default')#config_name指定ckeditor配置文件,不指定就使用default 5.修改forms from django import forms from ckeditor.fields import RichTextFormField from ckeditor_uploader.fields import RichTextUploadingFormField from .models import QAmodel class Add_questionsForm(forms.ModelForm): content = RichTextUploadingFormField(label='内容') class Meta: model = QAmodel fields = ['content',]到此,已经可以上传图片了
解决参考:Django+Cekeditor(排错)Browse for the image you want, then click ‘Embed Image‘ to continue..._我辈李想的博客-CSDN博客 2.ckeditor更换版本会出现的bug,TypeError: render() got an unexpected keyword argument 'renderer'解决参考:Django报错:TypeError: render() got an unexpected keyword argument 'renderer'_冷子夜的博客-CSDN博客 3.前端图片里没有上传选项解决:在forms中,将RichTextFormField替换成RichTextUploadingFormField。 from ckeditor.fields import RichTextField from ckeditor_uploader.fields import RichTextUploadingField class QAmodel(models.Model): content = RichTextUploadingField(verbose_name='正文内容',config_name='default')#config_name指定ckeditor配置文件,不指定就使用default |


【本文地址】
| 今日新闻 |
| 推荐新闻 |
| 专题文章 |