| 自己python实现单通道图像转成三通道及原理(2种方式) | 您所在的位置:网站首页 › 10100pcie通道 › 自己python实现单通道图像转成三通道及原理(2种方式) |
自己python实现单通道图像转成三通道及原理(2种方式)
|
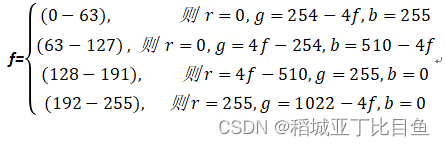
1. 方式一原理: 假设灰度图Gray的像素值为 f。则,r,g,b分量的像素值为r=g=b=f。 实现代码: ''' 单通道->三通道 ''' import os import cv2 import numpy as np import PIL.Image as Image import os #os.environ['CUDA_VISIBLE_DEVICES'] = '2' img_path='/home/gyx/QR/qr_detect_model/dataset/images_all_channel_1/' save_img_path='/home/gyx/QR/qr_detect_model/dataset/images_all_channel_3/' for img_name in os.listdir(img_path): image=Image.open(img_path+img_name) if len(image.split())==1: #查看通道数 print(len(image.split())) print(img_path+img_name) img = cv2.imread(img_path+img_name) gray = cv2.cvtColor(img, cv2.COLOR_BGR2GRAY) img2 = np.zeros_like(img) img2[:,:,0] = gray img2[:,:,1] = gray img2[:,:,2] = gray cv2.imwrite(save_img_path+img_name, img2) image=Image.open(save_img_path+img_name) print(len(image.split())) else: image.save(save_img_path+img_name) ''' 单通道->三通道 ''' #img_src = np.expand_dims(img_src, axis=2) #img_src = np.concatenate((img_src, img_src, img_src), axis=-1)参考链接 2. 方式二原理: 假设灰度图Gray的像素值为 f。则,r,g,b分量的像素值为 |
 方式二代码实现
【本文地址】
公司简介
联系我们